boot FIAT TALENTO 2018 Owner handbook (in English)
[x] Cancel search | Manufacturer: FIAT, Model Year: 2018, Model line: TALENTO, Model: FIAT TALENTO 2018Pages: 232, PDF Size: 5.54 MB
Page 15 of 232
THE KEYS
KEY WITH REMOTE
CONTROL
1)
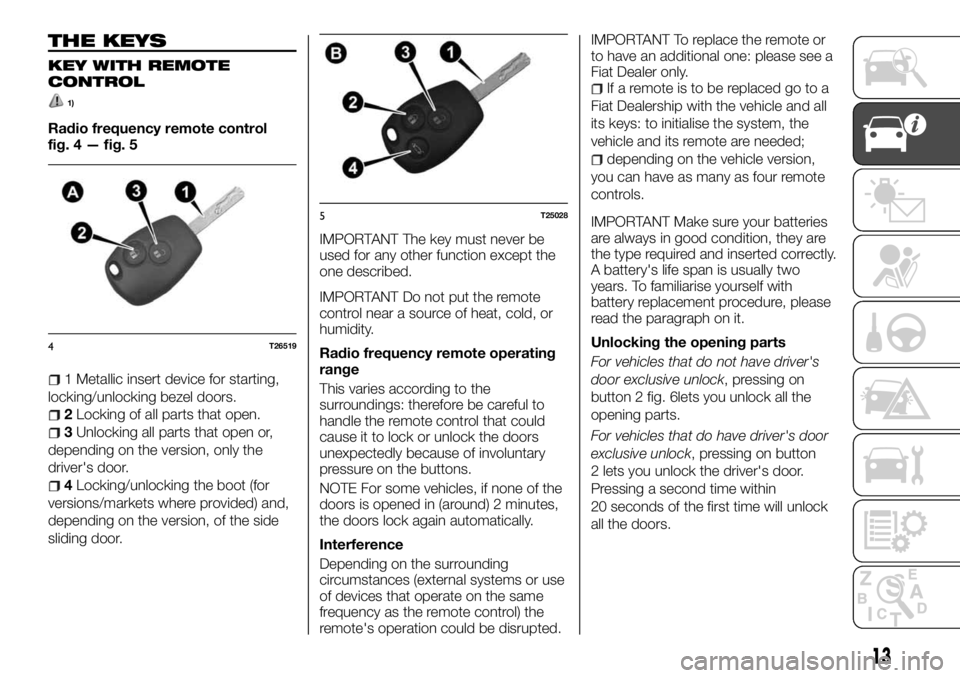
Radio frequency remote control
fig. 4 — fig. 5
1 Metallic insert device for starting,
locking/unlocking bezel doors.
2Locking of all parts that open.
3Unlocking all parts that open or,
depending on the version, only the
driver's door.
4Locking/unlocking the boot (for
versions/markets where provided) and,
depending on the version, of the side
sliding door.IMPORTANT The key must never be
used for any other function except the
one described.
IMPORTANT Do not put the remote
control near a source of heat, cold, or
humidity.
Radio frequency remote operating
range
This varies according to the
surroundings: therefore be careful to
handle the remote control that could
cause it to lock or unlock the doors
unexpectedly because of involuntary
pressure on the buttons.
NOTE For some vehicles, if none of the
doors is opened in (around) 2 minutes,
the doors lock again automatically.
Interference
Depending on the surrounding
circumstances (external systems or use
of devices that operate on the same
frequency as the remote control) the
remote's operation could be disrupted.IMPORTANT To replace the remote or
to have an additional one: please see a
Fiat Dealer only.
If a remote is to be replaced go to a
Fiat Dealership with the vehicle and all
its keys: to initialise the system, the
vehicle and its remote are needed;
depending on the vehicle version,
you can have as many as four remote
controls.
IMPORTANT Make sure your batteries
are always in good condition, they are
the type required and inserted correctly.
A battery's life span is usually two
years. To familiarise yourself with
battery replacement procedure, please
read the paragraph on it.
Unlocking the opening parts
For vehicles that do not have driver's
door exclusive unlock, pressing on
button 2 fig. 6lets you unlock all the
opening parts.
For vehicles that do have driver's door
exclusive unlock, pressing on button
2 lets you unlock the driver's door.
Pressing a second time within
20 seconds of the first time will unlock
all the doors.
4T26519
5T25028
13
Page 17 of 232
Locking is confirmed by the emergency
and turn signal lights flashing five times.
NOTE Deadlock centralised locking is
not possible if the vehicle hazard
warning lights or side lights are on.
Replacing the remote control
battery
1)
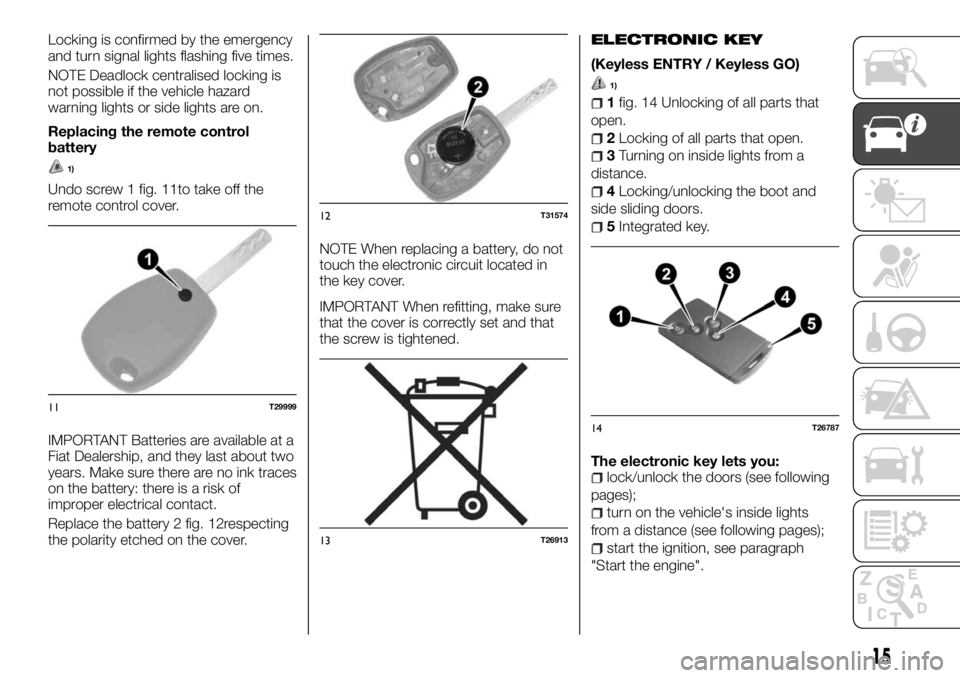
Undo screw 1 fig. 11to take off the
remote control cover.
IMPORTANT Batteries are available at a
Fiat Dealership, and they last about two
years. Make sure there are no ink traces
on the battery: there is a risk of
improper electrical contact.
Replace the battery 2 fig. 12respecting
the polarity etched on the cover.NOTE When replacing a battery, do not
touch the electronic circuit located in
the key cover.
IMPORTANT When refitting, make sure
that the cover is correctly set and that
the screw is tightened.
ELECTRONIC KEY
(Keyless ENTRY / Keyless GO)
1)
1fig. 14 Unlocking of all parts that
open.
2Locking of all parts that open.
3Turning on inside lights from a
distance.
4Locking/unlocking the boot and
side sliding doors.
5Integrated key.
The electronic key lets you:
lock/unlock the doors (see following
pages);
turn on the vehicle's inside lights
from a distance (see following pages);
start the ignition, see paragraph
"Start the engine".
11T29999
12T31574
13T26913
14T26787
15
Page 26 of 232
Proceed as follows:
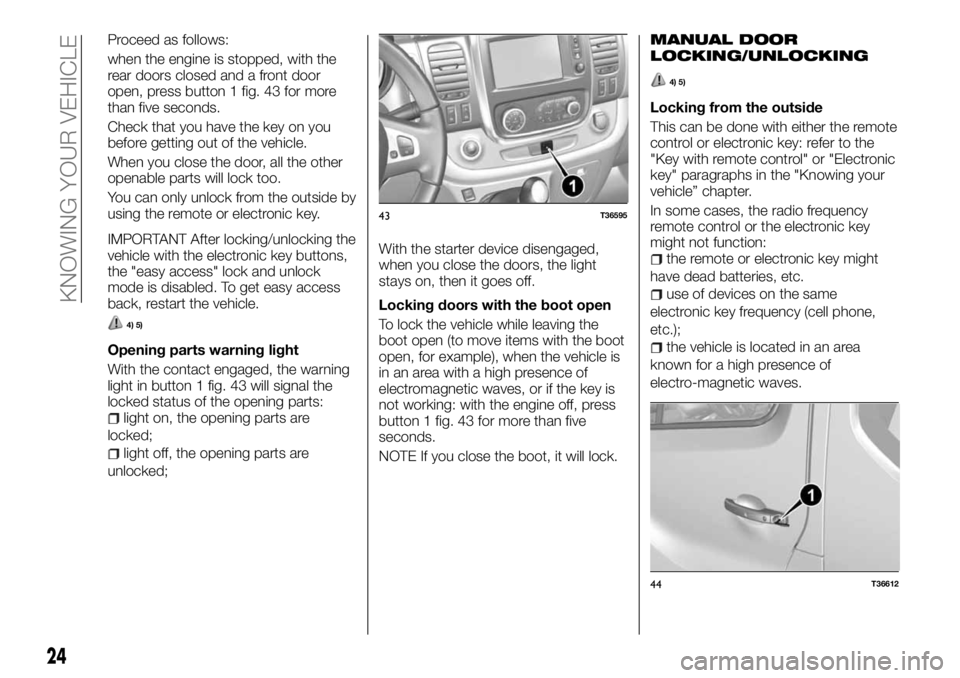
when the engine is stopped, with the
rear doors closed and a front door
open, press button 1 fig. 43 for more
than five seconds.
Check that you have the key on you
before getting out of the vehicle.
When you close the door, all the other
openable parts will lock too.
You can only unlock from the outside by
using the remote or electronic key.
IMPORTANT After locking/unlocking the
vehicle with the electronic key buttons,
the "easy access" lock and unlock
mode is disabled. To get easy access
back, restart the vehicle.
4) 5)
Opening parts warning light
With the contact engaged, the warning
light in button 1 fig. 43 will signal the
locked status of the opening parts:
light on, the opening parts are
locked;
light off, the opening parts are
unlocked;With the starter device disengaged,
when you close the doors, the light
stays on, then it goes off.
Locking doors with the boot open
To lock the vehicle while leaving the
boot open (to move items with the boot
open, for example), when the vehicle is
in an area with a high presence of
electromagnetic waves, or if the key is
not working: with the engine off, press
button 1 fig. 43 for more than five
seconds.
NOTE If you close the boot, it will lock.
MANUAL DOOR
LOCKING/UNLOCKING
4) 5)
Locking from the outside
This can be done with either the remote
control or electronic key: refer to the
"Key with remote control" or "Electronic
key" paragraphs in the "Knowing your
vehicle” chapter.
In some cases, the radio frequency
remote control or the electronic key
might not function:
the remote or electronic key might
have dead batteries, etc.
use of devices on the same
electronic key frequency (cell phone,
etc.);
the vehicle is located in an area
known for a high presence of
electro-magnetic waves.
43T36595
44T36612
24
KNOWING YOUR VEHICLE
Page 69 of 232
IMPORTANTThe features of the supports and
wiring (available at a Fiat Service
Dealership) vary according to the
vehicle's level of fittings and the radio
model. For their reference, contact a
Fiat Dealership.
Any intervention on the vehicle's
electrical circuit can be carried only by a
Fiat Dealership because an incorrect
connection could damage the electrical
system and/or parts it is connected to.
BAGGAGE COVER
74)
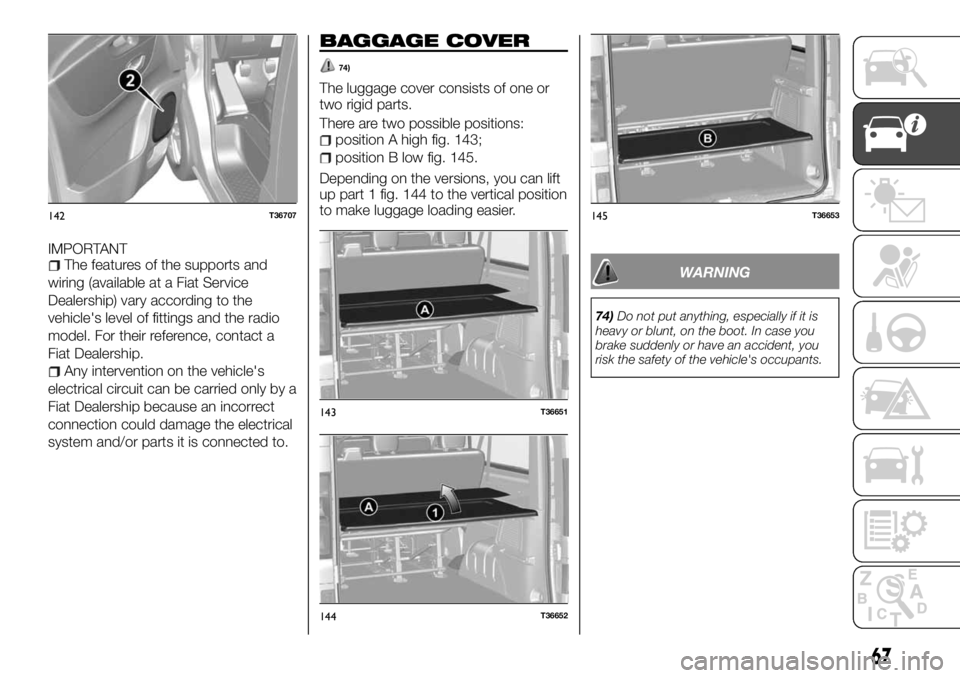
The luggage cover consists of one or
two rigid parts.
There are two possible positions:
position A high fig. 143;
position B low fig. 145.
Depending on the versions, you can lift
up part 1 fig. 144 to the vertical position
to make luggage loading easier.
WARNING
74)Do not put anything, especially if it is
heavy or blunt, on the boot. In case you
brake suddenly or have an accident, you
risk the safety of the vehicle's occupants.
142T36707
143T36651
144T36652
145T36653
67
Page 143 of 232
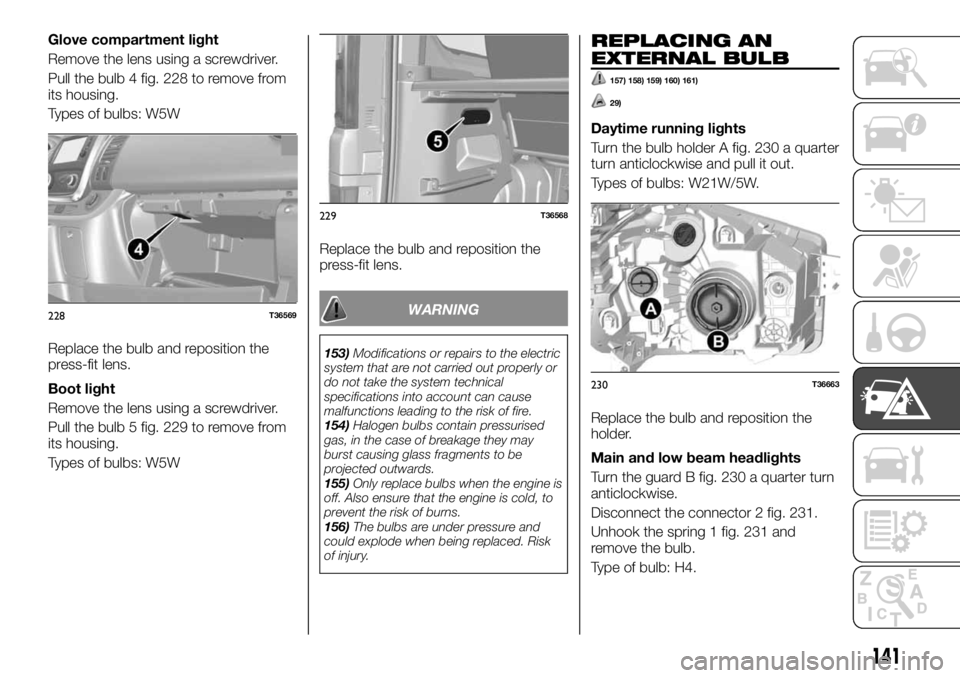
Glove compartment light
Remove the lens using a screwdriver.
Pull the bulb 4 fig. 228 to remove from
its housing.
Types of bulbs: W5W
Replace the bulb and reposition the
press-fit lens.
Boot light
Remove the lens using a screwdriver.
Pull the bulb 5 fig. 229 to remove from
its housing.
Types of bulbs: W5WReplace the bulb and reposition the
press-fit lens.
WARNING
153)Modifications or repairs to the electric
system that are not carried out properly or
do not take the system technical
specifications into account can cause
malfunctions leading to the risk of fire.
154)Halogen bulbs contain pressurised
gas, in the case of breakage they may
burst causing glass fragments to be
projected outwards.
155)Only replace bulbs when the engine is
off. Also ensure that the engine is cold, to
prevent the risk of burns.
156)The bulbs are under pressure and
could explode when being replaced. Risk
of injury.
REPLACING AN
EXTERNAL BULB
157) 158) 159) 160) 161)
29)
Daytime running lights
Turn the bulb holder A fig. 230 a quarter
turn anticlockwise and pull it out.
Types of bulbs: W21W/5W.
Replace the bulb and reposition the
holder.
Main and low beam headlights
Turn the guard B fig. 230 a quarter turn
anticlockwise.
Disconnect the connector 2 fig. 231.
Unhook the spring 1 fig. 231 and
remove the bulb.
Type of bulb: H4.
228T36569
229T36568
230T36663
141
Page 163 of 232
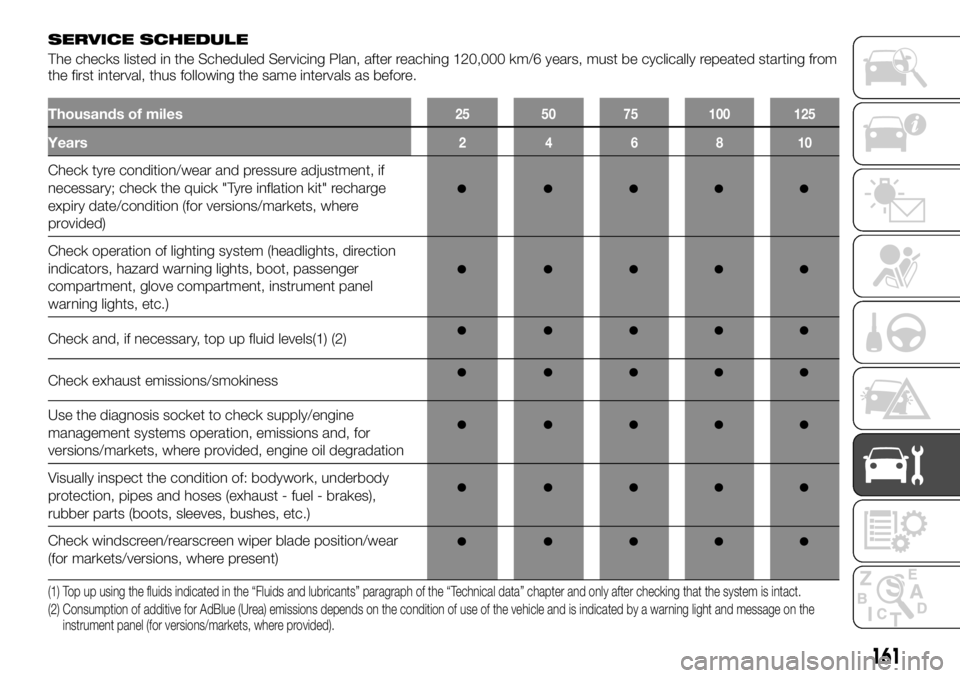
Thousands of miles25 50 75 100 125
SERVICE SCHEDULE
The checks listed in the Scheduled Servicing Plan, after reaching 120,000 km/6 years, must be cyclically repeated starting from
the first interval, thus following the same intervals as before.
Years246810
Check tyre condition/wear and pressure adjustment, if
necessary; check the quick "Tyre inflation kit" recharge
expiry date/condition (for versions/markets, where
provided)
Check operation of lighting system (headlights, direction
indicators, hazard warning lights, boot, passenger
compartment, glove compartment, instrument panel
warning lights, etc.)
Check and, if necessary, top up fluid levels(1) (2)
Check exhaust emissions/smokiness
Use the diagnosis socket to check supply/engine
management systems operation, emissions and, for
versions/markets, where provided, engine oil degradation
Visually inspect the condition of: bodywork, underbody
protection, pipes and hoses (exhaust - fuel - brakes),
rubber parts (boots, sleeves, bushes, etc.)
Check windscreen/rearscreen wiper blade position/wear
(for markets/versions, where present)
(1) Top up using the fluids indicated in the “Fluids and lubricants” paragraph of the “Technical data” chapter and only after checking that the system is intact.
(2) Consumption of additive for AdBlue (Urea) emissions depends on the condition of use of the vehicle and is indicated by a warning light and message onthe
instrument panel (for versions/markets, where provided).
161
Page 164 of 232
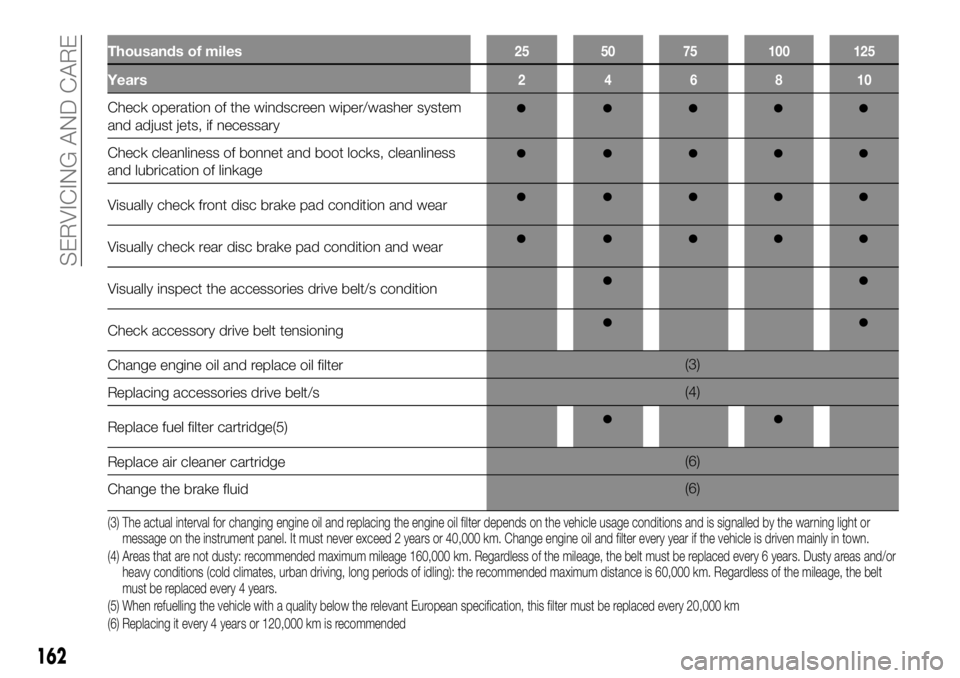
Thousands of miles
Years
246810
Check operation of the windscreen wiper/washer system
and adjust jets, if necessary
Check cleanliness of bonnet and boot locks, cleanliness
and lubrication of linkage
Visually check front disc brake pad condition and wear
Visually check rear disc brake pad condition and wear
Visually inspect the accessories drive belt/s condition
Check accessory drive belt tensioning
Change engine oil and replace oil filter(3)
Replacing accessories drive belt/s(4)
Replace fuel filter cartridge(5)
Replace air cleaner cartridge(6)
Change the brake fluid(6)
(3) The actual interval for changing engine oil and replacing the engine oil filter depends on the vehicle usage conditions and is signalled by the warning light or
message on the instrument panel. It must never exceed 2 years or 40,000 km. Change engine oil and filter every year if the vehicle is driven mainly in town.
(4) Areas that are not dusty: recommended maximum mileage 160,000 km. Regardless of the mileage, the belt must be replaced every 6 years. Dusty areas and/or
heavy conditions (cold climates, urban driving, long periods of idling): the recommended maximum distance is 60,000 km. Regardless of the mileage, the belt
must be replaced every 4 years.
(5) When refuelling the vehicle with a quality below the relevant European specification, this filter must be replaced every 20,000 km
(6) Replacing it every 4 years or 120,000 km is recommended
162
SERVICING AND CARE
25 50 75 100 125
Page 167 of 232
PERIODIC CHECKS
Every1,000km or before long trips
check and, if necessary, top up:
engine coolant level;
brake fluid level;
windscreen washer fluid level;
tyre inflation pressure and condition;
operation of lighting system
(headlights, direction indicators, hazard
warning lights, etc.);
operation of screen washer/wiper
system and positioning/wear of
windscreen/rear window wiper blades.
Every3,000km, check and top up the
engine oil level.
DEMANDING VEHICLE
USE
If the vehicle is mostly used in one of
the following conditions:
dusty roads;
short, repeated journeys (less than
7-8 km) at sub-zero outside
temperatures;
engine often idling or driving long
distances at low speeds or long periods
of inactivity;
the following checks must be carried
out more often than indicated in the
Scheduled Service Plan:
check front disc brake pad condition
and wear;
check cleanliness of bonnet and
boot locks, cleanliness and lubrication
of linkage;
visually inspect conditions of: engine,
gearbox, transmission, pipes and hoses
(exhaust/fuel system/brakes) and
rubber elements (gaiters/sleeves/
bushes, etc.);
check battery charge and battery
fluid level (electrolyte);
visually inspect conditions of the
accessory drive belts;
check and, if necessary, change
engine oil and replace oil filter;
check and, if necessary, replace
pollen filter;
check and, if necessary, replace air
cleaner.
SERVICING
PROCEDURES
The vehicle respects the recycling
criteria and scrapped vehicle
assessment that will become law in
2016.
Therefore, some of the vehicle’s
components are designed with their
ultimate recycling in mind.
These components can easily be
disassembled to be recovered and
reused in the recycling industry.
Moreover, thanks to its advanced
design, its original setup and its modest
fuel consumption, the vehicle complies
with the anti-pollution regulations in
force. We are actively committed to
reducing polluting gases and saving
energy. But the level of polluting gas
emissions and vehicle consumption
also depend on you. Take care to use
and service your vehicle correctly.
Keep in mind that lack of respect for
anti-pollution laws can expose the
vehicle's owner to administrative
sanctions. Moreover, replacing engine,
fuel system and exhaust parts with
other non-original ones voids the
vehicle's compliance with the
anti-pollution regulations.
165