tow FIAT TALENTO 2020 Owner handbook (in English)
[x] Cancel search | Manufacturer: FIAT, Model Year: 2020, Model line: TALENTO, Model: FIAT TALENTO 2020Pages: 236, PDF Size: 4.86 MB
Page 150 of 236
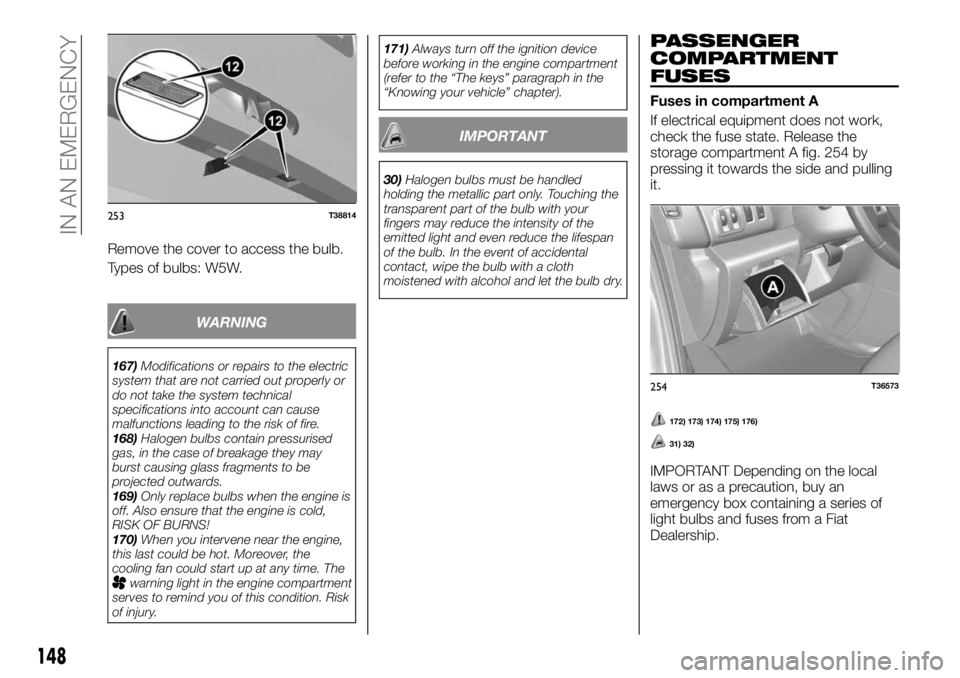
Remove the cover to access the bulb.
Types of bulbs: W5W.
WARNING
167)Modifications or repairs to the electric
system that are not carried out properly or
do not take the system technical
specifications into account can cause
malfunctions leading to the risk of fire.
168)Halogen bulbs contain pressurised
gas, in the case of breakage they may
burst causing glass fragments to be
projected outwards.
169)Only replace bulbs when the engine is
off. Also ensure that the engine is cold,
RISK OF BURNS!
170)When you intervene near the engine,
this last could be hot. Moreover, the
cooling fan could start up at any time. The
warning light in the engine compartment
serves to remind you of this condition. Risk
of injury.171)Always turn off the ignition device
before working in the engine compartment
(refer to the “The keys” paragraph in the
“Knowing your vehicle” chapter).
IMPORTANT
30)Halogen bulbs must be handled
holding the metallic part only. Touching the
transparent part of the bulb with your
fingers may reduce the intensity of the
emitted light and even reduce the lifespan
of the bulb. In the event of accidental
contact, wipe the bulb with a cloth
moistened with alcohol and let the bulb dry.
PASSENGER
COMPARTMENT
FUSES
Fuses in compartment A
If electrical equipment does not work,
check the fuse state. Release the
storage compartment A fig. 254 by
pressing it towards the side and pulling
it.
172) 173) 174) 175) 176)
31) 32)
IMPORTANT Depending on the local
laws or as a precaution, buy an
emergency box containing a series of
light bulbs and fuses from a Fiat
Dealership.
253T38814
254T36573
148
IN AN EMERGENCY
Page 153 of 236
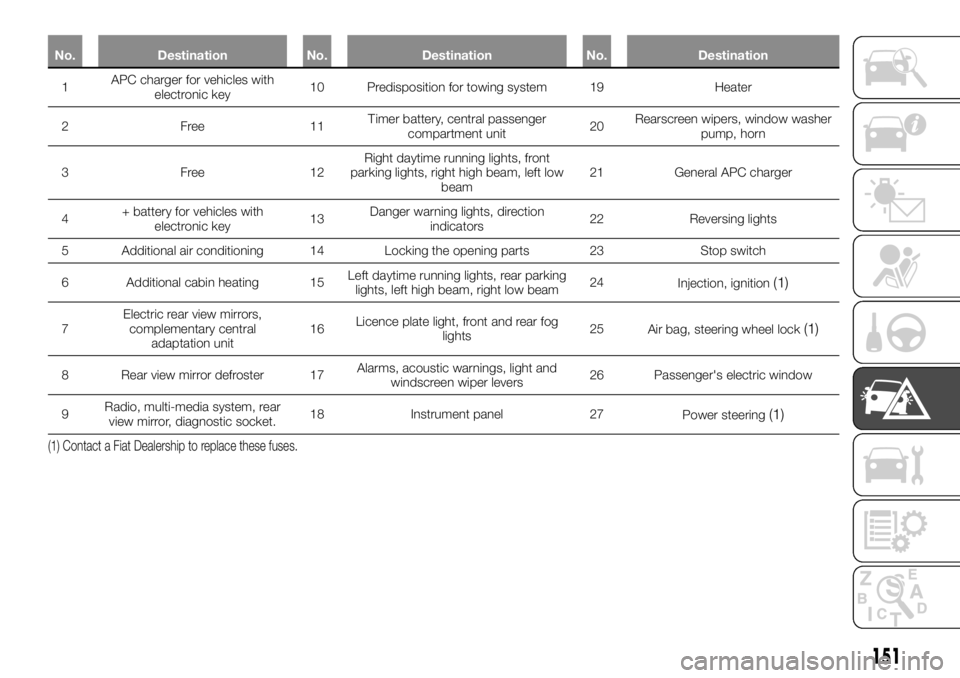
No. Destination No. Destination No. Destination
1APC charger forvehicles with
electronic key10 Predisposition for towing system 19 Heater
2Free11Timer battery, central passenger
compartment unit20Rearscreen wipers, window washer
pump, horn
3Free12Right daytime running lights, front
parking lights, right high beam, left low
beam21 General APC charger
4+ battery for vehicles with
electronic key13Danger warning lights, direction
indicators22 Reversing lights
5 Additional air conditioning 14 Locking the opening parts 23 Stop switch
6 Additional cabin heating 15Left daytime running lights, rear parking
lights, left high beam, right low beam24
Injection, ignition
(1)
7Electric rear view mirrors,
complementary central
adaptation unit16Licence plate light, front and rear fog
lights25
Air bag, steering wheel lock(1)
8 Rear view mirror defroster 17Alarms, acoustic warnings, light and
windscreen wiper levers26 Passenger's electric window
9Radio, multi-media system, rear
view mirror, diagnostic socket.18 Instrument panel 27
Power steering
(1)
(1) Contact a Fiat Dealership to replace these fuses.
151
Page 155 of 236
IN THE EVENT OF A
PUNCTURE
Depending on the vehicle, there may be
a tyre inflating kit or a spare tyre (see
the following page).
177)
WARNING
177)In case you are stopped by the
carriageway, warn other motorists that your
vehicle is there by placing the warning
triangle or other device allowed by law in
the country you are driving in.
REPLACING A
WHEEL
178) 179) 180) 181) 183) 184) 182)
Tools
The equipment in the relative tool bag
varies according to the vehicle's
function. The tool bag 2 fig. 257 is
located under the driver's seat. To take
it out, move the seat forward and put
the backrest down (refer to the "Front
seats” paragraph in the “Knowing you
vehicle” chapter). Undo the bag fixing
screw 1 fig. 257 and then turn the bag
to remove it.
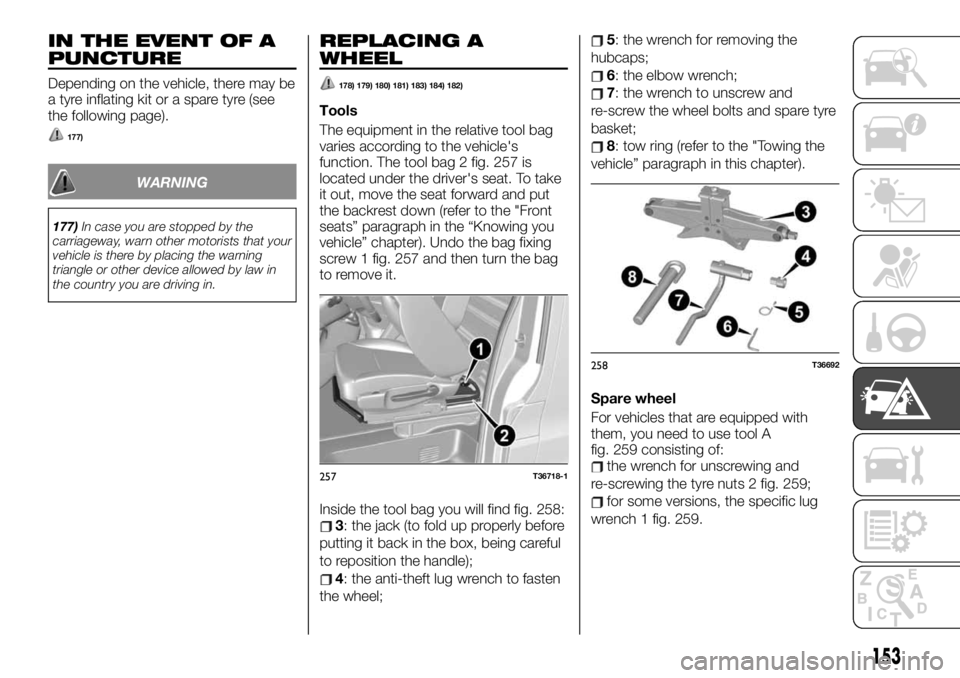
Inside the tool bag you will find fig. 258:
3: the jack (to fold up properly before
putting it back in the box, being careful
to reposition the handle);
4: the anti-theft lug wrench to fasten
the wheel;
5: the wrench for removing the
hubcaps;
6: the elbow wrench;
7: the wrench to unscrew and
re-screw the wheel bolts and spare tyre
basket;
8: tow ring (refer to the "Towing the
vehicle” paragraph in this chapter).
Spare wheel
For vehicles that are equipped with
them, you need to use tool A
fig. 259 consisting of:
the wrench for unscrewing and
re-screwing the tyre nuts 2 fig. 259;
for some versions, the specific lug
wrench 1 fig. 259.
257T36718-1
258T36692
153
Page 156 of 236

To extract the spare wheel B fig. 260:with tool A fig. 259 completely undo
nut 5 fig. 260 (right side) and partially
undo nut 3 fig. 260 (left side) in order to
free the basket 4 fig. 260 from nut 3;
free the spare wheel.
Depending on the version, there is
documentation with the instructions
described above in the tool box.
To put spare tyre B fig. 260 back in
place, proceed in the reverse order.
Check that bracket 4 is positioned
correctly before tightening nuts 3 and 5
fig. 260.IMPORTANT In some cases (rear wheel
puncture, vehicle loaded with tow
system) you may need to lift the vehicle
up (from the closest lifting point to the
tyre concerned) to be able to access
the spare tyre.
Wheel plate
Remove wheel plate 9 using wrench 5
fig. 261, inserting the hook in one of the
plate's outside openings.
To refit the plate, position it with respect
to valve 10 fig. 261.
Insert the retaining hooks starting from
the side of valve A, then B and C,
ending with the side opposite valve D
fig. 261.Remove wheel plate 11 fig. 262 with
wrench 5 by inserting the hook in the its
peripheral opening.
To refit it, position the five wheel plate
fasteners corresponding to the 5 fixing
screws fig. 262 and press hard on the
centre of the wheel plate to hook it to
the wheel.
259T36688260T36689261T36693
262T36694
154
IN AN EMERGENCY
Page 162 of 236
TOWING THE
VEHICLE
196) 197) 198)
41) 42) 43)
The steering wheel should not be
locked; the starter device has to be in
position "M" (ignition) to allow signalling
("Stop" lights, emergency lights). At
night the outside vehicle lighting must
remain on.
Detach the trailer where there is one.
Moreover, you have to comply with the
towing conditions, defined by the
regulations in force in the country you
are in.
Contact a Fiat Dealership.
Never use the gear or drive shafts to
tow the vehicle.
Use the rings exclusively for towing; in
no case must they be used to lift the
vehicle up, directly or indirectly.
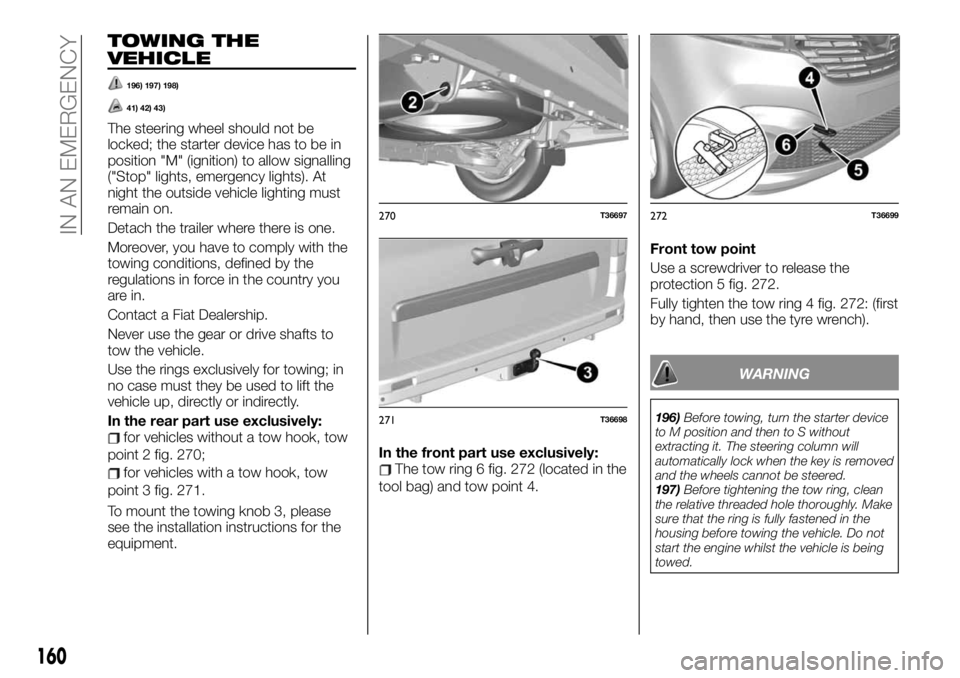
In the rear part use exclusively:
for vehicles without a tow hook, tow
point 2 fig. 270;
for vehicles with a tow hook, tow
point 3 fig. 271.
To mount the towing knob 3, please
see the installation instructions for the
equipment.In the front part use exclusively:The tow ring 6 fig. 272 (located in the
tool bag) and tow point 4.Front tow point
Use a screwdriver to release the
protection 5 fig. 272.
Fully tighten the tow ring 4 fig. 272: (first
by hand, then use the tyre wrench).
WARNING
196)Before towing, turn the starter device
to M position and then to S without
extracting it. The steering column will
automatically lock when the key is removed
and the wheels cannot be steered.
197)Before tightening the tow ring, clean
the relative threaded hole thoroughly. Make
sure that the ring is fully fastened in the
housing before towing the vehicle. Do not
start the engine whilst the vehicle is being
towed.
270T36697
271T36698
272T36699
160
IN AN EMERGENCY
Page 163 of 236

198)When towing, remember that greater
effort is required on the brake pedal in
order to brake, since the brake servo is not
providing assistance. Do not use flexible
cables when towing and avoid jerky
movements. During towing operations,
make sure that the fastened joint does not
damage adjoining components. When
towing the vehicle, it is necessary to obey
specific road regulations which relate both
to the towing device as well as to the
behaviour to adopt on the road. Do not
start the engine whilst the vehicle is being
towed.
IMPORTANT
41)With the engine stopped, the power
steering and power brakes no longer work.
42)Do not take the starter device from the
starter switch or reader while towing.
43)The front and rear tow hooks should be
used only for emergencies on the road. You
are allowed to tow the vehicle for short
distances using an appropriate device in
accordance with the highway code (a rigid
bar), to move the vehicle on the road in
readiness for towing or transport via a
breakdown vehicle. Tow rings MUST NOT
be used to tow vehicles off the road or
where there are obstacles and/or for
towing operations using cables or other
non-rigid devices. In compliance with the
above conditions, towing must take place
with the two vehicles (one towing, the other
towed) aligned as much as possible along
the same centre line.
161
Page 165 of 236
SCHEDULED
SERVICING
Correct servicing is crucial for
guaranteeing a long life for the vehicle
under the best conditions.
For this reason, Fiat has planned a
series of checks and services at fixed
distance and/or time intervals, as
described in the Service Schedule.
To keep the car’s efficiency in tip-top
condition, in the following Scheduled
Service plan pages a few additional
checks are listed that should be carried
out more frequently with respect to the
normal coupon redemption schedule.
Scheduled Servicing is offered by all
Fiat Dealerships according to fixed time
or kilometres/miles intervals. If, during
each operation, in addition to the ones
scheduled, the need arises for further
replacements or repairs, these may be
carried out with the owner's explicit
agreement only. If your car is used
frequently for towing, the interval
between one scheduled servicing
operation and the next should be
reduced.IMPORTANT NOTES
Scheduled Servicing interventions are
set out by the Manufacturer. Failure to
comply with the schedule may
invalidate the warranty.
We advise sharing any doubts
regarding the proper operation of the
car with your Fiat Dealership, before
waiting for the next coupon redemption.
163
Page 167 of 236
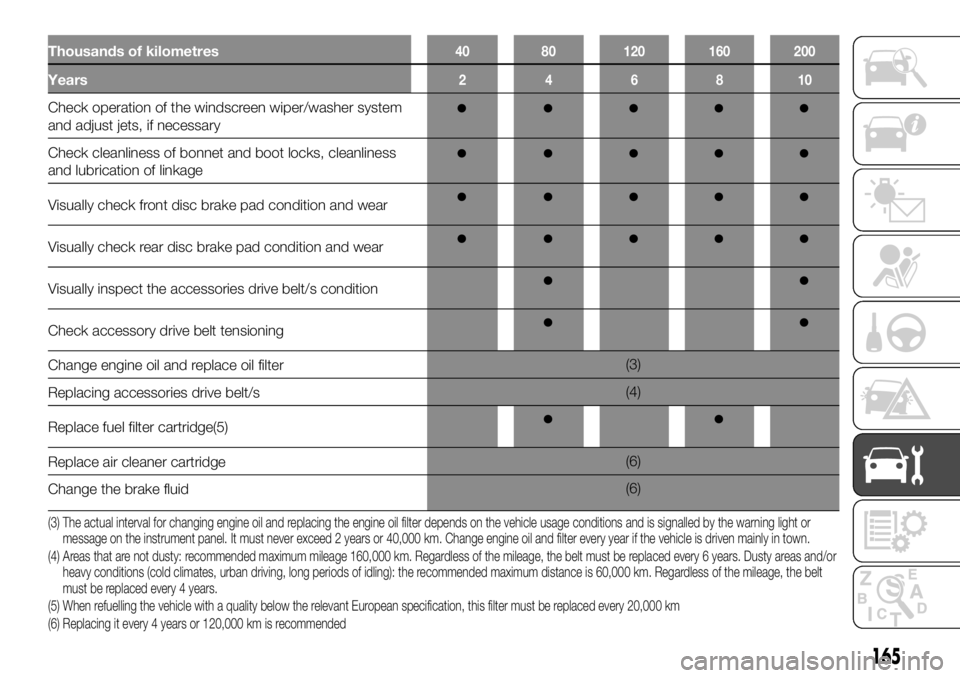
Thousands of kilometres40 80 120 160 200
Years246810
Check operation of the windscreen wiper/washer system
and adjust jets, if necessary
Check cleanliness of bonnet and boot locks, cleanliness
and lubrication of linkage
Visually check front disc brake pad condition and wear
Visually check rear disc brake pad condition and wear
Visually inspect the accessories drive belt/s condition
Check accessory drive belt tensioning
Change engine oil and replace oil filter(3)
Replacing accessories drive belt/s(4)
Replace fuel filter cartridge(5)
Replace air cleaner cartridge(6)
Change the brake fluid(6)
(3) The actual interval for changing engine oil and replacing the engine oil filter depends on the vehicle usage conditions and is signalled by the warning light or
message on the instrument panel. It must never exceed 2 years or 40,000 km. Change engine oil and filter every year if the vehicle is driven mainly in town.
(4) Areas that are not dusty: recommended maximum mileage 160,000 km. Regardless of the mileage, the belt must be replaced every 6 years. Dusty areas and/or
heavy conditions (cold climates, urban driving, long periods of idling): the recommended maximum distance is 60,000 km. Regardless of the mileage, the belt
must be replaced every 4 years.
(5) When refuelling the vehicle with a quality below the relevant European specification, this filter must be replaced every 20,000 km
(6) Replacing it every 4 years or 120,000 km is recommended
165
Page 177 of 236
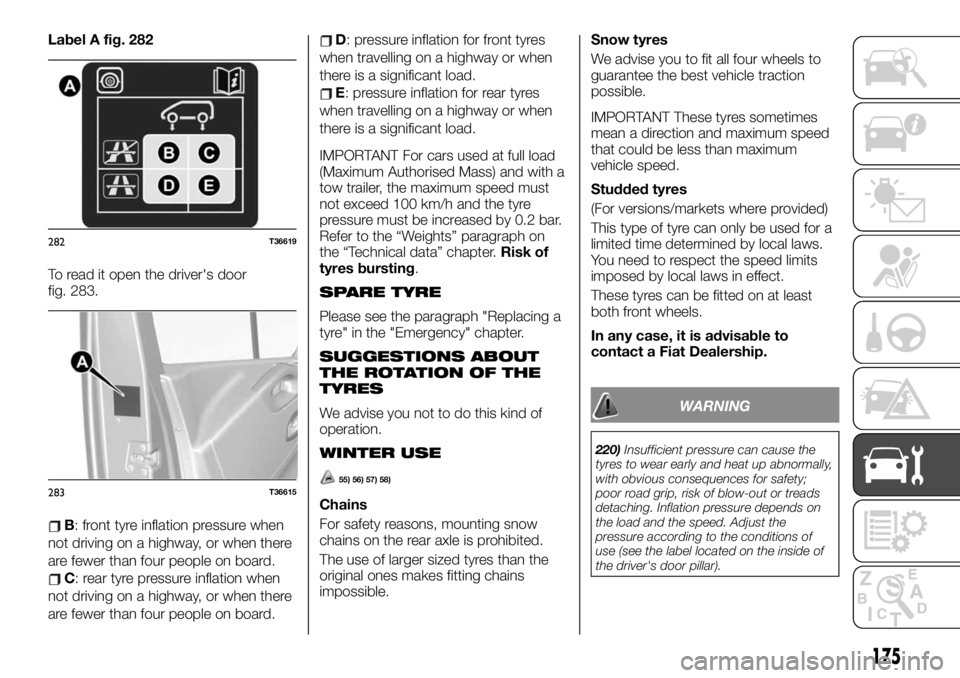
Label A fig. 282
To read it open the driver's door
fig. 283.
B: front tyre inflation pressure when
not driving on a highway, or when there
are fewer than four people on board.
C: rear tyre pressure inflation when
not driving on a highway, or when there
are fewer than four people on board.
D: pressure inflation for front tyres
when travelling on a highway or when
there is a significant load.
E: pressure inflation for rear tyres
when travelling on a highway or when
there is a significant load.
IMPORTANT For cars used at full load
(Maximum Authorised Mass) and with a
tow trailer, the maximum speed must
not exceed 100 km/h and the tyre
pressure must be increased by 0.2 bar.
Refer to the “Weights” paragraph on
the “Technical data” chapter.Risk of
tyres bursting.
SPARE TYRE
Please see the paragraph "Replacing a
tyre" in the "Emergency" chapter.
SUGGESTIONS ABOUT
THE ROTATION OF THE
TYRES
We advise you not to do this kind of
operation.
WINTER USE
55) 56) 57) 58)
Chains
For safety reasons, mounting snow
chains on the rear axle is prohibited.
The use of larger sized tyres than the
original ones makes fitting chains
impossible.Snow tyres
We advise you to fit all four wheels to
guarantee the best vehicle traction
possible.
IMPORTANT These tyres sometimes
mean a direction and maximum speed
that could be less than maximum
vehicle speed.
Studded tyres
(For versions/markets where provided)
This type of tyre can only be used for a
limited time determined by local laws.
You need to respect the speed limits
imposed by local laws in effect.
These tyres can be fitted on at least
both front wheels.
In any case, it is advisable to
contact a Fiat Dealership.
WARNING
220)Insufficient pressure can cause the
tyres to wear early and heat up abnormally,
with obvious consequences for safety;
poor road grip, risk of blow-out or treads
detaching. Inflation pressure depends on
the load and the speed. Adjust the
pressure according to the conditions of
use (see the label located on the inside of
the driver's door pillar).
282T36619
283T36615
175
Page 203 of 236
VOLUMES
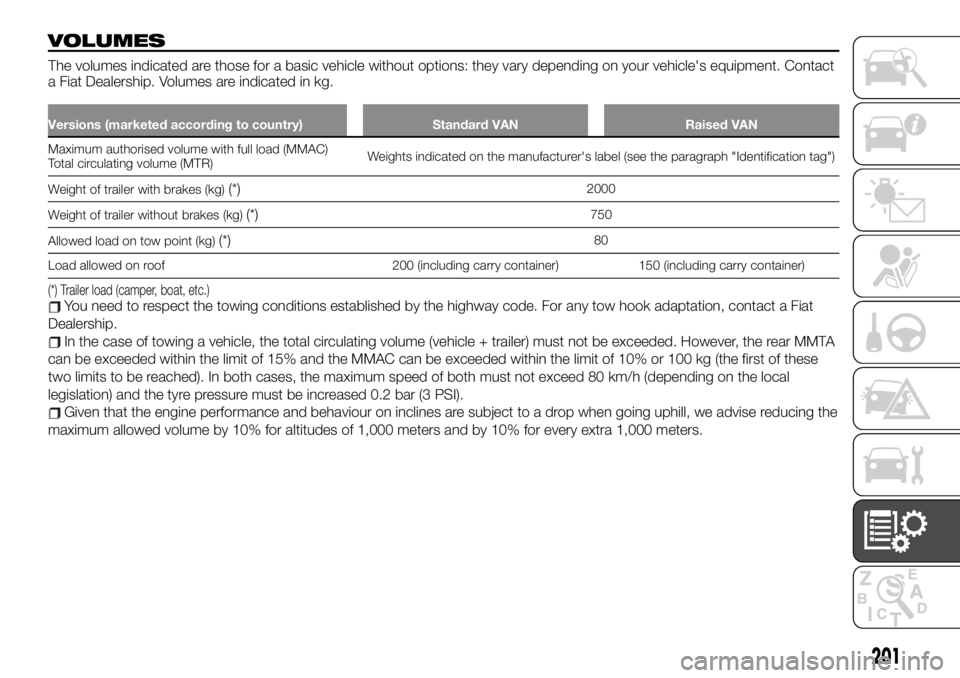
The volumes indicated are those for a basic vehicle without options: they vary depending on your vehicle's equipment. Contact
a Fiat Dealership. Volumes are indicated in kg.
Versions (marketed according to country) Standard VAN Raised VAN
Maximum authorised volume with full load (MMAC)
Total cir
culating volume (MTR)Weights indicated on the manufacturer's label (see the paragraph "Identification tag")
Weight of trailer with brakes (kg)
(*)2000
Weight of trailer without brakes (kg)
(*)750
Allowed load on tow point (kg)
(*)80
Load allowed on roof 200 (including carry container) 150 (including carry container)
(*) Trailer load (camper, boat, etc.)You need to respect the towing conditions established by the highway code. For any tow hook adaptation, contact a Fiat
Dealership.
In the case of towing a vehicle, the total circulating volume (vehicle + trailer) must not be exceeded. However, the rear MMTA
can be exceeded within the limit of 15% and the MMAC can be exceeded within the limit of 10% or 100 kg (the first of these
two limits to be reached). In both cases, the maximum speed of both must not exceed 80 km/h (depending on the local
legislation) and the tyre pressure must be increased 0.2 bar (3 PSI).
Given that the engine performance and behaviour on inclines are subject to a drop when going uphill, we advise reducing the
maximum allowed volume by 10% for altitudes of 1,000 meters and by 10% for every extra 1,000 meters.
201