low beam FIAT TALENTO 2020 Owner handbook (in English)
[x] Cancel search | Manufacturer: FIAT, Model Year: 2020, Model line: TALENTO, Model: FIAT TALENTO 2020Pages: 236, PDF Size: 4.86 MB
Page 37 of 236
EXTERNAL LIGHTS
SIDE LIGHTS
34) 35) 36) 37)
Switching off
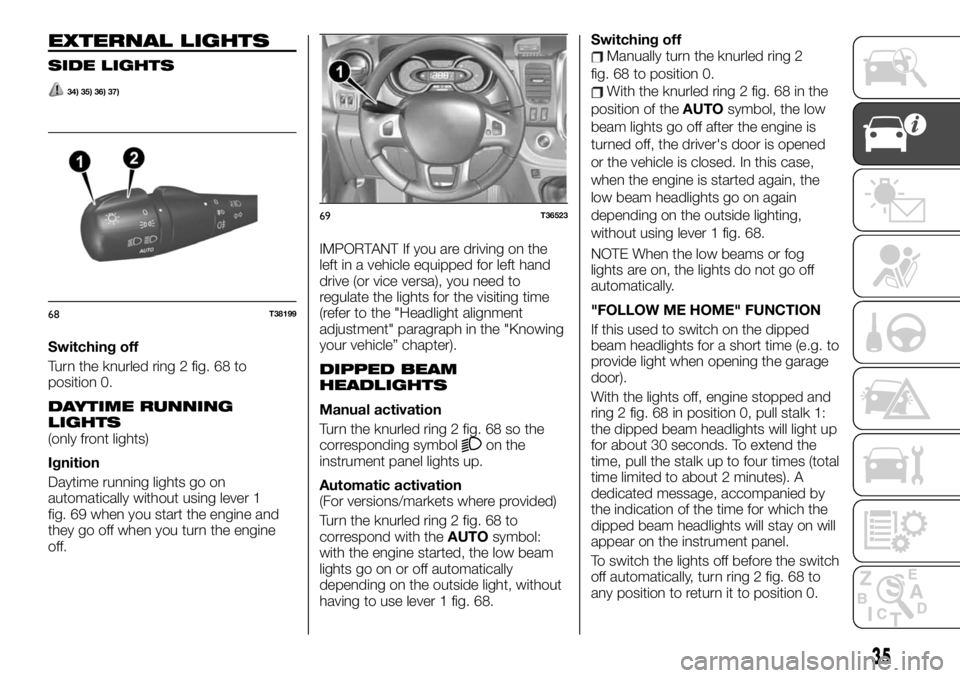
Turn the knurled ring 2 fig. 68 to
position 0.
DAYTIME RUNNING
LIGHTS
(only front lights)
Ignition
Daytime running lights go on
automatically without using lever 1
fig. 69 when you start the engine and
they go off when you turn the engine
off.IMPORTANT If you are driving on the
left in a vehicle equipped for left hand
drive (or vice versa), you need to
regulate the lights for the visiting time
(refer to the "Headlight alignment
adjustment" paragraph in the "Knowing
your vehicle” chapter).
DIPPED BEAM
HEADLIGHTS
Manual activation
Turn the knurled ring 2 fig. 68 so the
corresponding symbol
on the
instrument panel lights up.
Automatic activation
(For versions/markets where provided)
Turn the knurled ring 2 fig. 68 to
correspond with theAUTOsymbol:
with the engine started, the low beam
lights go on or off automatically
depending on the outside light, without
having to use lever 1 fig. 68.Switching off
Manually turn the knurled ring 2
fig. 68 to position 0.
With the knurled ring 2 fig. 68 in the
position of theAUTOsymbol, the low
beam lights go off after the engine is
turned off, the driver's door is opened
or the vehicle is closed. In this case,
when the engine is started again, the
low beam headlights go on again
depending on the outside lighting,
without using lever 1 fig. 68.
NOTE When the low beams or fog
lights are on, the lights do not go off
automatically.
"FOLLOW ME HOME" FUNCTION
If this used to switch on the dipped
beam headlights for a short time (e.g. to
provide light when opening the garage
door).
With the lights off, engine stopped and
ring 2 fig. 68 in position 0, pull stalk 1:
the dipped beam headlights will light up
for about 30 seconds. To extend the
time, pull the stalk up to four times (total
time limited to about 2 minutes). A
dedicated message, accompanied by
the indication of the time for which the
dipped beam headlights will stay on will
appear on the instrument panel.
To switch the lights off before the switch
off automatically, turn ring 2 fig. 68 to
any position to return it to position 0.
68T38199
69T36523
35
Page 38 of 236
MAIN BEAM HEADLIGHTS
Ignition
When the engine is running and the
main beam headlights are on, press the
stalk 1 fig. 68. The
warning light
switches on in the instrument panel. To
go back to the low beam lights, pull the
lever 1 fig. 68 towards you.
Switching off
Turn the knurled ring 2 fig. 68 to
position 0.
If the driver door is opened when the
lights are on, this is indicated by an
acoustic warning signal.
FRONT FOG LIGHTS
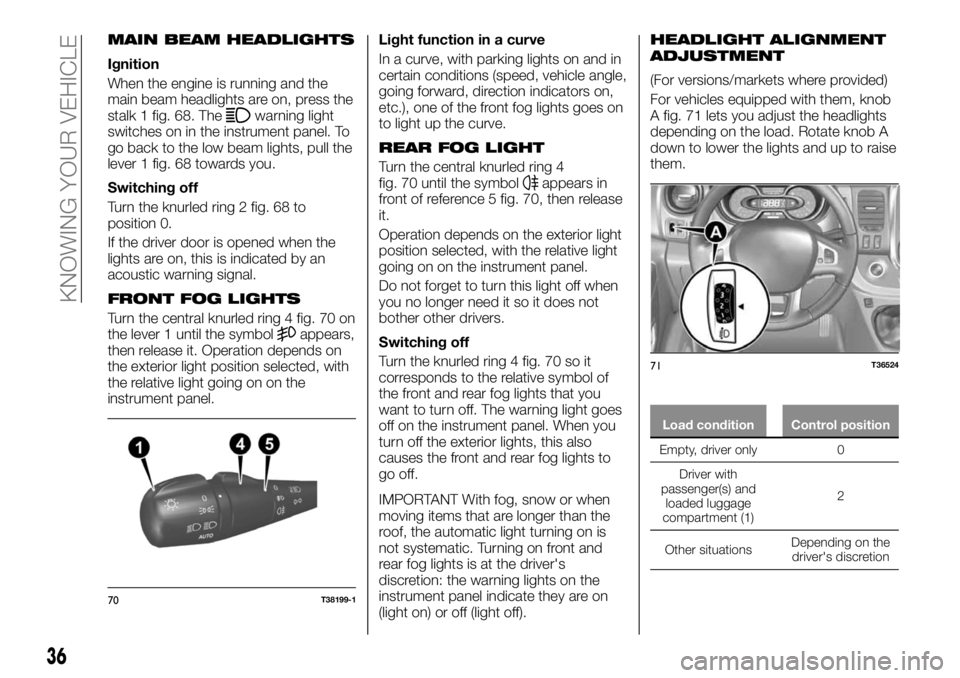
Turn the central knurled ring 4 fig. 70 on
the lever 1 until the symbolappears,
then release it. Operation depends on
the exterior light position selected, with
the relative light going on on the
instrument panel.Light function in a curve
In a curve, with parking lights on and in
certain conditions (speed, vehicle angle,
going forward, direction indicators on,
etc.), one of the front fog lights goes on
to light up the curve.
REAR FOG LIGHT
Turn the central knurled ring 4
fig. 70 until the symbolappears in
front of reference 5 fig. 70, then release
it.
Operation depends on the exterior light
position selected, with the relative light
going on on the instrument panel.
Do not forget to turn this light off when
you no longer need it so it does not
bother other drivers.
Switching off
Turn the knurled ring 4 fig. 70 so it
corresponds to the relative symbol of
the front and rear fog lights that you
want to turn off. The warning light goes
off on the instrument panel. When you
turn off the exterior lights, this also
causes the front and rear fog lights to
go off.
IMPORTANT With fog, snow or when
moving items that are longer than the
roof, the automatic light turning on is
not systematic. Turning on front and
rear fog lights is at the driver's
discretion: the warning lights on the
instrument panel indicate they are on
(light on) or off (light off).
HEADLIGHT ALIGNMENT
ADJUSTMENT
(For versions/markets where provided)
For vehicles equipped with them, knob
A fig. 71 lets you adjust the headlights
depending on the load. Rotate knob A
down to lower the lights and up to raise
them.
Load condition Control position
Empty, driver only 0
Driver with
passenger(s) and
loaded
luggage
compartment (1)2
Other situationsDepending on the
driver's discretion
70T38199-1
71T36524
36
KNOWING YOUR VEHICLE
Page 39 of 236
IMPORTANT The table above contains
several examples. In all cases, adjust
the control A according to the vehicle
load to illuminate the road without
dazzling other drivers.
IMPORTANT If you are driving on the
left in a vehicle equipped for left hand
drive (or vice versa), you must adjust
the headlight orientation for the duration
of the visit.
Adjusting the headlights externally
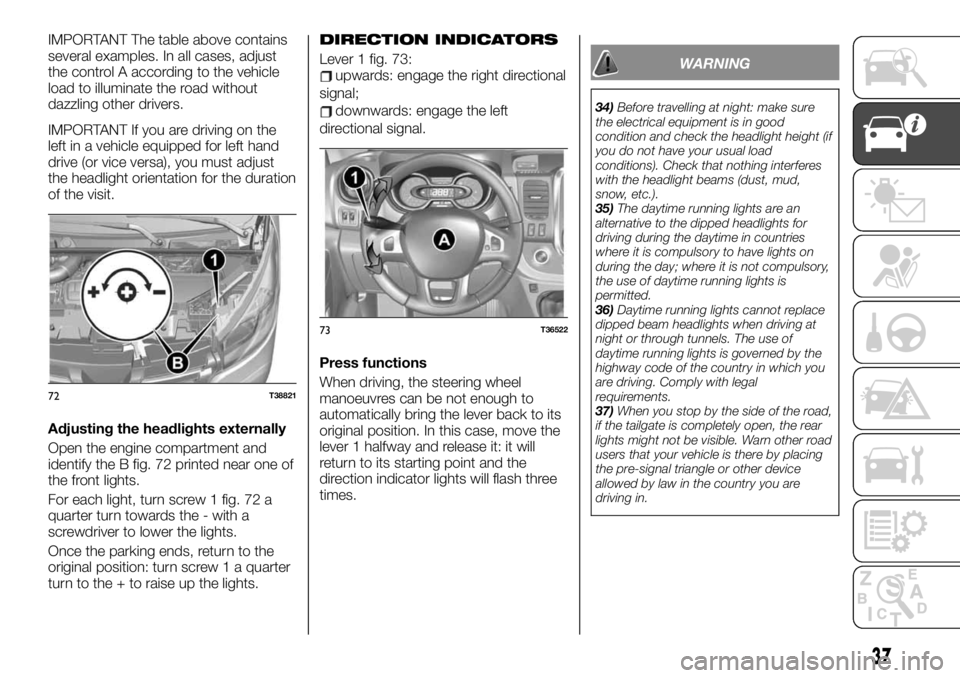
Open the engine compartment and
identify the B fig. 72 printed near one of
the front lights.
For each light, turn screw 1 fig. 72 a
quarter turn towards the - with a
screwdriver to lower the lights.
Once the parking ends, return to the
original position: turn screw 1 a quarter
turn to the + to raise up the lights.DIRECTION INDICATORS
Lever 1 fig. 73:upwards: engage the right directional
signal;
downwards: engage the left
directional signal.
Press functions
When driving, the steering wheel
manoeuvres can be not enough to
automatically bring the lever back to its
original position. In this case, move the
lever 1 halfway and release it: it will
return to its starting point and the
direction indicator lights will flash three
times.
WARNING
34)Before travelling at night: make sure
the electrical equipment is in good
condition and check the headlight height (if
you do not have your usual load
conditions). Check that nothing interferes
with the headlight beams (dust, mud,
snow, etc.).
35)The daytime running lights are an
alternative to the dipped headlights for
driving during the daytime in countries
where it is compulsory to have lights on
during the day; where it is not compulsory,
the use of daytime running lights is
permitted.
36)Daytime running lights cannot replace
dipped beam headlights when driving at
night or through tunnels. The use of
daytime running lights is governed by the
highway code of the country in which you
are driving. Comply with legal
requirements.
37)When you stop by the side of the road,
if the tailgate is completely open, the rear
lights might not be visible. Warn other road
users that your vehicle is there by placing
the pre-signal triangle or other device
allowed by law in the country you are
driving in.
72T38821
73T36522
37
Page 147 of 236
REPLACING AN
EXTERNAL BULB
167) 168) 169) 170) 171)
30)
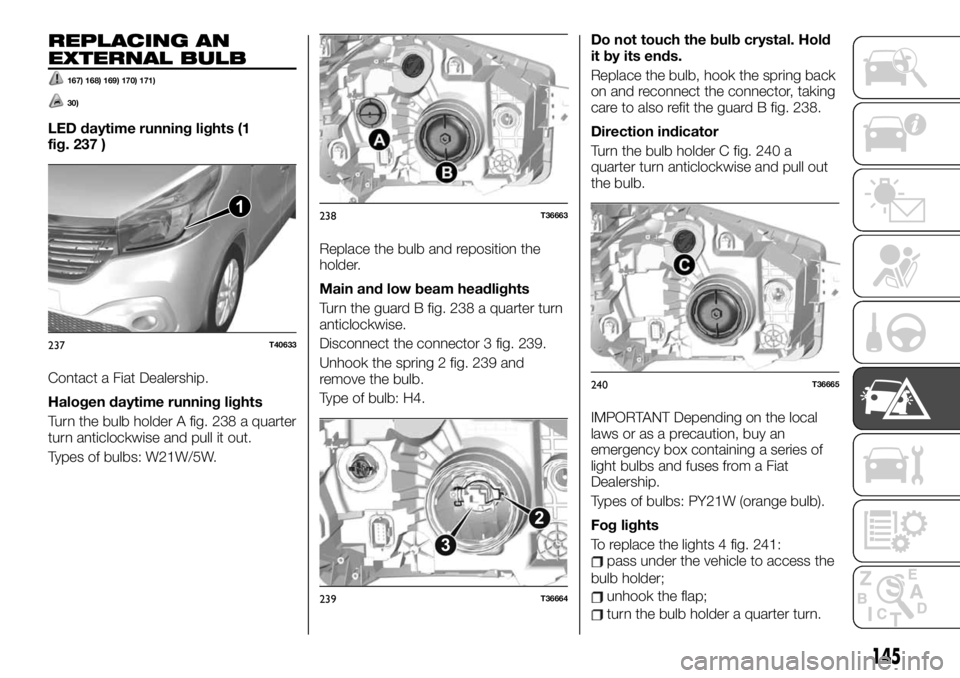
LED daytime running lights (1
fig. 237 )
Contact a Fiat Dealership.
Halogen daytime running lights
Turn the bulb holder A fig. 238 a quarter
turn anticlockwise and pull it out.
Types of bulbs: W21W/5W.Replace the bulb and reposition the
holder.
Main and low beam headlights
Turn the guard B fig. 238 a quarter turn
anticlockwise.
Disconnect the connector 3 fig. 239.
Unhook the spring 2 fig. 239 and
remove the bulb.
Type of bulb: H4.Do not touch the bulb crystal. Hold
it by its ends.
Replace the bulb, hook the spring back
on and reconnect the connector, taking
care to also refit the guard B fig. 238.
Direction indicator
Turn the bulb holder C fig. 240 a
quarter turn anticlockwise and pull out
the bulb.
IMPORTANT Depending on the local
laws or as a precaution, buy an
emergency box containing a series of
light bulbs and fuses from a Fiat
Dealership.
Types of bulbs: PY21W (orange bulb).
Fog lights
To replace the lights 4 fig. 241:
pass under the vehicle to access the
bulb holder;
unhook the flap;
turn the bulb holder a quarter turn.
1
237T40633
238T36663
2
3
239T36664
240T36665
145
Page 153 of 236
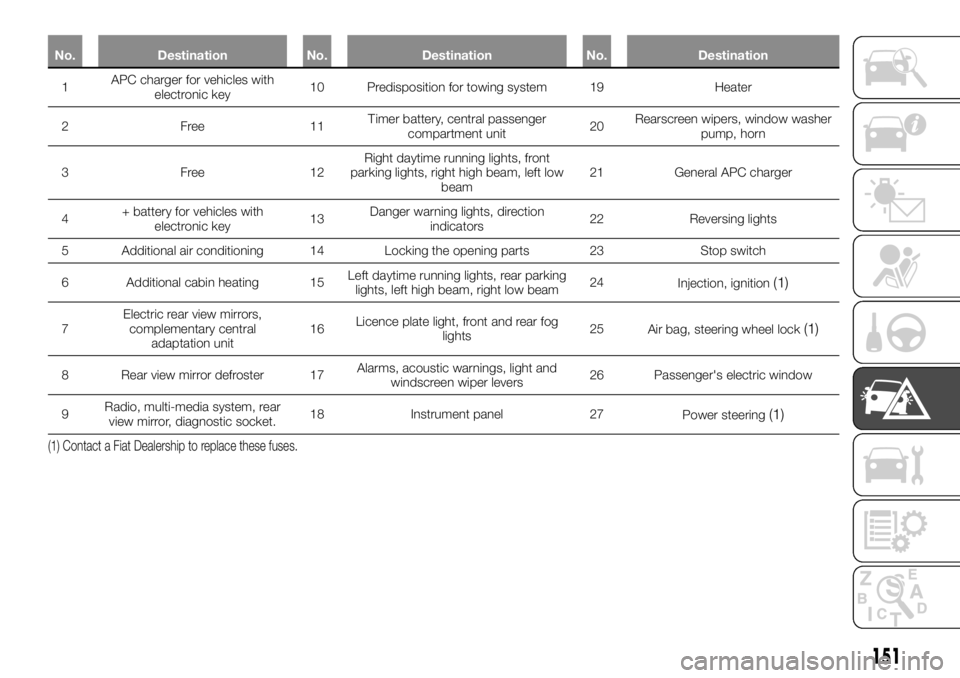
No. Destination No. Destination No. Destination
1APC charger forvehicles with
electronic key10 Predisposition for towing system 19 Heater
2Free11Timer battery, central passenger
compartment unit20Rearscreen wipers, window washer
pump, horn
3Free12Right daytime running lights, front
parking lights, right high beam, left low
beam21 General APC charger
4+ battery for vehicles with
electronic key13Danger warning lights, direction
indicators22 Reversing lights
5 Additional air conditioning 14 Locking the opening parts 23 Stop switch
6 Additional cabin heating 15Left daytime running lights, rear parking
lights, left high beam, right low beam24
Injection, ignition
(1)
7Electric rear view mirrors,
complementary central
adaptation unit16Licence plate light, front and rear fog
lights25
Air bag, steering wheel lock(1)
8 Rear view mirror defroster 17Alarms, acoustic warnings, light and
windscreen wiper levers26 Passenger's electric window
9Radio, multi-media system, rear
view mirror, diagnostic socket.18 Instrument panel 27
Power steering
(1)
(1) Contact a Fiat Dealership to replace these fuses.
151