FIAT TALENTO 2021 Owner handbook (in English)
Manufacturer: FIAT, Model Year: 2021, Model line: TALENTO, Model: FIAT TALENTO 2021Pages: 236, PDF Size: 4.86 MB
Page 61 of 236
IMPORTANT
16)It is vital, for correct operation, that the
camera is always kept clean and free from
any mud, dirt, snow or ice. Be careful not
to scratch or damage the camera while
cleaning it. Avoid using dry, rough or hard
cloths. The camera must be washed using
clean water, with the addition of car
shampoo if necessary. In washing stations
which use steam or high-pressure jets,
clean the camera quickly, keeping the
nozzle more than 10 cm away from the
sensors. Also, do not apply stickers to the
camera.
ELECTRIC WINDOWS
ELECTRIC WINDOWS
59) 60)
With the starter device inserted:press the button of the window
concerned to lower it to the desired
position;
lift the button of the window
concerned to raise it to the desired
position.
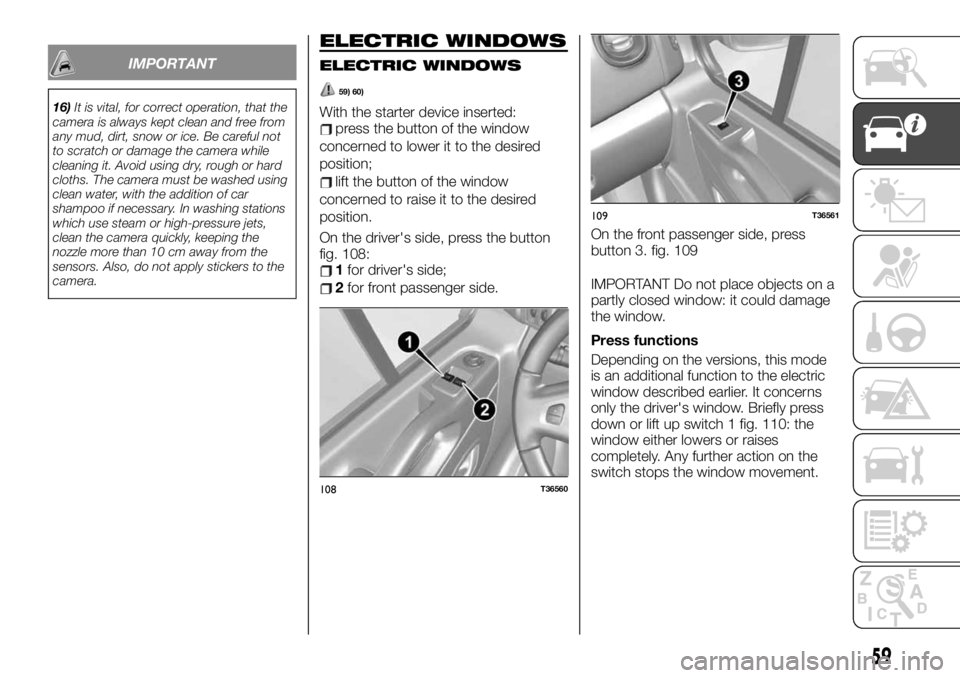
On the driver's side, press the button
fig. 108:
1for driver's side;
2for front passenger side.IMPORTANT Do not place objects on a
partly closed window: it could damage
the window.
Press functions
Depending on the versions, this mode
is an additional function to the electric
window described earlier. It concerns
only the driver's window. Briefly press
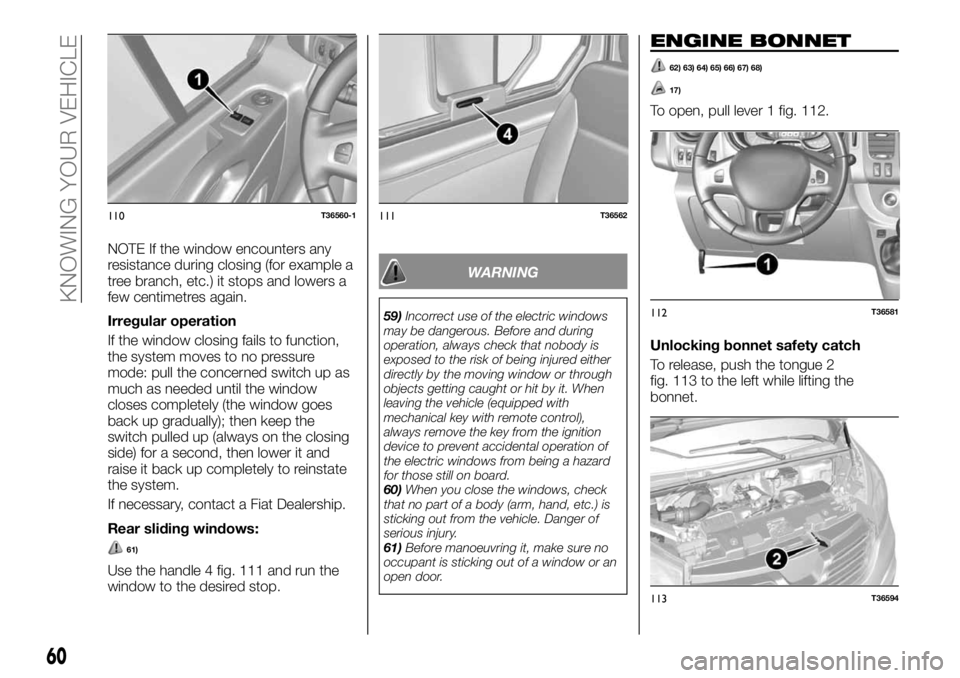
down or lift up switch 1 fig. 110: the
window either lowers or raises
completely. Any further action on the
switch stops the window movement.
108T36560
109T36561
On the front passenger side, press
button 3. fig. 109
59
Page 62 of 236
NOTE If the window encounters any
resistance during closing (for example a
tree branch, etc.) it stops and lowers a
few centimetres again.
Irregular operation
If the window closing fails to function,
the system moves to no pressure
mode: pull the concerned switch up as
much as needed until the window
closes completely (the window goes
back up gradually); then keep the
switch pulled up (always on the closing
side) for a second, then lower it and
raise it back up completely to reinstate
the system.
If necessary, contact a Fiat Dealership.
Rear sliding windows:
61)
Use the handle 4 fig. 111 and run the
window to the desired stop.
WARNING
59)Incorrect use of the electric windows
may be dangerous. Before and during
operation, always check that nobody is
exposed to the risk of being injured either
directly by the moving window or through
objects getting caught or hit by it. When
leaving the vehicle (equipped with
mechanical key with remote control),
always remove the key from the ignition
device to prevent accidental operation of
the electric windows from being a hazard
for those still on board.
60)When you close the windows, check
that no part of a body (arm, hand, etc.) is
sticking out from the vehicle. Danger of
serious injury.
61)Before manoeuvring it, make sure no
occupant is sticking out of a window or an
open door.
ENGINE BONNET
62) 63) 64) 65) 66) 67) 68)
17)
To open, pull lever 1 fig. 112.
Unlocking bonnet safety catch
To release, push the tongue 2
fig. 113 to the left while lifting the
bonnet.
110T36560-1111T36562
112T36581
113T36594
60
KNOWING YOUR VEHICLE
Page 63 of 236
Opening the bonnet
Lift the bonnet and accompany it.
Lifting is aided by side dampers.
Closing the bonnet
Make sure nothing has been left in the
engine compartment. Lower the bonnet
to approximately 30 centimetres from
the engine compartment and let it drop.
Make sure that the bonnet is
completely closed and not only
fastened by the locking device by trying
to open it. If it is not perfectly closed,
do not try to press the bonnet down
but open it and repeat the procedure.
WARNING
62)Before any intervention, the engine
must be turned off (and not in stand-by):
you must turn the engine off (refer to the
"Starting the engine" paragraph in the
“Starting and driving” chapter).
63)Do not lean on the bonnet: it could
close involuntarily.
64)When you intervene near the engine,
this last could be hot. Moreover, the
cooling fan could start up at any time. The
warning light serves to remind you of
this condition. Risk of injury.
65)When working in the engine
compartment, make sure that the
windscreen wiper is in the stopped
position. Risk of injury.
66)In case of a collision, even a light one
like against the cowling or bonnet, have it
checked at a Fiat Dealership as soon as
possible.67)Use both hands to lift the bonnet.
Before lifting, check that the windscreen
wiper arms are not raised from the
windscreen, that the vehicle is stationary
and that the parking brake is engaged.
68)For safety reasons, the bonnet must
always be properly closed while the car is
travelling. Therefore, make sure that the
bonnet is properly closed and that the lock
is engaged. If you discover that the bonnet
is not perfectly closed during travel, stop
immediately and close the bonnet in the
correct manner.
IMPORTANT
17)After every intervention in the engine
compartment, make sure you have not left
anything (rags, tools, etc.); basically these
could damage the engine or start a fire.
INTERIOR FITTINGS
SUN VISORS
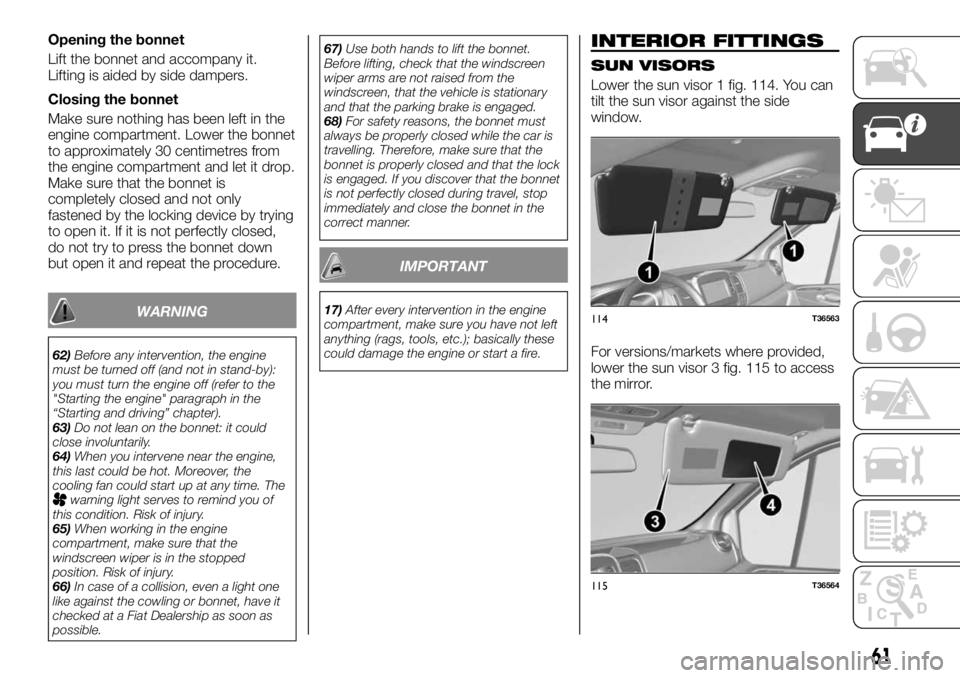
Lower the sun visor 1 fig. 114. You can
tilt the sun visor against the side
window.
For versions/markets where provided,
lower the sun visor 3 fig. 115 to access
the mirror.
114T36563
115T36564
61
Page 64 of 236
HOUSING
69)
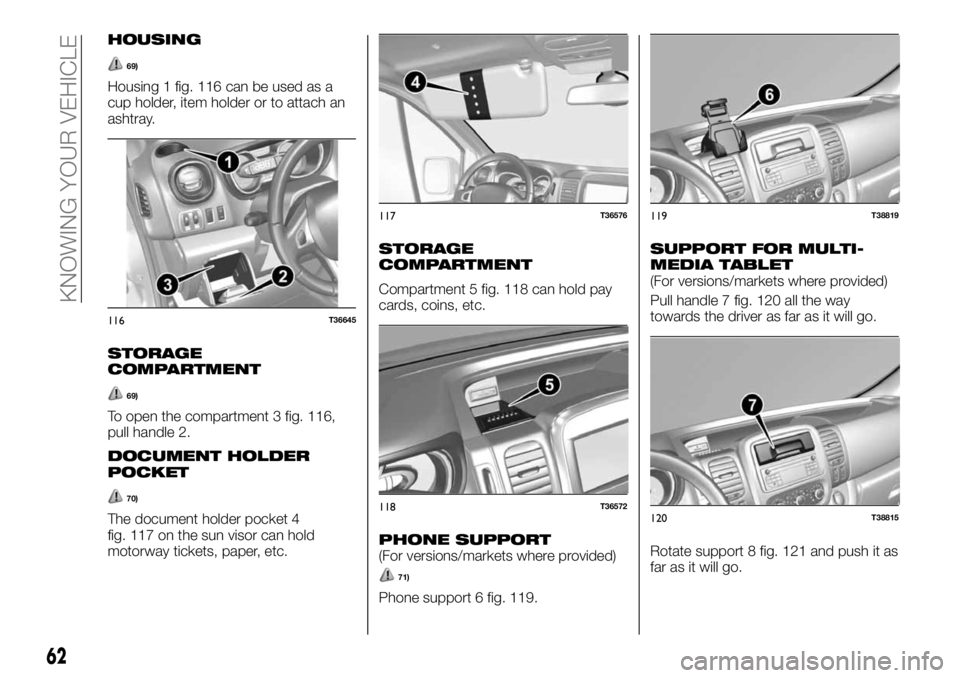
Housing 1 fig. 116 can be used as a
cup holder, item holder or to attach an
ashtray.
STORAGE
COMPARTMENT
69)
To open the compartment 3 fig. 116,
pull handle 2.
DOCUMENT HOLDER
POCKET
70)
The document holder pocket 4
fig. 117 on the sun visor can hold
motorway tickets, paper, etc.
STORAGE
COMPARTMENT
Compartment 5 fig. 118 can hold pay
cards, coins, etc.
PHONE SUPPORT(For versions/markets where provided)
71)
Phone support 6 fig. 119.
SUPPORT FOR MULTI-
MEDIA TABLET
(For versions/markets where provided)
Pull handle 7 fig. 120 all the way
towards the driver as far as it will go.
Rotate support 8 fig. 121 and push it as
far as it will go.
116T36645
117T36576
118T36572
119T38819
120T38815
62
KNOWING YOUR VEHICLE
Page 65 of 236
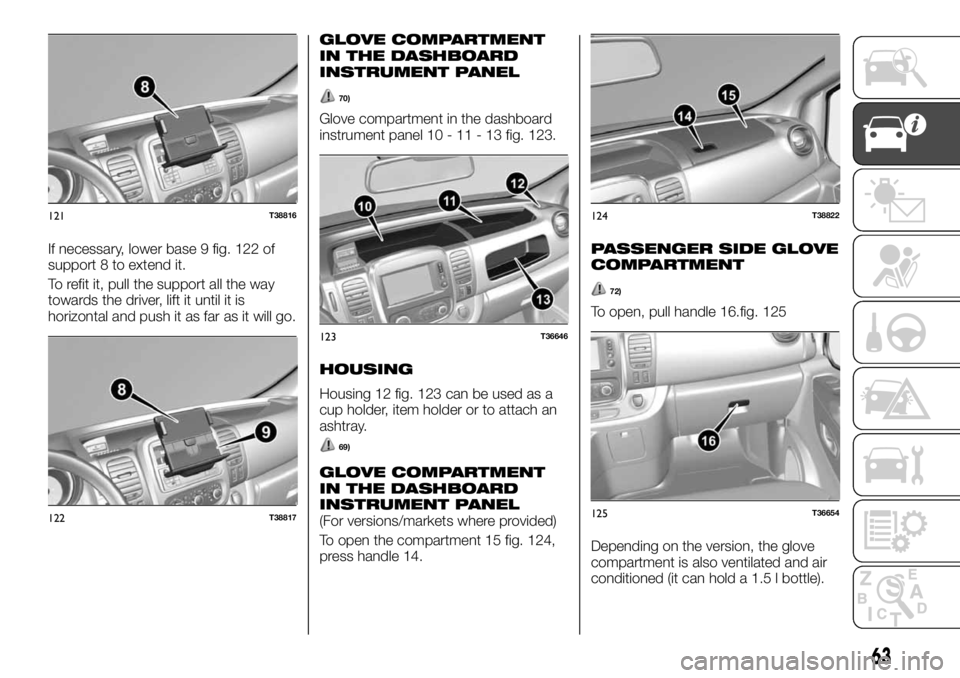
If necessary, lower base 9 fig. 122 of
support 8 to extend it.
To refit it, pull the support all the way
towards the driver, lift it until it is
horizontal and push it as far as it will go.
GLOVE COMPARTMENT
IN THE DASHBOARD
INSTRUMENT PANEL
70)
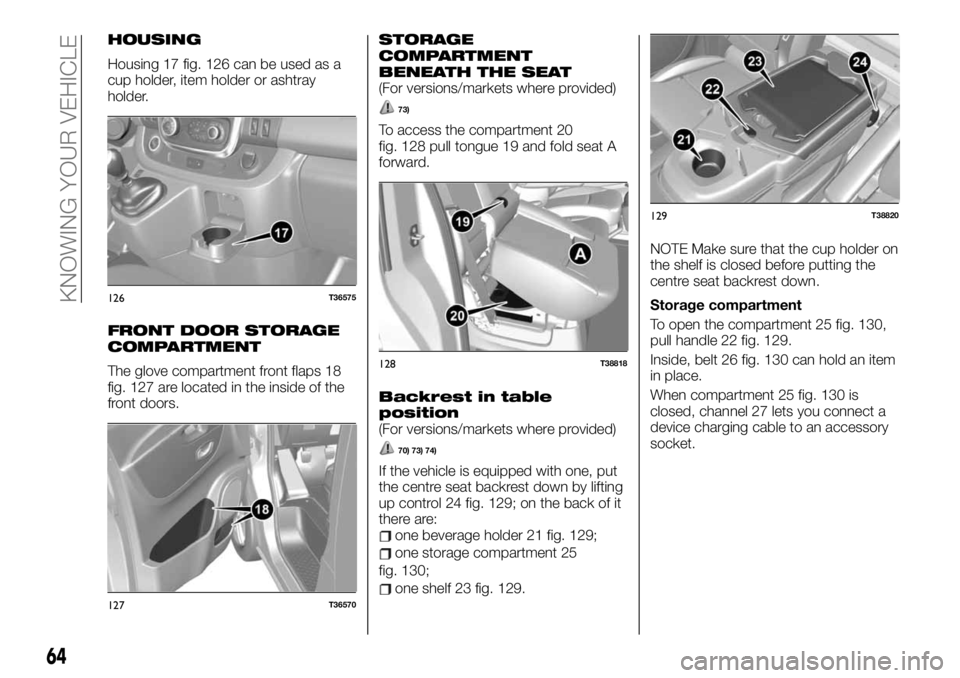
Glove compartment in the dashboard
instrument panel 10 - 11 - 13 fig. 123.
HOUSING
Housing 12 fig. 123 can be used as a
cup holder, item holder or to attach an
ashtray.
69)
GLOVE COMPARTMENT
IN THE DASHBOARD
INSTRUMENT PANEL
(For versions/markets where provided)
To open the compartment 15 fig. 124,
press handle 14.
PASSENGER SIDE GLOVE
COMPARTMENT
72)
To open, pull handle 16.fig. 125
Depending on the version, the glove
compartment is also ventilated and air
conditioned (it can hold a 1.5 l bottle).
121T38816
122T38817
123T36646
124T38822
125T36654
63
Page 66 of 236
HOUSING
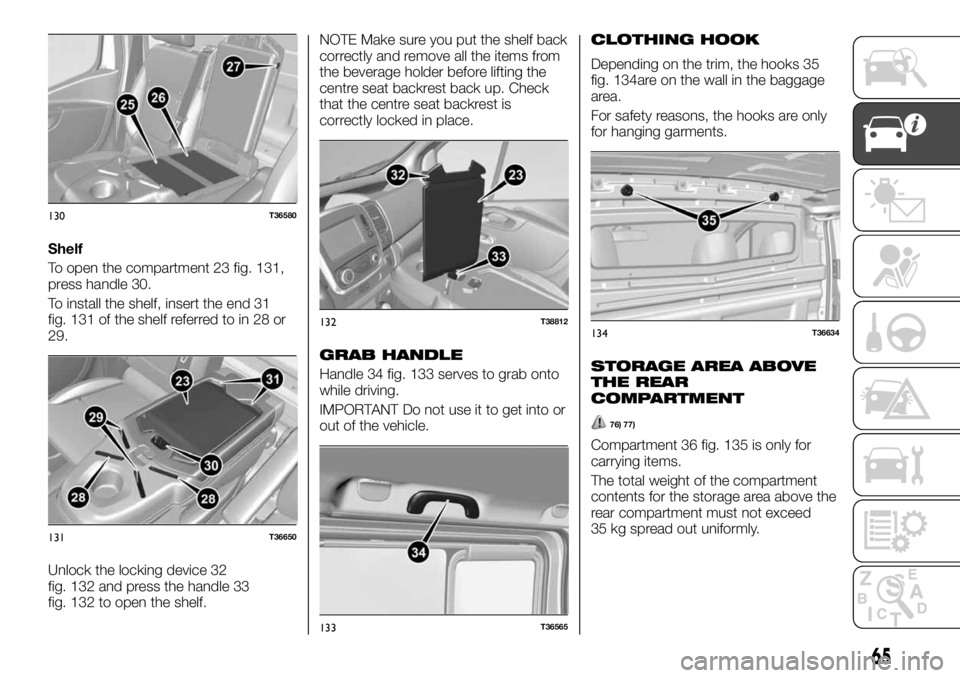
Housing 17 fig. 126 can be used as a
cup holder, item holder or ashtray
holder.
FRONT DOOR STORAGE
COMPARTMENT
The glove compartment front flaps 18
fig. 127 are located in the inside of the
front doors.
STORAGE
COMPARTMENT
BENEATH THE SEAT
(For versions/markets where provided)
73)
To access the compartment 20
fig. 128 pull tongue 19 and fold seat A
forward.
Backrest in table
position
(For versions/markets where provided)
70) 73) 74)
If the vehicle is equipped with one, put
the centre seat backrest down by lifting
up control 24 fig. 129; on the back of it
there are:
one beverage holder 21 fig. 129;
one storage compartment 25
fig. 130;
one shelf 23 fig. 129.NOTE Make sure that the cup holder on
the shelf is closed before putting the
centre seat backrest down.
Storage compartment
To open the compartment 25 fig. 130,
pull handle 22 fig. 129.
Inside, belt 26 fig. 130 can hold an item
in place.
When compartment 25 fig. 130 is
closed, channel 27 lets you connect a
device charging cable to an accessory
socket.
126T36575
127T36570
128T38818
129T38820
64
KNOWING YOUR VEHICLE
Page 67 of 236
Shelf
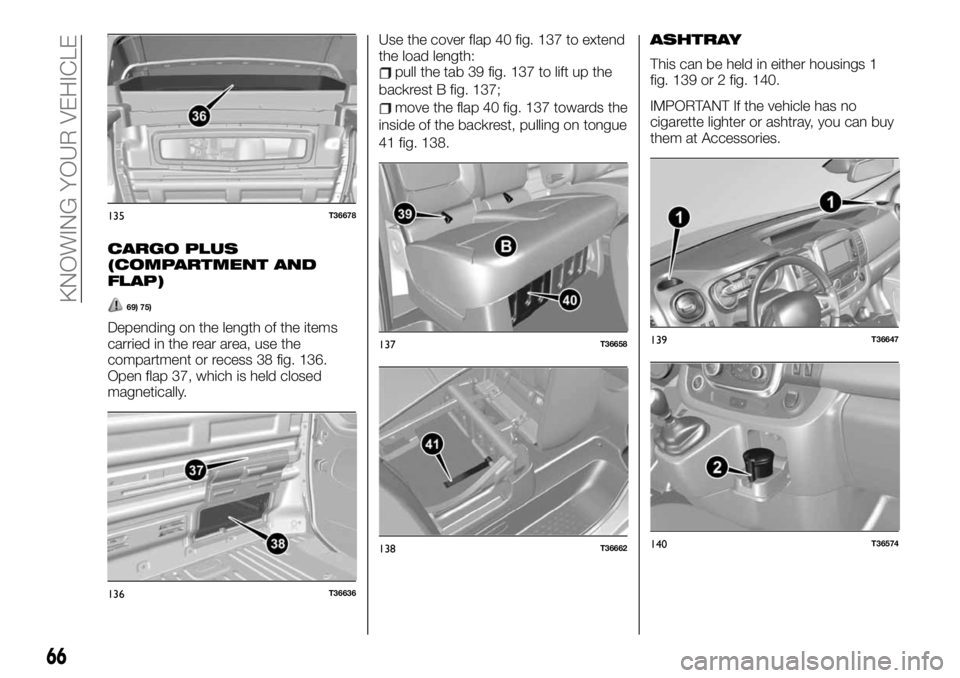
To open the compartment 23 fig. 131,
press handle 30.
To install the shelf, insert the end 31
fig. 131 of the shelf referred to in 28 or
29.
Unlock the locking device 32
fig. 132 and press the handle 33
fig. 132 to open the shelf.NOTE Make sure you put the shelf back
correctly and remove all the items from
the beverage holder before lifting the
centre seat backrest back up. Check
that the centre seat backrest is
correctly locked in place.
GRAB HANDLE
Handle 34 fig. 133 serves to grab onto
while driving.
IMPORTANT Do not use it to get into or
out of the vehicle.
CLOTHING HOOK
Depending on the trim, the hooks 35
fig. 134are on the wall in the baggage
area.
For safety reasons, the hooks are only
for hanging garments.
STORAGE AREA ABOVE
THE REAR
COMPARTMENT
76) 77)
Compartment 36 fig. 135 is only for
carrying items.
The total weight of the compartment
contents for the storage area above the
rear compartment must not exceed
35 kg spread out uniformly.
130T36580
131T36650
132T38812
133T36565
134T36634
65
Page 68 of 236
CARGO PLUS
(COMPARTMENT AND
FLAP)
69) 75)
Depending on the length of the items
carried in the rear area, use the
compartment or recess 38 fig. 136.
Open flap 37, which is held closed
magnetically.Use the cover flap 40 fig. 137 to extend
the load length:
pull the tab 39 fig. 137 to lift up the
backrest B fig. 137;
move the flap 40 fig. 137 towards the
inside of the backrest, pulling on tongue
41 fig. 138.
ASHTRAY
This can be held in either housings 1
fig. 139 or 2 fig. 140.
IMPORTANT If the vehicle has no
cigarette lighter or ashtray, you can buy
them at Accessories.
135T36678
136T36636
137T36658
138T36662
139T36647
140T36574
66
KNOWING YOUR VEHICLE
Page 69 of 236
ACCESSORIES SOCKET
77) 78)
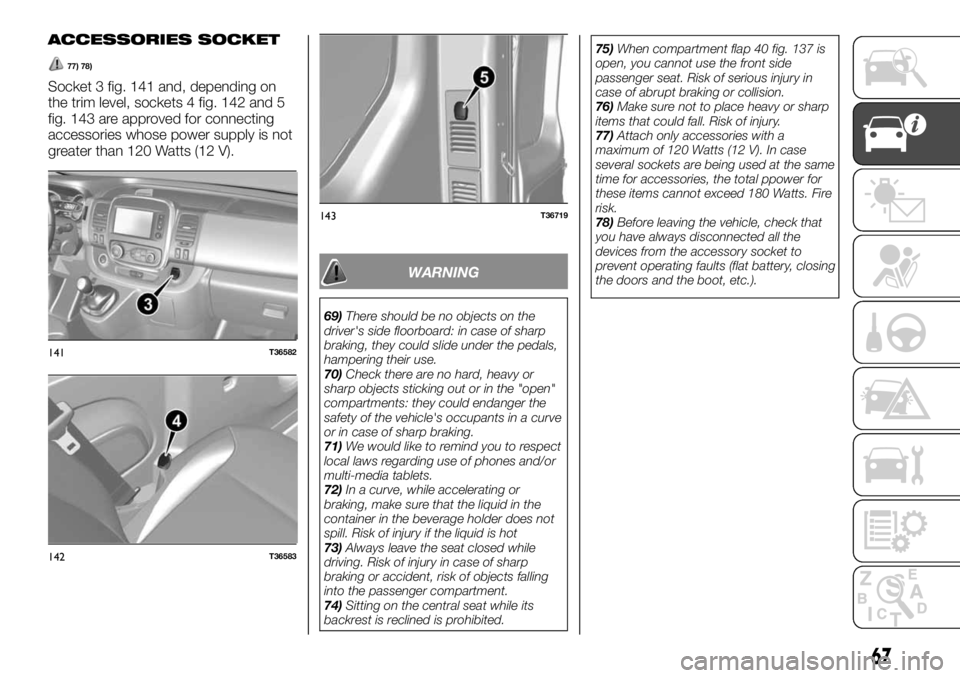
Socket 3 fig. 141 and, depending on
the trim level, sockets 4 fig. 142 and 5
fig. 143 are approved for connecting
accessories whose power supply is not
greater than 120 Watts (12 V).
WARNING
69)There should be no objects on the
driver's side floorboard: in case of sharp
braking, they could slide under the pedals,
hampering their use.
70)Check there are no hard, heavy or
sharp objects sticking out or in the "open"
compartments: they could endanger the
safety of the vehicle's occupants in a curve
or in case of sharp braking.
71)We would like to remind you to respect
local laws regarding use of phones and/or
multi-media tablets.
72)In a curve, while accelerating or
braking, make sure that the liquid in the
container in the beverage holder does not
spill. Risk of injury if the liquid is hot
73)Always leave the seat closed while
driving. Risk of injury in case of sharp
braking or accident, risk of objects falling
into the passenger compartment.
74)Sitting on the central seat while its
backrest is reclined is prohibited.75)When compartment flap 40 fig. 137 is
open, you cannot use the front side
passenger seat. Risk of serious injury in
case of abrupt braking or collision.
76)Make sure not to place heavy or sharp
items that could fall. Risk of injury.
77)Attach only accessories with a
maximum of 120 Watts (12 V). In case
several sockets are being used at the same
time for accessories, the total ppower for
these items cannot exceed 180 Watts. Fire
risk.
78)Before leaving the vehicle, check that
you have always disconnected all the
devices from the accessory socket to
prevent operating faults (flat battery, closing
the doors and the boot, etc.).
141T36582
142T36583
143T36719
67
Page 70 of 236
MULTIMEDIA
EQUIPMENT
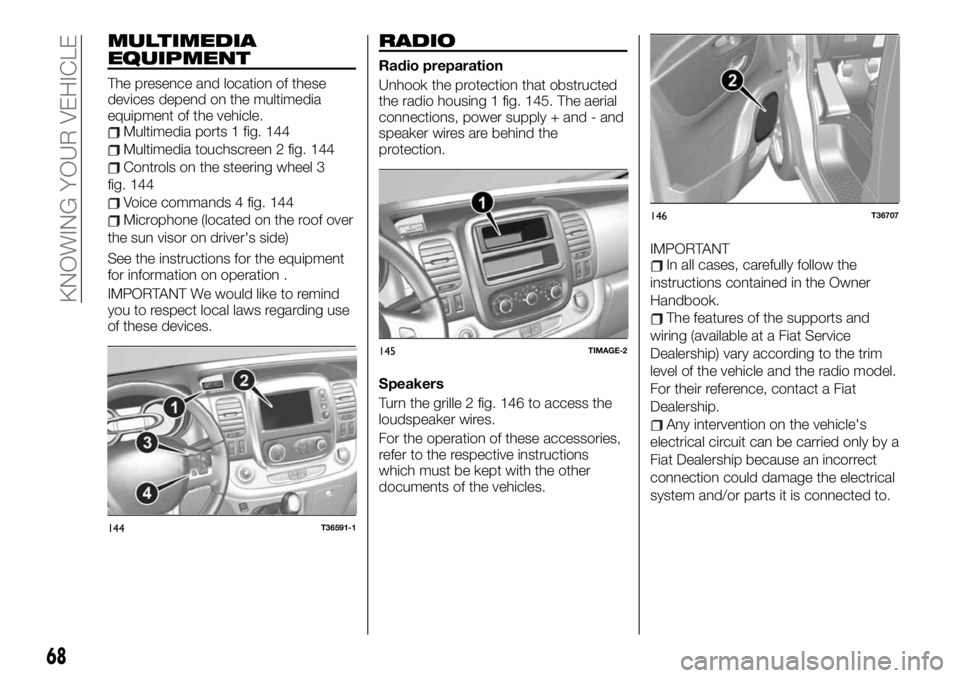
The presence and location of these
devices depend on the multimedia
equipment of the vehicle.
Multimedia ports 1 fig. 144
Multimedia touchscreen 2 fig. 144
Controls on the steering wheel 3
fig. 144
Voice commands 4 fig. 144
Microphone (located on the roof over
the sun visor on driver's side)
See the instructions for the equipment
for information on operation .
IMPORTANT We would like to remind
you to respect local laws regarding use
of these devices.
RADIO
Radio preparation
Unhook the protection that obstructed
the radio housing 1 fig. 145. The aerial
connections, power supply + and - and
speaker wires are behind the
protection.
Speakers
Turn the grille 2 fig. 146 to access the
loudspeaker wires.
For the operation of these accessories,
refer to the respective instructions
which must be kept with the other
documents of the vehicles.IMPORTANT
In all cases, carefully follow the
instructions contained in the Owner
Handbook.
The features of the supports and
wiring (available at a Fiat Service
Dealership) vary according to the trim
level of the vehicle and the radio model.
For their reference, contact a Fiat
Dealership.
Any intervention on the vehicle's
electrical circuit can be carried only by a
Fiat Dealership because an incorrect
connection could damage the electrical
system and/or parts it is connected to.
144T36591-1
145TIMAGE-2
146T36707
68
KNOWING YOUR VEHICLE