engine FIAT TALENTO 2021 Owner handbook (in English)
[x] Cancel search | Manufacturer: FIAT, Model Year: 2021, Model line: TALENTO, Model: FIAT TALENTO 2021Pages: 236, PDF Size: 4.86 MB
Page 140 of 236
IMPORTANT In certain situations (for
example, a steep slope) the speed
limiter can be exceeded slightly,
because the device does not intervene
on the braking system.
WARNING
162)This function does not take the
driver's place. Nor does it allow the
vehicle's driving limits to be ignored,
encouraging faster driving. However, this
does not exempt the driver from normal
driving safety or from responsibility.
MINIMUM SPEED
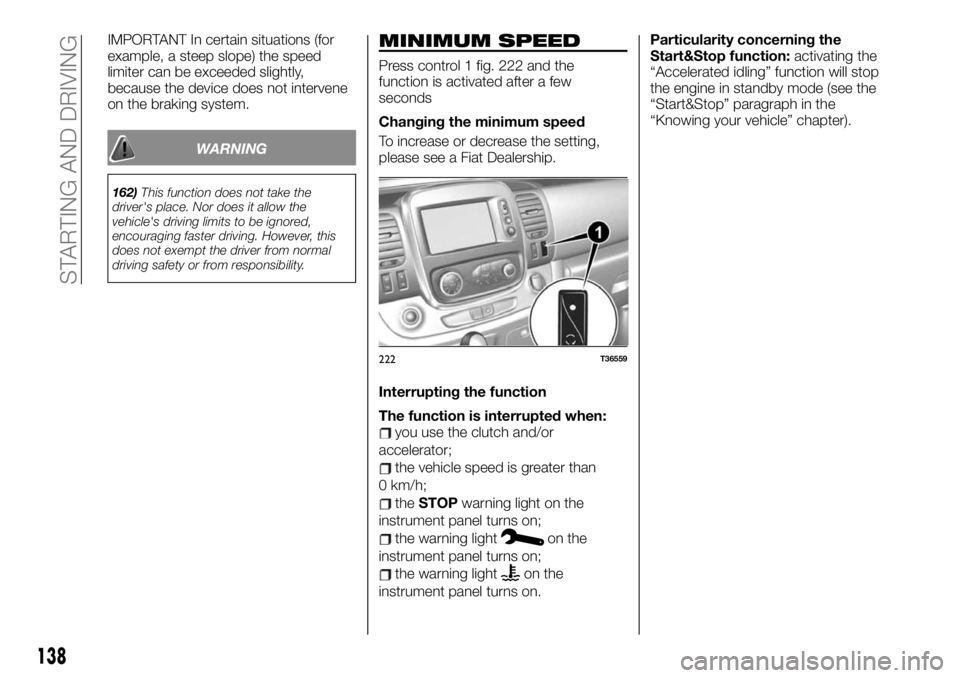
Press control 1 fig. 222 and the
function is activated after a few
seconds
Changing the minimum speed
To increase or decrease the setting,
please see a Fiat Dealership.
Interrupting the function
The function is interrupted when:
you use the clutch and/or
accelerator;
the vehicle speed is greater than
0 km/h;
theSTOPwarning light on the
instrument panel turns on;
the warning lighton the
instrument panel turns on;
the warning lighton the
instrument panel turns on.Particularity concerning the
Start&Stop function:activating the
“Accelerated idling” function will stop
the engine in standby mode (see the
“Start&Stop” paragraph in the
“Knowing your vehicle” chapter).
222T36559
138
STARTING AND DRIVING
Page 141 of 236
SUGGESTIONS FOR
DRIVING
SAVING FUEL
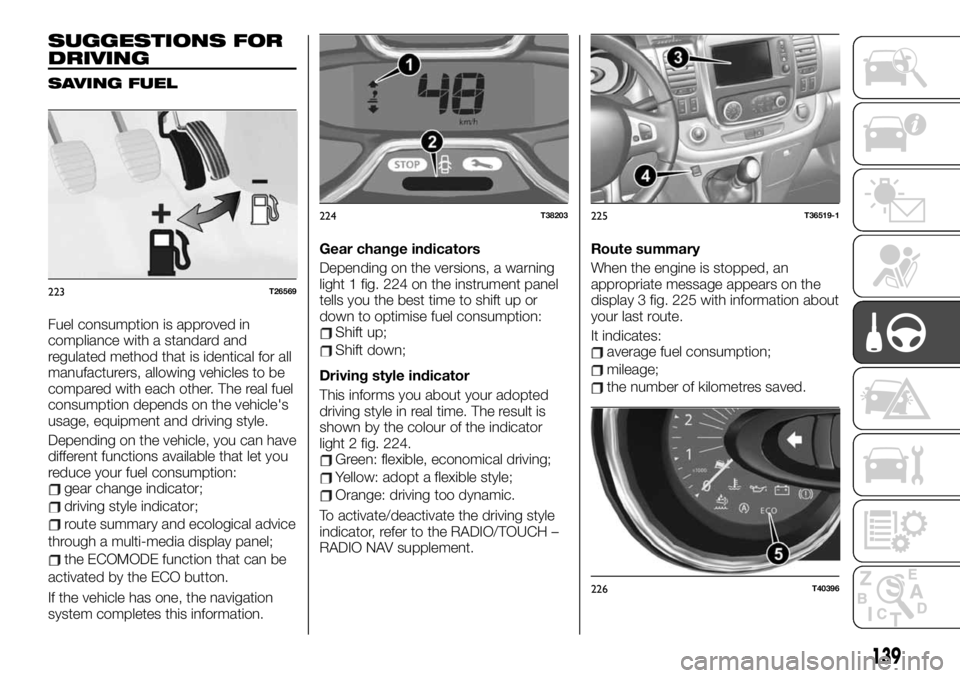
Fuel consumption is approved in
compliance with a standard and
regulated method that is identical for all
manufacturers, allowing vehicles to be
compared with each other. The real fuel
consumption depends on the vehicle's
usage, equipment and driving style.
Depending on the vehicle, you can have
different functions available that let you
reduce your fuel consumption:
gear change indicator;
driving style indicator;
route summary and ecological advice
through a multi-media display panel;
the ECOMODE function that can be
activated by the ECO button.
If the vehicle has one, the navigation
system completes this information.Gear change indicators
Depending on the versions, a warning
light 1 fig. 224 on the instrument panel
tells you the best time to shift up or
down to optimise fuel consumption:
Shift up;
Shift down;
Driving style indicator
This informs you about your adopted
driving style in real time. The result is
shown by the colour of the indicator
light 2 fig. 224.
Green: flexible, economical driving;
Yellow: adopt a flexible style;
Orange: driving too dynamic.
To activate/deactivate the driving style
indicator, refer to the RADIO/TOUCH –
RADIO NAV supplement.Route summary
When the engine is stopped, an
appropriate message appears on the
display 3 fig. 225 with information about
your last route.
It indicates:
average fuel consumption;
mileage;
the number of kilometres saved.
223T26569
224T38203225T36519-1
226T40396
139
Page 142 of 236
A general grade from 0 to 100 appears
that allows you to assess your
ecological driving performance: high
values mean reduced fuel consumption.
Below is some ecological advice to
improve your performance. Store your
preferred routes lets you compare
performances. For further information,
refer to the RADIO/TOUCH – RADIO
NAV supplement.
ECOMODE
ECOMODE is a function that optimises
fuel consumption. It acts on a few of
the vehicle's uses (heating, air
conditioning, power steering, etc.) and
on a few driving operations
(acceleration, gear shift, speed
regulation, deceleration, etc.).
Activation of the function
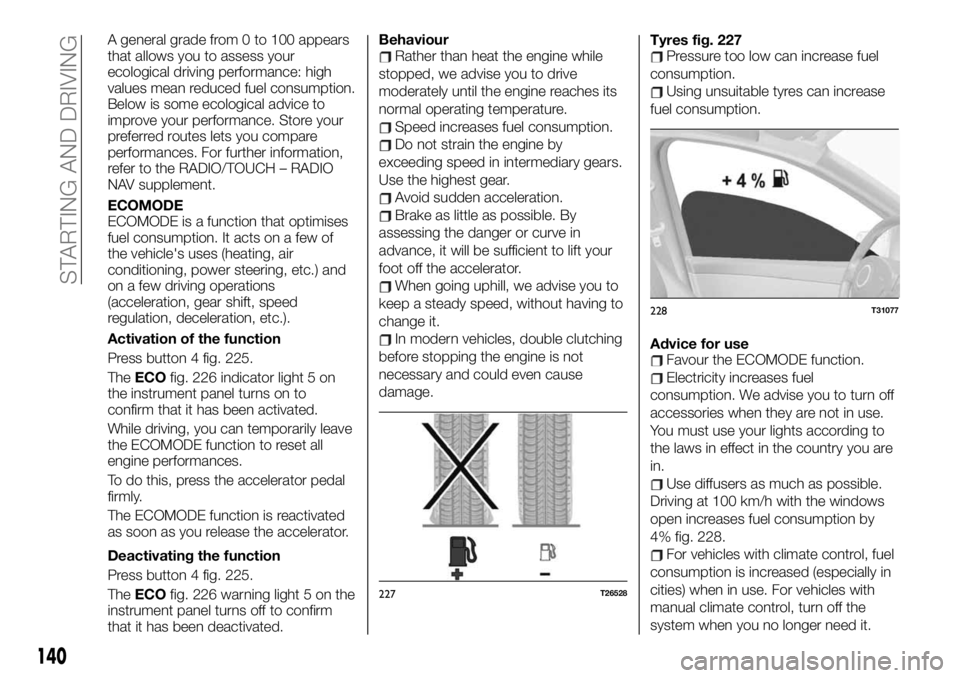
Press button 4 fig. 225.
TheECOfig. 226 indicator light 5 on
the instrument panel turns on to
confirm that it has been activated.
While driving, you can temporarily leave
the ECOMODE function to reset all
engine performances.
To do this, press the accelerator pedal
firmly.
The ECOMODE function is reactivated
as soon as you release the accelerator.
Deactivating the function
Press button 4 fig. 225.
TheECOfig. 226 warning light 5 on the
instrument panel turns off to confirm
that it has been deactivated.BehaviourRather than heat the engine while
stopped, we advise you to drive
moderately until the engine reaches its
normal operating temperature.
Speed increases fuel consumption.
Do not strain the engine by
exceeding speed in intermediary gears.
Use the highest gear.
Avoid sudden acceleration.
Brake as little as possible. By
assessing the danger or curve in
advance, it will be sufficient to lift your
foot off the accelerator.
When going uphill, we advise you to
keep a steady speed, without having to
change it.
In modern vehicles, double clutching
before stopping the engine is not
necessary and could even cause
damage.Tyres fig. 227
Pressure too low can increase fuel
consumption.
Using unsuitable tyres can increase
fuel consumption.
Advice for use
Favour the ECOMODE function.
Electricity increases fuel
consumption. We advise you to turn off
accessories when they are not in use.
You must use your lights according to
the laws in effect in the country you are
in.
Use diffusers as much as possible.
Driving at 100 km/h with the windows
open increases fuel consumption by
4% fig. 228.
For vehicles with climate control, fuel
consumption is increased (especially in
cities) when in use. For vehicles with
manual climate control, turn off the
system when you no longer need it.
227T26528
228T31077
140
STARTING AND DRIVING
Page 143 of 236
Some advice for reducing fuel
consumption and thus helping
safeguard the environment:
If the vehicle has been parked in high
temperatures or in the sun, open up the
doors to let out the hot air before
leaving.
Do not leave the roof rack mounted if
not in use.
When transporting particularly large
objects, use a trailer if possible.
To tow a camper, use an approved
deflector and do not forget to adjust it.
Avoid "door to door" use of the
vehicle (short trips with prolonged
stops) because the engine never
reaches its ideal temperature.
141
Page 146 of 236
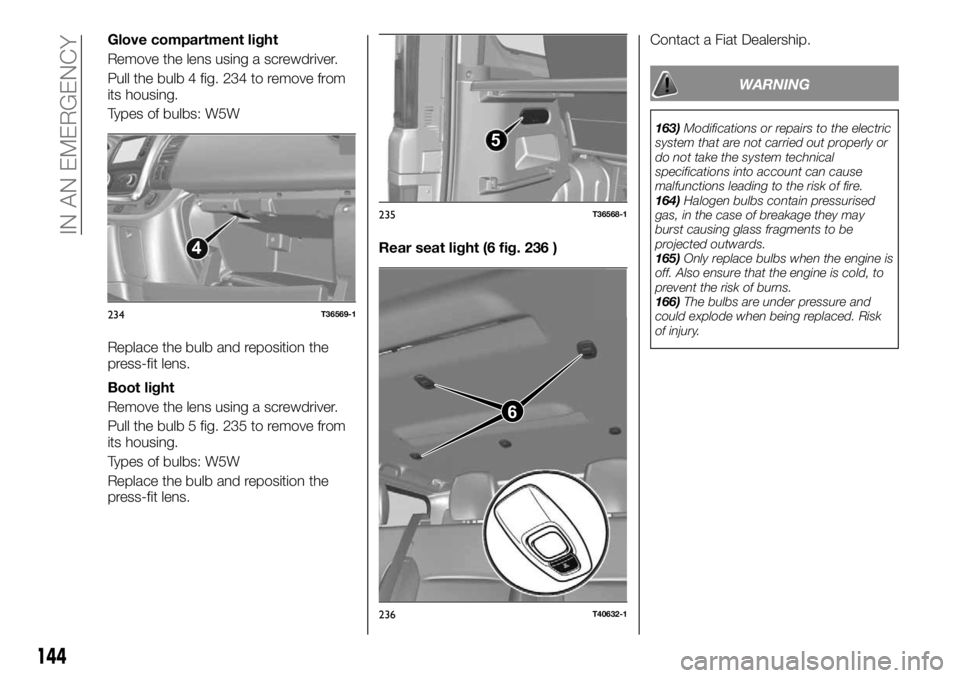
Glove compartment light
Remove the lens using a screwdriver.
Pull the bulb 4 fig. 234 to remove from
its housing.
Types of bulbs: W5W
Replace the bulb and reposition the
press-fit lens.
Boot light
Remove the lens using a screwdriver.
Pull the bulb 5 fig. 235 to remove from
its housing.
Types of bulbs: W5W
Replace the bulb and reposition the
press-fit lens.Rear seat light (6 fig. 236 )Contact a Fiat Dealership.
WARNING
163)Modifications or repairs to the electric
system that are not carried out properly or
do not take the system technical
specifications into account can cause
malfunctions leading to the risk of fire.
164)Halogen bulbs contain pressurised
gas, in the case of breakage they may
burst causing glass fragments to be
projected outwards.
165)Only replace bulbs when the engine is
off. Also ensure that the engine is cold, to
prevent the risk of burns.
166)The bulbs are under pressure and
could explode when being replaced. Risk
of injury.
4
234T36569-1
5
235T36568-1
6
236T40632-1
144
IN AN EMERGENCY
Page 150 of 236
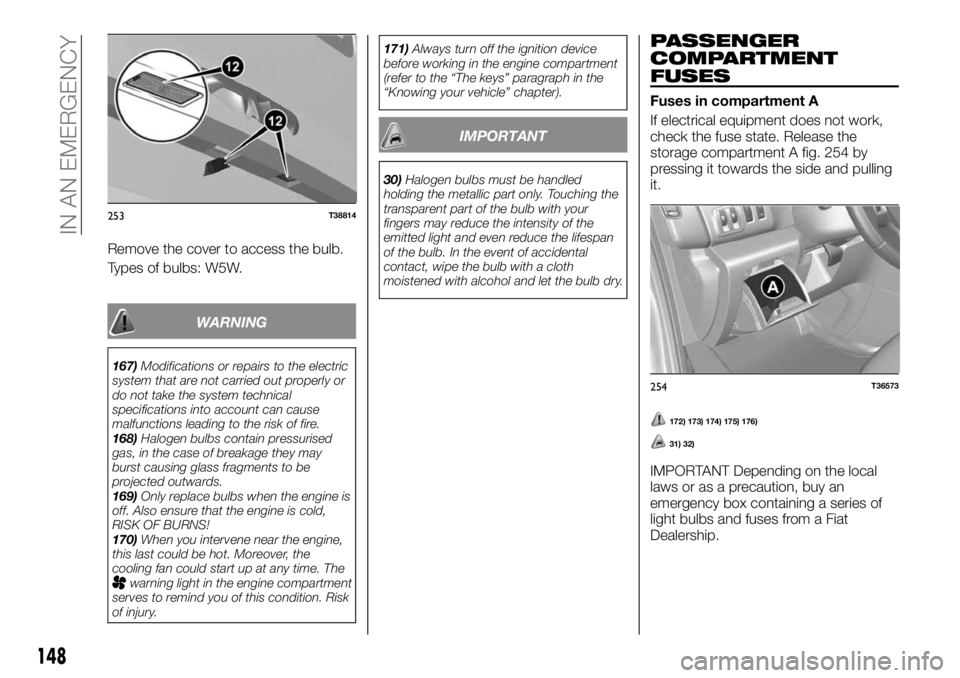
Remove the cover to access the bulb.
Types of bulbs: W5W.
WARNING
167)Modifications or repairs to the electric
system that are not carried out properly or
do not take the system technical
specifications into account can cause
malfunctions leading to the risk of fire.
168)Halogen bulbs contain pressurised
gas, in the case of breakage they may
burst causing glass fragments to be
projected outwards.
169)Only replace bulbs when the engine is
off. Also ensure that the engine is cold,
RISK OF BURNS!
170)When you intervene near the engine,
this last could be hot. Moreover, the
cooling fan could start up at any time. The
warning light in the engine compartment
serves to remind you of this condition. Risk
of injury.171)Always turn off the ignition device
before working in the engine compartment
(refer to the “The keys” paragraph in the
“Knowing your vehicle” chapter).
IMPORTANT
30)Halogen bulbs must be handled
holding the metallic part only. Touching the
transparent part of the bulb with your
fingers may reduce the intensity of the
emitted light and even reduce the lifespan
of the bulb. In the event of accidental
contact, wipe the bulb with a cloth
moistened with alcohol and let the bulb dry.
PASSENGER
COMPARTMENT
FUSES
Fuses in compartment A
If electrical equipment does not work,
check the fuse state. Release the
storage compartment A fig. 254 by
pressing it towards the side and pulling
it.
172) 173) 174) 175) 176)
31) 32)
IMPORTANT Depending on the local
laws or as a precaution, buy an
emergency box containing a series of
light bulbs and fuses from a Fiat
Dealership.
253T38814
254T36573
148
IN AN EMERGENCY
Page 154 of 236
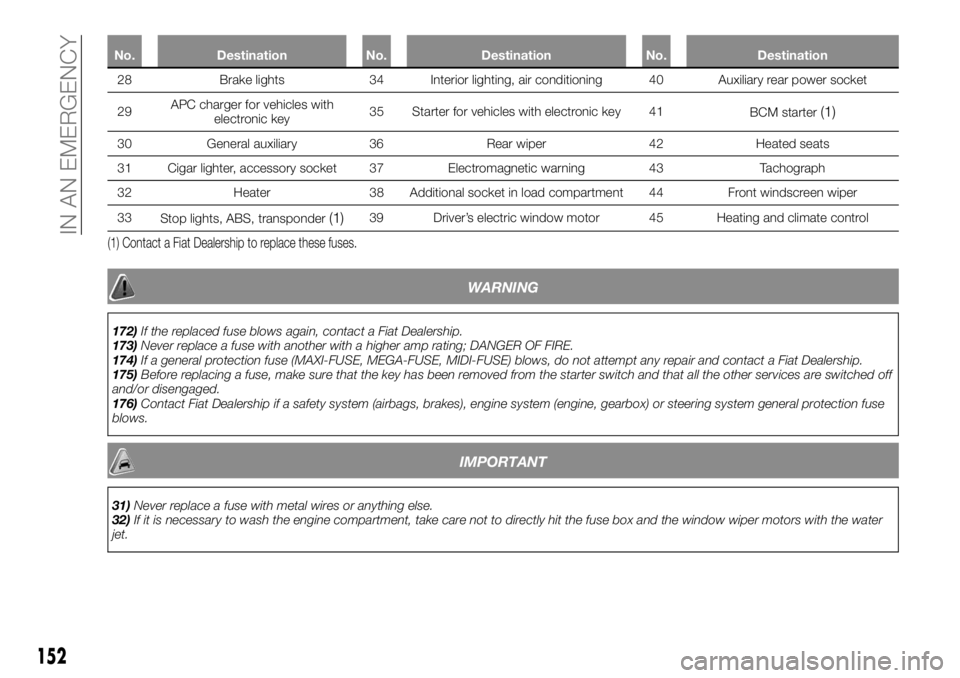
No. Destination No. Destination No. Destination
28 Brake lights 34 Interior lighting, air conditioning 40 Auxiliary rear power socket
29APCcharger for
vehicles with
electronic key35 Starter for vehicles with electronic key 41
BCM starter
(1)
30 General auxiliary 36 Rear wiper 42 Heated seats
31 Cigar lighter, accessory socket 37 Electromagnetic warning 43 Tachograph
32 Heater 38 Additional socket in load compartment 44 Front windscreen wiper
33
Stop lights, ABS, transponder
(1)39 Driver’s electric window motor 45 Heating and climate control
(1) Contact a Fiat Dealership to replace these fuses.
WARNING
172)If the replaced fuse blows again, contact a Fiat Dealership.
173)Never replace a fuse with another with a higher amp rating; DANGER OF FIRE.
174)If a general protection fuse (MAXI-FUSE, MEGA-FUSE, MIDI-FUSE) blows, do not attempt any repair and contact a Fiat Dealership.
175)Before replacing a fuse, make sure that the key has been removed from the starter switch and that all the other services are switched off
and/or disengaged.
176)Contact Fiat Dealership if a safety system (airbags, brakes), engine system (engine, gearbox) or steering system general protection fuse
blows.
IMPORTANT
31)Never replace a fuse with metal wires or anything else.
32)If it is necessary to wash the engine compartment, take care not to directly hit the fuse box and the window wiper motors with the water
jet.
152
IN AN EMERGENCY
Page 158 of 236
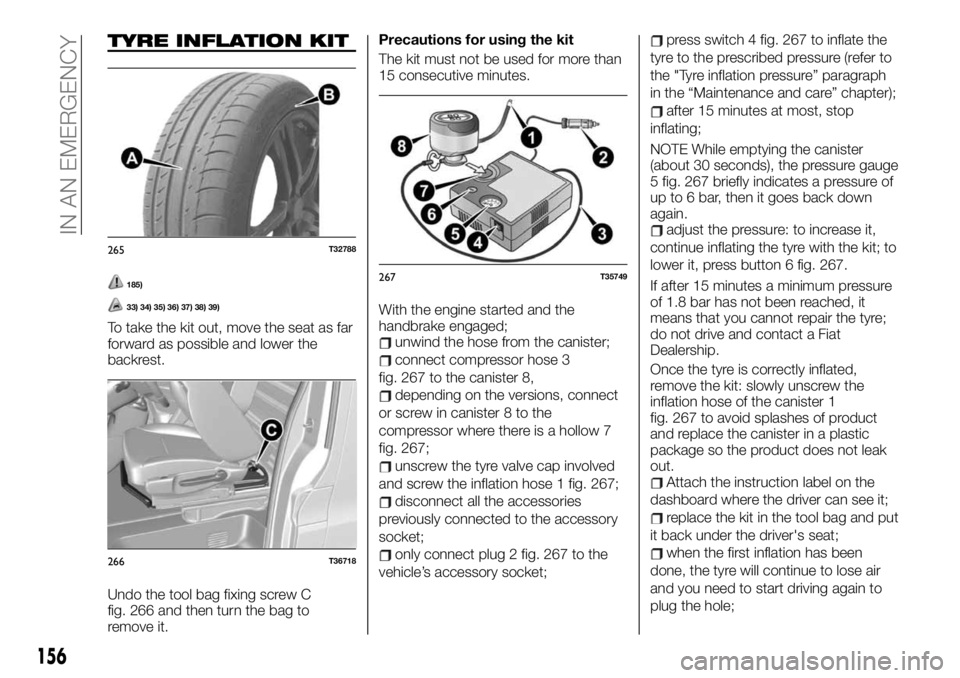
TYRE INFLATION KIT
185)
33) 34) 35) 36) 37) 38) 39)
To take the kit out, move the seat as far
forward as possible and lower the
backrest.
Undo the tool bag fixing screw C
fig. 266 and then turn the bag to
remove it.Precautions for using the kit
The kit must not be used for more than
15 consecutive minutes.
With the engine started and the
handbrake engaged;unwind the hose from the canister;
connect compressor hose 3
fig. 267 to the canister 8,
depending on the versions, connect
or screw in canister 8 to the
compressor where there is a hollow 7
fig. 267;
unscrew the tyre valve cap involved
and screw the inflation hose 1 fig. 267;
disconnect all the accessories
previously connected to the accessory
socket;
only connect plug 2 fig. 267 to the
vehicle’s accessory socket;
press switch 4 fig. 267 to inflate the
tyre to the prescribed pressure (refer to
the "Tyre inflation pressure” paragraph
in the “Maintenance and care” chapter);
after 15 minutes at most, stop
inflating;
NOTE While emptying the canister
(about 30 seconds), the pressure gauge
5 fig. 267 briefly indicates a pressure of
up to 6 bar, then it goes back down
again.
adjust the pressure: to increase it,
continue inflating the tyre with the kit; to
lower it, press button 6 fig. 267.
If after 15 minutes a minimum pressure
of 1.8 bar has not been reached, it
means that you cannot repair the tyre;
do not drive and contact a Fiat
Dealership.
Once the tyre is correctly inflated,
remove the kit: slowly unscrew the
inflation hose of the canister 1
fig. 267 to avoid splashes of product
and replace the canister in a plastic
package so the product does not leak
out.
Attach the instruction label on the
dashboard where the driver can see it;
replace the kit in the tool bag and put
it back under the driver's seat;
when the first inflation has been
done, the tyre will continue to lose air
and you need to start driving again to
plug the hole;
265T32788
266T36718
267T35749
156
IN AN EMERGENCY
Page 160 of 236
JUMP STARTING
186) 187) 188) 189) 190)
40)
Starting the engine that supplies
electrical power and keeping it at
medium speed.
To start, if you use the battery from
another vehicle, you need to have the
right cables (large size) from a Fiat
Dealership or, if you already have them,
make sure they are in perfect condition.
The two batteries have to have nominal
identical voltage: 12 Volt The battery
that supplies the power has to have a
capacity (amperes/hour, Ah) that is at
least identical to the dead battery.
Make sure that there is no contact
between the two vehicles (risk of short
circuit at the moment the positive poles
are in contact) and that the dead
battery is well connected. Disengage
the starter device.Depending on the versions, unhook the
battery guard.
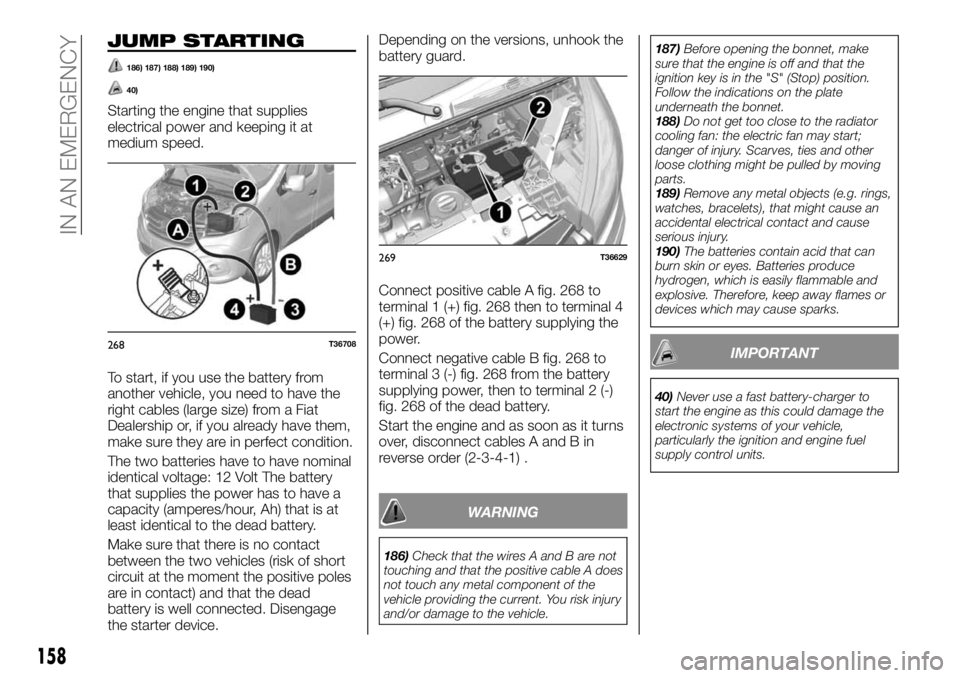
Connect positive cable A fig. 268 to
terminal 1 (+) fig. 268 then to terminal 4
(+) fig. 268 of the battery supplying the
power.
Connect negative cable B fig. 268 to
terminal 3 (-) fig. 268 from the battery
supplying power, then to terminal 2 (-)
fig. 268 of the dead battery.
Start the engine and as soon as it turns
over, disconnect cables A and B in
reverse order (2-3-4-1) .
WARNING
186)Check that the wires A and B are not
touching and that the positive cable A does
not touch any metal component of the
vehicle providing the current. You risk injury
and/or damage to the vehicle.187)Before opening the bonnet, make
sure that the engine is off and that the
ignition key is in the "S" (Stop) position.
Follow the indications on the plate
underneath the bonnet.
188)Do not get too close to the radiator
cooling fan: the electric fan may start;
danger of injury. Scarves, ties and other
loose clothing might be pulled by moving
parts.
189)Remove any metal objects (e.g. rings,
watches, bracelets), that might cause an
accidental electrical contact and cause
serious injury.
190)The batteries contain acid that can
burn skin or eyes. Batteries produce
hydrogen, which is easily flammable and
explosive. Therefore, keep away flames or
devices which may cause sparks.
IMPORTANT
40)Never use a fast battery-charger to
start the engine as this could damage the
electronic systems of your vehicle,
particularly the ignition and engine fuel
supply control units.
268T36708
269T36629
158
IN AN EMERGENCY
Page 161 of 236
BATTERY
RECHARGING
191) 192) 193) 194) 195)
To avoid risk of sparks:check that electrical utilities (courtesy
lights and so on) are off before
disconnecting or reconnecting a
battery;
while recharging, turn off the battery
charger before connecting or
disconnecting the battery;
do not place metal objects on the
battery, to prevent a short circuit
between terminals;
wait at least one minute after
stopping the engine before
disconnecting the battery;
check that the terminals have been
reconnected to the battery correctly
after having refitted it.
Connecting a battery charger
The battery charger has to be
compatible with a nominal voltage of
12 Volts.
Do not disconnect the battery while the
engine is started. Follow the battery
charger manufacturer's instructions for
the battery you plan to use.
WARNING
191)Handle the battery carefully, because
it contains sulphuric acid that must not
come into contact with eyes or skin. If that
happens, rinse thoroughly with water. If
necessary, see a doctor. Keep open
flames, incandescent items and sources of
sparks far from the battery's elements: risk
of explosion. When you intervene near the
engine, this last could be hot. Moreover,
the cooling fan could start up at any time.
The
warning light in the engine
compartment serves to remind you of this
condition. Risk of injury.
192)Some batteries can have specific
recharging rules, please ask for information
at a Fiat Dealership. Avoid the risk of
sparks that could cause an immediate
explosion. Proceed with the recharging in a
well ventilated place. Danger of serious
injury.
193)Battery fluid is poisonous and
corrosive: avoid contact with your skin and
eyes. The battery should be charged in a
well ventilated place, away from naked
flames or possible sources of sparks:
danger of explosion and fire.
194)Do not attempt to charge a frozen
battery: it must be thawed first, otherwise it
may explode. If freezing has occurred, the
battery should be checked by skilled
personnel to make sure that the internal
elements are not damaged and that the
body is not cracked, with the risk of leaking
poisonous and corrosive acid.195)Always turn off the ignition device
before working in the engine compartment
(refer to the “The keys” paragraph in the
“Knowing your vehicle” chapter).
159