check engine FIAT TALENTO 2021 Owner handbook (in English)
[x] Cancel search | Manufacturer: FIAT, Model Year: 2021, Model line: TALENTO, Model: FIAT TALENTO 2021Pages: 236, PDF Size: 4.86 MB
Page 4 of 236
READ THIS CAREFULLY
REFUELLING
Only refuel with automotive diesel conforming to the European specification EN590. The use of other products or mixtures may damage the
engine beyond repair and consequently invalidate the warranty, due to the damage caused.
STARTING THE ENGINE
Make sure that the handbrake is engaged, put the gear in neutral, fully press the clutch without pressing the accelerator, then turn the ignition
key to AVV and release it as soon as the engine has started. In versions with an electronic key, the engine will start as soon as the button on
the starter device is pressed.
PARKING ON FLAMMABLE MATERIAL
The catalytic converter develops high temperatures during operation. Do not park on grass, dry leaves, pine needles or other flammable
material: fire hazard.
RESPECTING THE ENVIRONMENT
The vehicle is fitted with a system that allows continuous diagnosis of the emission-related components in order to help protect the
environment.
ELECTRICAL ACCESSORIES
If, after buying the vehicle, you decide to add electrical accessories (with the risk of gradually draining the battery), visit a Fiat Dealership. They
can calculate the overall electrical requirement and check that the vehicle's electrical system can support the required load.
SCHEDULED SERVICING
Correct maintenance enables the vehicle to perfectly maintain performance and safety characteristics, its environmental friendliness and low
running costs over time.
Page 11 of 236
GRAPHICAL INDEX
FRONT VIEW
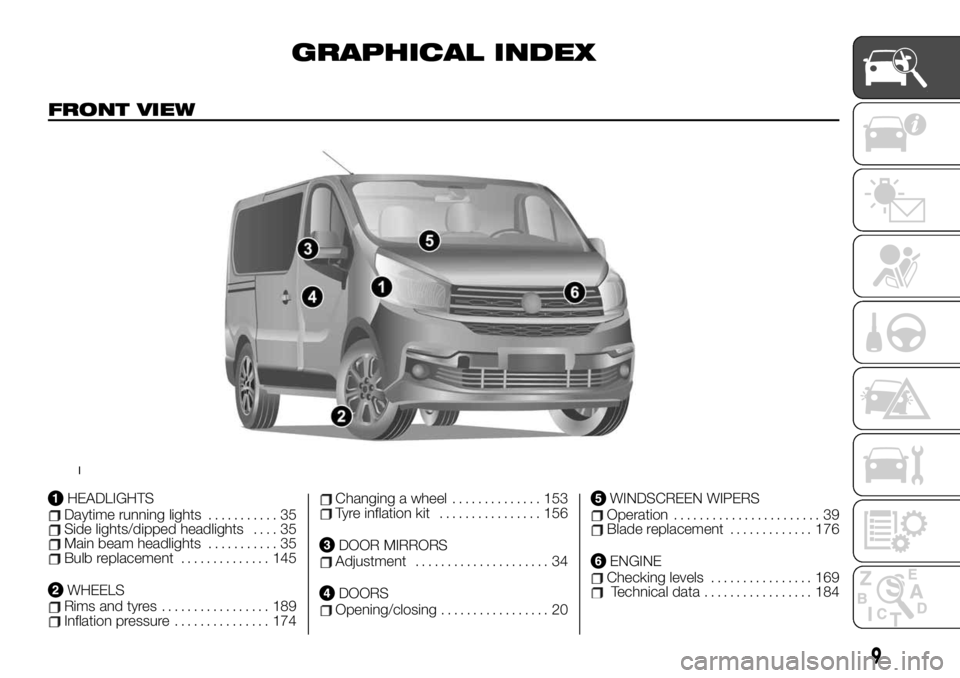
HEADLIGHTSDaytime running lights........... 35Side lights/dipped headlights.... 35Main beam headlights........... 35Bulb replacement.............. 145
WHEELSRims and tyres................. 189Inflation pressure............... 174
Changing a wheel.............. 153Tyre inflation kit................ 156
DOOR MIRRORSAdjustment..................... 34
DOORSOpening/closing................. 20
WINDSCREEN WIPERSOperation....................... 39Blade replacement............. 176
ENGINEChecking levels................ 169Technical data................. 184
1
9
Page 21 of 236
In both cases, the emergency lights will
flash five times to indicate the door is
locked.
To disable centralised closing:
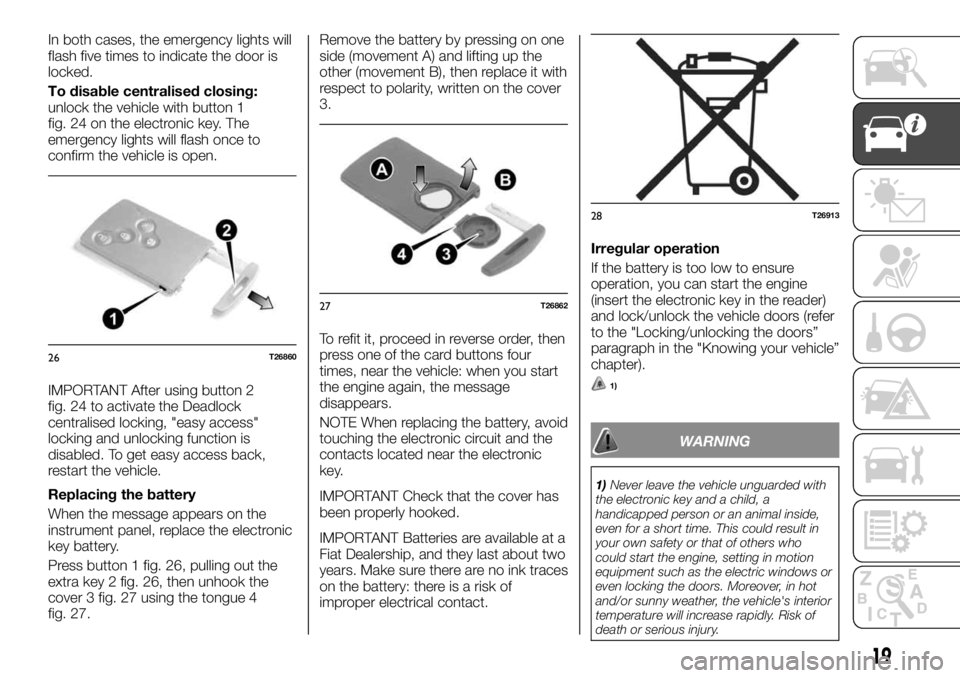
unlock the vehicle with button 1
fig. 24 on the electronic key. The
emergency lights will flash once to
confirm the vehicle is open.
IMPORTANT After using button 2
fig. 24 to activate the Deadlock
centralised locking, "easy access"
locking and unlocking function is
disabled. To get easy access back,
restart the vehicle.
Replacing the battery
When the message appears on the
instrument panel, replace the electronic
key battery.
Press button 1 fig. 26, pulling out the
extra key 2 fig. 26, then unhook the
cover 3 fig. 27 using the tongue 4
fig. 27.Remove the battery by pressing on one
side (movement A) and lifting up the
other (movement B), then replace it with
respect to polarity, written on the cover
3.
To refit it, proceed in reverse order, then
press one of the card buttons four
times, near the vehicle: when you start
the engine again, the message
disappears.
NOTE When replacing the battery, avoid
touching the electronic circuit and the
contacts located near the electronic
key.
IMPORTANT Check that the cover has
been properly hooked.
IMPORTANT Batteries are available at a
Fiat Dealership, and they last about two
years. Make sure there are no ink traces
on the battery: there is a risk of
improper electrical contact.Irregular operation
If the battery is too low to ensure
operation, you can start the engine
(insert the electronic key in the reader)
and lock/unlock the vehicle doors (refer
to the "Locking/unlocking the doors”
paragraph in the "Knowing your vehicle”
chapter).
1)
WARNING
1)Never leave the vehicle unguarded with
the electronic key and a child, a
handicapped person or an animal inside,
even for a short time. This could result in
your own safety or that of others who
could start the engine, setting in motion
equipment such as the electric windows or
even locking the doors. Moreover, in hot
and/or sunny weather, the vehicle's interior
temperature will increase rapidly. Risk of
death or serious injury.
26T26860
27T26862
28T26913
19
Page 26 of 236
Locking the openable parts without
using the key or electronic key
If, for example, a battery is dead, the
electronic key or the remote control key
is momentarily not working, etc.
Proceed as follows:
when the engine is stopped, with the
rear doors closed and a front door
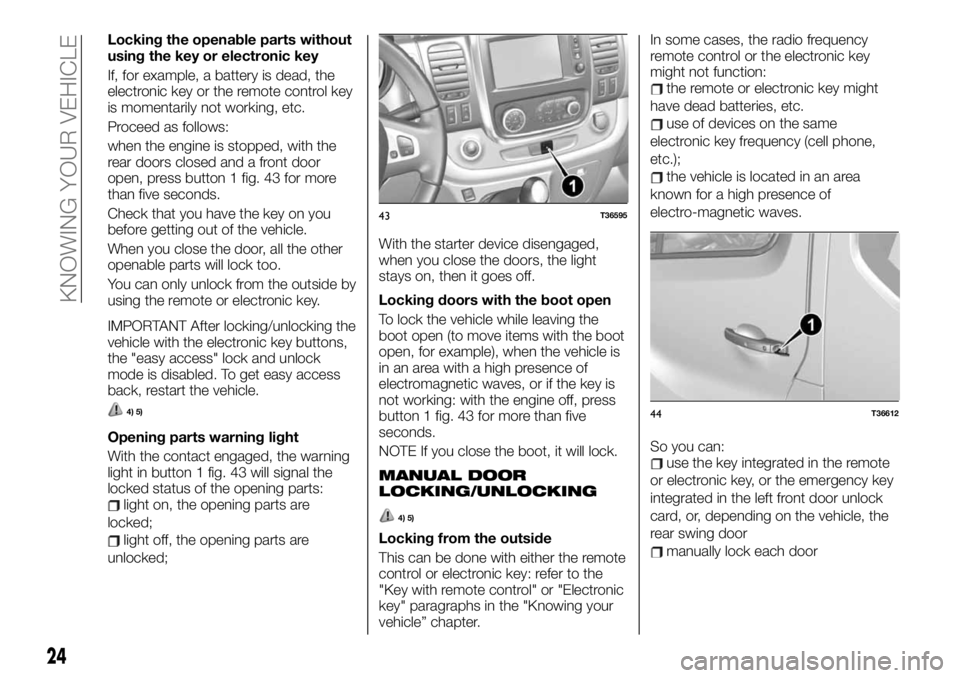
open, press button 1 fig. 43 for more
than five seconds.
Check that you have the key on you
before getting out of the vehicle.
When you close the door, all the other
openable parts will lock too.
You can only unlock from the outside by
using the remote or electronic key.
IMPORTANT After locking/unlocking the
vehicle with the electronic key buttons,
the "easy access" lock and unlock
mode is disabled. To get easy access
back, restart the vehicle.
4) 5)
Opening parts warning light
With the contact engaged, the warning
light in button 1 fig. 43 will signal the
locked status of the opening parts:
light on, the opening parts are
locked;
light off, the opening parts are
unlocked;With the starter device disengaged,
when you close the doors, the light
stays on, then it goes off.
Locking doors with the boot open
To lock the vehicle while leaving the
boot open (to move items with the boot
open, for example), when the vehicle is
in an area with a high presence of
electromagnetic waves, or if the key is
not working: with the engine off, press
button 1 fig. 43 for more than five
seconds.
NOTE If you close the boot, it will lock.
MANUAL DOOR
LOCKING/UNLOCKING
4) 5)
Locking from the outside
This can be done with either the remote
control or electronic key: refer to the
"Key with remote control" or "Electronic
key" paragraphs in the "Knowing your
vehicle” chapter.In some cases, the radio frequency
remote control or the electronic key
might not function:
the remote or electronic key might
have dead batteries, etc.
use of devices on the same
electronic key frequency (cell phone,
etc.);
the vehicle is located in an area
known for a high presence of
electro-magnetic waves.
So you can:
use the key integrated in the remote
or electronic key, or the emergency key
integrated in the left front door unlock
card, or, depending on the vehicle, the
rear swing door
manually lock each door
43T36595
44T36612
24
KNOWING YOUR VEHICLE
Page 29 of 236
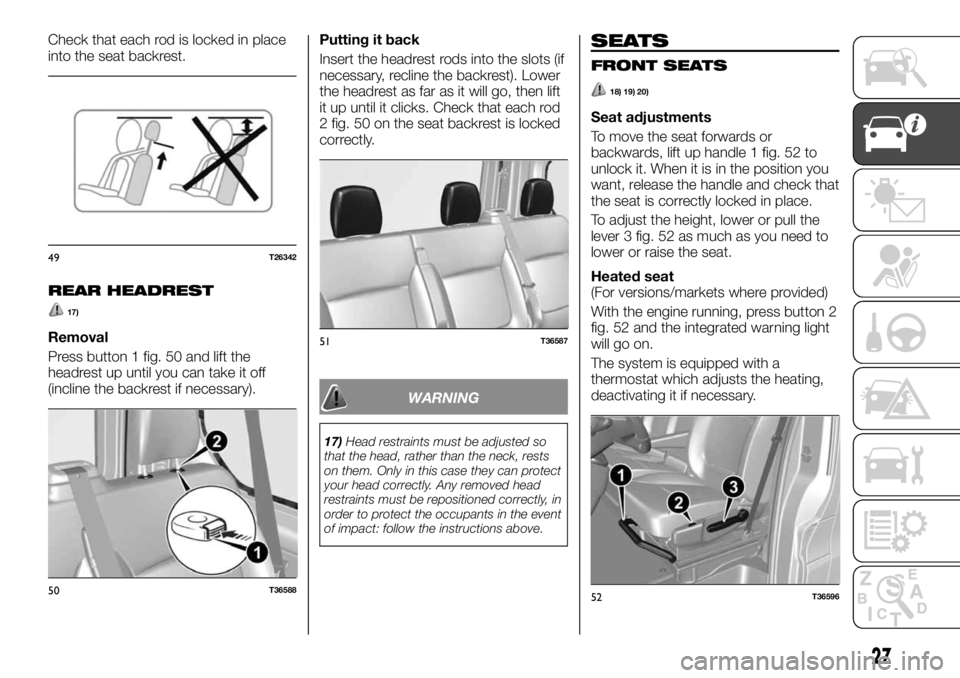
Check that each rod is locked in place
into the seat backrest.
REAR HEADREST
17)
Removal
Press button 1 fig. 50 and lift the
headrest up until you can take it off
(incline the backrest if necessary).Putting it back
Insert the headrest rods into the slots (if
necessary, recline the backrest). Lower
the headrest as far as it will go, then lift
it up until it clicks. Check that each rod
2 fig. 50 on the seat backrest is locked
correctly.
WARNING
17)Head restraints must be adjusted so
that the head, rather than the neck, rests
on them. Only in this case they can protect
your head correctly. Any removed head
restraints must be repositioned correctly, in
order to protect the occupants in the event
of impact: follow the instructions above.
SEATS
FRONT SEATS
18) 19) 20)
Seat adjustments
To move the seat forwards or
backwards, lift up handle 1 fig. 52 to
unlock it. When it is in the position you
want, release the handle and check that
the seat is correctly locked in place.
To adjust the height, lower or pull the
lever 3 fig. 52 as much as you need to
lower or raise the seat.
Heated seat
(For versions/markets where provided)
With the engine running, press button 2
fig. 52 and the integrated warning light
will go on.
The system is equipped with a
thermostat which adjusts the heating,
deactivating it if necessary.
49T26342
50T36588
51T36587
52T36596
27
Page 39 of 236
IMPORTANT The table above contains
several examples. In all cases, adjust
the control A according to the vehicle
load to illuminate the road without
dazzling other drivers.
IMPORTANT If you are driving on the
left in a vehicle equipped for left hand
drive (or vice versa), you must adjust
the headlight orientation for the duration
of the visit.
Adjusting the headlights externally
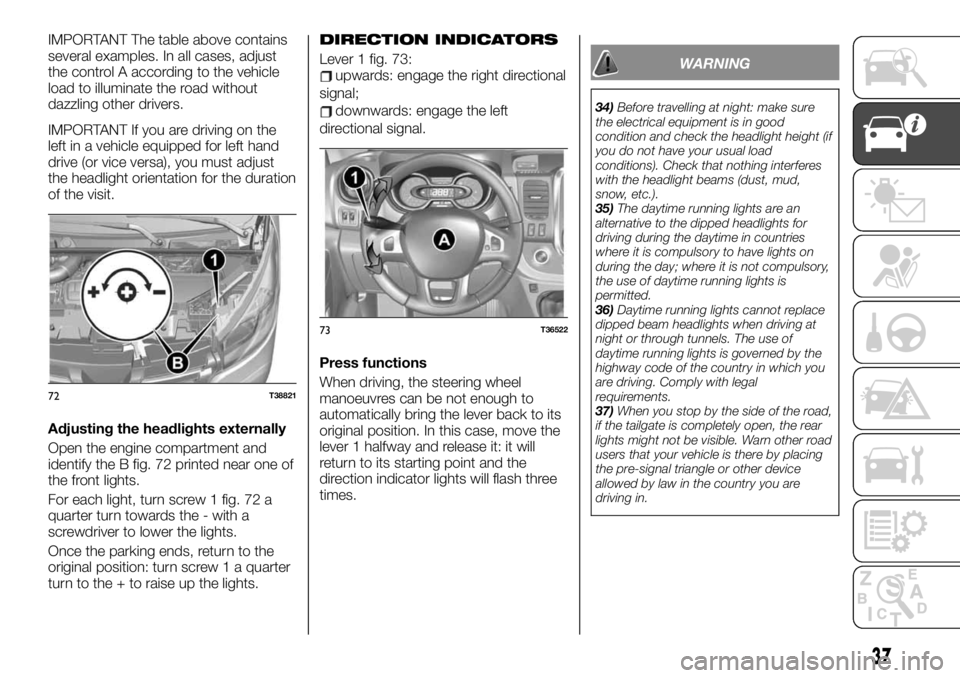
Open the engine compartment and
identify the B fig. 72 printed near one of
the front lights.
For each light, turn screw 1 fig. 72 a
quarter turn towards the - with a
screwdriver to lower the lights.
Once the parking ends, return to the
original position: turn screw 1 a quarter
turn to the + to raise up the lights.DIRECTION INDICATORS
Lever 1 fig. 73:upwards: engage the right directional
signal;
downwards: engage the left
directional signal.
Press functions
When driving, the steering wheel
manoeuvres can be not enough to
automatically bring the lever back to its
original position. In this case, move the
lever 1 halfway and release it: it will
return to its starting point and the
direction indicator lights will flash three
times.
WARNING
34)Before travelling at night: make sure
the electrical equipment is in good
condition and check the headlight height (if
you do not have your usual load
conditions). Check that nothing interferes
with the headlight beams (dust, mud,
snow, etc.).
35)The daytime running lights are an
alternative to the dipped headlights for
driving during the daytime in countries
where it is compulsory to have lights on
during the day; where it is not compulsory,
the use of daytime running lights is
permitted.
36)Daytime running lights cannot replace
dipped beam headlights when driving at
night or through tunnels. The use of
daytime running lights is governed by the
highway code of the country in which you
are driving. Comply with legal
requirements.
37)When you stop by the side of the road,
if the tailgate is completely open, the rear
lights might not be visible. Warn other road
users that your vehicle is there by placing
the pre-signal triangle or other device
allowed by law in the country you are
driving in.
72T38821
73T36522
37
Page 42 of 236
NOTE When driving, each time the
vehicle stops, the windscreen wipers
slow down: from fast to slow
continuous operation. As soon as the
vehicle moves again, the wipers return
to the initially selected speed. Any
operation of lever 1 fig. 81 takes
precedence and annuls any
automatism.
Cars with automatic windscreen
wipers
(For versions/markets where provided)
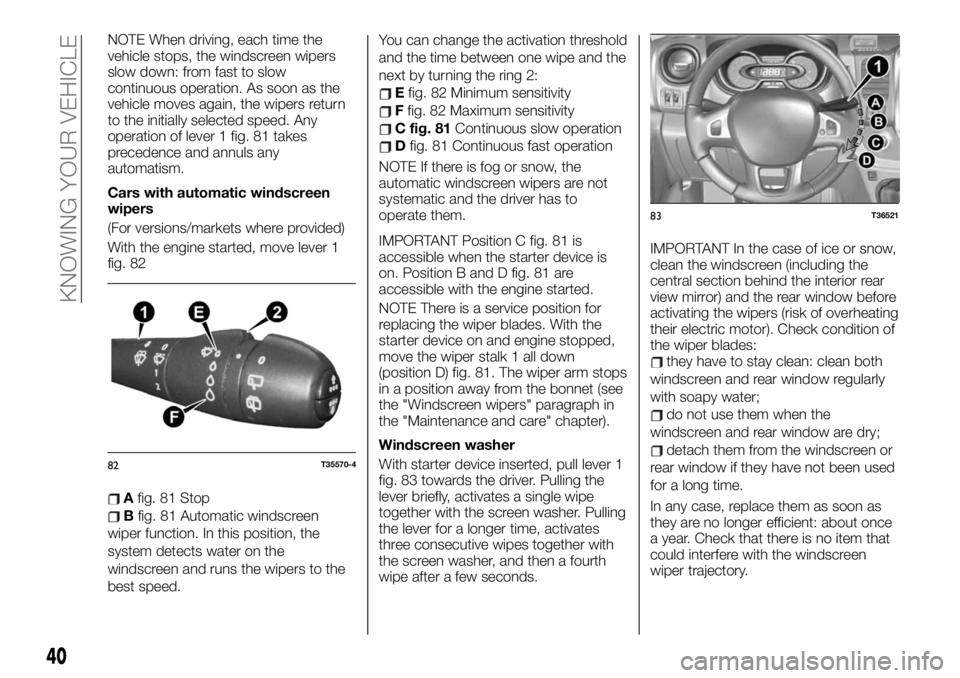
With the engine started, move lever 1
fig. 82
Afig. 81 Stop
Bfig. 81 Automatic windscreen
wiper function. In this position, the
system detects water on the
windscreen and runs the wipers to the
best speed.You can change the activation threshold
and the time between one wipe and the
next by turning the ring 2:
Efig. 82 Minimum sensitivity
Ffig. 82 Maximum sensitivity
C fig. 81Continuous slow operation
Dfig. 81 Continuous fast operation
NOTE If there is fog or snow, the
automatic windscreen wipers are not
systematic and the driver has to
operate them.
IMPORTANT Position C fig. 81 is
accessible when the starter device is
on. Position B and D fig. 81 are
accessible with the engine started.
NOTE There is a service position for
replacing the wiper blades. With the
starter device on and engine stopped,
move the wiper stalk 1 all down
(position D) fig. 81. The wiper arm stops
in a position away from the bonnet (see
the "Windscreen wipers" paragraph in
the "Maintenance and care" chapter).
Windscreen washer
With starter device inserted, pull lever 1
fig. 83 towards the driver. Pulling the
lever briefly, activates a single wipe
together with the screen washer. Pulling
the lever for a longer time, activates
three consecutive wipes together with
the screen washer, and then a fourth
wipe after a few seconds.IMPORTANT In the case of ice or snow,
clean the windscreen (including the
central section behind the interior rear
view mirror) and the rear window before
activating the wipers (risk of overheating
their electric motor). Check condition of
the wiper blades:
they have to stay clean: clean both
windscreen and rear window regularly
with soapy water;
do not use them when the
windscreen and rear window are dry;
detach them from the windscreen or
rear window if they have not been used
for a long time.
In any case, replace them as soon as
they are no longer efficient: about once
a year. Check that there is no item that
could interfere with the windscreen
wiper trajectory.
82T35570-4
83T36521
40
KNOWING YOUR VEHICLE
Page 43 of 236
REAR WINDOW WIPER /
WASHER
38) 39)
4) 5) 6)
Rear intermittent window wiper
according to speed
With the starter switch on, rotate the
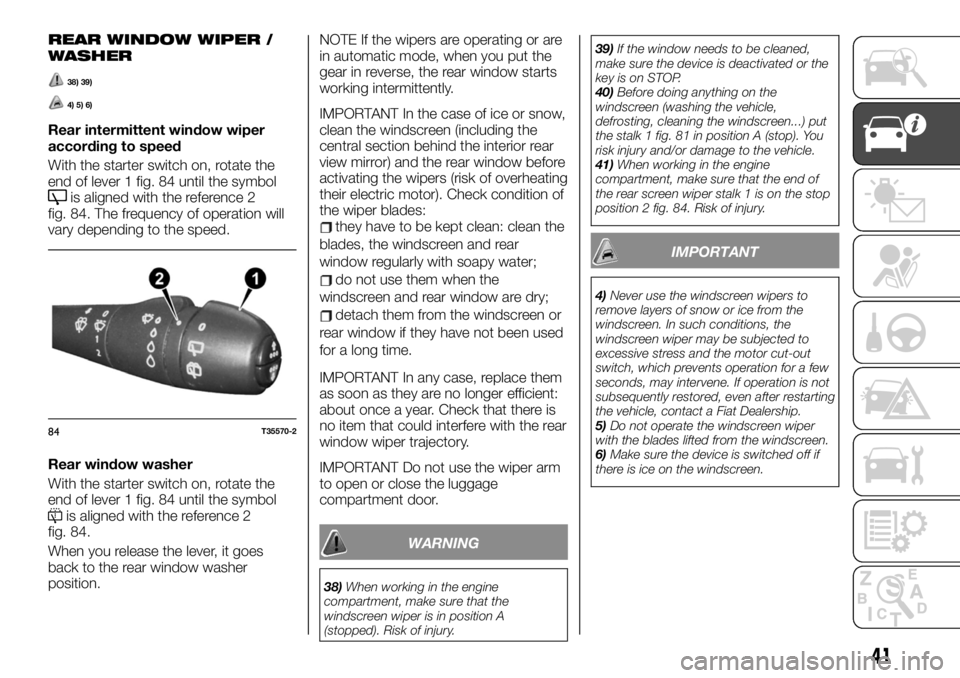
end of lever 1 fig. 84 until the symbol
is aligned with the reference 2
fig. 84. The frequency of operation will
vary depending to the speed.
Rear window washer
With the starter switch on, rotate the
end of lever 1 fig. 84 until the symbol
is aligned with the reference 2
fig. 84.
When you release the lever, it goes
back to the rear window washer
position.NOTE If the wipers are operating or are
in automatic mode, when you put the
gear in reverse, the rear window starts
working intermittently.
IMPORTANT In the case of ice or snow,
clean the windscreen (including the
central section behind the interior rear
view mirror) and the rear window before
activating the wipers (risk of overheating
their electric motor). Check condition of
the wiper blades:
they have to be kept clean: clean the
blades, the windscreen and rear
window regularly with soapy water;
do not use them when the
windscreen and rear window are dry;
detach them from the windscreen or
rear window if they have not been used
for a long time.
IMPORTANT In any case, replace them
as soon as they are no longer efficient:
about once a year. Check that there is
no item that could interfere with the rear
window wiper trajectory.
IMPORTANT Do not use the wiper arm
to open or close the luggage
compartment door.
WARNING
38)When working in the engine
compartment, make sure that the
windscreen wiper is in position A
(stopped). Risk of injury.39)If the window needs to be cleaned,
make sure the device is deactivated or the
key is on STOP.
40)Before doing anything on the
windscreen (washing the vehicle,
defrosting, cleaning the windscreen...) put
the stalk 1 fig. 81 in position A (stop). You
risk injury and/or damage to the vehicle.
41)When working in the engine
compartment, make sure that the end of
the rear screen wiper stalk 1 is on the stop
position 2 fig. 84. Risk of injury.
IMPORTANT
4)Never use the windscreen wipers to
remove layers of snow or ice from the
windscreen. In such conditions, the
windscreen wiper may be subjected to
excessive stress and the motor cut-out
switch, which prevents operation for a few
seconds, may intervene. If operation is not
subsequently restored, even after restarting
the vehicle, contact a Fiat Dealership.
5)Do not operate the windscreen wiper
with the blades lifted from the windscreen.
6)Make sure the device is switched off if
there is ice on the windscreen.
84T35570-2
41
Page 44 of 236
REFUELLING THE
VEHICLE
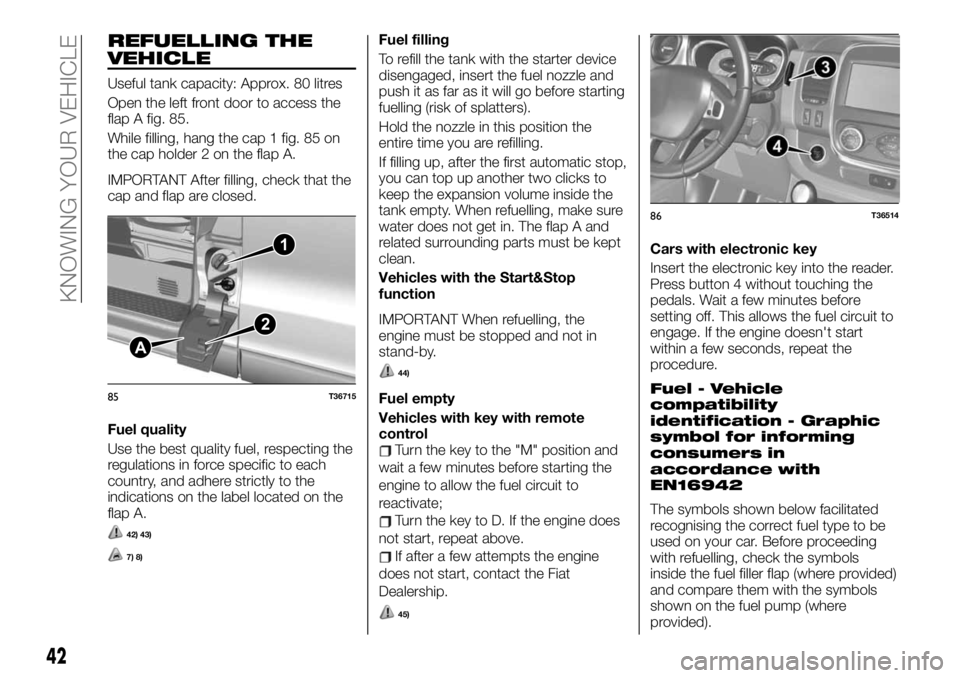
Useful tank capacity: Approx. 80 litres
Open the left front door to access the
flap A fig. 85.
While filling, hang the cap 1 fig. 85 on
the cap holder 2 on the flap A.
IMPORTANT After filling, check that the
cap and flap are closed.
Fuel quality
Use the best quality fuel, respecting the
regulations in force specific to each
country, and adhere strictly to the
indications on the label located on the
flap A.
42) 43)
7) 8)
Fuel filling
To refill the tank with the starter device
disengaged, insert the fuel nozzle and
push it as far as it will go before starting
fuelling (risk of splatters).
Hold the nozzle in this position the
entire time you are refilling.
If filling up, after the first automatic stop,
you can top up another two clicks to
keep the expansion volume inside the
tank empty. When refuelling, make sure
water does not get in. The flap A and
related surrounding parts must be kept
clean.
Vehicles with the Start&Stop
function
IMPORTANT When refuelling, the
engine must be stopped and not in
stand-by.
44)
Fuel empty
Vehicles with key with remote
control
Turn the key to the "M" position and
wait a few minutes before starting the
engine to allow the fuel circuit to
reactivate;
Turn the key to D. If the engine does
not start, repeat above.
If after a few attempts the engine
does not start, contact the Fiat
Dealership.
45)
Cars with electronic key
Insert the electronic key into the reader.
Press button 4 without touching the
pedals. Wait a few minutes before
setting off. This allows the fuel circuit to
engage. If the engine doesn't start
within a few seconds, repeat the
procedure.
Fuel - Vehicle
compatibility
identification - Graphic
symbol for informing
consumers in
accordance with
EN16942
The symbols shown below facilitated
recognising the correct fuel type to be
used on your car. Before proceeding
with refuelling, check the symbols
inside the fuel filler flap (where provided)
and compare them with the symbols
shown on the fuel pump (where
provided).
1
2
A
85T36715
86T36514
42
KNOWING YOUR VEHICLE
Page 46 of 236
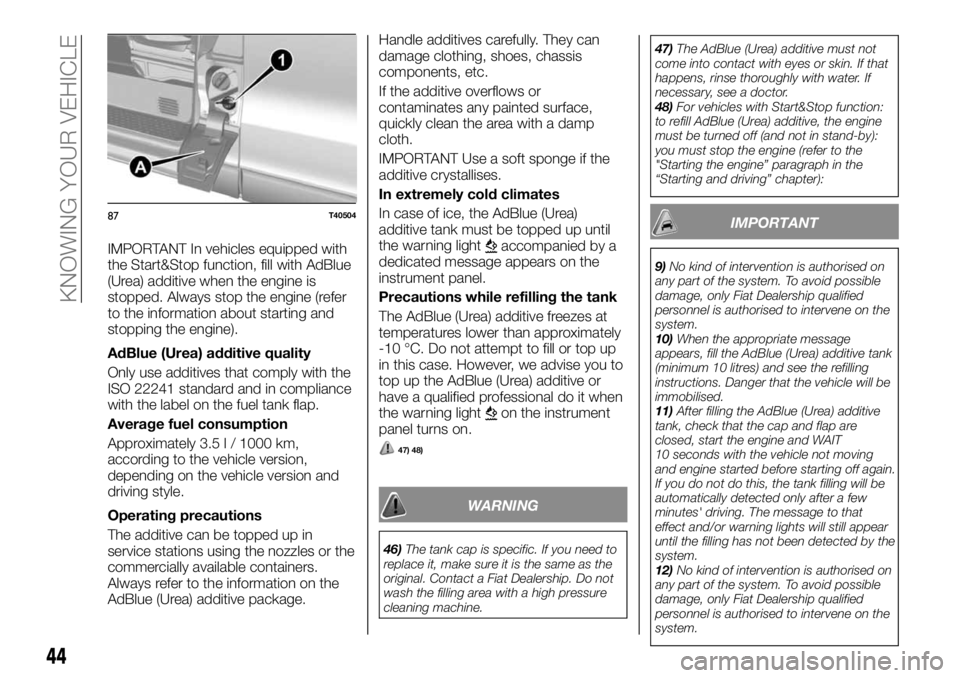
IMPORTANT In vehicles equipped with
the Start&Stop function, fill with AdBlue
(Urea) additive when the engine is
stopped. Always stop the engine (refer
to the information about starting and
stopping the engine).
AdBlue (Urea) additive quality
Only use additives that comply with the
ISO 22241 standard and in compliance
with the label on the fuel tank flap.
Average fuel consumption
Approximately 3.5 l / 1000 km,
according to the vehicle version,
depending on the vehicle version and
driving style.
Operating precautions
The additive can be topped up in
service stations using the nozzles or the
commercially available containers.
Always refer to the information on the
AdBlue (Urea) additive package.Handle additives carefully. They can
damage clothing, shoes, chassis
components, etc.
If the additive overflows or
contaminates any painted surface,
quickly clean the area with a damp
cloth.
IMPORTANT Use a soft sponge if the
additive crystallises.
In extremely cold climates
In case of ice, the AdBlue (Urea)
additive tank must be topped up until
the warning lightaccompanied by a
dedicated message appears on the
instrument panel.
Precautions while refilling the tank
The AdBlue (Urea) additive freezes at
temperatures lower than approximately
-10 °C. Do not attempt to fill or top up
in this case. However, we advise you to
top up the AdBlue (Urea) additive or
have a qualified professional do it when
the warning light
on the instrument
panel turns on.
47) 48)
WARNING
46)The tank cap is specific. If you need to
replace it, make sure it is the same as the
original. Contact a Fiat Dealership. Do not
wash the filling area with a high pressure
cleaning machine.47)The AdBlue (Urea) additive must not
come into contact with eyes or skin. If that
happens, rinse thoroughly with water. If
necessary, see a doctor.
48)For vehicles with Start&Stop function:
to refill AdBlue (Urea) additive, the engine
must be turned off (and not in stand-by):
you must stop the engine (refer to the
"Starting the engine” paragraph in the
“Starting and driving” chapter):
IMPORTANT
9)No kind of intervention is authorised on
any part of the system. To avoid possible
damage, only Fiat Dealership qualified
personnel is authorised to intervene on the
system.
10)When the appropriate message
appears, fill the AdBlue (Urea) additive tank
(minimum 10 litres) and see the refilling
instructions. Danger that the vehicle will be
immobilised.
11)After filling the AdBlue (Urea) additive
tank, check that the cap and flap are
closed, start the engine and WAIT
10 seconds with the vehicle not moving
and engine started before starting off again.
If you do not do this, the tank filling will be
automatically detected only after a few
minutes' driving. The message to that
effect and/or warning lights will still appear
until the filling has not been detected by the
system.
12)No kind of intervention is authorised on
any part of the system. To avoid possible
damage, only Fiat Dealership qualified
personnel is authorised to intervene on the
system.
87T40504
44
KNOWING YOUR VEHICLE