heating FIAT TALENTO 2021 Owner handbook (in English)
[x] Cancel search | Manufacturer: FIAT, Model Year: 2021, Model line: TALENTO, Model: FIAT TALENTO 2021Pages: 236, PDF Size: 4.86 MB
Page 13 of 236
INSTRUMENT PANEL
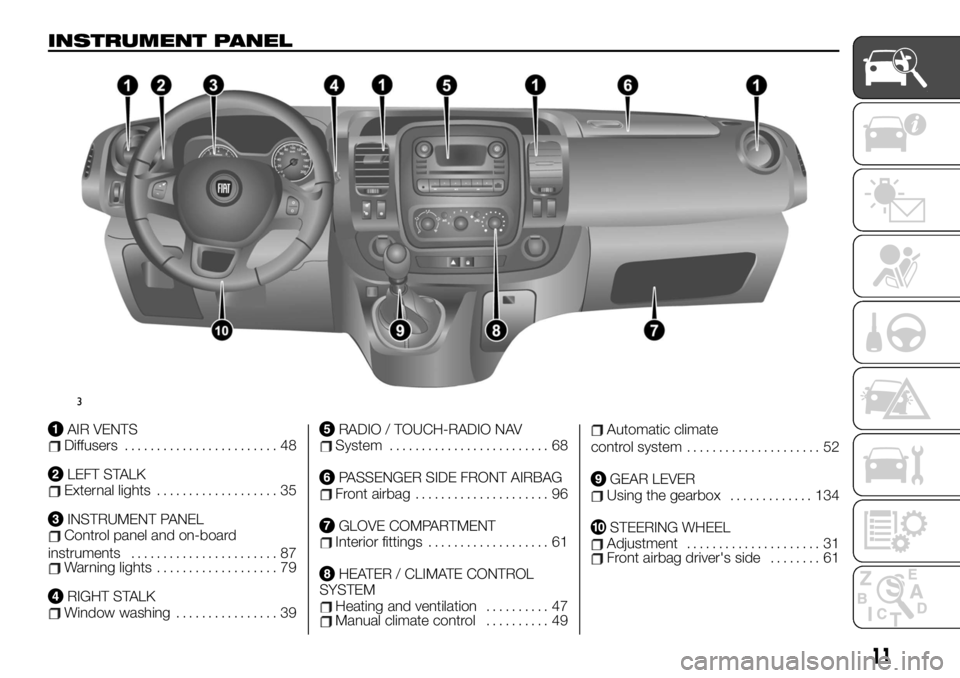
AIR VENTSDiffusers........................ 48
LEFT STALKExternal lights................... 35
INSTRUMENT PANELControl panel and on-board
instruments....................... 87
Warning lights................... 79
RIGHT STALKWindow washing................ 39
RADIO / TOUCH-RADIO NAVSystem......................... 68
PASSENGER SIDE FRONT AIRBAGFront airbag..................... 96
GLOVE COMPARTMENTInterior fittings................... 61
HEATER / CLIMATE CONTROL
SYSTEM
Heating and ventilation.......... 47Manual climate control.......... 49
Automatic climate
control system..................... 52
GEAR LEVERUsing the gearbox............. 134
STEERING WHEELAdjustment..................... 31Front airbag driver's side........ 61
3
11
Page 29 of 236
Check that each rod is locked in place
into the seat backrest.
REAR HEADREST
17)
Removal
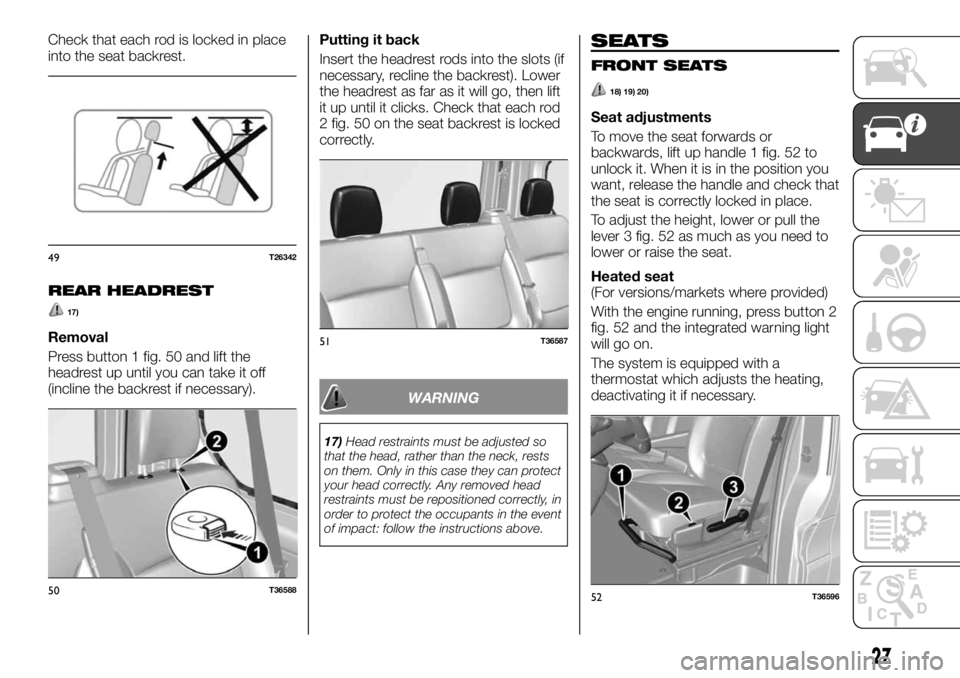
Press button 1 fig. 50 and lift the
headrest up until you can take it off
(incline the backrest if necessary).Putting it back
Insert the headrest rods into the slots (if
necessary, recline the backrest). Lower
the headrest as far as it will go, then lift
it up until it clicks. Check that each rod
2 fig. 50 on the seat backrest is locked
correctly.
WARNING
17)Head restraints must be adjusted so
that the head, rather than the neck, rests
on them. Only in this case they can protect
your head correctly. Any removed head
restraints must be repositioned correctly, in
order to protect the occupants in the event
of impact: follow the instructions above.
SEATS
FRONT SEATS
18) 19) 20)
Seat adjustments
To move the seat forwards or
backwards, lift up handle 1 fig. 52 to
unlock it. When it is in the position you
want, release the handle and check that
the seat is correctly locked in place.
To adjust the height, lower or pull the
lever 3 fig. 52 as much as you need to
lower or raise the seat.
Heated seat
(For versions/markets where provided)
With the engine running, press button 2
fig. 52 and the integrated warning light
will go on.
The system is equipped with a
thermostat which adjusts the heating,
deactivating it if necessary.
49T26342
50T36588
51T36587
52T36596
27
Page 42 of 236
NOTE When driving, each time the
vehicle stops, the windscreen wipers
slow down: from fast to slow
continuous operation. As soon as the
vehicle moves again, the wipers return
to the initially selected speed. Any
operation of lever 1 fig. 81 takes
precedence and annuls any
automatism.
Cars with automatic windscreen
wipers
(For versions/markets where provided)
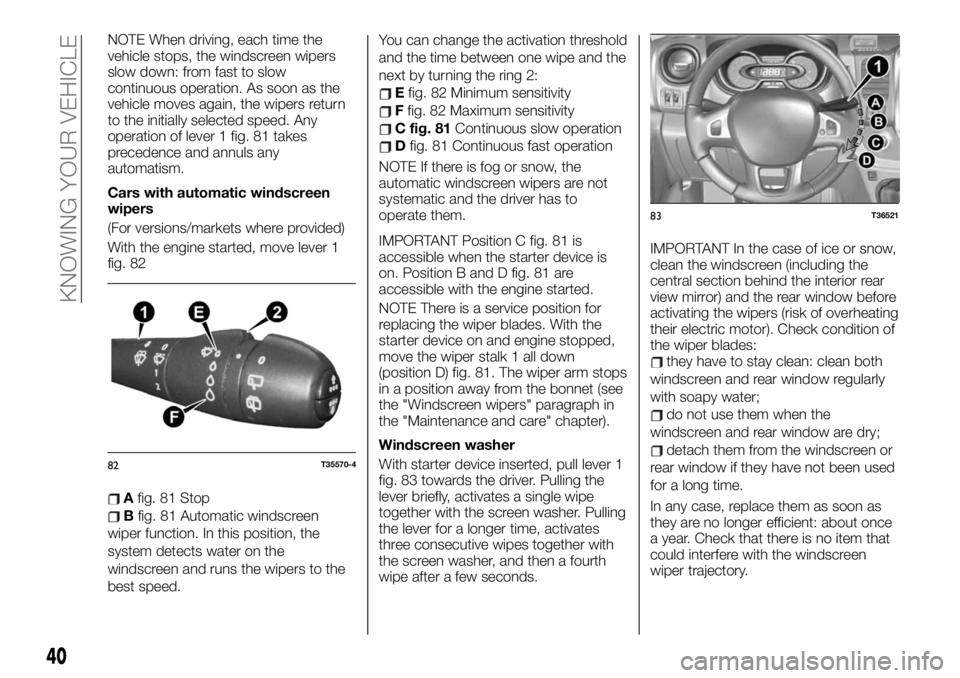
With the engine started, move lever 1
fig. 82
Afig. 81 Stop
Bfig. 81 Automatic windscreen
wiper function. In this position, the
system detects water on the
windscreen and runs the wipers to the
best speed.You can change the activation threshold
and the time between one wipe and the
next by turning the ring 2:
Efig. 82 Minimum sensitivity
Ffig. 82 Maximum sensitivity
C fig. 81Continuous slow operation
Dfig. 81 Continuous fast operation
NOTE If there is fog or snow, the
automatic windscreen wipers are not
systematic and the driver has to
operate them.
IMPORTANT Position C fig. 81 is
accessible when the starter device is
on. Position B and D fig. 81 are
accessible with the engine started.
NOTE There is a service position for
replacing the wiper blades. With the
starter device on and engine stopped,
move the wiper stalk 1 all down
(position D) fig. 81. The wiper arm stops
in a position away from the bonnet (see
the "Windscreen wipers" paragraph in
the "Maintenance and care" chapter).
Windscreen washer
With starter device inserted, pull lever 1
fig. 83 towards the driver. Pulling the
lever briefly, activates a single wipe
together with the screen washer. Pulling
the lever for a longer time, activates
three consecutive wipes together with
the screen washer, and then a fourth
wipe after a few seconds.IMPORTANT In the case of ice or snow,
clean the windscreen (including the
central section behind the interior rear
view mirror) and the rear window before
activating the wipers (risk of overheating
their electric motor). Check condition of
the wiper blades:
they have to stay clean: clean both
windscreen and rear window regularly
with soapy water;
do not use them when the
windscreen and rear window are dry;
detach them from the windscreen or
rear window if they have not been used
for a long time.
In any case, replace them as soon as
they are no longer efficient: about once
a year. Check that there is no item that
could interfere with the windscreen
wiper trajectory.
82T35570-4
83T36521
40
KNOWING YOUR VEHICLE
Page 43 of 236
REAR WINDOW WIPER /
WASHER
38) 39)
4) 5) 6)
Rear intermittent window wiper
according to speed
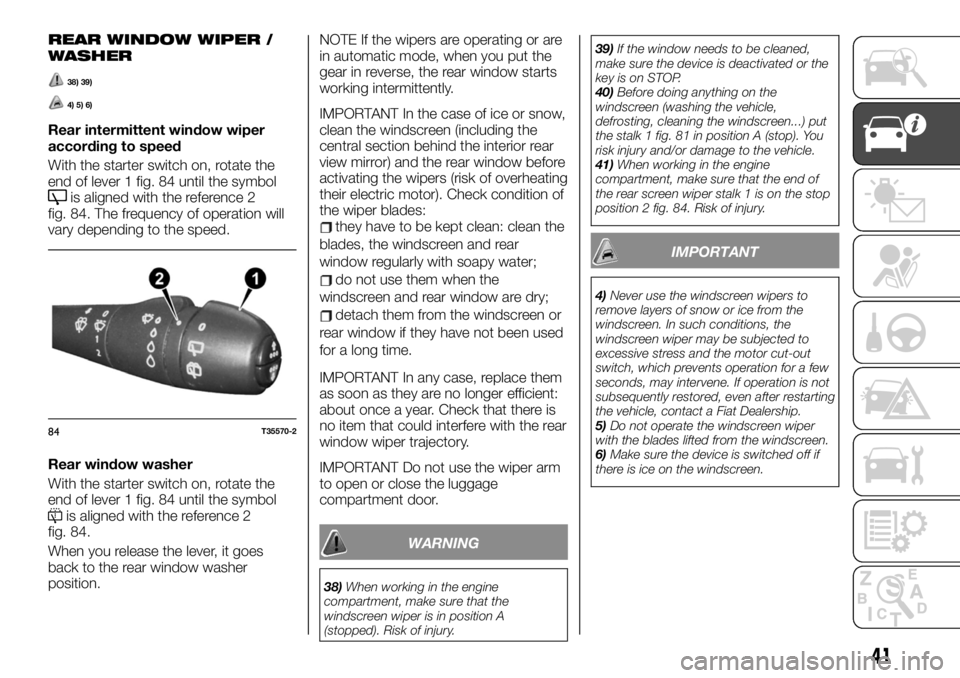
With the starter switch on, rotate the
end of lever 1 fig. 84 until the symbol
is aligned with the reference 2
fig. 84. The frequency of operation will
vary depending to the speed.
Rear window washer
With the starter switch on, rotate the
end of lever 1 fig. 84 until the symbol
is aligned with the reference 2
fig. 84.
When you release the lever, it goes
back to the rear window washer
position.NOTE If the wipers are operating or are
in automatic mode, when you put the
gear in reverse, the rear window starts
working intermittently.
IMPORTANT In the case of ice or snow,
clean the windscreen (including the
central section behind the interior rear
view mirror) and the rear window before
activating the wipers (risk of overheating
their electric motor). Check condition of
the wiper blades:
they have to be kept clean: clean the
blades, the windscreen and rear
window regularly with soapy water;
do not use them when the
windscreen and rear window are dry;
detach them from the windscreen or
rear window if they have not been used
for a long time.
IMPORTANT In any case, replace them
as soon as they are no longer efficient:
about once a year. Check that there is
no item that could interfere with the rear
window wiper trajectory.
IMPORTANT Do not use the wiper arm
to open or close the luggage
compartment door.
WARNING
38)When working in the engine
compartment, make sure that the
windscreen wiper is in position A
(stopped). Risk of injury.39)If the window needs to be cleaned,
make sure the device is deactivated or the
key is on STOP.
40)Before doing anything on the
windscreen (washing the vehicle,
defrosting, cleaning the windscreen...) put
the stalk 1 fig. 81 in position A (stop). You
risk injury and/or damage to the vehicle.
41)When working in the engine
compartment, make sure that the end of
the rear screen wiper stalk 1 is on the stop
position 2 fig. 84. Risk of injury.
IMPORTANT
4)Never use the windscreen wipers to
remove layers of snow or ice from the
windscreen. In such conditions, the
windscreen wiper may be subjected to
excessive stress and the motor cut-out
switch, which prevents operation for a few
seconds, may intervene. If operation is not
subsequently restored, even after restarting
the vehicle, contact a Fiat Dealership.
5)Do not operate the windscreen wiper
with the blades lifted from the windscreen.
6)Make sure the device is switched off if
there is ice on the windscreen.
84T35570-2
41
Page 49 of 236
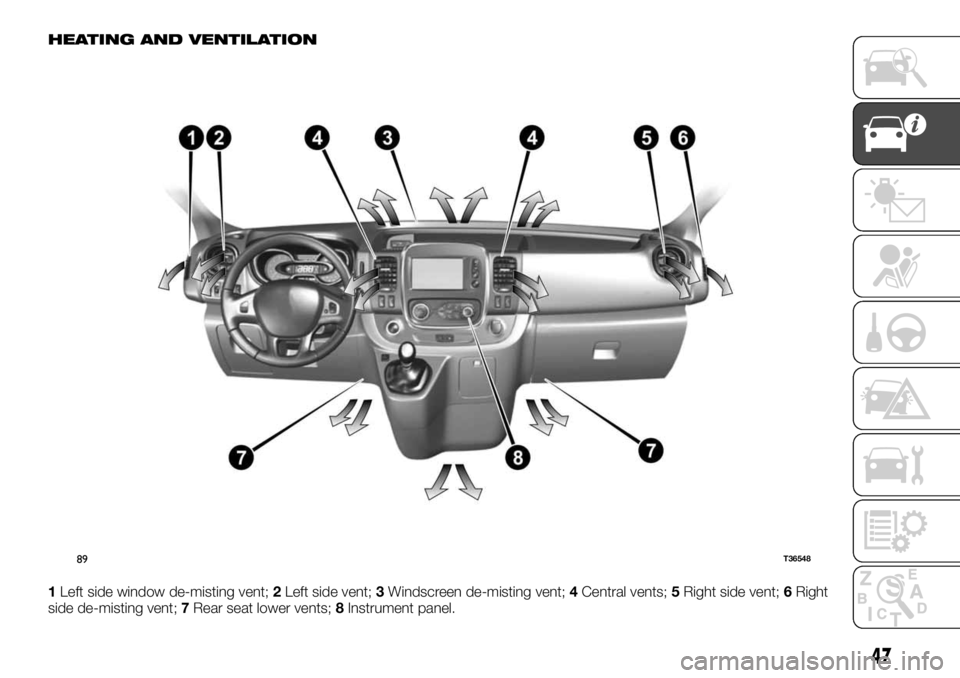
HEATING AND VENTILATION
1Left side window de-misting vent;2Left side vent;3Windscreen de-misting vent;4Central vents;5Right side vent;6Right
side de-misting vent;7Rear seat lower vents;8Instrument panel.
89T36548
47
Page 52 of 236
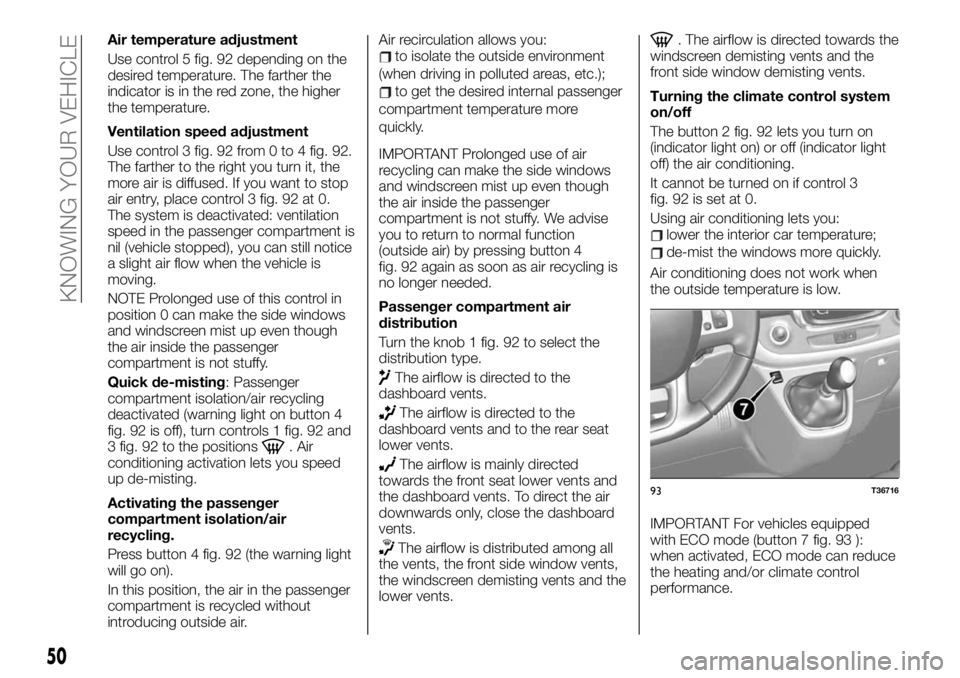
Air temperature adjustment
Use control 5 fig. 92 depending on the
desired temperature. The farther the
indicator is in the red zone, the higher
the temperature.
Ventilation speed adjustment
Use control 3 fig. 92 from 0 to 4 fig. 92.
The farther to the right you turn it, the
more air is diffused. If you want to stop
air entry, place control 3 fig. 92 at 0.
The system is deactivated: ventilation
speed in the passenger compartment is
nil (vehicle stopped), you can still notice
a slight air flow when the vehicle is
moving.
NOTE Prolonged use of this control in
position 0 can make the side windows
and windscreen mist up even though
the air inside the passenger
compartment is not stuffy.
Quick de-misting: Passenger
compartment isolation/air recycling
deactivated (warning light on button 4
fig. 92 is off), turn controls 1 fig. 92 and
3 fig. 92 to the positions
. Air
conditioning activation lets you speed
up de-misting.
Activating the passenger
compartment isolation/air
recycling.
Press button 4 fig. 92 (the warning light
will go on).
In this position, the air in the passenger
compartment is recycled without
introducing outside air.Air recirculation allows you:
to isolate the outside environment
(when driving in polluted areas, etc.);
to get the desired internal passenger
compartment temperature more
quickly.
IMPORTANT Prolonged use of air
recycling can make the side windows
and windscreen mist up even though
the air inside the passenger
compartment is not stuffy. We advise
you to return to normal function
(outside air) by pressing button 4
fig. 92 again as soon as air recycling is
no longer needed.
Passenger compartment air
distribution
Turn the knob 1 fig. 92 to select the
distribution type.
The airflow is directed to the
dashboard vents.
The airflow is directed to the
dashboard vents and to the rear seat
lower vents.
The airflow is mainly directed
towards the front seat lower vents and
the dashboard vents. To direct the air
downwards only, close the dashboard
vents.
The airflow is distributed among all
the vents, the front side window vents,
the windscreen demisting vents and the
lower vents.
. The airflow is directed towards the
windscreen demisting vents and the
front side window demisting vents.
Turning the climate control system
on/off
The button 2 fig. 92 lets you turn on
(indicator light on) or off (indicator light
off) the air conditioning.
It cannot be turned on if control 3
fig. 92 is set at 0.
Using air conditioning lets you:
lower the interior car temperature;
de-mist the windows more quickly.
Air conditioning does not work when
the outside temperature is low.
IMPORTANT For vehicles equipped
with ECO mode (button 7 fig. 93 ):
when activated, ECO mode can reduce
the heating and/or climate control
performance.
93T36716
50
KNOWING YOUR VEHICLE
Page 85 of 236
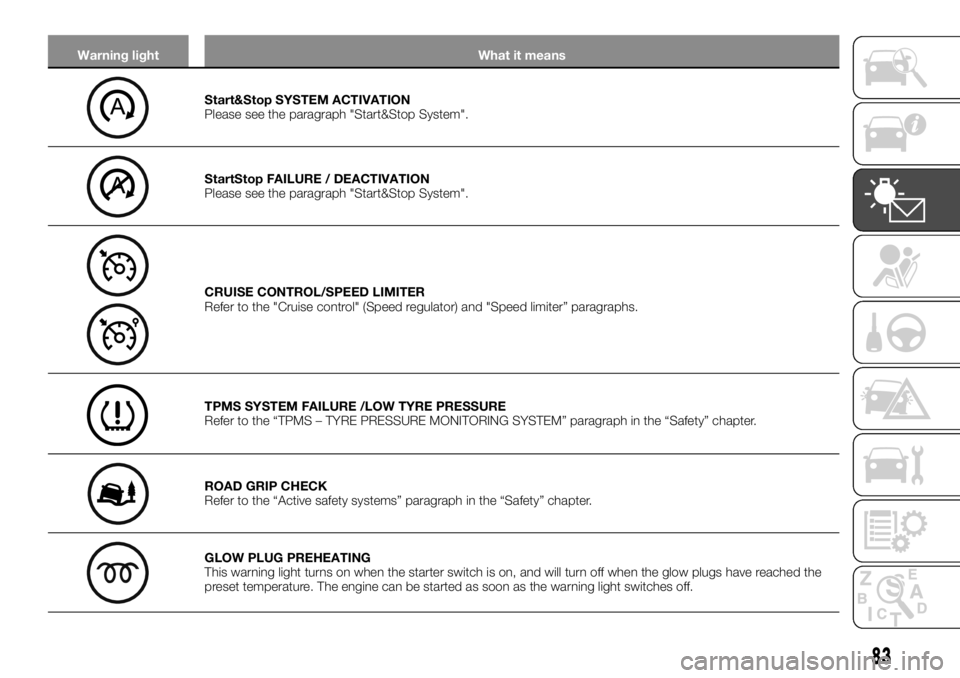
Warning light What it means
Start&Stop SYSTEM ACTIVATION
Please see the paragraph "Start&Stop System".
StartStop FAILURE / DEACTIVATION
Please see the paragraph "Start&Stop System".
CRUISE CONTROL/SPEED LIMITER
Refer to the "Cruise control" (Speed regulator) and "Speed limiter” paragraphs.
TPMS SYSTEM FAILURE /LOW TYRE PRESSURE
Refer to the “TPMS – TYRE PRESSURE MONITORING SYSTEM” paragraph in the “Safety” chapter.
ROAD GRIP CHECK
Refer to the “Active safety systems” paragraph in the “Safety” chapter.
GLOW PLUG PREHEATING
This warning light turns on when the starter switch is on, and will turn off when the glow plugs have reached the
preset temperature. The engine can be started as soon as the warning light switches off.
83
Page 134 of 236
ENGINE RUN-IN
Until you have gone 1,500 km, do not
exceed 130 km/h on the highest ratio,
or 2,500 rpm. After that mileage, you
can push the engine harder, but the
vehicle will perform better only after
having travelled 6,000 kilometres.
During the running-in period, do not
accelerate abruptly while the engine is
cold, and avoid running it too fast.
Coupon frequency:refer to the
"Scheduled Service Plan".
STARTING THE
ENGINE
149) 150) 151) 152) 153)
Vehicles with a key and remote
control
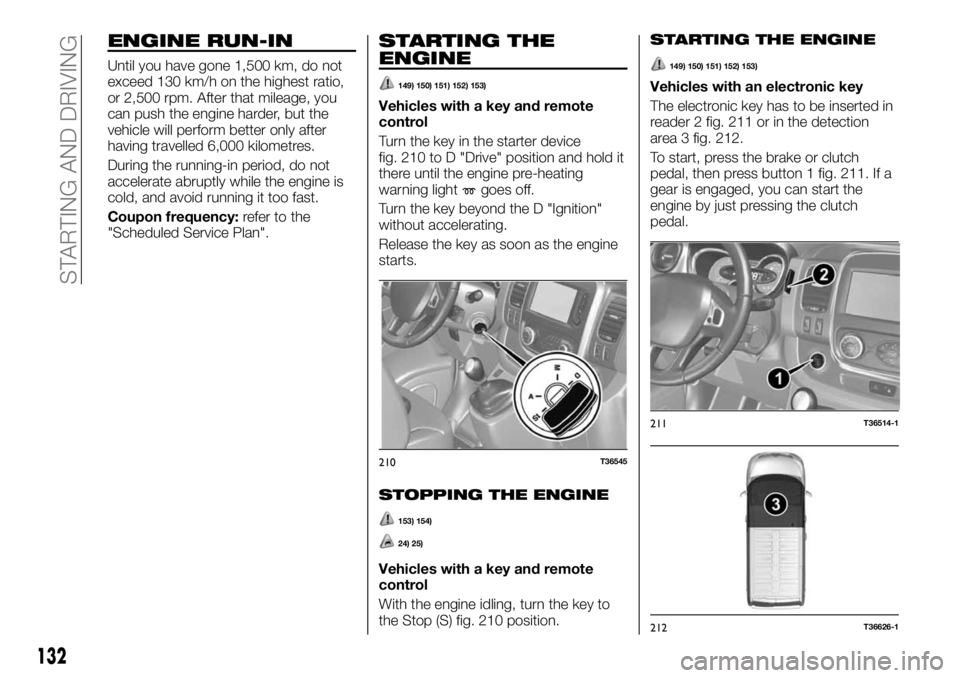
Turn the key in the starter device
fig. 210 to D "Drive" position and hold it
there until the engine pre-heating
warning light
goes off.
Turn the key beyond the D "Ignition"
without accelerating.
Release the key as soon as the engine
starts.
STOPPING THE ENGINE
153) 154)
24) 25)
Vehicles with a key and remote
control
With the engine idling, turn the key to
the Stop (S) fig. 210 position.
STARTING THE ENGINE
149) 150) 151) 152) 153)
Vehicles with an electronic key
The electronic key has to be inserted in
reader 2 fig. 211 or in the detection
area 3 fig. 212.
To start, press the brake or clutch
pedal, then press button 1 fig. 211. If a
gear is engaged, you can start the
engine by just pressing the clutch
pedal.
210T36545
211T36514-1
212T36626-1
132
STARTING AND DRIVING
Page 142 of 236
A general grade from 0 to 100 appears
that allows you to assess your
ecological driving performance: high
values mean reduced fuel consumption.
Below is some ecological advice to
improve your performance. Store your
preferred routes lets you compare
performances. For further information,
refer to the RADIO/TOUCH – RADIO
NAV supplement.
ECOMODE
ECOMODE is a function that optimises
fuel consumption. It acts on a few of
the vehicle's uses (heating, air
conditioning, power steering, etc.) and
on a few driving operations
(acceleration, gear shift, speed
regulation, deceleration, etc.).
Activation of the function
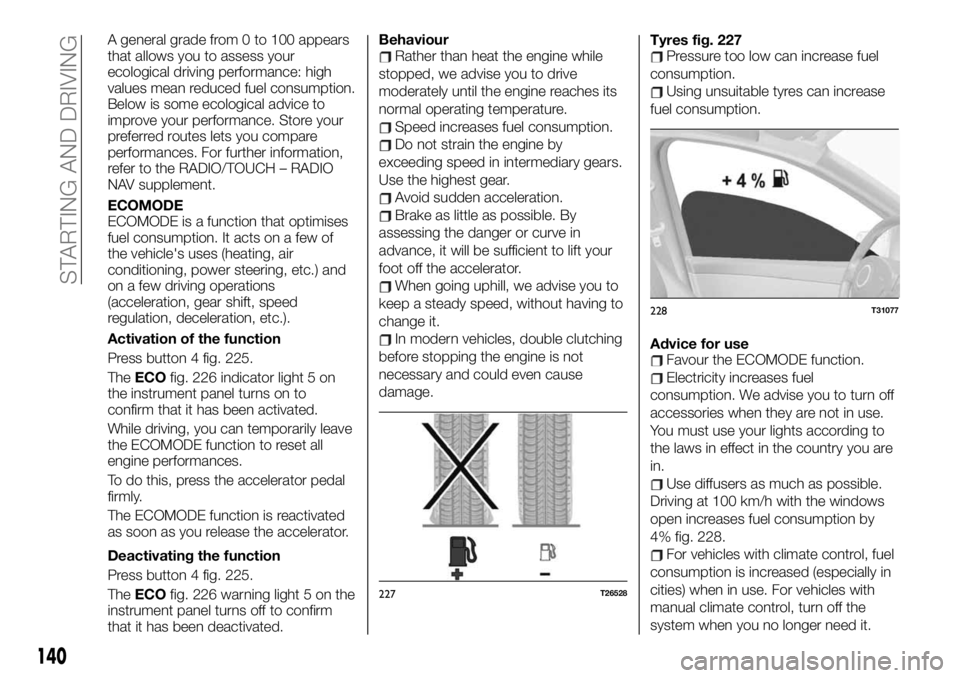
Press button 4 fig. 225.
TheECOfig. 226 indicator light 5 on
the instrument panel turns on to
confirm that it has been activated.
While driving, you can temporarily leave
the ECOMODE function to reset all
engine performances.
To do this, press the accelerator pedal
firmly.
The ECOMODE function is reactivated
as soon as you release the accelerator.
Deactivating the function
Press button 4 fig. 225.
TheECOfig. 226 warning light 5 on the
instrument panel turns off to confirm
that it has been deactivated.BehaviourRather than heat the engine while
stopped, we advise you to drive
moderately until the engine reaches its
normal operating temperature.
Speed increases fuel consumption.
Do not strain the engine by
exceeding speed in intermediary gears.
Use the highest gear.
Avoid sudden acceleration.
Brake as little as possible. By
assessing the danger or curve in
advance, it will be sufficient to lift your
foot off the accelerator.
When going uphill, we advise you to
keep a steady speed, without having to
change it.
In modern vehicles, double clutching
before stopping the engine is not
necessary and could even cause
damage.Tyres fig. 227
Pressure too low can increase fuel
consumption.
Using unsuitable tyres can increase
fuel consumption.
Advice for use
Favour the ECOMODE function.
Electricity increases fuel
consumption. We advise you to turn off
accessories when they are not in use.
You must use your lights according to
the laws in effect in the country you are
in.
Use diffusers as much as possible.
Driving at 100 km/h with the windows
open increases fuel consumption by
4% fig. 228.
For vehicles with climate control, fuel
consumption is increased (especially in
cities) when in use. For vehicles with
manual climate control, turn off the
system when you no longer need it.
227T26528
228T31077
140
STARTING AND DRIVING
Page 153 of 236
No. Destination No. Destination No. Destination
1APC charger forvehicles with
electronic key10 Predisposition for towing system 19 Heater
2Free11Timer battery, central passenger
compartment unit20Rearscreen wipers, window washer
pump, horn
3Free12Right daytime running lights, front
parking lights, right high beam, left low
beam21 General APC charger
4+ battery for vehicles with
electronic key13Danger warning lights, direction
indicators22 Reversing lights
5 Additional air conditioning 14 Locking the opening parts 23 Stop switch
6 Additional cabin heating 15Left daytime running lights, rear parking
lights, left high beam, right low beam24
Injection, ignition
(1)
7Electric rear view mirrors,
complementary central
adaptation unit16Licence plate light, front and rear fog
lights25
Air bag, steering wheel lock(1)
8 Rear view mirror defroster 17Alarms, acoustic warnings, light and
windscreen wiper levers26 Passenger's electric window
9Radio, multi-media system, rear
view mirror, diagnostic socket.18 Instrument panel 27
Power steering
(1)
(1) Contact a Fiat Dealership to replace these fuses.
151