ECO mode FIAT TEMPRA 1988 Service And Repair Manual
[x] Cancel search | Manufacturer: FIAT, Model Year: 1988, Model line: TEMPRA, Model: FIAT TEMPRA 1988Pages: 171, PDF Size: 18.05 MB
Page 5 of 171
Please read the whole of the CHAPTER 1, SAFETY FIRST! before carrying out any work on your car.
CHAPTER 2
USING YOUR CAR
This Chapter is taken from
FIAT's own official Handbooks
on the Tipo and Tempra. It
contains important and
helpful information for the
operation of your FIAT Tipo or
Tempra.
KEYS AND LOCKS
• 1. DOORS AMD BONNET
DOOR LOCKS
Most FIAT Tipos and Tempras have manual locking. You
turn the key in the lock in the normal way to lock and
unlock the door.
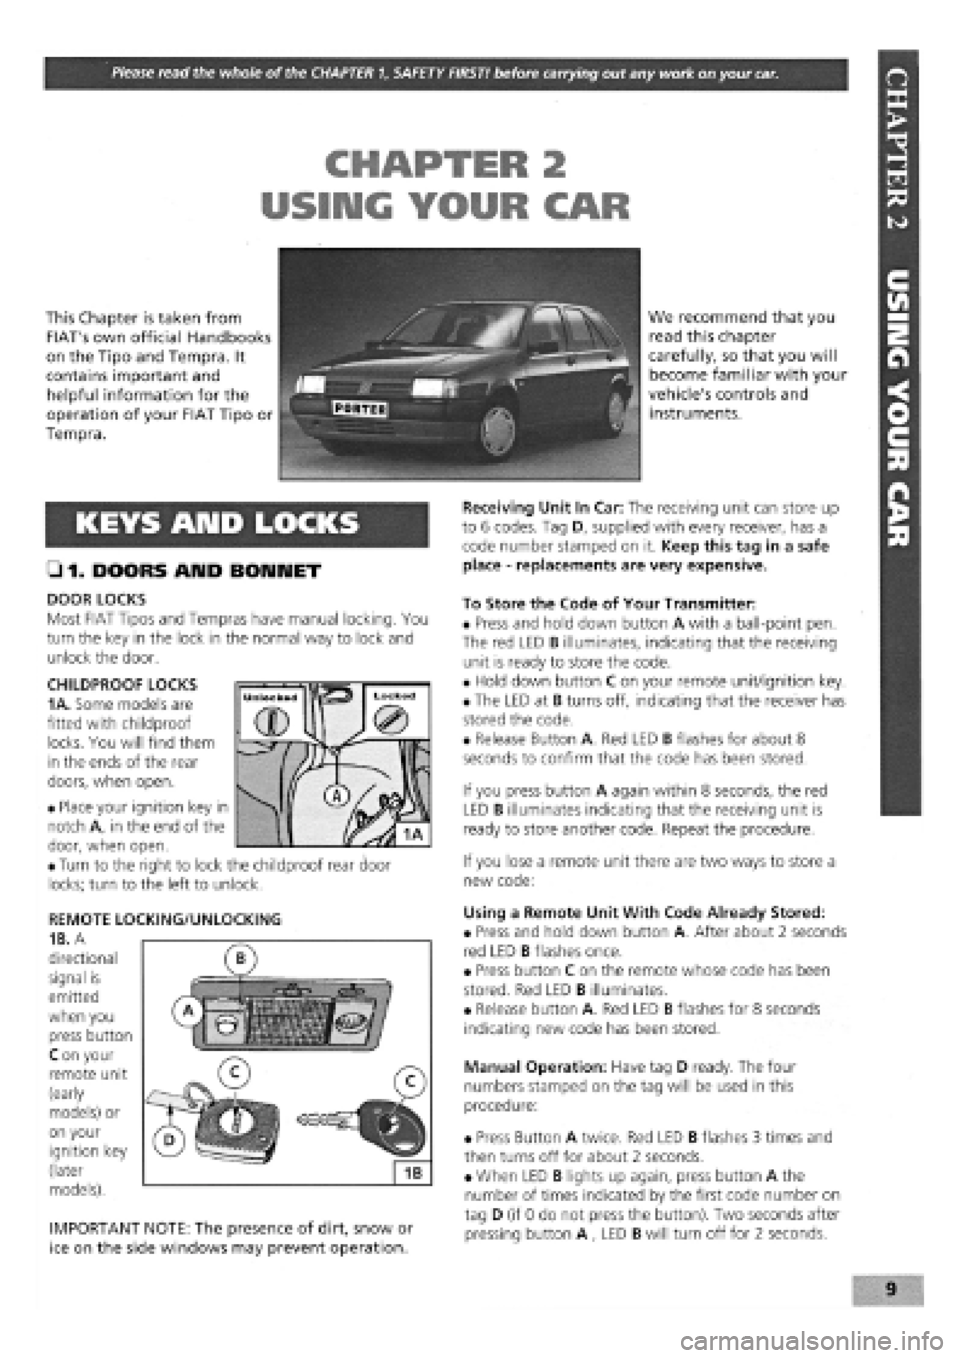
CHILDPROOF LOCKS
1 A.
Some models are
fitted with childproof
locks. You will find them
in the ends of the rear
doors, when open.
• Place your ignition key in
notch A, in the end of the
door, when open.
• Turn to the right to lock the childproof rear door
locks; turn to the left to unlock.
REMOTE LOCKING/UNLOCKING
1B. A
directional
signal is
emitted
when you
press button
C on your
remote unit
(early
models) or
on your
ignition key
(later
models).
IMPORTANT NOTE: The presence of dirt, snow or
ice on the side windows may prevent operation.
We recommend that you
read this chapter
carefully, so that you will
become familiar with your
vehicle's controls and
instruments.
Receiving Unit In Car: The receiving unit can store up
to 6 codes. Tag D, supplied with every receiver, has a
code number stamped on it. Keep this tag in a safe
place
-
replacements are very expensive.
To Store the Code of Your Transmitter:
• Press and hold down button A with a ball-point pen.
The red LED B illuminates, indicating that the receiving
unit is ready to store the code.
• Hold down button C on your remote unit/ignition key.
• The LED at B turns off, indicating that the receiver has
stored the code.
• Release Button A. Red LED B flashes for about 8
seconds to confirm that the code has been stored.
If you press button A again within 8 seconds, the red
LED B illuminates indicating that the receiving unit is
ready to store another code. Repeat the procedure.
If you lose a remote unit there are two ways to store a
new code:
Using a Remote Unit With Code Already Stored:
• Press and hold down button A. After about 2 seconds
red LED B flashes once.
• Press button C on the remote whose code has been
stored. Red LED B illuminates.
• Release button A. Red LED B flashes for 8 seconds
indicating new code has been stored.
Manual Operation: Have tag D ready. The four
numbers stamped on the tag will be used in this
procedure:
• Press Button A twice. Red LED B flashes 3 times and
then turns off for about 2 seconds.
• When LED B lights up again, press button A the
number of times indicated by the first code number on
tag D (if 0 do not press the button). Two seconds after
pressing button A , LED B will turn off for 2 seconds.
Page 6 of 171
• Repeat this operation three more times until the
complete code number has been entered, if the code
has been entered in correctly LED B will start flashing.
• Release button A (see illustration
1B).
Red LED B
flashes for 8 seconds indicating the new remote unit's
code has been stored.
IMPORTANT NOTE: If the LED does not illuminate
when remote unit button (illustration 1B, button
O is pressed, change the remote unit's battery.
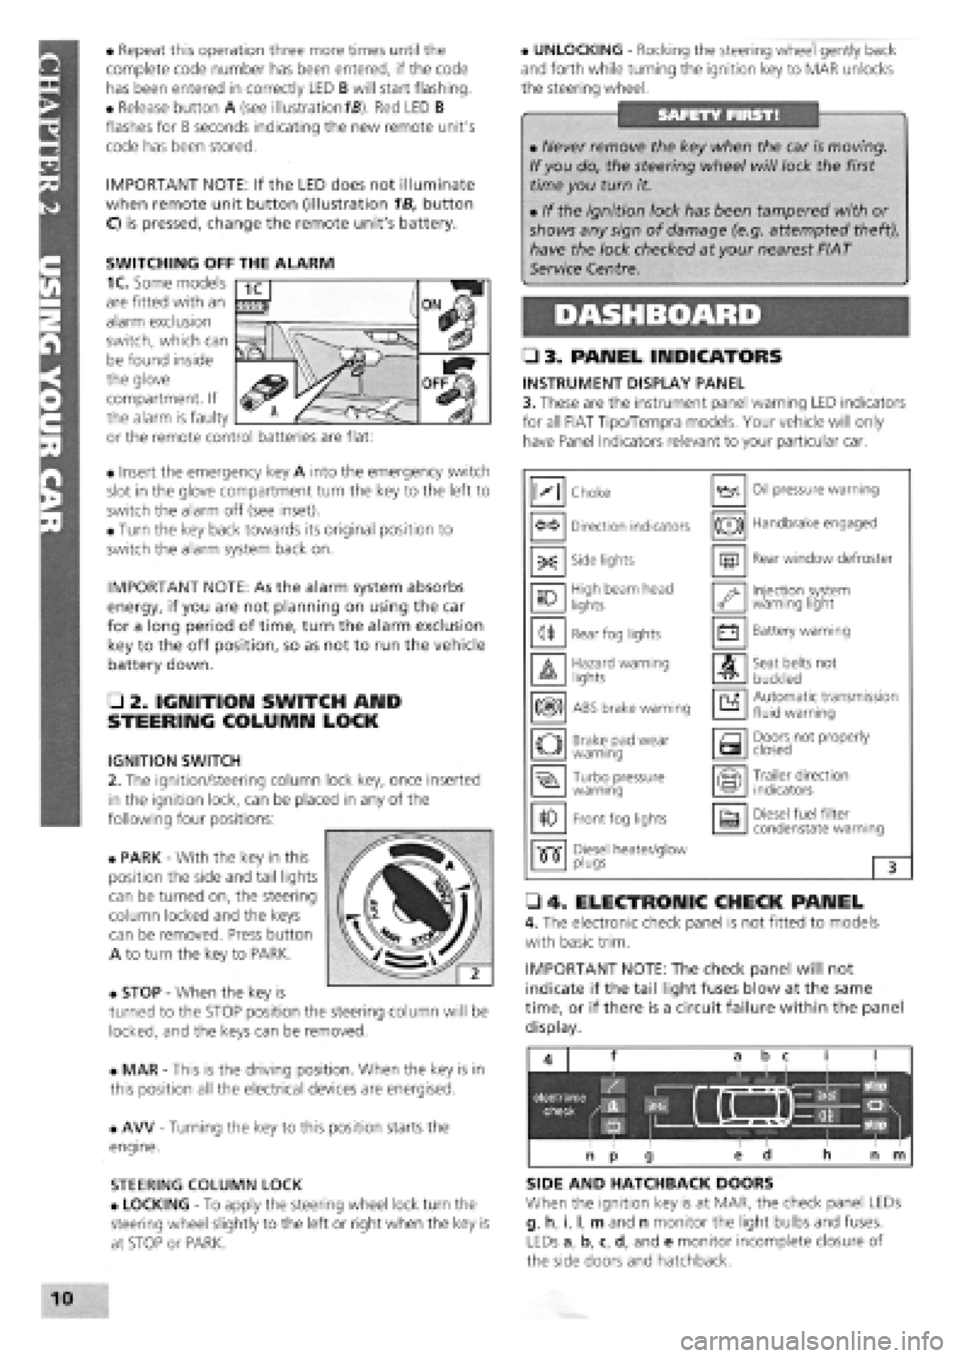
• Insert the emergency key A into the emergency switch
slot in the glove compartment turn the key to the left to
switch the alarm off (see inset).
• Turn the key back towards its original position to
switch the alarm system back on.
IMPORTANT NOTE: As the alarm system absorbs
energy, if you are not planning on using the car
for a long period of time, turn the alarm exclusion
key to the off position, so as not to run the vehicle
battery down.
• 2. IGNITION SWITCH AND
STEERING COLUMN LOCK
IGNITION SWITCH
2. The ignition/steering column lock key, once inserted
in the ignition lock, can be placed in any of the
following four positions:
• PARK
-
With the key in this
position the side and tail lights
can be turned on, the steering
column locked and the keys
can be removed. Press button
A to turn the key to PARK.
• STOP
-
When the key is
turned to the STOP position the steering column will be
locked, and the keys can be removed.
• MAR
-
This is the driving position. When the key is in
this position all the electrical devices are energised.
• AW
-
Turning the key to this position starts the
engine.
STEERING COLUMN LOCK
• LOCKING
-
To apply the steering wheel lock turn the
steering wheel slightly to the left or right when the key is
at STOP or PARK.
• UNLOCKING
-
Rocking the steering wheel gently back
and forth while turning the ignition key to MAR unlocks
the steering wheel.
• 3. PANEL INDICATORS
INSTRUMENT DISPLAY PANEL
3. These are the instrument panel warning LED indicators
for all FIAT Tipo/Tempra models. Your vehicle will only
have Panel Indicators relevant to your particular car.
• 4. ELECTRONIC CHECK PANEL
4. The electronic check panel is not fitted to models
with basic trim.
IMPORTANT NOTE: The check panel will not
indicate if the tail light fuses blow at the same
time, or if there is a circuit failure within the panel
display.
SIDE AND HATCHBACK DOORS
When the ignition key is at MAR, the check panel LEDs
g, h, i, I, m and n monitor the light bulbs and fuses.
LEDs a, b, c, d, and e monitor incomplete closure of
the side doors and hatchback.
• Never remove the key when the car is moving.
If you do, the steering wheel will lock the first
time you turn it.
• If the ignition lock has been tampered with or
shows any sign of damage (e.g. attempted theft),
have the lock checked at your nearest FIAT
Service Centre.
M Choke Oil pressure warning
Direction indicators (®) Handbrake engaged
-X: Side lights m Rear window defroster
10 High beam head
lights '•y Injection system warning light
<1* Rear fog lights • Battery warning
A Hazard warning lights A Seat belts not
buckled
m ABS brake warning a Automatic transmission fluid warning
o Brake pad wear warning a Doors not properly closed
Turbo pressure warning Trailer direction indicators
10 Front fog lights a Diesel fuel filter condenstate warning
•515" Diesel heater/glow •515" plugs 3
SWITCHING OFF THE ALARM
1C. Some models
are fitted with an
alarm exclusion
switch, which can
be found inside
the glove
compartment. If
the alarm is faulty
or the remote control batteries are flat:
Page 8 of 171
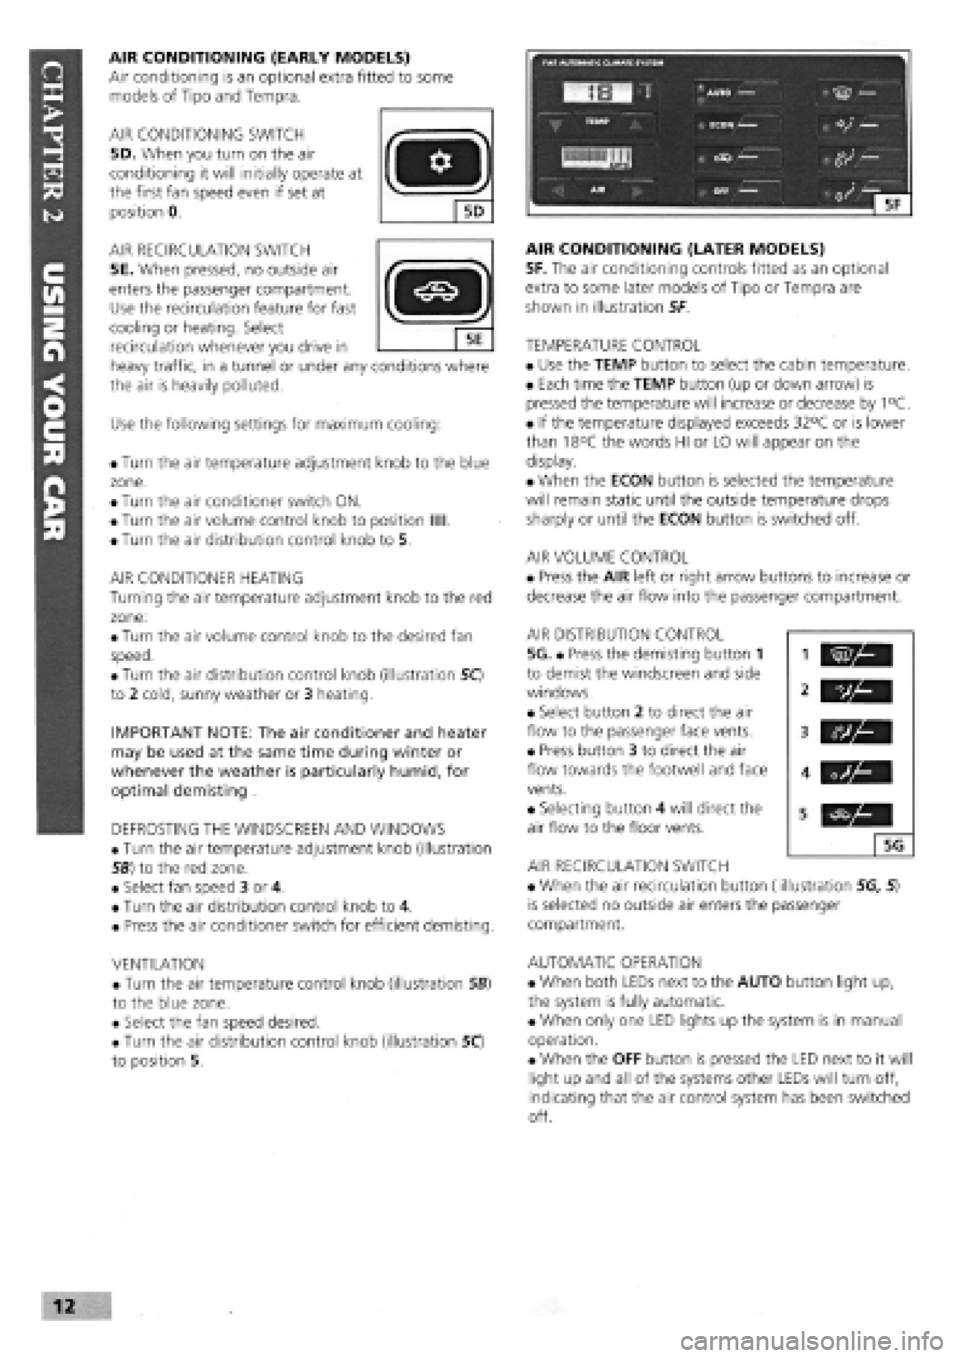
AIR CONDITIONING (EARLY MODELS)
Air conditioning is an optional extra fitted to some
models of Tipo and Tempra.
AIR CONDITIONING SWITCH
5D. When you turn on the air
conditioning it will initially operate at
the first fan speed even if set at
position 0.
AIR RECIRCULATION SWITCH
5E. When pressed, no outside air
enters the passenger compartment.
Use the recirculation feature for fast
cooling or heating. Select
recirculation whenever you drive in
heavy traffic, in a tunnel or under any conditions where
the air is heavily polluted.
Use the following settings for maximum cooling:
• Turn the air temperature adjustment knob to the blue
zone.
• Turn the air conditioner switch ON.
• Turn the air volume control knob to position Mil.
• Turn the air distribution control knob to 5.
AIR CONDITIONER HEATING
Turning the air temperature adjustment knob to the red
zone:
• Turn the air volume control knob to the desired fan
speed.
• Turn the air distribution control knob (illustration 50
to 2 cold, sunny weather or 3 heating.
IMPORTANT NOTE: The air conditioner and heater
may be used at the same time during winter or
whenever the weather is particularly humid, for
optimal demisting .
DEFROSTING THE WINDSCREEN AND WINDOWS
• Turn the air temperature adjustment knob (illustration
56) to the red zone.
• Select fan speed 3 or 4.
• Turn the air distribution control knob to 4.
• Press the air conditioner switch for efficient demisting.
VENTILATION
• Turn the air temperature control knob (illustration SB)
to the blue zone.
• Select the fan speed desired.
• Turn the air distribution control knob (illustration 50
to position 5.
AIR CONDITIONING (LATER MODELS)
5F. The air conditioning controls fitted as an optional
extra to some later models of Tipo or Tempra are
shown in illustration 5F
TEMPERATURE CONTROL
• Use the TEMP button to select the cabin temperature.
• Each time the TEMP button (up or down arrow) is
pressed the temperature will increase or decrease by 1°C.
• If the temperature displayed exceeds 32°C or is lower
than 18°C the words HI or LO will appear on the
display.
• When the ECON button is selected the temperature
will remain static until the outside temperature drops
sharply or until the ECON button is switched off.
AIR VOLUME CONTROL
• Press the AIR left or right arrow buttons to increase or
decrease the air flow into the passenger compartment.
AIR DISTRIBUTION CONTROL
5G. • Press the demisting button 1
to demist the windscreen and side
windows.
• Select button 2 to direct the air
flow to the passenger face vents.
• Press button 3 to direct the air
flow towards the footwell and face
vents.
• Selecting button 4 will direct the
air flow to the floor vents.
AIR RECIRCULATION SWITCH
• When the air recirculation button (illustration 5G, 5)
is selected no outside air enters the passenger
compartment.
AUTOMATIC OPERATION
• When both LEDs next to the AUTO button light up,
the system is fully automatic.
• When only one LED lights up the system is in manual
operation.
• When the OFF button is pressed the LED next to it will
light up and all of the systems other LEDs will turn off,
indicating that the air control system has been switched
off.
vh
5G
Page 12 of 171
EMERGENCY STARTING
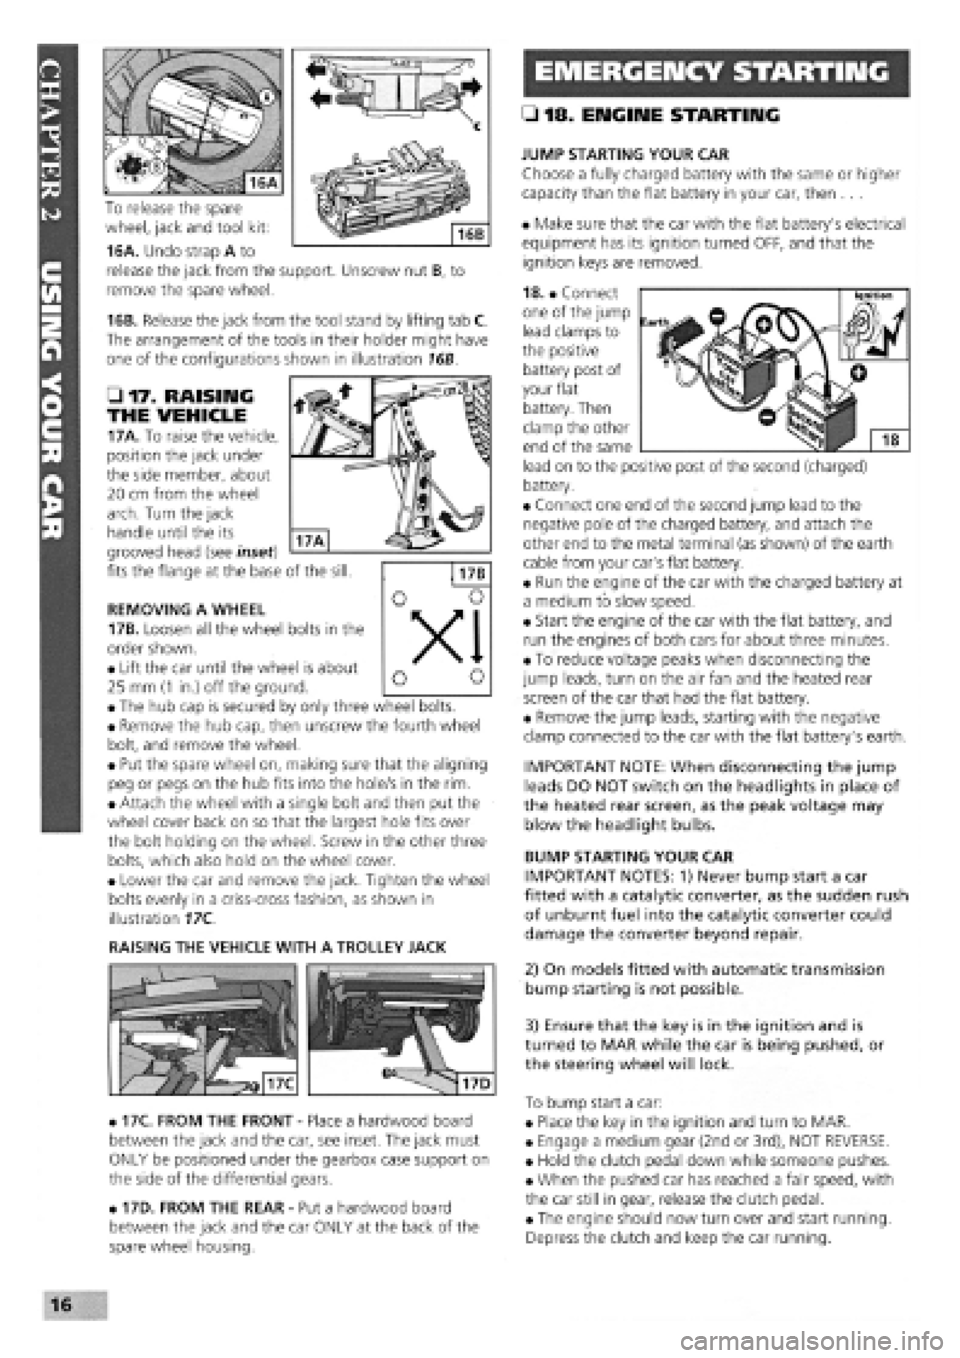
To release the spare
wheel, jack and tool kit:
16A. Undo strap A to
release the jack from the support. Unscrew nut B, to
remove the spare wheel.
16B. Release the jack from the tool stand by lifting tab C.
The arrangement of the tools in their holder might have
one of the configurations shown in illustration 16B.
• 17. RAISING
THE VEHICLE
17A. To raise the vehicle,
position the jack under
the side member, about
20 cm from the wheel
arch. Turn the jack
handle until the its
grooved head (see inset)
fits the flange at the base of the sill.
REMOVING A WHEEL
17B. Loosen all the wheel bolts in the
order shown.
• Lift the car until the wheel is about
25 mm
(1
in.) off the ground.
• The hub cap is secured by only three wheel bolts.
• Remove the hub cap, then unscrew the fourth wheel
bolt, and remove the wheel.
• Put the spare wheel on, making sure that the aligning
peg or pegs on the hub fits into the hole/s in the rim.
• Attach the wheel with a single bolt and then put the
wheel cover back on so that the largest hole fits over
the bolt holding on the wheel. Screw in the other three
bolts, which also hold on the wheel cover.
• Lower the car and remove the jack. Tighten the wheel
bolts evenly in a criss-cross fashion, as shown in
illustration 17C.
RAISING THE VEHICLE WITH A TROLLEY JACK
• 17C. FROM THE FRONT
-
Place a hardwood board
between the jack and the car, see inset. The jack must
ONLY be positioned under the gearbox case support on
the side of the differential gears.
• 17D. FROM THE REAR
-
Put a hardwood board
between the jack and the car ONLY at the back of the
spare wheel housing.
• 18. ENGINE STARTING
JUMP STARTING YOUR CAR
Choose a fully charged battery with the same or higher
capacity than the flat battery in your car, then ...
• Make sure that the car with the flat battery's electrical
equipment has its ignition turned OFF, and that the
ignition keys are removed.
18. • Connect
one of the jump
lead clamps to
the positive
battery post of
your flat
battery. Then
clamp the other
end of the same
lead on to the positive post of the second (charged)
battery.
• Connect one end of the second jump lead to the
negative pole of the charged battery, and attach the
other end to the metal terminal (as shown) of the earth
cable from your car's flat battery.
• Run the engine of the car with the charged battery at
a medium to slow speed.
• Start the engine of the car with the flat battery, and
run the engines of both cars for about three minutes.
• To reduce voltage peaks when disconnecting the
jump leads, turn on the air fan and the heated rear
screen of the car that had the flat battery.
• Remove the jump leads, starting with the negative
clamp connected to the car with the flat battery's earth.
IMPORTANT NOTE: When disconnecting the jump
leads DO NOT switch on the headlights in place of
the heated rear screen, as the peak voltage may
blow the headlight bulbs.
BUMP STARTING YOUR CAR
IMPORTANT NOTES: 1) Never bump start a car
fitted with a catalytic converter, as the sudden rush
of unburnt fuel into the catalytic converter could
damage the converter beyond repair.
2) On models fitted with automatic transmission
bump starting is not possible.
3) Ensure that the key is in the ignition and is
turned to MAR while the car is being pushed, or
the steering wheel will lock.
To bump start a car:
• Place the key in the ignition and turn to MAR.
• Engage a medium gear (2nd or 3rd), NOT REVERSE.
• Hold the clutch pedal down while someone pushes.
• When the pushed car has reached a fair speed, with
the car still in gear, release the clutch pedal.
• The engine should now turn over and start running.
Depress the clutch and keep the car running.
16
Page 14 of 171
October 1991 2.0 i.e. 16v introduced, with 1995cc, 16 valve
high-performance DOHC engine, catalytic converter, sports
suspension, front and rear disc brakes. ABS available as
option.
January 1992 Existing Tipo models lightly facelifted and
redesignated 1.4 Formula, 1.45, 1.6S, 1.6SX, 1.9TD SX,
1.8 i.e. SX. 1.7D discontinued. SX versions with digital
instruments.
Tempra 1.9 TDS (turbo diesel) Station Wagon introduced. 1.4
and 1.9D saloons discontinued.
May 1992 Tempra 1.8 i.e. SX Saloon and Station Wagon
discontinued.
June 1992 Tempra 2.0 i.e. SX saloon and station wagon
models introduced, with high performance 1995cc DOHC fuel
injected engine, catalytic converter and disc brakes front and
rear.
Tipo 1.4 and all Tipo and Tempra 1.6 models (except Selecta)
now with a catalytic converter and fuel injection in place of
Weber twin-choke carburettor. Designated i.e. in badging.
December 1992 Tipo 1.8 i.e. and 1.6 Selecta discontinued.
February 1993 Tipo 2.0 i.e. GT introduced. Slightly lower
performance and spec, version of the 16v model.
July 1993 Tipo 1.4 now available as a 3-door or 5-door
hatchback. 2.0 i.e. 16v now only available as 3-door. Tipo 2.0
i.e. GT replaced by similar spec. 2.0 i.e. SLX.
Tempra 2.0 i.e. SX saloons and estates now only available
with auto, gearbox. Otherwise, SX models become known as
SLX, with colour-coded mirrors and ABS brakes. Most Tempras
now with body-coloured bumpers. 1.9D (non turbo Diesel re-
introduced).
All Tipo and Tempra models now with revised front-end
styling
-
narrower headlights and revised grille. Improved crash
protection, including side impact beams, safety steering wheel
and uprated brakes. Power steering, central locking, electric
windows all standard.
February 1994 Tipo 1.7 non-turbo diesel re-introduced as
1.7 DS.
May 1994 Tempra 1.9DS Station Wagon introduced.
September 1994 Most models available with driver's airbag,
fire prevention system and seat belt pre-tensioners.
December 1994 Tempra 1.6 i.e. versions get M.P.I, engine.
February/March 1995 All models with VIN number window
etching and immobiliser standard on all Tempra petrol models.
October 1995 Immobiliser fitted to Tempra D and TD models.
End of 1995 Tipo discontinued.
Mid-1996 Tempra discontinued.
PART B: VITAL STATISTICS
All Tipo models
-
55 litres, except petrol with catalytic converter
- 51
litres.
All Tempra models
-
65 litres, except petrol with catalytic converter
-
62 litres.
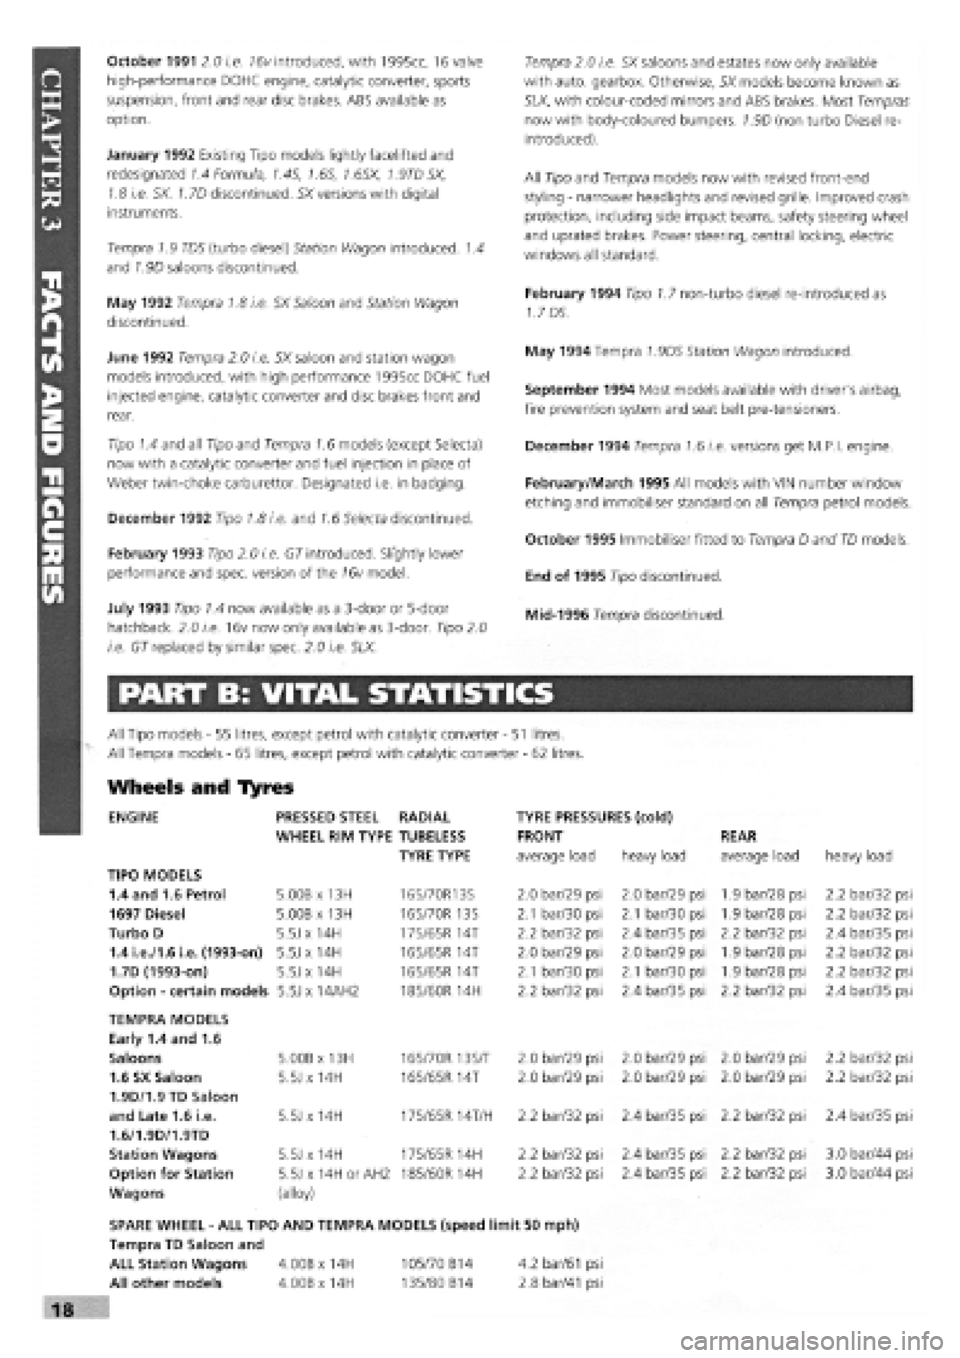
Wheels and Tyres
ENGINE PRESSED STEEL RADIAL TYRE PRESSURES (cold)
WHEEL RIM TYPE TUBELESS FRONT REAR
TYRE TYPE average load heavy load average load heavy load
TIPO MODELS
1.4 and 1.6 Petrol 5.00B x 13H 165/70R13S 2.0 bar/29 psi 2.0 bar/29 psi 1.9 bar/28 psi 2.2 bar/32 psi
1697 Diesel 5.00B x 13H 165/70R 13S 2.1 bar/30 psi 2.1 bar/30 psi 1.9 bar/28 psi 2.2 bar/32 psi
Turbo D 5.5J x 14H
175/65 R
14T 2.2 bar/32 psi 2.4 bar/35 psi 2.2 bar/32 psi 2.4 bar/35 psi
1.4 i.e./1.6 i.e. (1993-on) 5.5J x 14H
165/65 R
14T 2.0 bar/29 psi 2.0 bar/29 psi 1.9 bar/28 psi 2.2 bar/32 psi
1.7D (1993-on) 5.5J x 14H 165/65R 14T 2.1 bar/30 psi 2.1 bar/30 psi 1.9 bar/28 psi 2.2 bar/32 psi
Option
-
certain models 5.5J x 14AH2 185/60R 14H 2.2 bar/32 psi 2.4 bar/35 psi 2.2 bar/32 psi 2.4 bar/35 psi
TEMPRA MODELS
Early 1.4 and 1.6
Saloons 5.00B x 13H 165/70R 13S/T 2.0 bar/29 psi 2.0 bar/29 psi 2.0 bar/29 psi 2.2 bar/32 psi
1.6 SX Saloon 5.5J x 14H 165/65R 14T 2.0 bar/29 psi 2.0 bar/29 psi 2.0 bar/29 psi 2.2 bar/32 psi
1.9D/1.9 TD Saloon
and Late 1.6 i.e. 5.5J x 14H 175/65R 14T/H 2.2 bar/32 psi 2.4 bar/35 psi 2.2 bar/32 psi 2.4 bar/35 psi
1.6/1.9D/1.9TD
Station Wagons 5.5J x 14H 175/65R 14H 2.2 bar/32 psi 2.4 bar/35 psi 2.2 bar/32 psi 3.0 bar/44 psi
Option for Station 5.5J x 14H or AH2 185/60 R 14H 2.2 bar/32 psi 2.4 bar/35 psi 2.2 bar/32 psi 3.0 bar/44 psi
Wagons (alloy)
SPARE WHEEL
-
ALL TIPO AND TEMPRA MODELS (speed limit 50 mph)
Tempra TD Saloon and
ALL Station Wagons 4.00B x 14H 105/70 B14 4.2
bar/61
psi
All other models 4.00Bx14H 135/80 B14 2.8
bar/41
psi
Page 15 of 171
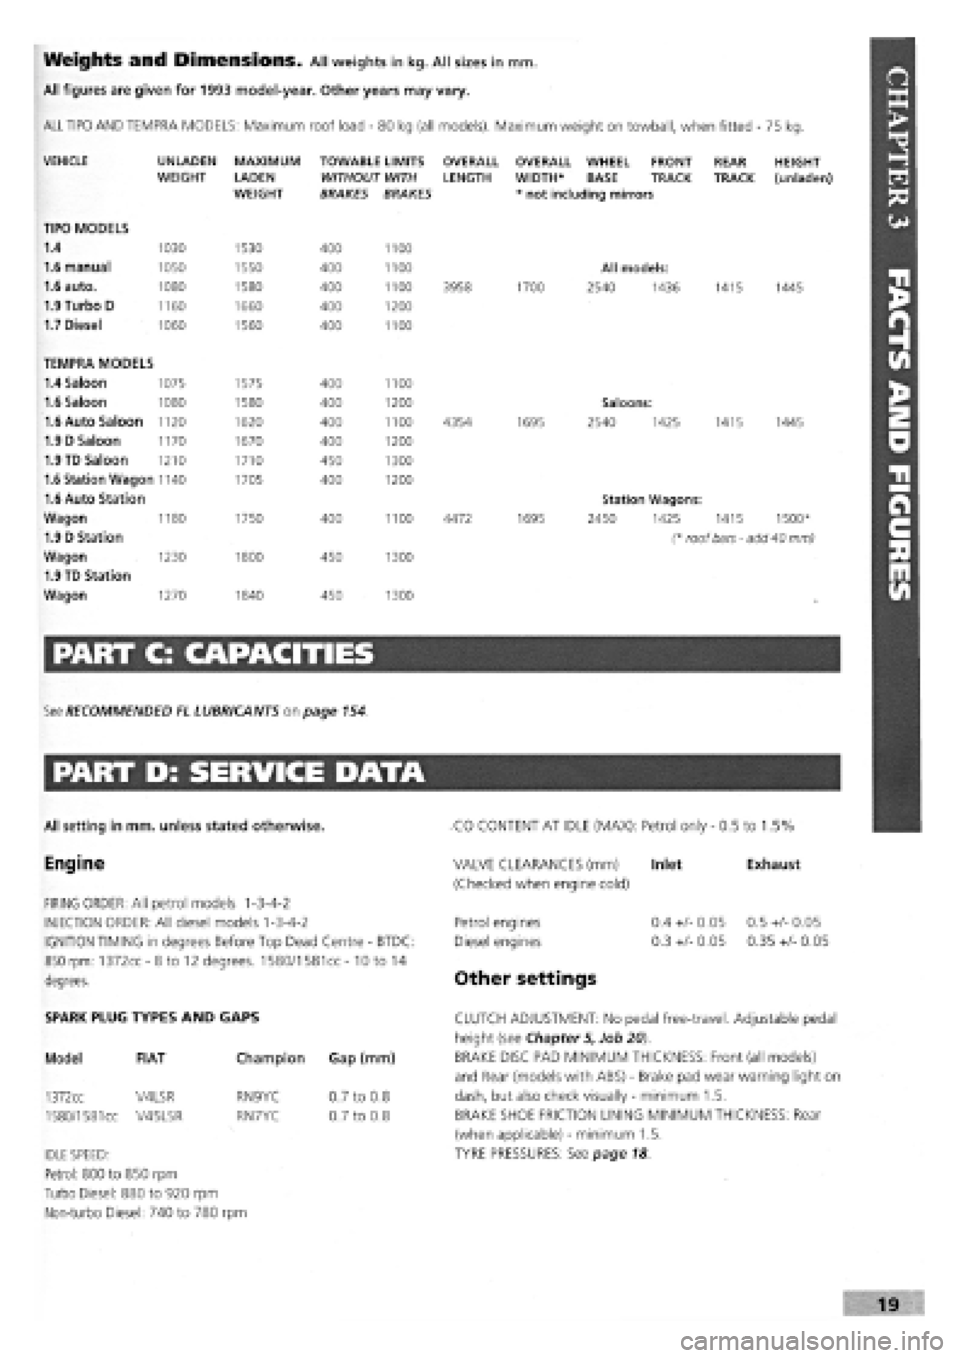
Weights and Dimensions. All weights in kg. All sizes in mm.
All figures are given for 1993 model-year. Other years may vary.
ALL TIPO AND TEMPRA MODELS: Maximum roof load
-
80 kg (all models). Maximum weight on towball, when fitted - 75 kg.
VEHICLE
TIPO MODELS
1.4
1.6 manual
1.6 auto.
1.9 Turbo D
1.7 Diesel
UNLADEN WEIGHT
1030
1050
1080
1160
1060
MAXIMUM
LADEN WEIGHT
1530
1550
1580
1660
1560
TOWABLE LIMITS WITHOUT WITH BRAKES BRAKES
400
400
400
400
400
1100
1100
1100
1200
1100
OVERALL LENGTH
3958
OVERALL WHEEL FRONT WIDTH* BASE TRACK * not including mirrors
1700
All models:
2540 1436
REAR TRACK
1415
HEIGHT (unladen)
1445
TEMPRA MODELS
1.4 Saloon 1075 1575 400 1100
1.6 Saloon 1080 1580 400 1200 Saloons:
1.6 Auto Saloon 1120 1620 400 1100 4354 1695 2540 1425 1415 1445
1.9 D Saloon 1170 1670 400 1200
1.9 TD Saloon 1210 1710 450 1300
1.6 Station Wagon 1140 1705 400 1200
1.6 Auto Station Station Wagons:
Wagon 1180 1750 400 1100 4472 1695 2450 1425 1415 1500*
1.9 D Station (* roof bars - add 40 mm)
Wagon 1230 1800 450 1300
1.9 TD Station
Wagon 1270 1840 450 1300
PART C: CAPACITIES
See RECOMMENDED EL LUBRICANTS on page 154.
PART D: SERVICE DATA
All setting in mm. unless stated otherwise.
Engine
FIRING ORDER: All petrol models 1-3-4-2
INJECTION ORDER: All diesel models 1-3-4-2
IGNITION TIMING in degrees Before Top Dead Centre
-
BTDC:
850 rpm: 1372cc-8to 12 degrees. 1580/1581cc- 10 to 14
degrees.
CO CONTENT AT IDLE (MAX): Petrol only
-
0.5 to 1.5%
Exhaust VALVE CLEARANCES (mm) Inlet
(Checked when engine cold)
Petrol engines
Diesel engines
Other settings
0.4
+/-
0.05
0.3
+/-
0.05
0.5
+/-
0.05
0.35
+/-
0.05
SPARK PLUG TYPES AND GAPS
Model FIAT
1372cc V4LSR
1580/1581
cc V45LSR
Champion Gap (mm)
RN9YC
RN7YC
IDLE SPEED:
Petrol: 800 to 850 rpm
Turbo Diesel: 880 to 920 rpm
Non-turbo Diesel: 740 to 780 rpm
0.7 to 0.8
0.7 to 0.8
CLUTCH ADJUSTMENT: No pedal free-travel. Adjustable pedal
height (see Chapter 5, Job 20).
BRAKE DISC PAD MINIMUM THICKNESS: Front (all models)
and Rear (models with ABS)
-
Brake pad wear warning light on
dash, but also check visually
-
minimum 1.5.
BRAKE SHOE FRICTION LINING MINIMUM THICKNESS: Rear
(when applicable)
-
minimum 1.5.
TYRE PRESSURES: See page 18
Page 16 of 171
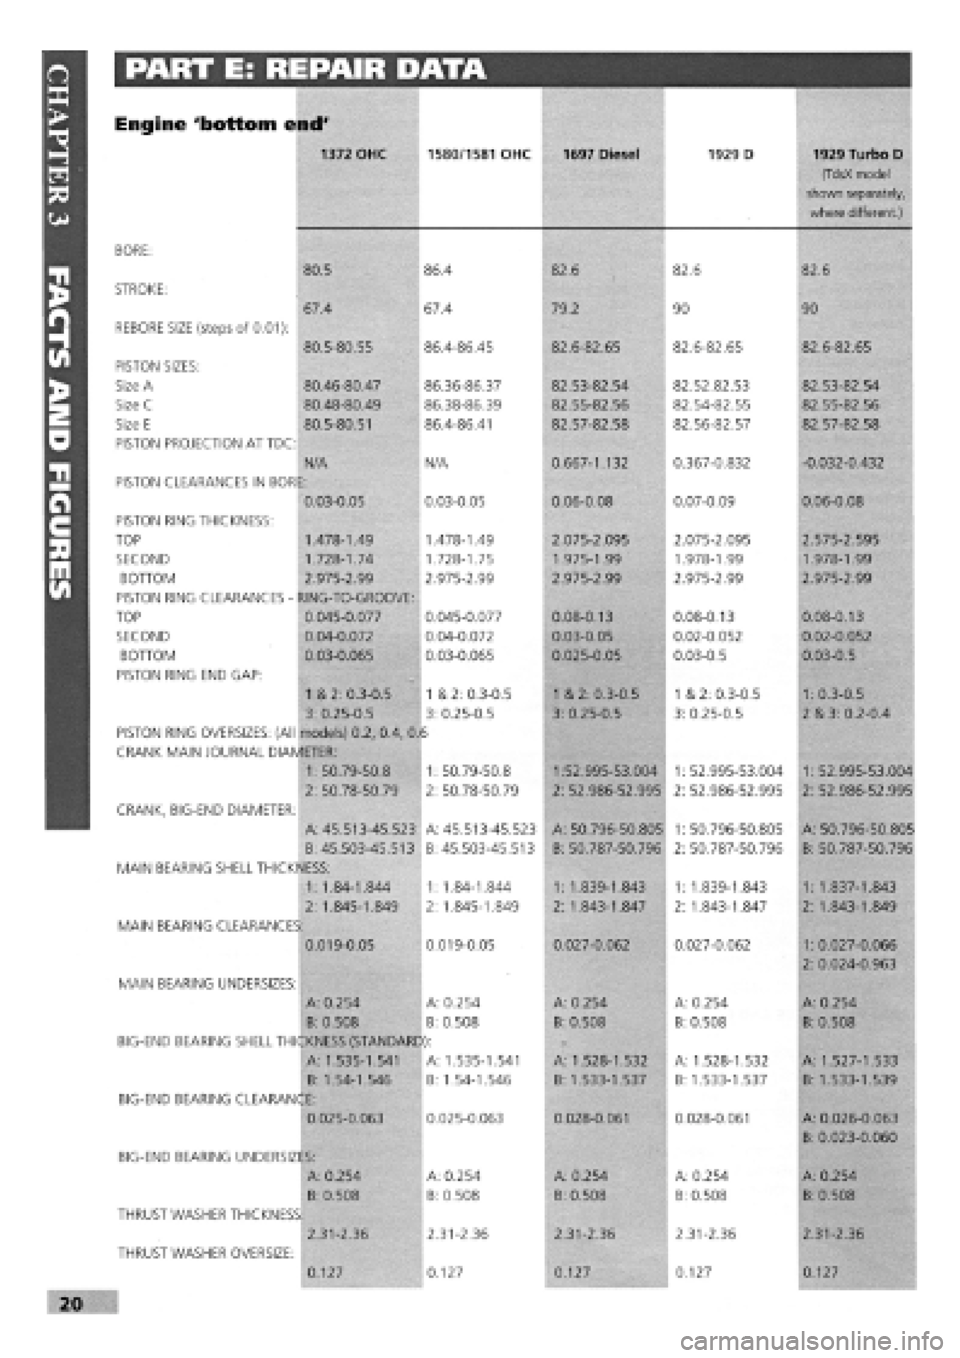
PART E: REPAIR DATA 1
Engine 'bottom end'
1372 OHC 1580/1581 OHC 1697 Diesel 1929 D 1929 Turbo D
(TdsX model
shown separately,
where different.)
BORE:
80.5 86.4 82.6 82.6 82.6
STROKE:
67.4 67.4 79.2 90 90
REBORE SIZE (steps of 0.01):
80.5-80.55 86.4-86.45 82.6-82.65 82.6-82.65 82.6-82.65
PISTON SIZES:
Size A 80.46-80.47 86.36-86.37 82.53-82.54 82.52.82.53 82.53-82.54
Size C 80.48-80.49 86.38-86.39 82.55-82.56 82.54-82.55 82.55-82.56
Size E 80.5-80.51 86.4-86.41 82.57-82.58 82.56-82.57 82.57-82.58
PISTON PROJECTION AT TDC:
N/A N/A 0.667-1.132 0.367-0.832 -0.032-0.432
PISTON CLEARANCES IN BORE:
0.03-0.05 0.03-0.05 0.06-0.08 0.07-0.09 0.06-0.08
PISTON RING THICKNESS: S^MRttffl
TOP 1.478-1.49 1.478-1.49 2.075-2.095 2.075-2.095 2.575-2.595
SECOND 1.728-1.74 1.728-1.75 1.975-1.99 1.978-1.99 1.978-1.99
BOTTOM 2.975-2.99 2.975-2.99 2.975-2.99 2.975-2.99 2.975-2.99
PISTON RING CLEARANCES -RING-TO-GROOVE:
TOP 0.045-0.077 0.045-0.077 0.08-0.13 0.08-0.13 0.08-0.13
SECOND 0.04-0.072 0.04-0.072 0.03-0.05 0.02-0.052 0.02-0.052
BOTTOM 0.03-0.065 0.03-0.065 0.025-0.05 0.03-0.5 0.03-0.5
PISTON RING END GAP:
1 & 2: 0.3-0.5 1 & 2: 0.3-0.5 1 & 2: 0.3-0.5 1 & 2: 0.3-0.5 1: 0.3-0.5
3: 0.25-0.5 3: 0.25-0.5 3: 0.25-0.5 3: 0.25-0.5 2 & 3: 0.2-0.4
PISTON RING OVERSIZES: (All models) 0.2, 0.4, 0. 6
CRANK MAIN JOURNAL DIAMETER:
1: 50.79-50.8 1: 50.79-50.8 1:52.995-53.004 1: 52.995-53.004 1: 52.995-53.004
2: 50.78-50.79 2: 50.78-50.79 2: 52.986-52.995 2: 52.986-52.995 2: 52.986-52.995
CRANK, BIG-END DIAMETER:
A: 45.513-45.523 A: 45.513-45.523 A: 50.796-50.805 1: 50.796-50.805 A: 50.796-50.805
B: 45.503-45.513 B: 45.503-45.513 B: 50.787-50.796 2: 50.787-50.796 B: 50.787-50.796
MAIN BEARING SHELL THICKNESS:
1: 1.84-1.844 1: 1.84-1.844 1: 1.839-1.843 1: 1.839-1.843 1: 1.837-1.843
2: 1.845-1.849 2: 1.845-1.849 2: 1.843-1.847 2: 1.843-1.847 2: 1.843-1.849
MAIN BEARING CLEARANCES
0.019-0.05 0.019-0.05 0.027-0.062 0.027-0.062 1: 0.027-0.066
2: 0.024-0.963
MAIN BEARING UNDERSIZES:
A: 0.254 A: 0.254 A: 0.254 A: 0.254 A: 0.254
B: 0.508 B: 0.508 B: 0.508 B: 0.508 B: 0.508
BIG-END BEARING SHELL THICKNESS (STANDARC ):
A: 1.535-1.541 A: 1.535-1.541 A: 1.528-1.532 A: 1.528-1.532 A: 1.527-1.533
B: 1.54-1.546 B: 1.54-1.546 B: 1.533-1.537 B: 1.533-1.537 B: 1.533-1.539
BIG-END BEARING CLEARANCE:
0.025-0.063 0.025-0.063 0.028-0.061 0.028-0.061 A: 0.026-0.063
B: 0.023-0.060
BIG-END BEARING UNDERSIZES:
A: 0.254 A: 0.254 A: 0.254 A: 0.254 A: 0.254
B: 0.508 B: 0.508 B: 0.508 B: 0.508 B: 0.508
THRUST WASHER THICKNESS
2.31-2.36 2.31-2.36 2.31-2.36 2.31-2.36 2.31-2.36
THRUST WASHER OVERSIZE:
0.127 0.127 0.127 0.127 0.127
20
Page 23 of 171
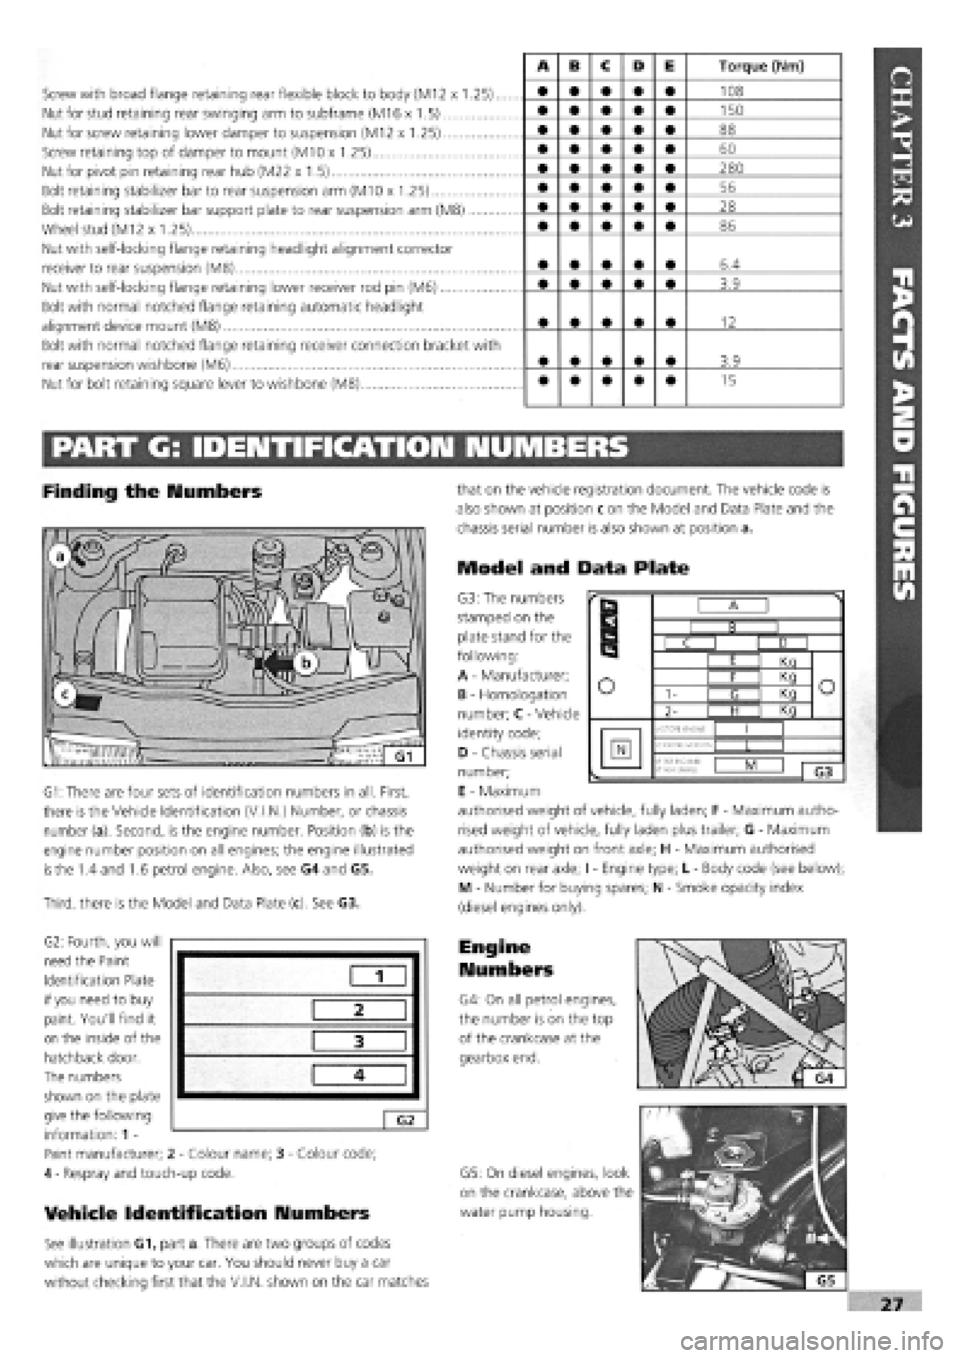
Screw with broad flange retaining rear flexible block to body (M12 x 1.25)..
Nut for stud retaining rear swinging arm to subframe (M16 x 1.5)
Nut for screw retaining lower damper to suspension (M12 x 1.25)
Screw retaining top of damper to mount (M10 x 1.25)
Nut for pivot pin retaining rear hub (M22 x 1.5)
Bolt retaining stabilizer bar to rear suspension arm (M10 x 1.25)
Bolt retaining stabilizer bar support plate to rear suspension arm (M8)
Wheel stud (M12 x 1.25)
Nut with self-locking flange retaining headlight alignment corrector
receiver to rear suspension (M8)
Nut with self-locking flange retaining lower receiver rod pin (M6)
Bolt with normal notched flange retaining automatic headlight
alignment device mount (M8)
Bolt with normal notched flange retaining receiver connection bracket with
rear suspension wishbone (M6)
Nut for bolt retaining square lever to wishbone (M8)
A B c D E Torque (Nm)
• • • • • 108
• • • • • 150
• • • • • 88
• • • • • 60
• • • • • 280
• • • • • 56
• • • • • 28
• • • • • 86
• • • • • 6.4
• • • • • 3.9
• • • • • 12
• • • • • 3.9
• • • • • 15
PART G: IDENTIFICATION NUMBERS
Finding the Numbers
G1: There are four sets of identification numbers in all. First,
there is the Vehicle Identification (V.I.N.) Number, or chassis
number (a). Second, is the engine number. Position (b) is the
engine number position on all engines; the engine illustrated
is
the 1.4 and 1.6 petrol engine. Also, see G4 and G5.
Third, there is the Model and Data Plate (c). See G3.
G2: Fourth, you will
need the Paint
Identification Plate
if you need to buy
paint. You'll find it
on the inside of the
hatchback door.
The numbers
shown on the plate
give the following
information: 1 -
Paint manufacturer; 2
-
Colour name; 3
-
Colour code;
4
-
Respray and touch-up code.
Vehicle Identification Numbers
See illustration G1, part a. There are two groups of codes
which are unique to your car. You should never buy a car
without checking first that the V.I.N, shown on the car matches
that on the vehicle registration document. The vehicle code is
also shown at position c on the Model and Data Plate and the
chassis serial number is also shown at position a.
Model and Data Plate
G3: The numbers
stamped on the
plate stand for the
following:
A
-
Manufacturer;
B
-
Homologation
number; C
-
Vehicle
identity code;
D
-
Chassis serial
number;
E
-
Maximum
authorised weight of vehicle, fully laden; F
-
Maximum autho-
rised weight of vehicle, fully laden plus trailer; G
-
Maximum
authorised weight on front axle; H
-
Maximum authorised
weight on rear axle; I
-
Engine type; L
-
Body code (see below);
M - Number for buying spares; N
-
Smoke opacity index
(diesel engines only).
Engine
Numbers
G4: On all petrol engines,
the number is on the top
of the crankcase at the
gearbox end.
G5: On diesel engines, look
on the crankcase, above the
water pump housing.
1
2
3
4
G2
r
B
r
B I B I
r
B
C I D I
r
B
I E I Kn
o o I F I Kq o o 1- I <3 I Kq o o
2- | H I Kq
o
MOTORE ENGINE
I I
N VERSIONE-VERSION •f
PER RICAM8:
N*
FOR SPARED
L I
1 G3
Page 28 of 171
Please read the whole of the Introduction to this Chapter before carrying out any work on your car.
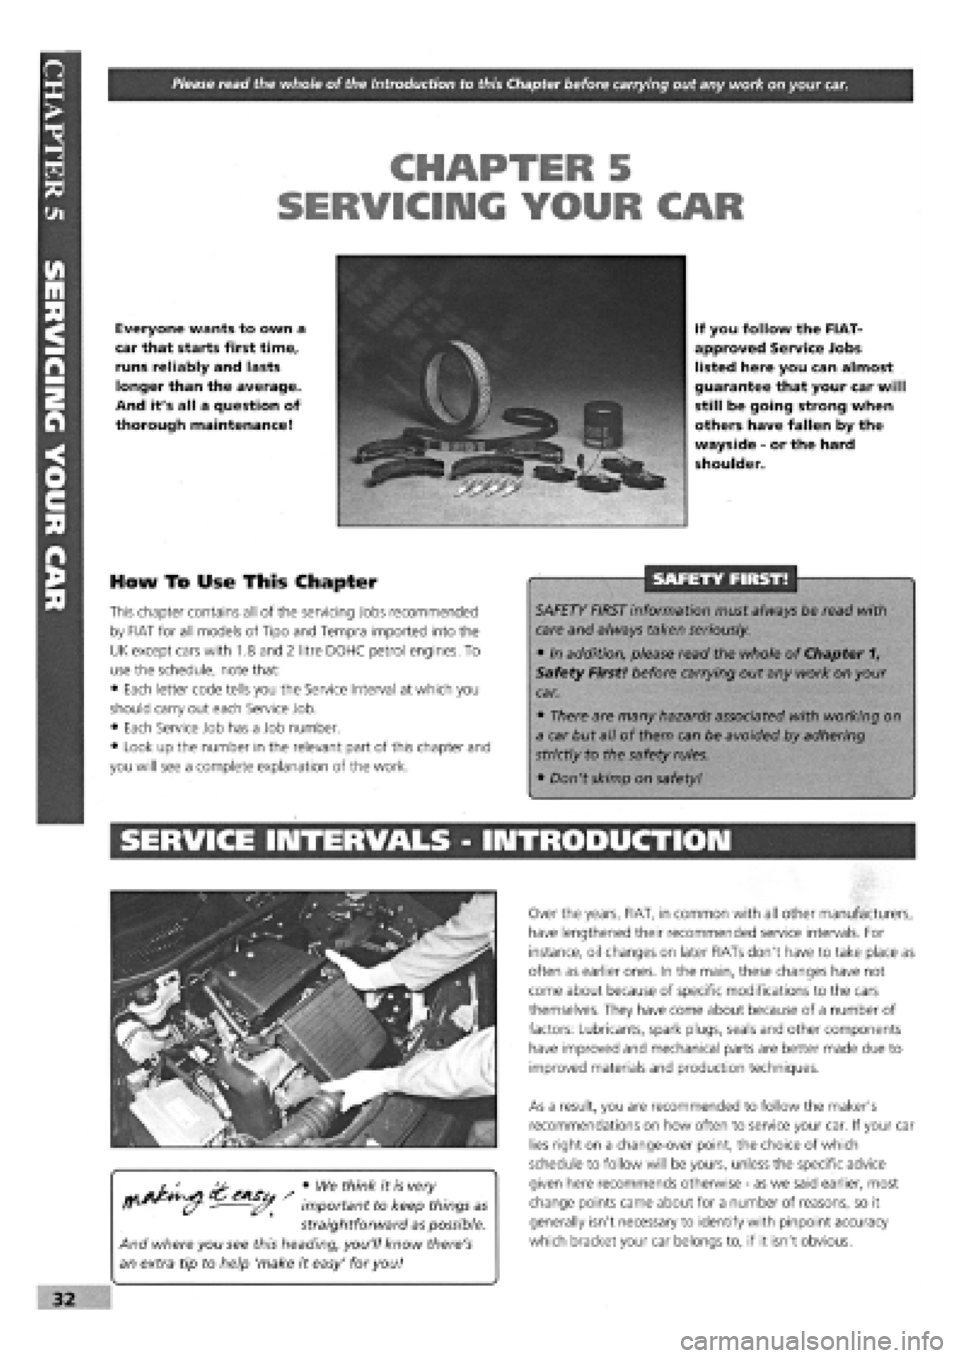
CHAPTER 5
SERVICING YOUR CAR
Everyone wants to own a
car that starts first time,
runs reliably and lasts
longer than the average.
And it's all a question of
thorough maintenance!
If you follow the FIAT-
approved Service Jobs
listed here you can almost
guarantee that your car will
still be going strong when
others have fallen by the
wayside
-
or the hard
shoulder.
How To Use This Chapter
This chapter contains all of the servicing Jobs recommended
by FIAT for all models of Tipo and Tempra imported into the
UK except cars with 1.8 and 2 litre DOHC petrol engines. To
use the schedule, note that:
• Each letter code tells you the Service Interval at which you
should carry out each Service Job.
• Each Service Job has a Job number.
• Look up the number in the relevant part of this chapter and
you will see a complete explanation of the work.
SAFETY FIRST!
SAFETY FIRST information must always be read with
care and always taken seriously.
• In addition, please read the whole of Chapter 1,
Safety First! before carrying out any work on your
car.
• There are many hazards associated with working on
a car but all of them can be avoided by adhering
strictly to the safety rules.
• Don't skimp on safety!
SERVICE INTERVALS - INTRODUCTION
• We think it is very
important to keep things as
straightforward as possible.
And where you see this heading, you'll know there's
an extra tip to help 'make it easy' for you!
Over the years, FIAT, in common with all other manufacturers,
have lengthened their recommended service intervals. For
instance, oil changes on later FIATs don't have to take place as
often as earlier ones. In the main, these changes have not
come about because of specific modifications to the cars
themselves. They have come about because of a number of
factors: Lubricants, spark plugs, seals and other components
have improved and mechanical parts are better made due to
improved materials and production techniques.
As a result, you are recommended to follow the maker's
recommendations on how often to service your car. If your car
lies right on a change-over point, the choice of which
schedule to follow will be yours, unless the specific advice
given here recommends otherwise
-
as we said earlier, most
change points came about for a number of reasons, so it
generally isn't necessary to identify with pinpoint accuracy
which bracket your car belongs to, if it isn't obvious.
32
Page 31 of 171
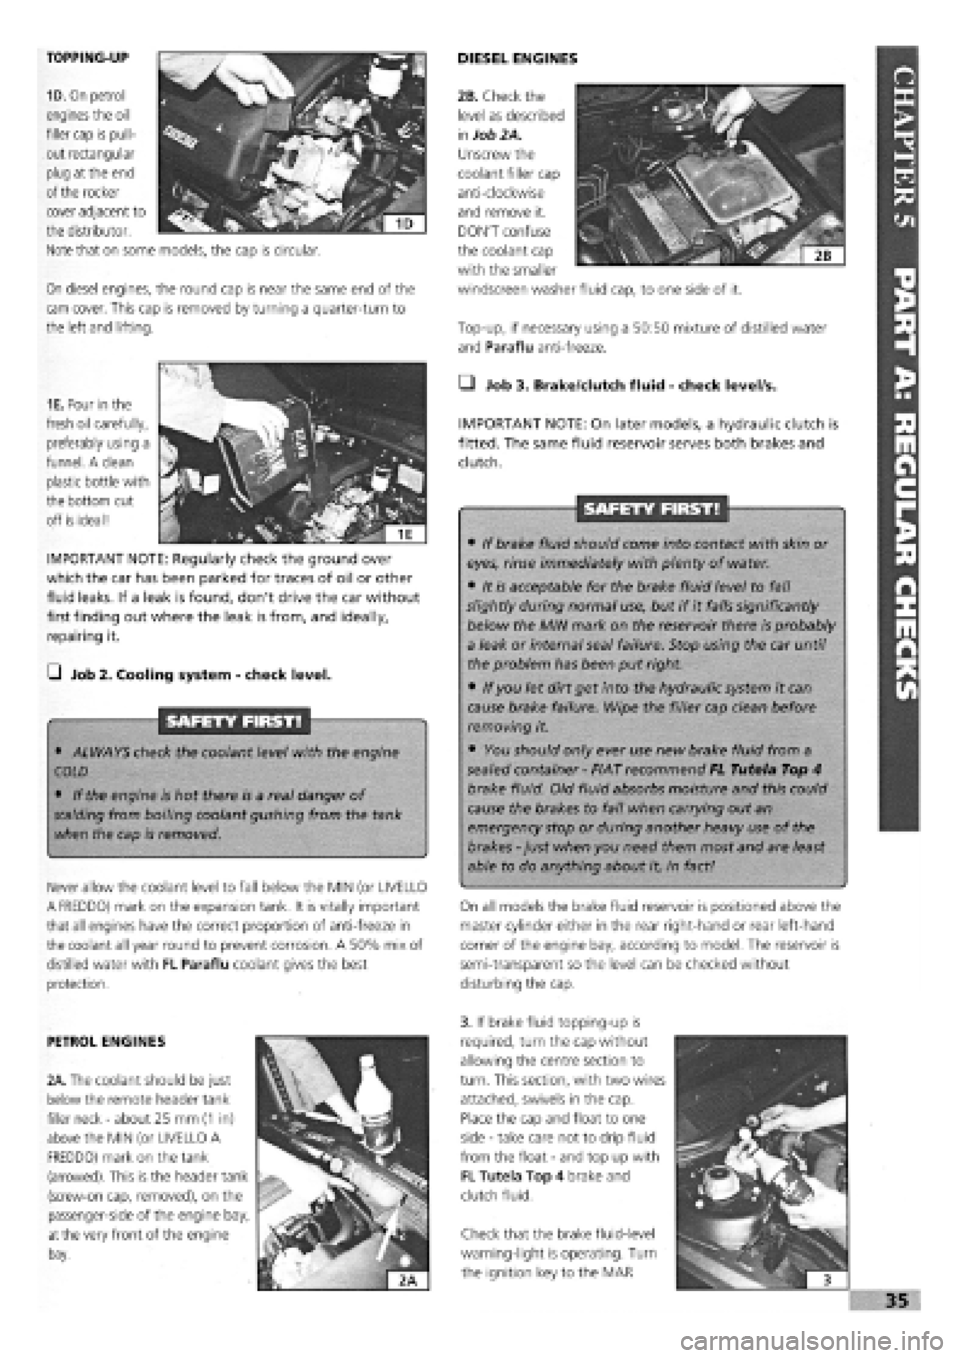
TOPPING-UP
1D. On petrol
engines the oil
filler cap is pull-
out rectangular
plug at the end
of the rocker
On diesel engines, the round cap is near the same end of the
cam cover. This cap is removed by turning a quarter-turn to
the left and lifting.
DIESEL ENGINES
Top-up, if necessary using a 50:50 mixture of distilled water
and Paraflu anti-freeze.
cover adjacent to
the distributor.
Note that on some models, the cap is circular.
1E. Pour in the
fresh oil carefully,
preferably using a
funnel. A clean
plastic bottle with
the bottom cut
off is ideal!
IMPORTANT NOTE: Regularly check the ground over
which the car has been parked for traces of oil or other
fluid leaks. If a leak is found, don't drive the car without
first finding out where the leak is from, and ideally,
repairing it.
G Job 2. Cooling system
-
check level.
SAFETY FIRST!
• ALWAYS check the coolant level with the engine
COLD
• If the engine is hot there is a real danger of
scalding
from boiling coolant gushing from the tank
when the cap is removed.
Never allow the coolant level to fall below the MIN (or UVELLO
A FREDDO) mark on the expansion tank. It is vitally important
that all engines have the correct proportion of anti-freeze in
the coolant all year round to prevent corrosion. A 50% mix of
distilled water with FL Paraflu coolant gives the best
protection.
• Job 3. Brake/dutch fluid
-
check level/s.
IMPORTANT NOTE: On later models, a hydraulic clutch is
fitted. The same fluid reservoir serves both brakes and
clutch.
SAFETY FIRST!
• If brake fluid should come into contact with skin or
eyes, rinse immediately with plenty of water.
• It is acceptable for the brake fluid level to fall
slightly during normal use, but if it falls significantly
below the MIN mark on the reservoir there is probably
a leak or internal seal failure. Stop using the car until
the problem has been put right.
• If you let dirt get into the hydraulic system it can
cause brake failure. Wipe the filler cap clean before
removing it.
• You should only ever use new brake fluid from a
sealed container
-
FIAT recommend FL Tutela Top 4
brake fluid. Old fluid absorbs moisture and this could
cause the brakes to fail when carrying out an
emergency stop or during another heavy use of the
brakes
-
just when you need them most and are least
able to do anything about it, in fact!
On all models the brake fluid reservoir is positioned above the
master cylinder either in the rear right-hand or rear left-hand
corner of the engine bay, according to model. The reservoir is
semi-transparent so the level can be checked without
disturbing the cap.
PETROL ENGINES
2A. The coolant should be just
below the remote header tank
filler neck
-
about 25 mm
(1
in)
above the MIN (or UVELLO A
FREDDO) mark on the tank
(arrowed). This is the header tank
(screw-on cap, removed), on the
passenger-side of the engine bay,
at
the very front of the engine
bay.
3. If brake fluid topping-up is
required, turn the cap without
allowing the centre section to
turn. This section, with two wires
attached, swivels in the cap.
Place the cap and float to one
side
-
take care not to drip fluid
from the float
-
and top up with
FL Tutela Top 4 brake and
clutch fluid.
Check that the brake fluid-level
warning-light is operating. Turn
the ignition key to the MAR
I
i 3
»35
2B. Check the
level as described
in
Job 2A.
Unscrew the
coolant filler cap
anti-clockwise
and remove it.
DON'T confuse
the coolant cap
with the smaller
windscreen washer fluid cap, to one side of it.