key FIAT TIPO 4DOORS 2018 Owner handbook (in English)
[x] Cancel search | Manufacturer: FIAT, Model Year: 2018, Model line: TIPO 4DOORS, Model: FIAT TIPO 4DOORS 2018Pages: 244, PDF Size: 5.77 MB
Page 120 of 244
The flap is provided with a dust cover
gaiter 2 which prevents deposits of
impurities and dust at the end of the
filler when the flap is closed.
Emergency refuelling
If there is no fuel in the vehicle or the
supply circuit is completely empty,
proceed as follows to reintroduce fuel
to the tank:
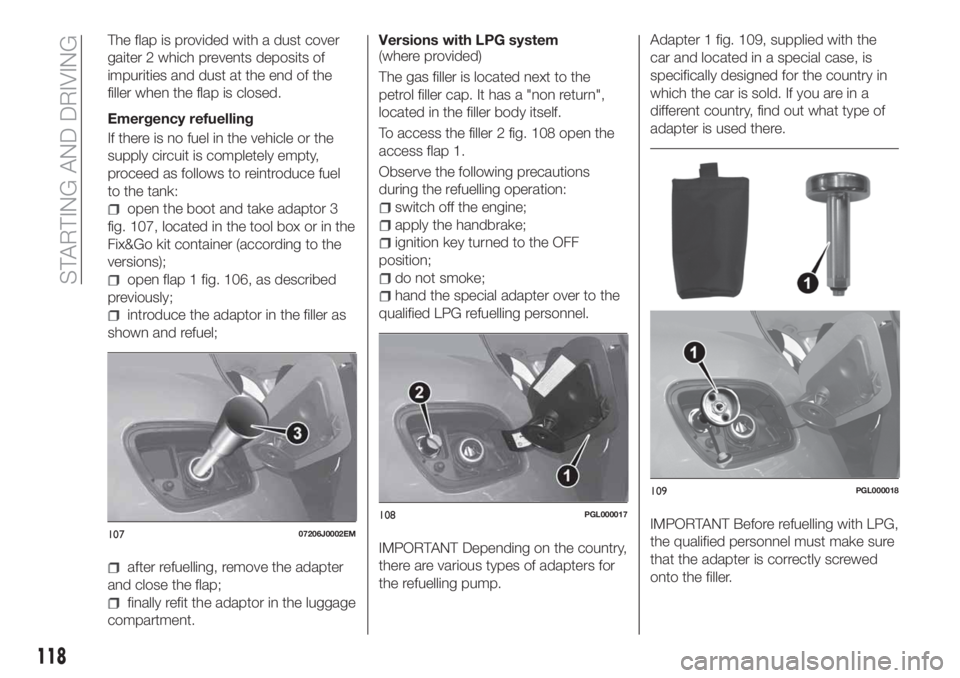
open the boot and take adaptor 3
fig. 107, located in the tool box or in the
Fix&Go kit container (according to the
versions);
open flap 1 fig. 106, as described
previously;
introduce the adaptor in the filler as
shown and refuel;
after refuelling, remove the adapter
and close the flap;
finally refit the adaptor in the luggage
compartment.Versions with LPG system
(where provided)
The gas filler is located next to the
petrol filler cap. It has a "non return",
located in the filler body itself.
To access the filler 2 fig. 108 open the
access flap 1.
Observe the following precautions
during the refuelling operation:
switch off the engine;
apply the handbrake;
ignition key turned to the OFF
position;
do not smoke;
hand the special adapter over to the
qualified LPG refuelling personnel.
IMPORTANT Depending on the country,
there are various types of adapters for
the refuelling pump.Adapter 1 fig. 109, supplied with the
car and located in a special case, is
specifically designed for the country in
which the car is sold. If you are in a
different country, find out what type of
adapter is used there.
IMPORTANT Before refuelling with LPG,
the qualified personnel must make sure
that the adapter is correctly screwed
onto the filler.10707206J0002EM
108PGL000017
109PGL000018
118
STARTING AND DRIVING
Page 135 of 244
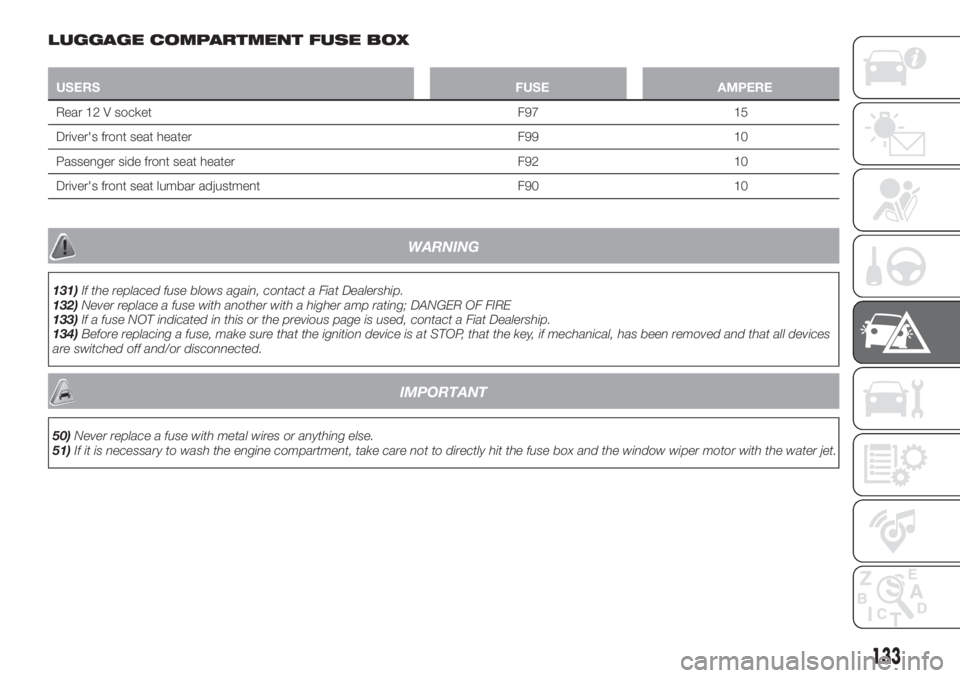
LUGGAGE COMPARTMENT FUSE BOX
USERSFUSE AMPERE
Rear 12 V socket F97 15
Driver's front seat heater F99 10
Passenger side front seat heater F92 10
Driver's front seat lumbar adjustment F90 10
WARNING
131)If the replaced fuse blows again, contact a Fiat Dealership.
132)Never replace a fuse with another with a higher amp rating; DANGER OF FIRE
133)If a fuse NOT indicated in this or the previous page is used, contact a Fiat Dealership.
134)Before replacing a fuse, make sure that the ignition device is at STOP, that the key, if mechanical, has been removed and that all devices
are switched off and/or disconnected.
IMPORTANT
50)Never replace a fuse with metal wires or anything else.
51)If it is necessary to wash the engine compartment, take care not to directly hit the fuse box and the window wiper motor with the water jet.
133
Page 144 of 244
start the vehicle engine with the
auxiliary battery, let it run for a few
minutes at idling. Start the engine of the
vehicle with flat battery.
Cable disconnection
Once the engine is started, remove the
leads, reversing the order above.
If after a few attempts the engine does
not start, do not persist but contact a
Fiat Dealership.
If it is often necessary to perform a
jump starting, have the vehicle battery
and the recharging system checked by
a Fiat Dealership.
WARNING
143)Before opening the bonnet, make
sure that the engine is off and that the
ignition key is in the STOP position. Follow
the indications on the plate underneath the
bonnet. We recommend that you remove
the key from the ignition if other people
remain in the vehicle. The vehicle should
always be left after the key has been
removed or turned to the STOP position.
During refuelling, make sure that the engine
is off (and that the ignition key is in the
STOP position).
144)Do not get too close to the radiator
cooling fan: the electric fan may start;
danger of injury. Scarves, ties and other
loose clothing might be pulled by moving
parts.145)Remove any metal objects (e.g. rings,
watches, bracelets), that might cause an
accidental electrical contact and cause
serious injury.
146)The batteries contain acid that can
burn skin or eyes. Batteries produce
hydrogen, which is easily flammable and
explosive. Therefore, keep away flames or
devices which may cause sparks.
IMPORTANT
55)Never use a fast battery-charger to
start the engine as this could damage the
electronic systems of your vehicle,
particularly the ignition and engine fuel
supply control units.
56)Do not connect the cable to the
negative terminal (–) of the flat battery. The
following spark could lead to battery
explosion and cause serious harm. Only
use the specific earth point; do not use any
other exposed metallic part.
FUEL CUT-OFF
SYSTEM
DESCRIPTION
Diesel and petrol versions
This intervenes in the case of an impact
causing:
the interruption of the fuel supply
with the engine consequently switching
off;
the automatic unlocking of the
doors;
turning on of the lights inside the
vehicle;
deactivation of climate control
system ventilation;
switching on of the hazard warning
lights (to deactivate the lights press the
button on the dashboard).
On some versions, the intervention of
the system is indicated by a message
shown on the display. In the same way,
a dedicated message on the display
warns the driver if system operation is
compromised.
IMPORTANT Carefully check the vehicle
for fuel leaks, for instance in the engine
compartment, under the vehicle or near
the tank area. After a collision, bring the
ignition device to STOP to prevent the
battery from running down.
142
IN AN EMERGENCY
Page 148 of 244
Key removal
57)
The ignition key (for versions with key
without remote control) can be removed
only if the gear lever is in position P
(Park).
If the vehicle battery is flat and the
ignition key is engaged, the latter is
locked in position.
To remove the key manually, proceed
as follows:
stop the vehicle in safety conditions,
engage a gear and the parking brake;
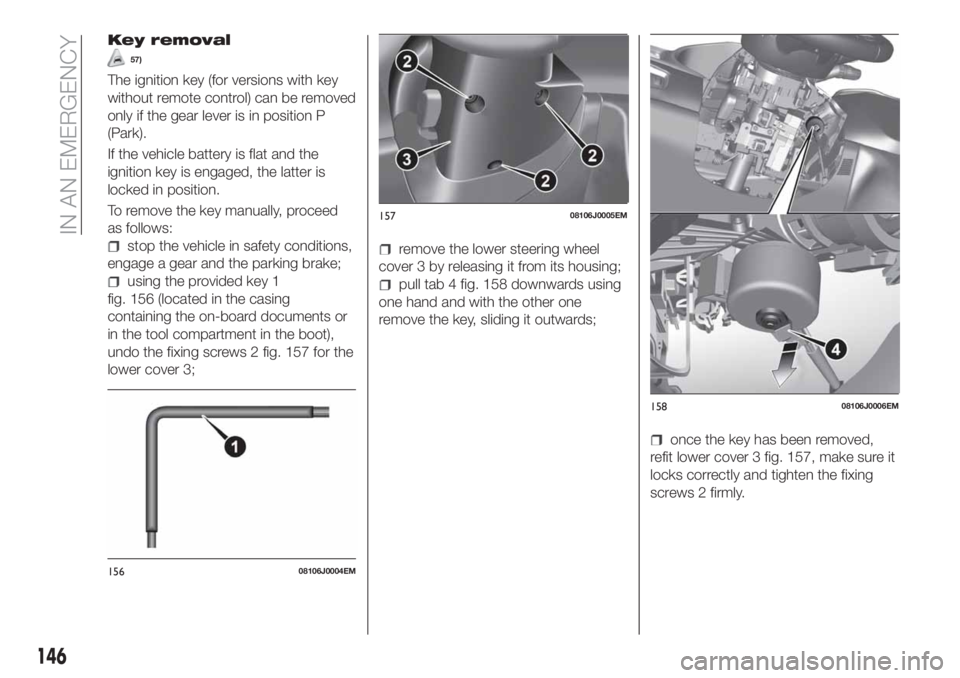
using the provided key 1
fig. 156 (located in the casing
containing the on-board documents or
in the tool compartment in the boot),
undo the fixing screws 2 fig. 157 for the
lower cover 3;
remove the lower steering wheel
cover 3 by releasing it from its housing;
pull tab 4 fig. 158 downwards using
one hand and with the other one
remove the key, sliding it outwards;
once the key has been removed,
refit lower cover 3 fig. 157, make sure it
locks correctly and tighten the fixing
screws 2 firmly.
15608106J0004EM
15708106J0005EM
15808106J0006EM
146
IN AN EMERGENCY
Page 149 of 244
IMPORTANT
57)It is advisable to contact a Fiat
Dealership to have the refitting procedure
carried out. If you would like to proceed
autonomously, special attention must be
paid to the correct coupling of the retaining
clips. Otherwise, noise might be heard due
to an incorrect fastening of the lower cover
with the upper cover.
TOWING THE
VEHICLE
ATTACHING THE TOW
RING
148) 149) 150)
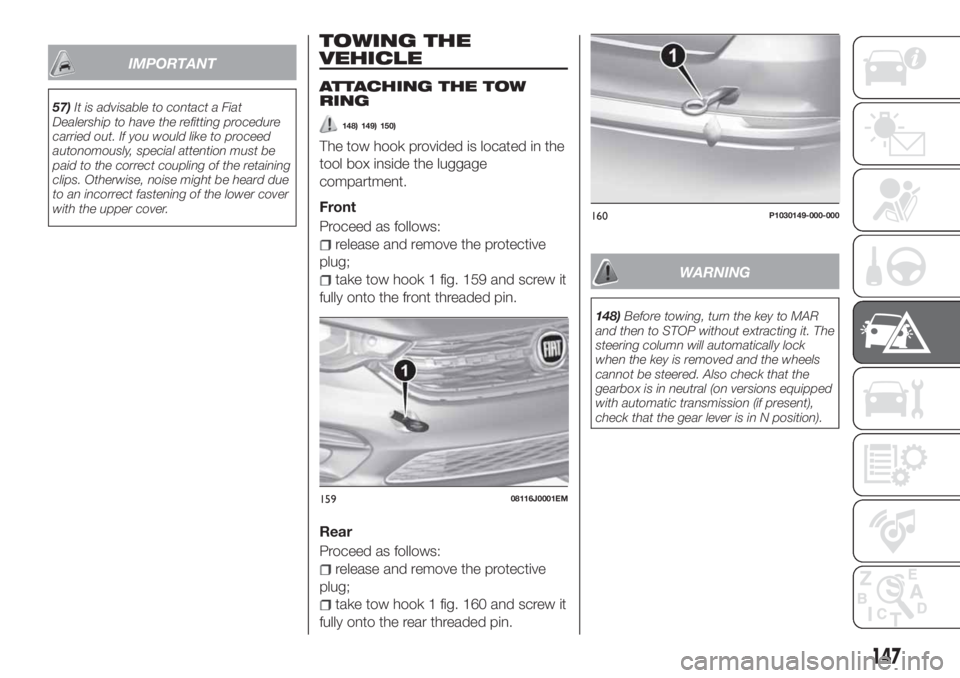
The tow hook provided is located in the
tool box inside the luggage
compartment.
Front
Proceed as follows:
release and remove the protective
plug;
take tow hook 1 fig. 159 and screw it
fully onto the front threaded pin.
Rear
Proceed as follows:
release and remove the protective
plug;
take tow hook 1 fig. 160 and screw it
fully onto the rear threaded pin.
WARNING
148)Before towing, turn the key to MAR
and then to STOP without extracting it. The
steering column will automatically lock
when the key is removed and the wheels
cannot be steered. Also check that the
gearbox is in neutral (on versions equipped
with automatic transmission (if present),
check that the gear lever is in N position).
15908116J0001EM
160P1030149-000-000
147
Page 207 of 244
TIPS, CONTROLS
AND GENERAL
INFORMATION
ROAD SAFETY
Learn how to use the various system
functions before setting off.
Read the instructions for the system
carefully before setting off.
178) 179)
RECEPTION CONDITIONS
Reception conditions change
constantly while driving. Reception may
be interfered with by the presence of
mountains, buildings or bridges,
especially when you are far away from
the broadcaster.
IMPORTANT The volume may be
increased when receiving traffic
information and news.
CARE AND
MAINTENANCE
Observe the following precautions to
ensure the system is fully operational:
the display lens should not come into
contact with pointed or rigid objects
which could damage its surface; use a
soft, dry anti-static cloth to clean and
do not press.
never use alcohol, petrols and
derivatives to clean the display lens.
prevent any liquid from entering the
system: this could damage it beyond
repair.
78) 79)
ANTITHEFT PROTECTION
The system is equipped with an
anti-theft protection system based on
the exchange of information with the
electronic control unit (Body Computer)
on the vehicle.
This guarantees maximum safety and
prevents the secret code from being
entered after the power supply has
been disconnected.
If the check has a positive outcome, the
system will start to operate, whereas if
the comparison codes are not the same
or if the electronic control unit (Body
Computer) is replaced, the system will
ask the user to enter the secret code
according to the procedure described
in the paragraph below.
Entering the secret code
When the system is switched on, if the
code is requested, the display will show
"Please enter Anti-Theft Code" followed
by the screen showing a keypad to
enter the secret code.
The secret code is made up of four
digits from 0 to 9.Uconnect™ Radio:
To enter the first digit of the code,
turn the "BROWSE/ENTER" right knob
and press to confirm.
After inserting the fourth digit, move
the cursor to "OK" and press the
"BROWSE ENTER" right knob: the
system will start to operate.
Uconnect™ 5” and Uconnect™ 5”
Nav:
Use the graphic buttons on the
display to enter the code digits.
If an incorrect code is entered, the
system displays "Incorrect Code" to
notify the user of the need to enter the
correct code.
After the 3 available attempts to enter
the code, the system displays
"Incorrect Code. Radio locked. Wait for
30 minutes". After the text has
disappeared it is possible to start the
code entering procedure again.
Vehicle radio passport
This document certifies ownership of
the system. The vehicle radio passport
shows the system model, serial number
and secret code.
In case of loss of the car radio
passport, contact the Fiat Dealership,
taking an ID document and the car
ownership documents.
205
Page 217 of 244
IMPORTANT NOTES
The functions of the device connected
with the AUX socket are directly
managed by the device itself: it is not
possible to change track/folder/playlist
or control playing start/end/pause with
the controls on the front panel or on the
steering wheel.
Do not leave the cable of your portable
player connected to the AUX socket
after disconnection, to avoid possible
hiss from the speakers.
IMPORTANT When connecting a device
to the AUX socket, make sure that it
does not obstruct the operation of the
handbrake lever.
PHONE MODE
(where provided)
Phone mode activation
Press the PHONE button on the front
panel to activate the Phone mode.
The available commands can be used
to:
dial the wished phone number;
display and call the contacts in the
mobile phone phonebook;
display and call contacts from the
registers of previous calls;
pair up to 8 phones to make access
and connection easier and quicker;
transfer calls from the system to the
mobile phone and vice versa and
deactivate the microphone audio for
private conversations.
The mobile phone audio is transmitted
through the vehicle’s audio system; the
system automatically mutes the radio
when the Phone function is used.
Pairing a mobile phone
To pair the mobile phone, proceed as
follows:
activate theBluetooth®
function on
the mobile phone;
press thePHONEbutton on the
front panel;
if no phone is paired with the system
yet, the display shows a dedicated
screen;
select "Connect Phone" to start the
pairing procedure then search for the
Uconnect™device on the mobile
phone (if "No" is selected, the Phone
main screen is displayed);
when prompted by the mobile
phone, use the phone keypad to enter
the PIN code shown on the system
display or confirm on the mobile phone
the PIN displayed;
from the "Settings" menu you can
always pair a mobile phone by selecting
"Phone menu/Add phone", then
proceed as described above;
during the pairing stage a screen is
displayed showing the progress of the
operation.
NOTE After updating the telephone
software, for correct operation it is
advisable to remove the telephone from
the list of devices paired to the radio,
delete the previous system pairing from
the telephone's availableBluetooth®
device list and pair it again.
Making a phone call
The operations described below can
only be accessed if supported by the
mobile phone in use.
A call can be made by:
selecting "Contacts" (Phonebook
......);
selecting "Recent Calls list";
selecting "Dial Pad".
Dialling the phone number using
the "keypad" on the display
Enter the phone number using the
graphic keypad displayed.
Proceed as follows:
press thePHONEbutton on the
front panel;
select "Dial Pad" on the display and
use the "BROWSE/ENTER" right knob
to enter the number;
select theicon to call.
215
Page 218 of 244
Dialling the phone number using
the mobile phone
It is possible to dial a phone number
with the mobile phone and continue
using the system (never allow yourself
to be distracted while driving).
When a phone number is dialled with
the keypad of the mobile phone, the
audio of the call is played over your
vehicle's sound system.
216
MULTIMEDIA
Page 226 of 244
NOTE To consult the list of mobile
phones and supported functions, visit
the www.driveuconnect.eu website
Use the buttons on the display to:
dial the phone number (using the
graphic keypad on the display);
display and call the contacts in the
mobile phone phonebook;
display and call contacts from the
registers of previous calls;
pair up to 10 phones/audio devices
to make access and connection easier
and quicker;
transfer calls from the system to the
mobile phone and vice versa and
deactivate the microphone audio for
private conversations.
The mobile phone audio is transmitted
through the vehicle’s audio system; the
system automatically mutes the radio
when the Phone function is used.
PAIRING A MOBILE PHONE
IMPORTANT Carry out this operation
only with vehicle stationary and in safety
conditions; this function is deactivated
when the vehicle is moving.
The pairing procedure for a mobile
phone is described below: always
consult the handbook for the mobile
phone in any case.To pair the mobile phone, proceed as
follows:
activate theBluetooth®
function on
the mobile phone;
press the PHONE button on the front
panel;
if no phone is paired with the system
yet, the display shows a dedicated
screen;
select "Yes" to start the recording
process, then search for the
Uconnect™device on the cell phone
(by selecting "No"instead you see the
main Phone screen);
when prompted by the mobile
phone, use its keypad to enter the PIN
code shown on the system display or
confirm on the mobile phone the PIN
displayed;
from the "Phone" screen you can
always pair a mobile phone by pressing
the "Settings" button: press the "Add
Device" button and proceed as
described above;
during the pairing stage a screen is
displayed showing the progress of the
operation;
when the pairing procedure is
completed successfully, a screen is
displayed: answer "Yes" to the question
to pair the mobile phone as favourite
(the mobile phone will have priority over
all other mobile phones to be paired
subsequently). If no other devices arepaired, the system will consider the first
associated device as favourite.
NOTE After updating the telephone
software, for correct operation it is
advisable to remove the telephone from
the list of devices paired to the radio,
delete the previous system pairing from
the telephone's availableBluetooth®
device list and pair it again.
MAKING A PHONE CALL
The operations described below can
only be accessed if supported by the
mobile phone in use.
For all functions available, refer to the
mobile phone owner's handbook.
A call can be made by:
selecting theicon (mobile phone
phonebook);
selecting "Recent Calls";
selecting theicon;
pressing the "Redial" button.
SMS MESSAGE READER
The system can read the messages
received by the mobile phone.
To use this phone function you need to
have SMS exchange support through
Bluetooth®
.
Where operation is not supported by
the phone, the relative graphic
button is deactivated (goes grey).
224
MULTIMEDIA
Page 230 of 244
IMPORTANT INFORMATION AND RECOMMENDATIONS
WARNING
INTERIOR FITTINGS
Do not travel with the storage compartment open: it may injure the front seat occupants in the event of an accident.
The cigar lighter gets extremely hot. Handle it carefully and make sure that children don’t use it: risk of fire and/or burns.
Do not use the ashtray as a waste paper basket: it may catch fire in contact with cigarette stubs.
ROOF RACK/SKI RACK
Before driving, make sure that the transversal bars have been fitted properly.
ENVIRONMENTAL PROTECTION SYSTEMS
The catalytic converter and particulate filter (DPF) reach very high temperatures during operation. Therefore do not park the
vehicle on flammable materials (e.g. grass, dry leaves, pine needles, etc.): fire hazard.
FUEL
Modifications or repairs to the supply system that are not carried out correctly or do not take the system technical
specifications into account can cause malfunctions leading to the risk of fire.
IMPORTANT
ROOF RACK/SKI RACK
Never exceed the maximum permitted loads (see the "Weights" paragraph in the "Technical specifications" chapter).
Fully comply with the regulations in force concerning maximum clearance.
IMPORTANT
THE KEYS
Used batteries may be harmful to the environment if not disposed of correctly. They must be disposed of as specified by law
in the special containers or taken to a Fiat Dealership, which will take care of their disposal.
228