dashboard warning lights FIAT TIPO 4DOORS 2020 Owner handbook (in English)
[x] Cancel search | Manufacturer: FIAT, Model Year: 2020, Model line: TIPO 4DOORS, Model: FIAT TIPO 4DOORS 2020Pages: 252, PDF Size: 7.29 MB
Page 14 of 252
FIAT CODE
The Fiat Code system prevents
unauthorised use of the vehicle,
disabling engine starting.
The system does not need to be
enabled/activated: operation is
automatic, regardless of the fact that
the vehicle's doors are locked or
unlocked.
When the ignition device is set to MAR,
the Fiat Code system identifies the
code transmitted by the key. If the code
is recognised as valid, the Fiat Code
system enables engine starting.
When the ignition device is brought
back to STOP, the Fiat Code system
deactivates the control unit controlling
the engine, thus preventing its starting.
For the correct engine starting
procedures, see the instructions in the
"Starting the engine" paragraph,
"Starting and driving" chapter.IRREGULAR OPERATION
If, during starting, the key code is not
correctly recognised, theicon is
displayed on the instrument panel (see
the instructions in the "Warning lights
and messages" paragraph, "Knowing
the instrument panel" chapter). This
condition leads to the engine switching
off after 2 seconds. In this case, bring
the ignition device to STOP and then to
MAR; if it is still blocked, try with the
other keys provided. If it is still not
possible to start the engine, contact a
Fiat Dealership.
If the
icon is displayed while
driving, this means that the system is
running a self-diagnosis (e.g. due to a
voltage drop). If the display persists,
contact a Fiat Dealership.
DOORS
LOCKING / UNLOCKING
DOORS FROM THE
INSIDE
Automatic locking in motion
(where present)
If all doors are closed properly, they will
automatically be locked once the
vehicle has exceeded 20 km/h
("Autoclose" function). This function can
also be disabled using the menu on the
instrument panel.
Manual locking/unlocking
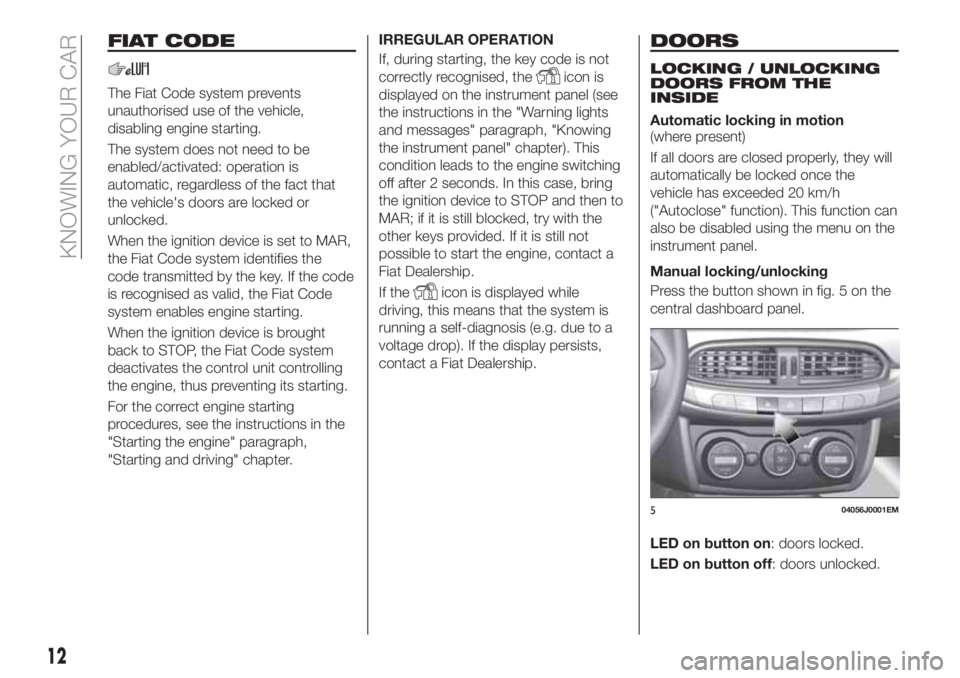
Press the button shown in fig. 5 on the
central dashboard panel.
LED on button on: doors locked.
LED on button off: doors unlocked.
504056J0001EM
12
KNOWING YOUR CAR
Page 22 of 252
Heated
Pressing the
button (heated rear
window) on the central dashboard
panel activates the demisting/defrosting
of the external rear view mirrors.
WARNING
19)As the driver's door mirror is curved, it
may slightly alter the perception of
distance.
EXTERNAL LIGHTS
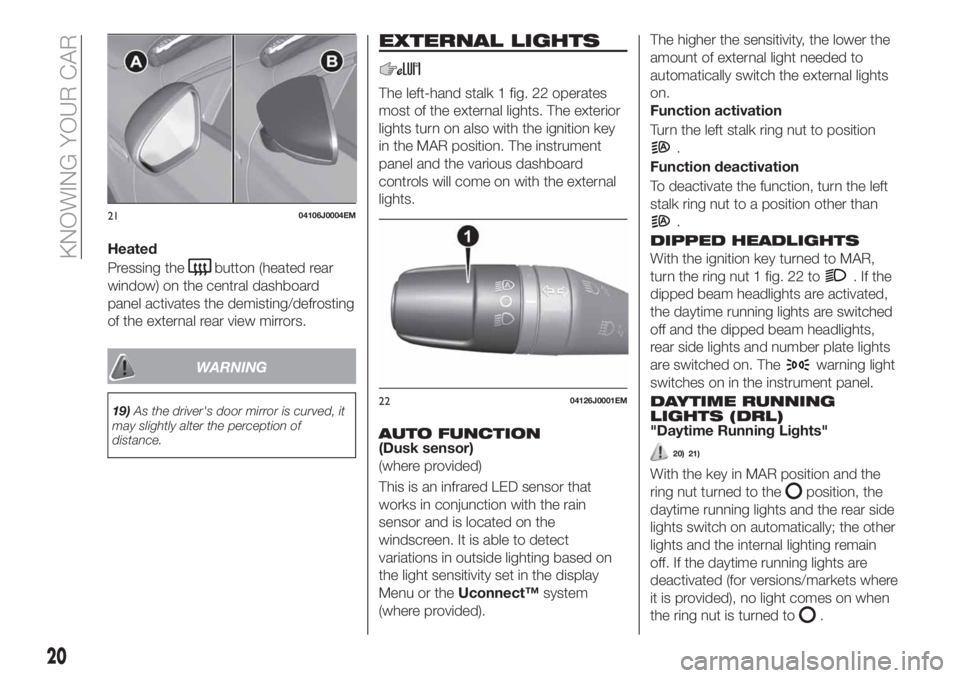
The left-hand stalk 1 fig. 22 operates
most of the external lights. The exterior
lights turn on also with the ignition key
in the MAR position. The instrument
panel and the various dashboard
controls will come on with the external
lights.
AUTO FUNCTION(Dusk sensor)
(where provided)
This is an infrared LED sensor that
works in conjunction with the rain
sensor and is located on the
windscreen. It is able to detect
variations in outside lighting based on
the light sensitivity set in the display
Menu or theUconnect™system
(where provided).The higher the sensitivity, the lower the
amount of external light needed to
automatically switch the external lights
on.
Function activation
Turn the left stalk ring nut to position
.
Function deactivation
To deactivate the function, turn the left
stalk ring nut to a position other than
.
DIPPED HEADLIGHTS
With the ignition key turned to MAR,
turn the ring nut 1 fig. 22 to
.Ifthe
dipped beam headlights are activated,
the daytime running lights are switched
off and the dipped beam headlights,
rear side lights and number plate lights
are switched on. The
warning light
switches on in the instrument panel.
DAYTIME RUNNING
LIGHTS (DRL)
"Daytime Running Lights"
20) 21)
With the key in MAR position and the
ring nut turned to the
position, the
daytime running lights and the rear side
lights switch on automatically; the other
lights and the internal lighting remain
off. If the daytime running lights are
deactivated (for versions/markets where
it is provided), no light comes on when
the ring nut is turned to
.
2104106J0004EM
2204126J0001EM
20
KNOWING YOUR CAR
Page 24 of 252
MAIN BEAM HEADLIGHTS
With ring nut in position, push the
stalk forward toward the dashboard
(stable position). The
warning light
switches on in the instrument panel.
They are switched off by pulling the
stalk towards the steering wheel.
Flashing the headlights
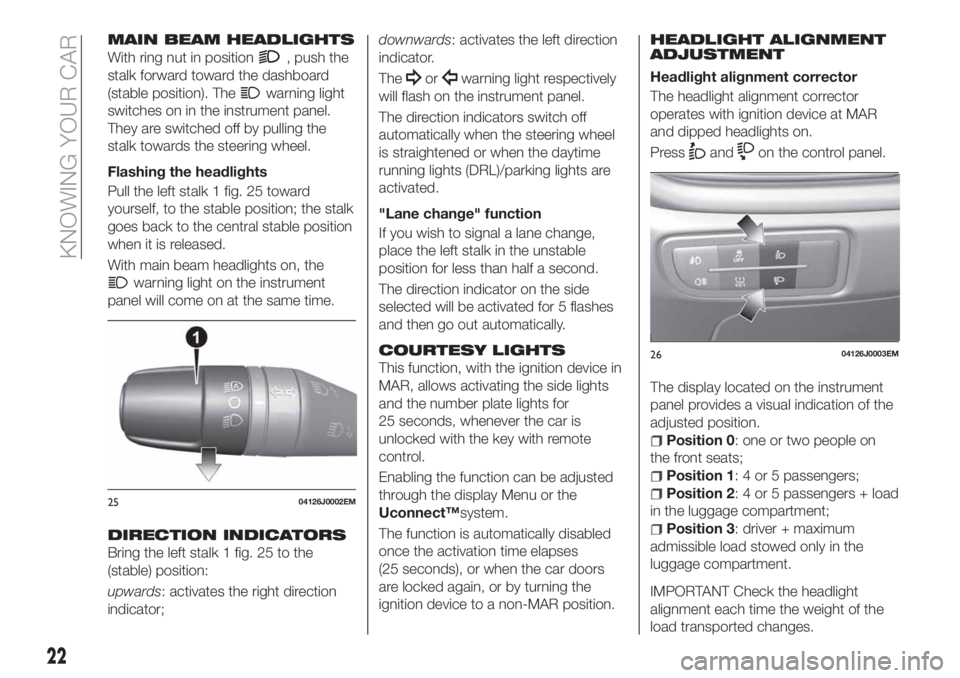
Pull the left stalk 1 fig. 25 toward
yourself, to the stable position; the stalk
goes back to the central stable position
when it is released.
With main beam headlights on, the
warning light on the instrument
panel will come on at the same time.
DIRECTION INDICATORS
Bring the left stalk 1 fig. 25 to the
(stable) position:
upwards: activates the right direction
indicator;downwards: activates the left direction
indicator.
The
orwarning light respectively
will flash on the instrument panel.
The direction indicators switch off
automatically when the steering wheel
is straightened or when the daytime
running lights (DRL)/parking lights are
activated.
"Lane change" function
If you wish to signal a lane change,
place the left stalk in the unstable
position for less than half a second.
The direction indicator on the side
selected will be activated for 5 flashes
and then go out automatically.
COURTESY LIGHTS
This function, with the ignition device in
MAR, allows activating the side lights
and the number plate lights for
25 seconds, whenever the car is
unlocked with the key with remote
control.
Enabling the function can be adjusted
through the display Menu or the
Uconnect™system.
The function is automatically disabled
once the activation time elapses
(25 seconds), or when the car doors
are locked again, or by turning the
ignition device to a non-MAR position.
HEADLIGHT ALIGNMENT
ADJUSTMENT
Headlight alignment corrector
The headlight alignment corrector
operates with ignition device at MAR
and dipped headlights on.
Press
andon the control panel.
The display located on the instrument
panel provides a visual indication of the
adjusted position.
Position 0: one or two people on
the front seats;
Position 1: 4 or 5 passengers;
Position 2: 4 or 5 passengers + load
in the luggage compartment;
Position 3: driver + maximum
admissible load stowed only in the
luggage compartment.
IMPORTANT Check the headlight
alignment each time the weight of the
load transported changes.
2504126J0002EM
2604126J0003EM
22
KNOWING YOUR CAR
Page 36 of 252
WARNING
28)It is absolutely forbidden to carry out
any after-market operation involving
steering system or steering column
modifications (e.g. installation of anti-theft
device) that could adversely affect
performance, invalidate the warranty, cause
serious safety problems and also result in
the car not meeting type-approval
requirements.
29)Before performing any maintenance
operations, always turn off the engine and
remove the key from the ignition to lock the
steering column (especially when the car
wheels are not touching the ground). If this
is not possible (for example if the key
needs to be turned to MAR or the engine
must be running), remove the main fuse
that protects the electric power steering.
BOOT
9)
IMPORTANT When travelling, do not
put any object on the rear parcel shelf
because they can injure passengers in
the event of an accident or sudden
braking.
OPENING
30)
Rear flap opening
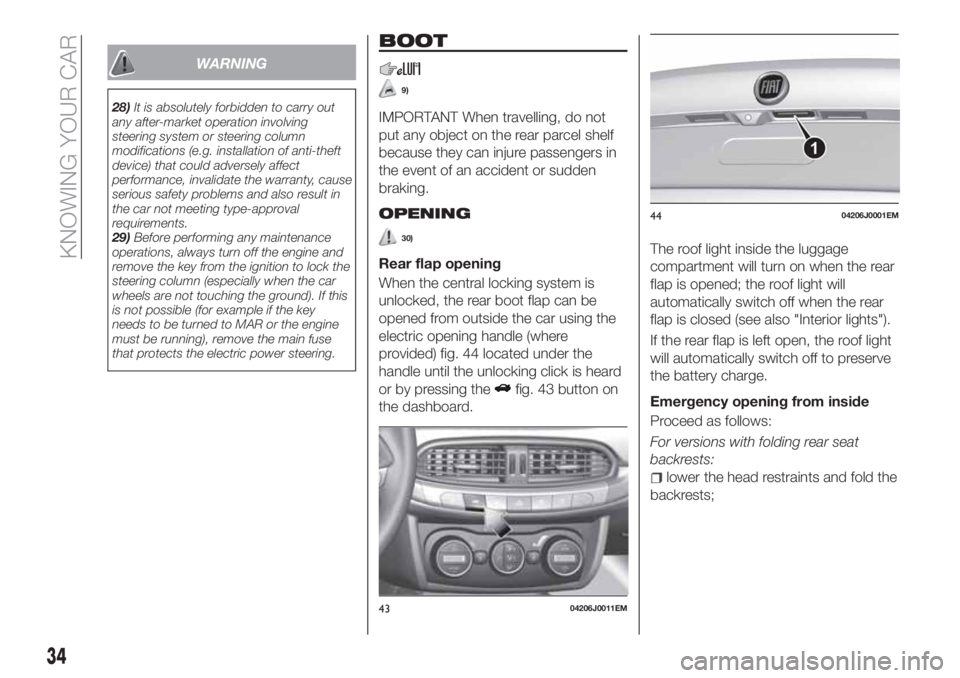
When the central locking system is
unlocked, the rear boot flap can be
opened from outside the car using the
electric opening handle (where
provided) fig. 44 located under the
handle until the unlocking click is heard
or by pressing the
fig. 43 button on
the dashboard.The roof light inside the luggage
compartment will turn on when the rear
flap is opened; the roof light will
automatically switch off when the rear
flap is closed (see also "Interior lights").
If the rear flap is left open, the roof light
will automatically switch off to preserve
the battery charge.
Emergency opening from inside
Proceed as follows:
For versions with folding rear seat
backrests:
lower the head restraints and fold the
backrests;
4304206J0011EM
4404206J0001EM
34
KNOWING YOUR CAR
Page 49 of 252
: press and release the button
to display the "Trip computer"
information.
MAIN MENU
The Menu includes the following items:
“Dimmer” (lighting)
“Speed”
“Hour” (Set time)
“Buzzer” (Acoustic warning)
“Units” (Units of measure)
“Corner” (Cornering lights)
“Bag P” (Passenger airbag) (where
present)
“DRL” (Daytime running lights) (for
versions/markets where provided)
Bag P (Passenger airbag)
(where provided)
This function is used to activate/
deactivate the front passenger's airbag.
Proceed as follows:
press theMENU OKbutton and,
after the displaying of the message
(Bag pass: Off, to deactivate) or the
message "Bag pass: On, to activate) by
pressing
/, press thebutton;
a confirmation request message will
appear on the display;
press buttons/to select (Yes)
(confirming activation/deactivation) or
(No) (to abort);
press theMENU OKbutton briefly; a
message confirming the selection is
displayed and you can return to the
menu screen.
WithPassenger's protection not
activethe
LED comes on
constantly in the instrument panel
dashboard.
NOTE With theUconnect™system,
some Menu items are shown and
managed on the display of the latter
and not on the instrument panel display
(refer to the dedicated Multimedia
chapter or to the supplement available
online).RECONFIGURABLE
MULTIFUNCTION
DISPLAY
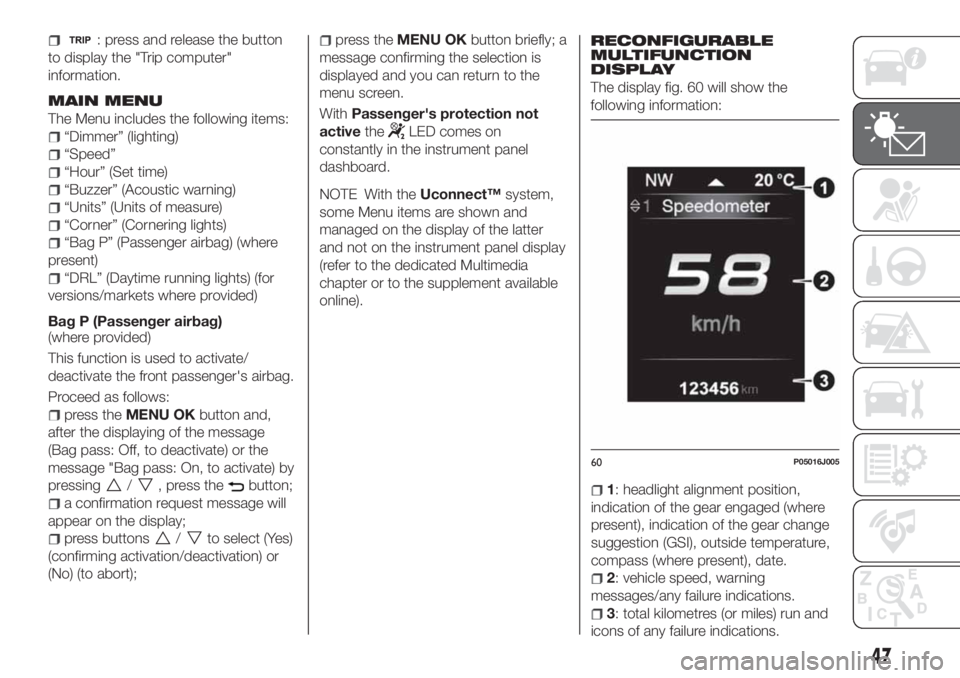
The display fig. 60 will show the
following information:
1: headlight alignment position,
indication of the gear engaged (where
present), indication of the gear change
suggestion (GSI), outside temperature,
compass (where present), date.
2: vehicle speed, warning
messages/any failure indications.
3: total kilometres (or miles) run and
icons of any failure indications.
60P05016J005
47
Page 50 of 252
CONTROL BUTTONS
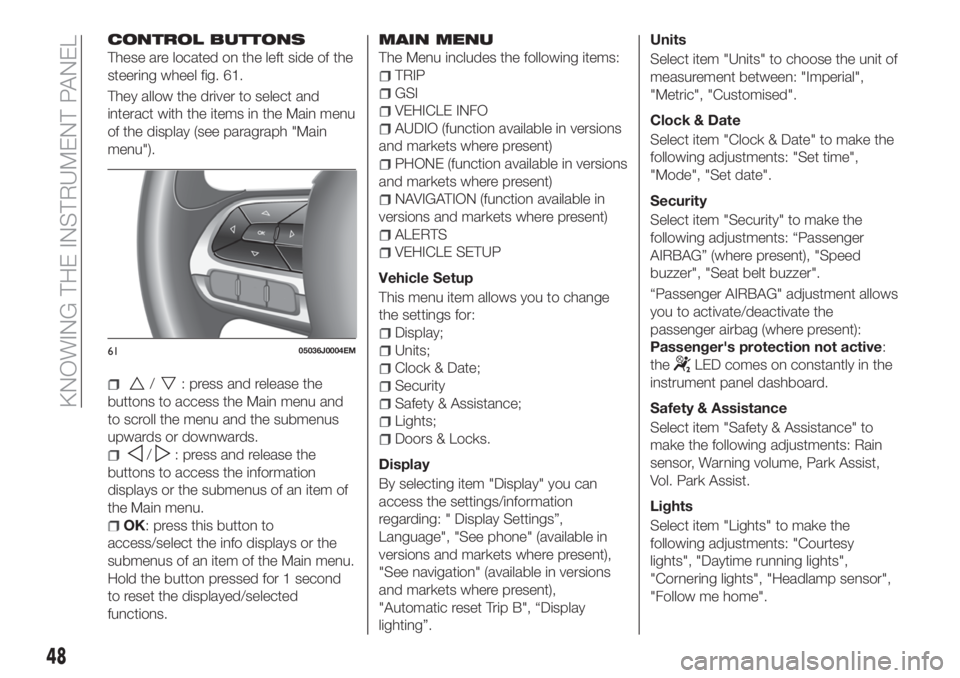
These are located on the left side of the
steering wheel fig. 61.
They allow the driver to select and
interact with the items in the Main menu
of the display (see paragraph "Main
menu").
/: press and release the
buttons to access the Main menu and
to scroll the menu and the submenus
upwards or downwards.
/: press and release the
buttons to access the information
displays or the submenus of an item of
the Main menu.
OK: press this button to
access/select the info displays or the
submenus of an item of the Main menu.
Hold the button pressed for 1 second
to reset the displayed/selected
functions.
MAIN MENU
The Menu includes the following items:
TRIP
GSI
VEHICLE INFO
AUDIO (function available in versions
and markets where present)
PHONE (function available in versions
and markets where present)
NAVIGATION (function available in
versions and markets where present)
ALERTS
VEHICLE SETUP
Vehicle Setup
This menu item allows you to change
the settings for:
Display;
Units;
Clock & Date;
Security
Safety & Assistance;
Lights;
Doors & Locks.
Display
By selecting item "Display" you can
access the settings/information
regarding: " Display Settings”,
Language", "See phone" (available in
versions and markets where present),
"See navigation" (available in versions
and markets where present),
"Automatic reset Trip B", “Display
lighting”.Units
Select item "Units" to choose the unit of
measurement between: "Imperial",
"Metric", "Customised".
Clock & Date
Select item "Clock & Date" to make the
following adjustments: "Set time",
"Mode", "Set date".
Security
Select item "Security" to make the
following adjustments: “Passenger
AIRBAG” (where present), "Speed
buzzer", "Seat belt buzzer".
“Passenger AIRBAG" adjustment allows
you to activate/deactivate the
passenger airbag (where present):
Passenger's protection not active:
the
LED comes on constantly in the
instrument panel dashboard.
Safety & Assistance
Select item "Safety & Assistance" to
make the following adjustments: Rain
sensor, Warning volume, Park Assist,
Vol. Park Assist.
Lights
Select item "Lights" to make the
following adjustments: "Courtesy
lights", "Daytime running lights",
"Cornering lights", "Headlamp sensor",
"Follow me home".6105036J0004EM
48
KNOWING THE INSTRUMENT PANEL
Page 145 of 252
142)A 16” spare wheel is provided with
17” and 18” tyres. The space-saver wheel
(for versions/markets where provided) is
specific to your car, do not use it on other
models, or use the space-saver wheel of
other models on your car. The space-saver
wheel must only be used in the event of an
emergency. Never use it for more than
strictly necessary and never exceed
80 km/h. Important! For temporary use
only! 80km/h max! Replace with standard
wheel as soon as possible. Never remove
or cover the sticker on the space-saver
wheel. Never apply a wheel cap on a
space-saver wheel. The vehicle's driving
characteristics will be modified with the
space-saver wheel fitted. Avoid violent
acceleration and braking, abrupt steering
and fast cornering. Have the wheel
repaired and refitted as soon as possible.
Using two or more spare wheels at the
same time is forbidden. Do not apply
grease to the bolt threads before fitting:
they could come unscrewed.
IMPORTANT
53)When turning the jack handle make
sure that it can turn freely without scraping
your hand against the ground. The moving
components of the jack ("worm screw" and
joints) can also cause injuries: avoid
touching them. If you come into contact
with lubricating grease, clean yourself
thoroughly.
54)Contact a Fiat Dealership as soon as
possible to have the correct tightening of
the wheel bolts checked.
FIX&GO KIT
(where provided)
143) 144)
55)
DESCRIPTION
The Fix&Go quick tyre repair kit
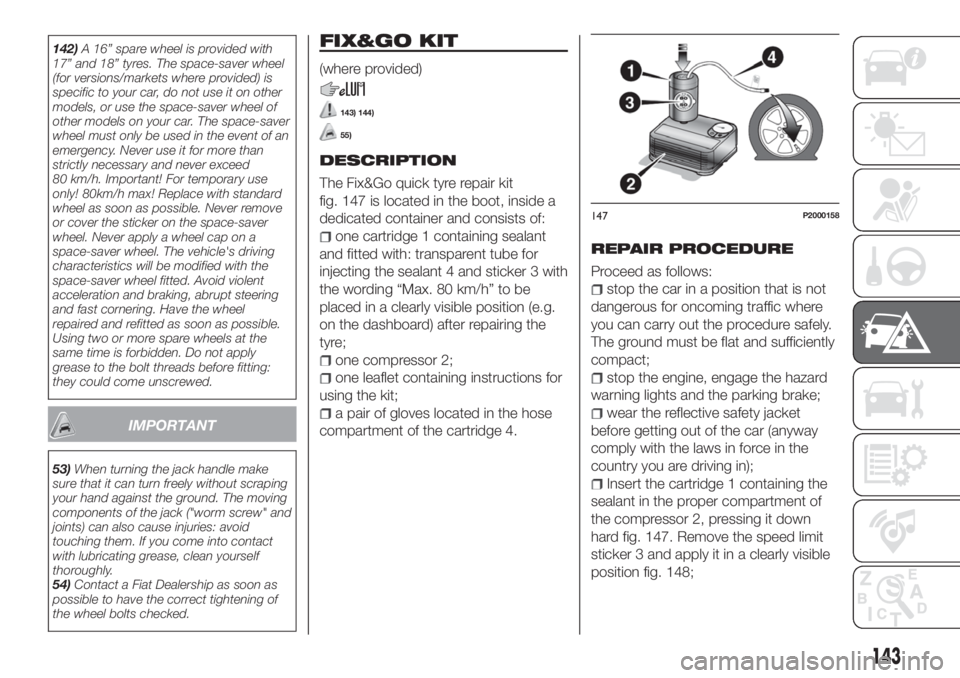
fig. 147 is located in the boot, inside a
dedicated container and consists of:
one cartridge 1 containing sealant
and fitted with: transparent tube for
injecting the sealant 4 and sticker 3 with
the wording “Max. 80 km/h” to be
placed in a clearly visible position (e.g.
on the dashboard) after repairing the
tyre;
one compressor 2;
one leaflet containing instructions for
using the kit;
a pair of gloves located in the hose
compartment of the cartridge 4.
REPAIR PROCEDURE
Proceed as follows:
stop the car in a position that is not
dangerous for oncoming traffic where
you can carry out the procedure safely.
The ground must be flat and sufficiently
compact;
stop the engine, engage the hazard
warning lights and the parking brake;
wear the reflective safety jacket
before getting out of the car (anyway
comply with the laws in force in the
country you are driving in);
Insert the cartridge 1 containing the
sealant in the proper compartment of
the compressor 2, pressing it down
hard fig. 147. Remove the speed limit
sticker 3 and apply it in a clearly visible
position fig. 148;
147P2000158
143
Page 150 of 252
FUEL CUT-OFF
SYSTEM
DESCRIPTION
Diesel and petrol versions
This intervenes in the case of an impact
causing:
the interruption of the fuel supply
with the engine consequently switching
off;
the automatic unlocking of the
doors;
turning on of the lights inside the
vehicle;
deactivation of climate control
system ventilation;
switching on of the hazard warning
lights (to deactivate the lights press the
button on the dashboard).
On some versions, the intervention of
the system is indicated by a message
shown on the display. In the same way,
a dedicated message on the display
warns the driver if system operation is
compromised.
IMPORTANT Carefully check the vehicle
for fuel leaks, for instance in the engine
compartment, under the vehicle or near
the tank area. After a collision, bring the
ignition device to STOP to prevent the
battery from running down.
LPG versions
(where provided)
On LPG versions, in addition to the
above, the fuel cut-off system stops
petrol supply immediately, closes the
LPG safety solenoid valve and stops
injection, consequently shutting off the
engine.
148
IN AN EMERGENCY