tow FIAT TIPO 5DOORS STATION WAGON 2016 1.G Owner's Manual
[x] Cancel search | Manufacturer: FIAT, Model Year: 2016, Model line: TIPO 5DOORS STATION WAGON, Model: FIAT TIPO 5DOORS STATION WAGON 2016 1.GPages: 240, PDF Size: 5.43 MB
Page 118 of 240
IN AN EMERGENCY
A punctured tyre or a burnt-out bulb?
At times, a problem may interfere with
our journey.
The pages on emergencies can help
you to deal with critical situations
independently and with calm.
In an emergency we recommend that
you call the freephone number found in
the Warranty Booklet.
It is also possible to call the national or
international universal freephone
number to search for the nearest Fiat
Dealership.HAZARD WARNING LIGHTS.....117
BULB REPLACEMENT........117
REPLACING FUSES..........127
CHANGING A WHEEL.........133
FIX&GO AUTOMATIC KIT.......136
JUMP STARTING............139
FUEL CUT-OFF SYSTEM.......140
TOWING THE VEHICLE........142
116
IN AN EMERGENCY
Page 119 of 240
HAZARD WARNING
LIGHTS
CONTROL
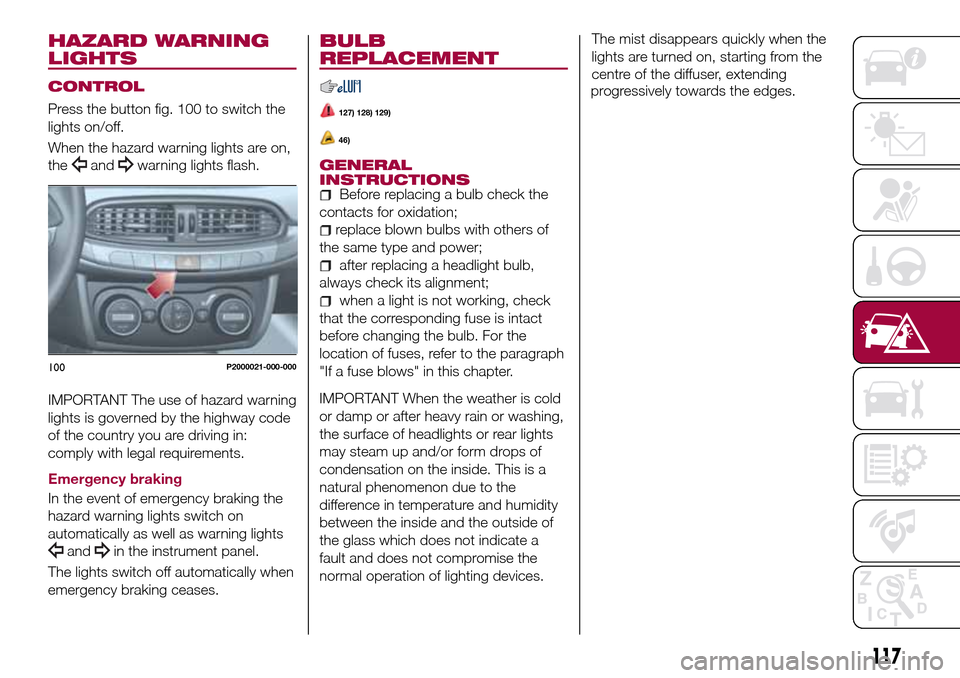
Press the button fig. 100 to switch the
lights on/off.
When the hazard warning lights are on,
the
andwarning lights flash.
IMPORTANT The use of hazard warning
lights is governed by the highway code
of the country you are driving in:
comply with legal requirements.
Emergency braking
In the event of emergency braking the
hazard warning lights switch on
automatically as well as warning lights
andin the instrument panel.
The lights switch off automatically when
emergency braking ceases.
BULB
REPLACEMENT
127) 128) 129)
46)
GENERAL
INSTRUCTIONS
Before replacing a bulb check the
contacts for oxidation;
replace blown bulbs with others of
the same type and power;
after replacing a headlight bulb,
always check its alignment;
when a light is not working, check
that the corresponding fuse is intact
before changing the bulb. For the
location of fuses, refer to the paragraph
"If a fuse blows" in this chapter.
IMPORTANT When the weather is cold
or damp or after heavy rain or washing,
the surface of headlights or rear lights
may steam up and/or form drops of
condensation on the inside. This is a
natural phenomenon due to the
difference in temperature and humidity
between the inside and the outside of
the glass which does not indicate a
fault and does not compromise the
normal operation of lighting devices.The mist disappears quickly when the
lights are turned on, starting from the
centre of the diffuser, extending
progressively towards the edges.
100P2000021-000-000
117
Page 130 of 240
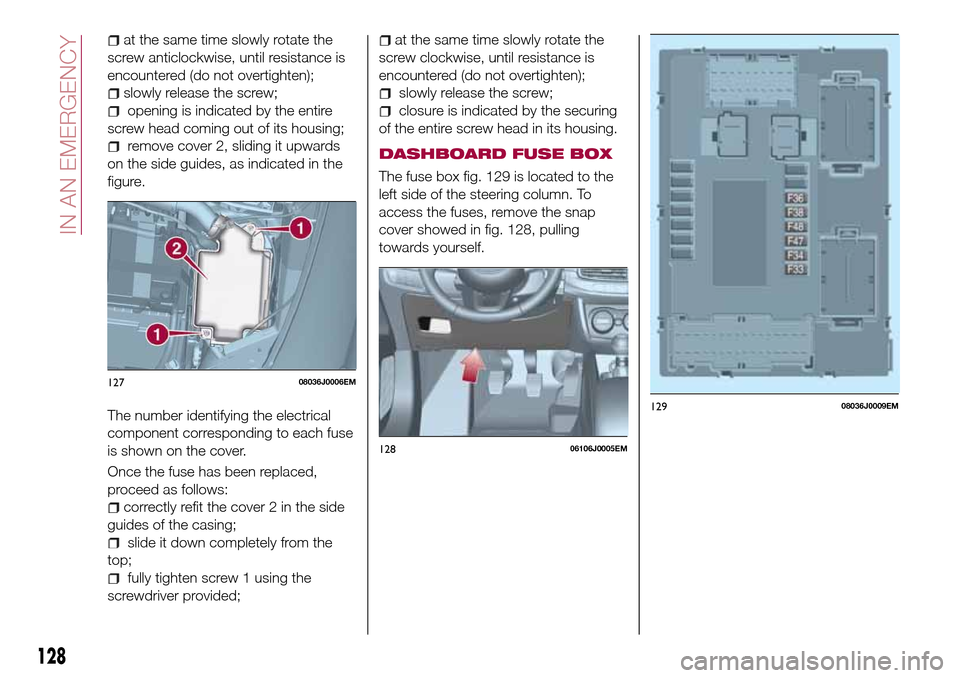
at the same time slowly rotate the
screw anticlockwise, until resistance is
encountered (do not overtighten);
slowly release the screw;
opening is indicated by the entire
screw head coming out of its housing;
remove cover 2, sliding it upwards
on the side guides, as indicated in the
figure.
The number identifying the electrical
component corresponding to each fuse
is shown on the cover.
Once the fuse has been replaced,
proceed as follows:
correctly refit the cover 2 in the side
guides of the casing;
slide it down completely from the
top;
fully tighten screw 1 using the
screwdriver provided;
at the same time slowly rotate the
screw clockwise, until resistance is
encountered (do not overtighten);
slowly release the screw;
closure is indicated by the securing
of the entire screw head in its housing.
DASHBOARD FUSE BOX
The fuse box fig. 129 is located to the
left side of the steering column. To
access the fuses, remove the snap
cover showed in fig. 128, pulling
towards yourself.
12708036J0006EM
12806106J0005EM
12908036J0009EM
128
IN AN EMERGENCY
Page 135 of 240
CHANGING A WHEEL
JACK
Please note that:
the jack weight is 2.15 kg;
the jack cannot be repaired and in
the event of a fault it must be replaced
by another genuine one;
No tool other than its cranking device
may be fitted on the jack.
Servicing
Prevent any dirt from depositing on
the "worm screw";
Keep the "worm screw" lubricated;
Never modify the jack.
Conditions for non-use
Temperatures below −40°C;
On sandy or muddy ground;
On uneven ground;
On steep roads;
In extreme weather conditions:
thunderstorms, typhoons, hurricanes,
blizzards, storms, etc.
In direct contact with the engine or
for repairs under the vehicle;
On boats.
CHANGING PROCEDURE
135) 136) 137) 138) 139)
49) 50)
Proceed as follows:
stop the car in a position that is not
dangerous for oncoming traffic where
you can change the wheel safely. The
ground must be flat and sufficiently
compact;
stop the engine, engage the hazard
warning lights and the parking brake;
engage first gear or reverse;
wear the reflective safety jacket
before getting out of the car (anyway
comply with the laws in force in the
country you are driving in);
open the boot and if there is a cargo
box, remove it as described in the
“Cargo box” paragraph in the “Getting
to know the car” chapter.
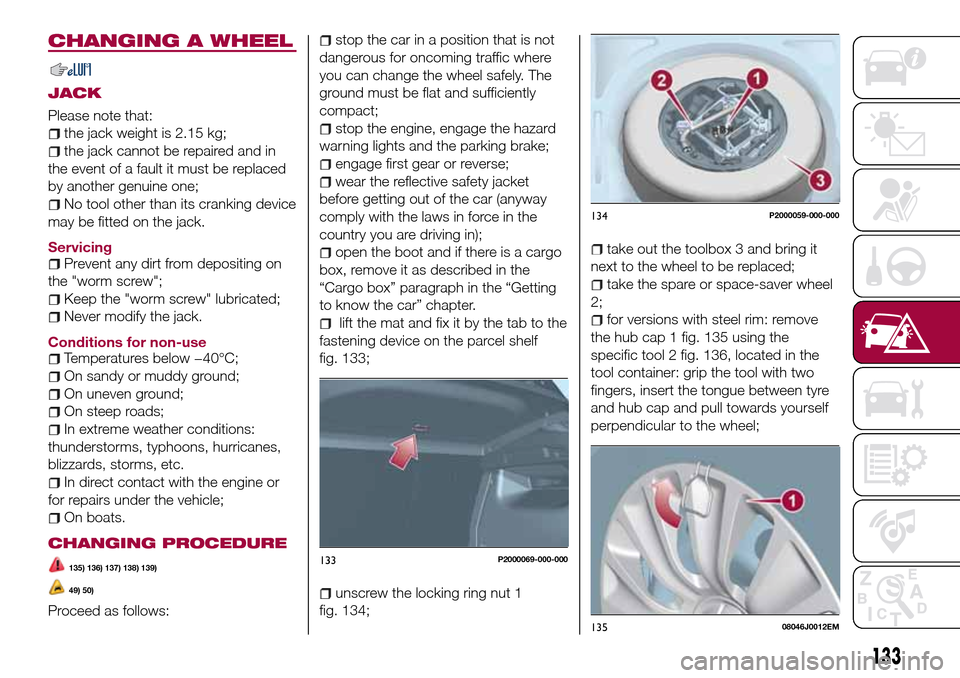
lift the mat and fix it by the tab to the
fastening device on the parcel shelf
fig. 133;
unscrew the locking ring nut 1
fig. 134;
take out the toolbox 3 and bring it
next to the wheel to be replaced;
take the spare or space-saver wheel
2;
for versions with steel rim: remove
the hub cap 1 fig. 135 using the
specific tool 2 fig. 136, located in the
tool container: grip the tool with two
fingers, insert the tongue between tyre
and hub cap and pull towards yourself
perpendicular to the wheel;
133P2000069-000-000
134P2000059-000-000
13508046J0012EM
133
Page 138 of 240
50)Contact a Fiat Dealership as soon as
possible to have the correct tightening of
the wheel bolts checked.FIX&GO AUTOMATIC
KIT
(where provided)
DESCRIPTION
140)
51) 52)
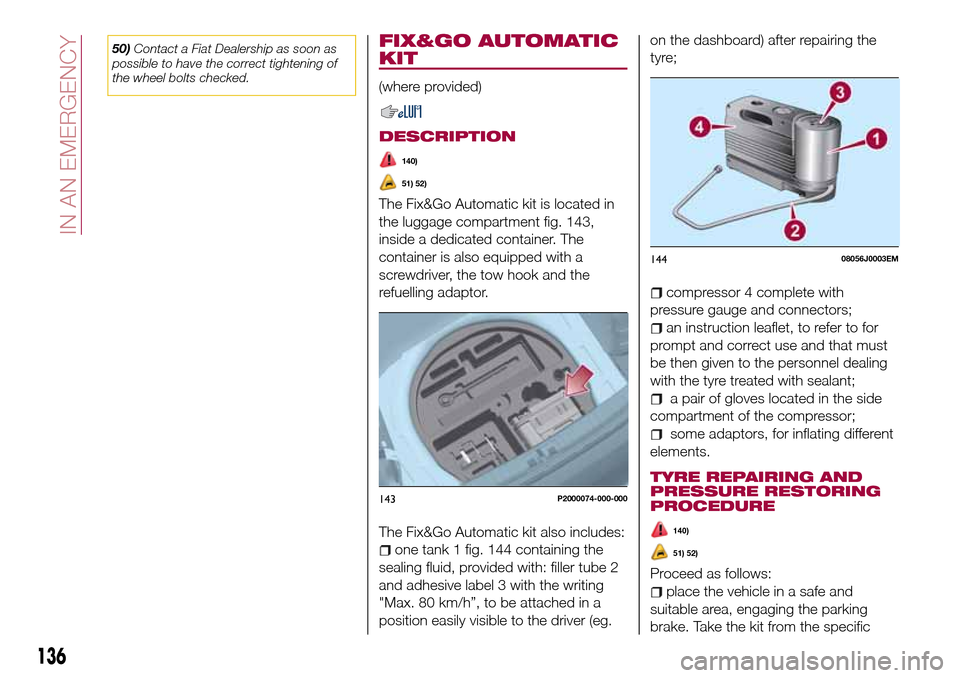
The Fix&Go Automatic kit is located in
the luggage compartment fig. 143,
inside a dedicated container. The
container is also equipped with a
screwdriver, the tow hook and the
refuelling adaptor.
The Fix&Go Automatic kit also includes:
one tank 1 fig. 144 containing the
sealing fluid, provided with: filler tube 2
and adhesive label 3 with the writing
"Max. 80 km/h”, to be attached in a
position easily visible to the driver (eg.on the dashboard) after repairing the
tyre;
compressor 4 complete with
pressure gauge and connectors;
an instruction leaflet, to refer to for
prompt and correct use and that must
be then given to the personnel dealing
with the tyre treated with sealant;
a pair of gloves located in the side
compartment of the compressor;
some adaptors, for inflating different
elements.
TYRE REPAIRING AND
PRESSURE RESTORING
PROCEDURE
140)
51) 52)
Proceed as follows:
place the vehicle in a safe and
suitable area, engaging the parking
brake. Take the kit from the specific
143P2000074-000-000
14408056J0003EM
136
IN AN EMERGENCY
Page 141 of 240
JUMP STARTING
141) 142) 143) 144)
53)
If the battery is flat, a jump starting can
be performed using the battery and the
cables of another vehicle, or using an
auxiliary battery. In all cases, the battery
used must have a capacity equal to or
a little higher than the flat one.
Jump starting may be dangerous if
carried out incorrectly: carefully follow
the procedures described below.
JUMP STARTING
IMPORTANT NOTES
Do not use an auxiliary battery or any
other source of external supply with a
voltage above 12 V: the battery, the
starter, the alternator and the electrical
system of the vehicle could be
damaged.
Do not attempt jump starting if the
battery is frozen. The battery could
break and explode!
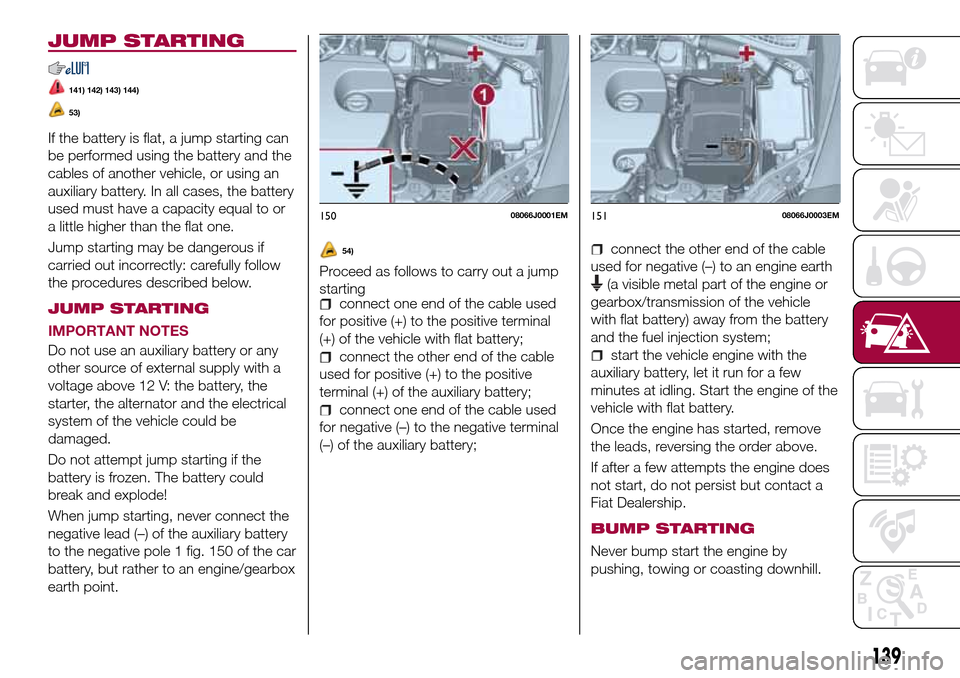
When jump starting, never connect the
negative lead (–) of the auxiliary battery
to the negative pole 1 fig. 150 of the car
battery, but rather to an engine/gearbox
earth point.
54)
Proceed as follows to carry out a jump
starting
connect one end of the cable used
for positive (+) to the positive terminal
(+) of the vehicle with flat battery;
connect the other end of the cable
used for positive (+) to the positive
terminal (+) of the auxiliary battery;
connect one end of the cable used
for negative (–) to the negative terminal
(–) of the auxiliary battery;
connect the other end of the cable
used for negative (–) to an engine earth
(a visible metal part of the engine or
gearbox/transmission of the vehicle
with flat battery) away from the battery
and the fuel injection system;
start the vehicle engine with the
auxiliary battery, let it run for a few
minutes at idling. Start the engine of the
vehicle with flat battery.
Once the engine has started, remove
the leads, reversing the order above.
If after a few attempts the engine does
not start, do not persist but contact a
Fiat Dealership.
BUMP STARTING
Never bump start the engine by
pushing, towing or coasting downhill.
15008066J0001EM15108066J0003EM
139
Page 144 of 240
TOWING THE
VEHICLE
ATTACHING THE TOW
RING
146) 147) 148)
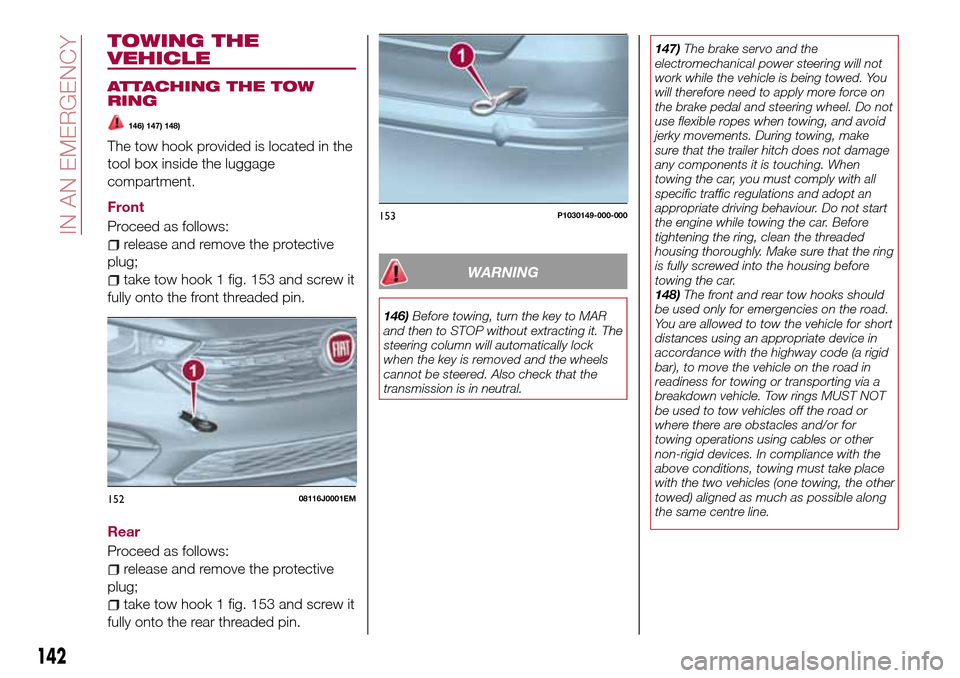
The tow hook provided is located in the
tool box inside the luggage
compartment.
Front
Proceed as follows:
release and remove the protective
plug;
take tow hook 1 fig. 153 and screw it
fully onto the front threaded pin.
Rear
Proceed as follows:
release and remove the protective
plug;
take tow hook 1 fig. 153 and screw it
fully onto the rear threaded pin.
WARNING
146)Before towing, turn the key to MAR
and then to STOP without extracting it. The
steering column will automatically lock
when the key is removed and the wheels
cannot be steered. Also check that the
transmission is in neutral.147)The brake servo and the
electromechanical power steering will not
work while the vehicle is being towed. You
will therefore need to apply more force on
the brake pedal and steering wheel. Do not
use flexible ropes when towing, and avoid
jerky movements. During towing, make
sure that the trailer hitch does not damage
any components it is touching. When
towing the car, you must comply with all
specific traffic regulations and adopt an
appropriate driving behaviour. Do not start
the engine while towing the car. Before
tightening the ring, clean the threaded
housing thoroughly. Make sure that the ring
is fully screwed into the housing before
towing the car.
148)The front and rear tow hooks should
be used only for emergencies on the road.
You are allowed to tow the vehicle for short
distances using an appropriate device in
accordance with the highway code (a rigid
bar), to move the vehicle on the road in
readiness for towing or transporting via a
breakdown vehicle. Tow rings MUST NOT
be used to tow vehicles off the road or
where there are obstacles and/or for
towing operations using cables or other
non-rigid devices. In compliance with the
above conditions, towing must take place
with the two vehicles (one towing, the other
towed) aligned as much as possible along
the same centre line.
15208116J0001EM
153P1030149-000-000
142
IN AN EMERGENCY
Page 146 of 240

SCHEDULED
SERVICING
Correct servicing is crucial for
guaranteeing a long life for the vehicle
under the best conditions.
For this reason, Fiat has planned a
series of checks and services at fixed
distance intervals and, for
versions/markets, where provided, at
fixed time intervals, as described in the
Scheduled Servicing Plan.
Regardless of the above, it is always
necessary to carefully follow the
instructions in the Scheduled Servicing
Plan (e.g. periodically check level of
liquids, tyre pressure, etc.).
Scheduled Servicing is offered by all
Fiat Dealerships according to fixed time
or kilometres/miles intervals. If, during
each operation, in addition to the ones
scheduled, the need arises for further
replacements or repairs, these may be
carried out with the owner's explicit
agreement only. If your vehicle is used
frequently for towing, the interval
between one service operation and the
next should be reduced.IMPORTANT NOTES
Scheduled Servicing interventions are
set out by the Manufacturer. Failure to
comply with the schedule may
invalidate the warranty.
It is advisable to inform a Fiat
Dealership of any small operating
irregularities without waiting for the next
service.
144
SERVICING AND CARE
Page 148 of 240
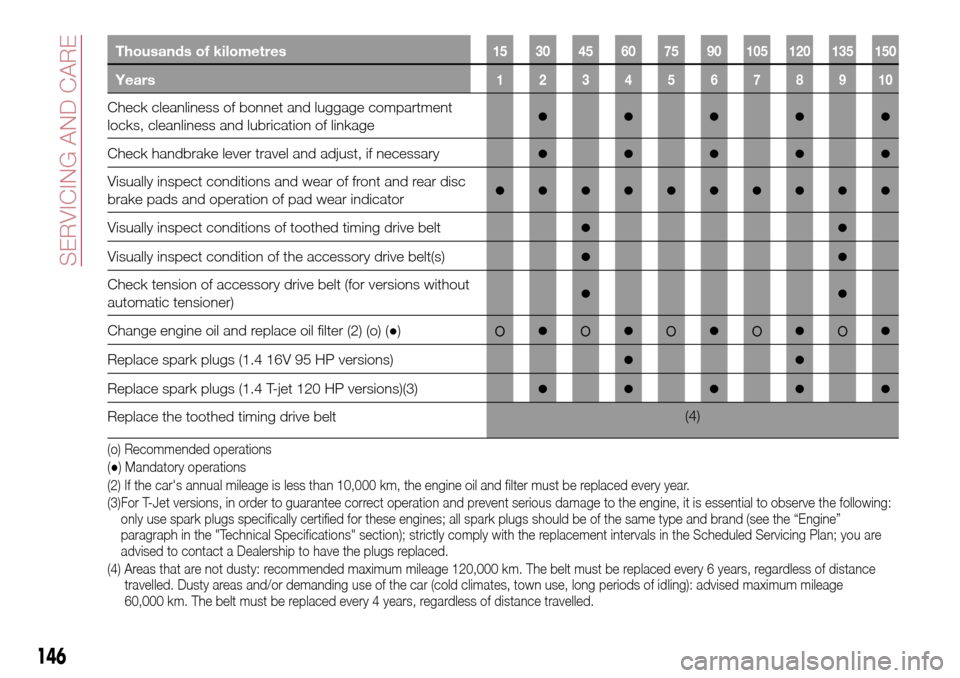
Thousands of kilometres15 30 45 60 75 90 105 120 135 150
Years12345678910
Check cleanliness of bonnet and luggage compartment
locks, cleanliness and lubrication of linkage●●●●●
Check handbrake lever travel and adjust, if necessary●●●●●
Visually inspect conditions and wear of front and rear disc
brake pads and operation of pad wear indicator●●●●●●●●●●
Visually inspect conditions of toothed timing drive belt●●
Visually inspect condition of the accessory drive belt(s)●●
Check tension of accessory drive belt (for versions without
automatic tensioner)●●
Change engine oil and replace oil filter (2) (o) (●)o●o●o●o●o●
Replace spark plugs (1.4 16V 95 HP versions)●●
Replace spark plugs (1.4 T-jet 120 HP versions)(3)●●●●●
Replace the toothed timing drive belt(4)
(2) If the car's annual mileage is less than 10,000 km, the engine oil and filter must be replaced every year. (o) Recommended operations
(●) Mandatory operations
(3)For T-Jet versions, in order to guarantee correct operation and prevent serious damage to the engine, it is essential to observe the following:
only use spark plugs specifically certified for these engines; all spark plugs should be of the same type and brand (see the “Engine”
paragraph in the "Technical Specifications" section); strictly comply with the replacement intervals in the Scheduled Servicing Plan; you are
advised to contact a Dealership to have the plugs replaced.
(4) Areas that are not dusty: recommended maximum mileage 120,000 km. The belt must be replaced every 6 years, regardless of distance
travelled. Dusty areas and/or demanding use of the car (cold climates, town use, long periods of idling): advised maximum mileage
60,000 km. The belt must be replaced every 4 years, regardless of distance travelled.
146
SERVICING AND CARE
Page 149 of 240

Thousands of kilometres15 30 45 60 75 90 105 120 135 150
Years12345678910
Replace accessory drive belt/s(4)
Replace air cleaner cartridge (5)
●●●●●
Change the brake fluid(6)
Replace the passenger compartment cleaner (5) (o) (●)
o●o●o●o●o●
(4) Areas that are not dusty: recommended maximum mileage 120,000 km. The belt must be replaced every 6 years, regardless of distance
travelled. Dusty areas and/or demanding use of the car (cold climates, town use, long periods of idling): advised maximum mileage
60,000 km. The belt must be replaced every 4 years, regardless of distance travelled.
(5) If the vehicle is used in dusty areas, you are advised to change this filter every 15,000 km
(6) The brake fluid replacement has to be done every two years, irrespective of the mileage.
(o) Recommended operations
(●) Mandatory operations
147