steering wheel adjustment FIAT TIPO 5DOORS STATION WAGON 2018 Owner handbook (in English)
[x] Cancel search | Manufacturer: FIAT, Model Year: 2018, Model line: TIPO 5DOORS STATION WAGON, Model: FIAT TIPO 5DOORS STATION WAGON 2018Pages: 292, PDF Size: 7.74 MB
Page 10 of 292
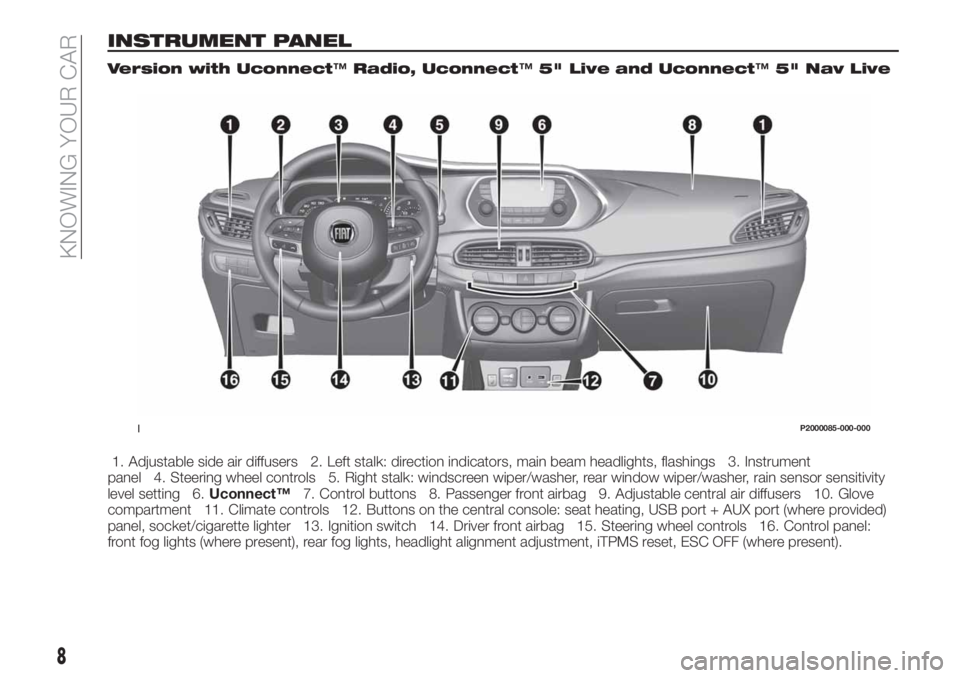
INSTRUMENT PANEL
Version with Uconnect™Radio, Uconnect™5" Live and Uconnect™5" Nav Live
1. Adjustable side air diffusers 2. Left stalk: direction indicators, main beam headlights, flashings 3. Instrument
panel 4. Steering wheel controls 5. Right stalk: windscreen wiper/washer, rear window wiper/washer, rain sensor sensitivity
level setting 6.Uconnect™7. Control buttons 8. Passenger front airbag 9. Adjustable central air diffusers 10. Glove
compartment 11. Climate controls 12. Buttons on the central console: seat heating, USB port + AUX port (where provided)
panel, socket/cigarette lighter 13. Ignition switch 14. Driver front airbag 15. Steering wheel controls 16. Control panel:
front fog lights (where present), rear fog lights, headlight alignment adjustment, iTPMS reset, ESC OFF (where present).
1P2000085-000-000
8
KNOWING YOUR CAR
Page 11 of 292
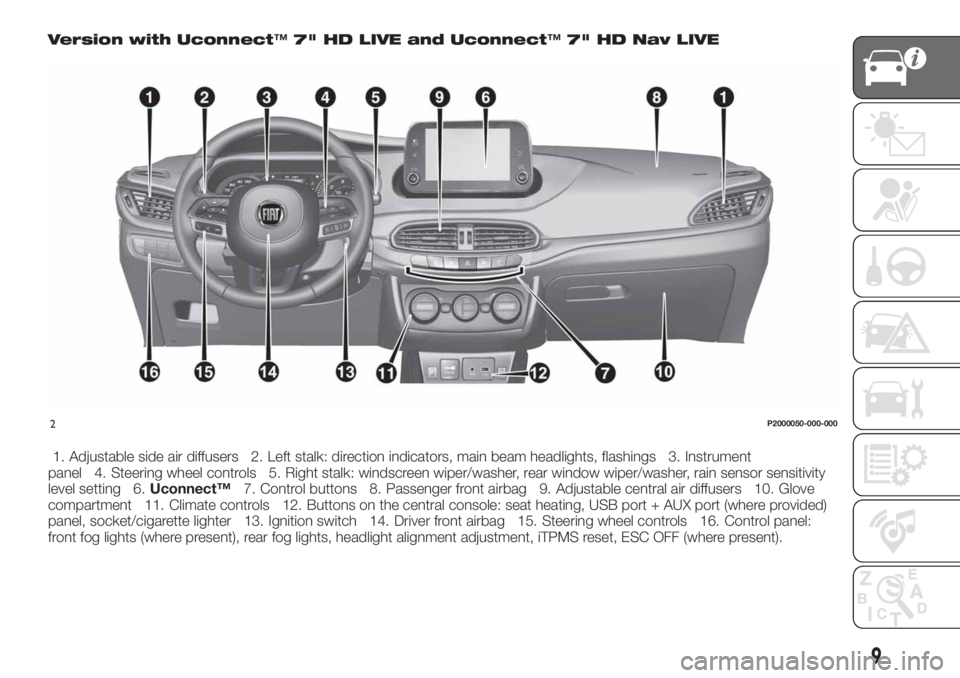
Version with Uconnect™7" HD LIVE and Uconnect™7" HD Nav LIVE
1. Adjustable side air diffusers 2. Left stalk: direction indicators, main beam headlights, flashings 3. Instrument
panel 4. Steering wheel controls 5. Right stalk: windscreen wiper/washer, rear window wiper/washer, rain sensor sensitivity
level setting 6.Uconnect™7. Control buttons 8. Passenger front airbag 9. Adjustable central air diffusers 10. Glove
compartment 11. Climate controls 12. Buttons on the central console: seat heating, USB port + AUX port (where provided)
panel, socket/cigarette lighter 13. Ignition switch 14. Driver front airbag 15. Steering wheel controls 16. Control panel:
front fog lights (where present), rear fog lights, headlight alignment adjustment, iTPMS reset, ESC OFF (where present).
2P2000050-000-000
9
Page 12 of 292
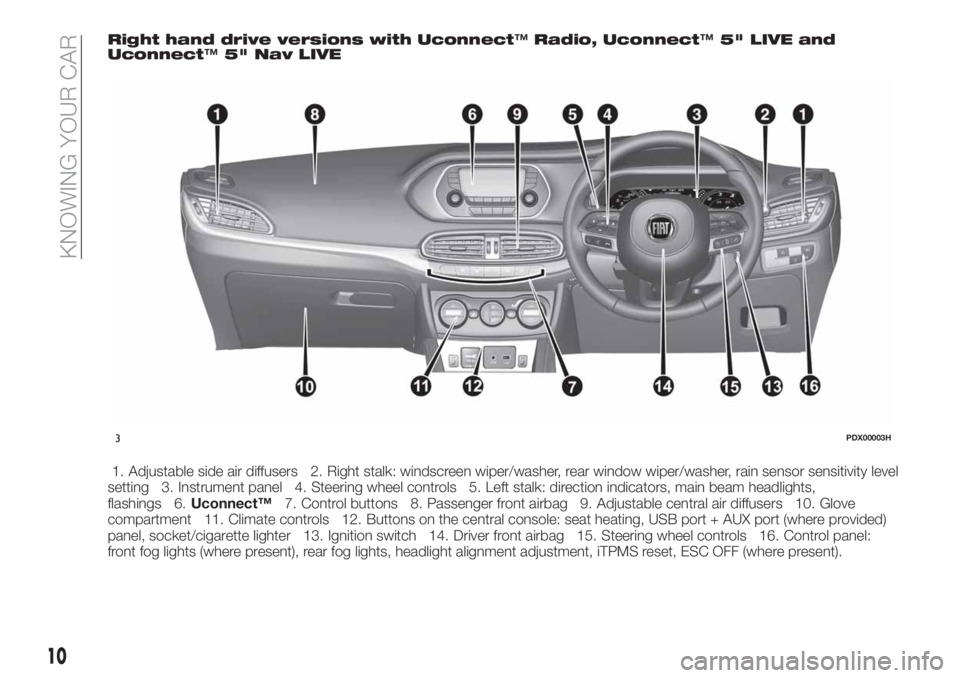
Right hand drive versions with Uconnect™Radio, Uconnect™5" LIVE and
Uconnect™5" Nav LIVE
1. Adjustable side air diffusers 2. Right stalk: windscreen wiper/washer, rear window wiper/washer, rain sensor sensitivity level
setting 3. Instrument panel 4. Steering wheel controls 5. Left stalk: direction indicators, main beam headlights,
flashings 6.Uconnect™7. Control buttons 8. Passenger front airbag 9. Adjustable central air diffusers 10. Glove
compartment 11. Climate controls 12. Buttons on the central console: seat heating, USB port + AUX port (where provided)
panel, socket/cigarette lighter 13. Ignition switch 14. Driver front airbag 15. Steering wheel controls 16. Control panel:
front fog lights (where present), rear fog lights, headlight alignment adjustment, iTPMS reset, ESC OFF (where present).
3PDX00003H
10
KNOWING YOUR CAR
Page 18 of 292
SEATS
The front seats can be adjusted so as
to ensure maximum comfort for the
occupants.
Driver seat adjustment must also be
carried out remembering that, keeping
the shoulders resting firmly against the
backrest, the wrists must be able to
reach the top of the steering wheel rim.
Additionally, it must be possible to
depress the clutch pedal with the left
foot, for versions with manual
transmission, or fully depress the brake
pedal with the right foot (versions with
automatic transmission, if present).
FRONT SEATS WITH
MANUAL ADJUSTMENT
11)
4)
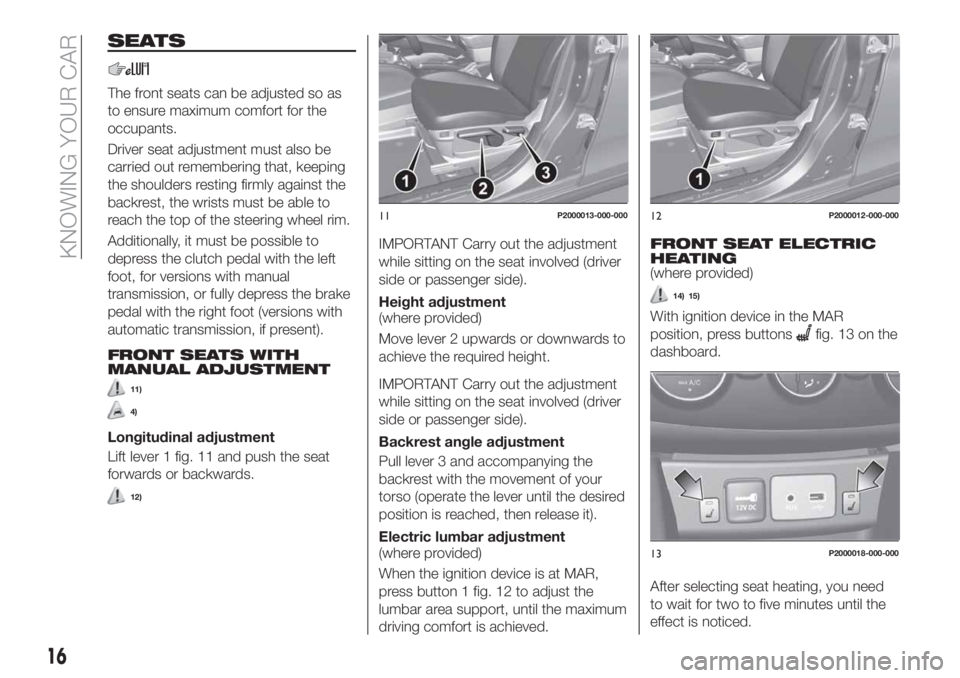
Longitudinal adjustment
Lift lever 1 fig. 11 and push the seat
forwards or backwards.
12)
IMPORTANT Carry out the adjustment
while sitting on the seat involved (driver
side or passenger side).
Height adjustment
(where provided)
Move lever 2 upwards or downwards to
achieve the required height.
IMPORTANT Carry out the adjustment
while sitting on the seat involved (driver
side or passenger side).
Backrest angle adjustment
Pull lever 3 and accompanying the
backrest with the movement of your
torso (operate the lever until the desired
position is reached, then release it).
Electric lumbar adjustment
(where provided)
When the ignition device is at MAR,
press button 1 fig. 12 to adjust the
lumbar area support, until the maximum
driving comfort is achieved.
FRONT SEAT ELECTRIC
HEATING
(where provided)
14) 15)
With ignition device in the MAR
position, press buttons
fig. 13 on the
dashboard.
After selecting seat heating, you need
to wait for two to five minutes until the
effect is noticed.
11P2000013-000-00012P2000012-000-000
13P2000018-000-000
16
KNOWING YOUR CAR
Page 23 of 292
STEERING WHEEL
17) 18)
ADJUSTMENTS
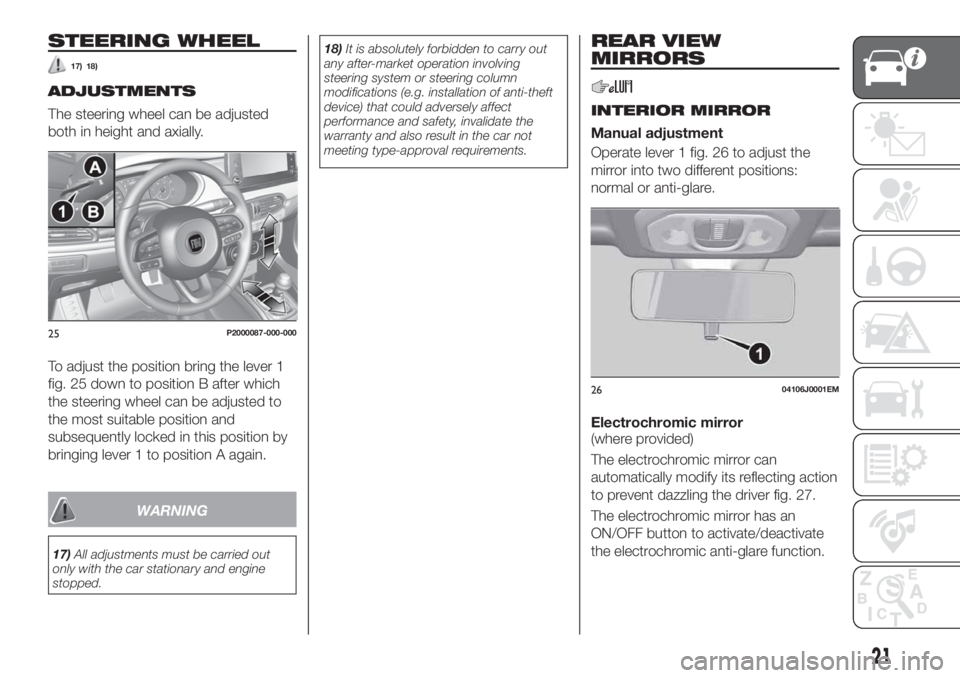
The steering wheel can be adjusted
both in height and axially.
To adjust the position bring the lever 1
fig. 25 down to position B after which
the steering wheel can be adjusted to
the most suitable position and
subsequently locked in this position by
bringing lever 1 to position A again.
WARNING
17)All adjustments must be carried out
only with the car stationary and engine
stopped.18)It is absolutely forbidden to carry out
any after-market operation involving
steering system or steering column
modifications (e.g. installation of anti-theft
device) that could adversely affect
performance and safety, invalidate the
warranty and also result in the car not
meeting type-approval requirements.
REAR VIEW
MIRRORS
INTERIOR MIRROR
Manual adjustment
Operate lever 1 fig. 26 to adjust the
mirror into two different positions:
normal or anti-glare.
Electrochromic mirror
(where provided)
The electrochromic mirror can
automatically modify its reflecting action
to prevent dazzling the driver fig. 27.
The electrochromic mirror has an
ON/OFF button to activate/deactivate
the electrochromic anti-glare function.
25P2000087-000-000
2604106J0001EM
21
Page 56 of 292
Doors & Locks.
Display
By selecting item "Display" you can
access the settings/information
regarding: " Display Settings”,
Language", "See phone" (available in
versions and markets where present),
"See navigation" (available in versions
and markets where present),
"Automatic reset Trip B", “Display
lighting”.
Units
Select item "Units" to choose the unit of
measurement between: "Imperial",
"Metric", "Customised".
Clock & Date
Select item "Clock & Date" to make the
following adjustments: "Set time", "Time
format", "Set date".
Safety
Select item "Security" to make the
following adjustments: "Passenger
AIRBAG", "Speed warning", "Seat belt
buzzer".
"Passenger AIRBAG" adjustment allows
you to activate/deactivate the
passenger airbag.Passenger's
protection not active: the
LED
comes on constantly in the dashboard
dashboard.Safety & Assistance
Select item "Safety & Assistance" to
make the following adjustments: Rain
sensor, Warning Volume, Brake Control,
Brake C.Sensivity, Park Assist, Vol. Park
Assist.
Lights
Select item "Lights" to make the
following adjustments: "Courtesy
lights", "Daytime running lights",
"Cornering lights", "Headlamp sensor",
"Follow me home".
Doors & Locks
Select item "Doors & Locks" to make
the following adjustments: "Autoclose",
"Flash Lights w/Lock", "Auto unlock on
exit".
NOTE With theUconnect™system,
some Menu items are shown and
managed on the display of the latter
and not on the instrument panel display
(refer to the dedicated Multimedia
chapter or to the supplement available
online).CONTROL BUTTONS
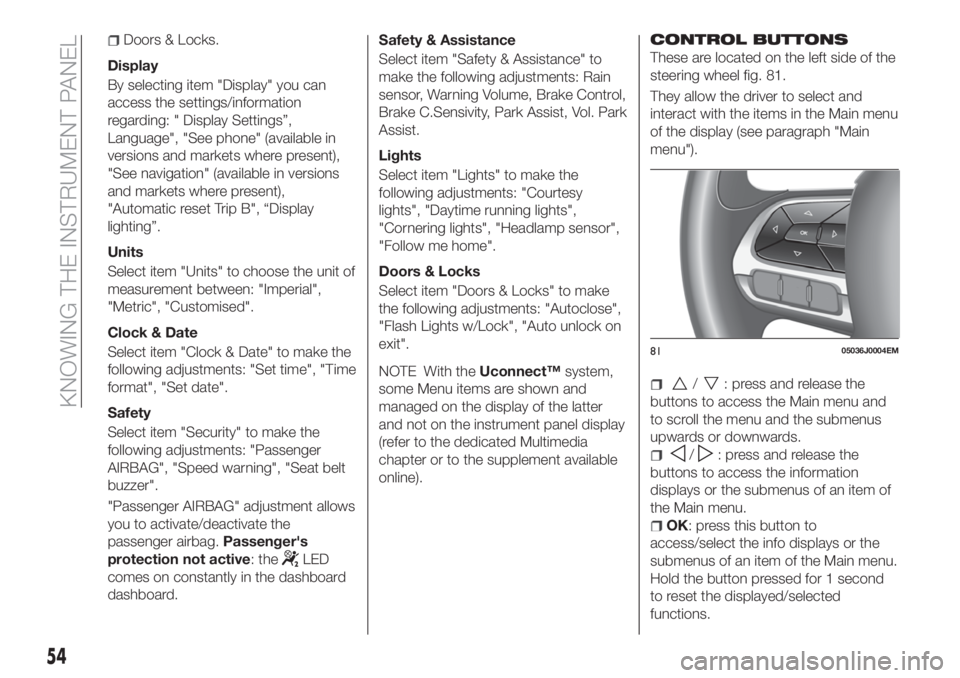
These are located on the left side of the
steering wheel fig. 81.
They allow the driver to select and
interact with the items in the Main menu
of the display (see paragraph "Main
menu").
/: press and release the
buttons to access the Main menu and
to scroll the menu and the submenus
upwards or downwards.
/: press and release the
buttons to access the information
displays or the submenus of an item of
the Main menu.
OK: press this button to
access/select the info displays or the
submenus of an item of the Main menu.
Hold the button pressed for 1 second
to reset the displayed/selected
functions.
8105036J0004EM
54
KNOWING THE INSTRUMENT PANEL
Page 104 of 292
86)After installing a child restraint system,
do not move the seat: always remove the
child restraint system before making any
adjustment.
87)Always make sure that the diagonal
section of the seat belt does not pass
under the arms or behind the back of the
child. In the event of an accident the seat
belt will not be able to secure the child,
with the risk of injury, including fatal injury.
Therefore the child must always wear the
seat belt correctly.
88)Do not use the same lower anchorage
to install more than one child restraint
system.
89)If a Universal ISOFIX child seat system
is not fixed to all three anchorages, it will
not be able to protect the child correctly. In
a crash, the child could be seriously or
fatally injured.
90)Fit the child restraint system when the
car is stationary. The child restraint system
is correctly fixed to the brackets when you
hear the click. Follow the instructions for
assembly, disassembly and positioning that
the Manufacturer must supply with the
child restraint system.SUPPLEMENTARY
RESTRAINT SYSTEM
(SRS) - AIRBAG
The vehicle is equipped with:
front driver airbag;
front passenger airbag;
driver and passenger front side bags
for pelvis, chest and shoulder
protection (Side bags);
side bags for head protection of front
seat passengers and rear side seat
passengers (window bag).
The location of the airbags on the
vehicle is marked by the word
"AIRBAG" in the middle of the steering
wheel, on the dashboard, on the side
trim or on a label placed next to the
airbag deployment area.
FRONT AIRBAGS
The front (driver and passenger) airbags
protect the front seat occupants in the
event of head-on crashes of
medium-high severity, by placing the
cushion between the occupant and the
steering wheel or dashboard.
Therefore non-activation of airbags in
other types of collisions (side impacts,
rear shunts, roll-overs, etc.) does not
indicate a system malfunction.
Driver and passenger front airbags are
not a replacement of but
complementary to the seat belts, whichshould always be worn, as specified by
law in Europe and most non-European
countries.
In the event of impact, those not
wearing a seat belt are projected
forwards and may come into contact
with the bag which is still inflating. The
protection offered by the bag is
compromised in these circumstances.
Front airbags may not activate in the
following situations:
frontal impacts against highly
deformable objects not involving the
front surface of the vehicle (e.g. wing
collision against guard rail, etc.);
vehicle wedging under other
vehicles or protective barriers (e.g.
trucks or guard rails).
Failure to activate in the conditions
described above is due to the fact that
they may not provide any additional
protection compared with seat belts, so
their activation would be inappropriate.
In these cases, non-deployment does
not indicate a system malfunction.
The driver's and passenger's front
airbags have been designed and
calibrated to protect front seat
occupants wearing seat belts. At their
maximum inflation, their volume fills
most of the space between the steering
wheel and the driver and between the
dashboard and the passenger.
102
SAFETY
Page 246 of 292
SWITCHING THE SYSTEM
ON/OFF
The system is switched on/off by
pressing the
button/knob.
Turn the button/knob clockwise to
increase the radio volume or
anticlockwise to decrease it. The
electronic volume adjustment control
rotates continuously (360°) in both
directions, without stop positions.
RADIO (TUNER) MODE
The system is equipped with the
following tuners: AM, FM and DAB (for
versions/markets, where provided).
Radio mode selection
Press the RADIO button on the front
panel to activate radio mode.
Selecting a frequency band
The different tuning modes can be
selected by pressing the RADIO button
on the front panel.
Indications on display
After the desired radio station is
selected on the display, the following
information is shown (INFO mode
activated):
In the upper part: the preset station, the
time and the other active radio settings
are highlighted.In the central part: the name of the
current station, the frequency and the
radio text information (if any) are
highlighted.
FM station list
Press the BROWSE ENTER
button/knob to display the complete list
of the FM stations that can be received.
AM/FM radio station storage
The preset stations are available in all
system modes and are selected by
touching one of the presetting buttons
1-2-3-4-5-6on the front panel. If you
are tuned to a radio station that you
wish to store, hold down the button on
the display which corresponds to the
desired preset until an acoustic
confirmation signal is emitted.
AM/FM radio station selection
To search for the desired radio station
press the
orbutton or use the
wheel of the steering wheel controls, or
turn the "BROWSE ENTER" knob.
Previous/next radio station search
Briefly press the
orbutton:
when the button is released the
previous or the next radio station is
displayed.Previous/next radio station fast
search
Hold down the
orbutton to
start the fast search: when the button is
released, the first tunable radio is
played.
MEDIA MODE
Interaction modes for AUX (where
provided), USB operation.
Audio source selection
To select the desired audio source
among those available: AUX (where
provided) or USB, press theMEDIA
media.
To select and playback music tracks on
the cell phone CD card (where the
phone allows) press the BROWSE
ENTER button, select Folders then
Card.
IMPORTANT Some multimedia players
may not be compatible with the
Uconnect™.
CHANGE TRACK (next/previous)
Briefly press the
button to play the
next track or briefly press the
button to return to the beginning
of the selected track or to the beginning
of the previous track if this has been
played for less than 3 seconds.
244
MULTIMEDIA
Page 248 of 292
Adjust the volume using the
button/knob on the front panel or
using the volume adjustment control on
the connected device.
For the "Audio source selection"
function, see the "Media mode"
chapter.
IMPORTANT NOTES
The functions of the device connected
with the AUX socket are directly
managed by the device itself: it is not
possible to change track/folder/playlist
or control playing start/end/pause with
the controls on the front panel or on the
steering wheel.
Do not leave the cable of your portable
player connected to the AUX socket
after disconnection, to avoid possible
hiss from the speakers.
IMPORTANT When connecting a device
to the AUX socket, make sure that it
does not obstruct the operation of the
handbrake lever.PHONE MODE
(where provided)
Phone mode activation
Press the PHONE button on the front
panel to activate the Phone mode.
The available commands can be used
to:
dial the wished phone number;
display and call the contacts in the
mobile phone phonebook;
display and call contacts from the
registers of previous calls;
pair up to 8 phones to make access
and connection easier and quicker;
transfer calls from the system to the
mobile phone and vice versa and
deactivate the microphone audio for
private conversations.
The mobile phone audio is transmitted
through the vehicle’s audio system; the
system automatically mutes the radio
when the Phone function is used.
Pairing a mobile phone
To pair the mobile phone, proceed as
follows:
activate theBluetooth®
function on
the mobile phone;
press thePHONEbutton on the
front panel;
if no phone is paired with the system
yet, the display shows a dedicated
screen;
select "Connect Phone" to start the
pairing procedure then search for the
Uconnect™device on the mobile
phone (if "No" is selected, the Phone
main screen is displayed);
when prompted by the mobile
phone, use the phone keypad to enter
the PIN code shown on the system
display or confirm on the mobile phone
the PIN displayed;
from the "Settings" menu you can
always pair a mobile phone by selecting
"Phone menu/Add phone", then
proceed as described above;
during the pairing stage a screen is
displayed showing the progress of the
operation.
NOTE After updating the telephone
software, for correct operation it is
advisable to remove the telephone from
the list of devices paired to the radio,
delete the previous system pairing from
the telephone's availableBluetooth®
device list and pair it again.
Making a phone call
The operations described below can
only be accessed if supported by the
mobile phone in use.
A call can be made by:
selecting "Contacts" (Phonebook
......);
selecting "Recent Calls list";
selecting "Dial Pad".
246
MULTIMEDIA
Page 256 of 292
This mode is activated by pairing a
Bluetooth®
device containing music
tracks with the system.
To pair a
Bluetooth®
audio device,
proceed as follows:
activate theBluetooth®
function on
the device;
press the MEDIA button on the front
panel;
if the "Media" source is active, press
the "Source" button;
select theBluetooth®
Media
source;
press the "Add Device" button;
search forUconnect™on the
Bluetooth®
audio device (during the
pairing stage a screen is displayed
showing the progress of the operation);
when requested by the audio device,
enter the PIN code shown on the
system display or confirm on the device
the PIN displayed;
if the pairing procedure is completed
successfully, a screen is displayed.
Answer "Yes" to the question to pair the
Bluetooth®
audio device as favourite
(the device will have priority over all
other devices to be paired
subsequently). If "No" is selected, the
priority is determined according to the
order of connection. The last device
connected will have the highest priority;
an audio device can also be paired
by pressing the PHONE button on the
front panel and by selecting "Settings"
or, from the "Settings" menu, selecting
"Phone/Bluetooth".
WARNING If the
Bluetooth®
connection between mobile phone and
system is lost, consult the mobile
phone handbook.
USB SOURCE
To activate the USB mode, insert the
corresponding USB device into the
USB port on the central console.
When a USB device is inserted with the
radio on, it starts to play the tracks on
the device if the “AutoPlay” is set to ON
in the “Audio” menu.
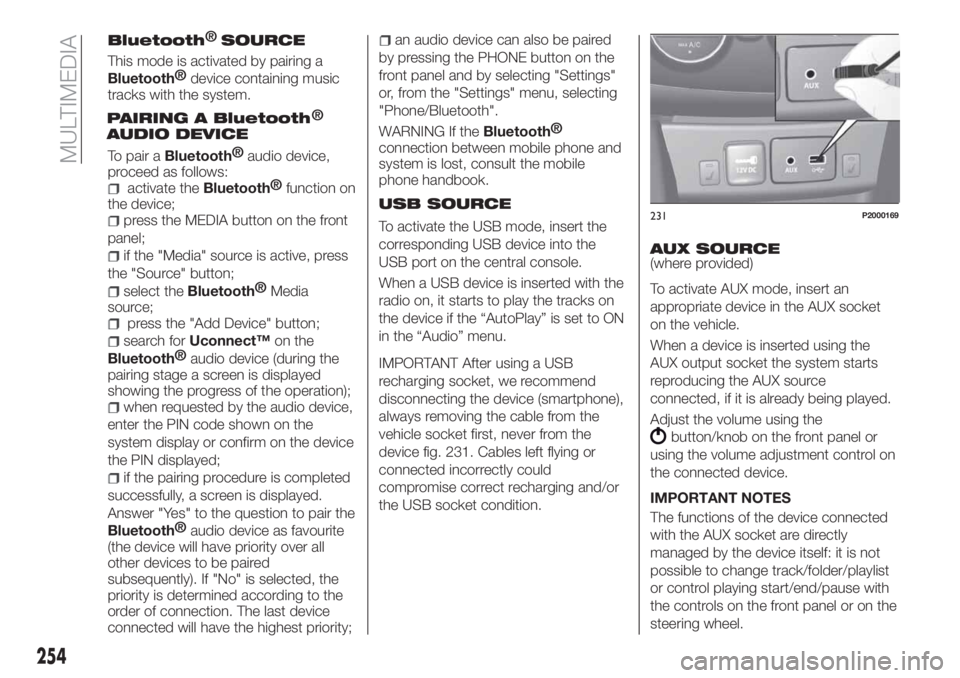
IMPORTANT After using a USB
recharging socket, we recommend
disconnecting the device (smartphone),
always removing the cable from the
vehicle socket first, never from the
device fig. 231. Cables left flying or
connected incorrectly could
compromise correct recharging and/or
the USB socket condition.AUX SOURCE
(where provided)
To activate AUX mode, insert an
appropriate device in the AUX socket
on the vehicle.
When a device is inserted using the
AUX output socket the system starts
reproducing the AUX source
connected, if it is already being played.
Adjust the volume using the
button/knob on the front panel or
using the volume adjustment control on
the connected device.
IMPORTANT NOTES
The functions of the device connected
with the AUX socket are directly
managed by the device itself: it is not
possible to change track/folder/playlist
or control playing start/end/pause with
the controls on the front panel or on the
steering wheel.
231P2000169
254
MULTIMEDIA
Bluetooth SOURCE
PAIRING A Bluetooth
AUDIO DEVICE®
®