warning FIAT TIPO 5DOORS STATION WAGON 2019 Owner handbook (in English)
[x] Cancel search | Manufacturer: FIAT, Model Year: 2019, Model line: TIPO 5DOORS STATION WAGON, Model: FIAT TIPO 5DOORS STATION WAGON 2019Pages: 304, PDF Size: 9.12 MB
Page 25 of 304

DIPPED HEADLIGHTS
With the ignition key turned to MAR,
turn the ring nut 1 fig. 28 to
.Ifthe
dipped beam headlights are activated,
the daytime running lights are switched
off and the dipped beam headlights,
rear side lights and number plate lights
are switched on. The
warning light
switches on in the instrument panel.
PARKING LIGHTS
These lights can be turned on with
ignition device in STOP position or with
the key removed, by moving the left
stalk ring nut first to position
and
then to position
.
The
warning light switches on in
the instrument panel.
Repeat the same operation to switch
them off.
With the parking lights on, a buzzer will
sound with the parking lights on. The
buzzer switches off as soon as the
driver's door is closed.
AUTO FUNCTION(Dusk sensor)
(where provided)
This is an infrared LED sensor that
works in conjunction with the rain
sensor and is located on the
windscreen.It is able to detect variations in outside
lighting based on the light sensitivity set
in the display Menu or theUconnect™
5"or7" HDsystem (where provided).
The higher the sensitivity, the lower the
amount of external light needed to
automatically switch the external lights
on.
Function activation
Turn the left stalk ring nut to position
.
IMPORTANT The function can only be
activated with the ignition device at
MAR.
Function deactivation
To deactivate the function, turn the left
stalk ring nut to a position other than
.
MAIN BEAM HEADLIGHTS
With ring nut in position, push the
stalk forward toward the dashboard
(stable position). The
warning light
switches on in the instrument panel.
They are switched off by pulling the
stalk towards the steering wheel.
Flashing the headlights
Pull the left stalk 1 fig. 29 toward
yourself, to the stable position; the stalk
goes back to the central stable position
when it is released.With main beam headlights on, the
warning light on the instrument
panel will come on at the same time.
HEADLIGHT ALIGNMENT
CORRECTOR
The headlight alignment corrector
operates with ignition device at MAR
and dipped headlights on.
Press
andon the control panel.
2904126J0002EM
3004126J0003EM
23
Page 26 of 304

The display located on the instrument
panel provides a visual indication of the
adjusted position.
Position 0: one or two people on
the front seats;
Position 1: 4 or 5 passengers;
Position 2: 4 or 5 passengers + load
in the luggage compartment;
Position 3: driver + maximum
admissible load stowed only in the
luggage compartment.
IMPORTANT Check the headlight
alignment each time the weight of the
load transported changes.
FOG LIGHTS
(where provided)
The rear fog light button is located on
the left control panel (button 1 fig. 31 ).
With fog lights on, the
warning light
on the instrument panel will come on at
the same time.
With the ignition device in MAR, with
the side lights and dipped beam
headlights on, press button 1 to turn on
the fog lights.
To switch off the rear fog light, press
button 1 again or turn the ring of the left
stalk fig. 28 to
or turn the ignition
device to the STOP position.Cornering lights
The function activates with the main
beam headlights switched on with a
speed lower than 40 km/h - For wide
wheel rotation angles or at the
switching on the direction indicator, a
light will turn on (built in the front fog
light) referring to the turning side which
will extend the night visibility angle.
REAR FOG LIGHT(where provided)
The rear fog light button is located on
the left control panel (button 1 fig. 32 ).
With rear fog lights on, the warning light
on the instrument panel will come
on at the same time.
With the ignition device in MAR, with
the dipped beam headlights and or fog
lights on, press button 1 to turn on the
fog lights.To switch off the rear fog light, press
button 1 again or turn the ring of the left
stalk fig. 28 to
or turn the ignition
device to the STOP position.
DIRECTION INDICATORS
Bring the left stalk 1 fig. 29 to the
(stable) position:
upwards: activates the right direction
indicator;
downwards: activates the left direction
indicator.
The
orwarning light respectively
will flash on the instrument panel.
The direction indicators switch off
automatically when the steering wheel
is straightened or when the daytime
running lights (DRL) /parking lights are
activated.
3104126J0008EM
3204126J0009EM
24
KNOWING YOUR CAR
Page 27 of 304
"Lane change" function
To indicate a change of lane with the
car moving, move the left lever to the
non-stable position for less than half a
second.
The direction indicator on the side
selected will be activated for 5 flashes
and then go out automatically.
COURTESY LIGHTS
This function, with the ignition device in
MAR, allows activating the side lights
and the number plate lights for
25 seconds, whenever the car is
unlocked with the key with remote
control.
Enabling the function can be adjusted
through the display Menu or the
Uconnect™system.
The function is automatically disabled
once the activation time elapses
(25 seconds), or when the car doors
are locked again, or by turning the
ignition device to a non-MAR position.
"FOLLOW ME HOME"
DEVICE
Activation
Bring the ignition device to STOP.
Within 2 minutes pull the left stalk in
main beam headlights flashing mode,
each displacement of the stalk will
correspond to an increment of
30 seconds of delay on headlightsswitching off up to a maximum of
210 seconds (equal to 7 flashes).
Deactivation
Keep the left stalk in main beam
headlight flashing mode for a few
seconds.
WARNING
20)The daytime running lights are an
alternative to the dipped headlights for
driving during the daytime in countries
where it is compulsory to have lights on
during the day; where it is not compulsory,
the use of daytime running lights is
permitted.
21)Daytime running lights cannot replace
dipped beam headlights when driving at
night or through tunnels. The use of
daytime running lights is governed by the
highway code of the country in which you
are driving. Comply with legal
requirements.
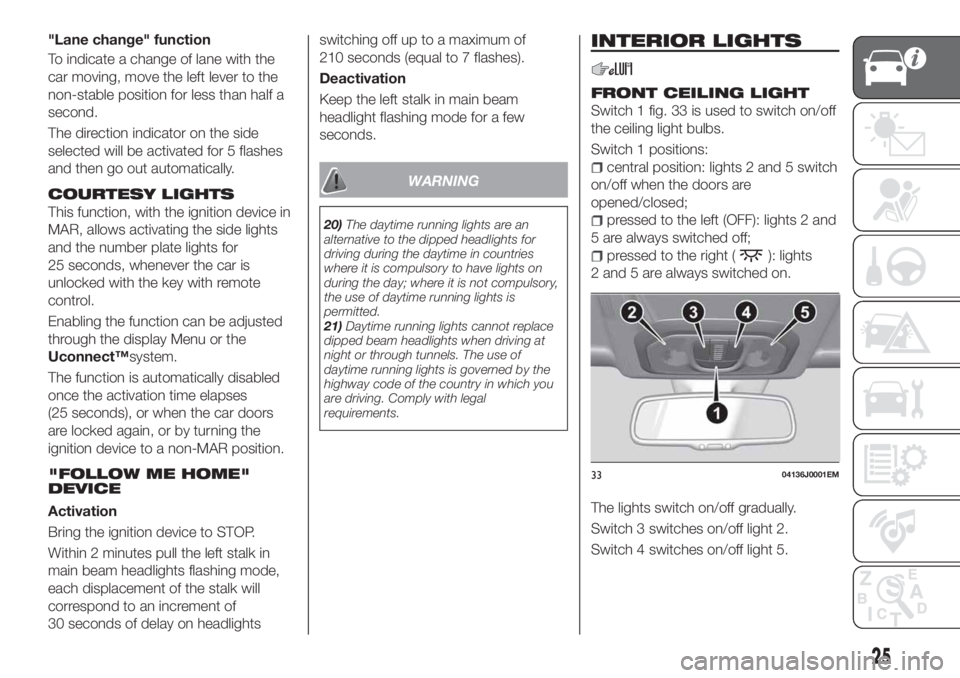
INTERIOR LIGHTS
FRONT CEILING LIGHT
Switch 1 fig. 33 is used to switch on/off
the ceiling light bulbs.
Switch 1 positions:
central position: lights 2 and 5 switch
on/off when the doors are
opened/closed;
pressed to the left (OFF): lights 2 and
5 are always switched off;
pressed to the right (): lights
2 and 5 are always switched on.
The lights switch on/off gradually.
Switch 3 switches on/off light 2.
Switch 4 switches on/off light 5.
3304136J0001EM
25
Page 30 of 304

The rear window wiper can be activated
in the following ways:
intermittent with a 2-second pause
between two strokes, when ring nut 2 is
in position
and the windscreen wiper
is not in operation;
synchronous (at half the windscreen
wiper frequency), when ring nut 2 is in
position
and the windscreen wiper is
in operation or when ring nut 2 is in
position
, reverse gear is engaged
and the windscreen wiper is in
operation;
continuous when ring 2 is in the
position.
Push the stalk towards the dashboard
(rocking position) to activate the rear
window washer jet. Keep pushing the
lever to automatically activate both the
rear window washer jet and the rear
window wiper with a single movement.Releasing the stalk will activate three
strokes, as described for the
windscreen wiper. If the position is
(rear window wiper stopped), after a
6 second pause, the washing cycle is
completed by a single stroke. The
smart wash cycle will not be performed
if the position is
.
WARNING
22)If the window needs to be cleaned,
make sure the device is deactivated or the
key is on STOP.
IMPORTANT
5)Never use the windscreen wipers to
remove layers of snow or ice from the
windscreen. In such conditions, the
windscreen wiper may be subjected to
excessive stress and the motor cut-out
switch, which prevents operation for a few
seconds, may intervene. If operation is not
subsequently restored, even after restarting
the engine, contact a Fiat Dealership.
6)Do not operate the windscreen wiper
with the blades lifted from the windscreen.
7)Do not activate the rain sensor when
washing the car in an automatic car wash.
8)Make sure the device is switched off if
there is ice on the windscreen.
36P2000177
28
KNOWING YOUR CAR
Page 35 of 304

ELECTRIC WINDOWS
23)
Electric windows operate with the
ignition device at MAR and for about
3 minutes after the ignition device
switches to STOP (or key removed).
When one of the front doors is opened
this operation is disabled.
Driver side front door controls
All windows can be controlled from the
driver side door panel fig. 39.
1: front left window opening/closing.
"Continuous automatic" operation
during the window opening/closing
stage;
2: front right window opening/
closing. "Continuous automatic"
operation during the window opening
stage;
3: enabling/disabling of rear door
electric window controls;
4: right rear window opening/closing
(if present);
5: left rear window opening/closing
(if present).
Front passenger side door and rear
door controls
On the passenger side front door
control panel, buttons are provided to
control the associated windows.
The trims of the rear door panels
include the buttons for controlling the
relevant windows.
WARNING
23)Incorrect use of the electric windows
may be dangerous. Before and during
operation, always check that nobody is
exposed to the risk of being injured either
directly by the moving window or through
objects getting caught or hit by it. When
leaving the vehicle (equipped with
mechanical key with remote control),
always remove the key from the ignition
device to prevent accidental operation of
the electric windows from being a hazard
for those still on board.
BONNET
OPENING
Proceed as follows:
pull the lever 1 fig. 40, located in the
driver's side pedal area, in the direction
of the arrow;
adjust the lever 2 fig. 41 in the
direction indicated by the arrow;
3904166J0001EM
4004196J0001EM
4104196J0002EM
33
Page 36 of 304

raise the bonnet and, at the same
time, release the bonnet stay 3
fig. 42 from its locking device, then
insert the end of the stay in the housing
4 in the bonnet.
IMPORTANT Before raising the bonnet,
make sure that the arms of the wipers
are not raised from the windscreen and
that the wiper is not operational.
24) 25) 26)
CLOSING
27)
Proceed as follows:
hold the bonnet up with one hand
and with the other remove the stay 3
fig. 42 from the housing 4 and fit it back
in locking device;
lower the bonnet to approximately
40 centimetres from the engine
compartment and let it drop.Make sure that the bonnet is
completely closed and not only
fastened by the locking device by trying
to open it. If it is not perfectly closed,
do not try to press the bonnet lid down
but open it and repeat the procedure.
IMPORTANT Always check that the
bonnet is closed correctly to prevent it
from opening while the vehicle is
travelling.
WARNING
24)Perform these operations only when
the car is stationary.
25)The bonnet may drop suddenly if the
supporting rod is not positioned correctly.
26)Use both hands to lift the bonnet.
Before lifting, check that the windscreen
wiper arms are not raised from the
windscreen, that the vehicle is stationary
and that the parking brake is engaged.
27)For safety reasons, the bonnet must
always be properly closed while the car is
travelling. Therefore, make sure that the
bonnet is properly closed and that the lock
is engaged. If you discover that the bonnet
is not perfectly closed during travel, stop
immediately and close the bonnet in the
correct manner.
DUALDRIVE
ELECTRIC POWER
STEERING
This only operates with the key turned
to MAR and the engine started. The
electric steering allows the force
required at the steering wheel to be
adjusted to suit driving conditions.
POWER STEERING
ACTIVATION/
DEACTIVATION
28) 29)
Activation/deactivation:
Press the fig. 43 button.
The activation of the function is
signalled by a visual indication (CITY) on
the instrument panel or, based on the
version, on the display.4204196J0003EM
43P2000025-000-000
34
KNOWING YOUR CAR
Page 37 of 304

When the CITY function is on, the
steering wheel effort is lighter, making
parking easier: therefore, this function is
particularly useful for driving in city
centres.
To ensure steering uniformity, when the
key is pressed while the steering wheel
is being turned, the change of force will
only be felt when it is turned in the
opposite direction, or the steering
wheel is released.
WARNING
28)It is absolutely forbidden to carry out
any after-market operation involving
steering system or steering column
modifications (e.g. installation of anti-theft
device) that could adversely affect
performance, invalidate the warranty, cause
serious safety problems and also result in
the car not meeting type-approval
requirements.
29)Before performing any maintenance
operations, always stop the engine and
remove the key from the ignition to lock the
steering column (especially when the car
wheels are not touching the ground). If this
is not possible (for example if the key
needs to be turned to MAR or the engine
must be running), remove the main fuse
that protects the electric power steering.
LUGGAGE
COMPARTMENT
IMPORTANT When travelling, do not
put any object on the rear parcel shelf
because they can injure passengers in
the event of an accident or sudden
braking.
OPENING
30)
Tailgate opening
When the central locking system is
unlocked, the tailgate can be opened
from outside the car using the electric
opening handle (where provided)
fig. 44 located under the handle until
the unlocking click is heard.The roof light inside the luggage
compartment will turn on when the
tailgate is opened; the roof light will
automatically switch off when the
tailgate is closed (see also "Interior
lights").
If the tailgate is left open, the roof light
will automatically switch off to preserve
the battery charge.
Emergency opening from inside
Proceed as follows:lower the head restraints and fold the
backrests;
identify and remove yellow guard A
fig. 45, which is press-fitted on the lock,
using the screwdriver provided;
insert the screwdriver in order to
activate tab B fig. 46, to mechanically
release the lock.44P2000015-000-000
45P2000092-000-000
35
Page 42 of 304

WARNING
30)Take care not to knock objects on the
roof rack when opening the tailgate.
31)In the event of an accident or sharp
braking, any object placed on the curtain
may be projected into the passenger
compartment, and risk hurting the
occupants.
IMPORTANT
9)The dimensions of the platform permit a
maximum distributed weight capacity of
95 kg: do not load objects with a greater
weight.
ROOF RACK / SKI
RACK
(where provided)
TIPO 5 DOOR VERSIONS
The car might be equipped with two
transversal bars which, with the
addition of special accessories, can be
used to carry various objects (e.g. skis,
surfboards, bikes, etc.).
The front couplings are located in
points 1 fig. 64.
The rear couplings are located in points
2.
Points 1 can be accessed with the
doors open, points 2 can be accessed
with the rear doors open.
32)
10) 11)
Refer to the instructions provided by
the manufacturer of the purchased
crossbars for installation. For further
information, contact a Fiat Dealership.
TIPO STATION WAGON VERSIONS
The car might be equipped with two
longitudinal bars which, with the
addition of special accessories, can be
used to carry various objects (e.g. skis,
surfboards, bikes, etc.).
Crossbars
The crossbars can only be installed
when the longitudinal bars are present.
Refer to the instructions provided by
the manufacturer of the purchased
crossbars for installation. For further
information, contact a Fiat Dealership.
32)
10) 11)
6404256J0001EM
40
KNOWING YOUR CAR
Page 43 of 304

WARNING
32)Before driving, make sure that the
transversal bars have been fitted properly.
IMPORTANT
10)Never exceed the maximum permitted
loads (see the "Weights" paragraph in the
"Technical specifications" chapter).
11)Fully comply with the regulations in
force concerning maximum clearance.
VERSION WITH LPG
SYSTEM
(where provided)
33) 34)
12) 13) 14) 15)
INTRODUCTION
The LPG version features two fuel
supply systems: one for petrol and one
for LPG.
PASSIVE SAFETY /
ACTIVE SAFETY
Passive safety
The car has the same passive safety
specifications as other versions. In
particular, the mountings of the tank
(located in the space-saver wheel
housing) have been designed to comply
with the Fiat safety standards for impact
tests.
When running on LPG, the flow of gas
(in a liquid state) leaving the tank
passes through the specific piping to
the pressure regulator unit, where there
is a safety solenoid valve that stops the
flow of LPG when the ignition key is
removed or when the driver selects a
fuel change (decision to run on petrol).Together with the regulator solenoid
valve, a second solenoid valve, in the
tank, closes the LPG pipe at the tank
outlet.
The two solenoid valves are connected
to the fuel cut-off system (Fire
Protection System).
The LPG tank complies with the current
legal regulations of the countries where
the car is sold.
Active safety
The car has the same active safety
specifications as other versions.
Although the LPG system has
numerous safety features, it is advisable
to proceed as follows every time the car
is not in use for a long period or moved
in an emergency as a result of a
breakdown or accident:
unscrew the fixing devices 1 fig. 65,
then remove the cover 2;
close the LPG cock rotating the ring
1 fig. 66clockwise;
refit the cover and retighten the
fastening devices.
41
Page 44 of 304

IMPORTANT If gas is smelt, switch from
LPG operation to petrol operation and
immediately go to the Fiat Dealership to
have the vehicle checked and possible
system faults excluded.LPG TANK
The car has a pressurised tank for
storing LPG in a liquid state. It is
toroidal and is located in the spare
wheel compartment with suitable
protection.
LPG tank certification
The LPG tank is certified in accordance
with the regulations in force.
In Italy, the tank has a life of 10 years
starting from the car registration date. If
the vehicle has been registered in a
country other than Italy, the duration
and the testing/inspection procedures
of the LPG tank can vary depending on
the national provisions in force in that
country. In all case, when the time limit
for your country has expired, go to a
Fiat Dealer to have the tank replaced.
LPG/PETROL SWITCH
This engine normally runs on LPG
except during starting when it runs on
petrol. Switching to LPG is automatic,
the warning light
1 fig. 67 on the
instrument panel, switches off.If you specifically want to use petrol,
press the button on the dashboard
fig. 68. If the LED located above the
button turns on, it indicates that
switching has taken place correctly.
Regardless of the last fuel system used,
at the following engine starting, after the
initial petrol stage, the system will
automatically switch to LPG.
65PGL00002
66PGL00003
67PGL00022
68PGL00001
42
KNOWING YOUR CAR