engine FIAT TIPO 5DOORS STATION WAGON 2020 Owner handbook (in English)
[x] Cancel search | Manufacturer: FIAT, Model Year: 2020, Model line: TIPO 5DOORS STATION WAGON, Model: FIAT TIPO 5DOORS STATION WAGON 2020Pages: 304, PDF Size: 9.12 MB
Page 146 of 304
AdBlue®(UREA)
ADDITIVE FOR
DIESEL EMISSIONS
The car is equipped with an UREA
injection system and Selective Catalytic
Reduction to meet emission standards.
These two systems ensure compliance
with the diesel emissions requirements;
at the same, they ensure fuel-efficiency,
handling, torque and power. For
messages and system warnings, refer
to the "Warning lights and messages"
paragraph in the "Knowing the
instrument panel" chapter.
AdBlue®
(UREA) is a very stable
product with a long shelf life. Stored at
temperatures LOWER than 32 °C, it
has a shelf life of at least one year.
For more information on the
AdBlue®
liquid type, see the “Fluids and
lubricants” paragraph in the “Technical
specifications” chapter.
The car is provided with an automatic
AdBlue®
heating system when the
engine starts allowing the system to
work correctly at temperatures lower
than -11 °C.
IMPORTANT
AdBlue®
freezes at
temperatures lower than -11 °C.
144
STARTING AND DRIVING
Page 151 of 304
REPLACING AN
EXTERNAL BULB
Versions with poly-elliptical
headlights
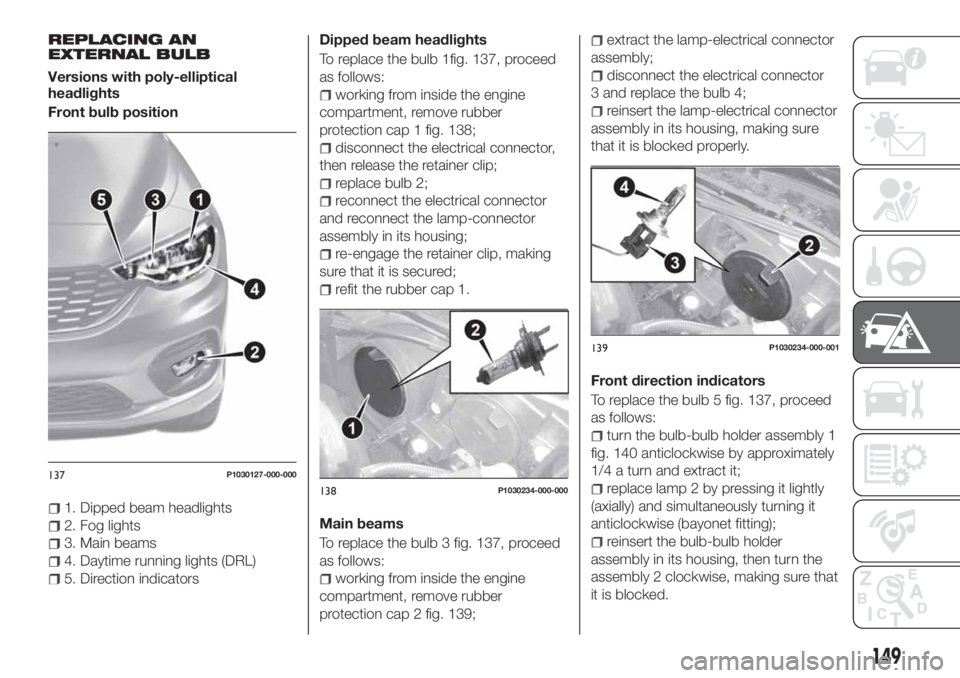
Front bulb position
1. Dipped beam headlights
2. Fog lights
3. Main beams
4. Daytime running lights (DRL)
5. Direction indicatorsDipped beam headlights
To replace the bulb 1fig. 137, proceed
as follows:
working from inside the engine
compartment, remove rubber
protection cap 1 fig. 138;
disconnect the electrical connector,
then release the retainer clip;
replace bulb 2;
reconnect the electrical connector
and reconnect the lamp-connector
assembly in its housing;
re-engage the retainer clip, making
sure that it is secured;
refit the rubber cap 1.
Main beams
To replace the bulb 3 fig. 137, proceed
as follows:
working from inside the engine
compartment, remove rubber
protection cap 2 fig. 139;
extract the lamp-electrical connector
assembly;
disconnect the electrical connector
3 and replace the bulb 4;
reinsert the lamp-electrical connector
assembly in its housing, making sure
that it is blocked properly.
Front direction indicators
To replace the bulb 5 fig. 137, proceed
as follows:
turn the bulb-bulb holder assembly 1
fig. 140 anticlockwise by approximately
1/4 a turn and extract it;
replace lamp 2 by pressing it lightly
(axially) and simultaneously turning it
anticlockwise (bayonet fitting);
reinsert the bulb-bulb holder
assembly in its housing, then turn the
assembly 2 clockwise, making sure that
it is blocked.
137P1030127-000-000
138P1030234-000-000
139P1030234-000-001
149
Page 153 of 304
Main beam headlights / Daytime
running lights (DRL)/ Positions
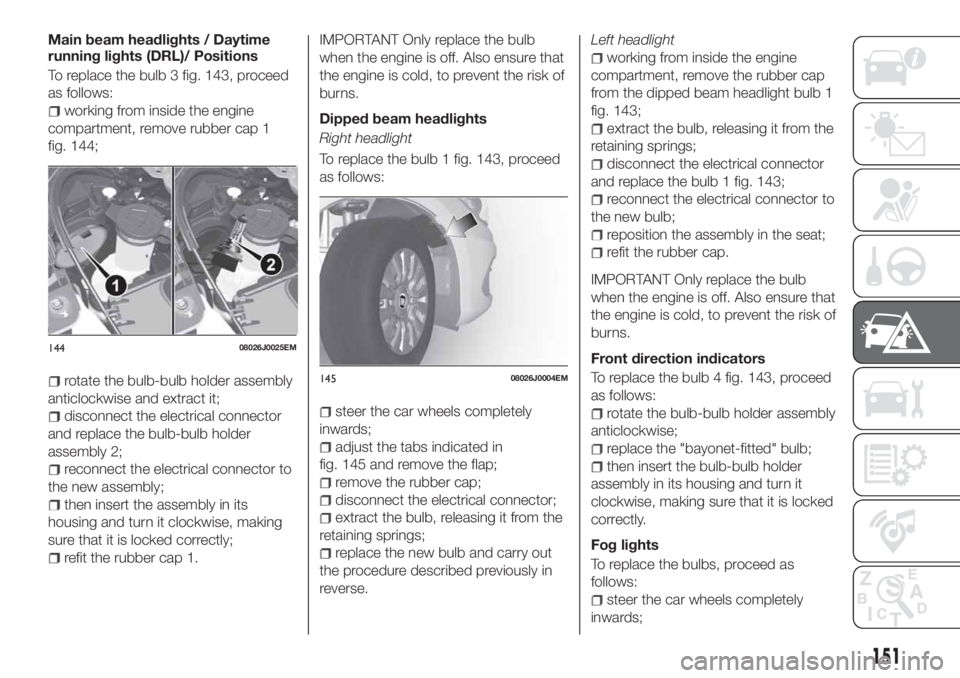
To replace the bulb 3 fig. 143, proceed
as follows:
working from inside the engine
compartment, remove rubber cap 1
fig. 144;
rotate the bulb-bulb holder assembly
anticlockwise and extract it;
disconnect the electrical connector
and replace the bulb-bulb holder
assembly 2;
reconnect the electrical connector to
the new assembly;
then insert the assembly in its
housing and turn it clockwise, making
sure that it is locked correctly;
refit the rubber cap 1.
IMPORTANT Only replace the bulb
when the engine is off. Also ensure that
the engine is cold, to prevent the risk of
burns.
Dipped beam headlights
Right headlight
To replace the bulb 1 fig. 143, proceed
as follows:
steer the car wheels completely
inwards;
adjust the tabs indicated in
fig. 145 and remove the flap;
remove the rubber cap;
disconnect the electrical connector;
extract the bulb, releasing it from the
retaining springs;
replace the new bulb and carry out
the procedure described previously in
reverse.Left headlight
working from inside the engine
compartment, remove the rubber cap
from the dipped beam headlight bulb 1
fig. 143;
extract the bulb, releasing it from the
retaining springs;
disconnect the electrical connector
and replace the bulb 1 fig. 143;
reconnect the electrical connector to
the new bulb;
reposition the assembly in the seat;
refit the rubber cap.
IMPORTANT Only replace the bulb
when the engine is off. Also ensure that
the engine is cold, to prevent the risk of
burns.
Front direction indicators
To replace the bulb 4 fig. 143, proceed
as follows:
rotate the bulb-bulb holder assembly
anticlockwise;
replace the "bayonet-fitted" bulb;
then insert the bulb-bulb holder
assembly in its housing and turn it
clockwise, making sure that it is locked
correctly.
Fog lights
To replace the bulbs, proceed as
follows:
steer the car wheels completely
inwards;
14408026J0025EM
14508026J0004EM
151
Page 157 of 304
WARNING
141)Modifications or repairs to the electric
system that are not carried out properly or
do not take the system technical
specifications into account can cause
malfunctions leading to the risk of fire.142)Halogen bulbs contain pressurised
gas, in the case of breakage they may
burst causing glass fragments to be
projected outwards.
143)Only replace the light bulbs when the
engine is off and in a position that does not
interfere with traffic and lets you safely
replace them (see the description in the
“Replacement” paragraph). Also ensure
that the engine is cold, to prevent the risk
of burns.
144)Before replacing the bulb, wait for the
exhaust ducts to cool down: DANGER OF
SCALDING!
IMPORTANT
62)Halogen bulbs must be handled
holding the metallic part only. Touching the
transparent part of the bulb with your
fingers may reduce the intensity of the
emitted light and even reduce the lifespan
of the bulb. In the event of accidental
contact, wipe the bulb with a cloth
moistened with alcohol and let the bulb dry.
REPLACING FUSES
GENERAL INFORMATION
145) 146) 147) 148)
63)
Fuses protect the electrical system:
they intervene (blow) in the event of a
failure or improper action on the
system.
Fuse extracting pliers
To replace a fuse, use the pliers hooked
inside the engine compartment fuse
box cover (see fig. 159 ).
The pliers have two different ends,
specifically designed to remove the
different types of fuses present in the
vehicle.
157P1030157-000-000
15808026J0026EM
155
Page 158 of 304
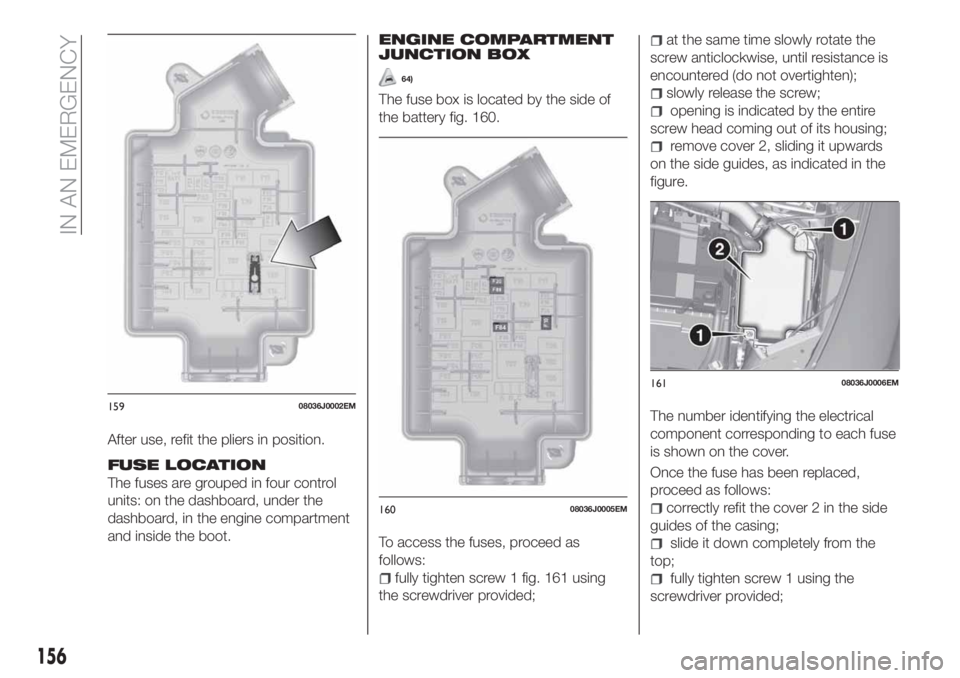
After use, refit the pliers in position.
FUSE LOCATION
The fuses are grouped in four control
units: on the dashboard, under the
dashboard, in the engine compartment
and inside the boot.
ENGINE COMPARTMENT
JUNCTION BOX
64)
The fuse box is located by the side of
the battery fig. 160.
To access the fuses, proceed as
follows:
fully tighten screw 1 fig. 161 using
the screwdriver provided;
at the same time slowly rotate the
screw anticlockwise, until resistance is
encountered (do not overtighten);
slowly release the screw;
opening is indicated by the entire
screw head coming out of its housing;
remove cover 2, sliding it upwards
on the side guides, as indicated in the
figure.
The number identifying the electrical
component corresponding to each fuse
is shown on the cover.
Once the fuse has been replaced,
proceed as follows:
correctly refit the cover 2 in the side
guides of the casing;
slide it down completely from the
top;
fully tighten screw 1 using the
screwdriver provided;
15908036J0002EM
16008036J0005EM
16108036J0006EM
156
IN AN EMERGENCY
Page 161 of 304
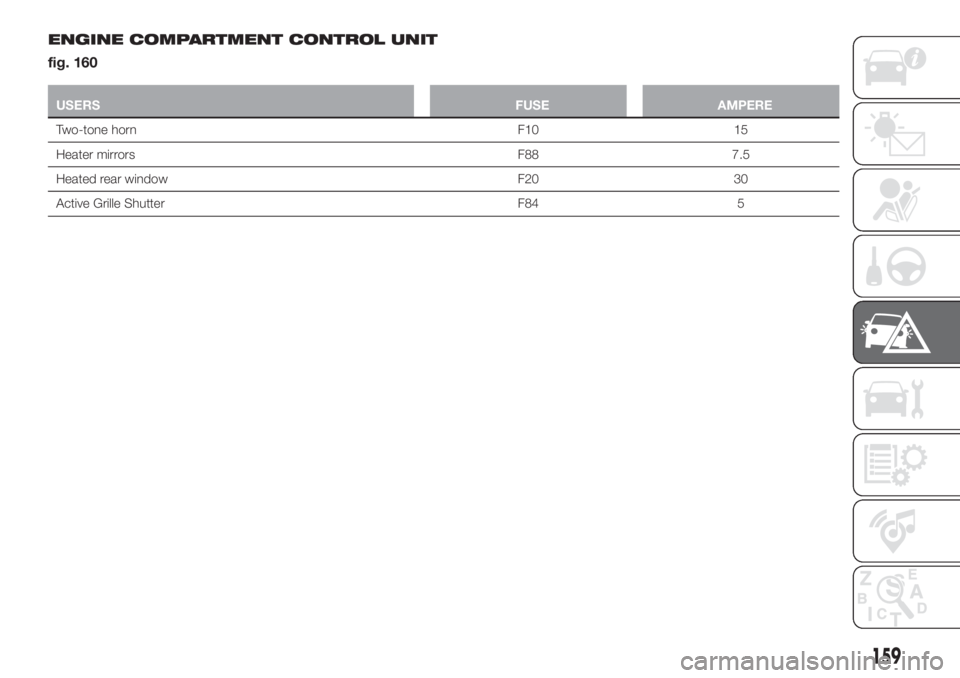
ENGINE COMPARTMENT CONTROL UNIT
fig. 160
USERSFUSE AMPERE
Two-tone horn F10 15
Heater mirrors F88 7.5
Heated rear window F20 30
Active Grille Shutter F84 5
159
Page 163 of 304
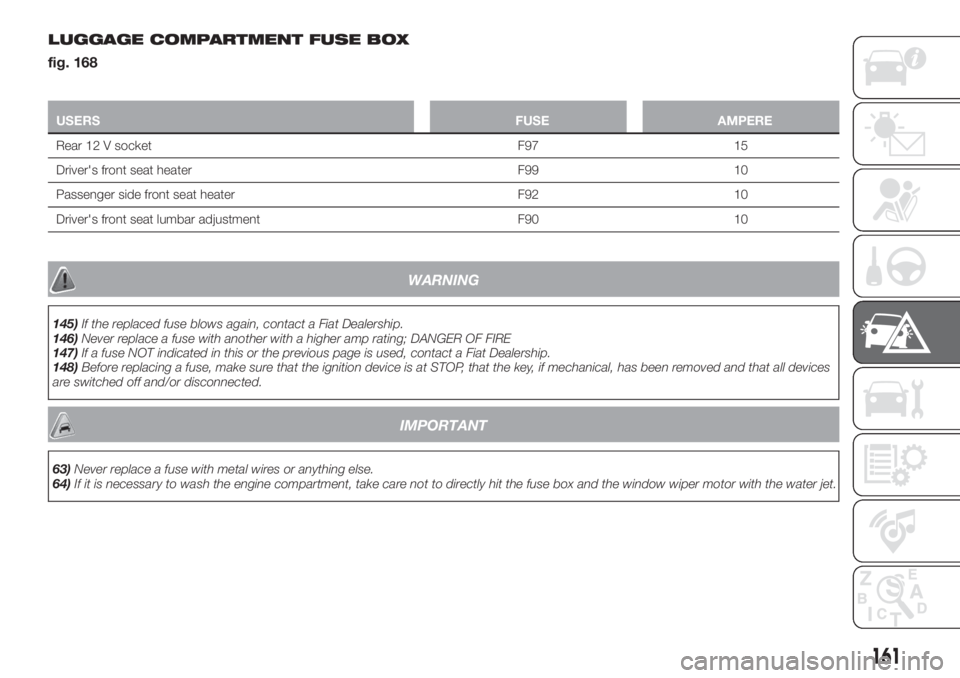
LUGGAGE COMPARTMENT FUSE BOX
fig. 168
USERSFUSE AMPERE
Rear 12 V socket F97 15
Driver's front seat heater F99 10
Passenger side front seat heater F92 10
Driver's front seat lumbar adjustment F90 10
WARNING
145)If the replaced fuse blows again, contact a Fiat Dealership.
146)Never replace a fuse with another with a higher amp rating; DANGER OF FIRE
147)If a fuse NOT indicated in this or the previous page is used, contact a Fiat Dealership.
148)Before replacing a fuse, make sure that the ignition device is at STOP, that the key, if mechanical, has been removed and that all devices
are switched off and/or disconnected.
IMPORTANT
63)Never replace a fuse with metal wires or anything else.
64)If it is necessary to wash the engine compartment, take care not to directly hit the fuse box and the window wiper motor with the water jet.
161
Page 164 of 304
CHANGING A WHEEL
JACK
Please note that:
the jack weight is 2.15 kg;
the jack cannot be repaired and in
the event of a fault it must be replaced
by another genuine one;
No tool other than its cranking device
may be fitted on the jack.
Servicing
Prevent any dirt from depositing on
the "worm screw";
Keep the "worm screw" lubricated;
Never modify the jack.
Conditions for non-use
Temperatures below −40°C;
On sandy or muddy ground;
On uneven ground;
On steep roads;
In extreme weather conditions:
thunderstorms, typhoons, hurricanes,
blizzards, storms, etc.
In direct contact with the engine or
for repairs under the vehicle;
On boats.
CHANGING PROCEDURE
149) 150) 151) 152) 153) 154)
65) 66)
Proceed as follows:
stop the car in a position that is not
dangerous for oncoming traffic where
you can change the wheel safely. The
ground must be flat and sufficiently
compact;
stop the engine, engage the hazard
warning lights and the parking brake;
engage first gear or reverse or, for
versions with automatic transmission
(where provided), move the lever to the
P (Parking) position;
wear the reflective safety jacket
before getting out of the car (anyway
comply with the laws in force in the
country you are driving in);
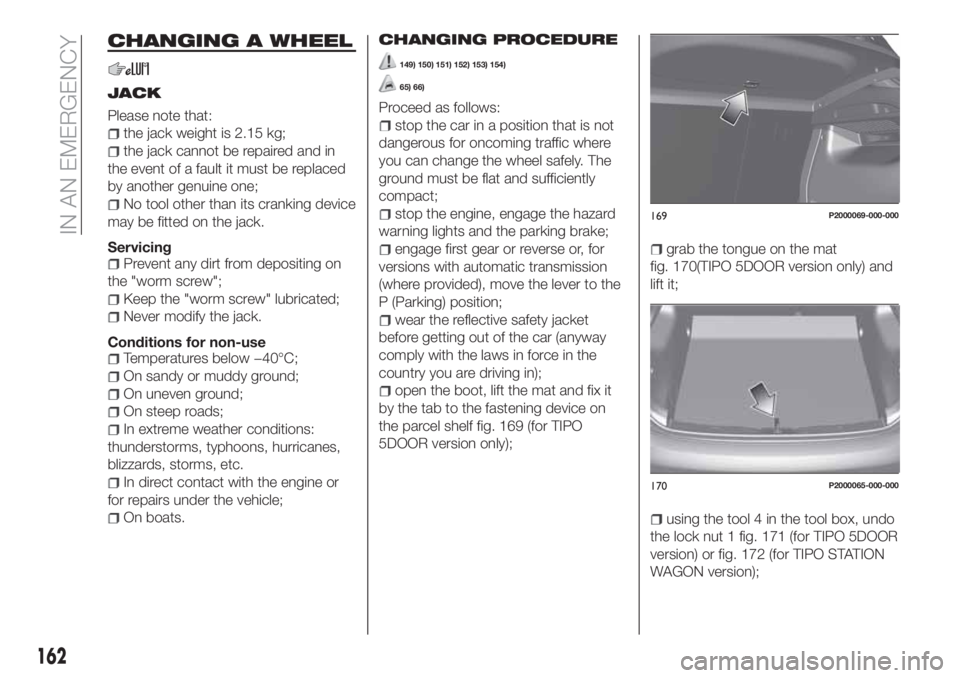
open the boot, lift the mat and fix it
by the tab to the fastening device on
the parcel shelf fig. 169 (for TIPO
5DOOR version only);
grab the tongue on the mat
fig. 170(TIPO 5DOOR version only) and
lift it;
using the tool 4 in the tool box, undo
the lock nut 1 fig. 171 (for TIPO 5DOOR
version) or fig. 172 (for TIPO STATION
WAGON version);
169P2000069-000-000
170P2000065-000-000
162
IN AN EMERGENCY
Page 167 of 304
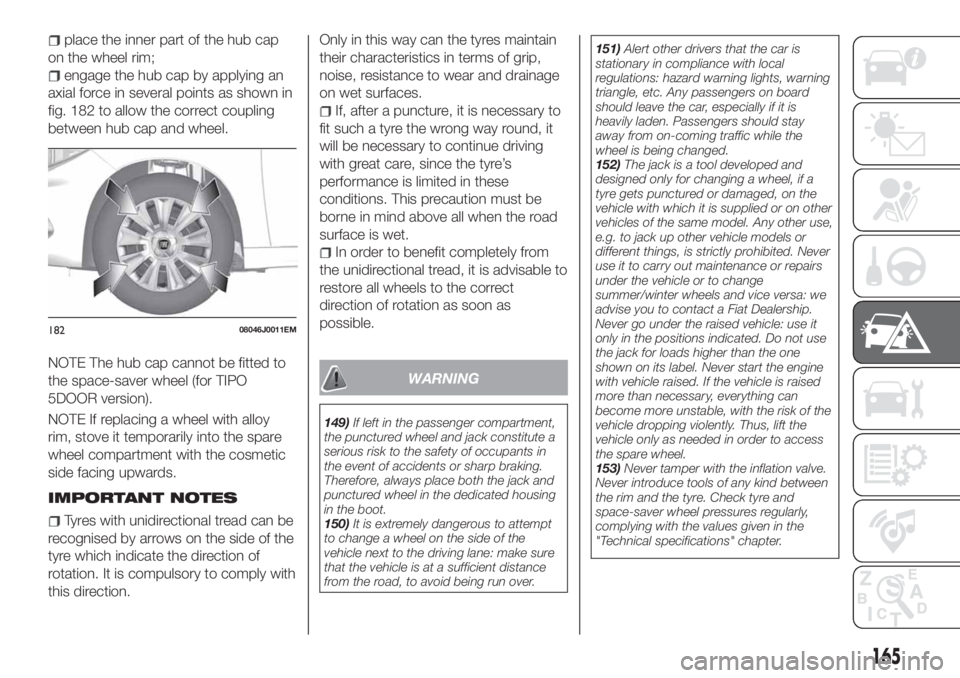
place the inner part of the hub cap
on the wheel rim;
engage the hub cap by applying an
axial force in several points as shown in
fig. 182 to allow the correct coupling
between hub cap and wheel.
NOTE The hub cap cannot be fitted to
the space-saver wheel (for TIPO
5DOOR version).
NOTE If replacing a wheel with alloy
rim, stove it temporarily into the spare
wheel compartment with the cosmetic
side facing upwards.
IMPORTANT NOTES
Tyres with unidirectional tread can be
recognised by arrows on the side of the
tyre which indicate the direction of
rotation. It is compulsory to comply with
this direction.Only in this way can the tyres maintain
their characteristics in terms of grip,
noise, resistance to wear and drainage
on wet surfaces.
If, after a puncture, it is necessary to
fit such a tyre the wrong way round, it
will be necessary to continue driving
with great care, since the tyre’s
performance is limited in these
conditions. This precaution must be
borne in mind above all when the road
surface is wet.
In order to benefit completely from
the unidirectional tread, it is advisable to
restore all wheels to the correct
direction of rotation as soon as
possible.
WARNING
149)If left in the passenger compartment,
the punctured wheel and jack constitute a
serious risk to the safety of occupants in
the event of accidents or sharp braking.
Therefore, always place both the jack and
punctured wheel in the dedicated housing
in the boot.
150)It is extremely dangerous to attempt
to change a wheel on the side of the
vehicle next to the driving lane: make sure
that the vehicle is at a sufficient distance
from the road, to avoid being run over.151)Alert other drivers that the car is
stationary in compliance with local
regulations: hazard warning lights, warning
triangle, etc. Any passengers on board
should leave the car, especially if it is
heavily laden. Passengers should stay
away from on-coming traffic while the
wheel is being changed.
152)The jack is a tool developed and
designed only for changing a wheel, if a
tyre gets punctured or damaged, on the
vehicle with which it is supplied or on other
vehicles of the same model. Any other use,
e.g. to jack up other vehicle models or
different things, is strictly prohibited. Never
use it to carry out maintenance or repairs
under the vehicle or to change
summer/winter wheels and vice versa: we
advise you to contact a Fiat Dealership.
Never go under the raised vehicle: use it
only in the positions indicated. Do not use
the jack for loads higher than the one
shown on its label. Never start the engine
with vehicle raised. If the vehicle is raised
more than necessary, everything can
become more unstable, with the risk of the
vehicle dropping violently. Thus, lift the
vehicle only as needed in order to access
the spare wheel.
153)Never tamper with the inflation valve.
Never introduce tools of any kind between
the rim and the tyre. Check tyre and
space-saver wheel pressures regularly,
complying with the values given in the
"Technical specifications" chapter.
18208046J0011EM
165
Page 169 of 304
REPAIR PROCEDURE
Proceed as follows:
stop the car in a position that is not
dangerous for oncoming traffic where
you can carry out the procedure safely.
The ground must be flat and sufficiently
compact;
stop the engine, engage the hazard
warning lights and the parking brake;
wear the reflective safety jacket
before getting out of the car (anyway
comply with the laws in force in the
country you are driving in);
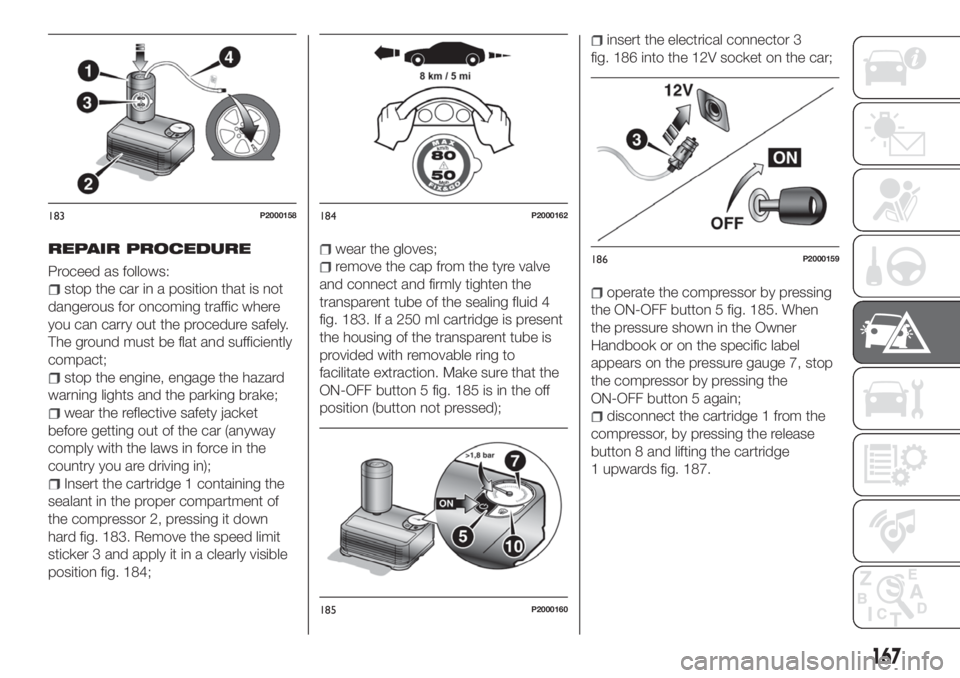
Insert the cartridge 1 containing the
sealant in the proper compartment of
the compressor 2, pressing it down
hard fig. 183. Remove the speed limit
sticker 3 and apply it in a clearly visible
position fig. 184;
wear the gloves;
remove the cap from the tyre valve
and connect and firmly tighten the
transparent tube of the sealing fluid 4
fig. 183. If a 250 ml cartridge is present
the housing of the transparent tube is
provided with removable ring to
facilitate extraction. Make sure that the
ON-OFF button 5 fig. 185 is in the off
position (button not pressed);
insert the electrical connector 3
fig. 186 into the 12V socket on the car;
operate the compressor by pressing
the ON-OFF button 5 fig. 185. When
the pressure shown in the Owner
Handbook or on the specific label
appears on the pressure gauge 7, stop
the compressor by pressing the
ON-OFF button 5 again;
disconnect the cartridge 1 from the
compressor, by pressing the release
button 8 and lifting the cartridge
1 upwards fig. 187.
183P2000158184P2000162
185P2000160
186P2000159
167