remove seats FORD BRONCO 2021 Warranty Guide
[x] Cancel search | Manufacturer: FORD, Model Year: 2021, Model line: BRONCO, Model: FORD BRONCO 2021Pages: 106, PDF Size: 2.6 MB
Page 16 of 106
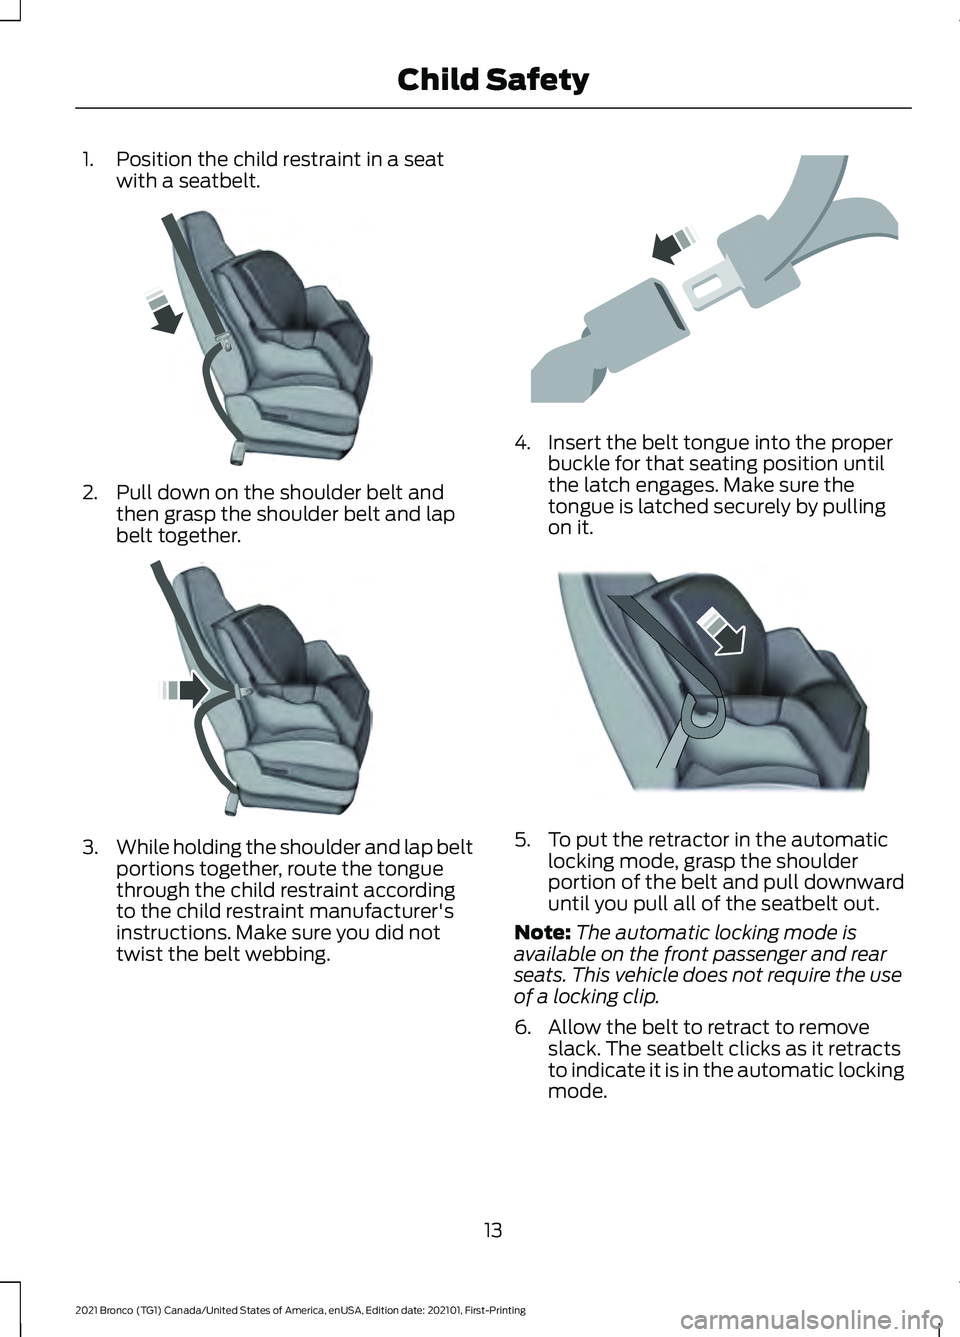
1. Position the child restraint in a seat
with a seatbelt. 2. Pull down on the shoulder belt and
then grasp the shoulder belt and lap
belt together. 3.
While holding the shoulder and lap belt
portions together, route the tongue
through the child restraint according
to the child restraint manufacturer's
instructions. Make sure you did not
twist the belt webbing. 4. Insert the belt tongue into the proper
buckle for that seating position until
the latch engages. Make sure the
tongue is latched securely by pulling
on it. 5. To put the retractor in the automatic
locking mode, grasp the shoulder
portion of the belt and pull downward
until you pull all of the seatbelt out.
Note: The automatic locking mode is
available on the front passenger and rear
seats. This vehicle does not require the use
of a locking clip.
6. Allow the belt to retract to remove slack. The seatbelt clicks as it retracts
to indicate it is in the automatic locking
mode.
13
2021 Bronco (TG1) Canada/United States of America, enUSA, Edition date: 202101, First-Printing Child SafetyE142529 E142530 E142531 E142875
Page 19 of 106
USING TETHER STRAPS
Many forward-facing child restraints
include a tether strap which extends from
the back of the child restraint and hooks
to an anchoring point called the top tether
anchor. Tether straps are available as an
accessory for many older child restraints.
Contact the manufacturer of your child
restraint for information about ordering a
tether strap, or to obtain a longer tether
strap if the tether strap on your child
restraint does not reach the appropriate
top tether anchor in your vehicle.
Attach the tether strap only to the
appropriate tether anchor. The tether strap
may not work properly if attached
somewhere other than the correct tether
anchor.
Note:
If you install a child restraint with rigid
LATCH attachments, do not tighten the
tether strap enough to lift the child restraint
off the vehicle seat cushion when the child
is seated in it. Keep the tether strap just snug
without lifting the front of the child restraint.
Keeping the child restraint just touching the
vehicle seat gives the best protection in a
severe crash.
Once you have installed the child restraint
using either the seatbelt, the lower anchors
of the LATCH system, or both, you can
attach the top tether strap.
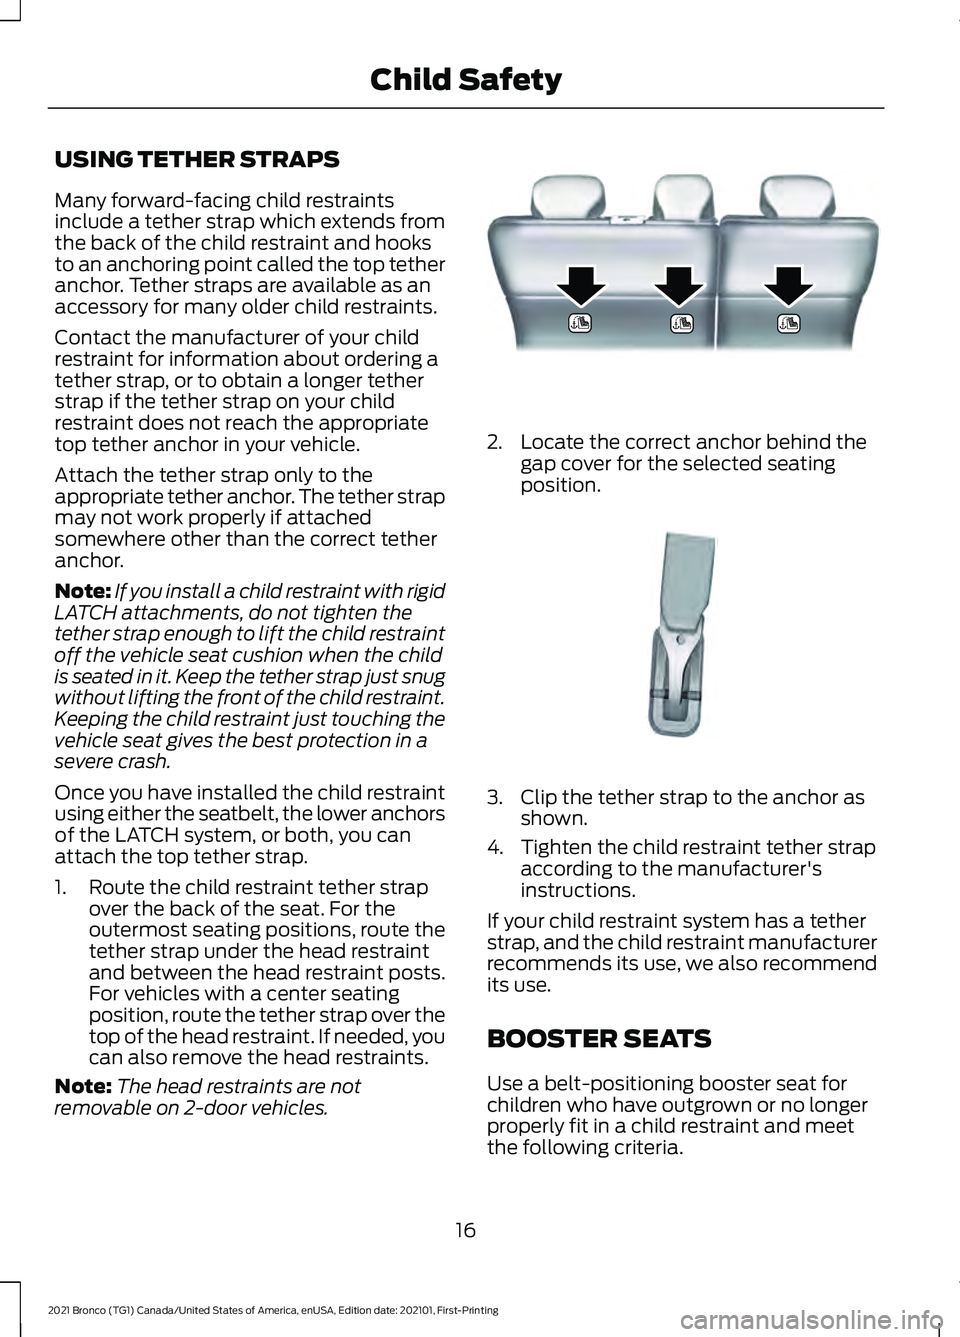
1. Route the child restraint tether strap over the back of the seat. For the
outermost seating positions, route the
tether strap under the head restraint
and between the head restraint posts.
For vehicles with a center seating
position, route the tether strap over the
top of the head restraint. If needed, you
can also remove the head restraints.
Note: The head restraints are not
removable on 2-door vehicles. 2. Locate the correct anchor behind the
gap cover for the selected seating
position. 3. Clip the tether strap to the anchor as
shown.
4. Tighten the child restraint tether strap according to the manufacturer's
instructions.
If your child restraint system has a tether
strap, and the child restraint manufacturer
recommends its use, we also recommend
its use.
BOOSTER SEATS
Use a belt-positioning booster seat for
children who have outgrown or no longer
properly fit in a child restraint and meet
the following criteria.
16
2021 Bronco (TG1) Canada/United States of America, enUSA, Edition date: 202101, First-Printing Child SafetyE193589 E142539
Page 20 of 106
•
Generally children who are less than
57 in (1.45 m) tall.
• Are greater than age four (4) and less
than age twelve (12).
• Are between
40 lb (18 kg) and 80 lb
(36 kg) and upward to 100 lb (45 kg).
Many state and provincial laws require that
children use approved booster seats until
they reach age eight, a height of
57 in
(1.45 m) tall, or 80 lb (36 kg).
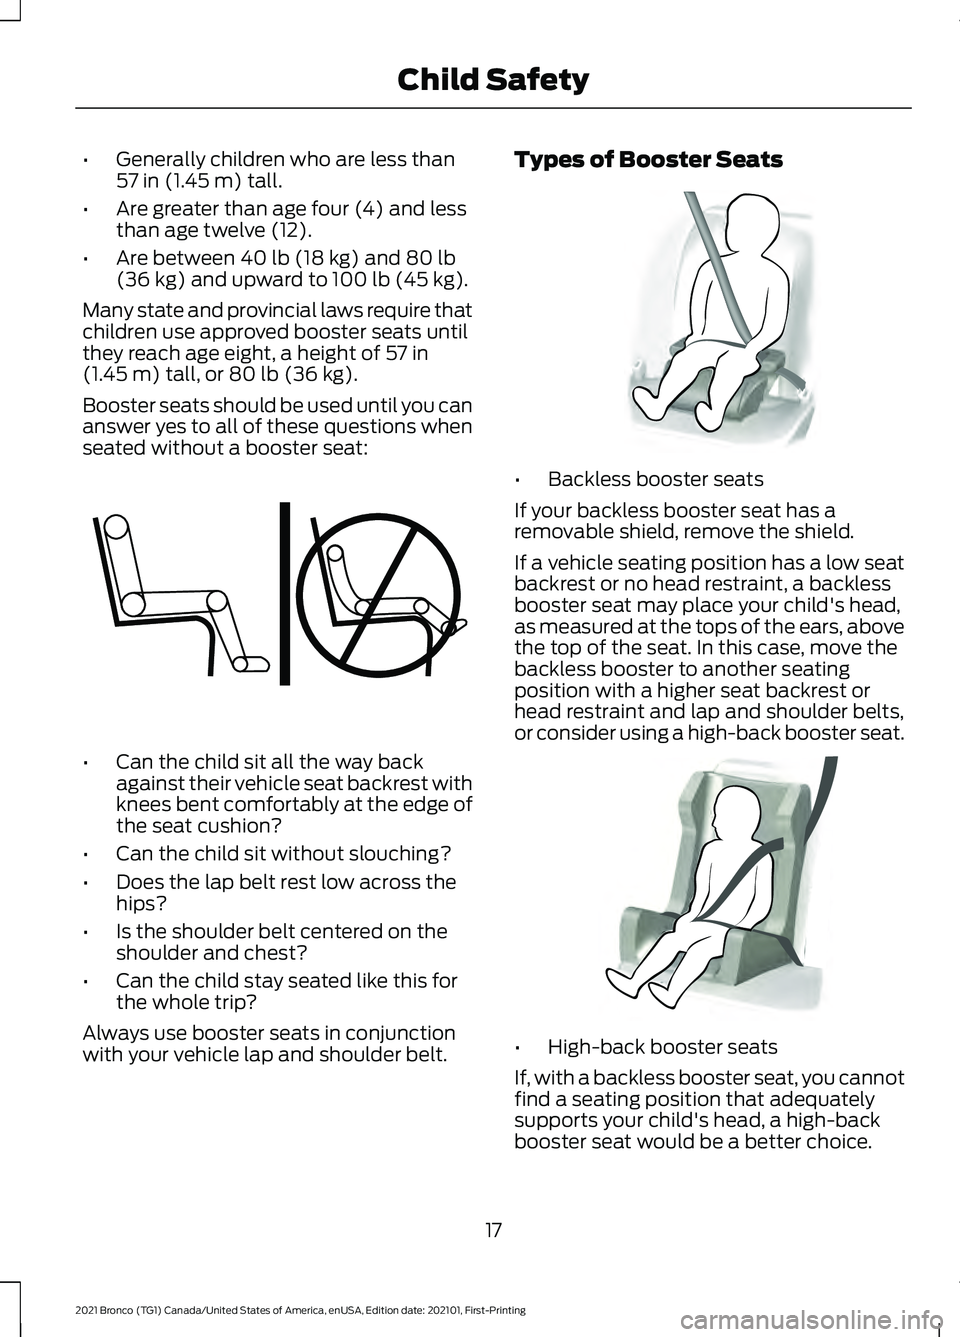
Booster seats should be used until you can
answer yes to all of these questions when
seated without a booster seat: •
Can the child sit all the way back
against their vehicle seat backrest with
knees bent comfortably at the edge of
the seat cushion?
• Can the child sit without slouching?
• Does the lap belt rest low across the
hips?
• Is the shoulder belt centered on the
shoulder and chest?
• Can the child stay seated like this for
the whole trip?
Always use booster seats in conjunction
with your vehicle lap and shoulder belt. Types of Booster Seats
•
Backless booster seats
If your backless booster seat has a
removable shield, remove the shield.
If a vehicle seating position has a low seat
backrest or no head restraint, a backless
booster seat may place your child's head,
as measured at the tops of the ears, above
the top of the seat. In this case, move the
backless booster to another seating
position with a higher seat backrest or
head restraint and lap and shoulder belts,
or consider using a high-back booster seat. •
High-back booster seats
If, with a backless booster seat, you cannot
find a seating position that adequately
supports your child's head, a high-back
booster seat would be a better choice.
17
2021 Bronco (TG1) Canada/United States of America, enUSA, Edition date: 202101, First-Printing Child SafetyE142595 E68924 E70710
Page 34 of 106
If a person of adult size is sitting in the front
passenger seat, but the passenger airbag
status indicator off lamp is illuminated, it
is possible that the person is not sitting
properly in the seat. If this happens:
•
Switch your vehicle off and ask the
person to place the seat backrest in an
upright position.
• Have the person sit upright in the seat,
centered on the seat cushion, with the
person's legs comfortably extended.
• Restart your vehicle and have the
person remain in this position for about
two minutes. This allows the system
to detect that person and enable the
passenger frontal airbag.
• If the indicator off lamp remains
illuminated even after this, you should
advise the person to ride in the rear
seat.
After all occupants have adjusted their
seats and put on seatbelts, it is very
important that they continue to sit upright,
leaning against the seat backrest, and
centered on the seat cushion, with their
feet comfortably extended on the floor.
Sitting improperly can increase the chance
of injury in a crash event. For example, if
an occupant slouches, lies down, turns
sideways, sits forward, leans forward or
sideways, or puts one or both feet up, the
chance of injury during a crash greatly
increases.
If you think that the state of the passenger
airbag status indicator lamp is incorrect,
check for the following:
• Objects lodged underneath the seat.
• Objects between the seat cushion and
the center console.
• Objects hanging off the seat backrest.
• Objects stowed in the seat backrest
map pocket.
• Objects placed on the occupant's lap. •
Cargo interference with the seat
• Other passengers pushing or pulling on
the seat.
• Rear passenger feet and knees resting
or pushing on the seat.
The listed conditions could cause the
weight of a properly seated occupant to
be incorrectly interpreted by the front
passenger sensing system. The person in
the front passenger seat could appear
heavier or lighter due to the conditions
listed. Make sure the front passenger
sensing system is operating
properly.
If the airbag readiness light is on, do the
following:
• Pull your vehicle over.
• Switch your vehicle off.
• Check for any objects lodged
underneath the front passenger seat
or cargo interfering with the seat.
• Remove the obstruction if found.
• Restart your vehicle.
• Wait at least two minutes and verify
that the airbag readiness light in the
instrument cluster is no longer
illuminated.
• If the airbag readiness light in the
instrument cluster remains illuminated,
there may be a problem due to the
front passenger sensing system.
Do not attempt to repair or service the
system. Take your vehicle in for service
immediately.
If it is necessary to modify an advanced
front airbag system to accommodate a
person with disabilities, contact your
Customer Relationship Center.
31
2021 Bronco (TG1) Canada/United States of America, enUSA, Edition date: 202101, First-Printing AirbagsE67017
Page 47 of 106
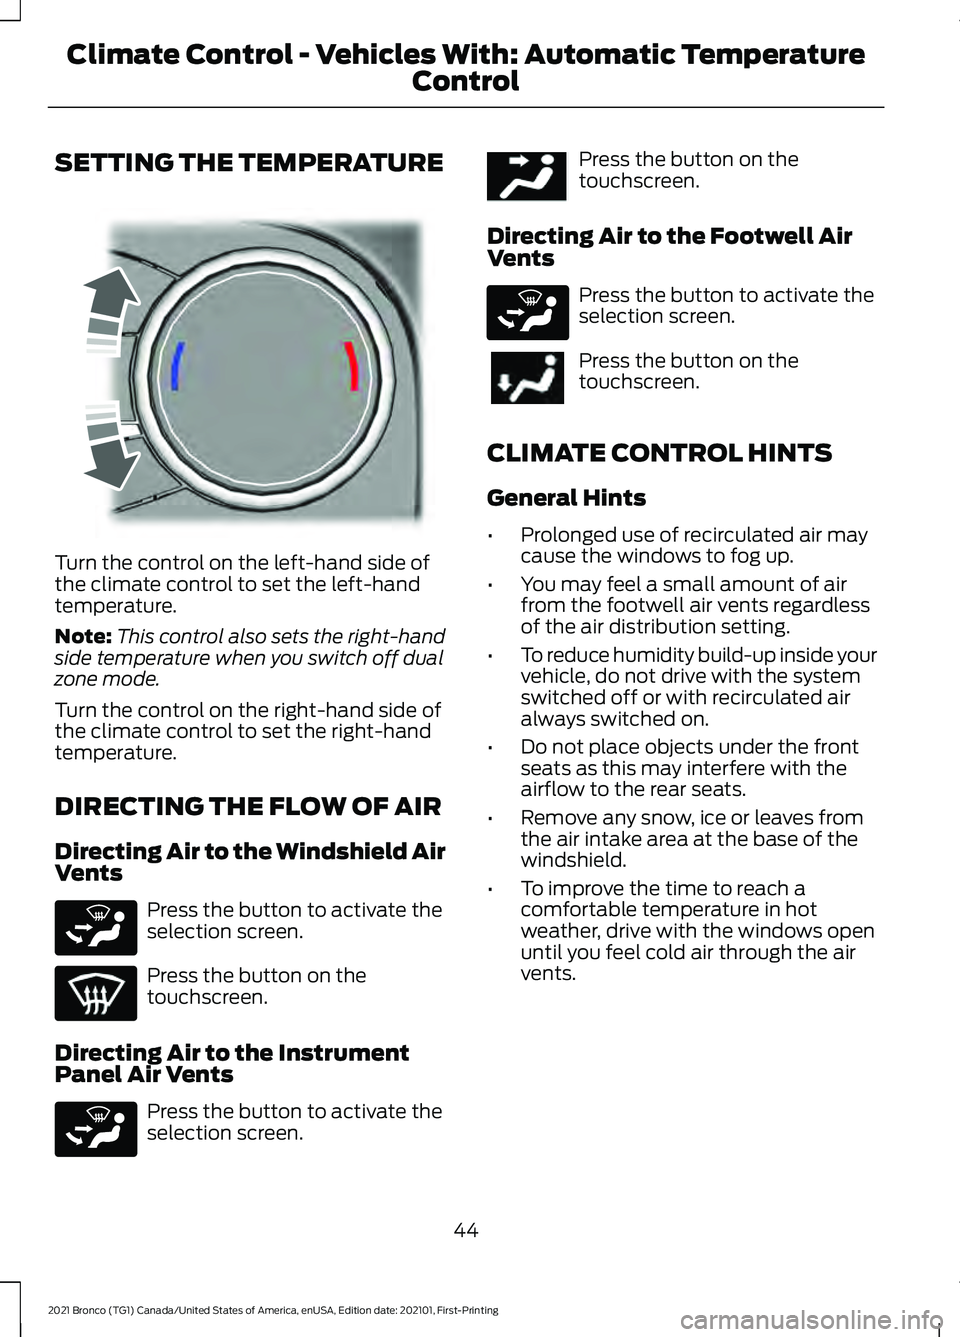
SETTING THE TEMPERATURE
Turn the control on the left-hand side of
the climate control to set the left-hand
temperature.
Note:
This control also sets the right-hand
side temperature when you switch off dual
zone mode.
Turn the control on the right-hand side of
the climate control to set the right-hand
temperature.
DIRECTING THE FLOW OF AIR
Directing Air to the Windshield Air
Vents Press the button to activate the
selection screen.
Press the button on the
touchscreen.
Directing Air to the Instrument
Panel Air Vents Press the button to activate the
selection screen. Press the button on the
touchscreen.
Directing Air to the Footwell Air
Vents Press the button to activate the
selection screen.
Press the button on the
touchscreen.
CLIMATE CONTROL HINTS
General Hints
• Prolonged use of recirculated air may
cause the windows to fog up.
• You may feel a small amount of air
from the footwell air vents regardless
of the air distribution setting.
• To reduce humidity build-up inside your
vehicle, do not drive with the system
switched off or with recirculated air
always switched on.
• Do not place objects under the front
seats as this may interfere with the
airflow to the rear seats.
• Remove any snow, ice or leaves from
the air intake area at the base of the
windshield.
• To improve the time to reach a
comfortable temperature in hot
weather, drive with the windows open
until you feel cold air through the air
vents.
44
2021 Bronco (TG1) Canada/United States of America, enUSA, Edition date: 202101, First-Printing Climate Control - Vehicles With: Automatic Temperature
ControlE244115 E265283 E265283 E244097 E265283
Page 50 of 106
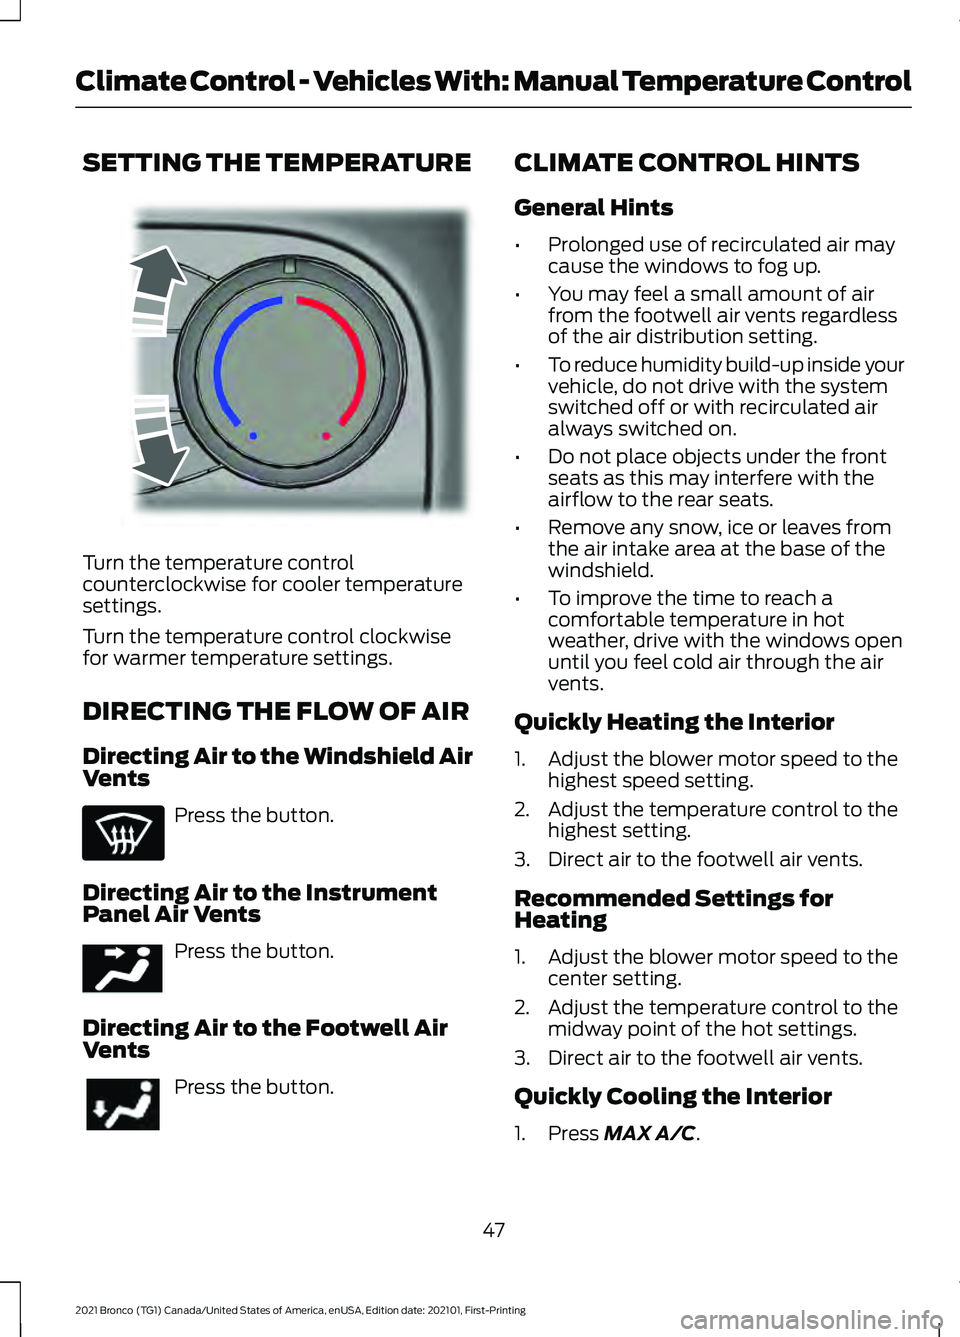
SETTING THE TEMPERATURE
Turn the temperature control
counterclockwise for cooler temperature
settings.
Turn the temperature control clockwise
for warmer temperature settings.
DIRECTING THE FLOW OF AIR
Directing Air to the Windshield Air
Vents
Press the button.
Directing Air to the Instrument
Panel Air Vents Press the button.
Directing Air to the Footwell Air
Vents Press the button. CLIMATE CONTROL HINTS
General Hints
•
Prolonged use of recirculated air may
cause the windows to fog up.
• You may feel a small amount of air
from the footwell air vents regardless
of the air distribution setting.
• To reduce humidity build-up inside your
vehicle, do not drive with the system
switched off or with recirculated air
always switched on.
• Do not place objects under the front
seats as this may interfere with the
airflow to the rear seats.
• Remove any snow, ice or leaves from
the air intake area at the base of the
windshield.
• To improve the time to reach a
comfortable temperature in hot
weather, drive with the windows open
until you feel cold air through the air
vents.
Quickly Heating the Interior
1. Adjust the blower motor speed to the highest speed setting.
2. Adjust the temperature control to the highest setting.
3. Direct air to the footwell air vents.
Recommended Settings for
Heating
1. Adjust the blower motor speed to the center setting.
2. Adjust the temperature control to the midway point of the hot settings.
3. Direct air to the footwell air vents.
Quickly Cooling the Interior
1. Press MAX A/C.
47
2021 Bronco (TG1) Canada/United States of America, enUSA, Edition date: 202101, First-Printing Climate Control - Vehicles With: Manual Temperature ControlE244106 E244097
Page 52 of 106
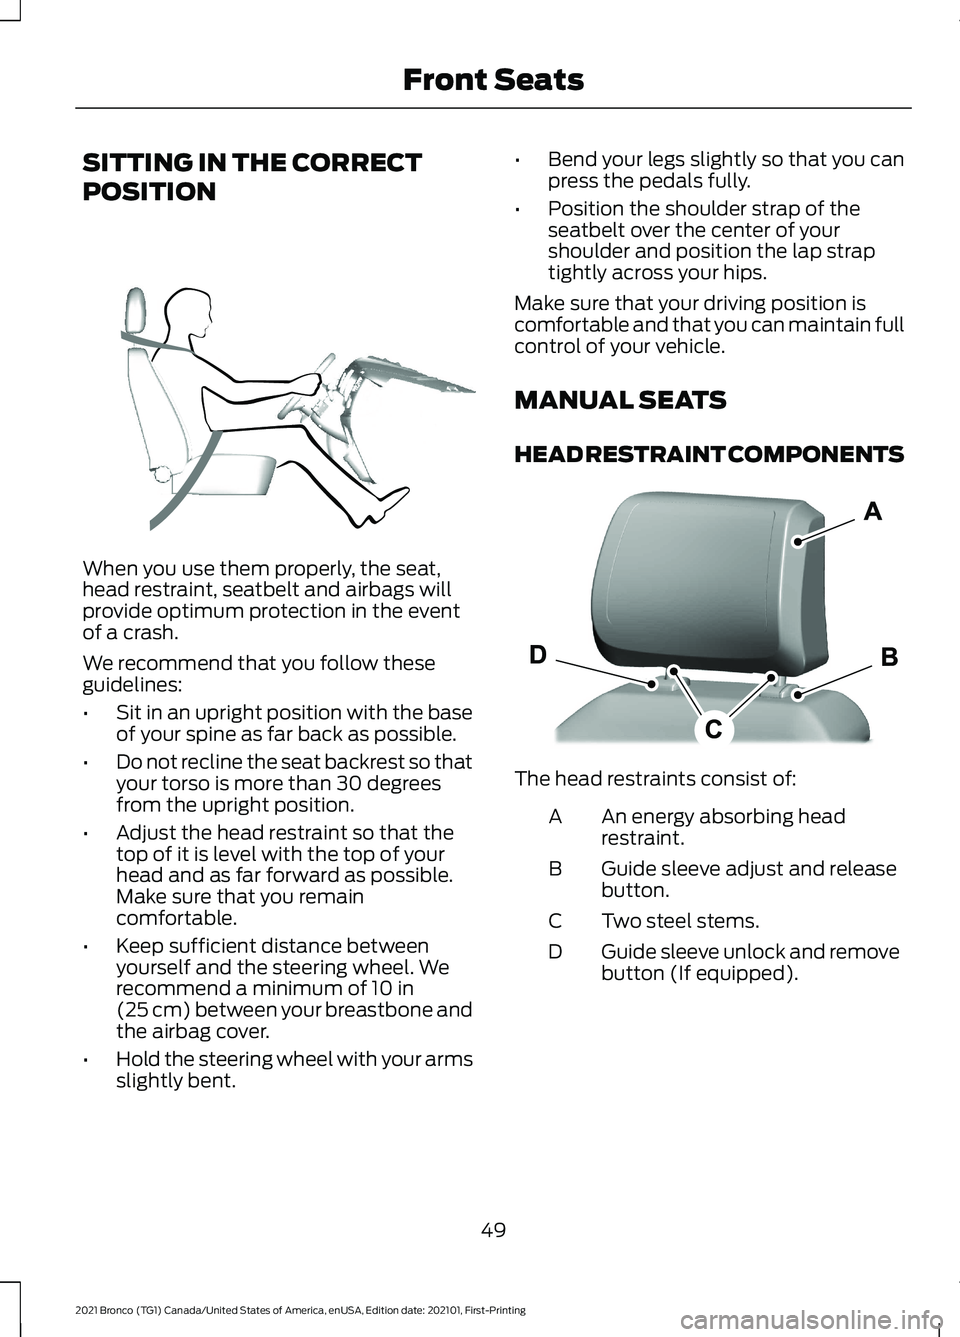
SITTING IN THE CORRECT
POSITION
When you use them properly, the seat,
head restraint, seatbelt and airbags will
provide optimum protection in the event
of a crash.
We recommend that you follow these
guidelines:
•
Sit in an upright position with the base
of your spine as far back as possible.
• Do not recline the seat backrest so that
your torso is more than 30 degrees
from the upright position.
• Adjust the head restraint so that the
top of it is level with the top of your
head and as far forward as possible.
Make sure that you remain
comfortable.
• Keep sufficient distance between
yourself and the steering wheel. We
recommend a minimum of 10 in
(25 cm) between your breastbone and
the airbag cover.
• Hold the steering wheel with your arms
slightly bent. •
Bend your legs slightly so that you can
press the pedals fully.
• Position the shoulder strap of the
seatbelt over the center of your
shoulder and position the lap strap
tightly across your hips.
Make sure that your driving position is
comfortable and that you can maintain full
control of your vehicle.
MANUAL SEATS
HEAD RESTRAINT COMPONENTS The head restraints consist of:
An energy absorbing head
restraint.
A
Guide sleeve adjust and release
button.
B
Two steel stems.
C
Guide sleeve unlock and remove
button (If equipped).
D
49
2021 Bronco (TG1) Canada/United States of America, enUSA, Edition date: 202101, First-Printing Front SeatsE68595 E308298
Page 54 of 106
1. Pull up the head restraint until it
reaches the highest adjustment
position.
2. Press and hold the button.
3. Pull up the head restraint.
Note: You cannot remove head restraints
that have audio system speakers.
INSTALLING THE HEAD
RESTRAINT
Align the steel stems into the guide sleeves
and push the head restraint down until it
locks.
POWER SEATS
HEAD RESTRAINT COMPONENTS The head restraints consist of:
An energy absorbing head
restraint.
A
Two steel stems.
B
Guide sleeve adjust and release
button.
C
Guide sleeve unlock and remove
button (If equipped).
D ADJUSTING THE HEAD
RESTRAINT WARNING: Fully adjust the head
restraint before you sit in or operate your
vehicle. This will help minimize the risk
of neck injury in the event of a crash. Do
not adjust the head restraint when your
vehicle is moving. WARNING:
The head restraint is a
safety device. Whenever possible it
should be installed and properly
adjusted when the seat is occupied.
Failure to adjust the head restraint
properly could reduce its effectiveness
during certain impacts. WARNING:
Adjust the head
restraints for all passengers before you
drive your vehicle. This will help minimize
the risk of neck injury in the event of a
crash. Do not adjust the head restraints
when your vehicle is moving.
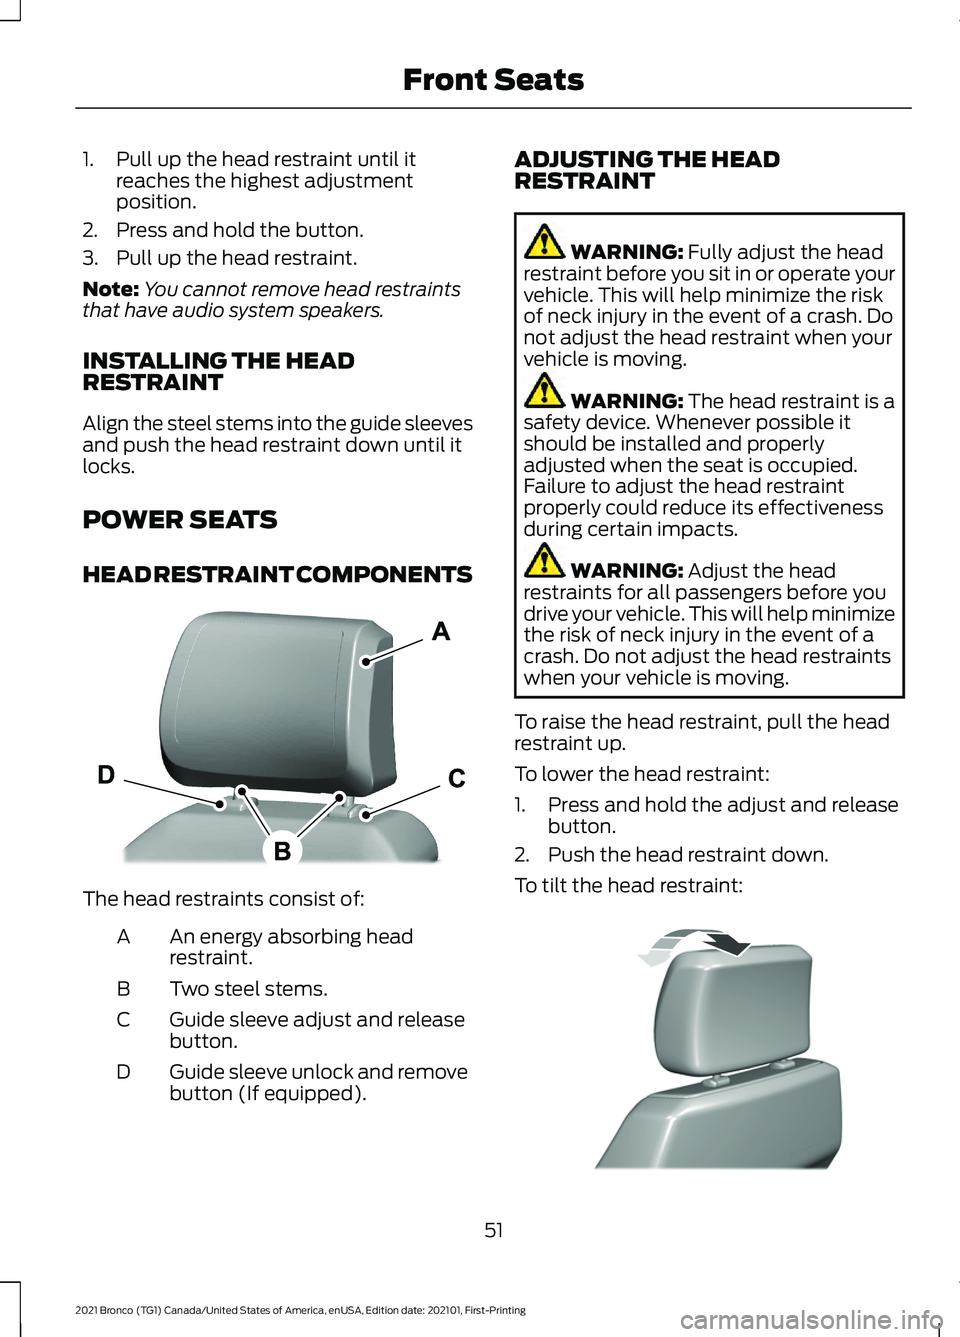
To raise the head restraint, pull the head
restraint up.
To lower the head restraint:
1. Press and hold the adjust and release button.
2. Push the head restraint down.
To tilt the head restraint: 51
2021 Bronco (TG1) Canada/United States of America, enUSA, Edition date: 202101, First-Printing Front SeatsE327921 E327919
Page 55 of 106
1. Adjust the seat backrest to an upright
driving or riding position.
2. Pivot the head restraint forward toward
your head to the preferred position.
After the head restraint reaches the
forward-most tilt position, pivot it forward
again to release it to the rearward, untilted
position.
Note: Do not attempt to force the head
restraint backward after it is tilted. Instead,
continue tilting it forward until the head
restraint releases to the upright position.
REMOVING THE HEAD RESTRAINT
1. Pull up the head restraint until it reaches its highest position.
2. Press and hold the adjust and release button.
3. Pull up the head restraint.
Note: You cannot remove head restraints
that have audio system speakers.
INSTALLING THE HEAD
RESTRAINT
Align the steel stems into the guide sleeves
and push the head restraint down until it
locks. HEATED SEATS (IF EQUIPPED)
HEATED SEAT PRECAUTIONS WARNING: Use caution when using
the heated seat if you are unable to feel
pain to your skin because of advanced
age, chronic illness, diabetes, spinal cord
injury, medication, alcohol use,
exhaustion or other physical conditions.
The heated seat could cause burns even
at low temperatures, especially if used
for long periods of time. Failure to follow
this instruction could result in personal
injury. WARNING:
Do not poke sharp
objects into the seat cushion or seat
backrest. This could damage the heated
seat element and cause it to overheat.
Failure to follow this instruction could
result in personal injury. WARNING:
Do not place anything
on the seat that blocks the heat, for
example a seat cover or a cushion. This
could cause the seat to overheat. Failure
to follow this instruction could result in
personal injury.
Do not:
• Place heavy objects on the seat.
• Operate the heated seat if water or any
other liquid spills on the seat. Allow the
seat to dry.
SWITCHING THE HEATED SEATS
ON AND OFF
The vehicle must be running to use this
feature.
52
2021 Bronco (TG1) Canada/United States of America, enUSA, Edition date: 202101, First-Printing Front Seats
Page 57 of 106
MANUAL SEATS
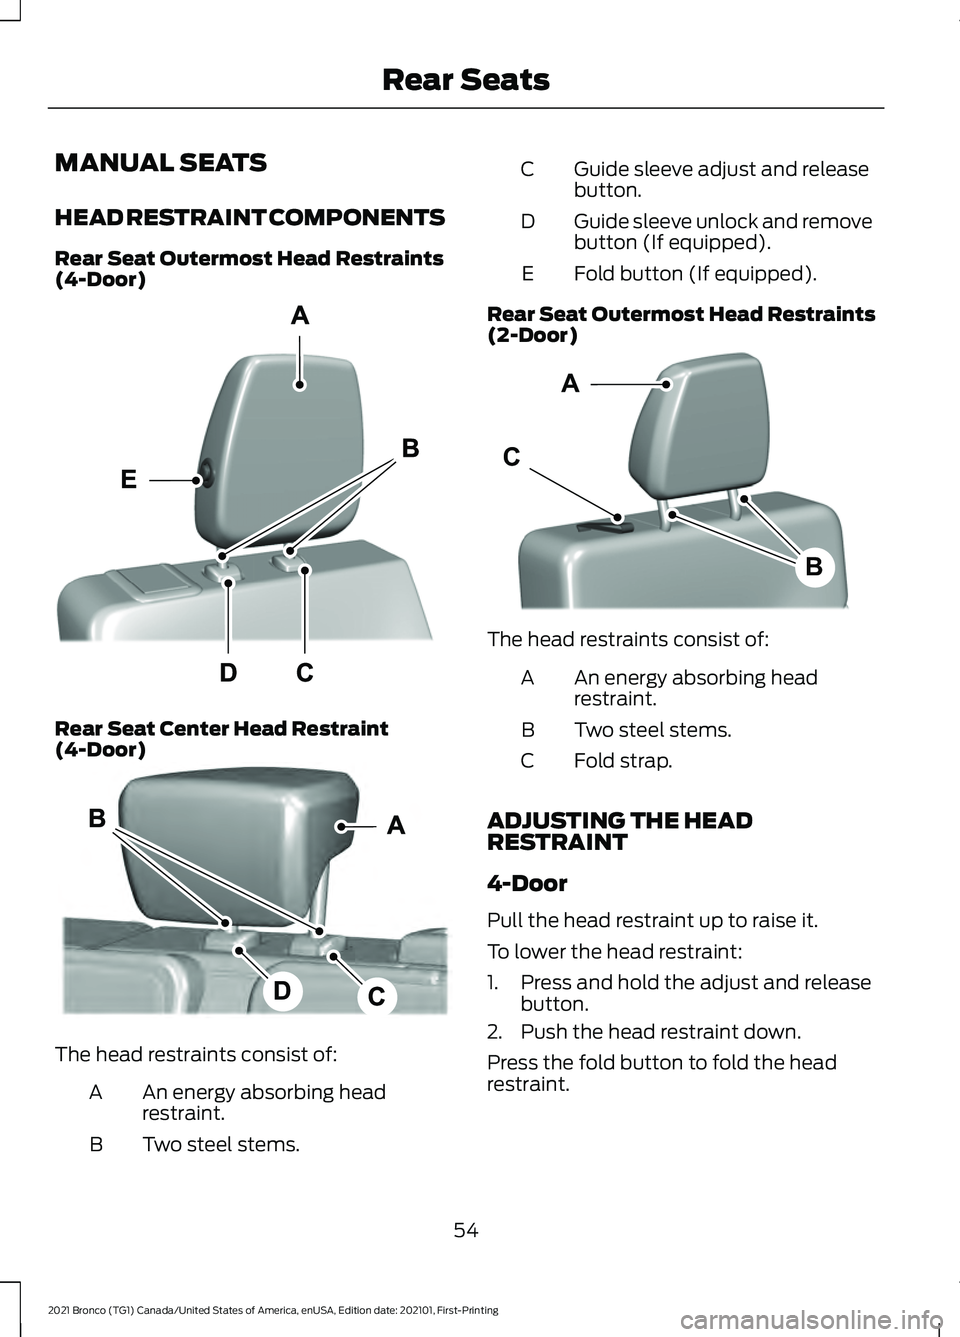
HEAD RESTRAINT COMPONENTS
Rear Seat Outermost Head Restraints
(4-Door)
Rear Seat Center Head Restraint
(4-Door)
The head restraints consist of:
An energy absorbing head
restraint.
A
Two steel stems.
B Guide sleeve adjust and release
button.
C
Guide sleeve unlock and remove
button (If equipped).
D
Fold button (If equipped).
E
Rear Seat Outermost Head Restraints
(2-Door) The head restraints consist of:
An energy absorbing head
restraint.
A
Two steel stems.
B
Fold strap.
C
ADJUSTING THE HEAD
RESTRAINT
4-Door
Pull the head restraint up to raise it.
To lower the head restraint:
1. Press and hold the adjust and release button.
2. Push the head restraint down.
Press the fold button to fold the head
restraint.
54
2021 Bronco (TG1) Canada/United States of America, enUSA, Edition date: 202101, First-Printing Rear SeatsE330418 E342165 A
B
CE333887