storage FORD BRONCO 2022 User Guide
[x] Cancel search | Manufacturer: FORD, Model Year: 2022, Model line: BRONCO, Model: FORD BRONCO 2022Pages: 562, PDF Size: 73 MB
Page 354 of 562
REMOVABLE ROOF PANELS (IF
EQUIPPED)
REMOVABLE ROOF PANELPRECAUTIONS
WARNING: When opening, closing,removing or installing the removablevehicle components, take care not to getyour fingers or hands caught in themechanism. Failure to follow thisinstruction could result in personal injury.
WARNING: Do not drive yourvehicle with only the center or the rearroof panel removed. Failure to follow thisinstruction could cause unintendedseparation of the roof panels from yourvehicle.
WARNING: Do not drive yourvehicle unless the installed roof panelsare properly secured. Failure to followthis instruction could cause unintendedseparation of the roof panels from yourvehicle.
Note:Do not step or kneel on the centerconsole during roof removal or once roofpanels are removed.
Removal of the center and rear roof panelsrequires two adults.
Do not cut, drill, weld or modify the roofpanels or attach anything other than thefactory-installed roof rack.
If there is any damage to the roof panels,see an authorized dealer.
Make sure the locating pins on the rear roofpanel sit flush in your vehicle wheninstalled.
Failure to follow these instructions couldcause interior water damage, stains ormildew:
•Properly position the hard topassembly to seal the top to your vehicleduring installation. Improperinstallation could cause water to leakinto the vehicle’s interior.
•Properly handle and store theremovable roof panels. Improperhandling and storage could damagethe seals, causing water to leak intothe vehicle’s interior.
•Do not place anything on top of therear roof panel when it is removed fromthe vehicle. This could cause damageto the rear roof panel and its seals.
REMOVING AND INSTALLING THEFRONT ROOF PANEL
Remove the driver side front roof panelbefore removing the passenger side frontroof panel.
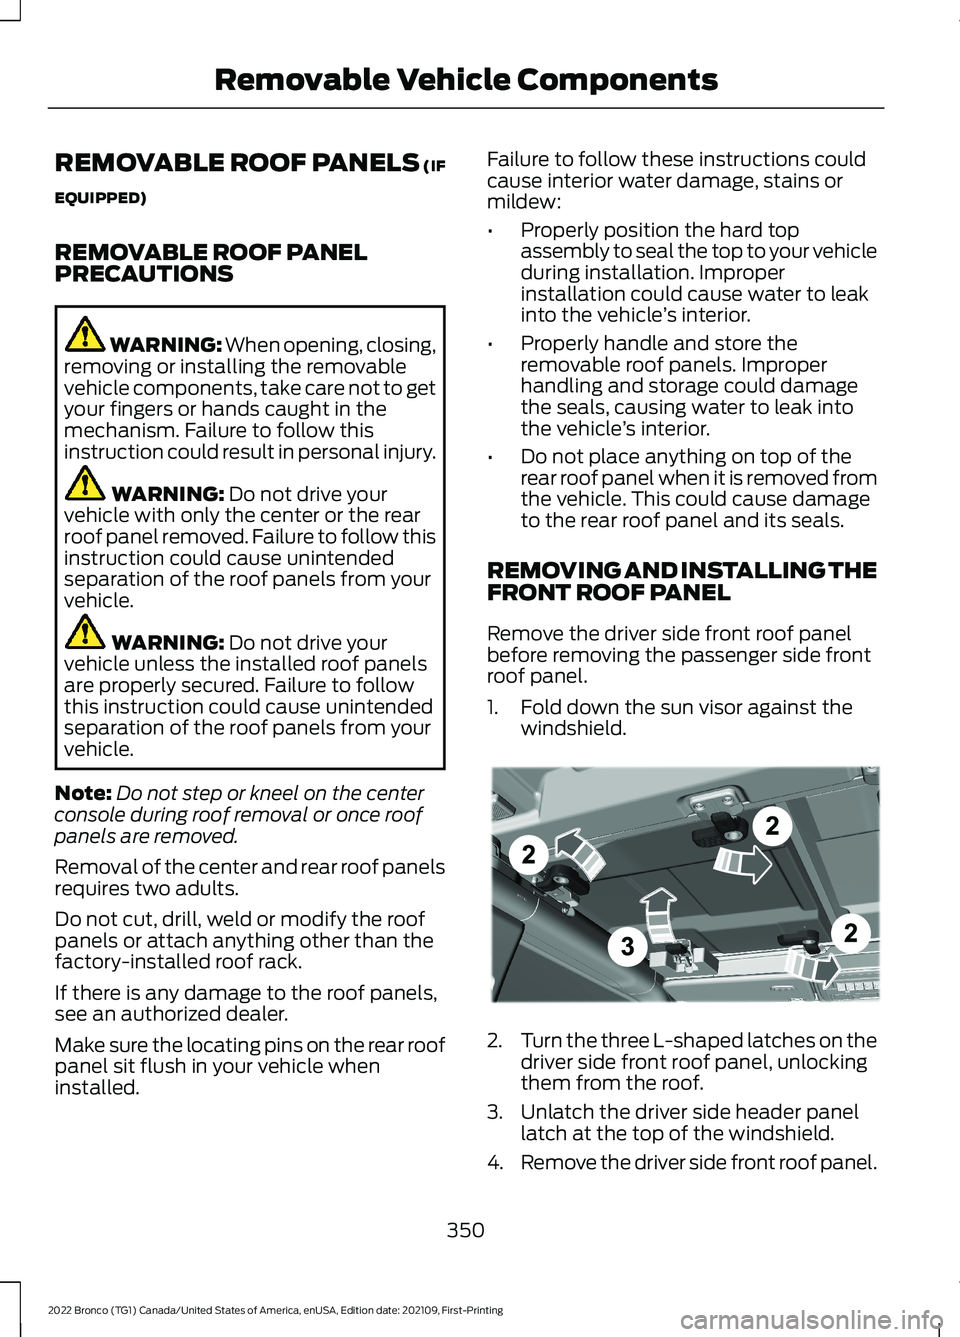
1.Fold down the sun visor against thewindshield.
2.Turn the three L-shaped latches on thedriver side front roof panel, unlockingthem from the roof.
3.Unlatch the driver side header panellatch at the top of the windshield.
4.Remove the driver side front roof panel.
350
2022 Bronco (TG1) Canada/United States of America, enUSA, Edition date: 202109, First-PrintingRemovable Vehicle ComponentsE333995
Page 355 of 562
5.Repeat the steps to remove thepassenger side panel front roof panel.
6.Store the front roof panels in thestorage bag. See Storing the RoofPanels (page 366). See Storing theDoors and the Roof Panels (page360).
7.To install, reverse the removalprocedure.
REMOVING AND INSTALLING THECENTER ROOF PANEL - 4-DOOR
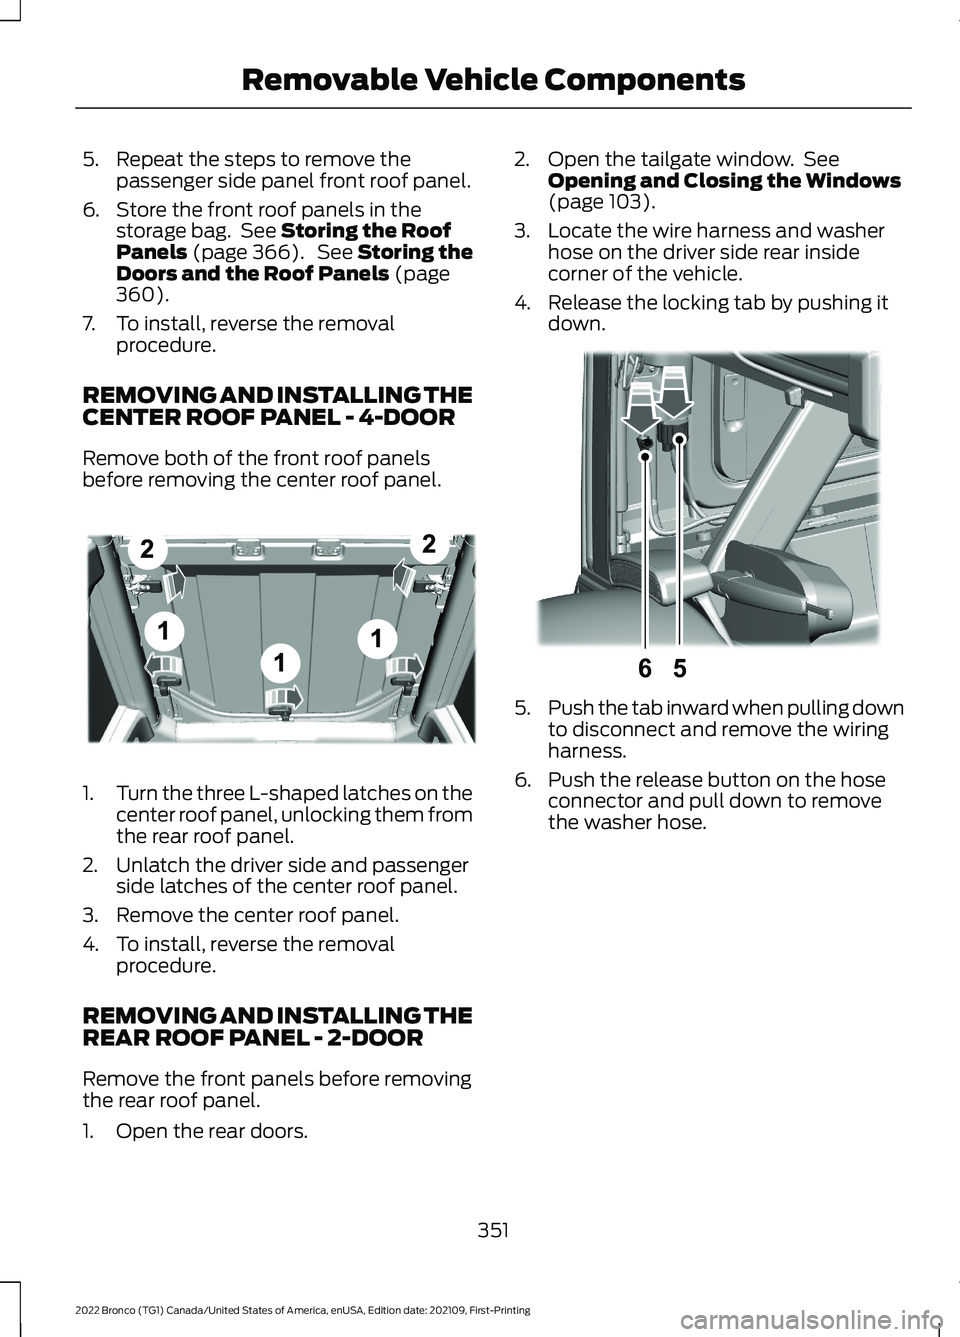
Remove both of the front roof panelsbefore removing the center roof panel.
1.Turn the three L-shaped latches on thecenter roof panel, unlocking them fromthe rear roof panel.
2.Unlatch the driver side and passengerside latches of the center roof panel.
3.Remove the center roof panel.
4.To install, reverse the removalprocedure.
REMOVING AND INSTALLING THEREAR ROOF PANEL - 2-DOOR
Remove the front panels before removingthe rear roof panel.
1.Open the rear doors.
2.Open the tailgate window. SeeOpening and Closing the Windows(page 103).
3.Locate the wire harness and washerhose on the driver side rear insidecorner of the vehicle.
4.Release the locking tab by pushing itdown.
5.Push the tab inward when pulling downto disconnect and remove the wiringharness.
6.Push the release button on the hoseconnector and pull down to removethe washer hose.
351
2022 Bronco (TG1) Canada/United States of America, enUSA, Edition date: 202109, First-PrintingRemovable Vehicle ComponentsE333996 65E335339
Page 364 of 562
2.Lock the five quarter turn clips byturning the clips clockwise.
STORING THE DOORS AND
THE ROOF PANELS - 4-DOOR
(IF EQUIPPED)
WARNING: Do not store removeddoors or roof panels in vehicle withoutusing the Ford onboard storage kit, andverifying they have been secured perinstructions. Failure to follow thisinstruction could result in personal injuryor death.
Note:Cargo can shift under severe vehicleuse, to reduce the risk of damage, avoid highspeed or extreme rock crawl off-roadsituations when storing the doors in thecargo area.
Note:Inspect the bags and harnessperiodically to make sure they are notdamaged. Inspect the door retentionharness straps to make sure there are nonicks, tears or cuts. Replace if necessary.
Note:Clean the roof panels and doors priorto storing them in the bags as dirt maydamage the finish.
Storing the Front Roof Panels
1.Remove the front roof panels. SeeRemoving and Installing the FrontRoof Panel (page 350).
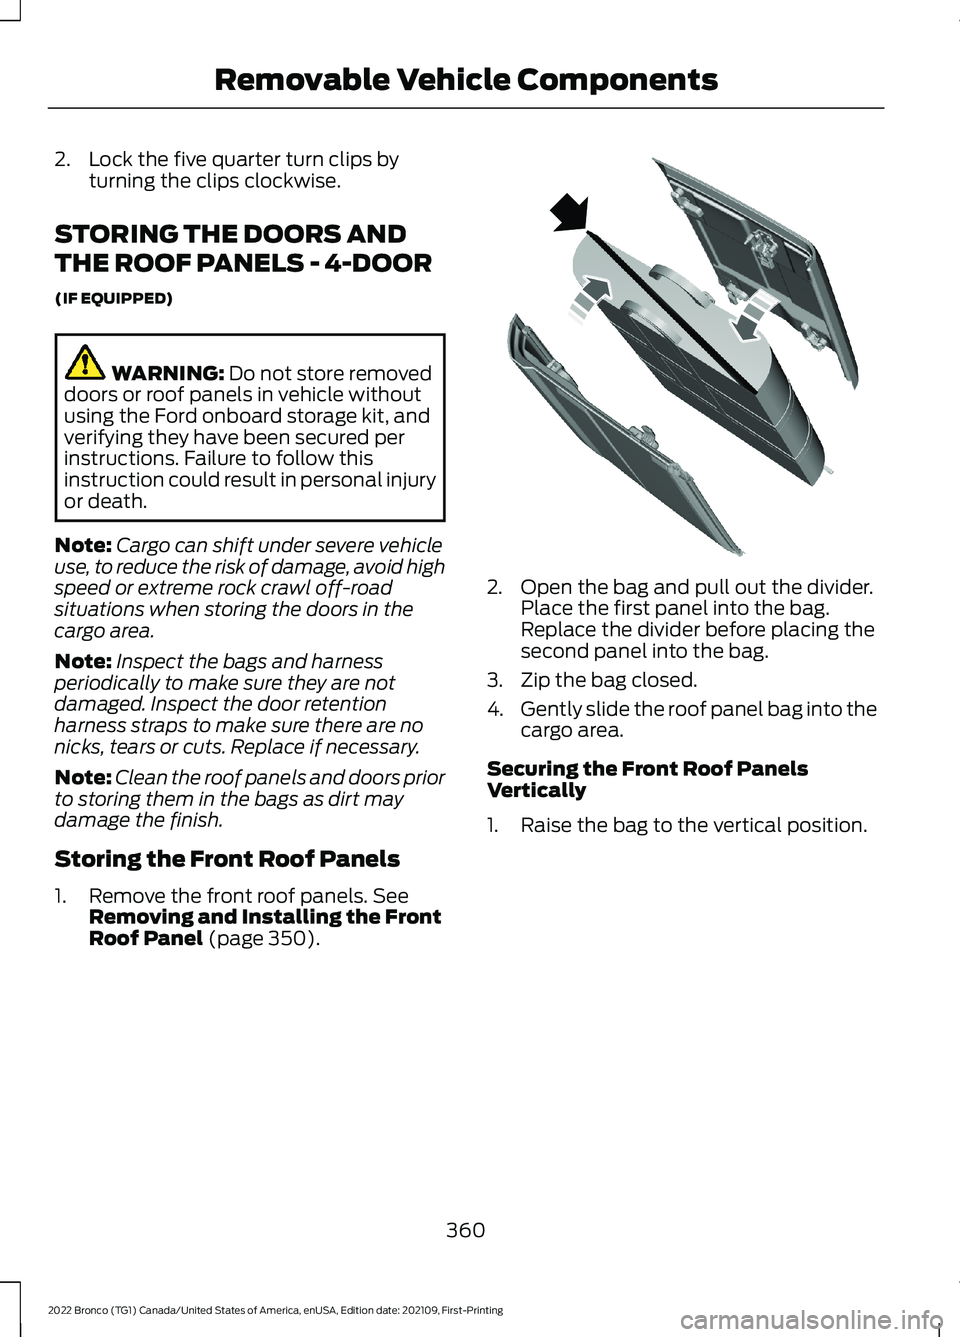
2.Open the bag and pull out the divider.Place the first panel into the bag.Replace the divider before placing thesecond panel into the bag.
3.Zip the bag closed.
4.Gently slide the roof panel bag into thecargo area.
Securing the Front Roof PanelsVertically
1.Raise the bag to the vertical position.
360
2022 Bronco (TG1) Canada/United States of America, enUSA, Edition date: 202109, First-PrintingRemovable Vehicle ComponentsE338782
Page 365 of 562
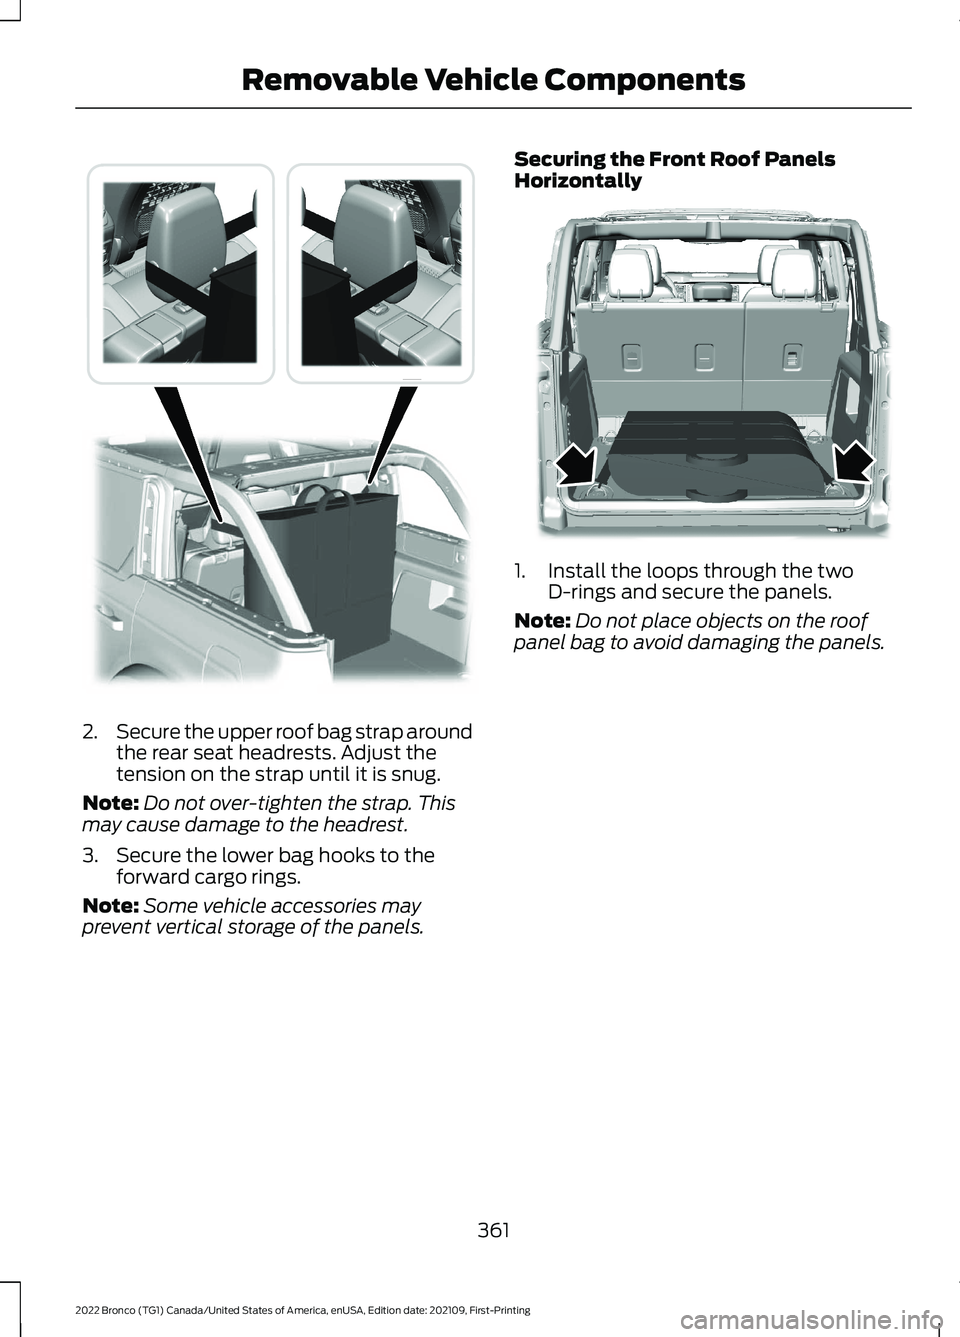
2.Secure the upper roof bag strap aroundthe rear seat headrests. Adjust thetension on the strap until it is snug.
Note:Do not over-tighten the strap. Thismay cause damage to the headrest.
3.Secure the lower bag hooks to theforward cargo rings.
Note:Some vehicle accessories mayprevent vertical storage of the panels.
Securing the Front Roof PanelsHorizontally
1.Install the loops through the twoD-rings and secure the panels.
Note:Do not place objects on the roofpanel bag to avoid damaging the panels.
361
2022 Bronco (TG1) Canada/United States of America, enUSA, Edition date: 202109, First-PrintingRemovable Vehicle ComponentsE340967 E346658
Page 366 of 562
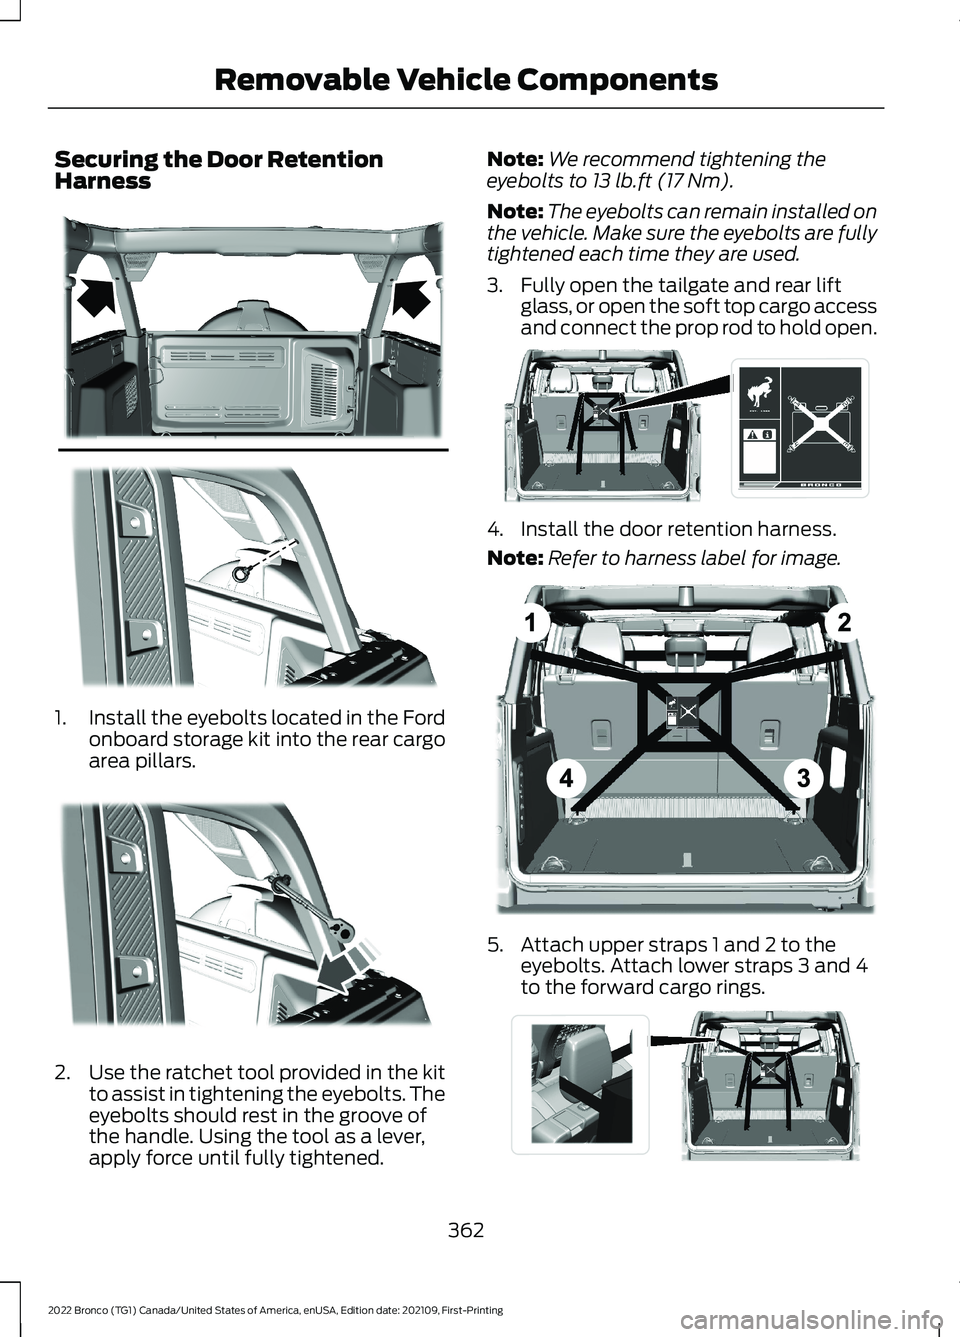
Securing the Door RetentionHarness
1.Install the eyebolts located in the Fordonboard storage kit into the rear cargoarea pillars.
2.Use the ratchet tool provided in the kitto assist in tightening the eyebolts. Theeyebolts should rest in the groove ofthe handle. Using the tool as a lever,apply force until fully tightened.
Note:We recommend tightening theeyebolts to 13 lb.ft (17 Nm).
Note:The eyebolts can remain installed onthe vehicle. Make sure the eyebolts are fullytightened each time they are used.
3.Fully open the tailgate and rear liftglass, or open the soft top cargo accessand connect the prop rod to hold open.
4.Install the door retention harness.
Note:Refer to harness label for image.
5.Attach upper straps 1 and 2 to theeyebolts. Attach lower straps 3 and 4to the forward cargo rings.
362
2022 Bronco (TG1) Canada/United States of America, enUSA, Edition date: 202109, First-PrintingRemovable Vehicle ComponentsE339591 E339585 E339054 E339061 E339067
Page 369 of 562
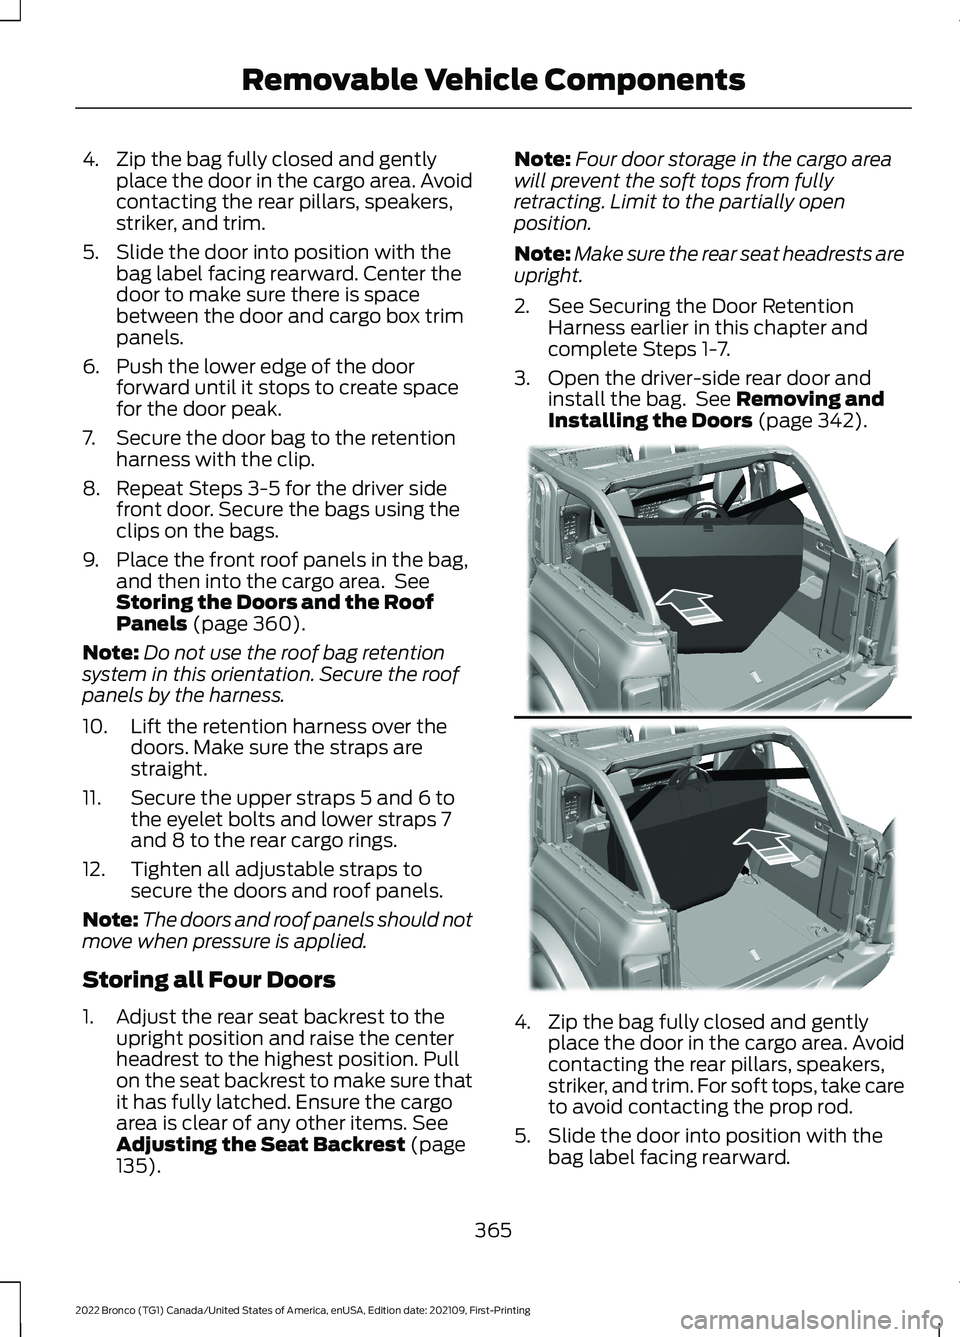
4.Zip the bag fully closed and gentlyplace the door in the cargo area. Avoidcontacting the rear pillars, speakers,striker, and trim.
5.Slide the door into position with thebag label facing rearward. Center thedoor to make sure there is spacebetween the door and cargo box trimpanels.
6.Push the lower edge of the doorforward until it stops to create spacefor the door peak.
7.Secure the door bag to the retentionharness with the clip.
8.Repeat Steps 3-5 for the driver sidefront door. Secure the bags using theclips on the bags.
9.Place the front roof panels in the bag,and then into the cargo area. SeeStoring the Doors and the RoofPanels (page 360).
Note:Do not use the roof bag retentionsystem in this orientation. Secure the roofpanels by the harness.
10.Lift the retention harness over thedoors. Make sure the straps arestraight.
11.Secure the upper straps 5 and 6 tothe eyelet bolts and lower straps 7and 8 to the rear cargo rings.
12.Tighten all adjustable straps tosecure the doors and roof panels.
Note:The doors and roof panels should notmove when pressure is applied.
Storing all Four Doors
1.Adjust the rear seat backrest to theupright position and raise the centerheadrest to the highest position. Pullon the seat backrest to make sure thatit has fully latched. Ensure the cargoarea is clear of any other items. SeeAdjusting the Seat Backrest (page135).
Note:Four door storage in the cargo areawill prevent the soft tops from fullyretracting. Limit to the partially openposition.
Note:Make sure the rear seat headrests areupright.
2.See Securing the Door RetentionHarness earlier in this chapter andcomplete Steps 1-7.
3.Open the driver-side rear door andinstall the bag. See Removing andInstalling the Doors (page 342).
4.Zip the bag fully closed and gentlyplace the door in the cargo area. Avoidcontacting the rear pillars, speakers,striker, and trim. For soft tops, take careto avoid contacting the prop rod.
5.Slide the door into position with thebag label facing rearward.
365
2022 Bronco (TG1) Canada/United States of America, enUSA, Edition date: 202109, First-PrintingRemovable Vehicle ComponentsE338915
Page 370 of 562
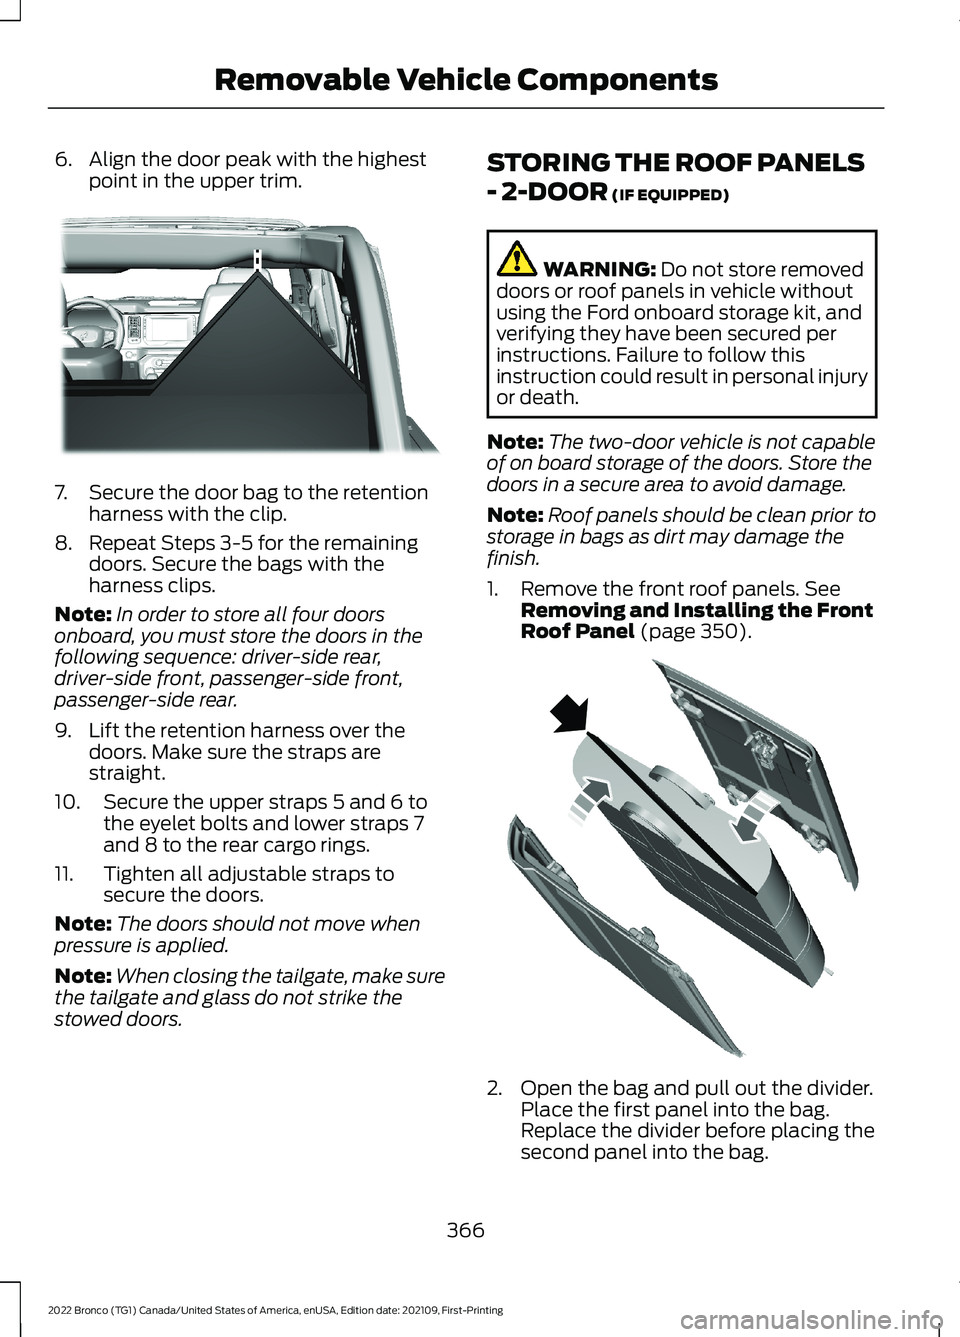
6.Align the door peak with the highestpoint in the upper trim.
7.Secure the door bag to the retentionharness with the clip.
8.Repeat Steps 3-5 for the remainingdoors. Secure the bags with theharness clips.
Note:In order to store all four doorsonboard, you must store the doors in thefollowing sequence: driver-side rear,driver-side front, passenger-side front,passenger-side rear.
9.Lift the retention harness over thedoors. Make sure the straps arestraight.
10.Secure the upper straps 5 and 6 tothe eyelet bolts and lower straps 7and 8 to the rear cargo rings.
11.Tighten all adjustable straps tosecure the doors.
Note:The doors should not move whenpressure is applied.
Note:When closing the tailgate, make surethe tailgate and glass do not strike thestowed doors.
STORING THE ROOF PANELS
- 2-DOOR (IF EQUIPPED)
WARNING: Do not store removeddoors or roof panels in vehicle withoutusing the Ford onboard storage kit, andverifying they have been secured perinstructions. Failure to follow thisinstruction could result in personal injuryor death.
Note:The two-door vehicle is not capableof on board storage of the doors. Store thedoors in a secure area to avoid damage.
Note:Roof panels should be clean prior tostorage in bags as dirt may damage thefinish.
1.Remove the front roof panels. SeeRemoving and Installing the FrontRoof Panel (page 350).
2.Open the bag and pull out the divider.Place the first panel into the bag.Replace the divider before placing thesecond panel into the bag.
366
2022 Bronco (TG1) Canada/United States of America, enUSA, Edition date: 202109, First-PrintingRemovable Vehicle ComponentsE339016 E338782
Page 378 of 562
PREPARING YOUR VEHICLE
FOR STORAGE
If you plan on storing your vehicle for 30days or more, the following maintenancerecommendations ensures your vehiclestays in good operating condition.
Under various conditions, long-termstorage may lead to degraded engineperformance or failure unless you usespecific precautions to preserve yourvehicle.
General
•Store all vehicles in a dry, ventilatedplace.
•If vehicles are stored outside, theyrequire regular maintenance to protectagainst rust and weather damage.
•Make sure all linkages, cables, leversand pins under your vehicle are coveredwith grease to prevent rust.
•Move vehicles at least 25 ft (7.5 m)every 15 days to lubricate working partsand prevent corrosion.
•Fill the fuel tank with high-quality fueluntil the first automatic shutoff of thefuel pump nozzle.
Engine
•Change the engine oil and filter prior tostorage because used engine oilcontains contaminants which maycause engine damage.
•Start the engine every 15 days for aminimum of 15 minutes. Run at fastidle with the climate controls set todefrost until the engine reaches normaloperating temperature.
•With your foot on the brake, shiftthrough all the gears while the engineis running.
Body
•Wash your vehicle thoroughly toremove dirt, grease, oil, tar or mud fromexterior surfaces, rear-wheel housingsand the underside of front fenders.
•Periodically wash your vehicle if it isstored in exposed locations.
•Touch-up exposed or primed metal toprevent rust.
•Cover chrome and stainless steel partswith a thick coat of auto wax to preventdiscoloration. Re-wax as necessarywhen you wash your vehicle.
•Lubricate all hood, door and luggagecompartment hinges and latches witha light grade oil.
•Cover interior trim to prevent fading.
•Keep all rubber parts free from oil andsolvents.
12 Volt Battery
•Check and recharge as necessary. Keepconnections clean.
Note:It is necessary to reset memoryfeatures if you disconnect the batterycables.
Brakes
Make sure the brakes and parking brakerelease fully.
Note:If you intend on parking your vehiclefor an extended period after cleaning thewheels with a wheel cleaner, drive yourvehicle for a few minutes before doing so toreduce the risk of increased corrosion of thebrake discs, brake pads and linings.
Tires
•Maintain recommended air pressure.
374
2022 Bronco (TG1) Canada/United States of America, enUSA, Edition date: 202109, First-PrintingStoring Your Vehicle
Page 379 of 562
Note:If you intend on parking your vehiclefor an extended period after cleaning thewheels with a wheel cleaner, drive yourvehicle for a few minutes before doing so.This reduces the risk of corrosion of thebrake discs, brake pads and linings.
REMOVING YOUR VEHICLE
FROM STORAGE
When your vehicle is ready to come out ofstorage, do the following:
•We recommend that you change theengine oil before you use your vehicleagain.
•Wash your vehicle to remove any dirtor grease film build-up on windowsurfaces.
•Check windshield wipers for anydeterioration.
•Check under the hood for any foreignmaterial that may have collectedduring storage such as mice or squirrelnests.
•Check the exhaust for any foreignmaterial that may have collectedduring storage.
•Check tire pressures and set tireinflation per the Tire Label.
•Check brake pedal operation. Driveyour vehicle 15 ft (4.5 m) back andforth to remove rust build-up.
•Check fluid levels (including coolant,oil and gas) to make sure there are noleaks, and fluids are at recommendedlevels.
•If you remove the battery, clean thebattery cable ends and check fordamage.
Contact an authorized dealer if you haveany concerns or issues.
375
2022 Bronco (TG1) Canada/United States of America, enUSA, Edition date: 202109, First-PrintingStoring Your Vehicle
Page 387 of 562
*Tread area of the tire: Area ofthe perimeter of the tire thatcontacts the road when mountedon the vehicle.
*Rim: The metal support (wheel)for a tire or a tire and tubeassembly upon which the tirebeads are seated.
TIRE REPLACEMENT
REQUIREMENTS
AGE
WARNING: Tires degradeover time depending on manyfactors such as weather, storageconditions, and conditions of use(load, speed, inflation pressure)the tires experience throughouttheir lives.In general, tires should bereplaced after six yearsregardless of tread wear.However, heat caused by hotclimates or frequent high loadingconditions can accelerate theaging process and may requiretires to be replaced morefrequently.You should replace your sparetire when you replace the roadtires or after six years due toaging even if it has not beenused.
U.S. DOT Tire IdentificationNumber
Both United States and CanadaFederal regulations require tiremanufacturers to placestandardized information on thesidewall of all tires. Thisinformation identifies anddescribes the fundamentalcharacteristics of the tire and alsoprovides a U.S. DOT TireIdentification Number for safetystandard certification and in caseof a recall.
This begins with the letters DOTand indicates that the tire meetsall federal standards. The nexttwo numbers or letters are theplant code designating where itwas manufactured, the next twoare the tire size code and the lastfour numbers represent the weekand year the tire was built. Forexample, the numbers 317 meanthe 31st week of 1997. After 2000,the numbers go to four digits. Forexample, 2501 means the 25thweek of 2001. The numbers inbetween are identification codesused for traceability. Thisinformation is used to contactcustomers if a tire defect requiresa recall.
Tire ReplacementRequirements
Your vehicle is equipped with tiresdesigned to provide a safe rideand handling capability.
383
2022 Bronco (TG1) Canada/United States of America, enUSA, Edition date: 202109, First-PrintingWheel and Tire Information