Button FORD BRONCO SPORT 2022 Owners Manual
[x] Cancel search | Manufacturer: FORD, Model Year: 2022, Model line: BRONCO SPORT, Model: FORD BRONCO SPORT 2022Pages: 494, PDF Size: 8.74 MB
Page 30 of 494
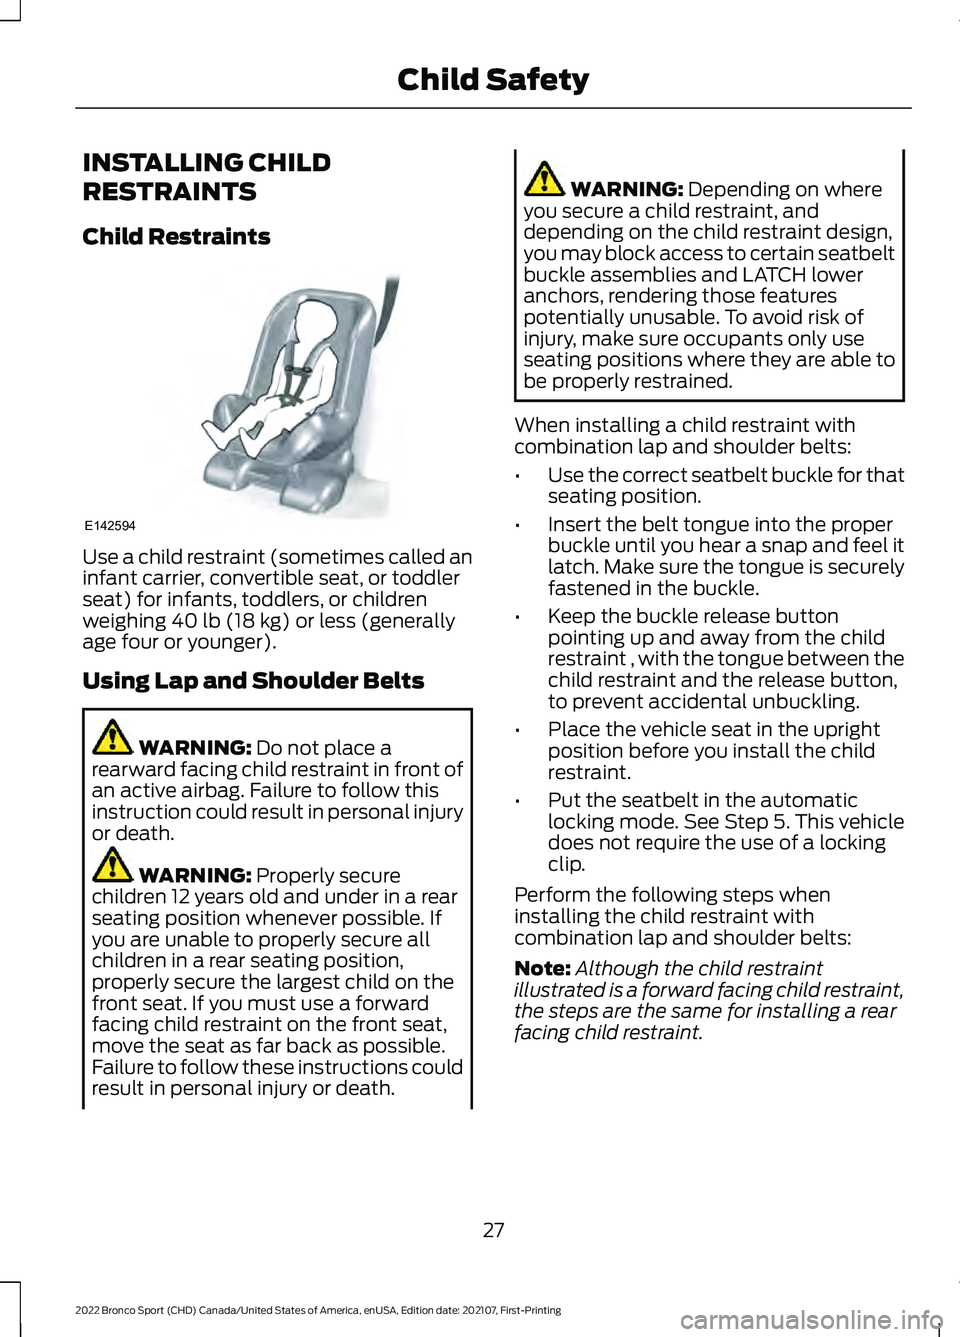
INSTALLING CHILD
RESTRAINTS
Child Restraints
Use a child restraint (sometimes called an
infant carrier, convertible seat, or toddler
seat) for infants, toddlers, or children
weighing 40 lb (18 kg) or less (generally
age four or younger).
Using Lap and Shoulder Belts WARNING:
Do not place a
rearward facing child restraint in front of
an active airbag. Failure to follow this
instruction could result in personal injury
or death. WARNING:
Properly secure
children 12 years old and under in a rear
seating position whenever possible. If
you are unable to properly secure all
children in a rear seating position,
properly secure the largest child on the
front seat. If you must use a forward
facing child restraint on the front seat,
move the seat as far back as possible.
Failure to follow these instructions could
result in personal injury or death. WARNING:
Depending on where
you secure a child restraint, and
depending on the child restraint design,
you may block access to certain seatbelt
buckle assemblies and LATCH lower
anchors, rendering those features
potentially unusable. To avoid risk of
injury, make sure occupants only use
seating positions where they are able to
be properly restrained.
When installing a child restraint with
combination lap and shoulder belts:
• Use the correct seatbelt buckle for that
seating position.
• Insert the belt tongue into the proper
buckle until you hear a snap and feel it
latch. Make sure the tongue is securely
fastened in the buckle.
• Keep the buckle release button
pointing up and away from the child
restraint , with the tongue between the
child restraint and the release button,
to prevent accidental unbuckling.
• Place the vehicle seat in the upright
position before you install the child
restraint.
• Put the seatbelt in the automatic
locking mode. See Step 5. This vehicle
does not require the use of a locking
clip.
Perform the following steps when
installing the child restraint with
combination lap and shoulder belts:
Note: Although the child restraint
illustrated is a forward facing child restraint,
the steps are the same for installing a rear
facing child restraint.
27
2022 Bronco Sport (CHD) Canada/United States of America, enUSA, Edition date: 202107, First-Printing Child SafetyE142594
Page 42 of 494
•
Crash sensors and monitoring system
with readiness indicator.
The seatbelt pretensioners are designed
to tighten the seatbelts when activated. In
frontal and near-frontal crashes, the
seatbelt pretensioners may be activated
alone or, if the crash is of sufficient severity,
together with the front airbags. The
pretensioners may also activate when a
Safety Canopy airbag deploys.
FASTENING THE SEATBELTS
The front outboard and rear safety
restraints in the vehicle are combination
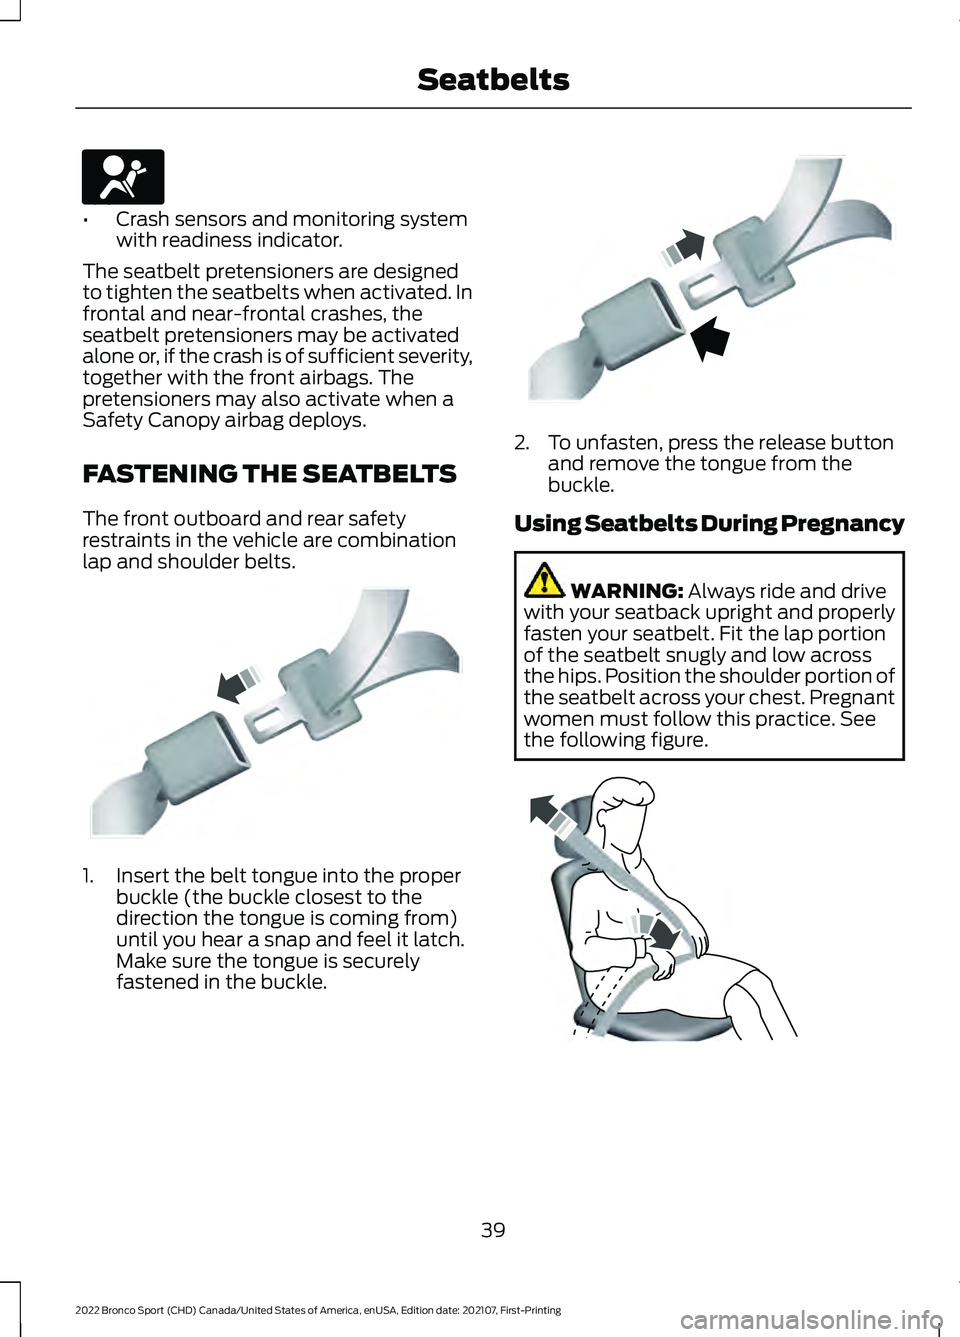
lap and shoulder belts. 1. Insert the belt tongue into the proper
buckle (the buckle closest to the
direction the tongue is coming from)
until you hear a snap and feel it latch.
Make sure the tongue is securely
fastened in the buckle. 2. To unfasten, press the release button
and remove the tongue from the
buckle.
Using Seatbelts During Pregnancy WARNING: Always ride and drive
with your seatback upright and properly
fasten your seatbelt. Fit the lap portion
of the seatbelt snugly and low across
the hips. Position the shoulder portion of
the seatbelt across your chest. Pregnant
women must follow this practice. See
the following figure. 39
2022 Bronco Sport (CHD) Canada/United States of America, enUSA, Edition date: 202107, First-Printing SeatbeltsE67017 E142587 E142588 E142590
Page 44 of 494
2. Grasp the shoulder portion and pull
downward until you pull the entire belt
out. Allow the belt to retract. As the
belt retracts, you will hear a clicking
sound. This indicates the seatbelt is
now in the automatic locking mode.
How to Disengage the Automatic
Locking Mode
Unbuckle the combination lap and
shoulder belt and allow it to retract
completely to disengage the automatic
locking mode and turn on the vehicle
sensitive (emergency) locking mode.
How to Extract Seatbelts in the
Rear Outermost Positions
Seatbelts in the rear outermost positions
can lock if you firmly return the seat
backrest to its upright position. You can
unlock the seatbelts using the following
procedures.
For vehicles where the rear seats recline:
1. Recline the seat to its full rear recline position.
2. The seatbelt should then unlock.
3. Return the seat backrest to its desired upright position.
For vehicles with rear seats that do not
recline or are locked with the seat in its full
rear recline position:
1. Grasp the seatbelt webbing at the top of the seat backrest.
2. Pull the seatbelt webbing forward, firmly.
3. After pulling the seatbelt forward, allow the seatbelt to feed back into the
seatbelt retractor as much as possible.
If necessary, press the seat backrest
down to allow the seatbelt webbing to
retract further.
4. The seatbelt should then unlock. 5. If the seatbelt does not unlock, repeat
steps 1-3.
SEATBELT HEIGHT
ADJUSTMENT WARNING: Position the seatbelt
height adjusters so that the belt rests
across the middle of your shoulder.
Failure to adjust the seatbelt correctly
could reduce the effectiveness of the
seatbelt and increase the risk of injury in
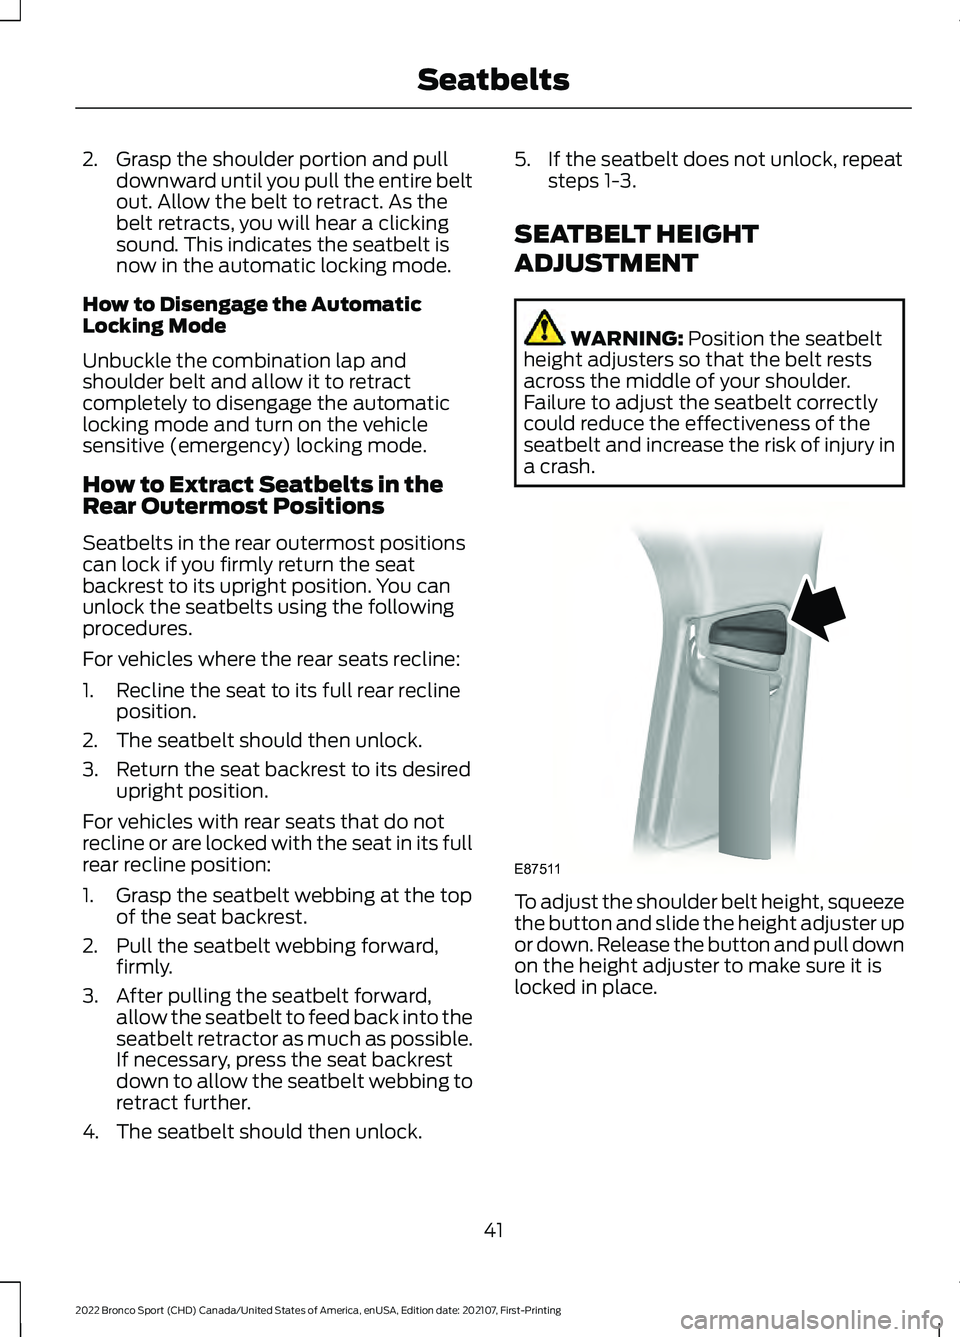
a crash. To adjust the shoulder belt height, squeeze
the button and slide the height adjuster up
or down. Release the button and pull down
on the height adjuster to make sure it is
locked in place.
41
2022 Bronco Sport (CHD) Canada/United States of America, enUSA, Edition date: 202107, First-Printing SeatbeltsE87511
Page 58 of 494
WHAT IS 911 ASSIST
If a crash deploys an airbag, excluding knee
airbags and rear inflatable seatbelts, or
activates the fuel pump shut-off, your
vehicle may be able to contact emergency
services by dialing 911 through a paired and
connected Bluetooth®-enabled phone.
Website
www.owner.ford.com
www.syncmyride.ca
www.syncmaroute.ca
Not all crashes will deploy an airbag or
activate the fuel pump shut-off (the
triggers for 911 Assist). If a connected cell
phone sustains damage or loses its
connection to SYNC during a crash, SYNC
will search for and try to connect to a
previously paired cell phone; SYNC will
then attempt to call emergency services.
Before making the call:
• SYNC provides a short window of time
(about 10 seconds) to cancel the call.
If you fail to cancel the call, SYNC
attempts to dial 911.
• SYNC says the following, or a similar
message: "SYNC will attempt to call
911, to cancel the call, press Cancel on
your screen or press and hold the
phone button on your steering wheel."
If you do not cancel the call, and SYNC
makes a successful call, a pre-recorded
message plays for the 911 operator, and
then the occupant(s) in your vehicle is able
to talk with the operator. Be prepared to
provide your name, phone number and
location immediately, because not all 911
systems are capable of receiving this
information electronically.
During an emergency call, the system
transmits vehicle data to emergency
services. See
Data Recording (page 11). EMERGENCY CALL
REQUIREMENTS WARNING:
Do not wait for 911
Assist to make an emergency call if you
can do it yourself. Dial emergency
services immediately to avoid delayed
response time which could increase the
risk of serious injury or death after a
crash. If you do not hear 911 Assist within
five seconds of the crash, the system or
phone may be damaged or
non-functional. WARNING:
Always place your
phone in a secure location in your vehicle
so it does not become a projectile or get
damaged in a crash. Failure to do so may
cause serious injury to someone or
damage the phone which could prevent
911 Assist from working properly. WARNING:
Unless the 911 Assist
setting is set on before a crash, the
system will not dial for help which could
delay response time, potentially
increasing the risk of serious injury or
death after a crash.
• SYNC must be powered and working
properly at the time of the incident and
throughout feature activation and use.
• The 911 Assist feature must be set on
before the incident.
• You must pair and connect a
Bluetooth®
enabled and compatible
cell phone to SYNC.
• A connected
Bluetooth® enabled
phone must have the ability to make
and maintain an outgoing call at the
time of the incident.
55
2022 Bronco Sport (CHD) Canada/United States of America, enUSA, Edition date: 202107, First-Printing 911 Assist
Page 60 of 494
GENERAL INFORMATION ON
RADIO FREQUENCIES
This device complies with Part 15 of the
FCC Rules and with Industry Canada
license-exempt RSS standard(s).
Operation is subject to the following two
conditions: (1) This device may not cause
harmful interference, and (2) This device
must accept any interference received,
including interference that may cause
undesired operation.
WARNING: Changes or
modifications not expressively approved
by the party responsible for compliance
could void the user's authority to operate
the equipment. The term "IC:" before the
radio certification number only signifies
that Industry Canada technical
specifications were met.
The typical operating range for your
transmitter is approximately
33 ft (10 m).
Vehicles with the remote start feature will
have a greater range.
One of the following could cause a
decrease in operating range:
• Weather conditions.
• Nearby radio towers.
• Structures around the vehicle.
• Other vehicles parked next to your
vehicle.
The radio frequency used by your remote
control can also be used by other radio
transmitters, for example amateur radios,
medical equipment, wireless headphones,
wireless remote controls, cell phones,
battery chargers and alarm systems. If the
frequencies are jammed, you will not be
able to use your remote control. You can
lock and unlock the doors with the key.
Note: Make sure to lock your vehicle before
leaving it unattended. Note:
If you are in range, the remote control
will operate if you press any button
unintentionally.
Note: The remote control contains sensitive
electrical components. Exposure to moisture
or impact may cause permanent damage.
Intelligent Access
(If Equipped)
The system uses a radio frequency signal
to communicate with your vehicle and
authorize your vehicle to unlock when one
of the following conditions are met:
• You activate the front exterior door
handle switch.
• You press the luggage compartment
button.
• You press a button on the transmitter.
If excessive radio frequency interference
is present in the area or if the transmitter
battery is low, you may need to
mechanically unlock your door. You can
use the mechanical key blade in your
intelligent access key to open the driver
door in this situation. See
Remote
Control (page 57).
REMOTE CONTROL
Integrated Keyhead Transmitter
Use the key blade to start your vehicle, and
unlock or lock the driver door from outside
your vehicle. The integrated keyhead
transmitter functions as a programmed
ignition key that operates all the locks and
starts your vehicle, as well as a remote
control.
57
2022 Bronco Sport (CHD) Canada/United States of America, enUSA, Edition date: 202107, First-Printing Keys and Remote Controls
Page 61 of 494
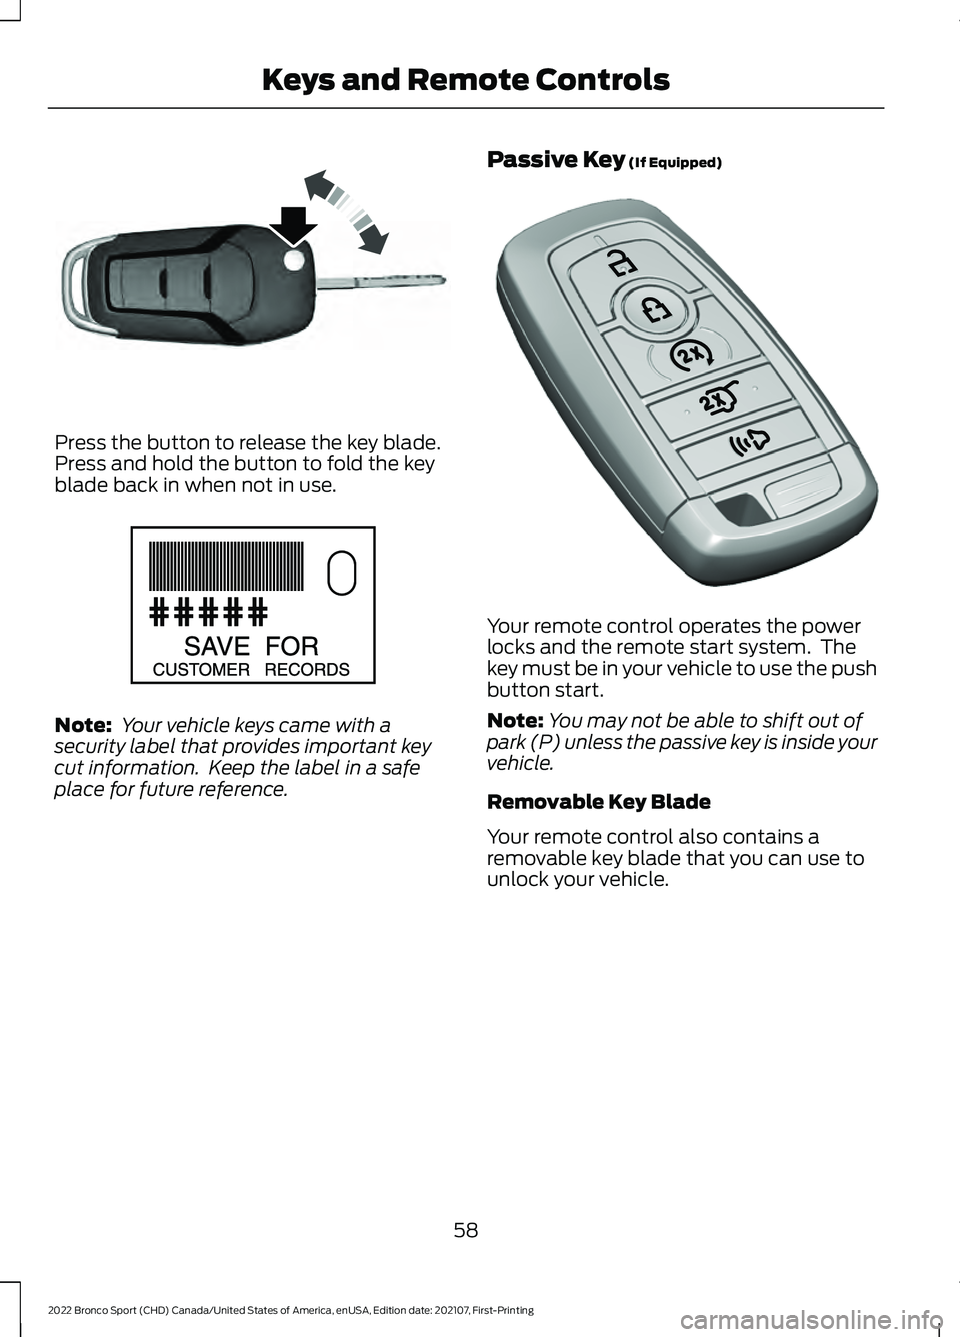
Press the button to release the key blade.
Press and hold the button to fold the key
blade back in when not in use.
Note:
Your vehicle keys came with a
security label that provides important key
cut information. Keep the label in a safe
place for future reference. Passive Key (If Equipped) Your remote control operates the power
locks and the remote start system. The
key must be in your vehicle to use the push
button start.
Note:
You may not be able to shift out of
park (P) unless the passive key is inside your
vehicle.
Removable Key Blade
Your remote control also contains a
removable key blade that you can use to
unlock your vehicle.
58
2022 Bronco Sport (CHD) Canada/United States of America, enUSA, Edition date: 202107, First-Printing Keys and Remote ControlsE191532 E151795 E305198
Page 62 of 494
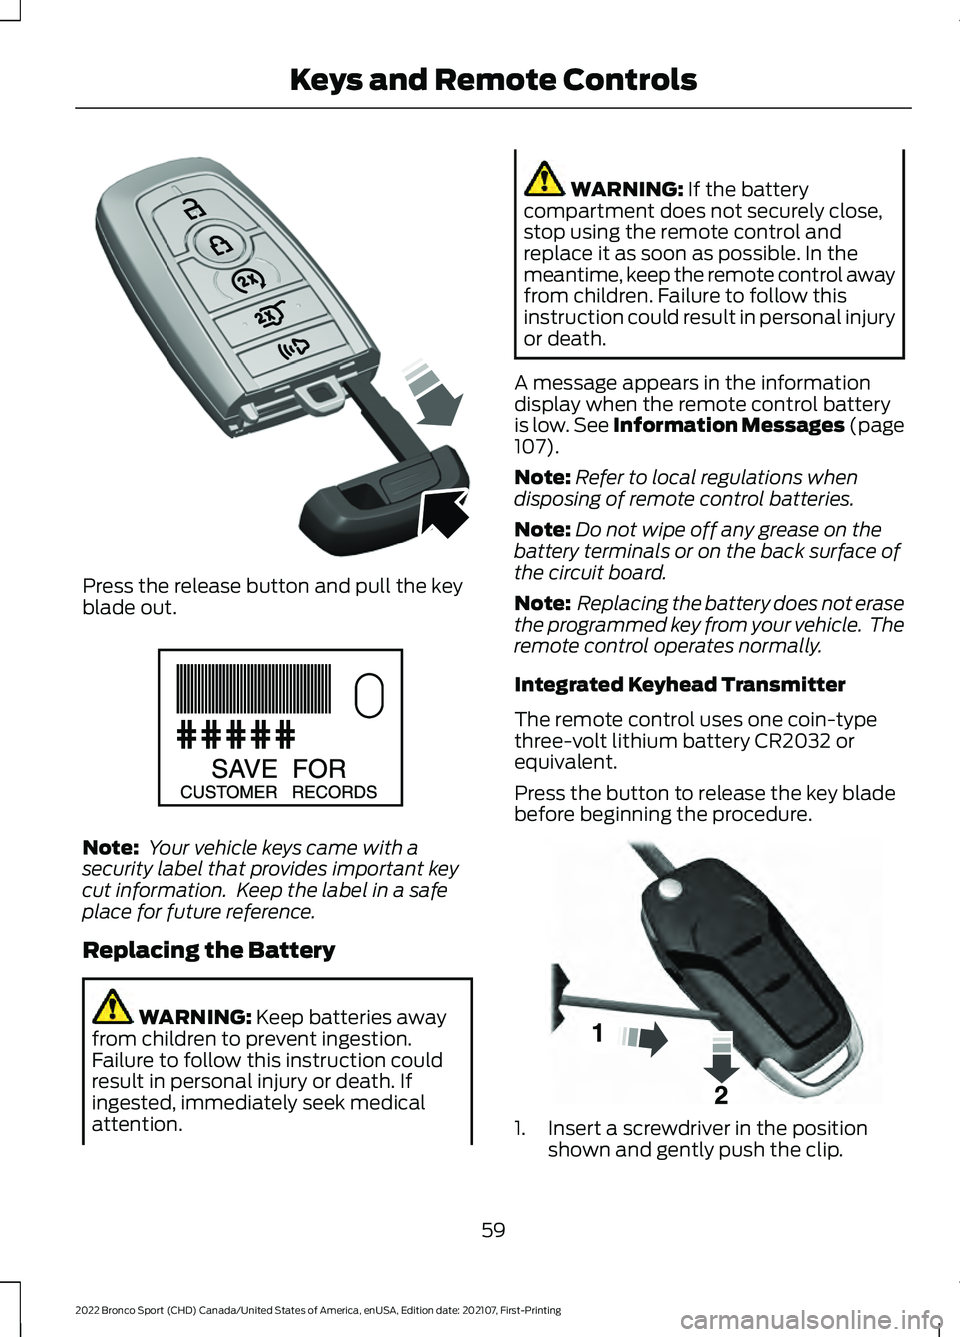
Press the release button and pull the key
blade out.
Note:
Your vehicle keys came with a
security label that provides important key
cut information. Keep the label in a safe
place for future reference.
Replacing the Battery WARNING: Keep batteries away
from children to prevent ingestion.
Failure to follow this instruction could
result in personal injury or death. If
ingested, immediately seek medical
attention. WARNING:
If the battery
compartment does not securely close,
stop using the remote control and
replace it as soon as possible. In the
meantime, keep the remote control away
from children. Failure to follow this
instruction could result in personal injury
or death.
A message appears in the information
display when the remote control battery
is low.
See Information Messages (page
107).
Note: Refer to local regulations when
disposing of remote control batteries.
Note: Do not wipe off any grease on the
battery terminals or on the back surface of
the circuit board.
Note: Replacing the battery does not erase
the programmed key from your vehicle. The
remote control operates normally.
Integrated Keyhead Transmitter
The remote control uses one coin-type
three-volt lithium battery CR2032 or
equivalent.
Press the button to release the key blade
before beginning the procedure. 1. Insert a screwdriver in the position
shown and gently push the clip.
59
2022 Bronco Sport (CHD) Canada/United States of America, enUSA, Edition date: 202107, First-Printing Keys and Remote ControlsE305199 E151795 E191533
Page 63 of 494
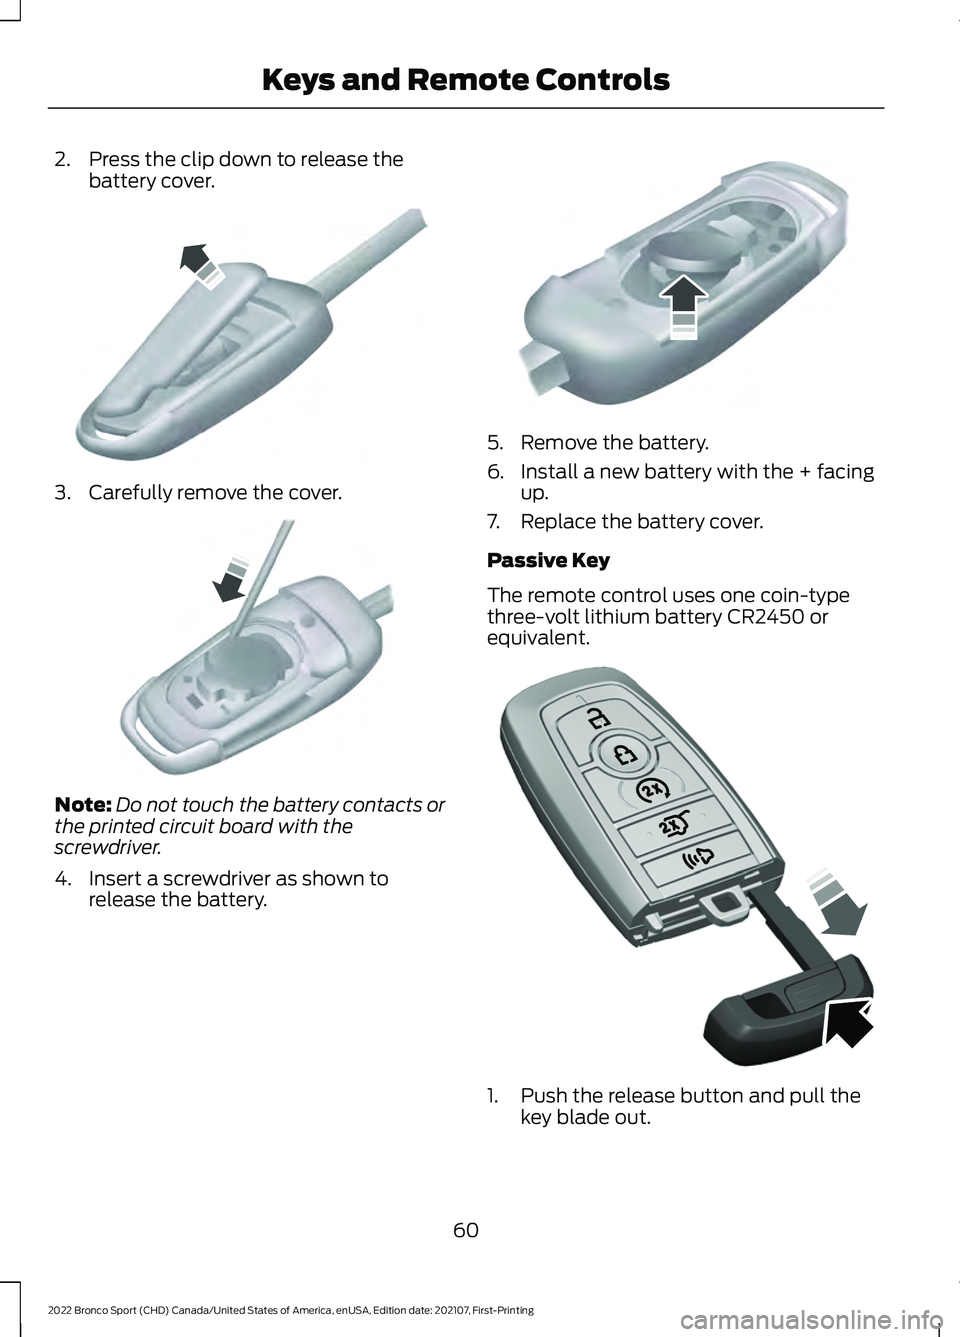
2. Press the clip down to release the
battery cover. 3. Carefully remove the cover.
Note:
Do not touch the battery contacts or
the printed circuit board with the
screwdriver.
4. Insert a screwdriver as shown to release the battery. 5. Remove the battery.
6. Install a new battery with the + facing
up.
7. Replace the battery cover.
Passive Key
The remote control uses one coin-type
three-volt lithium battery CR2450 or
equivalent. 1. Push the release button and pull the
key blade out.
60
2022 Bronco Sport (CHD) Canada/United States of America, enUSA, Edition date: 202107, First-Printing Keys and Remote ControlsE151799 E151800 E151801 E305199
Page 64 of 494
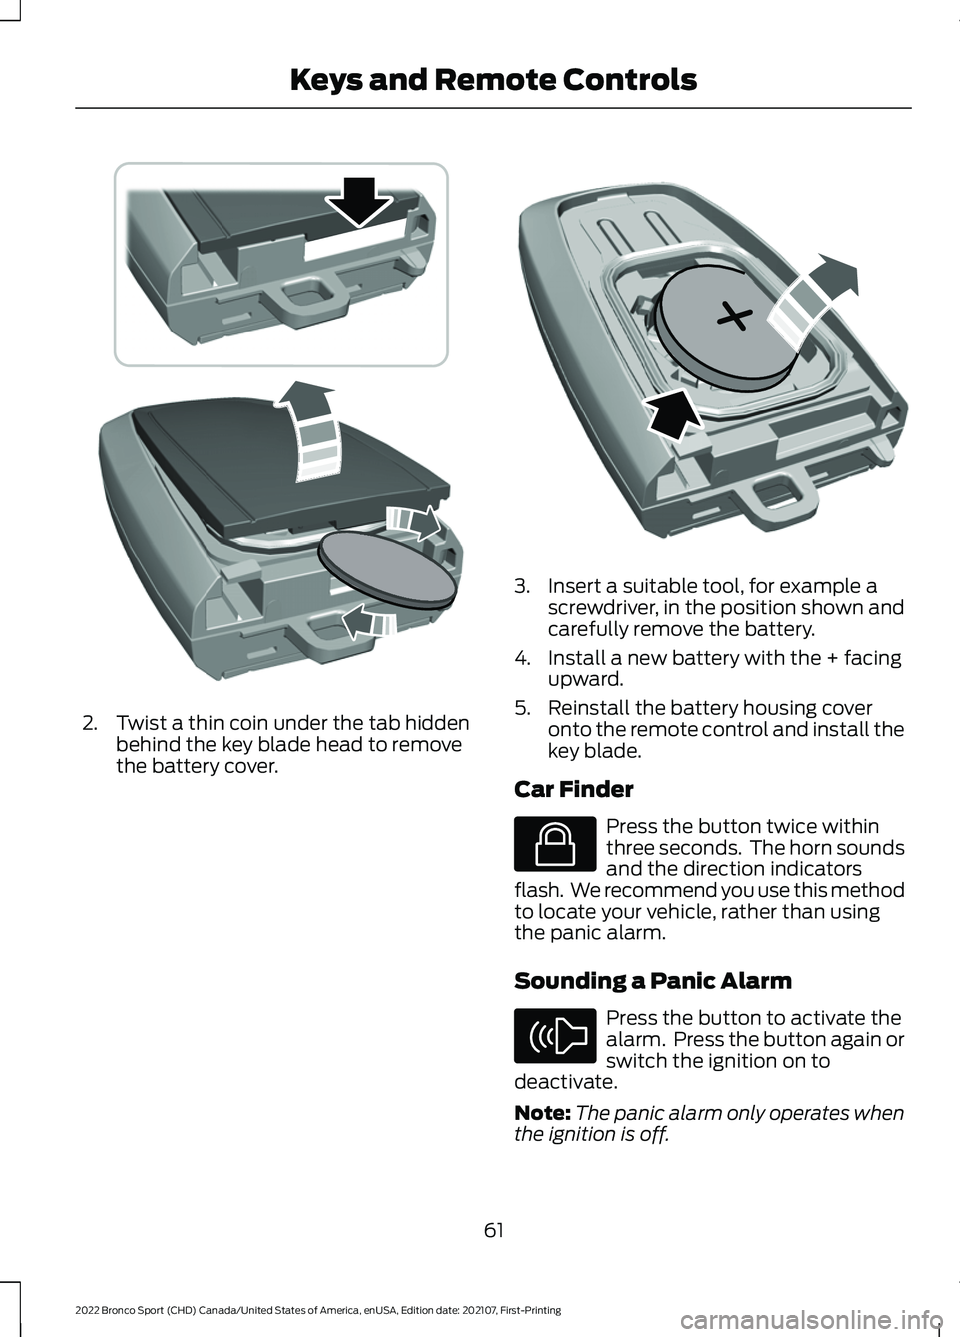
2. Twist a thin coin under the tab hidden
behind the key blade head to remove
the battery cover. 3. Insert a suitable tool, for example a
screwdriver, in the position shown and
carefully remove the battery.
4. Install a new battery with the + facing upward.
5. Reinstall the battery housing cover onto the remote control and install the
key blade.
Car Finder Press the button twice within
three seconds. The horn sounds
and the direction indicators
flash. We recommend you use this method
to locate your vehicle, rather than using
the panic alarm.
Sounding a Panic Alarm Press the button to activate the
alarm. Press the button again or
switch the ignition on to
deactivate.
Note: The panic alarm only operates when
the ignition is off.
61
2022 Bronco Sport (CHD) Canada/United States of America, enUSA, Edition date: 202107, First-Printing Keys and Remote ControlsE303824 E218402 E138623 E138624
Page 66 of 494
PRINCIPLE OF OPERATION
MyKey allows you to program keys with
restricted driving modes to promote good
driving habits. You can program the
restrictions to all keys except one. Any keys
that you did not program are administrator
keys or admin keys.
You can use admin keys to:
•
Create a MyKey with certain vehicle
restrictions.
• Program certain MyKey settings.
• Clear all MyKey restrictions.
After you program a MyKey, you can view
the following information through the
information display:
• The total number of admin keys and
MyKeys for your vehicle.
• The total distance a MyKey driver
traveled with your vehicle.
Note: Every MyKey receives the same
restrictions and settings. You cannot
program them individually.
Note: For vehicles equipped with a
push-button start switch: When both a
MyKey and an admin key are present when
you start your vehicle, the system recognizes
the admin key only. Standard Settings
Not every vehicle includes the features
listed below. If your vehicle has this
equipment, then you cannot change the
following settings when using a MyKey:
•
Seatbelt reminder or Belt-Minder™.
MyKey mutes the audio system until
drivers, and in some instances,
passengers, fasten their seatbelts.
Note: If your vehicle includes an
AM/FM radio or a very basic audio
system, then the radio may not mute.
• Earlier low-fuel warning. The low-fuel
warning activates earlier for MyKey
drivers, giving them more time to refuel.
• Certain driver alerts, stability systems
or parking aids turn on automatically
when you use the MyKey system. For
example, Blind Spot Information
System (BLIS), cross traffic alert, lane
departure warning or forward collision
warning. Note:
MyKey drivers may be
able to turn the lane departure warning
feature off, but this feature turns back
on automatically with every new key
cycle.
• Restricted touchscreen operation in
some markets. For example, MyKey
may prevent manual navigation
destination input while the vehicle is in
any gear other than park (P) or when
the vehicle reaches a certain rate of
speed.
• Satellite radio adult content
restrictions, if this feature is available
in your market.
Optional Settings
You can configure certain vehicle feature
settings when you first create a MyKey. You
can also change the settings afterward
with an admin key.
63
2022 Bronco Sport (CHD) Canada/United States of America, enUSA, Edition date: 202107, First-Printing MyKey
™