headlamp FORD C MAX 2008 1.G User Guide
[x] Cancel search | Manufacturer: FORD, Model Year: 2008, Model line: C MAX, Model: FORD C MAX 2008 1.GPages: 278, PDF Size: 17.5 MB
Page 68 of 278
Downloaded from www.Manualslib.com manuals search engine HEADLAMP LEVELLING
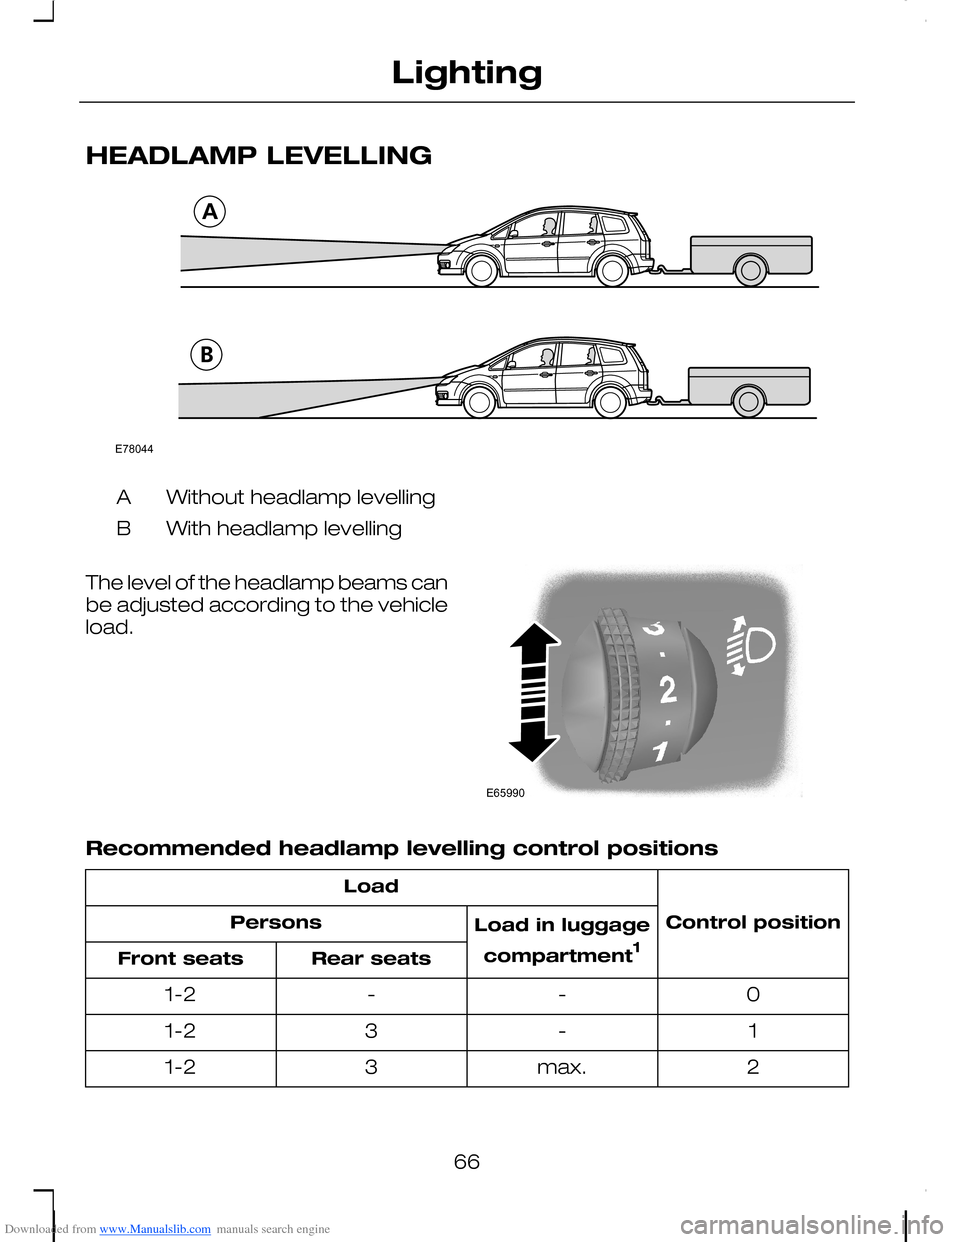
Without headlamp levellingA
With headlamp levellingB
The level of the headlamp beams canbe adjusted according to the vehicleload.
Recommended headlamp levelling control positions
Control position
Load
Load in luggage
compartment1
Persons
Rear seatsFront seats
0--1-2
1-31-2
2max.31-2
66
LightingE78044 E65990
Page 70 of 278
Downloaded from www.Manualslib.com manuals search engine ADAPTIVE FRONT LIGHTING SYSTEM (AFS)
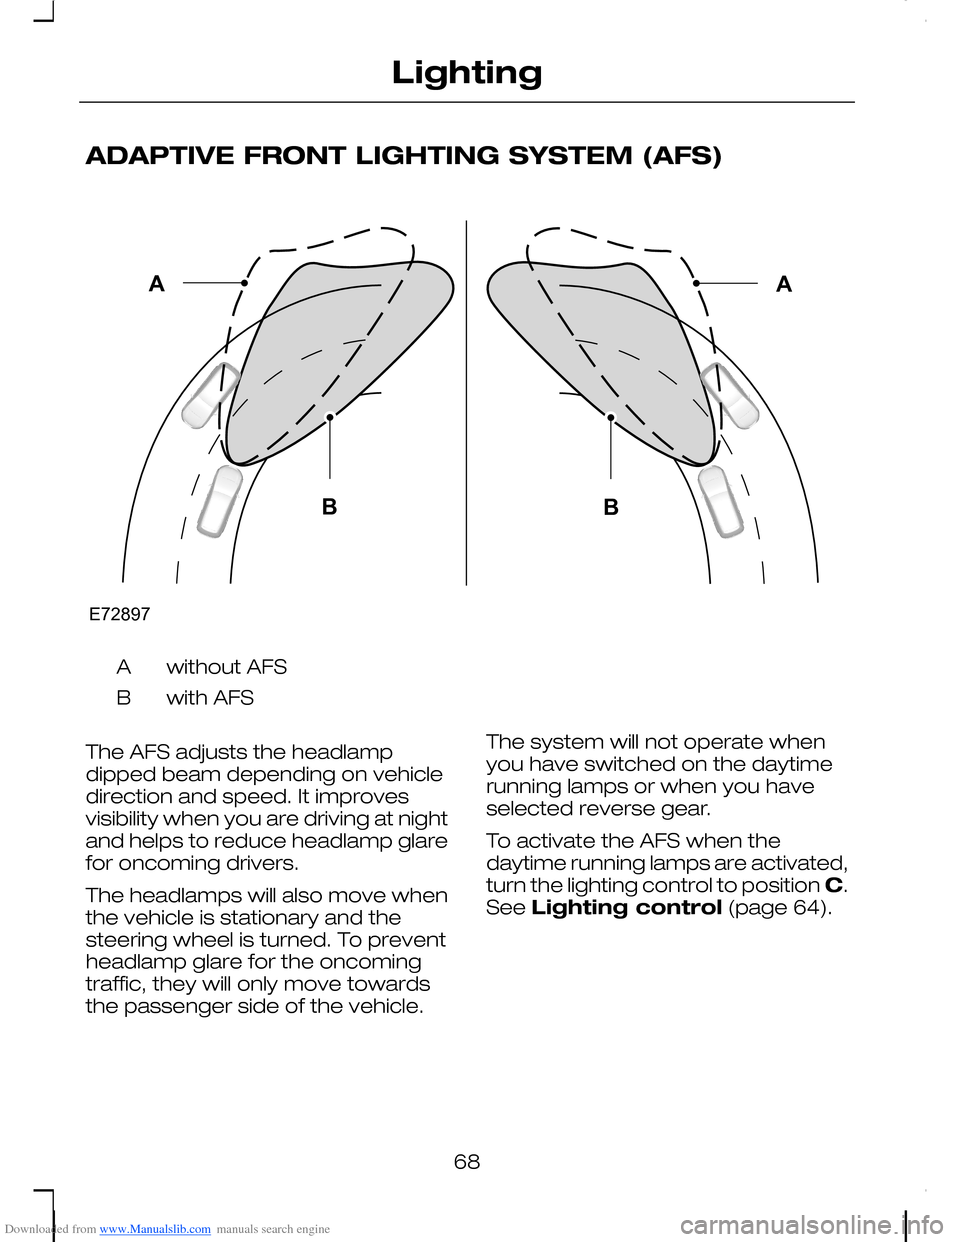
without AFSA
with AFSB
The AFS adjusts the headlampdipped beam depending on vehicledirection and speed. It improvesvisibility when you are driving at nightand helps to reduce headlamp glarefor oncoming drivers.
The headlamps will also move whenthe vehicle is stationary and thesteering wheel is turned. To preventheadlamp glare for the oncomingtraffic, they will only move towardsthe passenger side of the vehicle.
The system will not operate whenyou have switched on the daytimerunning lamps or when you haveselected reverse gear.
To activate the AFS when thedaytime running lamps are activated,turn the lighting control to position C.See Lighting control (page 64).
68
LightingE72897ABAB
Page 71 of 278
Downloaded from www.Manualslib.com manuals search engine A message will appear in theinformation display and the headlampindicator flashes if the systemmalfunctions. See Informationmessages (page 103). Theheadlamps will move to a fixedcentral or dipped position. Have thesystem checked as soon as possible.
69
Lighting
Page 76 of 278
Downloaded from www.Manualslib.com manuals search engine CHANGING A BULB
WARNINGS
On vehicles fitted with Xenonheadlamps, have the headlampbulbs changed by an expert. Thereis a risk of injury due to high voltage.
During operation, the bulbs andtheir surroundings get hot.Switch off the lights and let the bulbscool down before replacing them.
Always switch off lights and ignitionbefore replacing any bulb.
Never touch the glass of the bulbs.Fit only bulbs having a UV filter.Always replace a faulty bulb with anew one of the same type. Afterreplacing a bulb, check that the lightsoperate correctly.
Headlamps, side lamps,direction indicators
Note:It is necessary to remove theheadlamp assembly to remove anyof the bulbs.
Removing the headlampassembly
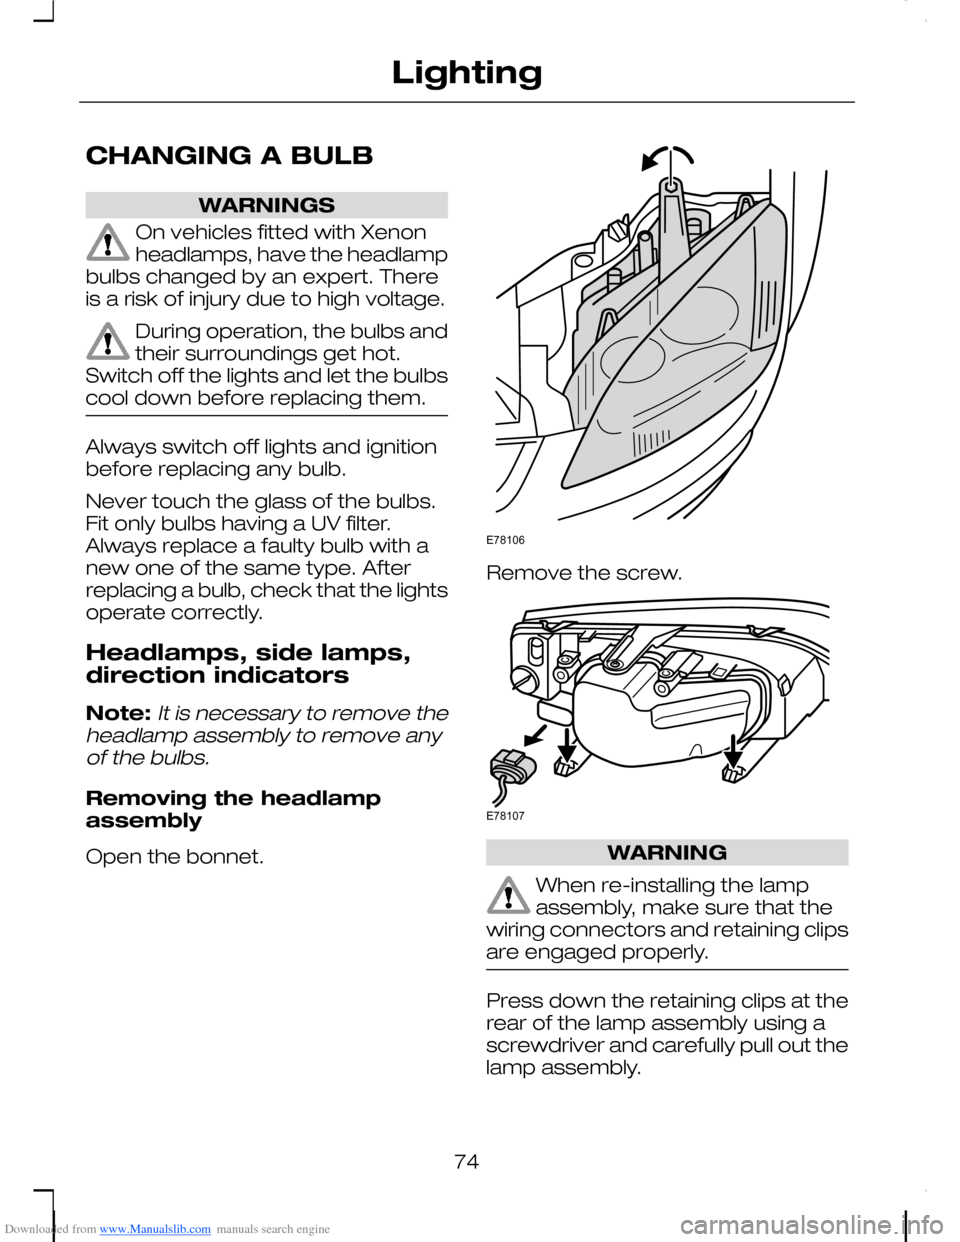
Open the bonnet.
Remove the screw.
WARNING
When re-installing the lampassembly, make sure that thewiring connectors and retaining clipsare engaged properly.
Press down the retaining clips at therear of the lamp assembly using ascrewdriver and carefully pull out thelamp assembly.
74
LightingE78106 E78107
Page 77 of 278
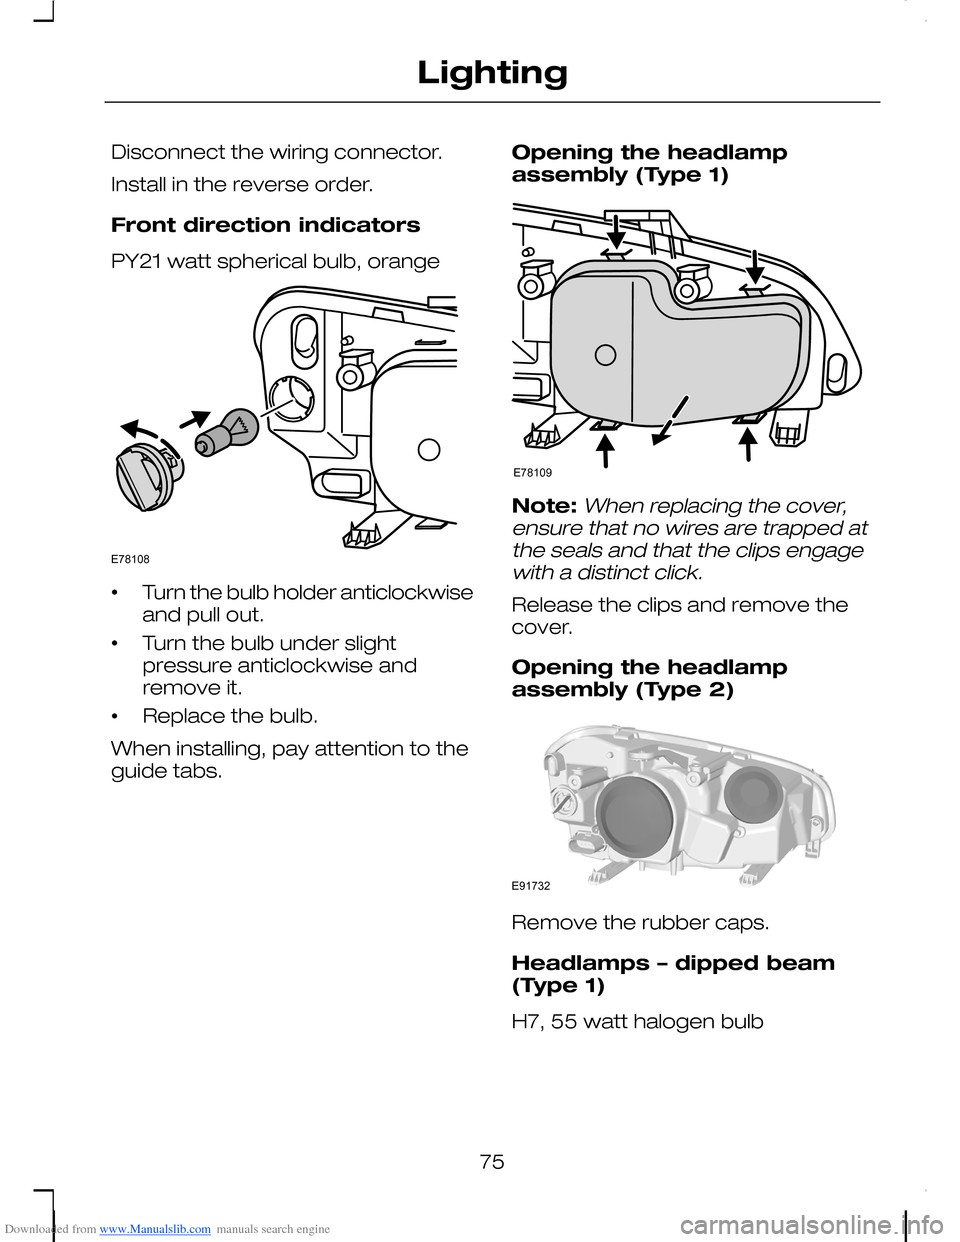
Downloaded from www.Manualslib.com manuals search engine Disconnect the wiring connector.
Install in the reverse order.
Front direction indicators
PY21 watt spherical bulb, orange
•Turn the bulb holder anticlockwiseand pull out.
•Turn the bulb under slightpressure anticlockwise andremove it.
•Replace the bulb.
When installing, pay attention to theguide tabs.
Opening the headlampassembly (Type 1)
Note:When replacing the cover,ensure that no wires are trapped atthe seals and that the clips engagewith a distinct click.
Release the clips and remove thecover.
Opening the headlampassembly (Type 2)
Remove the rubber caps.
Headlamps – dipped beam(Type 1)
H7, 55 watt halogen bulb
75
LightingE78108 E78109 E91732
Page 78 of 278
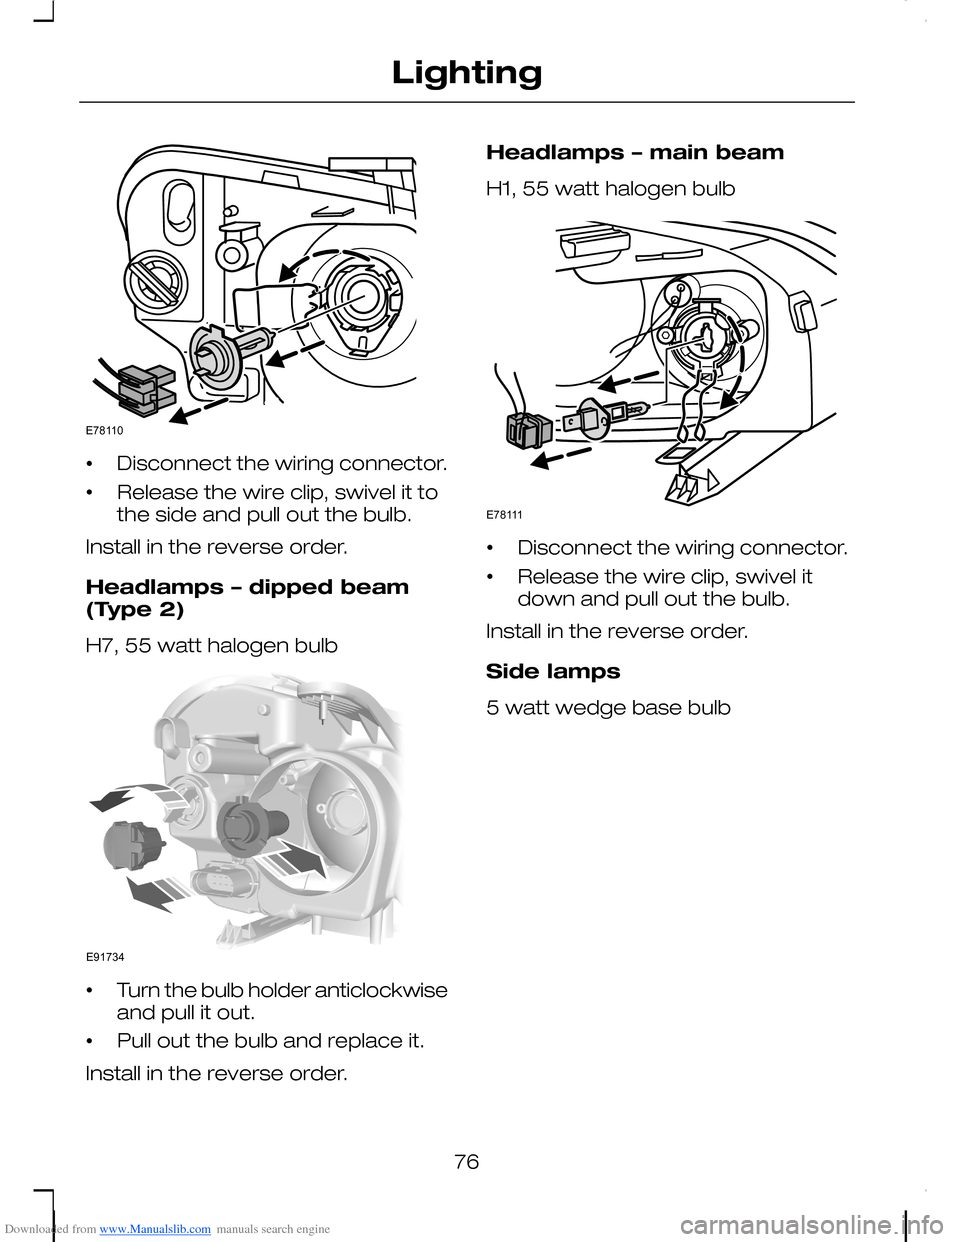
Downloaded from www.Manualslib.com manuals search engine •Disconnect the wiring connector.
•Release the wire clip, swivel it tothe side and pull out the bulb.
Install in the reverse order.
Headlamps – dipped beam(Type 2)
H7, 55 watt halogen bulb
•Turn the bulb holder anticlockwiseand pull it out.
•Pull out the bulb and replace it.
Install in the reverse order.
Headlamps – main beam
H1, 55 watt halogen bulb
•Disconnect the wiring connector.
•Release the wire clip, swivel itdown and pull out the bulb.
Install in the reverse order.
Side lamps
5 watt wedge base bulb
76
LightingE78110 E91734 E78111
Page 94 of 278
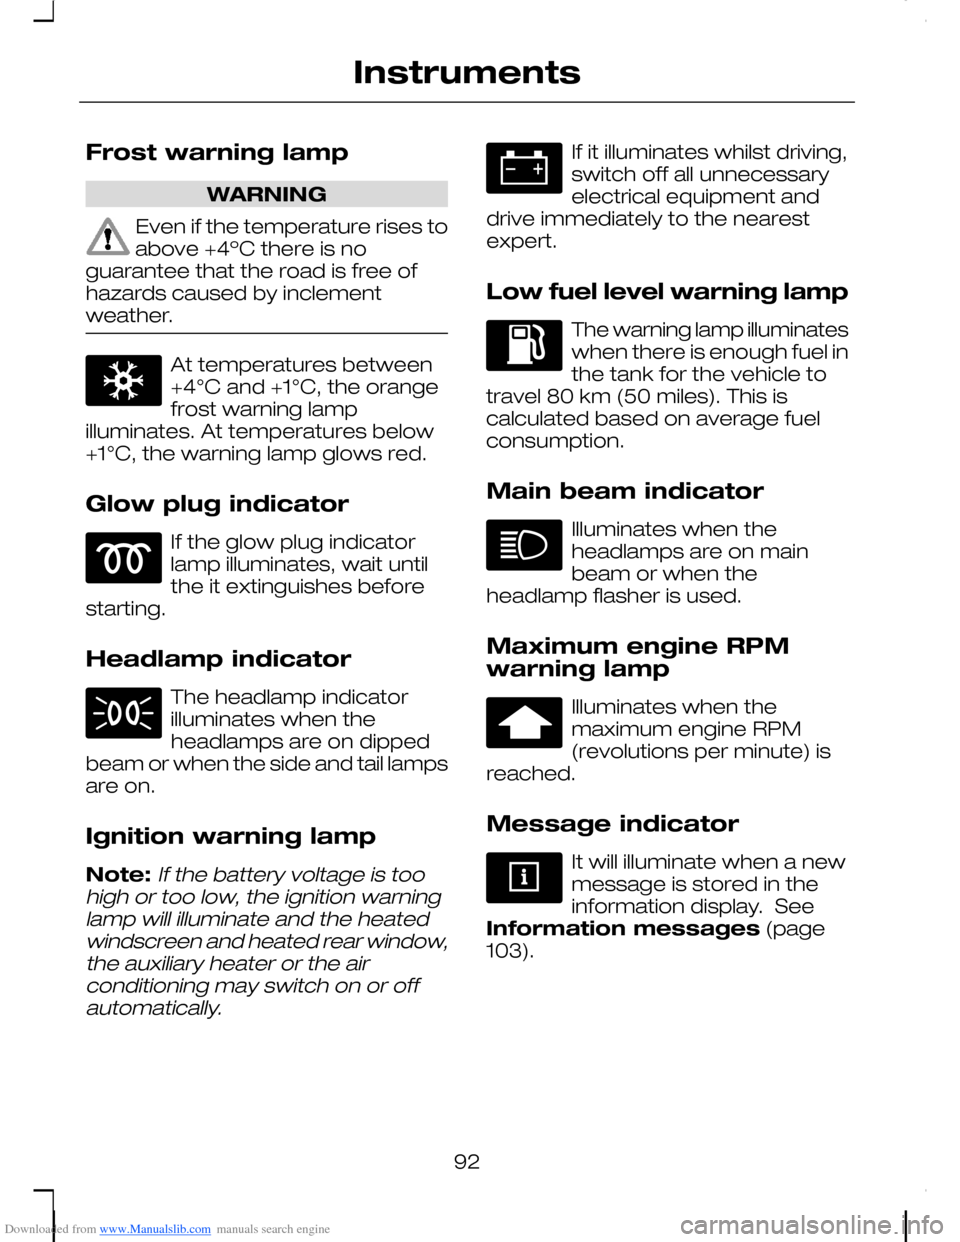
Downloaded from www.Manualslib.com manuals search engine Frost warning lamp
WARNING
Even if the temperature rises toabove +4ºC there is noguarantee that the road is free ofhazards caused by inclementweather.
At temperatures between+4°C and +1°C, the orangefrost warning lampilluminates. At temperatures below+1°C, the warning lamp glows red.
Glow plug indicator
If the glow plug indicatorlamp illuminates, wait untilthe it extinguishes beforestarting.
Headlamp indicator
The headlamp indicatorilluminates when theheadlamps are on dippedbeam or when the side and tail lampsare on.
Ignition warning lamp
Note:If the battery voltage is toohigh or too low, the ignition warninglamp will illuminate and the heatedwindscreen and heated rear window,the auxiliary heater or the airconditioning may switch on or offautomatically.
If it illuminates whilst driving,switch off all unnecessaryelectrical equipment anddrive immediately to the nearestexpert.
Low fuel level warning lamp
The warning lamp illuminateswhen there is enough fuel inthe tank for the vehicle totravel 80 km (50 miles). This iscalculated based on average fuelconsumption.
Main beam indicator
Illuminates when theheadlamps are on mainbeam or when theheadlamp flasher is used.
Maximum engine RPMwarning lamp
Illuminates when themaximum engine RPM(revolutions per minute) isreached.
Message indicator
It will illuminate when a newmessage is stored in theinformation display. SeeInformation messages (page103).
92
Instruments
Page 180 of 278
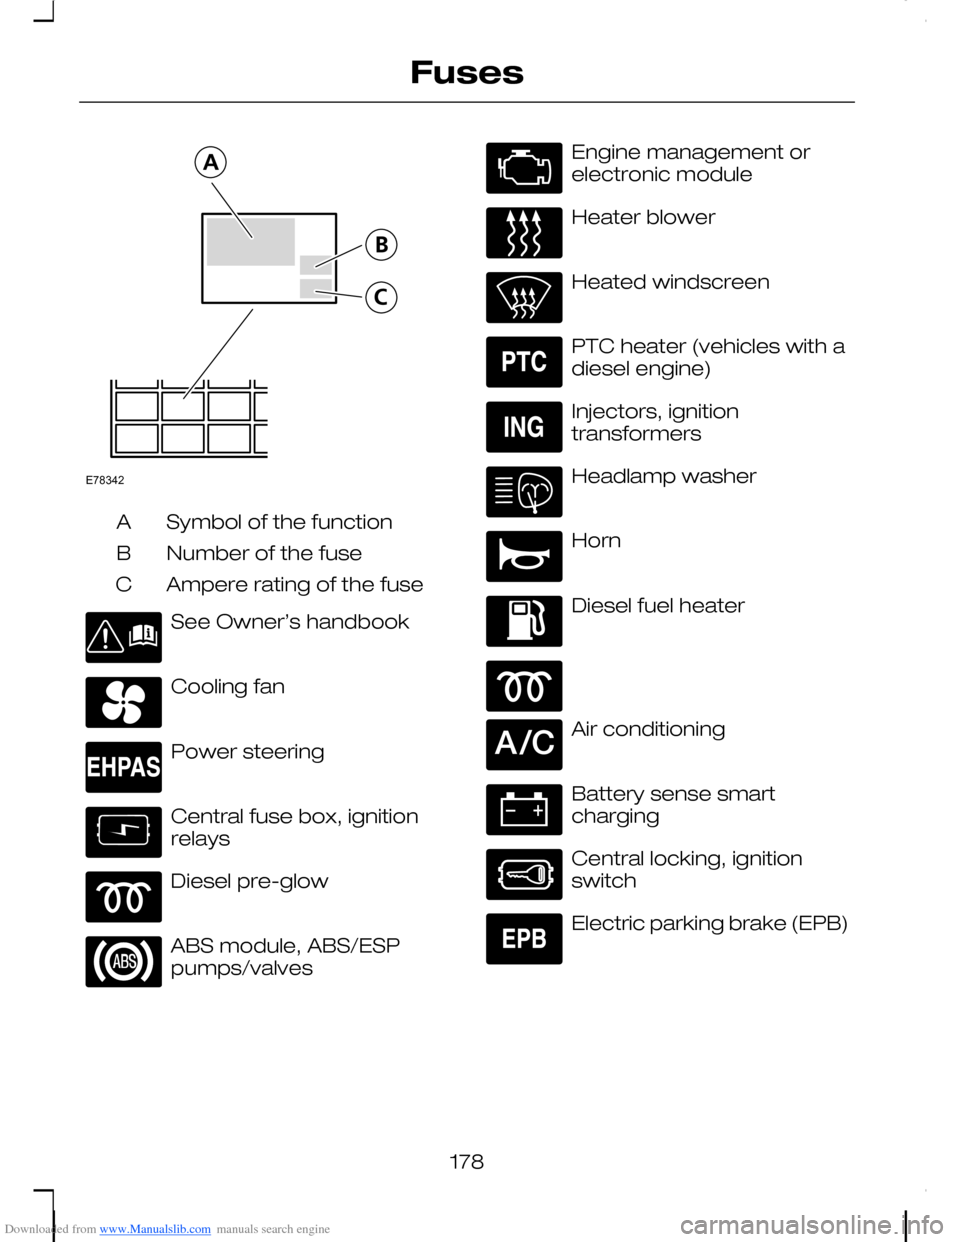
Downloaded from www.Manualslib.com manuals search engine Symbol of the functionA
Number of the fuseB
Ampere rating of the fuseC
See Owner’s handbook
Cooling fan
Power steering
Central fuse box, ignitionrelays
Diesel pre-glow
ABS module, ABS/ESPpumps/valves
Engine management orelectronic module
Heater blower
Heated windscreen
PTC heater (vehicles with adiesel engine)
Injectors, ignitiontransformers
Headlamp washer
Horn
Diesel fuel heater
Air conditioning
Battery sense smartcharging
Central locking, ignitionswitch
Electric parking brake (EPB)
178
FusesE78342
Page 182 of 278
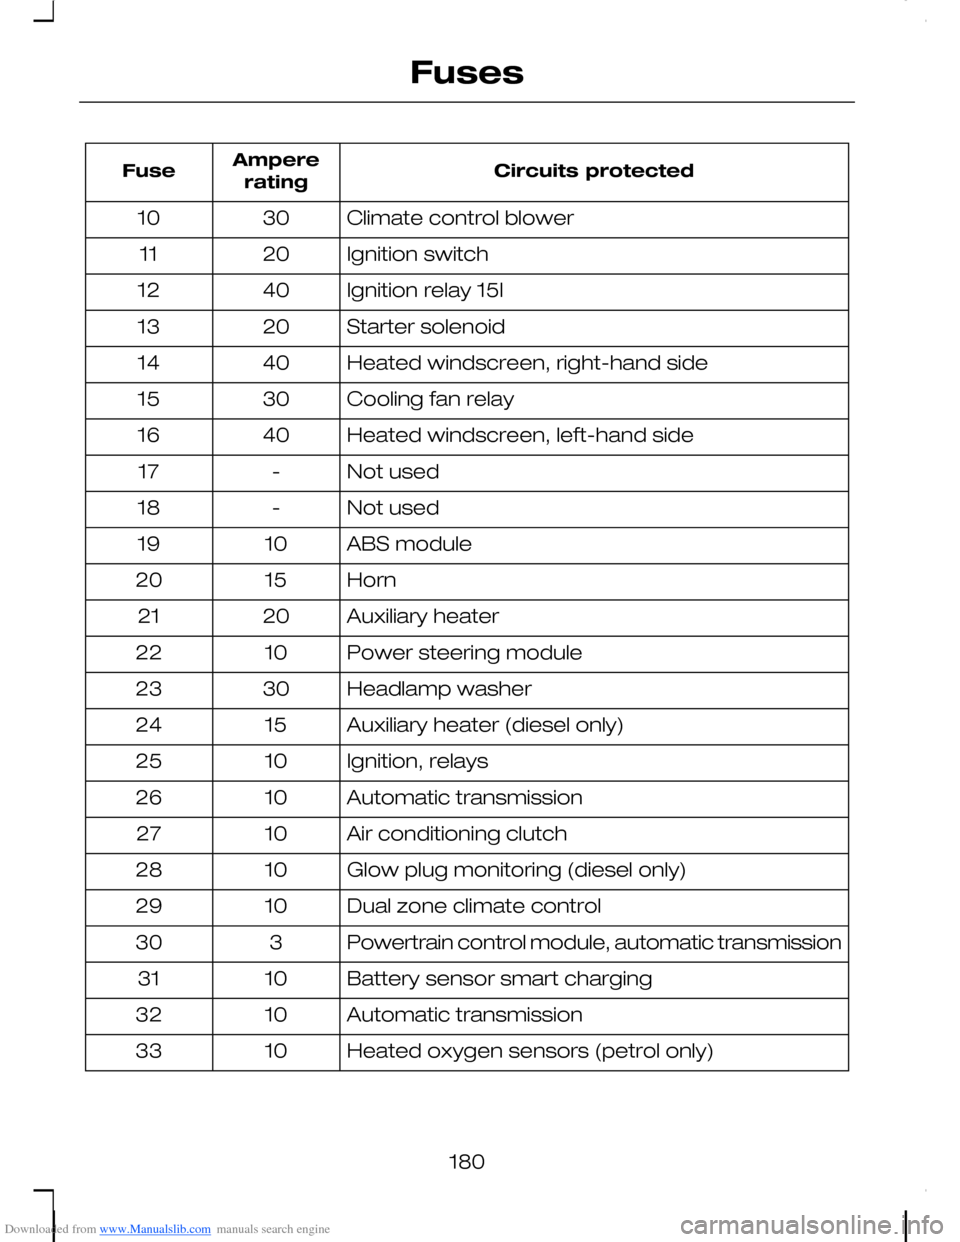
Downloaded from www.Manualslib.com manuals search engine Circuits protectedAmpereratingFuse
Climate control blower3010
Ignition switch2011
Ignition relay 15l4012
Starter solenoid2013
Heated windscreen, right-hand side4014
Cooling fan relay3015
Heated windscreen, left-hand side4016
Not used-17
Not used-18
ABS module1019
Horn1520
Auxiliary heater2021
Power steering module1022
Headlamp washer3023
Auxiliary heater (diesel only)1524
Ignition, relays1025
Automatic transmission1026
Air conditioning clutch1027
Glow plug monitoring (diesel only)1028
Dual zone climate control1029
Powertrain control module, automatic transmission330
Battery sensor smart charging1031
Automatic transmission1032
Heated oxygen sensors (petrol only)1033
180
Fuses
Page 209 of 278
Downloaded from www.Manualslib.com manuals search engine CLEANING THE
EXTERIOR
WARNING
If you use a car wash with awaxing cycle, make sure thatyou remove the wax from thewindscreen.
CAUTIONS
Some car wash installations usewater at high pressure. Thiscould damage certain parts of yourvehicle.
Remove the aerial before usingan automatic car wash.
Switch the heater blower off toprevent contamination of thefresh air filter.
We recommend that you wash yourvehicle with a sponge and lukewarmwater containing a car shampoo.
Cleaning the headlamps
CAUTIONS
Do not scrape the headlamplenses or use abrasives orchemical solvents to clean them.
Do not wipe the headlampswhen they are dry.
Cleaning the rear window
CAUTION
Do not scrape the inside of therear window or use abrasives orchemical solvents to clean it.
Use a clean, lint free cloth or a dampchamois leather to clean the insideof the rear window.
Cleaning the chrome trim
CAUTION
Do not use abrasives or chemicalsolvents. Use soapy water.
Body paintworkpreservation
CAUTIONS
Do not polish your vehicle instrong sunshine.
Do not allow polish to touchplastic surfaces. It could bedifficult to remove.
Do not apply polish to thewindscreen or rear window. Thiscould cause the wipers to becomenoisy and they may not clear thewindow properly.
We recommend that you wax thepaintwork once or twice a year.
207
Vehicle care