ESP FORD C MAX 2008 1.G Owner's Manual
[x] Cancel search | Manufacturer: FORD, Model Year: 2008, Model line: C MAX, Model: FORD C MAX 2008 1.GPages: 278, PDF Size: 17.5 MB
Page 162 of 278
Downloaded from www.Manualslib.com manuals search engine PRINCIPLE OF
OPERATION
Electronic stabilityprogramme (ESP)
WARNING
ESP does not relieve you of yourresponsibility to drive with duecare and attention.
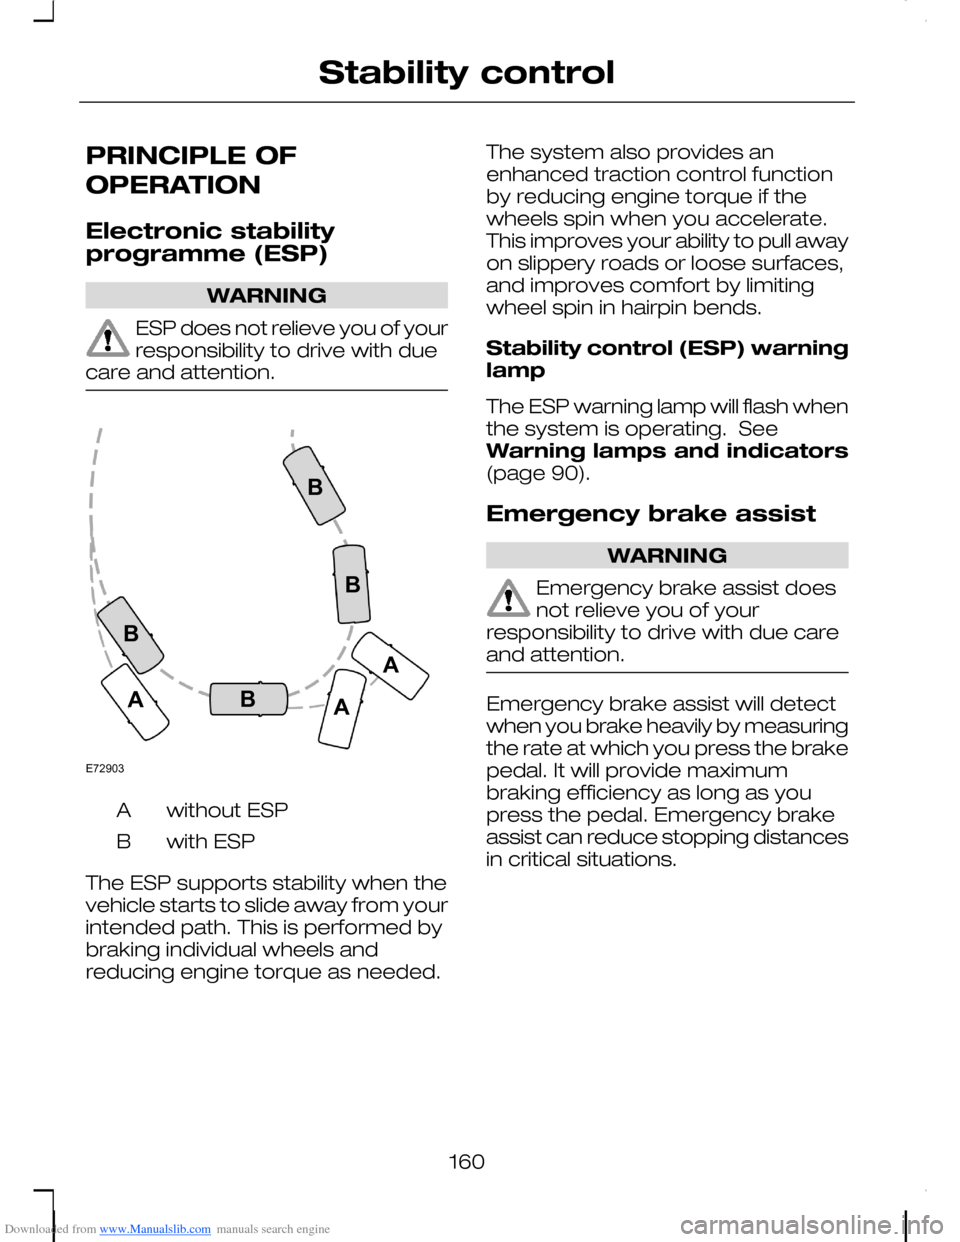
without ESPA
with ESPB
The ESP supports stability when thevehicle starts to slide away from yourintended path. This is performed bybraking individual wheels andreducing engine torque as needed.
The system also provides anenhanced traction control functionby reducing engine torque if thewheels spin when you accelerate.This improves your ability to pull awayon slippery roads or loose surfaces,and improves comfort by limitingwheel spin in hairpin bends.
Stability control (ESP) warninglamp
The ESP warning lamp will flash whenthe system is operating. SeeWarning lamps and indicators(page 90).
Emergency brake assist
WARNING
Emergency brake assist doesnot relieve you of yourresponsibility to drive with due careand attention.
Emergency brake assist will detectwhen you brake heavily by measuringthe rate at which you press the brakepedal. It will provide maximumbraking efficiency as long as youpress the pedal. Emergency brakeassist can reduce stopping distancesin critical situations.
160
Stability controlE72903AAABBBB
Page 164 of 278
Downloaded from www.Manualslib.com manuals search engine PRINCIPLE OF
OPERATION
WARNING
The parking aid does not relieveyou of your responsibility todrive with due care and attention.
CAUTIONS
The sensors may not detectobjects in heavy rain or otherconditions that cause disruptivereflections.
The sensors may not detectobjects with surfaces that absorbultrasonic waves.
The sensors may not detectobjects that are close to thevehicle (approximately 30centimetres [11 inches] to the rearand above or below the sensors).
If you use a high pressure sprayto wash your vehicle, only spraythe sensors briefly from a distancenot less than 20 centimetres (8inches).
Note:The parking aid may emit falsetones if it detects a signal using thesame frequency as the sensors or ifthe vehicle is fully laden.
Note:The outer sensors may detectthe side walls of a garage. If thedistance between the outer sensorand the side wall remains constantfor three seconds, the tone willswitch off. As you continue, the innersensors will detect rearward objects.
USING THE PARKING AID
Note:Keep the sensors free fromdirt, ice and snow. Do not clean withsharp objects.
Switching the parking aidon and off
Note:The parking aid switches offautomatically when you start theengine or when you exceed 16 km/h(10 mph).
Note:Vehicles fitted with a trailertow module not approved by us maynot correctly detect obstacles.
Note:On vehicles fitted with a towball arm, the rear sensors aredeactivated automatically when anytrailer lamps (or lighting boards) areconnected to the 13-pin socket via atrailer tow module we haveapproved. On vehicles fitted with atrailer tow module not approved byus, you have to switch the parkingaid off using the switch.
Note:The front and rear sensors arealways activated or deactivatedtogether.
Note:On vehicles fitted withautomatic transmission, the parkingaid will not operate in position P.
The parking aid is per default off. Toswitch the parking aid on, press theswitch in the instrument panel orselect reverse gear.
The light in the switch illuminateswhen the parking aid is activated.
To turn it off, press the switch again.
162
Parking aid
Page 180 of 278
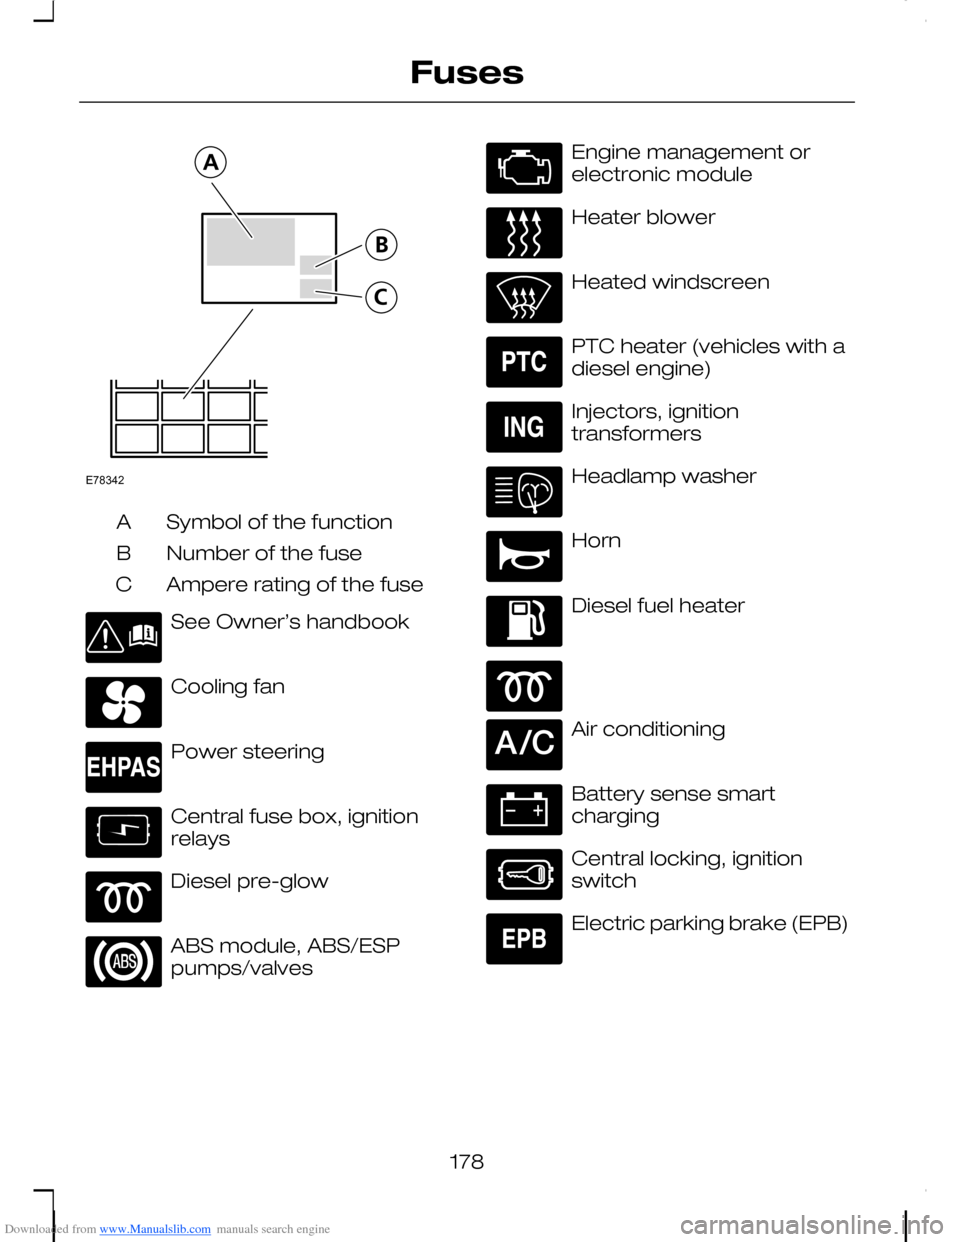
Downloaded from www.Manualslib.com manuals search engine Symbol of the functionA
Number of the fuseB
Ampere rating of the fuseC
See Owner’s handbook
Cooling fan
Power steering
Central fuse box, ignitionrelays
Diesel pre-glow
ABS module, ABS/ESPpumps/valves
Engine management orelectronic module
Heater blower
Heated windscreen
PTC heater (vehicles with adiesel engine)
Injectors, ignitiontransformers
Headlamp washer
Horn
Diesel fuel heater
Air conditioning
Battery sense smartcharging
Central locking, ignitionswitch
Electric parking brake (EPB)
178
FusesE78342
Page 206 of 278
Downloaded from www.Manualslib.com manuals search engine TECHNICAL SPECIFICATIONS
Vehicle fluids
SpecificationRecommended fluidItem
WSS-M2C913-B
Ford or MotorcraftFormula E SAE 5W-30
Engine Oil*Engine oil
WSS-M2C204-A2Ford or MotorcraftPower Steering FluidPower steering fluid
WSS-M97B44-DMotorcraft SuperPlusAntifreezeAntifreeze
ESD-M6C57-AFord or Motorcraft SuperDOT 4 Brake FluidBrake fluid
* You can use an alternative SAE 5W-30 engine oil, providing it meets the
specification defined by WSS-M2C913-B.
Note:If you operate your vehicle in temperatures below -20°C, you mustnot use SAE 10W-40 engine oil.
Topping up the oil: If you are unable to find an oil that meets thespecification defined by WSS-M2C913-B, you must use SAE 5W-30(preferred), SAE 5W-40 (except Flexfuel vehicles) or SAE 10W-40 thatmeets the specification defined by either ACEA A1/B1 (preferred) or ACEAA3/B3. Using these oils can result in longer engine cranking periods, reducedengine performance, reduced fuel economy and increased emission levels.
Capacities
Capacity in litres(gallons)ItemVariant
MAX-markPower assisted steeringfluidAll
55 (12.1)Fuel tankVehicles with a petrolengine
55 (12.1)Fuel tankVehicles with a dieselengine
204
Maintenance
Page 214 of 278
Downloaded from www.Manualslib.com manuals search engine Vehicles with stability control
Vehicles with ESP may exhibit someunusual driving characteristics. Switchthe ESP off. See Using stabilitycontrol (page 161).
All vehicles
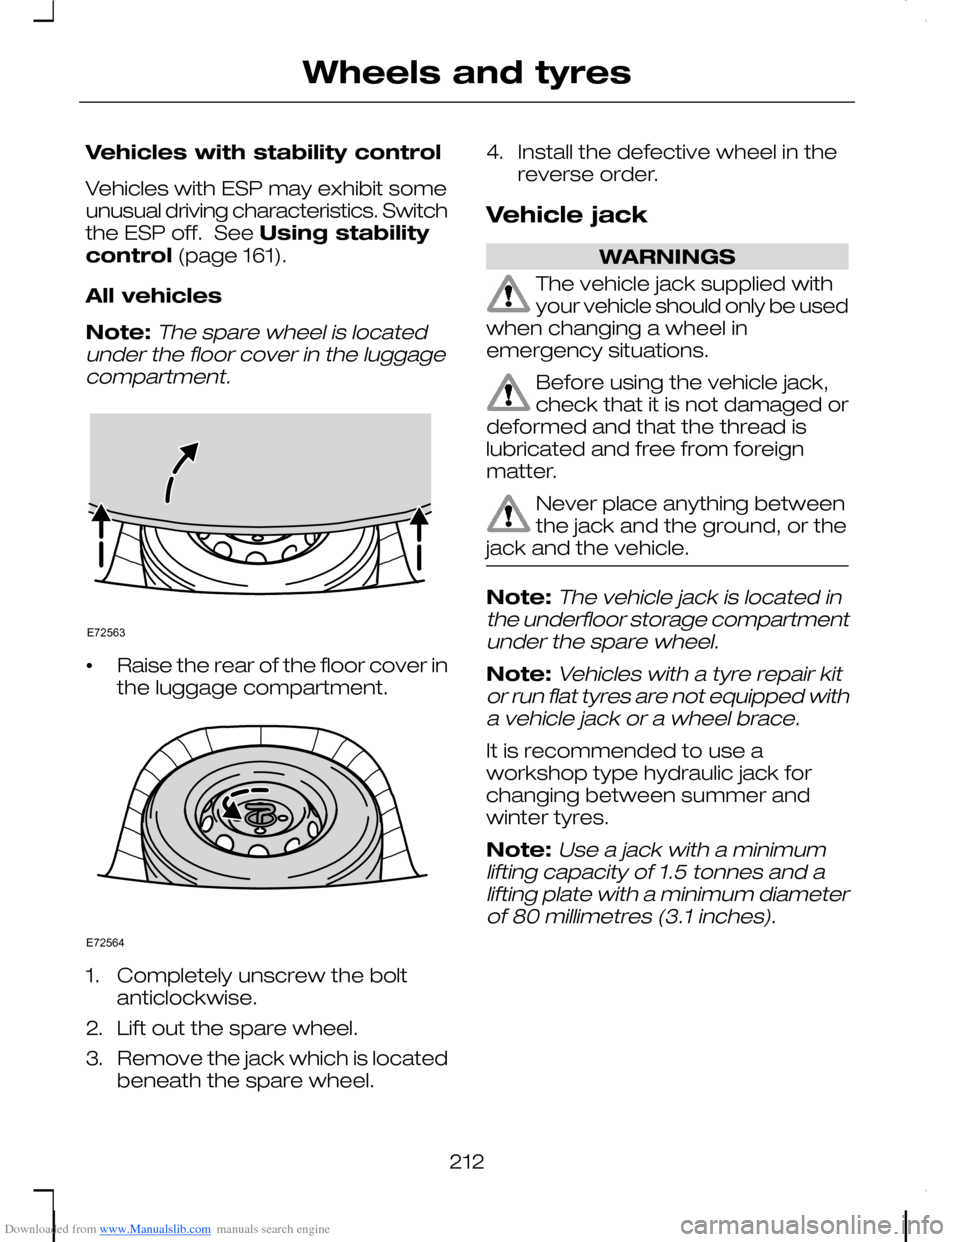
Note:The spare wheel is locatedunder the floor cover in the luggagecompartment.
•Raise the rear of the floor cover inthe luggage compartment.
1.Completely unscrew the boltanticlockwise.
2.Lift out the spare wheel.
3.Remove the jack which is locatedbeneath the spare wheel.
4.Install the defective wheel in thereverse order.
Vehicle jack
WARNINGS
The vehicle jack supplied withyour vehicle should only be usedwhen changing a wheel inemergency situations.
Before using the vehicle jack,check that it is not damaged ordeformed and that the thread islubricated and free from foreignmatter.
Never place anything betweenthe jack and the ground, or thejack and the vehicle.
Note:The vehicle jack is located inthe underfloor storage compartmentunder the spare wheel.
Note:Vehicles with a tyre repair kitor run flat tyres are not equipped witha vehicle jack or a wheel brace.
It is recommended to use aworkshop type hydraulic jack forchanging between summer andwinter tyres.
Note:Use a jack with a minimumlifting capacity of 1.5 tonnes and alifting plate with a minimum diameterof 80 millimetres (3.1 inches).
212
Wheels and tyresE72563 E72564
Page 219 of 278
Downloaded from www.Manualslib.com manuals search engine All vehicles
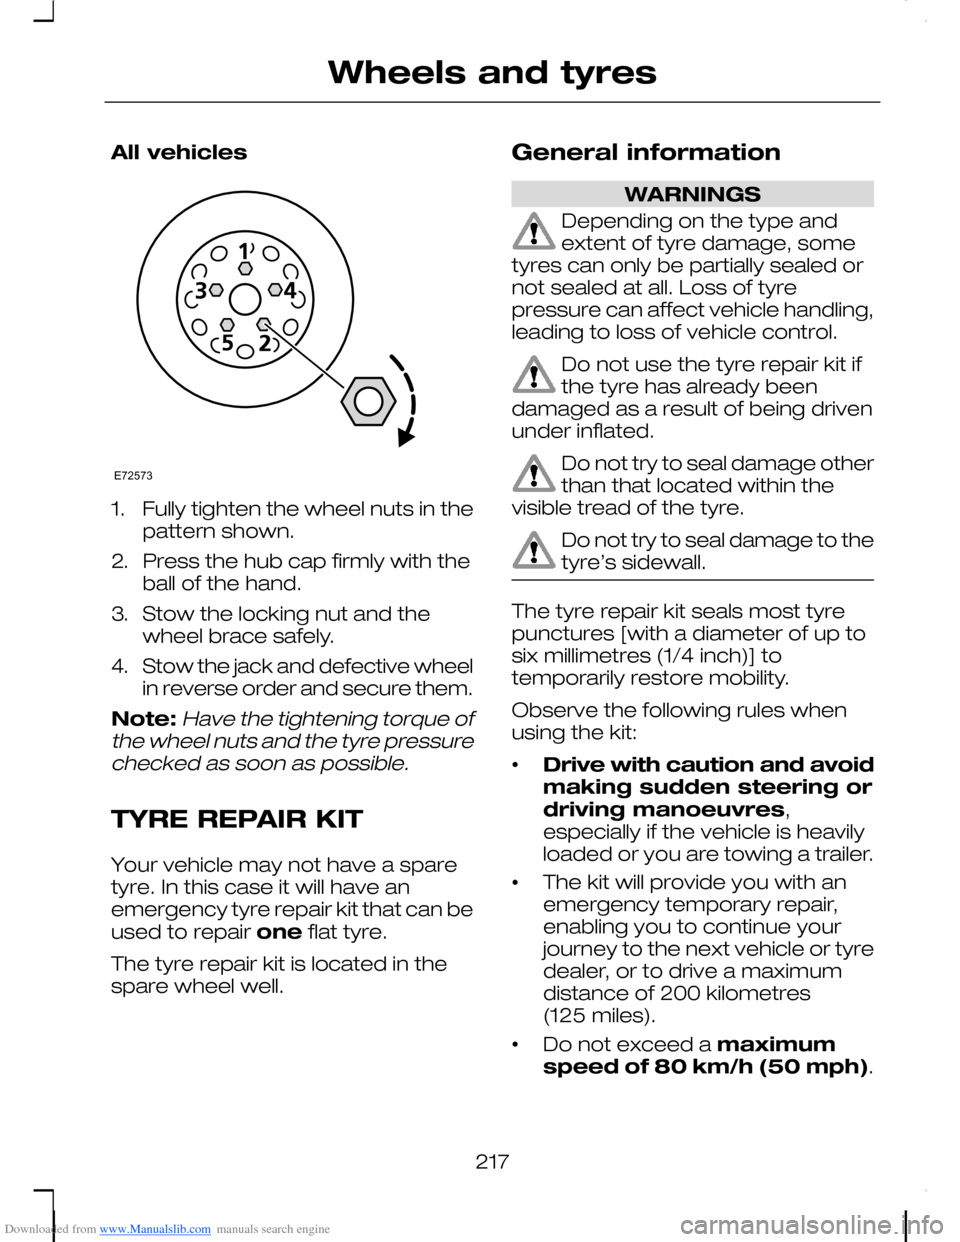
1.Fully tighten the wheel nuts in thepattern shown.
2.Press the hub cap firmly with theball of the hand.
3.Stow the locking nut and thewheel brace safely.
4.Stow the jack and defective wheelin reverse order and secure them.
Note:Have the tightening torque ofthe wheel nuts and the tyre pressurechecked as soon as possible.
TYRE REPAIR KIT
Your vehicle may not have a sparetyre. In this case it will have anemergency tyre repair kit that can beused to repair one flat tyre.
The tyre repair kit is located in thespare wheel well.
General information
WARNINGS
Depending on the type andextent of tyre damage, sometyres can only be partially sealed ornot sealed at all. Loss of tyrepressure can affect vehicle handling,leading to loss of vehicle control.
Do not use the tyre repair kit ifthe tyre has already beendamaged as a result of being drivenunder inflated.
Do not try to seal damage otherthan that located within thevisible tread of the tyre.
Do not try to seal damage to thetyre’s sidewall.
The tyre repair kit seals most tyrepunctures [with a diameter of up tosix millimetres (1/4 inch)] totemporarily restore mobility.
Observe the following rules whenusing the kit:
•Drive with caution and avoidmaking sudden steering ordriving manoeuvres,especially if the vehicle is heavilyloaded or you are towing a trailer.
•The kit will provide you with anemergency temporary repair,enabling you to continue yourjourney to the next vehicle or tyredealer, or to drive a maximumdistance of 200 kilometres(125 miles).
•Do not exceed a maximumspeed of 80 km/h (50 mph).
217
Wheels and tyresE72573
Page 224 of 278
Downloaded from www.Manualslib.com manuals search engine 17.Immediately drive approximatelythree kilometres (two miles) sothat the sealant can seal thedamaged area.
Note:When pumping in the sealantthrough the tyre valve, the pressuremay rise up to 6 bar (87 psi) but willdrop again after about 30 seconds.
WARNING
If you experience heavyvibrations, unsteady steeringbehaviour or noises while driving,reduce your speed and drive withcaution to a place where it is safe foryou to stop the vehicle. Recheck thetyre and its pressure. If the tyrepressure is less than 1.3 bar (19 psi)or if there are any cracks, bumps orsimilar damage visible, do notcontinue driving with this tyre.
Checking the tyre pressure
1.Stop the vehicle after drivingapproximately three kilometres(two miles). Check, and wherenecessary, adjust the pressure ofthe damaged tyre.
2.Attach the kit and read the tyrepressure from the pressure gaugeF.
3.If the pressure of the sealant-filledtyre is 1.3 bar (19 psi) or more,adjust it to the specified pressure.See Technical specifications(page 224).
4.Follow the inflation procedureonce again to top up the tyre.
5.Check the tyre pressure againfrom the pressure gauge F. If thetyre pressure is too high, deflatethe tyre to the specified pressureusing the pressure relief valve B.
6.Once you have inflated the tyre toits correct tyre pressure, movethe compressor switch H toposition 0, remove the powerplug G from the socket, unscrewthe hose C, fasten the valve capand replace the protective cap A.
7.Leave the sealant bottle K in thebottle holder E and store the kitaway safely in its original location.
8.Drive to the nearest tyre specialistto get the damaged tyre replaced.Before the tyre is removed fromthe rim, inform your tyre dealerthat the tyre contains sealant.Renew the kit as soon as possibleafter it has been used once.
Note:Remember that emergencyroadside tyre repair kits only providetemporary mobility. Regulationsconcerning tyre repair after usage oftyre repair kit may differ from countryto country. You should consult a tyrespecialist for advice.
WARNING
Before driving, make sure thetyre is adjusted to therecommended inflation pressure.See Technical specifications(page 224). Monitor the tyre pressureuntil the sealed tyre is replaced.
222
Wheels and tyres
Page 225 of 278
Downloaded from www.Manualslib.com manuals search engine Empty sealant bottles can bedisposed of together with normalhousehold waste. Return remains ofsealant to your dealer or dispose ofit in compliance with local wastedisposal regulations.
TYRE CARE
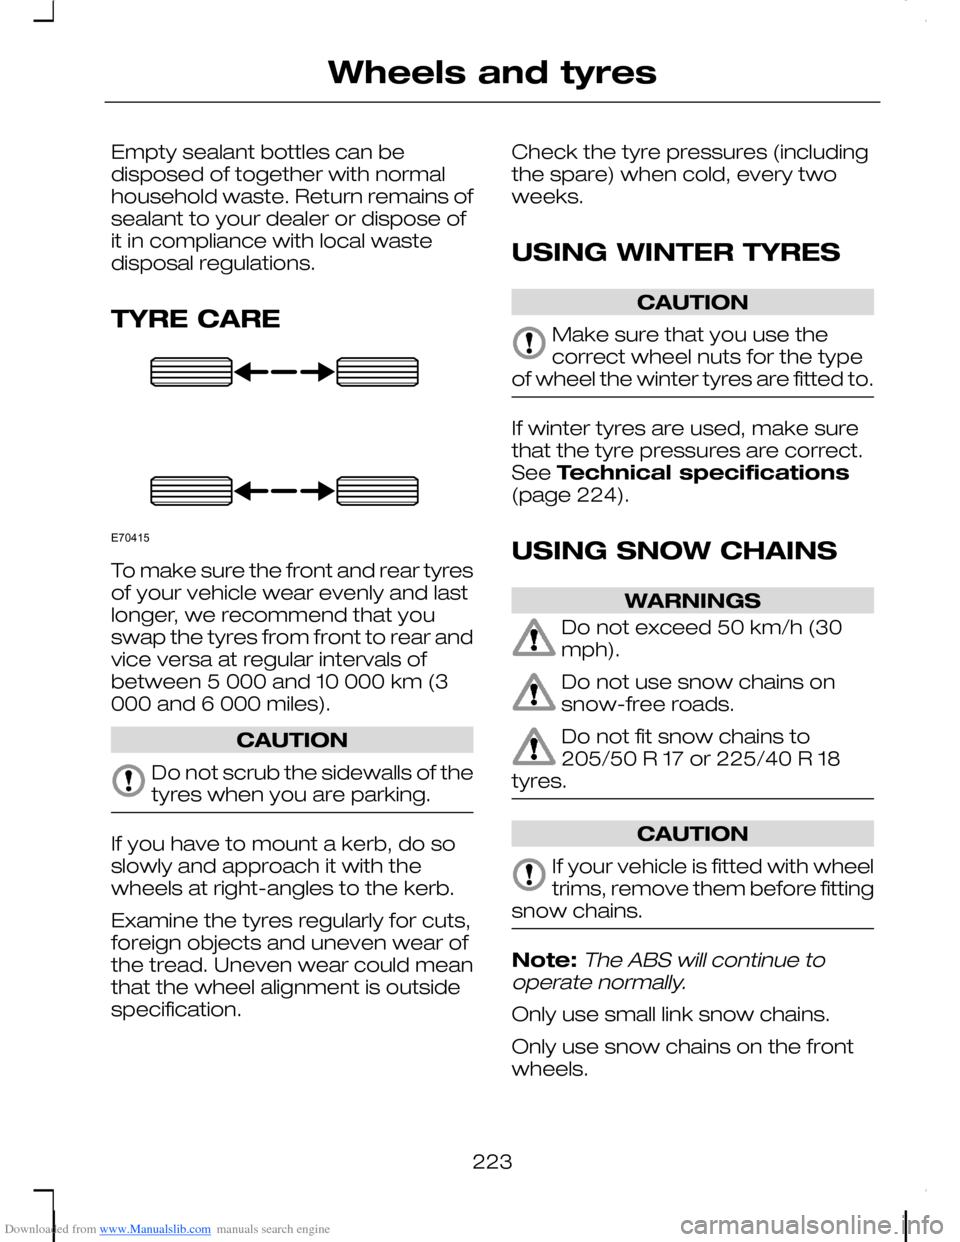
To make sure the front and rear tyresof your vehicle wear evenly and lastlonger, we recommend that youswap the tyres from front to rear andvice versa at regular intervals ofbetween 5 000 and 10 000 km (3000 and 6 000 miles).
CAUTION
Do not scrub the sidewalls of thetyres when you are parking.
If you have to mount a kerb, do soslowly and approach it with thewheels at right-angles to the kerb.
Examine the tyres regularly for cuts,foreign objects and uneven wear ofthe tread. Uneven wear could meanthat the wheel alignment is outsidespecification.
Check the tyre pressures (includingthe spare) when cold, every twoweeks.
USING WINTER TYRES
CAUTION
Make sure that you use thecorrect wheel nuts for the typeof wheel the winter tyres are fitted to.
If winter tyres are used, make surethat the tyre pressures are correct.See Technical specifications(page 224).
USING SNOW CHAINS
WARNINGS
Do not exceed 50 km/h (30mph).
Do not use snow chains onsnow-free roads.
Do not fit snow chains to205/50 R 17 or 225/40 R 18tyres.
CAUTION
If your vehicle is fitted with wheeltrims, remove them before fittingsnow chains.
Note:The ABS will continue tooperate normally.
Only use small link snow chains.
Only use snow chains on the frontwheels.
223
Wheels and tyresE70415
Page 226 of 278
Downloaded from www.Manualslib.com manuals search engine Vehicles with stabilitycontrol (ESP)
Vehicles with stability control (ESP)may exhibit some unusual drivingcharacteristics which can be avoidedby switching the system off. SeeStability control (page 160).
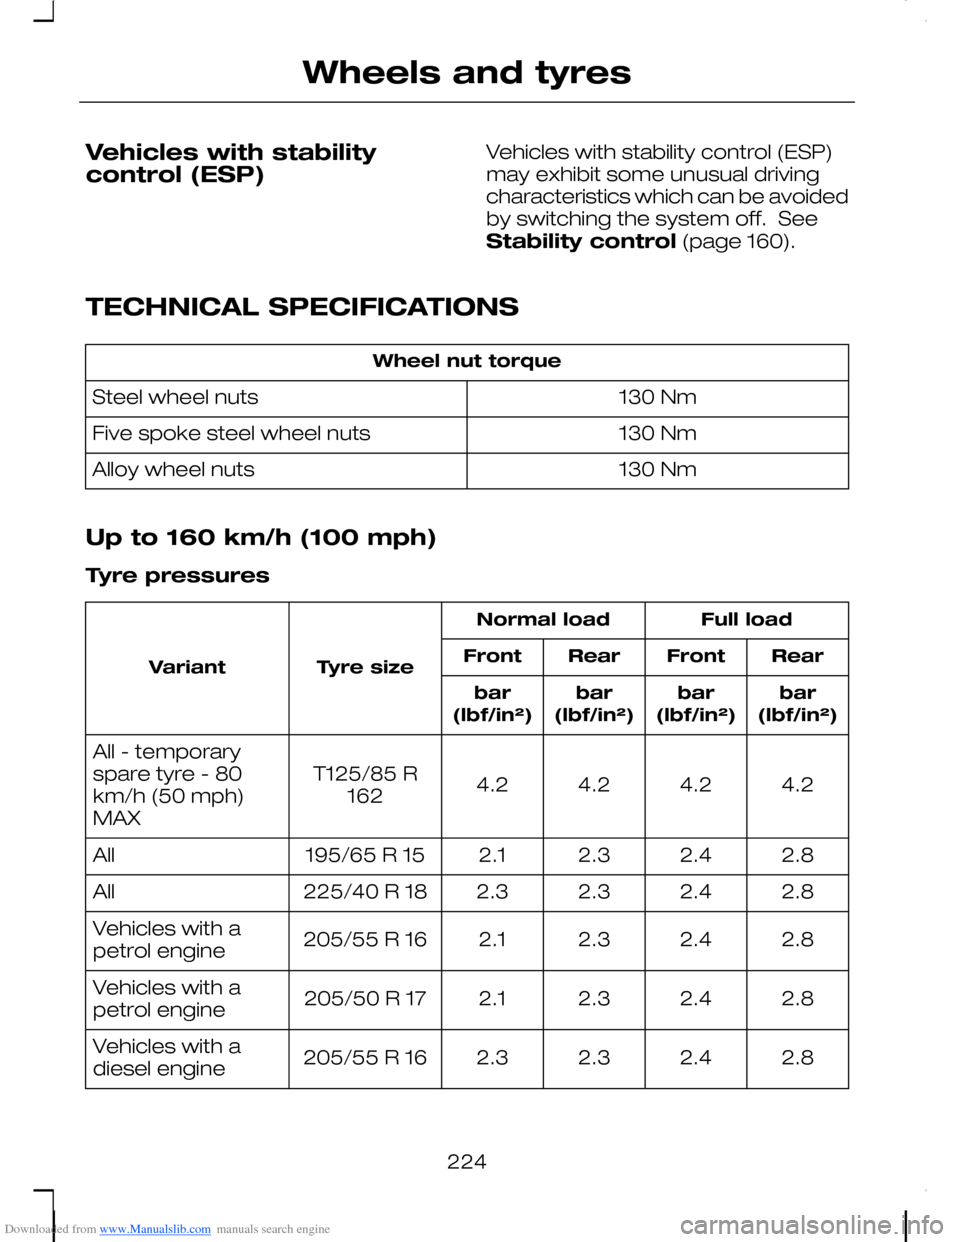
TECHNICAL SPECIFICATIONS
Wheel nut torque
130 NmSteel wheel nuts
130 NmFive spoke steel wheel nuts
130 NmAlloy wheel nuts
Up to 160 km/h (100 mph)
Tyre pressures
Full loadNormal load
Tyre sizeVariantRearFrontRearFront
bar(lbf/in²)bar(lbf/in²)bar(lbf/in²)bar(lbf/in²)
4.24.24.24.2T125/85 R162
All - temporaryspare tyre - 80km/h (50 mph)MAX
2.82.42.32.1195/65 R 15All
2.82.42.32.3225/40 R 18All
2.82.42.32.1205/55 R 16Vehicles with apetrol engine
2.82.42.32.1205/50 R 17Vehicles with apetrol engine
2.82.42.32.3205/55 R 16Vehicles with adiesel engine
224
Wheels and tyres
Page 243 of 278
Downloaded from www.Manualslib.com manuals search engine PRINCIPLE OF
OPERATION
Voice recognition enables operationof the audio system without the needto divert your attention from the roadahead in order to change settings, orreceive feedback from the system.
Whenever you issue one of thedefined commands with the systemactive, the voice recognition systemconverts your command into acontrol signal for the audio system.Your inputs take the form ofdialogues or commands. You areguided through these dialogues byannouncements or questions.
Please familiarise yourself with thefunctions of the audio system beforeusing voice recognition.
Note:If the Bluetooth and voicecontrol is used for an extendedperiod of time when the vehicle isstationary, make sure that the engineis running to avoid draining thebattery.
Supported commands
The voice control system allows youto control the following vehiclefunctions:
•phone
•radio
•CD Player
•climate control
•navigation system.
Note:The voice control system islanguage specific. If you require thesystem to operate in anotherlanguage please consult your dealer.
System response
As you work through a voice sessionthe system will prompt you with abeep tone each time the system isready to proceed.
Do not try to give any commandsuntil the beep tone has been heard.The voice control system will repeateach spoken command back to you.
If you are not sure how to continuesay "HELP" for assistance or"CANCEL" if you do not wish tocontinue.
The "HELP" function provides only asubset of the available voicecommands. Detailed explanations ofall possible voice commands can befound on the following pages.
Voice commands
All voice commands should be givenusing a natural speaking voice, as ifspeaking to a passenger or on thephone. Your voice level should bedependant on the surrounding noiselevel inside or outside the vehicle butdo not shout.
Name tag
The name tag functionality cansupport the phone, audio andnavigation features by using the"STORE NAME" function.
241
Voice control