lock FORD C MAX 2008 1.G Owner's Manual
[x] Cancel search | Manufacturer: FORD, Model Year: 2008, Model line: C MAX, Model: FORD C MAX 2008 1.GPages: 278, PDF Size: 17.5 MB
Page 51 of 278
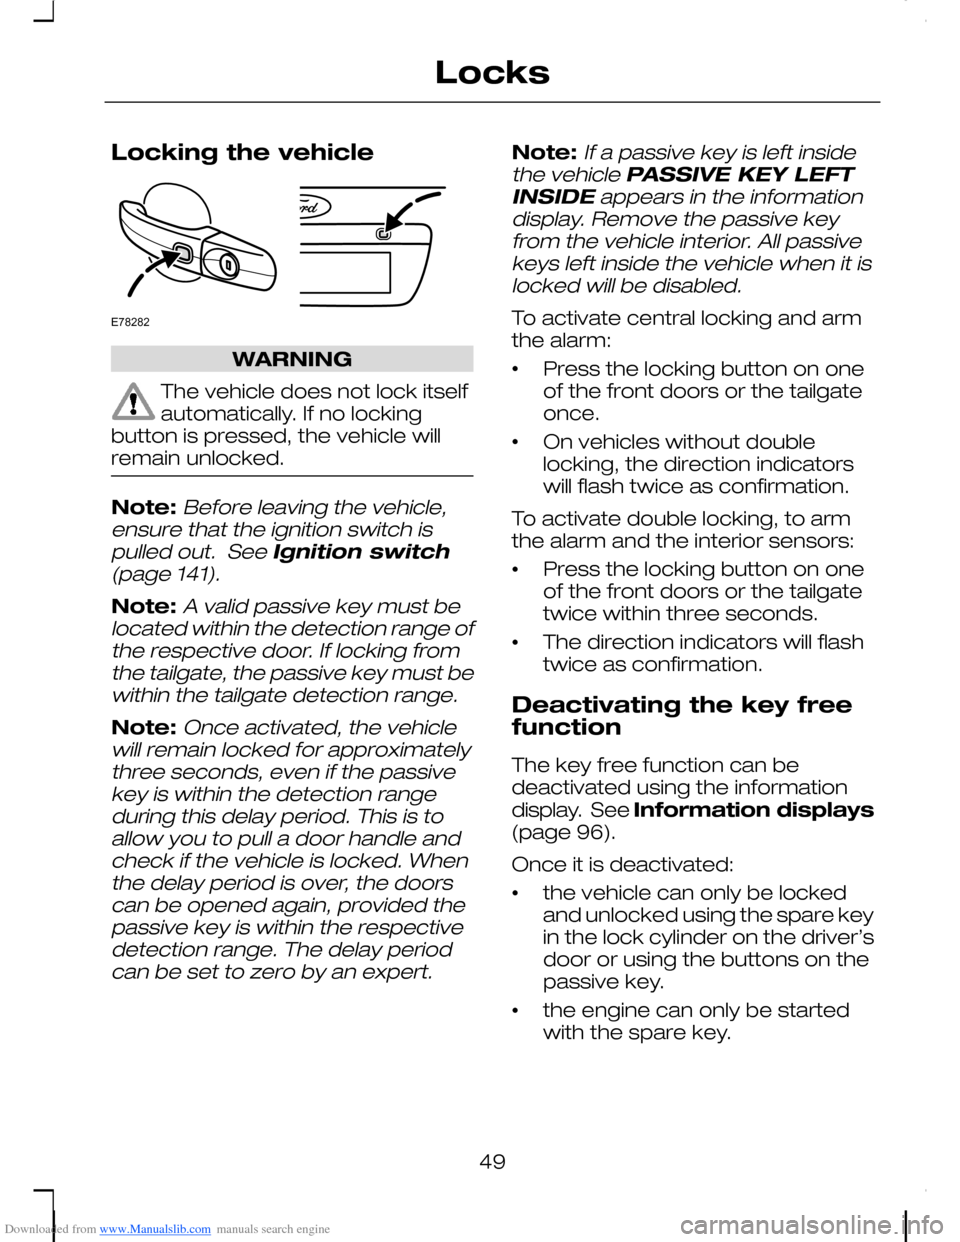
Downloaded from www.Manualslib.com manuals search engine Locking the vehicle
WARNING
The vehicle does not lock itselfautomatically. If no lockingbutton is pressed, the vehicle willremain unlocked.
Note:Before leaving the vehicle,ensure that the ignition switch ispulled out. See Ignition switch(page 141).
Note:A valid passive key must belocated within the detection range ofthe respective door. If locking fromthe tailgate, the passive key must bewithin the tailgate detection range.
Note:Once activated, the vehiclewill remain locked for approximatelythree seconds, even if the passivekey is within the detection rangeduring this delay period. This is toallow you to pull a door handle andcheck if the vehicle is locked. Whenthe delay period is over, the doorscan be opened again, provided thepassive key is within the respectivedetection range. The delay periodcan be set to zero by an expert.
Note:If a passive key is left insidethe vehicle PASSIVE KEY LEFTINSIDE appears in the informationdisplay. Remove the passive keyfrom the vehicle interior. All passivekeys left inside the vehicle when it islocked will be disabled.
To activate central locking and armthe alarm:
•Press the locking button on oneof the front doors or the tailgateonce.
•On vehicles without doublelocking, the direction indicatorswill flash twice as confirmation.
To activate double locking, to armthe alarm and the interior sensors:
•Press the locking button on oneof the front doors or the tailgatetwice within three seconds.
•The direction indicators will flashtwice as confirmation.
Deactivating the key freefunction
The key free function can bedeactivated using the informationdisplay. See Information displays(page 96).
Once it is deactivated:
•the vehicle can only be lockedand unlocked using the spare keyin the lock cylinder on the driver’sdoor or using the buttons on thepassive key.
•the engine can only be startedwith the spare key.
49
LocksE78282
Page 52 of 278
Downloaded from www.Manualslib.com manuals search engine GLOBAL OPENING AND
CLOSING
You can also operate the electricwindows with the ignition off via theglobal opening and global closingfunction.
Note:Global closing will only operateif you have set the memory correctlyfor each window. See Electricwindows (page 84).
Global opening
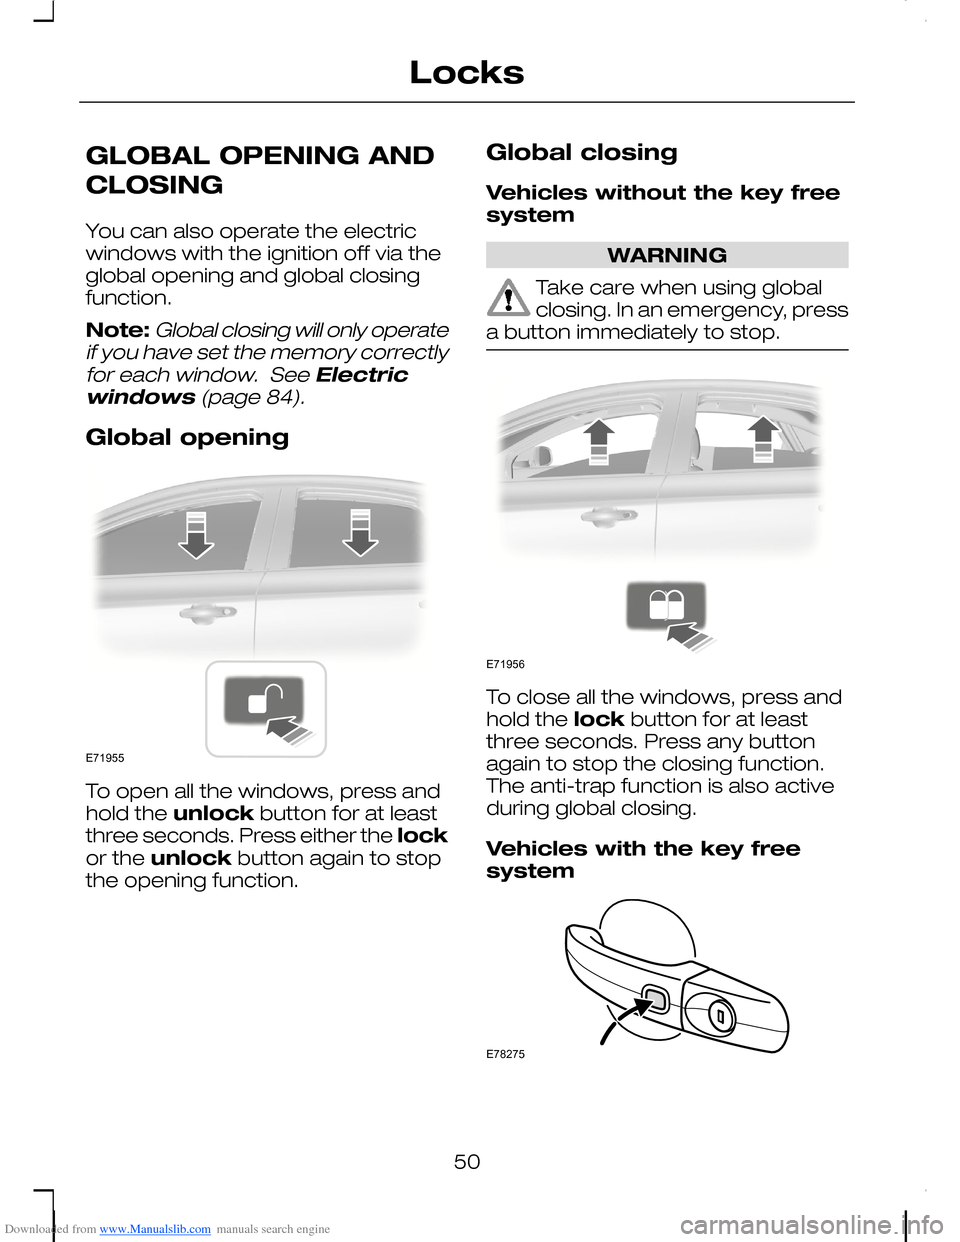
To open all the windows, press andhold the unlock button for at leastthree seconds. Press either the lockor the unlock button again to stopthe opening function.
Global closing
Vehicles without the key freesystem
WARNING
Take care when using globalclosing. In an emergency, pressa button immediately to stop.
To close all the windows, press andhold the lock button for at leastthree seconds. Press any buttonagain to stop the closing function.The anti-trap function is also activeduring global closing.
Vehicles with the key freesystem
50
LocksE71955 E71956 E78275
Page 53 of 278

Downloaded from www.Manualslib.com manuals search engine WARNING
Take care when using globalclosing. In an emergency, pressthe button on the driver’s doorhandle to stop.
Note:Global closing can beactivated using the button on thedriver’s door handle. Global openingand closing can also be activatedusing the buttons on the passive key.
To close all the windows, press andhold the button on the driver’s doorhandle for at least two seconds. Theanti-trap function is also active duringglobal closing.
51
Locks
Page 55 of 278
Downloaded from www.Manualslib.com manuals search engine ARMING THE ALARM
The system is armed as soon as thevehicle is locked and acts as adeterrent to unauthorised personswho attempt to open the doors,bonnet or luggage compartment, orremove the audio system.
The alarm sounds for 30 seconds ifan unauthorised person opens adoor, the luggage compartment orthe bonnet. The hazard flasher lightswill flash for five minutes.
Any attempt to start the enginewithout a valid key or to remove theaudio system sounds the alarmagain.
Automatic arming delay
The 20 seconds arming delay beginswhen the bonnet, luggagecompartment and all doors areclosed.
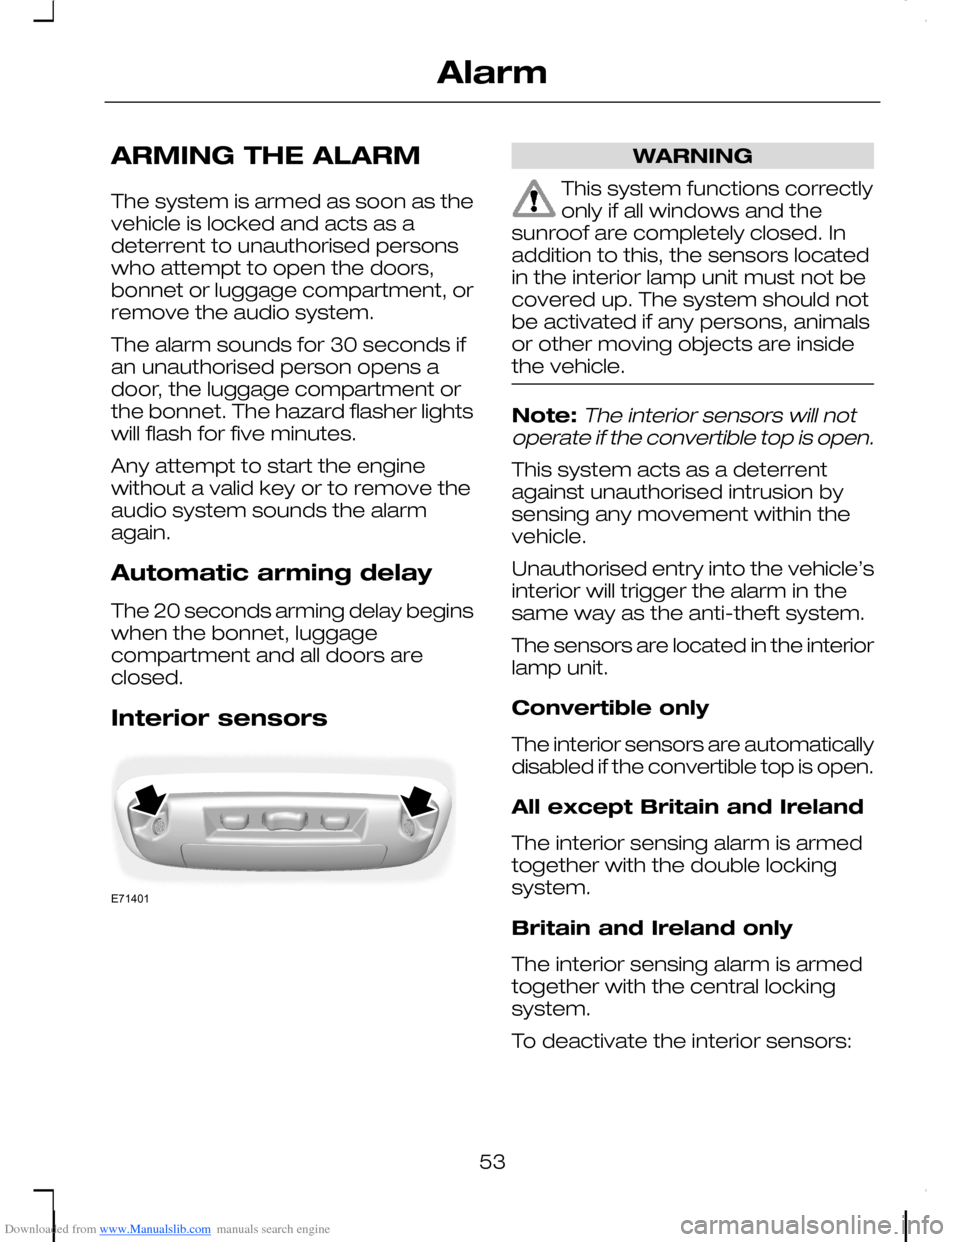
Interior sensors
WARNING
This system functions correctlyonly if all windows and thesunroof are completely closed. Inaddition to this, the sensors locatedin the interior lamp unit must not becovered up. The system should notbe activated if any persons, animalsor other moving objects are insidethe vehicle.
Note:The interior sensors will notoperate if the convertible top is open.
This system acts as a deterrentagainst unauthorised intrusion bysensing any movement within thevehicle.
Unauthorised entry into the vehicle’sinterior will trigger the alarm in thesame way as the anti-theft system.
The sensors are located in the interiorlamp unit.
Convertible only
The interior sensors are automaticallydisabled if the convertible top is open.
All except Britain and Ireland
The interior sensing alarm is armedtogether with the double lockingsystem.
Britain and Ireland only
The interior sensing alarm is armedtogether with the central lockingsystem.
To deactivate the interior sensors:
53
AlarmE71401
Page 56 of 278
Downloaded from www.Manualslib.com manuals search engine Vehicles without keyless entrysystem
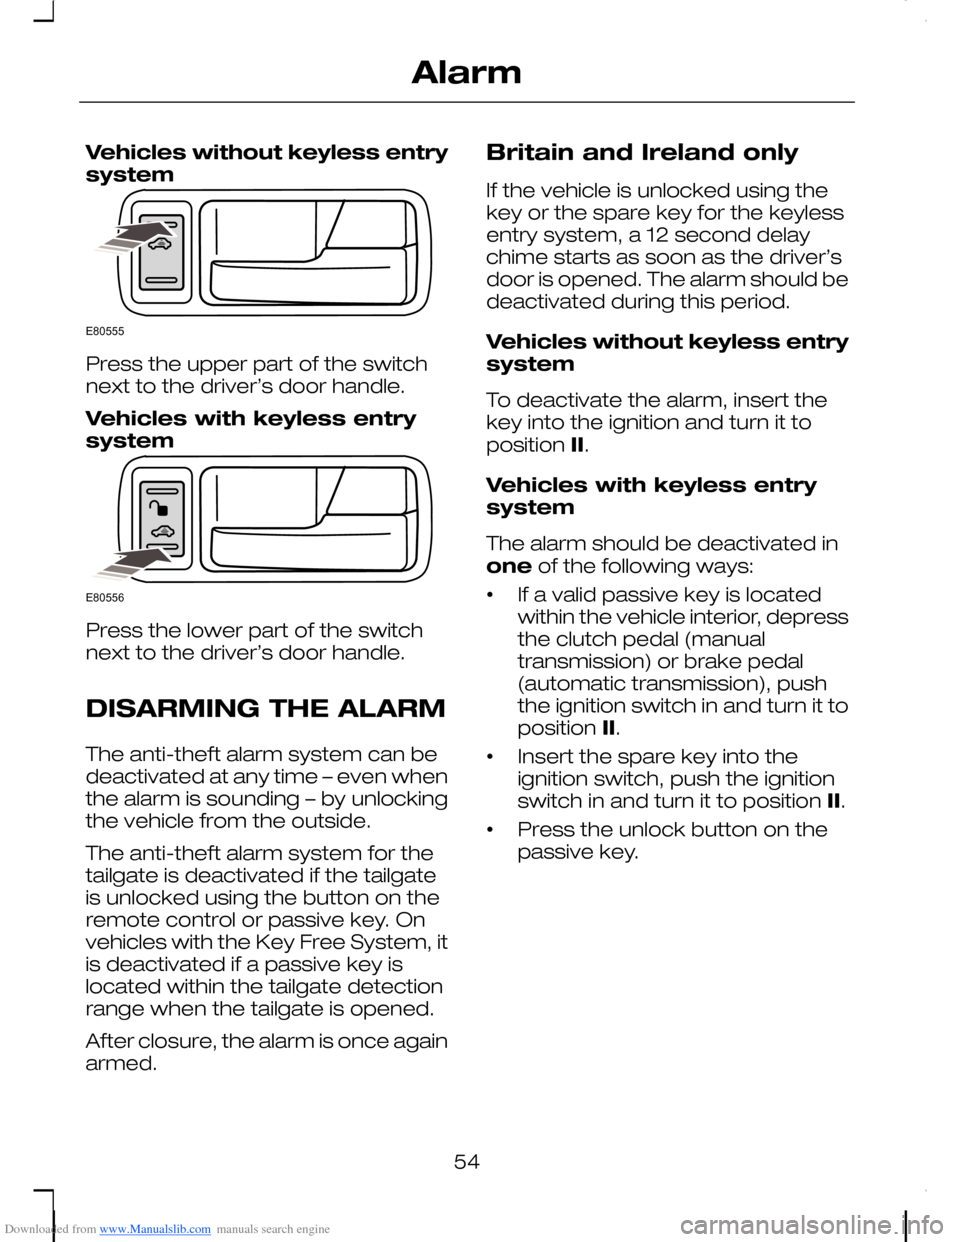
Press the upper part of the switchnext to the driver’s door handle.
Vehicles with keyless entrysystem
Press the lower part of the switchnext to the driver’s door handle.
DISARMING THE ALARM
The anti-theft alarm system can bedeactivated at any time – even whenthe alarm is sounding – by unlockingthe vehicle from the outside.
The anti-theft alarm system for thetailgate is deactivated if the tailgateis unlocked using the button on theremote control or passive key. Onvehicles with the Key Free System, itis deactivated if a passive key islocated within the tailgate detectionrange when the tailgate is opened.
After closure, the alarm is once againarmed.
Britain and Ireland only
If the vehicle is unlocked using thekey or the spare key for the keylessentry system, a 12 second delaychime starts as soon as the driver’sdoor is opened. The alarm should bedeactivated during this period.
Vehicles without keyless entrysystem
To deactivate the alarm, insert thekey into the ignition and turn it toposition II.
Vehicles with keyless entrysystem
The alarm should be deactivated inone of the following ways:
•If a valid passive key is locatedwithin the vehicle interior, depressthe clutch pedal (manualtransmission) or brake pedal(automatic transmission), pushthe ignition switch in and turn it toposition II.
•Insert the spare key into theignition switch, push the ignitionswitch in and turn it to position II.
•Press the unlock button on thepassive key.
54
AlarmE80555 E80556
Page 57 of 278
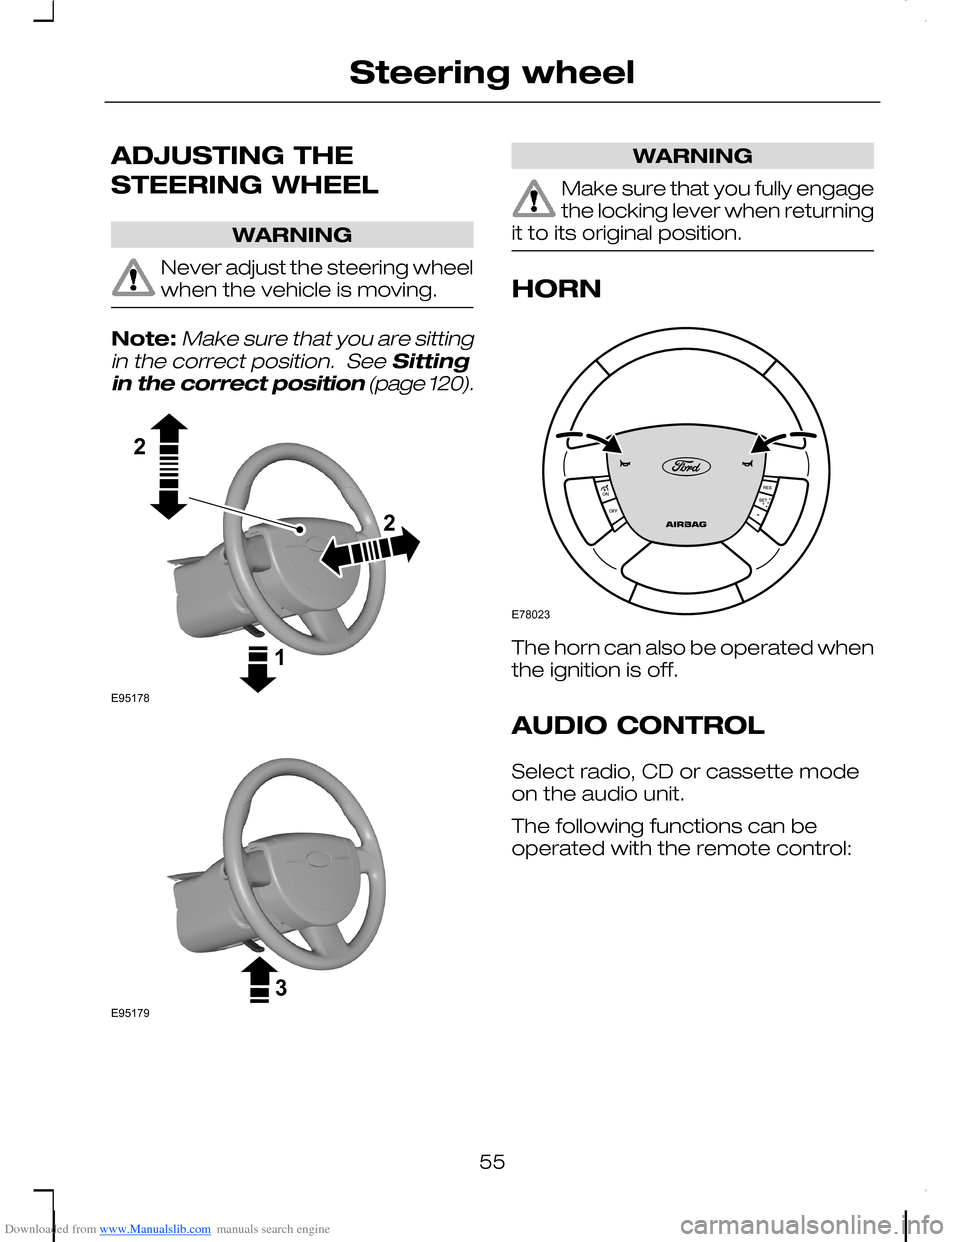
Downloaded from www.Manualslib.com manuals search engine ADJUSTING THE
STEERING WHEEL
WARNING
Never adjust the steering wheelwhen the vehicle is moving.
Note:Make sure that you are sittingin the correct position. See Sittingin the correct position (page 120).
WARNING
Make sure that you fully engagethe locking lever when returningit to its original position.
HORN
The horn can also be operated whenthe ignition is off.
AUDIO CONTROL
Select radio, CD or cassette modeon the audio unit.
The following functions can beoperated with the remote control:
55
Steering wheel122E95178 3E95179 E78023
Page 74 of 278
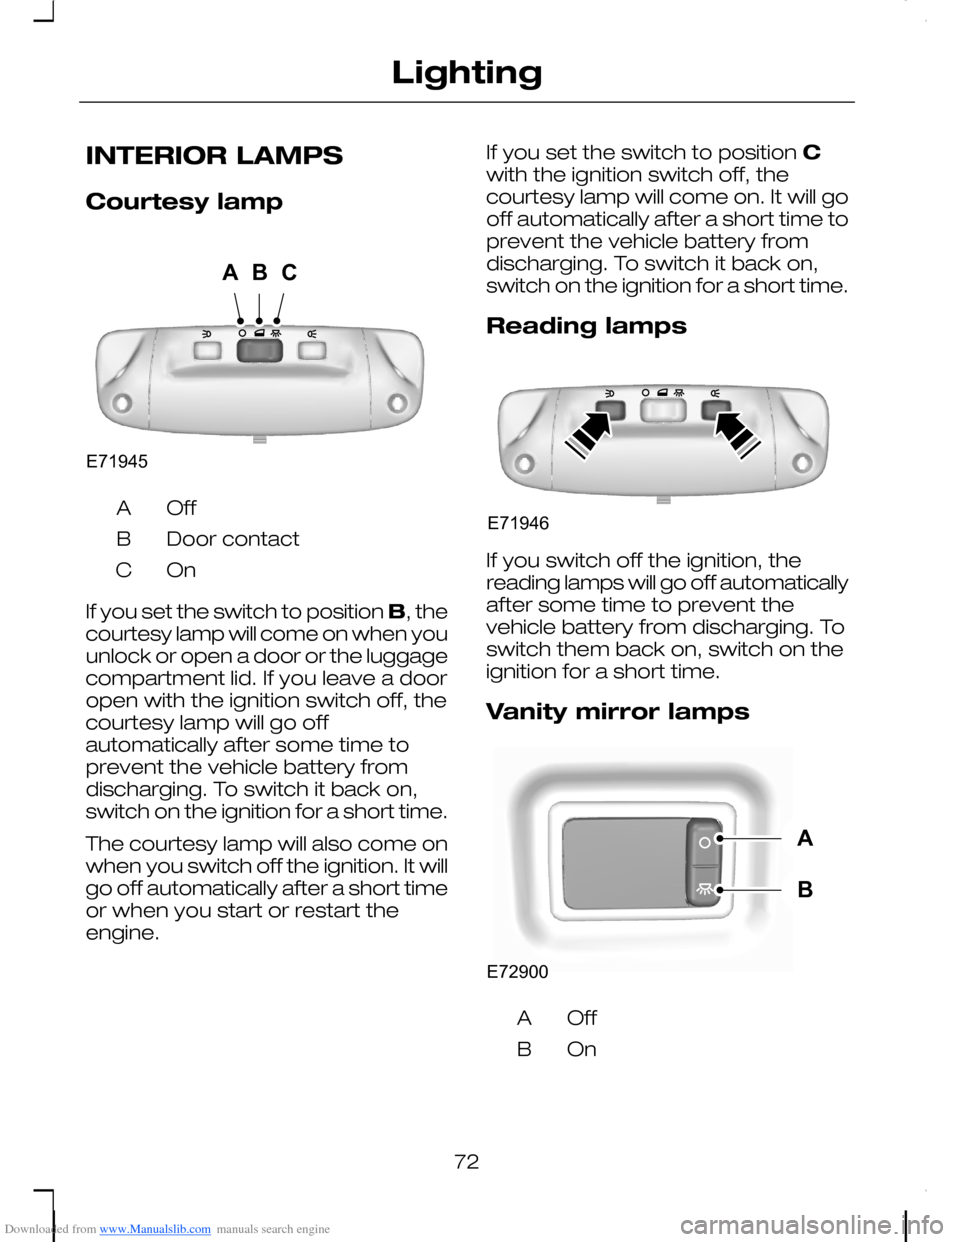
Downloaded from www.Manualslib.com manuals search engine INTERIOR LAMPS
Courtesy lamp
OffA
Door contactB
OnC
If you set the switch to position B, thecourtesy lamp will come on when youunlock or open a door or the luggagecompartment lid. If you leave a dooropen with the ignition switch off, thecourtesy lamp will go offautomatically after some time toprevent the vehicle battery fromdischarging. To switch it back on,switch on the ignition for a short time.
The courtesy lamp will also come onwhen you switch off the ignition. It willgo off automatically after a short timeor when you start or restart theengine.
If you set the switch to position Cwith the ignition switch off, thecourtesy lamp will come on. It will gooff automatically after a short time toprevent the vehicle battery fromdischarging. To switch it back on,switch on the ignition for a short time.
Reading lamps
If you switch off the ignition, thereading lamps will go off automaticallyafter some time to prevent thevehicle battery from discharging. Toswitch them back on, switch on theignition for a short time.
Vanity mirror lamps
OffA
OnB
72
LightingCBAE71945 E71946 ABE72900
Page 77 of 278
Downloaded from www.Manualslib.com manuals search engine Disconnect the wiring connector.
Install in the reverse order.
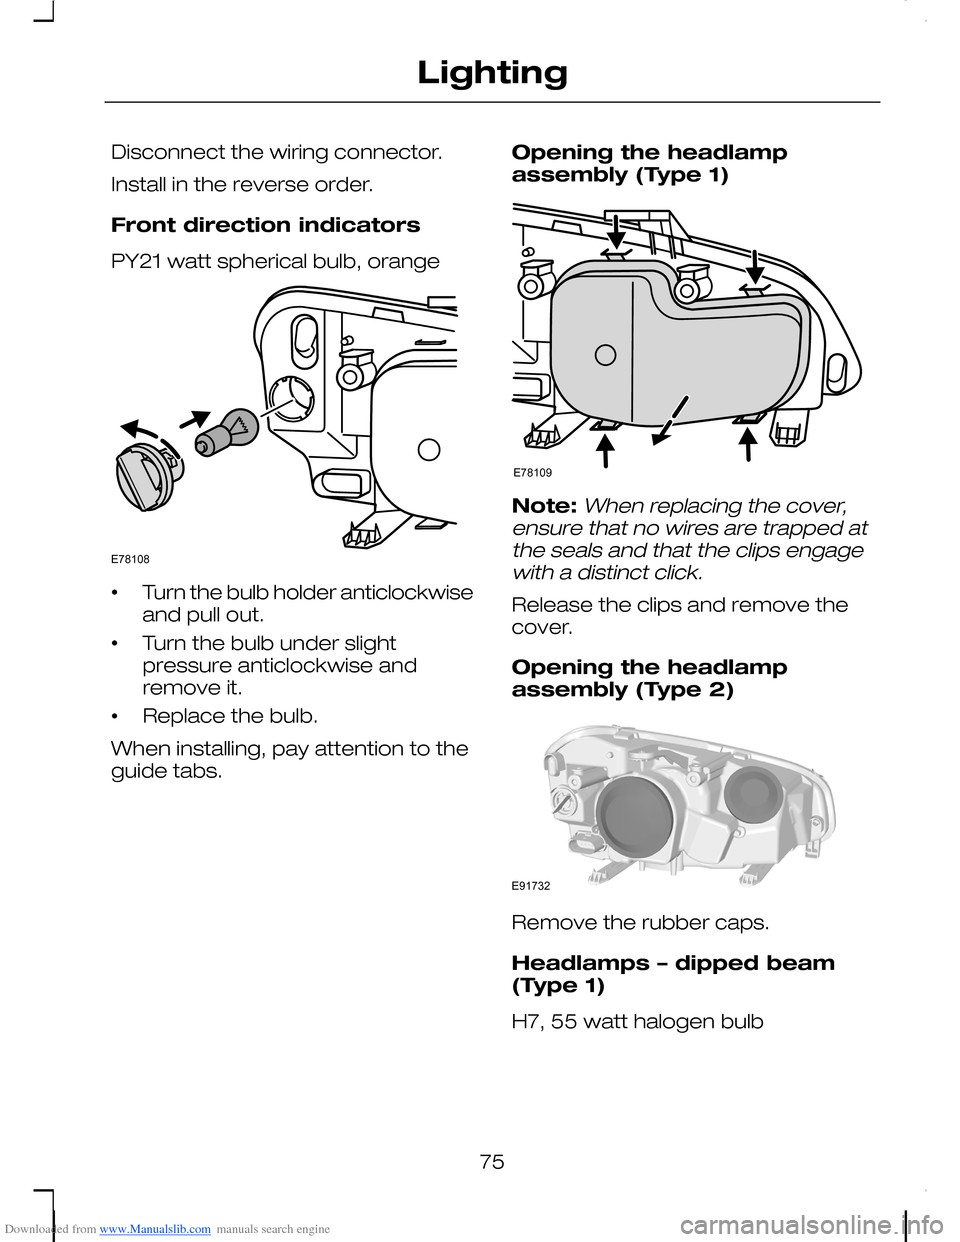
Front direction indicators
PY21 watt spherical bulb, orange
•Turn the bulb holder anticlockwiseand pull out.
•Turn the bulb under slightpressure anticlockwise andremove it.
•Replace the bulb.
When installing, pay attention to theguide tabs.
Opening the headlampassembly (Type 1)
Note:When replacing the cover,ensure that no wires are trapped atthe seals and that the clips engagewith a distinct click.
Release the clips and remove thecover.
Opening the headlampassembly (Type 2)
Remove the rubber caps.
Headlamps – dipped beam(Type 1)
H7, 55 watt halogen bulb
75
LightingE78108 E78109 E91732
Page 78 of 278
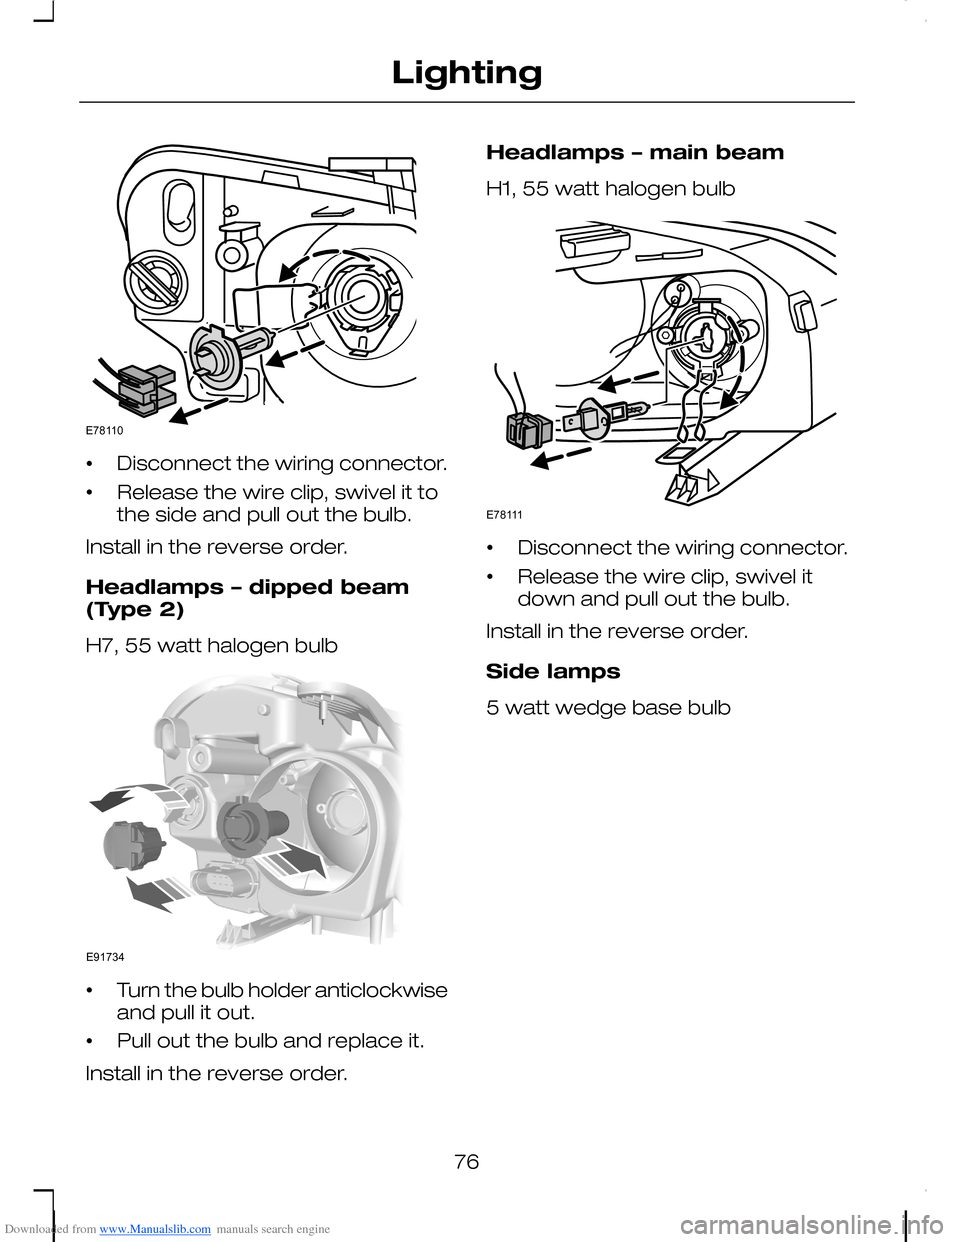
Downloaded from www.Manualslib.com manuals search engine •Disconnect the wiring connector.
•Release the wire clip, swivel it tothe side and pull out the bulb.
Install in the reverse order.
Headlamps – dipped beam(Type 2)
H7, 55 watt halogen bulb
•Turn the bulb holder anticlockwiseand pull it out.
•Pull out the bulb and replace it.
Install in the reverse order.
Headlamps – main beam
H1, 55 watt halogen bulb
•Disconnect the wiring connector.
•Release the wire clip, swivel itdown and pull out the bulb.
Install in the reverse order.
Side lamps
5 watt wedge base bulb
76
LightingE78110 E91734 E78111
Page 79 of 278
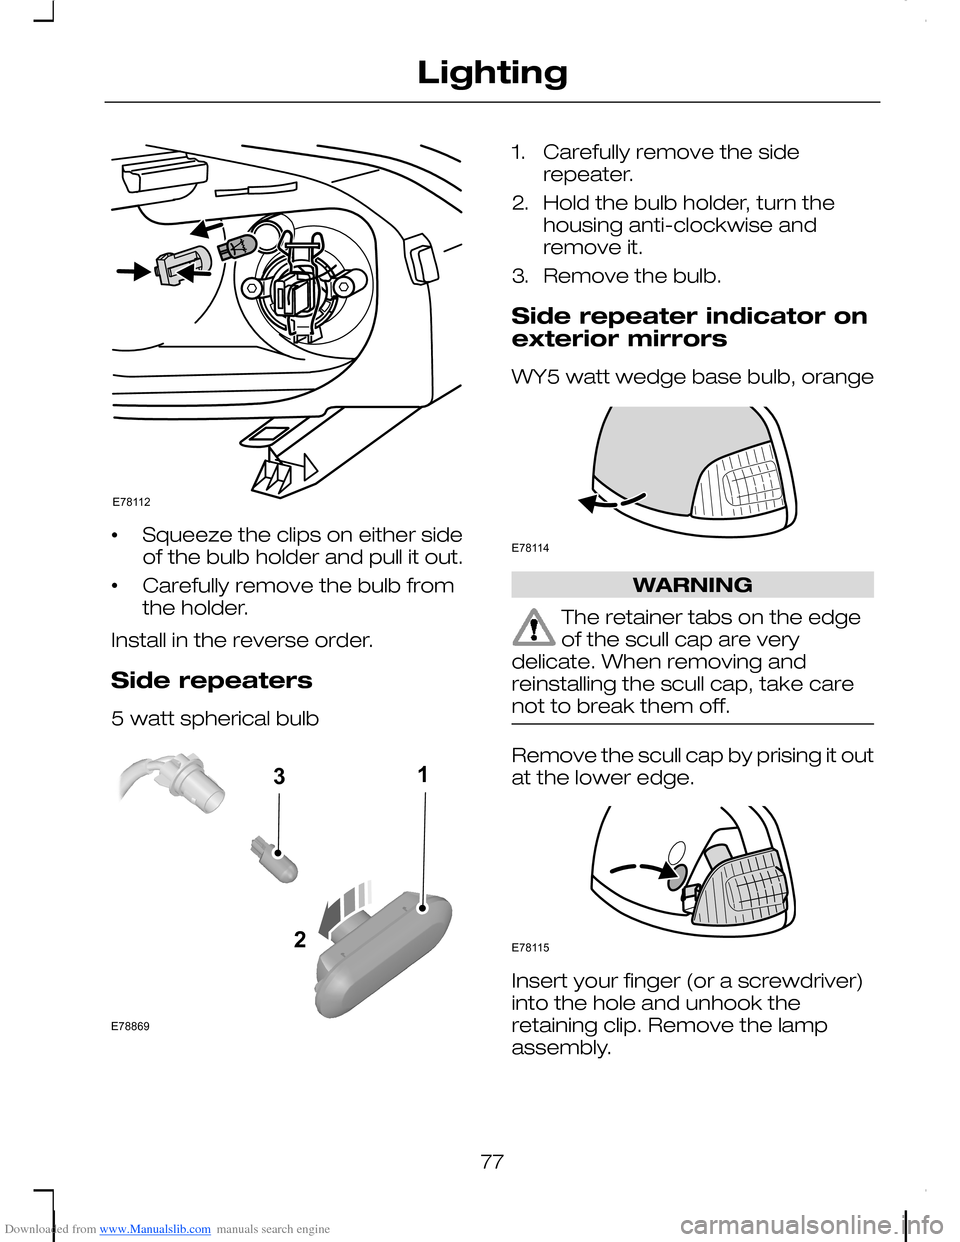
Downloaded from www.Manualslib.com manuals search engine •Squeeze the clips on either sideof the bulb holder and pull it out.
•Carefully remove the bulb fromthe holder.
Install in the reverse order.
Side repeaters
5 watt spherical bulb
1.Carefully remove the siderepeater.
2.Hold the bulb holder, turn thehousing anti-clockwise andremove it.
3.Remove the bulb.
Side repeater indicator onexterior mirrors
WY5 watt wedge base bulb, orange
WARNING
The retainer tabs on the edgeof the scull cap are verydelicate. When removing andreinstalling the scull cap, take carenot to break them off.
Remove the scull cap by prising it outat the lower edge.
Insert your finger (or a screwdriver)into the hole and unhook theretaining clip. Remove the lampassembly.
77
LightingE78112 213E78869 E78114 E78115