warning FORD C MAX 2016 Owners Manual
[x] Cancel search | Manufacturer: FORD, Model Year: 2016, Model line: C MAX, Model: FORD C MAX 2016Pages: 395, PDF Size: 5.78 MB
Page 199 of 395
This program is separate from the New
Vehicle Limited Warranty, but the coverage
is concurrent with the powertrain coverage
period of your vehicle.
Canadian customers who require roadside
assistance, call 1-800-665-2006.
Vehicles Sold in Canada: Using
Roadside Assistance
Complete the roadside assistance
identification card and place it in your
wallet for quick reference.
In Canada, this card is found in the
Warranty Guide in the glove compartment
of your vehicle.
Vehicles Sold in Canada: Roadside
Assistance Program Coverage
The service is available 24 hours a day,
seven days a week.
Canadian roadside coverage and benefits
may differ from the U.S. coverage.
For complete program coverage details
you may contact your dealer, you can call
us in Canada at 1-800-665-2006, or visit
our website at www.ford.ca.
HAZARD WARNING FLASHERS
Note:
If used when the vehicle is not
running, the battery will lose charge. There
may be insufficient power to restart your
vehicle. The hazard warning button is
located on the instrument panel.
Use it when your vehicle is
creating a safety hazard for other
motorists.
• Press the button to turn on the hazard
warning function, and the front and
rear direction indicators will flash.
• Press the button again to turn them
off. FUEL SHUTOFF WARNING
Failure to inspect and, if necessary,
repair fuel leaks after a collision may
increase the risk of fire and serious
injury. Ford Motor Company recommends
that the fuel system be inspected by an
authorized dealer after any collision. In the event of a moderate to severe
collision, this vehicle has a fuel pump
shut-off feature that stops the flow of fuel
to the engine. Not every impact will cause
a shut-off.
Should your vehicle shut off after a
collision, you may restart your vehicle.
For vehicles equipped with a key system:
1. Switch off the ignition.
2. Switch on the ignition.
3. Check the information display for the
Ready to Drive light as the gasoline
engine may not start, but the electric
motor may be running. If you do not see
the Ready to Drive light, repeat Steps
1 and 2 up to two more times.
For vehicles equipped with a push button
start system:
1. Press the push button start to switch off the ignition.
2. Press the brake pedal and press the push button start to switch on the
ignition.
3. Check the information display for the Ready to Drive light as the gasoline
engine may not start, but the electric
motor may be running. If you do not see
the Ready to Drive light, repeat Steps
1 and 2 up to two more times.
196
C-MAX (CCG) Canada/United States of America, enUSA, First Printing Roadside Emergencies
Page 200 of 395
Note:
When you try to restart your vehicle
after a fuel shutoff, the vehicle makes sure
that the electrical system is safe to restart.
Once your vehicle determines that the
electrical system is safe, then the vehicle
will allow you to restart.
Note: In the event that your vehicle does
not restart after your third attempt, contact
an authorized dealer.
JUMP STARTING THE VEHICLE WARNINGS
The gases around the battery can
explode if exposed to flames, sparks
or lit cigarettes. An explosion could
result in injury or vehicle damage. Batteries contain sulfuric acid which
can burn skin, eyes and clothing, if
contacted.
Do not attempt to push-start your
automatic transmission vehicle. Automatic
transmissions do not have push-start
capability. Attempting to push-start a
vehicle with an automatic transmission
may cause transmission damage.
Preparing Your Vehicle
Note:
Use only a 12-volt supply to start your
vehicle.
Note: Do not disconnect the battery of the
disabled vehicle as this could damage the
vehicle's electrical system.
1. Park the booster vehicle close to the hood of the disabled vehicle making
sure the two vehicles do not touch. Set
the parking brake on both vehicles and
stay clear of the engine cooling fan and
other moving parts.
2. Check all battery terminals and remove
any excessive corrosion before you
attach the battery cables. Ensure that
vent caps are tight and level. 3.
Turn the heater fan on in both vehicles
to protect from any electrical surges.
Turn all other accessories off.
Connecting the Jumper Cables
Your vehicle has a 12-volt battery that has
two prongs accessible from under the
hood. Your vehicle can be jumped the
same way conventional vehicles can by
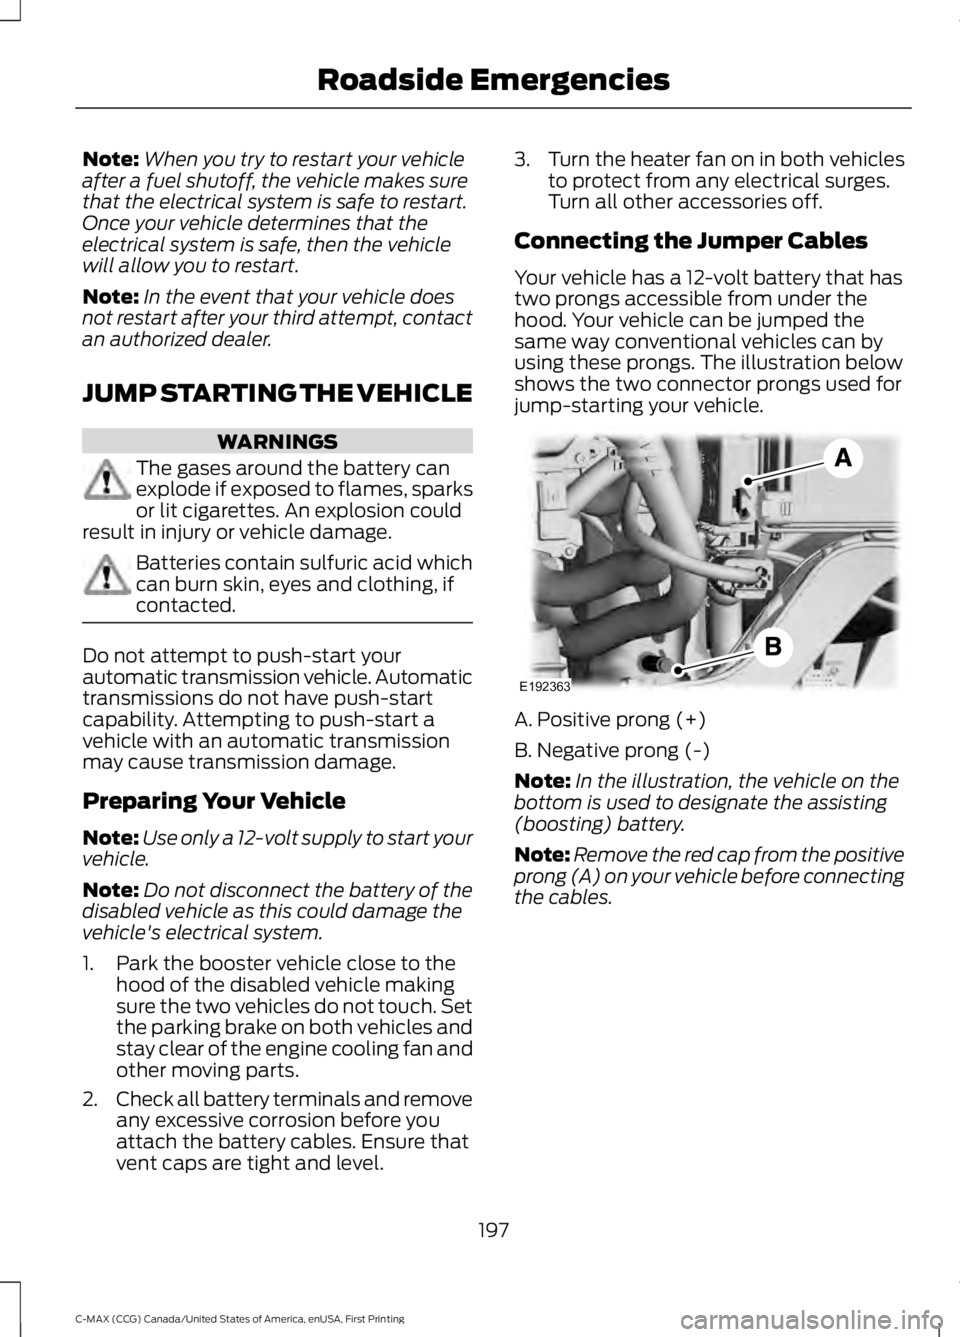
using these prongs. The illustration below
shows the two connector prongs used for
jump-starting your vehicle. A. Positive prong (+)
B. Negative prong (-)
Note:
In the illustration, the vehicle on the
bottom is used to designate the assisting
(boosting) battery.
Note: Remove the red cap from the positive
prong (A) on your vehicle before connecting
the cables.
197
C-MAX (CCG) Canada/United States of America, enUSA, First Printing Roadside EmergenciesE192363
Page 201 of 395
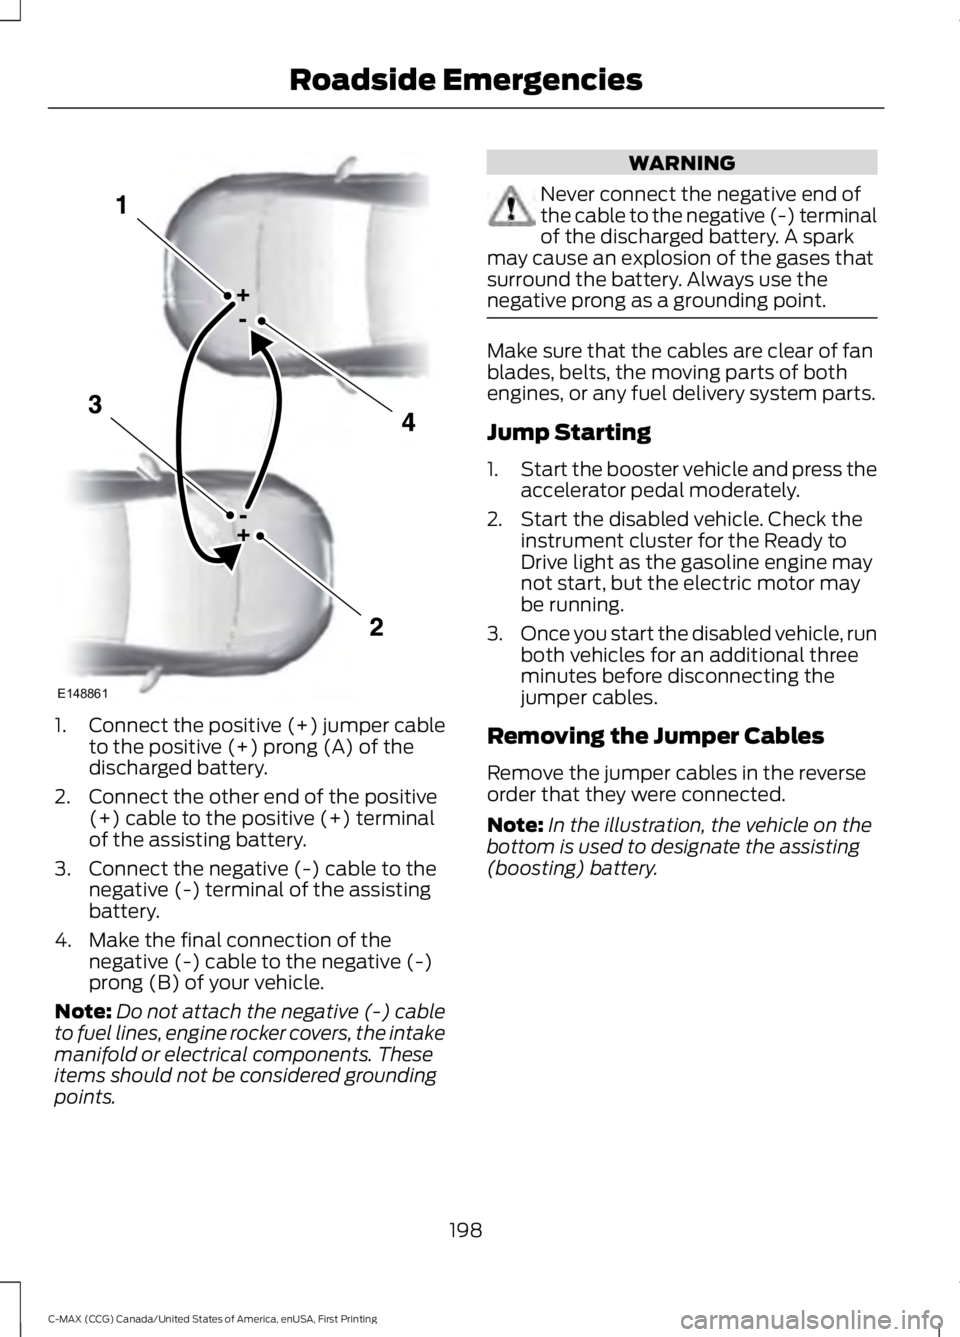
1.
Connect the positive (+) jumper cable
to the positive (+) prong (A) of the
discharged battery.
2. Connect the other end of the positive (+) cable to the positive (+) terminal
of the assisting battery.
3. Connect the negative (-) cable to the negative (-) terminal of the assisting
battery.
4. Make the final connection of the negative (-) cable to the negative (-)
prong (B) of your vehicle.
Note: Do not attach the negative (-) cable
to fuel lines, engine rocker covers, the intake
manifold or electrical components. These
items should not be considered grounding
points. WARNING
Never connect the negative end of
the cable to the negative (-) terminal
of the discharged battery. A spark
may cause an explosion of the gases that
surround the battery. Always use the
negative prong as a grounding point. Make sure that the cables are clear of fan
blades, belts, the moving parts of both
engines, or any fuel delivery system parts.
Jump Starting
1.
Start the booster vehicle and press the
accelerator pedal moderately.
2. Start the disabled vehicle. Check the instrument cluster for the Ready to
Drive light as the gasoline engine may
not start, but the electric motor may
be running.
3. Once you start the disabled vehicle, run
both vehicles for an additional three
minutes before disconnecting the
jumper cables.
Removing the Jumper Cables
Remove the jumper cables in the reverse
order that they were connected.
Note: In the illustration, the vehicle on the
bottom is used to designate the assisting
(boosting) battery.
198
C-MAX (CCG) Canada/United States of America, enUSA, First Printing Roadside EmergenciesE148861
Page 212 of 395
FUSE SPECIFICATION CHART
Pre-Fuse Box
Your vehicle has a pre-fuse box attached
to the power distribution box. There is a
second pre-fuse box attached to the
12-volt battery terminal in the rear of your
vehicle. They contain high-current fuses.
If you need to replace one of these fuses,
see an authorized dealer.
Power Distribution Box
WARNINGS
Always disconnect the battery before
servicing high current fuses. WARNINGS
To reduce risk of electrical shock,
always replace the cover to the
power distribution box before
reconnecting the battery or refilling fluid
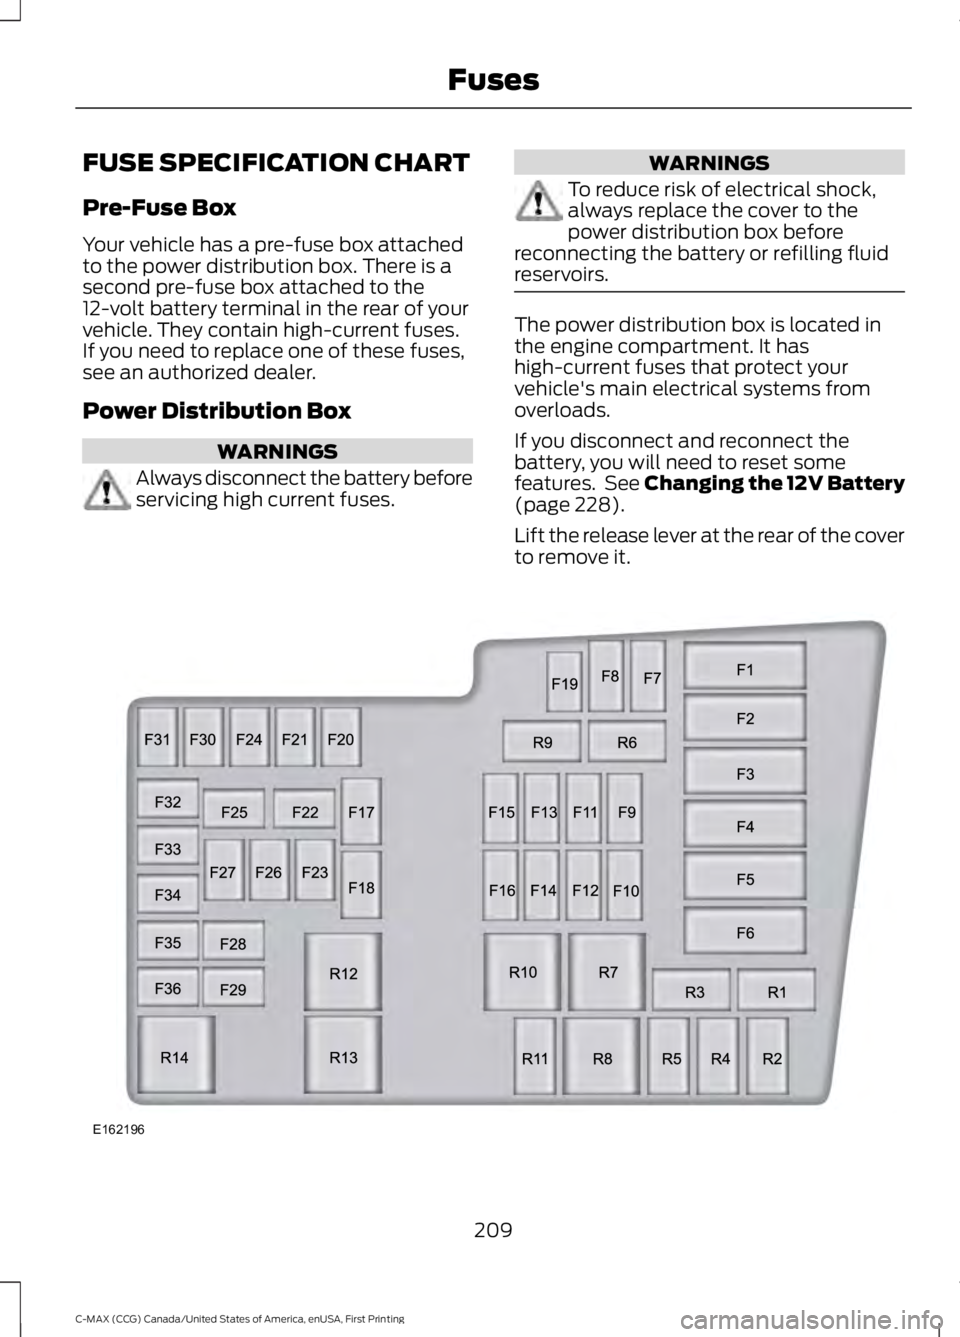
reservoirs. The power distribution box is located in
the engine compartment. It has
high-current fuses that protect your
vehicle's main electrical systems from
overloads.
If you disconnect and reconnect the
battery, you will need to reset some
features. See Changing the 12V Battery
(page 228).
Lift the release lever at the rear of the cover
to remove it. 209
C-MAX (CCG) Canada/United States of America, enUSA, First Printing FusesE162196
Page 220 of 395
Protected components
Fuse amp rating
Fuse or relay number
Fuel system.
10A
F46
Rear 15 relay.
Power relay
R1
Heated rear window.
Mini relay
R2
Fuel door (C-MAX Energi).
Micro relay
R3
Not used.
—
R4
Not used.
—
R5
Rear wiper.
Micro relay
R6
CHANGING A FUSE
Fuses WARNING
You must replace a failed fuse with
one that has the specified amperage
rating. If you use a fuse with a higher
amperage rating, you may cause severe
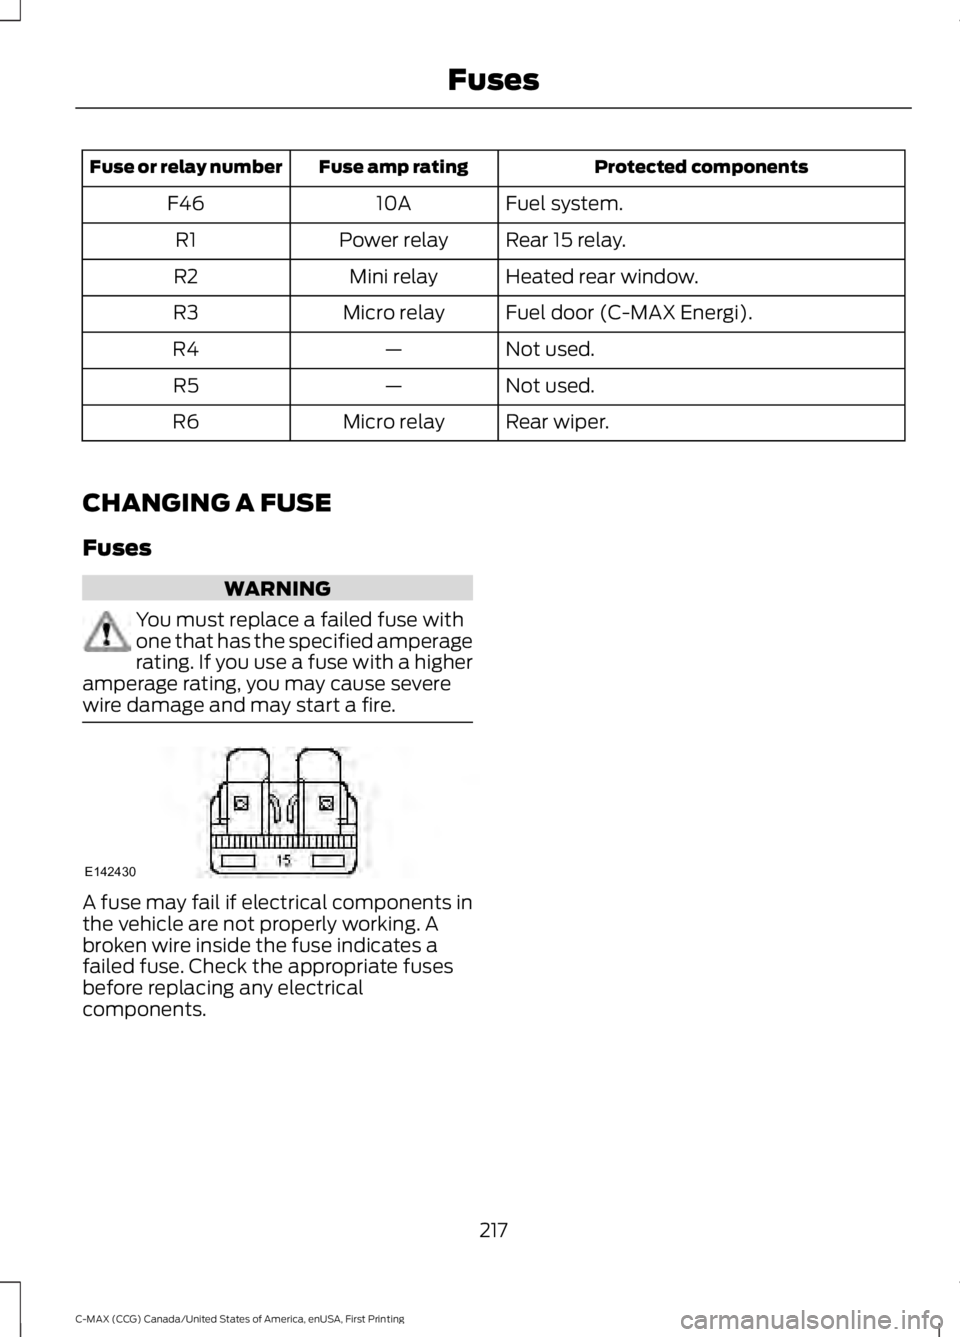
wire damage and may start a fire. A fuse may fail if electrical components in
the vehicle are not properly working. A
broken wire inside the fuse indicates a
failed fuse. Check the appropriate fuses
before replacing any electrical
components.
217
C-MAX (CCG) Canada/United States of America, enUSA, First Printing FusesE142430
Page 221 of 395
GENERAL INFORMATION
Have your vehicle serviced regularly to help
maintain its roadworthiness and resale
value. There is a large network of
authorized dealers that are there to help
you with their professional servicing
expertise. We believe that their specially
trained technicians are best qualified to
service your vehicle properly and expertly.
They are supported by a wide range of
highly specialized tools developed
specifically for servicing your vehicle.
If your vehicle requires professional service,
an authorized dealer can provide the
necessary parts and service. Check your
warranty information to find out which
parts and services are covered.
Use only recommended fuels, lubricants,
fluids and service parts conforming to
specifications. Motorcraft® parts are
designed and built to provide the best
performance in your vehicle.
Precautions
•
Do not work on a hot engine.
• Make sure that nothing gets caught in
moving parts.
• Do not work on a vehicle with the
engine running in an enclosed space,
unless you are sure you have enough
ventilation.
• Keep all open flames and other burning
material (such as cigarettes) away
from the battery and all fuel related
parts.
Working with the Engine Off
1. Set the parking brake and shift to park
(P).
2. Switch off the engine.
3. Block the wheels. Working with the Engine On WARNING
To reduce the risk of vehicle damage
and/or personal burn injuries, do not
start your engine with the air cleaner
removed and do not remove it while the
engine is running. 1.
Set the parking brake and shift to park
(P).
2. Block the wheels.
OPENING AND CLOSING THE
HOOD
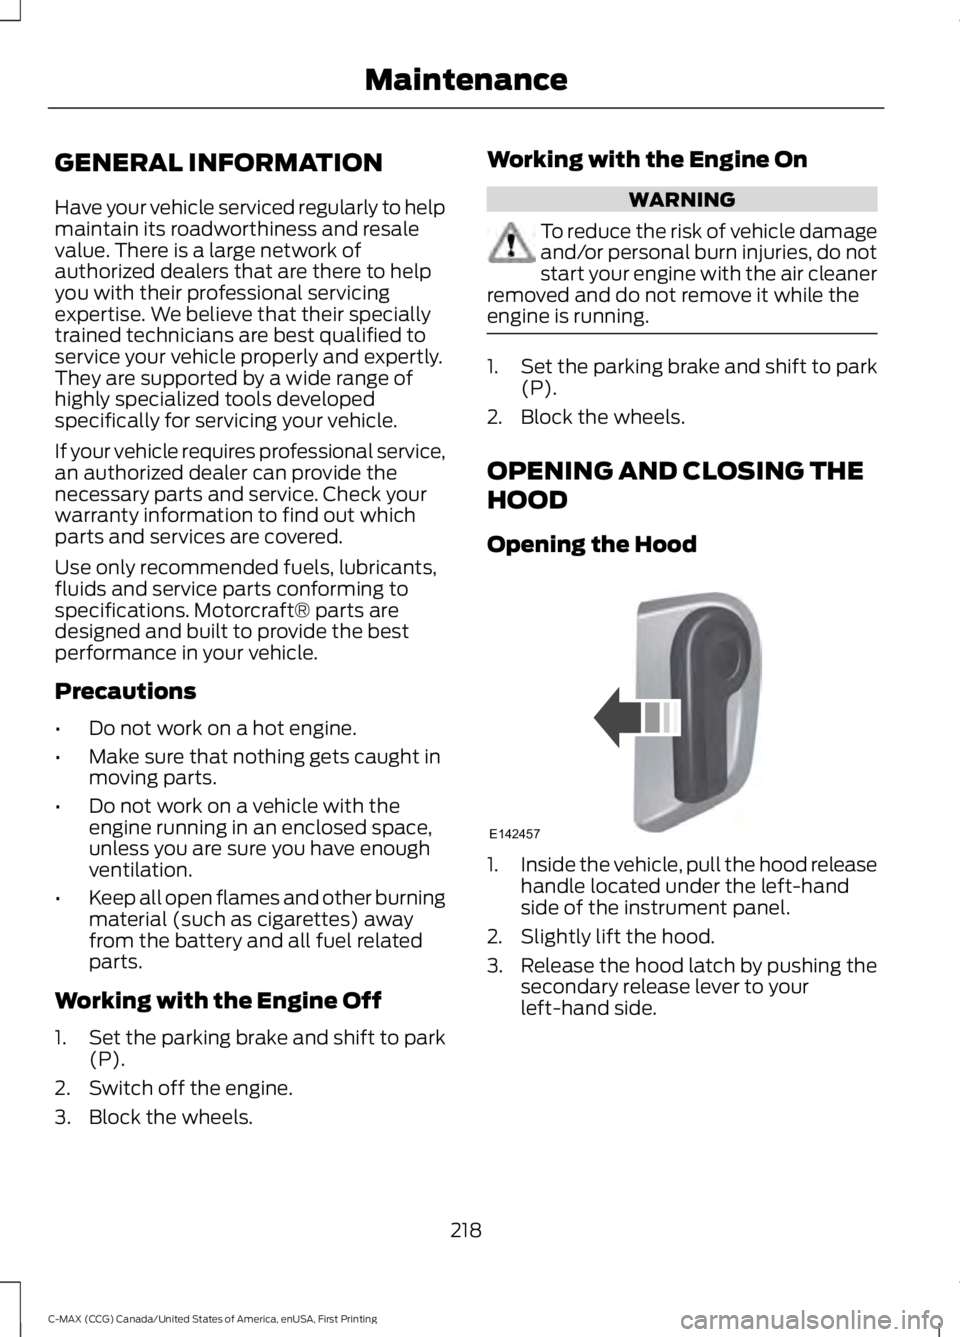
Opening the Hood 1.
Inside the vehicle, pull the hood release
handle located under the left-hand
side of the instrument panel.
2. Slightly lift the hood.
3. Release the hood latch by pushing the secondary release lever to your
left-hand side.
218
C-MAX (CCG) Canada/United States of America, enUSA, First Printing MaintenanceE142457
Page 222 of 395
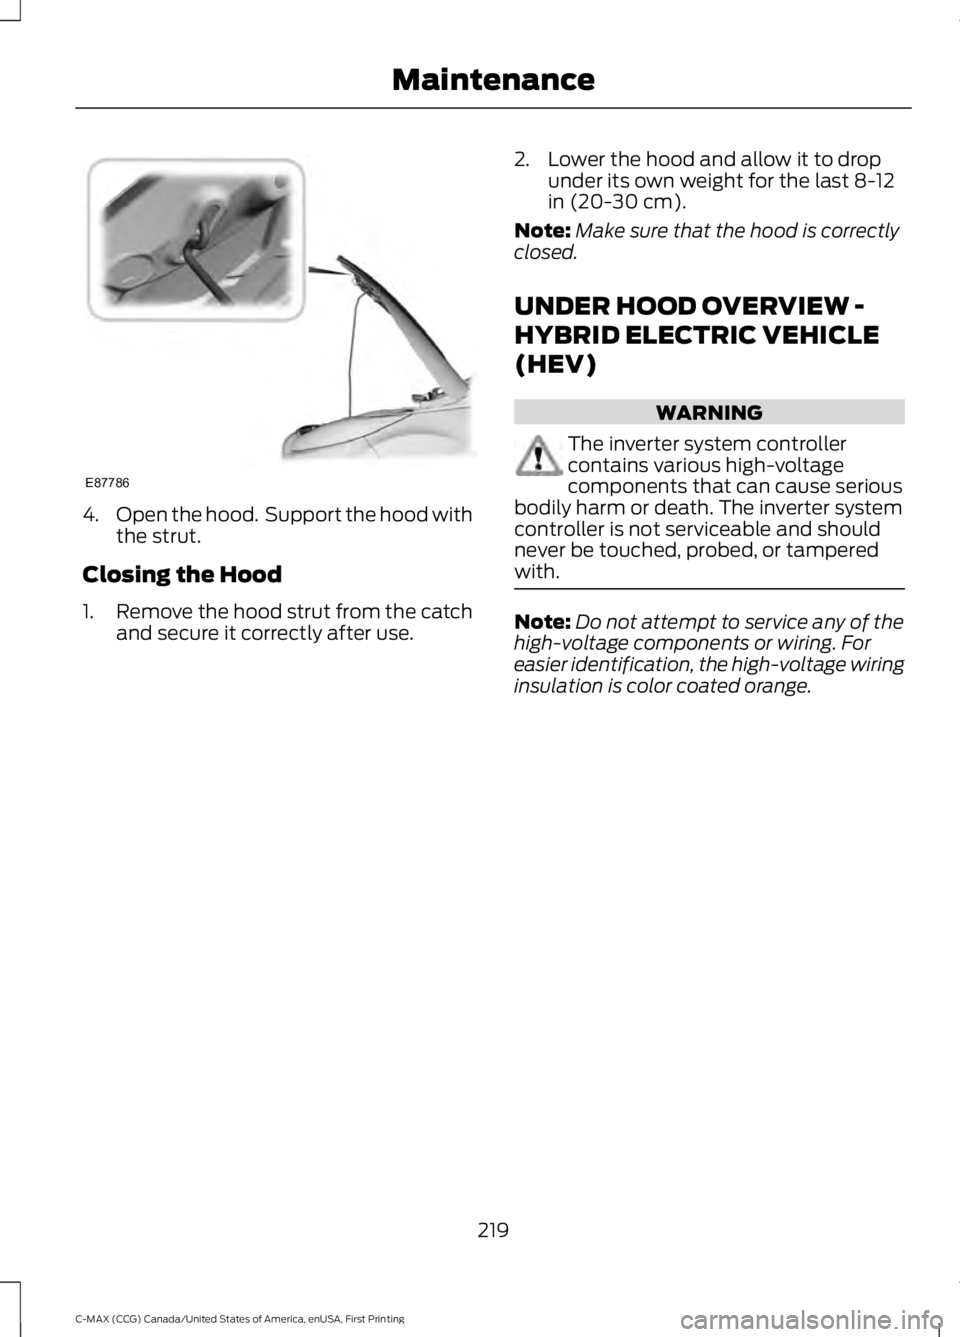
4.
Open the hood. Support the hood with
the strut.
Closing the Hood
1. Remove the hood strut from the catch
and secure it correctly after use. 2. Lower the hood and allow it to drop
under its own weight for the last 8-12
in (20-30 cm).
Note: Make sure that the hood is correctly
closed.
UNDER HOOD OVERVIEW -
HYBRID ELECTRIC VEHICLE
(HEV) WARNING
The inverter system controller
contains various high-voltage
components that can cause serious
bodily harm or death. The inverter system
controller is not serviceable and should
never be touched, probed, or tampered
with. Note:
Do not attempt to service any of the
high-voltage components or wiring. For
easier identification, the high-voltage wiring
insulation is color coated orange.
219
C-MAX (CCG) Canada/United States of America, enUSA, First Printing MaintenanceE87786
Page 224 of 395
UNDER HOOD OVERVIEW -
PLUG-IN HYBRID ELECTRIC
VEHICLE (PHEV)
WARNING
The inverter system controller
contains various high-voltage
components that can cause serious
bodily harm or death. The inverter system
controller is not serviceable and should
never be touched, probed, or tampered
with. Note:
Do not attempt to service any of the
high-voltage components or wiring. For
easier identification, the high-voltage wiring
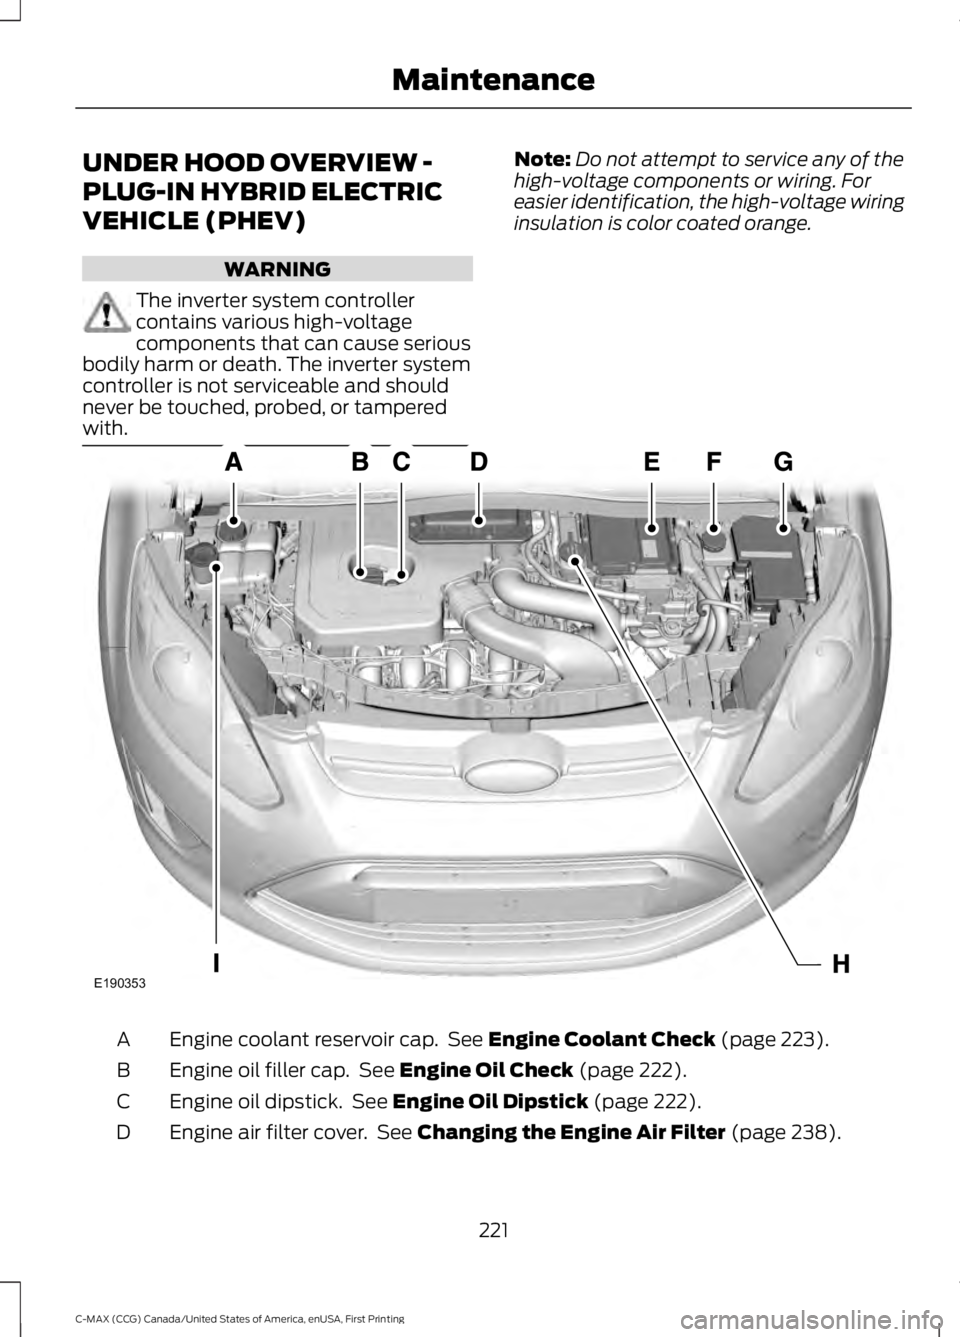
insulation is color coated orange. Engine coolant reservoir cap. See Engine Coolant Check (page 223).
A
Engine oil filler cap. See
Engine Oil Check (page 222).
B
Engine oil dipstick. See
Engine Oil Dipstick (page 222).
C
Engine air filter cover. See
Changing the Engine Air Filter (page 238).
D
221
C-MAX (CCG) Canada/United States of America, enUSA, First Printing MaintenanceE190353
Page 226 of 395
Low Engine Use (If Equipped)
The low engine use mode is equipped on
Energi models only. The low engine use
mode keeps the engine oil quality in good
condition when you drive your vehicle with
limited engine use. If your vehicle is in low
engine use mode when you start the
vehicle, a message appears in the
information display. When your vehicle is
in low engine use mode, your vehicle runs
the engine as necessary.
Selecting EV Now mode when your vehicle
is in the low engine use mode suspends
the low engine use mode for as long as you
continue driving your vehicle. The low
engine use mode resumes the next time
you start your vehicle.
Changing the engine oil and resetting the
oil life monitoring system suspends the low
engine use mode.
ENGINE COOLANT CHECK WARNINGS
Do not add engine coolant when the
engine is hot. Steam and scalding
liquids released from a hot cooling
system can burn you badly. Also, you can
be burned if you spill coolant on hot engine
parts. Do not put engine coolant in the
windshield washer fluid container. If
sprayed on the windshield, engine
coolant could make it difficult to see
through the windshield. To reduce the risk of personal injury,
make sure the engine is cool before
unscrewing the coolant pressure
relief cap. The cooling system is under
pressure; steam and hot liquid can come
out forcefully when the cap is loosened
slightly. Do not add coolant further than the
MAX
mark. Engine Coolant and Inverter
System Controller Coolant
Your vehicle has two separate cooling
systems. One is for cooling the engine and
one is for cooling the inverter system
controller that is specific to the hybrid
operating system. The two systems
operate similarly, with the inverter system
controller cooling system generally
operating at a lower temperature and
pressure.
Checking the Engine Coolant
When the engine is cold, check the
concentration and level of the engine
coolant at the intervals listed in the
scheduled maintenance information. See
Scheduled Maintenance
(page 348).
Note: Make sure that the level is between
the MIN and MAX marks on the engine
coolant reservoir.
Note: Coolant expands when it is hot. The
level may extend beyond the MAX mark.
Note: If the level is at the MIN mark, below
the MIN mark, or empty, add coolant
immediately. See
Adding Engine Coolant
in this chapter.
The coolant concentration should be
maintained within 48% to 50%, which
equates to a freeze point between -30°F
(-34°C) and -34°F (-37°C).
Note: For best results, coolant
concentration should be tested with a
refractometer such as Robinair® Coolant
and Battery Refractometer 75240. We do
not recommend the use of hydrometers or
coolant test strips for measuring coolant
concentrations.
Note: Automotive fluids are not
interchangeable. Do not use engine coolant
or antifreeze or windshield washer fluid
outside of its specified function and vehicle
location.
223
C-MAX (CCG) Canada/United States of America, enUSA, First Printing Maintenance
Page 229 of 395
Vehicles driven year-round in non-extreme
climates should use coolant meeting the
Ford specification for optimum cooling
system and engine protection.
What You Should Know About Fail-
Safe Cooling
If the engine coolant supply is depleted,
this feature allows the vehicle to be driven
temporarily before incremental component
damage is incurred. The
“fail-safe”
distance depends on ambient
temperatures, vehicle load and terrain.
How Fail-Safe Cooling Works
If the engine begins to overheat, the engine
coolant temperature gauge will move to
the red (hot) area and: The coolant temperature
warning light will illuminate.
The service engine soon
indicator will illuminate.
If the engine reaches a preset
over-temperature condition, the engine
will automatically switch to alternating
cylinder operation. Each disabled cylinder
acts as an air pump and cools the engine.
When this occurs the vehicle will still
operate. However:
• The engine power will be limited.
• The air conditioning system will be
disabled.
Continued operation will increase the
engine temperature and the engine will
completely shut down, causing steering
and braking effort to increase.
Once the engine temperature cools, the
engine can be re-started. Take your vehicle
to an authorized dealer as soon as possible
to minimize engine damage. When Fail-Safe Mode Is Activated WARNINGS
Fail-safe mode is for use during
emergencies only. Operate your
vehicle in fail-safe mode only as long
as necessary to bring your vehicle to rest
in a safe location and seek immediate
repairs. When in fail-safe mode, your
vehicle will have limited power, will not be
able to maintain high-speed operation, and
may completely shut down without
warning, potentially losing engine power,
power steering assist, and power brake
assist, which may increase the possibility
of a crash resulting in serious injury. Never remove the coolant reservoir
cap while the engine is running or hot.
Note:
Driving the vehicle without repairing
the engine problem increases the chance of
engine damage. Take your vehicle to an
authorized dealer as soon as possible.
You have limited engine power when in the
fail-safe mode, so drive the vehicle with
caution. The vehicle will not be able to
maintain high-speed operation and the
engine will run rough. Remember that the
engine is capable of completely shutting
down automatically to prevent engine
damage, therefore:
1. Pull off the road as soon as safely possible and turn off the engine.
2. Arrange for the vehicle to be taken to an authorized dealer.
3. If this is not possible, wait a short period for the engine to cool.
4. Check the coolant level and replenish if low.
5. Re-start the engine and take your vehicle to an authorized dealer.
226
C-MAX (CCG) Canada/United States of America, enUSA, First Printing Maintenance