check engine FORD C MAX 2016 User Guide
[x] Cancel search | Manufacturer: FORD, Model Year: 2016, Model line: C MAX, Model: FORD C MAX 2016Pages: 395, PDF Size: 5.78 MB
Page 133 of 395
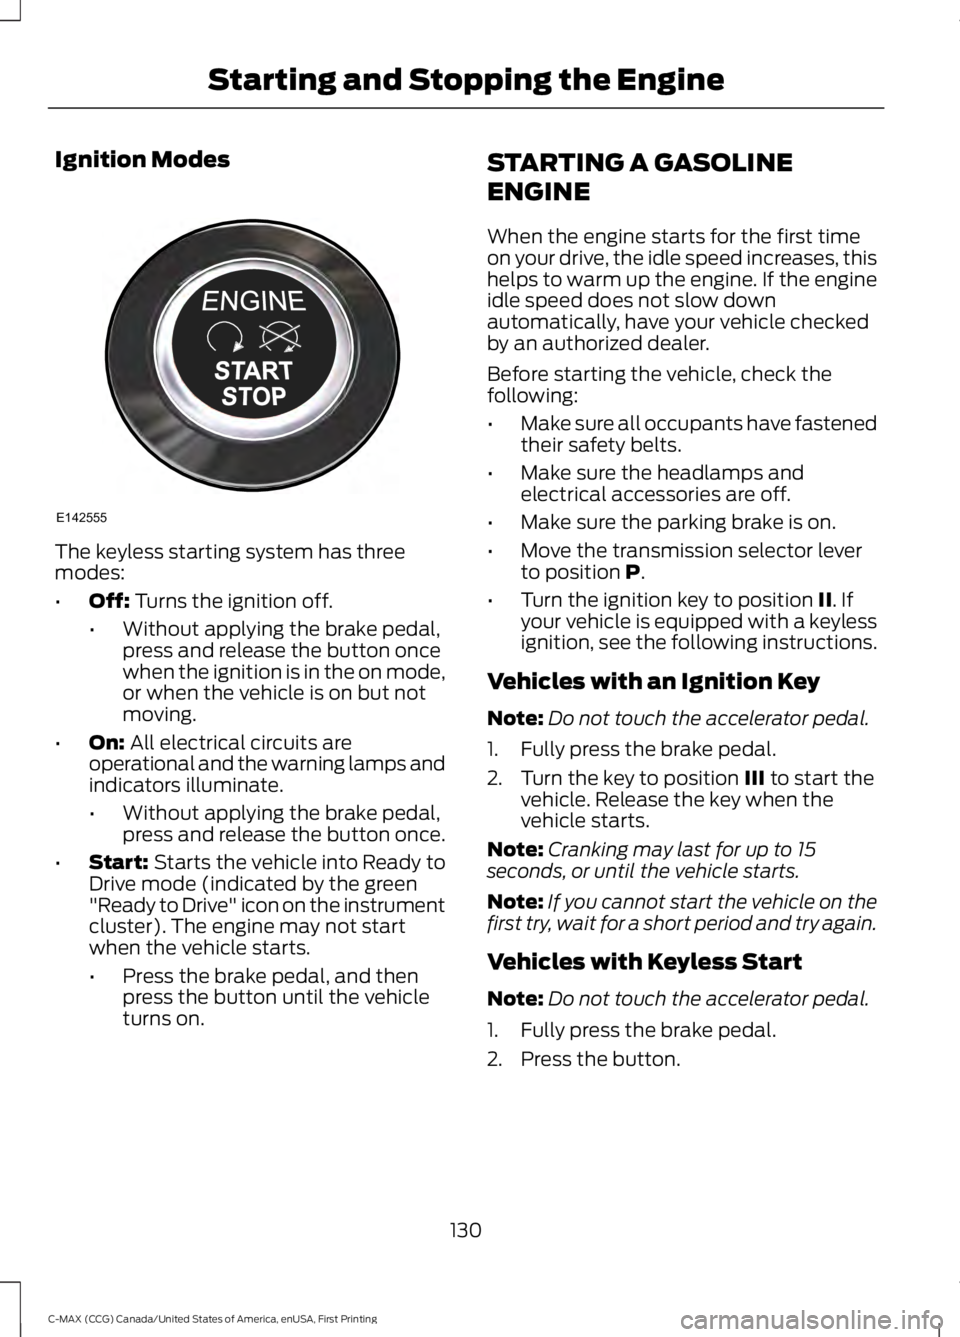
Ignition Modes
The keyless starting system has three
modes:
•
Off: Turns the ignition off.
• Without applying the brake pedal,
press and release the button once
when the ignition is in the on mode,
or when the vehicle is on but not
moving.
• On:
All electrical circuits are
operational and the warning lamps and
indicators illuminate.
• Without applying the brake pedal,
press and release the button once.
• Start:
Starts the vehicle into Ready to
Drive mode (indicated by the green
"Ready to Drive" icon on the instrument
cluster). The engine may not start
when the vehicle starts.
• Press the brake pedal, and then
press the button until the vehicle
turns on. STARTING A GASOLINE
ENGINE
When the engine starts for the first time
on your drive, the idle speed increases, this
helps to warm up the engine. If the engine
idle speed does not slow down
automatically, have your vehicle checked
by an authorized dealer.
Before starting the vehicle, check the
following:
•
Make sure all occupants have fastened
their safety belts.
• Make sure the headlamps and
electrical accessories are off.
• Make sure the parking brake is on.
• Move the transmission selector lever
to position
P.
• Turn the ignition key to position
II. If
your vehicle is equipped with a keyless
ignition, see the following instructions.
Vehicles with an Ignition Key
Note: Do not touch the accelerator pedal.
1. Fully press the brake pedal.
2. Turn the key to position
III to start the
vehicle. Release the key when the
vehicle starts.
Note: Cranking may last for up to 15
seconds, or until the vehicle starts.
Note: If you cannot start the vehicle on the
first try, wait for a short period and try again.
Vehicles with Keyless Start
Note: Do not touch the accelerator pedal.
1. Fully press the brake pedal.
2. Press the button.
130
C-MAX (CCG) Canada/United States of America, enUSA, First Printing Starting and Stopping the EngineE142555
Page 135 of 395
Switching Off the Vehicle When It
Is Moving
WARNING
Switching off the engine when the
vehicle is still moving will result in a
loss of brake and steering assistance.
The steering will not lock, but higher effort
will be required. When the ignition is
switched off, some electrical circuits,
including air bags, warning lamps and
indicators may also be off. If the ignition
was turned off accidentally, you can shift
into neutral (N) and re-start the engine. Vehicles with an Ignition Key
1. Move the transmission selector lever
to position N and use the brakes to
bring your vehicle to a safe stop.
2. When your vehicle has stopped, move the transmission selector lever to
position
P and turn the key to position
0.
3. Apply the parking brake.
Vehicles with Keyless Start
1. Move the transmission selector lever to position
N and use the brakes to
bring your vehicle to a safe stop.
2. When your vehicle has stopped, move the transmission selector lever to
position
P.
3. Press and hold the button for one second, or press it three times within
two seconds.
4. Apply the parking brake. Guarding Against Exhaust Fumes WARNING
If you smell exhaust fumes inside
your vehicle, have your vehicle
checked by your authorized dealer
immediately. Do not drive your vehicle if
you smell exhaust fumes. Carbon
monoxide is present in exhaust fumes.
Take precautions to avoid its dangerous
effects. Important Ventilating Information
If you stop your vehicle and leave it idling
for long periods, we recommend that you
do one of the following:
•
Open the windows at least
1 in
(2.5 cm).
• Set your climate control to outside air.
ENGINE BLOCK HEATER
(If
Equipped) WARNINGS
Failure to follow engine block heater
instructions could result in property
damage or serious personal injury.
Do not use your heater with
ungrounded electrical systems or
two-pronged adapters. There is a risk
of electrical shock. Do not fully close the hood, or allow
it to drop under its own weight when
using the engine block heater. This
could damage the power cable and may
cause an electrical short resulting in fire,
injury and property damage. Note:
The heater is most effective when
outdoor temperatures are below 0°F
(-18°C).
132
C-MAX (CCG) Canada/United States of America, enUSA, First Printing Starting and Stopping the Engine
Page 136 of 395
The heater acts as a starting aid by
warming the engine coolant. This allows
the climate control system to respond
quickly. The equipment includes a heater
element (installed in the engine block) and
a wire harness. You can connect the
system to a grounded 120-volt AC
electrical source.
We recommend that you do the following
for a safe and correct operation:
•
Use a 16-gauge outdoor extension cord
that is product certified by
Underwriter ’s Laboratory (UL) or
Canadian Standards Association
(CSA). This extension cord must be
suitable for use outdoors, in cold
temperatures, and be clearly marked
Suitable for Use with Outdoor
Appliances. Do not use an indoor
extension cord outdoors. This could
result in an electric shock or become a
fire hazard.
• Use as short an extension cord as
possible.
• Do not use multiple extension cords.
• Make sure that when in operation, the
extension cord plug and heater cord
plug connections are free and clear of
water. This could cause an electric
shock or fire.
• Make sure your vehicle is parked in a
clean area, clear of combustibles.
• Make sure the heater, heater cord and
extension cord are firmly connected.
• Check for heat anywhere in the
electrical hookup once the system has
been operating for approximately 30
minutes. •
Make sure the system is unplugged and
properly stowed before starting and
driving your vehicle. Make sure the
protective cover seals the prongs of the
block heater cord plug when not in use.
• Make sure the heater system is
checked for proper operation before
winter.
Using the Engine Block Heater
Make sure the receptacle terminals are
clean and dry prior to use. Clean them with
a dry cloth if necessary.
The heater uses 0.4 to 1.0 kilowatt-hours
of energy per hour of use. The system does
not have a thermostat. It achieves
maximum temperature after
approximately three hours of operation.
Using the heater longer than three hours
does not improve system performance and
unnecessarily uses electricity.
AUTOMATIC ENGINE
SHUTDOWN
For vehicles with a keyless ignition, this
automatically shuts down your vehicle if
it has been idling for an extended period.
The ignition also turns off to save battery
power. Before your vehicle shuts down, a
message appears in the information
display showing a timer counting down. If
you do not intervene within 30 seconds,
your vehicle shuts down. Start your vehicle
as normal.
Automatic Engine Shutdown Override
Note: You cannot permanently switch off
the automatic shutdown. When you switch
it off temporarily, it turns on at the next
ignition cycle.
133
C-MAX (CCG) Canada/United States of America, enUSA, First Printing Starting and Stopping the Engine
Page 155 of 395
4. Driving through deep water
—the
electrical system may be wet.
You can correct these temporary
malfunctions by filling the fuel tank with
good quality fuel, properly closing the fuel
fill inlet or letting the electrical system dry
out. After three driving cycles without these
or any other temporary malfunctions
present, the service engine soon indicator
should stay off the next time you start the
engine. A driving cycle consists of a cold
engine startup followed by mixed city and
highway driving. No additional vehicle
service is required.
If the service engine soon indicator remains
on, have your vehicle serviced at the first
available opportunity. Although some
malfunctions detected by the OBD-II may
not have symptoms that are apparent,
continued driving with the service engine
soon indicator on can result in increased
emissions, lower fuel economy, reduced
engine and transmission smoothness and
lead to more costly repairs.
Readiness for Inspection and
Maintenance (I/M) Testing
Some state and provincial and local
governments may have
Inspection/Maintenance (I/M) programs
to inspect the emission control equipment
on your vehicle. Failure to pass this
inspection could prevent you from getting
a vehicle registration. If the service engine soon
indicator is on or the bulb does
not work, your vehicle may need
service. See On-Board Diagnostics. Your vehicle may not pass the I/M test if
the service engine soon indicator is on or
not working properly (bulb is burned out),
or if the OBD-II system has determined
that some of the emission control systems
have not been properly checked. In this
case, the vehicle is not ready for I/M
testing.
If the vehicle
’s engine or transmission has
just been serviced, or the battery has
recently run down or been replaced, the
OBD-II system may indicate that the
vehicle is not ready for I/M testing. To
determine if the vehicle is ready for I/M
testing, turn the ignition key to the on
position for 15 seconds without cranking
the engine. If the service engine soon
indicator blinks eight times, it means that
the vehicle is not ready for I/M testing; if
the service engine soon indicator stays on
solid, it means that your vehicle is ready
for I/M testing.
The OBD-II system checks the emission
control system during normal driving. A
complete check may take several days.
If the vehicle is not ready for I/M testing,
you can perform the following driving cycle
consisting of mixed city and highway
driving:
1. 15 minutes of steady driving on an expressway or highway followed by 20
minutes of stop-and-go driving with at
least four 30-second idle periods.
2. Allow your vehicle to sit for at least eight hours with the ignition off. Then,
start the vehicle and complete the
above driving cycle. The vehicle must
warm up to its normal operating
temperature. Once started, do not turn
off the vehicle until the above driving
cycle is complete.
If the vehicle is still not ready for I/M
testing, you need to repeat the above
driving cycle.
152
C-MAX (CCG) Canada/United States of America, enUSA, First Printing Fuel and Refueling
Page 167 of 395
GENERAL INFORMATION
Note:
Occasional brake noise is normal. If
a metal-to-metal, continuous grinding or
continuous squeal sound is present, the
brake linings may be worn-out. Have the
system checked by an authorized dealer. If
the vehicle has continuous vibration or
shudder in the steering wheel while braking,
have it checked by an authorized dealer.
Note: Brake dust may accumulate on the
wheels, even under normal driving
conditions. Some dust is inevitable as the
brakes wear and does not contribute to
brake noise. See Cleaning the Alloy
Wheels (page 245). See
Warning Lamps and
Indicators (page 89).
Wet brakes result in reduced braking
efficiency. Gently press the brake pedal a
few times when driving from a car wash or
standing water to dry the brakes.
Brake Over Accelerator
In the event the accelerator pedal
becomes stuck or entrapped, apply steady
and firm pressure to the brake pedal to
slow the vehicle and reduce engine power.
If you experience this condition, apply the
brakes and bring your vehicle to a safe
stop. Move the transmission to park (P),
switch the engine off and apply the parking
brake. Inspect the accelerator pedal for
any interference. If none are found and the
condition persists, have your vehicle towed
to the nearest authorized dealer.
Brake Assist
Brake assist detects when you brake
heavily by measuring the rate at which you
press the brake pedal. It provides
maximum braking efficiency as long as you
press the pedal. Brake assist can reduce
stopping distances in critical situations. Anti-lock Brake System
This system helps you maintain steering
control during emergency stops by keeping
the brakes from locking. This lamp momentarily
illuminates when you turn the
ignition on. If the light does not
illuminate during start up, remains on or
flashes, the system may be disabled. Have
the system checked by an authorized
dealer. If the anti-lock brake system is
disabled, normal braking is still effective. If the brake warning lamp
illuminates when you release the
parking brake, have the system
checked by an authorized dealer.
Regenerative Braking System
This feature is used to simulate the engine
braking of an internal combustion engine
and assist the standard brake system while
recovering some of the energy of motion
and storing it in the battery to improve the
range of your vehicle. The standard brake
system is designed to fully stop the car if
regenerative braking is not available.
During regenerative braking, the motor is
spun as a generator to create electrical
current. This recharges the battery and
slows the vehicle. In effect, once the
accelerator pedal is released, the motor
changes from an energy user to an energy
producer.
When the accelerator pedal is released or
the brake pedal is applied, the brake
controller automatically detects the
amount of deceleration requested and
optimizes how much of the deceleration
will be produced by regenerative braking.
The remaining portion is generated by
164
C-MAX (CCG) Canada/United States of America, enUSA, First Printing BrakesE144522 E144522
Page 196 of 395
•
Perform all regularly scheduled
maintenance. See Scheduled
Maintenance (page 348).
• Use the coach and brake coach display
to get feedback on your economical
drive style. For more information, See
Information Displays
(page 93).
Avoid these actions because they reduce
your fuel economy:
• Avoid sudden or hard accelerations and
decelerations. Accelerate and slow
down in a smooth, moderate fashion.
• Avoid revving the engine before
switching off your vehicle.
• Avoid long idle periods.
• Do not warm up your vehicle on cold
mornings.
• Do not rest your foot on the brake
pedal while driving.
• Avoid carrying unnecessary weight.
Approximately 1 mile per gallon (0.4
kilometers per liter) is lost for every
400 lb (180 kg)
of weight carried.
• Avoid adding accessories that increase
aerodynamic drag to your vehicle such
as bug deflectors, car top carriers and
ski or bike racks.
• Avoid driving with the wheels out of
alignment.
Things to keep in mind when you refuel
your vehicle:
• Fuel generates fewer vapors when it is
cool and dark outside. Refuel your
vehicle in the early morning or late
evening.
• Use the recommended octane-rated
fuel. Using fuel below the
recommended rating will lower your
fuel economy. DRIVING THROUGH WATER WARNING
Do not drive through flowing or deep
water as you may lose control of your
vehicle.
Note:
Driving through standing water can
cause vehicle damage.
Note: Engine damage can occur if water
enters the air filter.
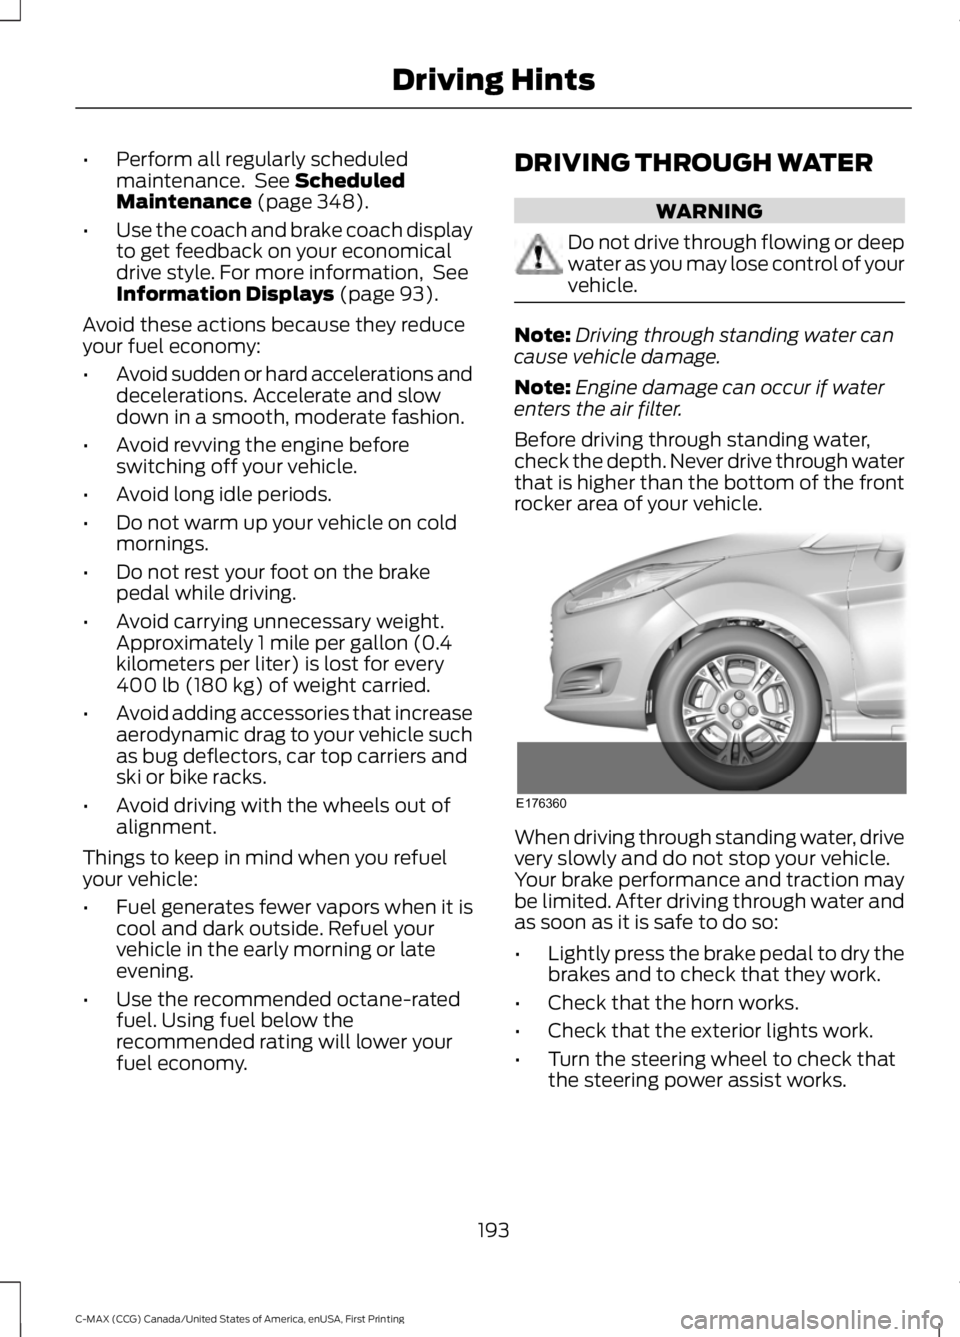
Before driving through standing water,
check the depth. Never drive through water
that is higher than the bottom of the front
rocker area of your vehicle. When driving through standing water, drive
very slowly and do not stop your vehicle.
Your brake performance and traction may
be limited. After driving through water and
as soon as it is safe to do so:
•
Lightly press the brake pedal to dry the
brakes and to check that they work.
• Check that the horn works.
• Check that the exterior lights work.
• Turn the steering wheel to check that
the steering power assist works.
193
C-MAX (CCG) Canada/United States of America, enUSA, First Printing Driving HintsE176360
Page 199 of 395
This program is separate from the New
Vehicle Limited Warranty, but the coverage
is concurrent with the powertrain coverage
period of your vehicle.
Canadian customers who require roadside
assistance, call 1-800-665-2006.
Vehicles Sold in Canada: Using
Roadside Assistance
Complete the roadside assistance
identification card and place it in your
wallet for quick reference.
In Canada, this card is found in the
Warranty Guide in the glove compartment
of your vehicle.
Vehicles Sold in Canada: Roadside
Assistance Program Coverage
The service is available 24 hours a day,
seven days a week.
Canadian roadside coverage and benefits
may differ from the U.S. coverage.
For complete program coverage details
you may contact your dealer, you can call
us in Canada at 1-800-665-2006, or visit
our website at www.ford.ca.
HAZARD WARNING FLASHERS
Note:
If used when the vehicle is not
running, the battery will lose charge. There
may be insufficient power to restart your
vehicle. The hazard warning button is
located on the instrument panel.
Use it when your vehicle is
creating a safety hazard for other
motorists.
• Press the button to turn on the hazard
warning function, and the front and
rear direction indicators will flash.
• Press the button again to turn them
off. FUEL SHUTOFF WARNING
Failure to inspect and, if necessary,
repair fuel leaks after a collision may
increase the risk of fire and serious
injury. Ford Motor Company recommends
that the fuel system be inspected by an
authorized dealer after any collision. In the event of a moderate to severe
collision, this vehicle has a fuel pump
shut-off feature that stops the flow of fuel
to the engine. Not every impact will cause
a shut-off.
Should your vehicle shut off after a
collision, you may restart your vehicle.
For vehicles equipped with a key system:
1. Switch off the ignition.
2. Switch on the ignition.
3. Check the information display for the
Ready to Drive light as the gasoline
engine may not start, but the electric
motor may be running. If you do not see
the Ready to Drive light, repeat Steps
1 and 2 up to two more times.
For vehicles equipped with a push button
start system:
1. Press the push button start to switch off the ignition.
2. Press the brake pedal and press the push button start to switch on the
ignition.
3. Check the information display for the Ready to Drive light as the gasoline
engine may not start, but the electric
motor may be running. If you do not see
the Ready to Drive light, repeat Steps
1 and 2 up to two more times.
196
C-MAX (CCG) Canada/United States of America, enUSA, First Printing Roadside Emergencies
Page 200 of 395
Note:
When you try to restart your vehicle
after a fuel shutoff, the vehicle makes sure
that the electrical system is safe to restart.
Once your vehicle determines that the
electrical system is safe, then the vehicle
will allow you to restart.
Note: In the event that your vehicle does
not restart after your third attempt, contact
an authorized dealer.
JUMP STARTING THE VEHICLE WARNINGS
The gases around the battery can
explode if exposed to flames, sparks
or lit cigarettes. An explosion could
result in injury or vehicle damage. Batteries contain sulfuric acid which
can burn skin, eyes and clothing, if
contacted.
Do not attempt to push-start your
automatic transmission vehicle. Automatic
transmissions do not have push-start
capability. Attempting to push-start a
vehicle with an automatic transmission
may cause transmission damage.
Preparing Your Vehicle
Note:
Use only a 12-volt supply to start your
vehicle.
Note: Do not disconnect the battery of the
disabled vehicle as this could damage the
vehicle's electrical system.
1. Park the booster vehicle close to the hood of the disabled vehicle making
sure the two vehicles do not touch. Set
the parking brake on both vehicles and
stay clear of the engine cooling fan and
other moving parts.
2. Check all battery terminals and remove
any excessive corrosion before you
attach the battery cables. Ensure that
vent caps are tight and level. 3.
Turn the heater fan on in both vehicles
to protect from any electrical surges.
Turn all other accessories off.
Connecting the Jumper Cables
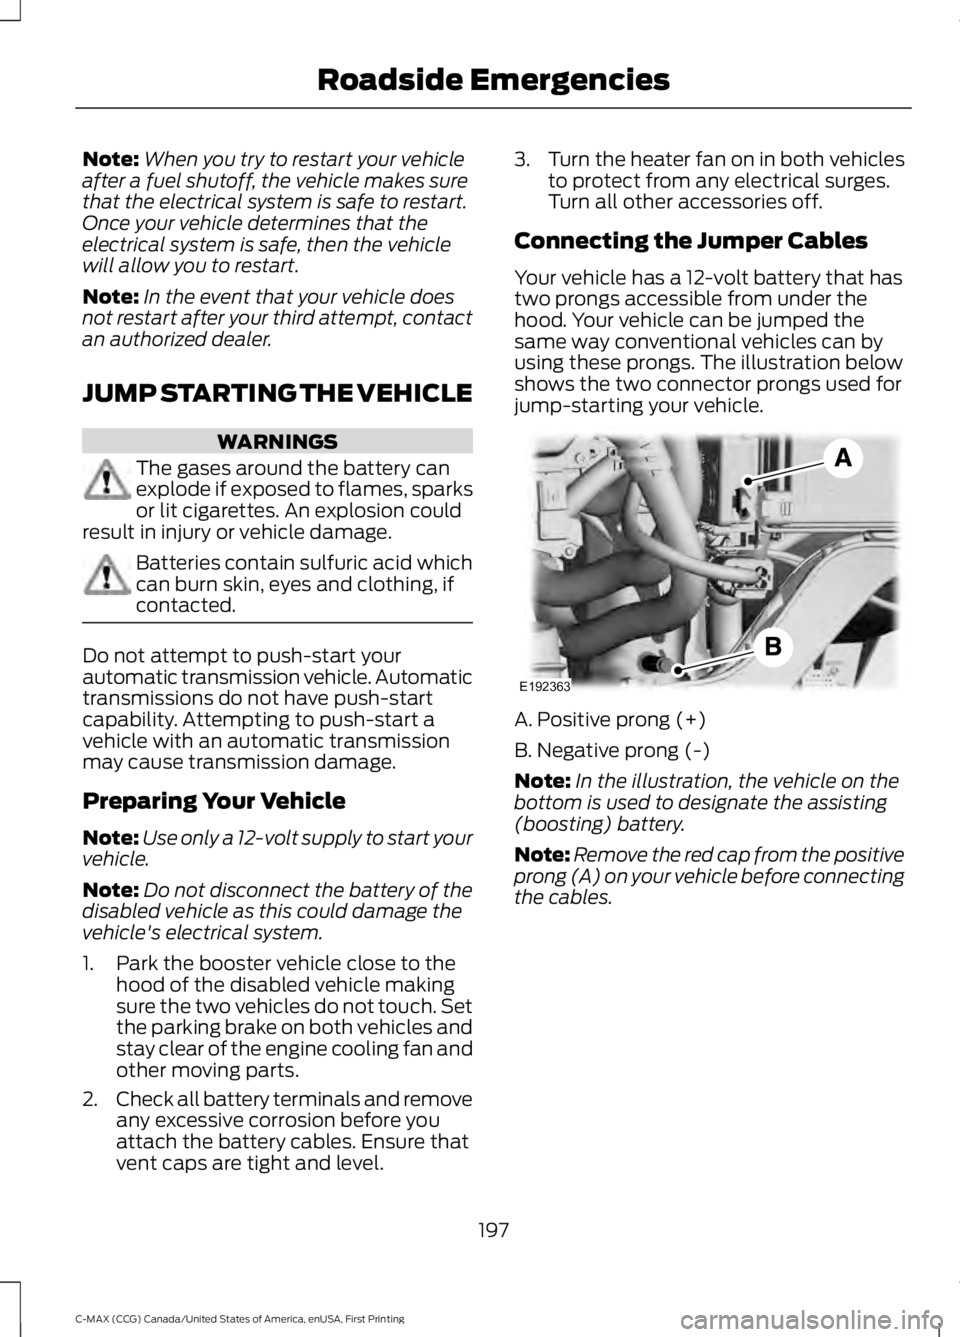
Your vehicle has a 12-volt battery that has
two prongs accessible from under the
hood. Your vehicle can be jumped the
same way conventional vehicles can by
using these prongs. The illustration below
shows the two connector prongs used for
jump-starting your vehicle. A. Positive prong (+)
B. Negative prong (-)
Note:
In the illustration, the vehicle on the
bottom is used to designate the assisting
(boosting) battery.
Note: Remove the red cap from the positive
prong (A) on your vehicle before connecting
the cables.
197
C-MAX (CCG) Canada/United States of America, enUSA, First Printing Roadside EmergenciesE192363
Page 201 of 395
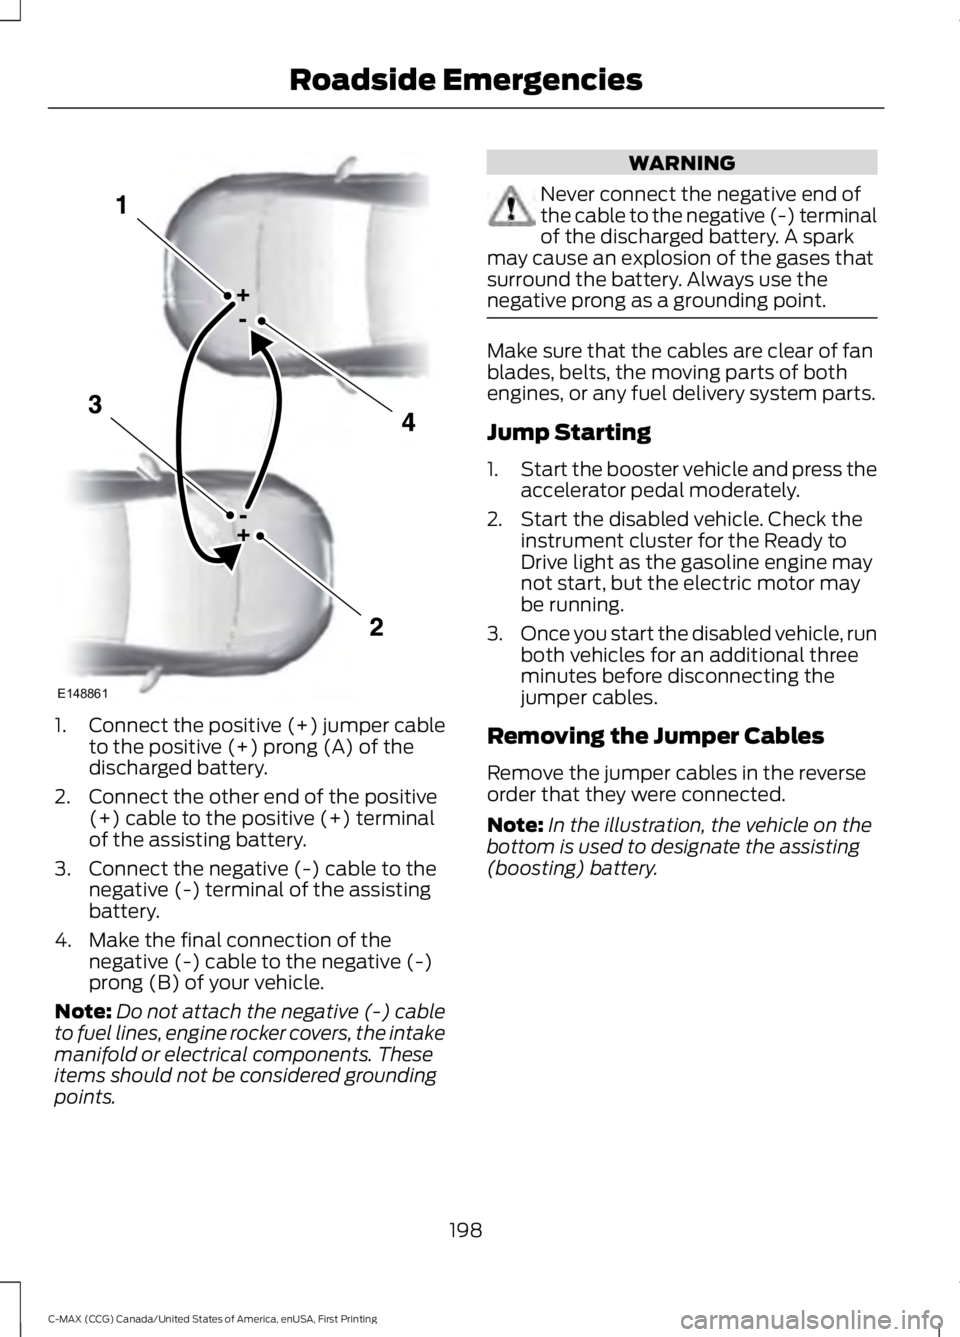
1.
Connect the positive (+) jumper cable
to the positive (+) prong (A) of the
discharged battery.
2. Connect the other end of the positive (+) cable to the positive (+) terminal
of the assisting battery.
3. Connect the negative (-) cable to the negative (-) terminal of the assisting
battery.
4. Make the final connection of the negative (-) cable to the negative (-)
prong (B) of your vehicle.
Note: Do not attach the negative (-) cable
to fuel lines, engine rocker covers, the intake
manifold or electrical components. These
items should not be considered grounding
points. WARNING
Never connect the negative end of
the cable to the negative (-) terminal
of the discharged battery. A spark
may cause an explosion of the gases that
surround the battery. Always use the
negative prong as a grounding point. Make sure that the cables are clear of fan
blades, belts, the moving parts of both
engines, or any fuel delivery system parts.
Jump Starting
1.
Start the booster vehicle and press the
accelerator pedal moderately.
2. Start the disabled vehicle. Check the instrument cluster for the Ready to
Drive light as the gasoline engine may
not start, but the electric motor may
be running.
3. Once you start the disabled vehicle, run
both vehicles for an additional three
minutes before disconnecting the
jumper cables.
Removing the Jumper Cables
Remove the jumper cables in the reverse
order that they were connected.
Note: In the illustration, the vehicle on the
bottom is used to designate the assisting
(boosting) battery.
198
C-MAX (CCG) Canada/United States of America, enUSA, First Printing Roadside EmergenciesE148861
Page 221 of 395
GENERAL INFORMATION
Have your vehicle serviced regularly to help
maintain its roadworthiness and resale
value. There is a large network of
authorized dealers that are there to help
you with their professional servicing
expertise. We believe that their specially
trained technicians are best qualified to
service your vehicle properly and expertly.
They are supported by a wide range of
highly specialized tools developed
specifically for servicing your vehicle.
If your vehicle requires professional service,
an authorized dealer can provide the
necessary parts and service. Check your
warranty information to find out which
parts and services are covered.
Use only recommended fuels, lubricants,
fluids and service parts conforming to
specifications. Motorcraft® parts are
designed and built to provide the best
performance in your vehicle.
Precautions
•
Do not work on a hot engine.
• Make sure that nothing gets caught in
moving parts.
• Do not work on a vehicle with the
engine running in an enclosed space,
unless you are sure you have enough
ventilation.
• Keep all open flames and other burning
material (such as cigarettes) away
from the battery and all fuel related
parts.
Working with the Engine Off
1. Set the parking brake and shift to park
(P).
2. Switch off the engine.
3. Block the wheels. Working with the Engine On WARNING
To reduce the risk of vehicle damage
and/or personal burn injuries, do not
start your engine with the air cleaner
removed and do not remove it while the
engine is running. 1.
Set the parking brake and shift to park
(P).
2. Block the wheels.
OPENING AND CLOSING THE
HOOD
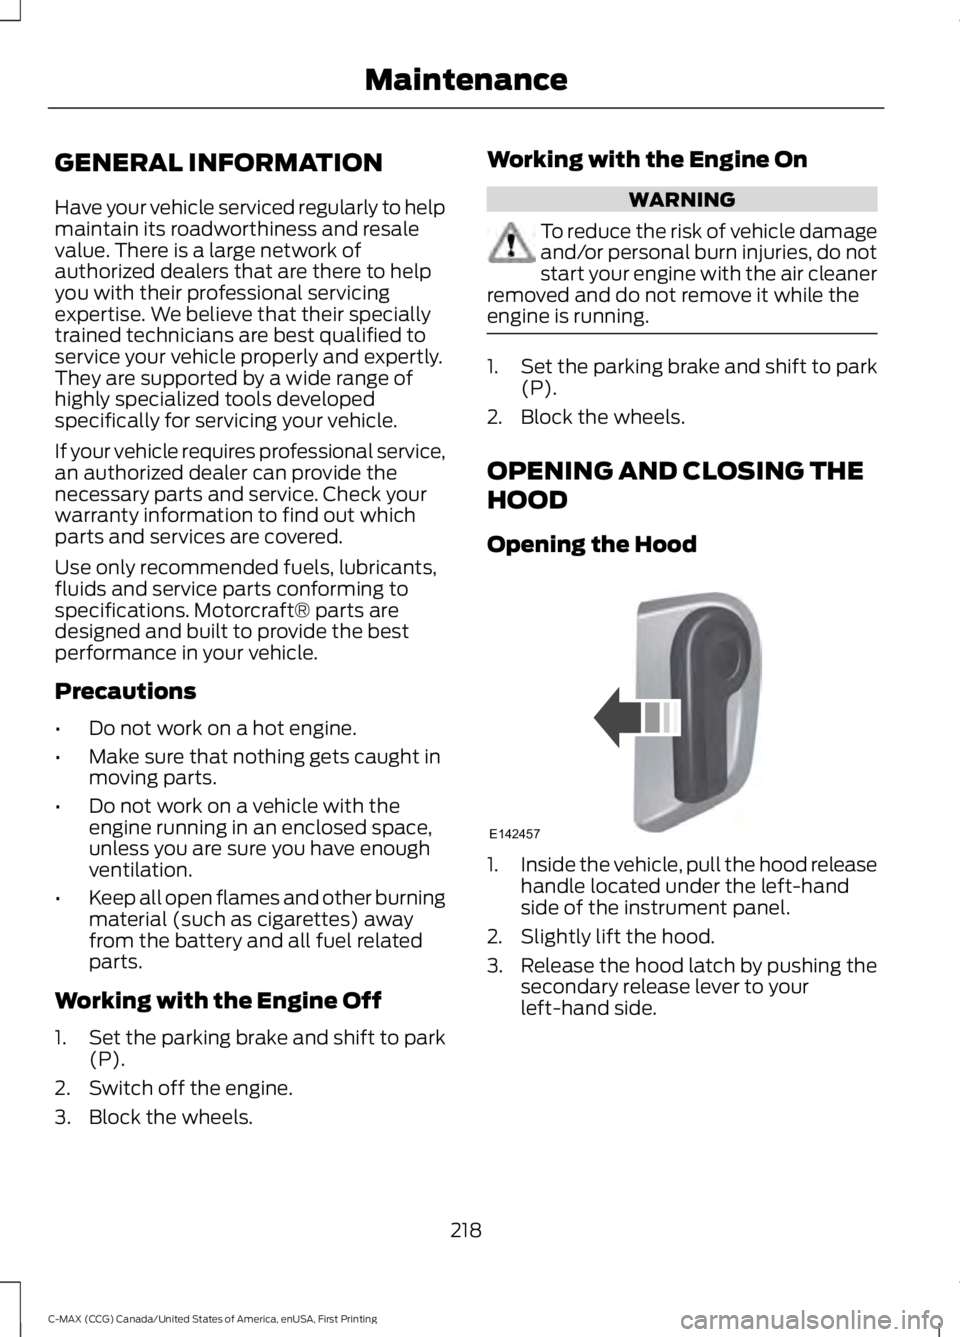
Opening the Hood 1.
Inside the vehicle, pull the hood release
handle located under the left-hand
side of the instrument panel.
2. Slightly lift the hood.
3. Release the hood latch by pushing the secondary release lever to your
left-hand side.
218
C-MAX (CCG) Canada/United States of America, enUSA, First Printing MaintenanceE142457