check engine light FORD C MAX 2016 Owners Manual
[x] Cancel search | Manufacturer: FORD, Model Year: 2016, Model line: C MAX, Model: FORD C MAX 2016Pages: 395, PDF Size: 5.78 MB
Page 11 of 395
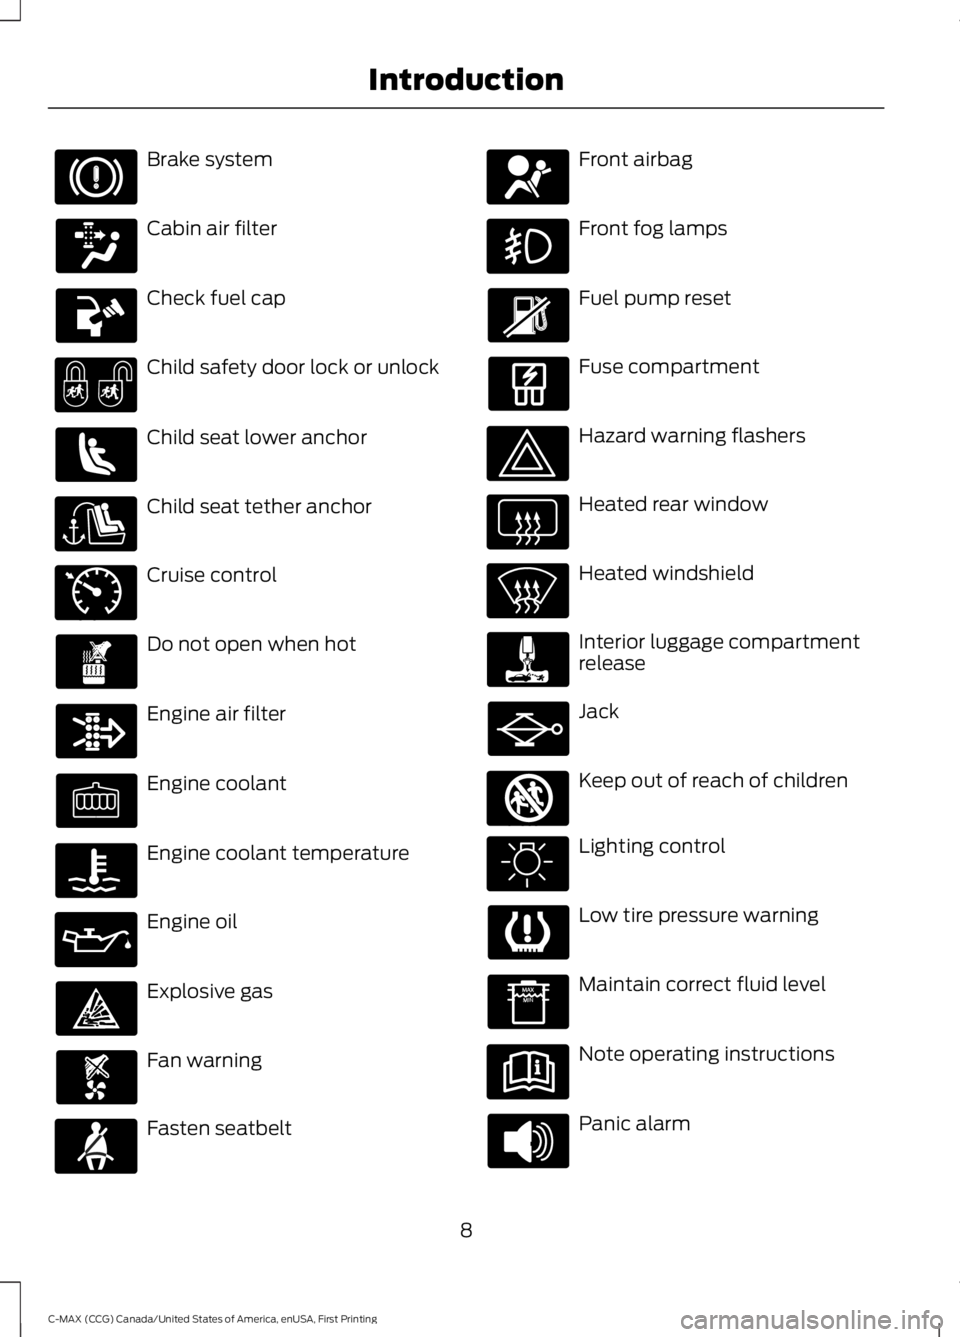
Brake system
Cabin air filter
Check fuel cap
Child safety door lock or unlock
Child seat lower anchor
Child seat tether anchor
Cruise control
Do not open when hot
Engine air filter
Engine coolant
Engine coolant temperature
Engine oil
Explosive gas
Fan warning
Fasten seatbelt Front airbag
Front fog lamps
Fuel pump reset
Fuse compartment
Hazard warning flashers
Heated rear window
Heated windshield
Interior luggage compartment
release
Jack
Keep out of reach of children
Lighting control
Low tire pressure warning
Maintain correct fluid level
Note operating instructions
Panic alarm
8
C-MAX (CCG) Canada/United States of America, enUSA, First Printing Introduction E71340 E161353
Page 92 of 395
WARNING LAMPS AND
INDICATORS
The following warning lamps and
indicators will alert you to a vehicle
condition that may become serious. Some
lamps will light when you start your vehicle
to make sure they work. If any lamps
remain on after starting your vehicle, refer
to the respective system warning lamp for
further information.
Note:
Some warning indicators appear in
the information display and function the
same as a warning lamp but do not display
when you start your vehicle.
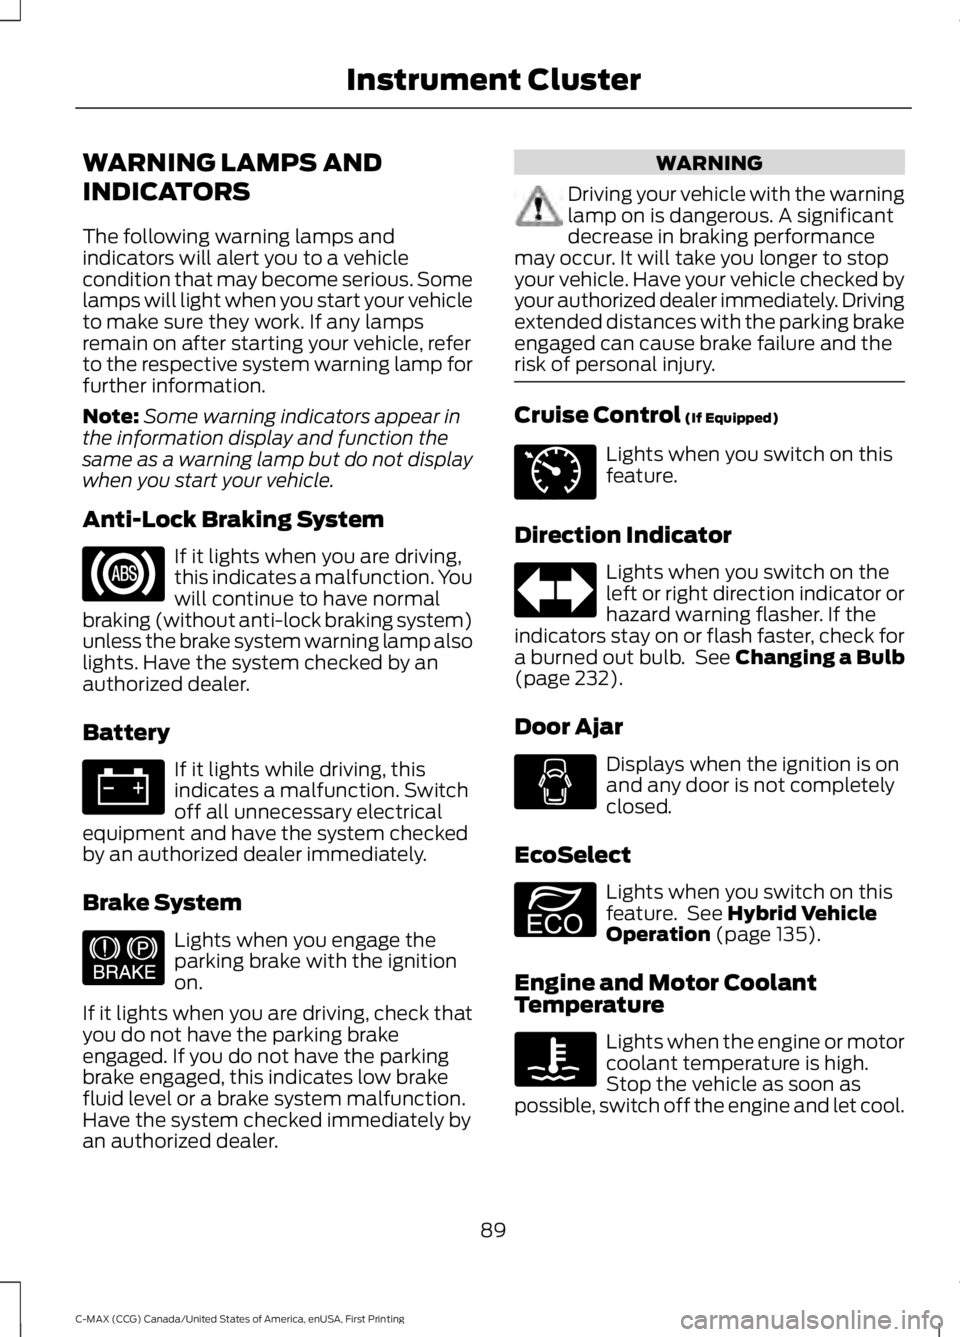
Anti-Lock Braking System If it lights when you are driving,
this indicates a malfunction. You
will continue to have normal
braking (without anti-lock braking system)
unless the brake system warning lamp also
lights. Have the system checked by an
authorized dealer.
Battery If it lights while driving, this
indicates a malfunction. Switch
off all unnecessary electrical
equipment and have the system checked
by an authorized dealer immediately.
Brake System Lights when you engage the
parking brake with the ignition
on.
If it lights when you are driving, check that
you do not have the parking brake
engaged. If you do not have the parking
brake engaged, this indicates low brake
fluid level or a brake system malfunction.
Have the system checked immediately by
an authorized dealer. WARNING
Driving your vehicle with the warning
lamp on is dangerous. A significant
decrease in braking performance
may occur. It will take you longer to stop
your vehicle. Have your vehicle checked by
your authorized dealer immediately. Driving
extended distances with the parking brake
engaged can cause brake failure and the
risk of personal injury. Cruise Control (If Equipped)
Lights when you switch on this
feature.
Direction Indicator Lights when you switch on the
left or right direction indicator or
hazard warning flasher. If the
indicators stay on or flash faster, check for
a burned out bulb. See
Changing a Bulb
(page 232).
Door Ajar Displays when the ignition is on
and any door is not completely
closed.
EcoSelect Lights when you switch on this
feature. See
Hybrid Vehicle
Operation (page 135).
Engine and Motor Coolant
Temperature Lights when the engine or motor
coolant temperature is high.
Stop the vehicle as soon as
possible, switch off the engine and let cool.
89
C-MAX (CCG) Canada/United States of America, enUSA, First Printing Instrument Cluster E144522 E71340 E194390
Page 93 of 395
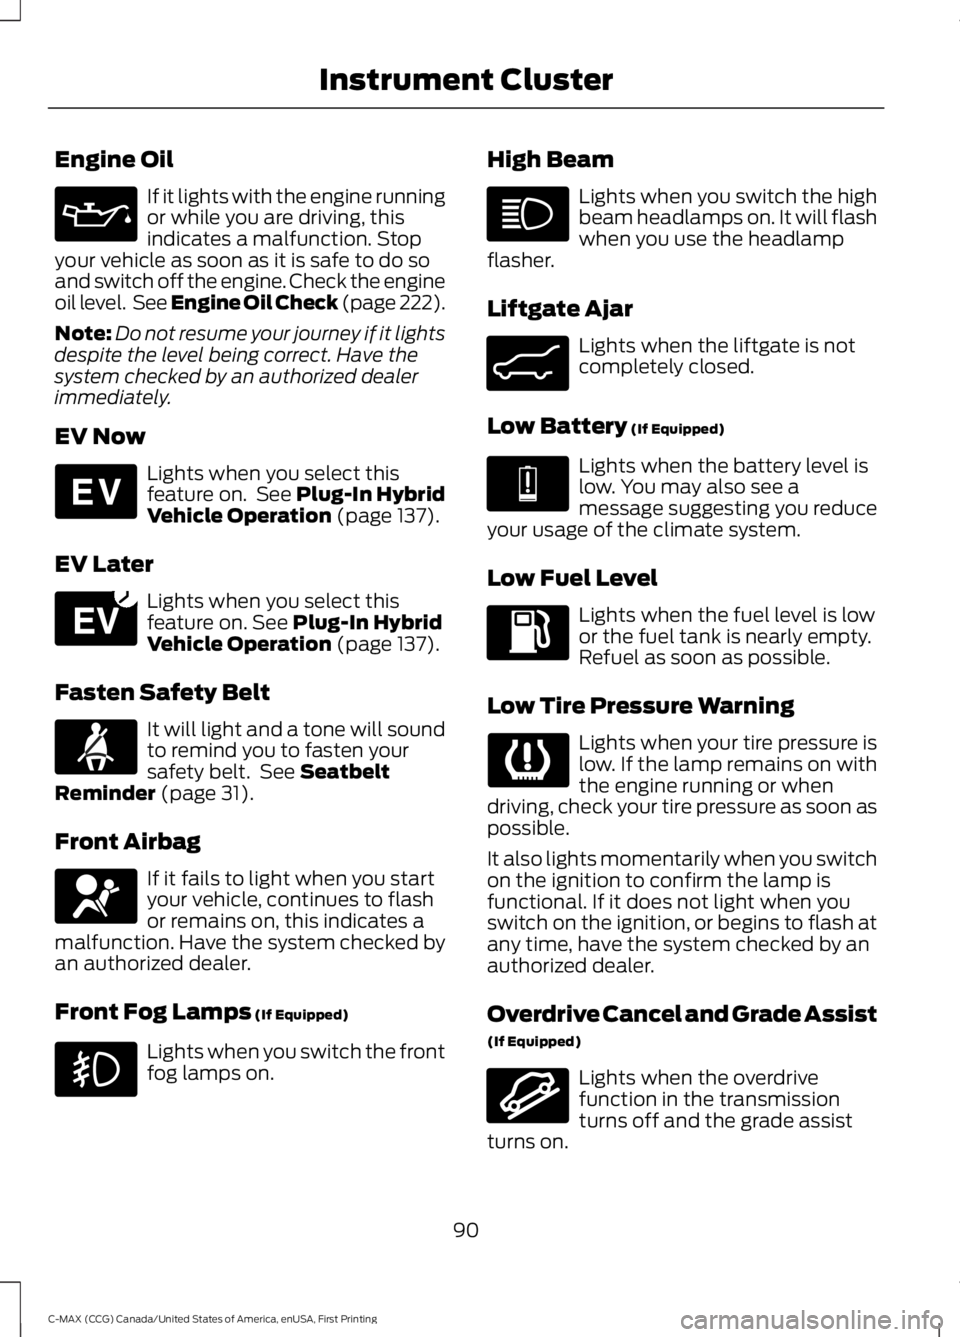
Engine Oil
If it lights with the engine running
or while you are driving, this
indicates a malfunction. Stop
your vehicle as soon as it is safe to do so
and switch off the engine. Check the engine
oil level. See Engine Oil Check (page 222).
Note: Do not resume your journey if it lights
despite the level being correct. Have the
system checked by an authorized dealer
immediately.
EV Now Lights when you select this
feature on. See Plug-In Hybrid
Vehicle Operation (page 137).
EV Later Lights when you select this
feature on.
See Plug-In Hybrid
Vehicle Operation (page 137).
Fasten Safety Belt It will light and a tone will sound
to remind you to fasten your
safety belt. See
Seatbelt
Reminder (page 31).
Front Airbag If it fails to light when you start
your vehicle, continues to flash
or remains on, this indicates a
malfunction. Have the system checked by
an authorized dealer.
Front Fog Lamps
(If Equipped) Lights when you switch the front
fog lamps on. High Beam Lights when you switch the high
beam headlamps on. It will flash
when you use the headlamp
flasher.
Liftgate Ajar Lights when the liftgate is not
completely closed.
Low Battery
(If Equipped) Lights when the battery level is
low. You may also see a
message suggesting you reduce
your usage of the climate system.
Low Fuel Level Lights when the fuel level is low
or the fuel tank is nearly empty.
Refuel as soon as possible.
Low Tire Pressure Warning Lights when your tire pressure is
low. If the lamp remains on with
the engine running or when
driving, check your tire pressure as soon as
possible.
It also lights momentarily when you switch
on the ignition to confirm the lamp is
functional. If it does not light when you
switch on the ignition, or begins to flash at
any time, have the system checked by an
authorized dealer.
Overdrive Cancel and Grade Assist
(If Equipped) Lights when the overdrive
function in the transmission
turns off and the grade assist
turns on.
90
C-MAX (CCG) Canada/United States of America, enUSA, First Printing Instrument Cluster E144814 E151263 E162453 E144691 E162456
Page 94 of 395
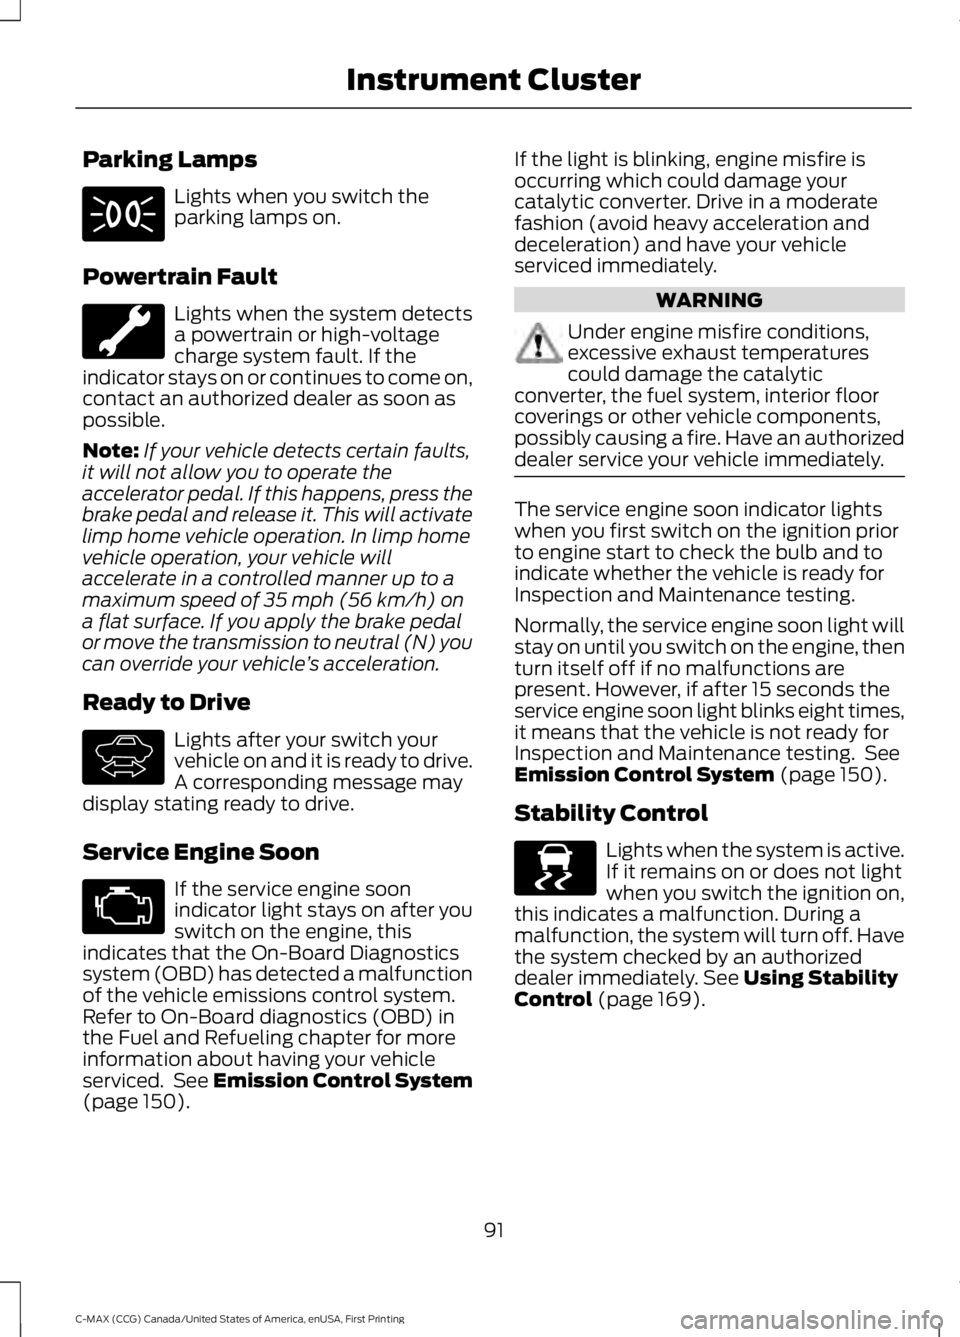
Parking Lamps
Lights when you switch the
parking lamps on.
Powertrain Fault Lights when the system detects
a powertrain or high-voltage
charge system fault. If the
indicator stays on or continues to come on,
contact an authorized dealer as soon as
possible.
Note: If your vehicle detects certain faults,
it will not allow you to operate the
accelerator pedal. If this happens, press the
brake pedal and release it. This will activate
limp home vehicle operation. In limp home
vehicle operation, your vehicle will
accelerate in a controlled manner up to a
maximum speed of 35 mph (56 km/h) on
a flat surface. If you apply the brake pedal
or move the transmission to neutral (N) you
can override your vehicle ’s acceleration.
Ready to Drive Lights after your switch your
vehicle on and it is ready to drive.
A corresponding message may
display stating ready to drive.
Service Engine Soon If the service engine soon
indicator light stays on after you
switch on the engine, this
indicates that the On-Board Diagnostics
system (OBD) has detected a malfunction
of the vehicle emissions control system.
Refer to On-Board diagnostics (OBD) in
the Fuel and Refueling chapter for more
information about having your vehicle
serviced. See Emission Control System
(page 150). If the light is blinking, engine misfire is
occurring which could damage your
catalytic converter. Drive in a moderate
fashion (avoid heavy acceleration and
deceleration) and have your vehicle
serviced immediately. WARNING
Under engine misfire conditions,
excessive exhaust temperatures
could damage the catalytic
converter, the fuel system, interior floor
coverings or other vehicle components,
possibly causing a fire. Have an authorized
dealer service your vehicle immediately. The service engine soon indicator lights
when you first switch on the ignition prior
to engine start to check the bulb and to
indicate whether the vehicle is ready for
Inspection and Maintenance testing.
Normally, the service engine soon light will
stay on until you switch on the engine, then
turn itself off if no malfunctions are
present. However, if after 15 seconds the
service engine soon light blinks eight times,
it means that the vehicle is not ready for
Inspection and Maintenance testing. See
Emission Control System
(page 150).
Stability Control Lights when the system is active.
If it remains on or does not light
when you switch the ignition on,
this indicates a malfunction. During a
malfunction, the system will turn off. Have
the system checked by an authorized
dealer immediately.
See Using Stability
Control (page 169).
91
C-MAX (CCG) Canada/United States of America, enUSA, First Printing Instrument Cluster E144692 E138639
Page 95 of 395
Stability Control Off
Lights when you switch the
system off. It will go out when
you switch the system back on
or when you switch the ignition off. See
Using Stability Control (page 169).
Stop Safely Indicates an electrical
component fault or failure that
will cause the vehicle to
shutdown or enter into a limited operating
mode. A message may also display.
Vehicle Plugged in
(If Equipped) Lights after you plug in your
vehicle. A corresponding
message may display after
attempting to start the vehicle.
AUDIBLE WARNINGS AND
INDICATORS
Key in Ignition Warning Chime
Sounds when you open the driver's door
and you have left the key in the ignition.
Engine On Warning Chime
A warning chime will sound when any door
is opened if the vehicle exceeds a relatively
low speed.
Keyless Warning Alert
(If Equipped)
Sounds the horn twice when you exit the
vehicle and the keyless vehicle is in RUN,
indicating the vehicle is still on. Headlamps On Warning Chime
Sounds when you remove the key from the
ignition and open the driver's door and you
have left the headlamps or parking lamps
on.
Parking Brake On Warning Chime
Sounds when you have left the parking
brake on and drive your vehicle. If the
warning chime remains on after you have
released the parking brake, have the
system checked by your authorized dealer
immediately.
Automatic Transmission Warning
Chime
Sounds when you have not moved the
transmission selector lever to position
P.
A message will be shown in the display.
92
C-MAX (CCG) Canada/United States of America, enUSA, First Printing Instrument Cluster E144693 E144694
Page 167 of 395
GENERAL INFORMATION
Note:
Occasional brake noise is normal. If
a metal-to-metal, continuous grinding or
continuous squeal sound is present, the
brake linings may be worn-out. Have the
system checked by an authorized dealer. If
the vehicle has continuous vibration or
shudder in the steering wheel while braking,
have it checked by an authorized dealer.
Note: Brake dust may accumulate on the
wheels, even under normal driving
conditions. Some dust is inevitable as the
brakes wear and does not contribute to
brake noise. See Cleaning the Alloy
Wheels (page 245). See
Warning Lamps and
Indicators (page 89).
Wet brakes result in reduced braking
efficiency. Gently press the brake pedal a
few times when driving from a car wash or
standing water to dry the brakes.
Brake Over Accelerator
In the event the accelerator pedal
becomes stuck or entrapped, apply steady
and firm pressure to the brake pedal to
slow the vehicle and reduce engine power.
If you experience this condition, apply the
brakes and bring your vehicle to a safe
stop. Move the transmission to park (P),
switch the engine off and apply the parking
brake. Inspect the accelerator pedal for
any interference. If none are found and the
condition persists, have your vehicle towed
to the nearest authorized dealer.
Brake Assist
Brake assist detects when you brake
heavily by measuring the rate at which you
press the brake pedal. It provides
maximum braking efficiency as long as you
press the pedal. Brake assist can reduce
stopping distances in critical situations. Anti-lock Brake System
This system helps you maintain steering
control during emergency stops by keeping
the brakes from locking. This lamp momentarily
illuminates when you turn the
ignition on. If the light does not
illuminate during start up, remains on or
flashes, the system may be disabled. Have
the system checked by an authorized
dealer. If the anti-lock brake system is
disabled, normal braking is still effective. If the brake warning lamp
illuminates when you release the
parking brake, have the system
checked by an authorized dealer.
Regenerative Braking System
This feature is used to simulate the engine
braking of an internal combustion engine
and assist the standard brake system while
recovering some of the energy of motion
and storing it in the battery to improve the
range of your vehicle. The standard brake
system is designed to fully stop the car if
regenerative braking is not available.
During regenerative braking, the motor is
spun as a generator to create electrical
current. This recharges the battery and
slows the vehicle. In effect, once the
accelerator pedal is released, the motor
changes from an energy user to an energy
producer.
When the accelerator pedal is released or
the brake pedal is applied, the brake
controller automatically detects the
amount of deceleration requested and
optimizes how much of the deceleration
will be produced by regenerative braking.
The remaining portion is generated by
164
C-MAX (CCG) Canada/United States of America, enUSA, First Printing BrakesE144522 E144522
Page 196 of 395
•
Perform all regularly scheduled
maintenance. See Scheduled
Maintenance (page 348).
• Use the coach and brake coach display
to get feedback on your economical
drive style. For more information, See
Information Displays
(page 93).
Avoid these actions because they reduce
your fuel economy:
• Avoid sudden or hard accelerations and
decelerations. Accelerate and slow
down in a smooth, moderate fashion.
• Avoid revving the engine before
switching off your vehicle.
• Avoid long idle periods.
• Do not warm up your vehicle on cold
mornings.
• Do not rest your foot on the brake
pedal while driving.
• Avoid carrying unnecessary weight.
Approximately 1 mile per gallon (0.4
kilometers per liter) is lost for every
400 lb (180 kg)
of weight carried.
• Avoid adding accessories that increase
aerodynamic drag to your vehicle such
as bug deflectors, car top carriers and
ski or bike racks.
• Avoid driving with the wheels out of
alignment.
Things to keep in mind when you refuel
your vehicle:
• Fuel generates fewer vapors when it is
cool and dark outside. Refuel your
vehicle in the early morning or late
evening.
• Use the recommended octane-rated
fuel. Using fuel below the
recommended rating will lower your
fuel economy. DRIVING THROUGH WATER WARNING
Do not drive through flowing or deep
water as you may lose control of your
vehicle.
Note:
Driving through standing water can
cause vehicle damage.
Note: Engine damage can occur if water
enters the air filter.
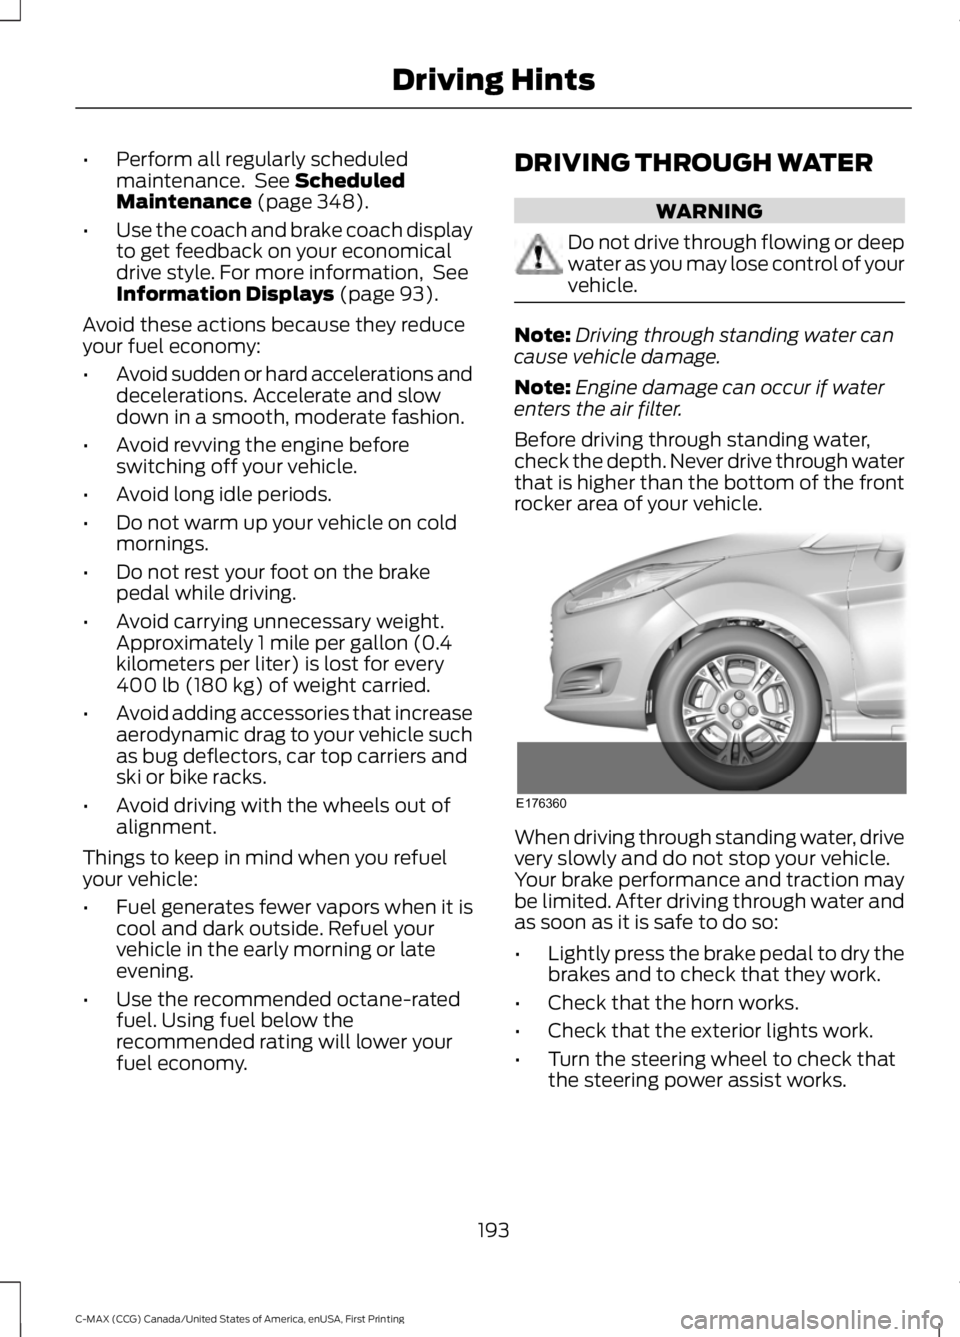
Before driving through standing water,
check the depth. Never drive through water
that is higher than the bottom of the front
rocker area of your vehicle. When driving through standing water, drive
very slowly and do not stop your vehicle.
Your brake performance and traction may
be limited. After driving through water and
as soon as it is safe to do so:
•
Lightly press the brake pedal to dry the
brakes and to check that they work.
• Check that the horn works.
• Check that the exterior lights work.
• Turn the steering wheel to check that
the steering power assist works.
193
C-MAX (CCG) Canada/United States of America, enUSA, First Printing Driving HintsE176360
Page 199 of 395
This program is separate from the New
Vehicle Limited Warranty, but the coverage
is concurrent with the powertrain coverage
period of your vehicle.
Canadian customers who require roadside
assistance, call 1-800-665-2006.
Vehicles Sold in Canada: Using
Roadside Assistance
Complete the roadside assistance
identification card and place it in your
wallet for quick reference.
In Canada, this card is found in the
Warranty Guide in the glove compartment
of your vehicle.
Vehicles Sold in Canada: Roadside
Assistance Program Coverage
The service is available 24 hours a day,
seven days a week.
Canadian roadside coverage and benefits
may differ from the U.S. coverage.
For complete program coverage details
you may contact your dealer, you can call
us in Canada at 1-800-665-2006, or visit
our website at www.ford.ca.
HAZARD WARNING FLASHERS
Note:
If used when the vehicle is not
running, the battery will lose charge. There
may be insufficient power to restart your
vehicle. The hazard warning button is
located on the instrument panel.
Use it when your vehicle is
creating a safety hazard for other
motorists.
• Press the button to turn on the hazard
warning function, and the front and
rear direction indicators will flash.
• Press the button again to turn them
off. FUEL SHUTOFF WARNING
Failure to inspect and, if necessary,
repair fuel leaks after a collision may
increase the risk of fire and serious
injury. Ford Motor Company recommends
that the fuel system be inspected by an
authorized dealer after any collision. In the event of a moderate to severe
collision, this vehicle has a fuel pump
shut-off feature that stops the flow of fuel
to the engine. Not every impact will cause
a shut-off.
Should your vehicle shut off after a
collision, you may restart your vehicle.
For vehicles equipped with a key system:
1. Switch off the ignition.
2. Switch on the ignition.
3. Check the information display for the
Ready to Drive light as the gasoline
engine may not start, but the electric
motor may be running. If you do not see
the Ready to Drive light, repeat Steps
1 and 2 up to two more times.
For vehicles equipped with a push button
start system:
1. Press the push button start to switch off the ignition.
2. Press the brake pedal and press the push button start to switch on the
ignition.
3. Check the information display for the Ready to Drive light as the gasoline
engine may not start, but the electric
motor may be running. If you do not see
the Ready to Drive light, repeat Steps
1 and 2 up to two more times.
196
C-MAX (CCG) Canada/United States of America, enUSA, First Printing Roadside Emergencies
Page 201 of 395
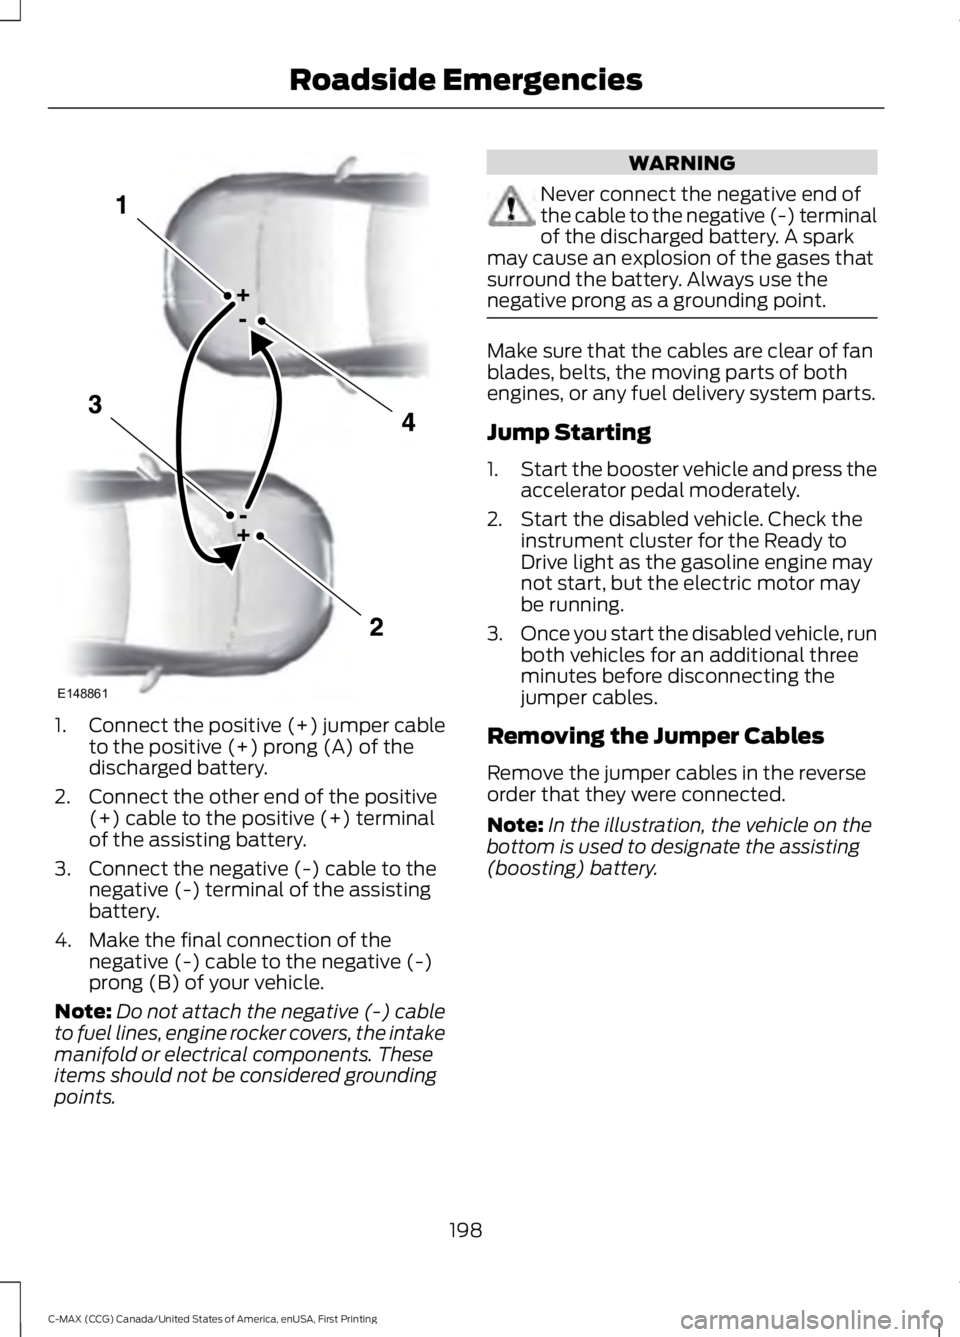
1.
Connect the positive (+) jumper cable
to the positive (+) prong (A) of the
discharged battery.
2. Connect the other end of the positive (+) cable to the positive (+) terminal
of the assisting battery.
3. Connect the negative (-) cable to the negative (-) terminal of the assisting
battery.
4. Make the final connection of the negative (-) cable to the negative (-)
prong (B) of your vehicle.
Note: Do not attach the negative (-) cable
to fuel lines, engine rocker covers, the intake
manifold or electrical components. These
items should not be considered grounding
points. WARNING
Never connect the negative end of
the cable to the negative (-) terminal
of the discharged battery. A spark
may cause an explosion of the gases that
surround the battery. Always use the
negative prong as a grounding point. Make sure that the cables are clear of fan
blades, belts, the moving parts of both
engines, or any fuel delivery system parts.
Jump Starting
1.
Start the booster vehicle and press the
accelerator pedal moderately.
2. Start the disabled vehicle. Check the instrument cluster for the Ready to
Drive light as the gasoline engine may
not start, but the electric motor may
be running.
3. Once you start the disabled vehicle, run
both vehicles for an additional three
minutes before disconnecting the
jumper cables.
Removing the Jumper Cables
Remove the jumper cables in the reverse
order that they were connected.
Note: In the illustration, the vehicle on the
bottom is used to designate the assisting
(boosting) battery.
198
C-MAX (CCG) Canada/United States of America, enUSA, First Printing Roadside EmergenciesE148861
Page 221 of 395
GENERAL INFORMATION
Have your vehicle serviced regularly to help
maintain its roadworthiness and resale
value. There is a large network of
authorized dealers that are there to help
you with their professional servicing
expertise. We believe that their specially
trained technicians are best qualified to
service your vehicle properly and expertly.
They are supported by a wide range of
highly specialized tools developed
specifically for servicing your vehicle.
If your vehicle requires professional service,
an authorized dealer can provide the
necessary parts and service. Check your
warranty information to find out which
parts and services are covered.
Use only recommended fuels, lubricants,
fluids and service parts conforming to
specifications. Motorcraft® parts are
designed and built to provide the best
performance in your vehicle.
Precautions
•
Do not work on a hot engine.
• Make sure that nothing gets caught in
moving parts.
• Do not work on a vehicle with the
engine running in an enclosed space,
unless you are sure you have enough
ventilation.
• Keep all open flames and other burning
material (such as cigarettes) away
from the battery and all fuel related
parts.
Working with the Engine Off
1. Set the parking brake and shift to park
(P).
2. Switch off the engine.
3. Block the wheels. Working with the Engine On WARNING
To reduce the risk of vehicle damage
and/or personal burn injuries, do not
start your engine with the air cleaner
removed and do not remove it while the
engine is running. 1.
Set the parking brake and shift to park
(P).
2. Block the wheels.
OPENING AND CLOSING THE
HOOD
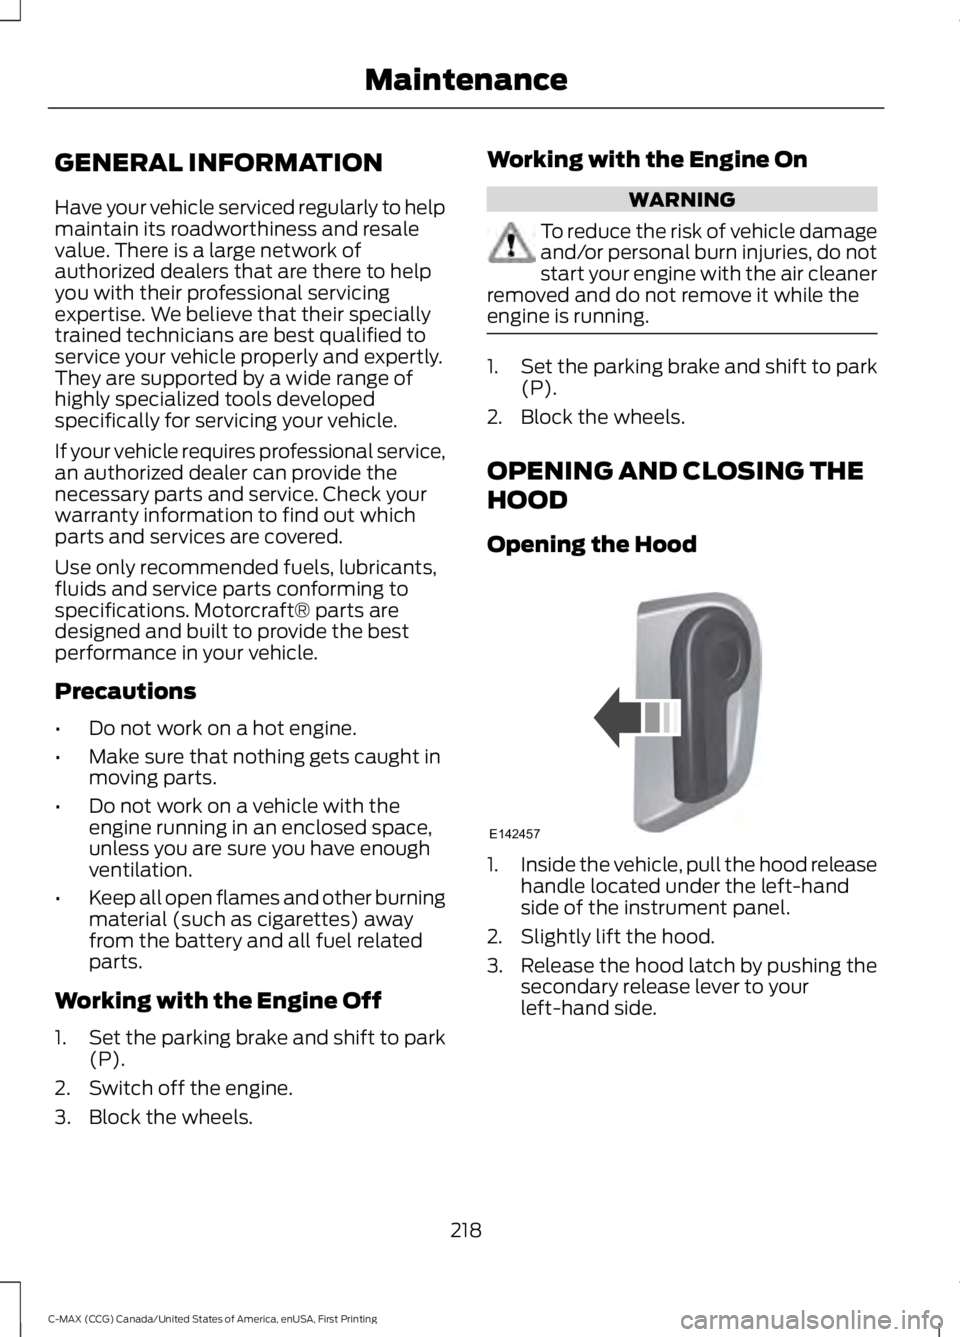
Opening the Hood 1.
Inside the vehicle, pull the hood release
handle located under the left-hand
side of the instrument panel.
2. Slightly lift the hood.
3. Release the hood latch by pushing the secondary release lever to your
left-hand side.
218
C-MAX (CCG) Canada/United States of America, enUSA, First Printing MaintenanceE142457