open hood FORD C MAX ENERGI 2016 Owners Manual
[x] Cancel search | Manufacturer: FORD, Model Year: 2016, Model line: C MAX ENERGI, Model: FORD C MAX ENERGI 2016Pages: 395, PDF Size: 6.78 MB
Page 7 of 395
Ordering Additional Owner'sLiterature....................................................206
Reporting Safety Defects (U.S.Only).............................................................207
Reporting Safety Defects (CanadaOnly).............................................................207
Fuses
Fuse Specification Chart..........................209
Changing a Fuse............................................217
Maintenance
General Information....................................218
Opening and Closing the Hood...............218
Under Hood Overview - Hybrid ElectricVehicle (HEV)............................................219
Under Hood Overview - Plug-In HybridElectric Vehicle (PHEV)..........................221
Engine Oil Dipstick.......................................222
Engine Oil Check..........................................222
Engine Coolant Check................................223
Automatic Transmission FluidCheck............................................................227
Brake Fluid Check.........................................227
Power Steering Fluid Check.....................227
Washer Fluid Check.....................................227
Fuel Filter.........................................................227
Changing the 12V Battery.........................228
Checking the Wiper Blades......................229
Changing the Wiper Blades.....................229
Adjusting the Headlamps..........................231
Removing a Headlamp..............................232
Changing a Bulb...........................................232
Bulb Specification Chart...........................237
Changing the Engine Air Filter................238
Vehicle Care
General Information....................................241
Cleaning Products........................................241
Cleaning the Exterior...................................241
Waxing.............................................................242
Cleaning the Engine....................................243
Cleaning the Windows and WiperBlades..........................................................243
Cleaning the Interior...................................244
Cleaning the Instrument Panel andInstrument Cluster Lens.......................244
Cleaning Leather Seats.............................245
Repairing Minor Paint Damage..............245
Cleaning the Alloy Wheels.......................245
Vehicle Storage............................................246
Wheels and Tires
Tire Sealant and Inflator Kit....................249
Tire Care..........................................................255
Using Snow Chains.....................................270
Tire Pressure Monitoring System...........270
Technical Specifications...........................274
Capacities and Specific-ations
Engine Specifications.................................276
Motorcraft Parts............................................277
Vehicle Identification Number................278
Vehicle Certification Label.......................279
Transmission Code Designation............279
Capacities and Specifications...............280
Audio System
General Information...................................283
Audio Unit - Vehicles With: AM/FM/CD/SYNC............................................................284
Audio Unit - Vehicles With: Premium AM/FM/CD.........................................................286
Audio Unit - Vehicles With: Sony AM/FM/CD.................................................................288
Digital Radio...................................................291
Satellite Radio..............................................294
USB Port.........................................................296
Media Hub......................................................296
4
C-MAX (CCG) Canada/United States of America, enUSA, First Printing
Table of Contents
Page 44 of 395
WARNINGS
Do not lean your head on the door.The curtain airbag could injure youas it deploys from the headliner.
Do not attempt to service, repair, ormodify the curtain airbags, its fuses,the A, B, or C pillar trim, or theheadliner on a vehicle containing curtainairbags as you could be seriously injuredor killed. Contact your authorized dealeras soon as possible.
All occupants of your vehicleincluding the driver should alwayswear their safety belts even when anairbag supplemental restraint system andcurtain airbag is provided. Failure toproperly wear your safety belt couldseriously increase the risk of injury or death.
To reduce risk of injury, do notobstruct or place objects in thedeployment path of the curtainairbag.
If the curtain airbags have deployed,the curtain airbags will not functionagain. The curtain airbags (includingthe A, B and C pillar trim and headliner)must be inspected and serviced by anauthorized dealer. If the curtain airbag isnot replaced, the unrepaired area willincrease the risk of injury in a crash.
The Safety Canopy will deploy duringsignificant side crashes or when a certainlikelihood of a rollover event is detectedby the rollover sensor. The Safety Canopyis mounted to the roof side-rail sheetmetal, behind the headliner, above eachrow of seats. In certain sideways crashesor rollover events, the Safety Canopy willbe activated, regardless of which seats areoccupied. The Safety Canopy is designedto inflate between the side window areaand occupants to further enhanceprotection provided in side impact crashesand rollover events.
The system consists of the following:
•Safety canopy curtain airbags locatedabove the trim panels over the frontand rear side windows identified by alabel or wording on the headliner orroof-pillar trim.
•A flexible headliner which opens abovethe side doors to allow air curtaindeployment
· Crash sensors and monitoringsystem with a readinessindicator. See Crash Sensorsand Airbag Indicator (page 42).
Children 12 years old and under shouldalways be properly restrained in the rearseats. The Safety Canopy will not interferewith children restrained using a properlyinstalled child or booster seat because itis designed to inflate downward from theheadliner above the doors along the sidewindow opening.
The design and development of the SafetyCanopy included recommended testingprocedures that were developed by agroup of automotive safety experts knownas the Side Airbag Technical WorkingGroup. These recommended testingprocedures help reduce the risk of injuriesrelated to the deployment of side airbags(including the Safety Canopy).
41
C-MAX (CCG) Canada/United States of America, enUSA, First Printing
Supplementary Restraints SystemE75004
Page 51 of 395
Intelligent Access Key (Type 2)
1. Remove the backup key from thetransmitter.
2. Twist a thin coin under the tab hiddenbehind the backup key head to removethe battery cover. Do not use thebackup key to remove the cover or youcould damage the intelligent accesskey.
3. Remove the old battery.
4. Insert a new battery with the + facingdownward. Press the battery down tomake sure it is fully in the housing.
5. Snap the battery cover back onto thetransmitter and install the backup key.
Car Finder
Press the lock button on the key twicewithin three seconds. The horn sounds andthe turn signals flash. We recommend youuse this method to locate your vehicle,rather than using the panic alarm.
Note:If locking was not successful or if anydoor or the liftgate is open, or if the hood isopen on vehicles with a perimeter alarm orremote start, the horn does sound twice andthe lamp does not flash.
Sounding a Panic Alarm (If Equipped)
Note:The panic alarm only operates whenthe ignition is off.
Press the button to activate thealarm. Press the button again orswitch the ignition on todeactivate it.
Remote Start (If Equipped)
WARNING
To avoid exhaust fumes, do not useremote start if your vehicle is parkedindoors or areas that are not wellventilated.
Note:Do not use remote start if your vehicleis low on fuel.
The remote start button is on thetransmitter.
This feature allows you to start yourvehicle from outside the vehicle. Thetransmitter has an extended operatingrange.
Vehicles with automatic climate controlcan be configured to operate when thevehicle is remote started. See AutomaticClimate Control (page 108).
48
C-MAX (CCG) Canada/United States of America, enUSA, First Printing
Keys and Remote ControlsE142432 E138622 E138624 E138625
Page 52 of 395
Many states and provinces haverestrictions for the use of remote start.Check your local and state or provinciallaws for specific requirements regardingremote start systems.
The remote start system does not work ifany of the following occur:
•The ignition is on.
•The alarm system triggers.
•You disable the feature.
•The hood is open.
•The transmission is not in P.
•The vehicle battery voltage is too low.
•The powertrain fault indicator was onthe last time your vehicle was driven.
Remote Starting the Vehicle
Note:You must press each button withinthree seconds of each other. If you do notfollow this sequence, your vehicle does notremote start, the exterior lamps do not flashtwice, and the horn does not sound.
The label on your transmitter details thestarting procedure.
To remote start your vehicle:
1. Press the lock button to lock all thedoors.
2. Press the remote start button twice.The exterior lamps flash twice.
The horn sounds if the system fails to start,unless quiet start is on. Quiet start runs theblower fan at a slower speed to reducenoise. You can switch it on or off in theinformation display. See GeneralInformation (page 93).
Note:If you remote start your vehicle withan integrated keyhead transmitter, you mustswitch the ignition on before driving yourvehicle. If you remote start your vehicle withan intelligent access transmitter, you mustpress the START/STOP button on theinstrument panel once while applying thebrake pedal before driving your vehicle.
The power windows do not work duringremote start and the radio does not turnon automatically.
The parking lamps remain on and thevehicle runs for 5, 10, or 15 minutes,depending on the setting.
Extending the Vehicle Run Time
Repeat Steps 1 and 2 with the vehicle stillrunning to extend the run time for anotherremote start duration. If the duration is setto last 10 minutes, the duration extends byanother 10 minutes. For example, if thevehicle had been running from the firstremote start for five minutes, the vehiclecontinues to run now for a total of 20minutes. You can extend the remote startup to a maximum of 30 minutes.
Wait at least five seconds before remotestarting after a vehicle shutdown.
Turning the Vehicle Off After RemoteStarting
Press the button once. Theparking lamps turns off.
You may have to be closer to thevehicle than when starting due to groundreflection and the added noise of therunning vehicle.
49
C-MAX (CCG) Canada/United States of America, enUSA, First Printing
Keys and Remote ControlsE138626 E138625
Page 59 of 395
LOCKING AND UNLOCKING
You can use the power door lock controlor the remote control to lock and unlockyour vehicle.
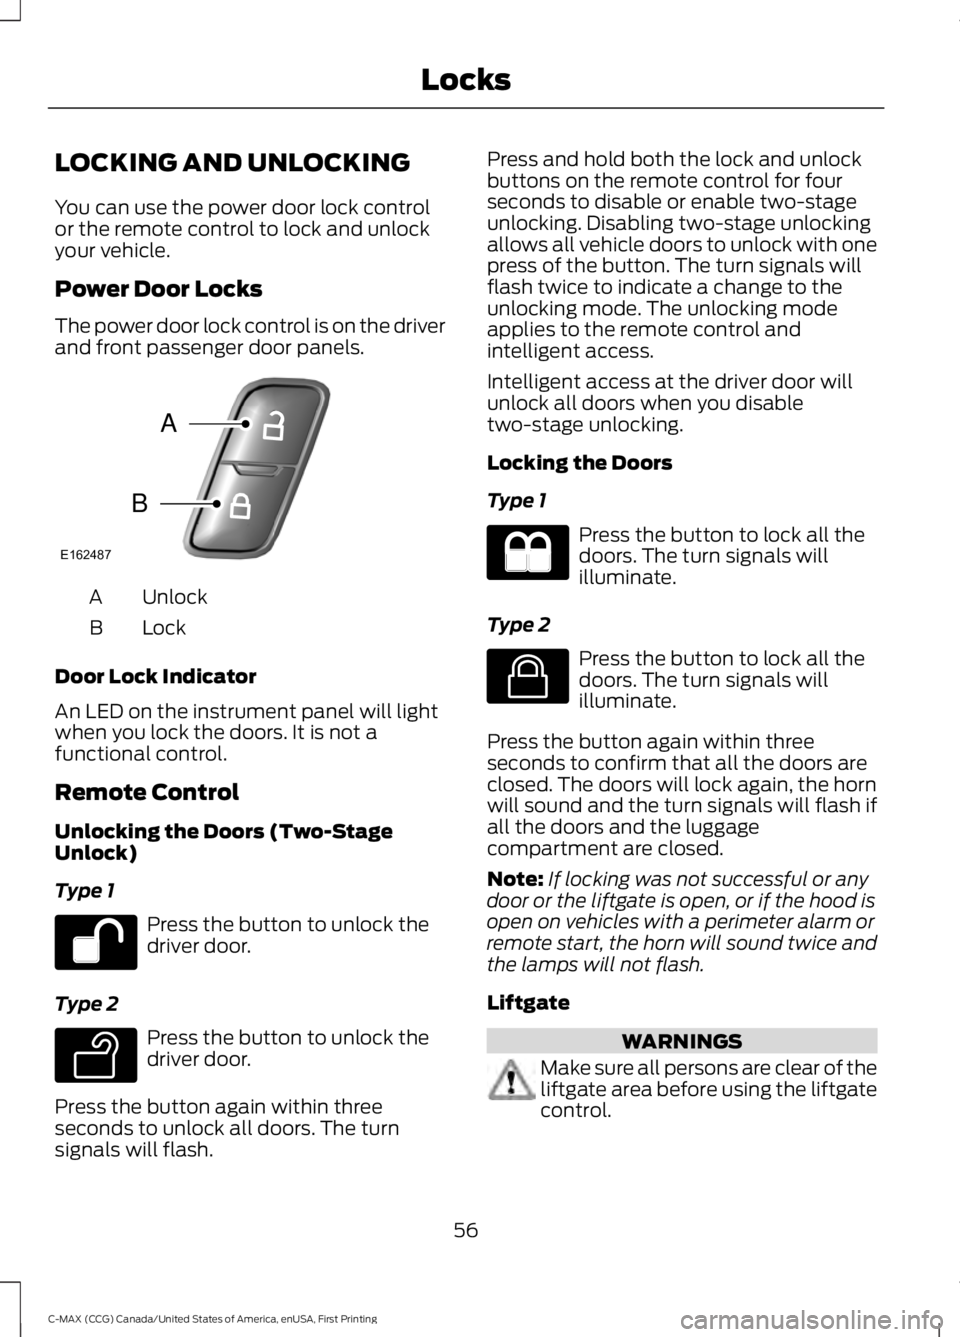
Power Door Locks
The power door lock control is on the driverand front passenger door panels.
UnlockA
LockB
Door Lock Indicator
An LED on the instrument panel will lightwhen you lock the doors. It is not afunctional control.
Remote Control
Unlocking the Doors (Two-StageUnlock)
Type 1
Press the button to unlock thedriver door.
Type 2
Press the button to unlock thedriver door.
Press the button again within threeseconds to unlock all doors. The turnsignals will flash.
Press and hold both the lock and unlockbuttons on the remote control for fourseconds to disable or enable two-stageunlocking. Disabling two-stage unlockingallows all vehicle doors to unlock with onepress of the button. The turn signals willflash twice to indicate a change to theunlocking mode. The unlocking modeapplies to the remote control andintelligent access.
Intelligent access at the driver door willunlock all doors when you disabletwo-stage unlocking.
Locking the Doors
Type 1
Press the button to lock all thedoors. The turn signals willilluminate.
Type 2
Press the button to lock all thedoors. The turn signals willilluminate.
Press the button again within threeseconds to confirm that all the doors areclosed. The doors will lock again, the hornwill sound and the turn signals will flash ifall the doors and the luggagecompartment are closed.
Note:If locking was not successful or anydoor or the liftgate is open, or if the hood isopen on vehicles with a perimeter alarm orremote start, the horn will sound twice andthe lamps will not flash.
Liftgate
WARNINGS
Make sure all persons are clear of theliftgate area before using the liftgatecontrol.
56
C-MAX (CCG) Canada/United States of America, enUSA, First Printing
LocksE162487
A
B E138629 E138623
Page 69 of 395
You must have two previouslyprogrammed coded keys and the newunprogrammed key readily accessible. Seeyour authorized dealer to have the sparekey programmed if two previouslyprogrammed coded keys are not available.
Read and understand the entire procedurebefore you begin.
1.Insert the first previously programmedcoded key into the ignition.
2.Switch the ignition from off to on. Keepthe ignition on for at least threeseconds, but no more than 10 seconds.
3.Switch the ignition off and remove thefirst coded key from the ignition.
4. After three seconds but within 10seconds of switching the ignition off,insert the second previously coded keyinto the ignition.
5.Switch the ignition from off to on. Keepthe ignition on for at least threeseconds, but no more than 10 seconds.
6.Switch the ignition off and remove thesecond previously programmed codedkey from the ignition.
7. After three seconds but within 10seconds of switching the ignition offand removing the previouslyprogrammed coded key, insert the newunprogrammed key into the ignition.
8.Switch the ignition from off to on. Keepthe ignition on for at least six seconds.
9.Remove the newly programmed codedkey from the ignition.
If the key has been successfullyprogrammed it will start your vehicle andoperate the remote entry system (if thenew key is an integrated keyheadtransmitter).
If programming was not successful, wait10 seconds and repeat Steps 1 through 8.If you are still unsuccessful, take yourvehicle to your authorized dealer.
Programming a Spare IntelligentAccess Key
See your authorized dealer to haveadditional keys programmed to yourvehicle.
ANTI-THEFT ALARM (If Equipped)
The system warns you of an unauthorizedentry to your vehicle. It triggers if any door,the luggage compartment or the hoodopens without using the key or remotecontrol.
The direction indicators flash and the hornsounds if unauthorized entry is attemptedwhile the alarm is armed.
Take all remote controls to an authorizeddealer if there is any potential alarmproblem with your vehicle.
Arming the Alarm
The alarm is ready to arm when there isnot a key in the ignition. Electronically lockthe vehicle to arm the alarm.
Disarming the Alarm
Disarm the alarm by any of the followingactions:
•Unlock the doors or luggagecompartment with the remote controlor keyless entry keypad.
•Switch the ignition on or start thevehicle.
•Use a key in the driver’s door to unlockthe vehicle, then switch the ignition onwithin 12 seconds.
Note:Pressing the panic button on theremote control will stop the horn and signalindicators, but will not disarm the system.
66
C-MAX (CCG) Canada/United States of America, enUSA, First Printing
Security
Page 135 of 395
Switching Off the Vehicle When ItIs Moving
WARNING
Switching off the engine when thevehicle is still moving will result in aloss of brake and steering assistance.The steering will not lock, but higher effortwill be required. When the ignition isswitched off, some electrical circuits,including air bags, warning lamps andindicators may also be off. If the ignitionwas turned off accidentally, you can shiftinto neutral (N) and re-start the engine.
Vehicles with an Ignition Key
1. Move the transmission selector leverto position N and use the brakes tobring your vehicle to a safe stop.
2. When your vehicle has stopped, movethe transmission selector lever toposition P and turn the key to position0.
3. Apply the parking brake.
Vehicles with Keyless Start
1. Move the transmission selector leverto position N and use the brakes tobring your vehicle to a safe stop.
2. When your vehicle has stopped, movethe transmission selector lever toposition P.
3. Press and hold the button for onesecond, or press it three times withintwo seconds.
4. Apply the parking brake.
Guarding Against Exhaust Fumes
WARNING
If you smell exhaust fumes insideyour vehicle, have your vehiclechecked by your authorized dealerimmediately. Do not drive your vehicle ifyou smell exhaust fumes. Carbonmonoxide is present in exhaust fumes.Take precautions to avoid its dangerouseffects.
Important Ventilating Information
If you stop your vehicle and leave it idlingfor long periods, we recommend that youdo one of the following:
•Open the windows at least 1 in(2.5 cm).
•Set your climate control to outside air.
ENGINE BLOCK HEATER (If
Equipped)
WARNINGS
Failure to follow engine block heaterinstructions could result in propertydamage or serious personal injury.
Do not use your heater withungrounded electrical systems ortwo-pronged adapters. There is a riskof electrical shock.
Do not fully close the hood, or allowit to drop under its own weight whenusing the engine block heater. Thiscould damage the power cable and maycause an electrical short resulting in fire,injury and property damage.
Note:The heater is most effective whenoutdoor temperatures are below 0°F(-18°C).
132
C-MAX (CCG) Canada/United States of America, enUSA, First Printing
Starting and Stopping the Engine
Page 221 of 395
GENERAL INFORMATION
Have your vehicle serviced regularly to helpmaintain its roadworthiness and resalevalue. There is a large network ofauthorized dealers that are there to helpyou with their professional servicingexpertise. We believe that their speciallytrained technicians are best qualified toservice your vehicle properly and expertly.They are supported by a wide range ofhighly specialized tools developedspecifically for servicing your vehicle.
If your vehicle requires professional service,an authorized dealer can provide thenecessary parts and service. Check yourwarranty information to find out whichparts and services are covered.
Use only recommended fuels, lubricants,fluids and service parts conforming tospecifications. Motorcraft® parts aredesigned and built to provide the bestperformance in your vehicle.
Precautions
•Do not work on a hot engine.
•Make sure that nothing gets caught inmoving parts.
•Do not work on a vehicle with theengine running in an enclosed space,unless you are sure you have enoughventilation.
•Keep all open flames and other burningmaterial (such as cigarettes) awayfrom the battery and all fuel relatedparts.
Working with the Engine Off
1.Set the parking brake and shift to park(P).
2. Switch off the engine.
3. Block the wheels.
Working with the Engine On
WARNING
To reduce the risk of vehicle damageand/or personal burn injuries, do notstart your engine with the air cleanerremoved and do not remove it while theengine is running.
1.Set the parking brake and shift to park(P).
2. Block the wheels.
OPENING AND CLOSING THE
HOOD
Opening the Hood
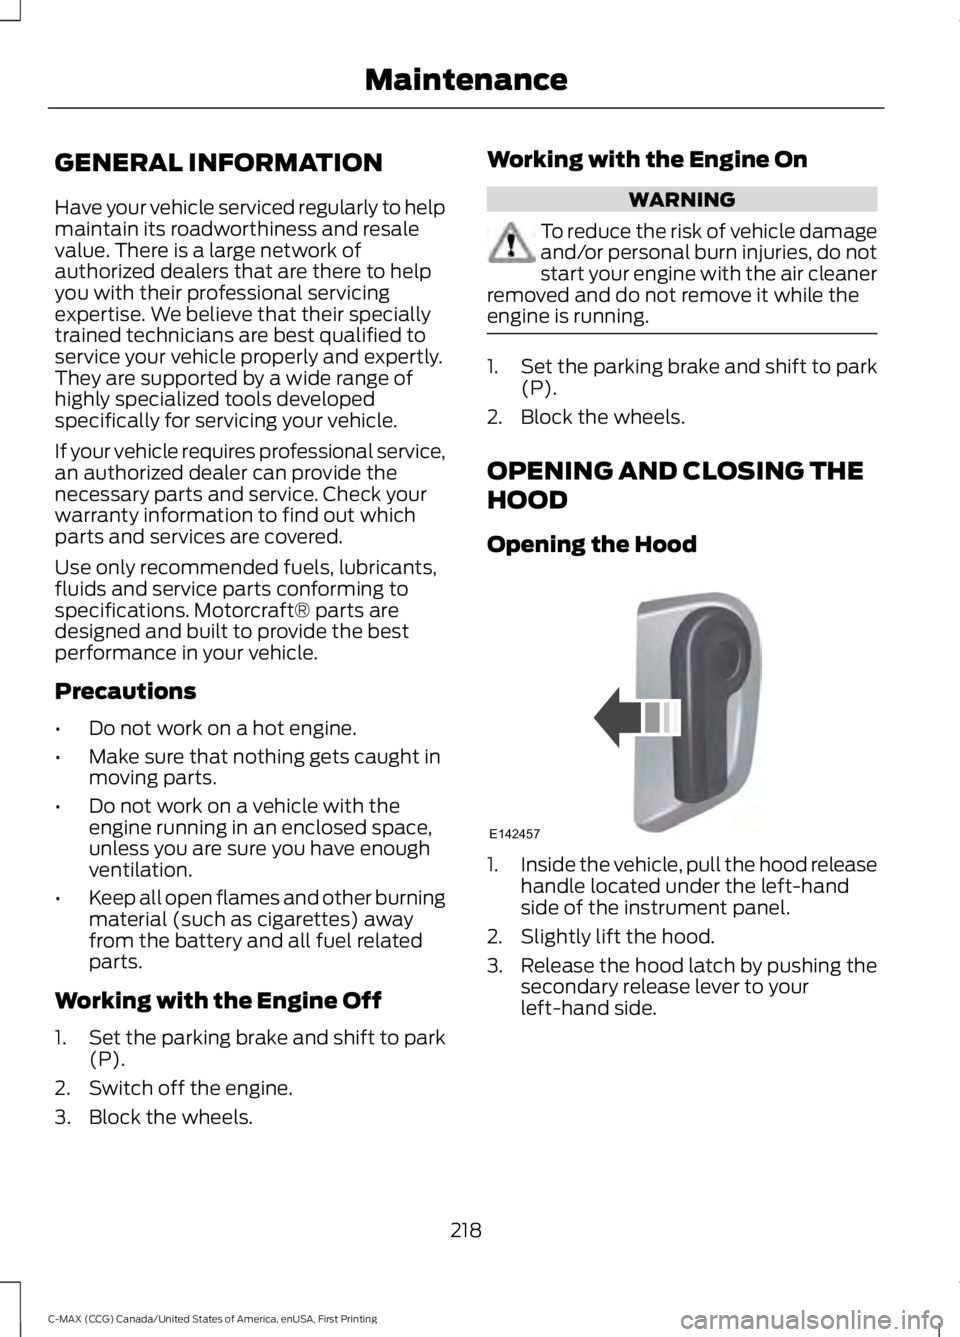
1.Inside the vehicle, pull the hood releasehandle located under the left-handside of the instrument panel.
2. Slightly lift the hood.
3. Release the hood latch by pushing thesecondary release lever to yourleft-hand side.
218
C-MAX (CCG) Canada/United States of America, enUSA, First Printing
MaintenanceE142457
Page 222 of 395
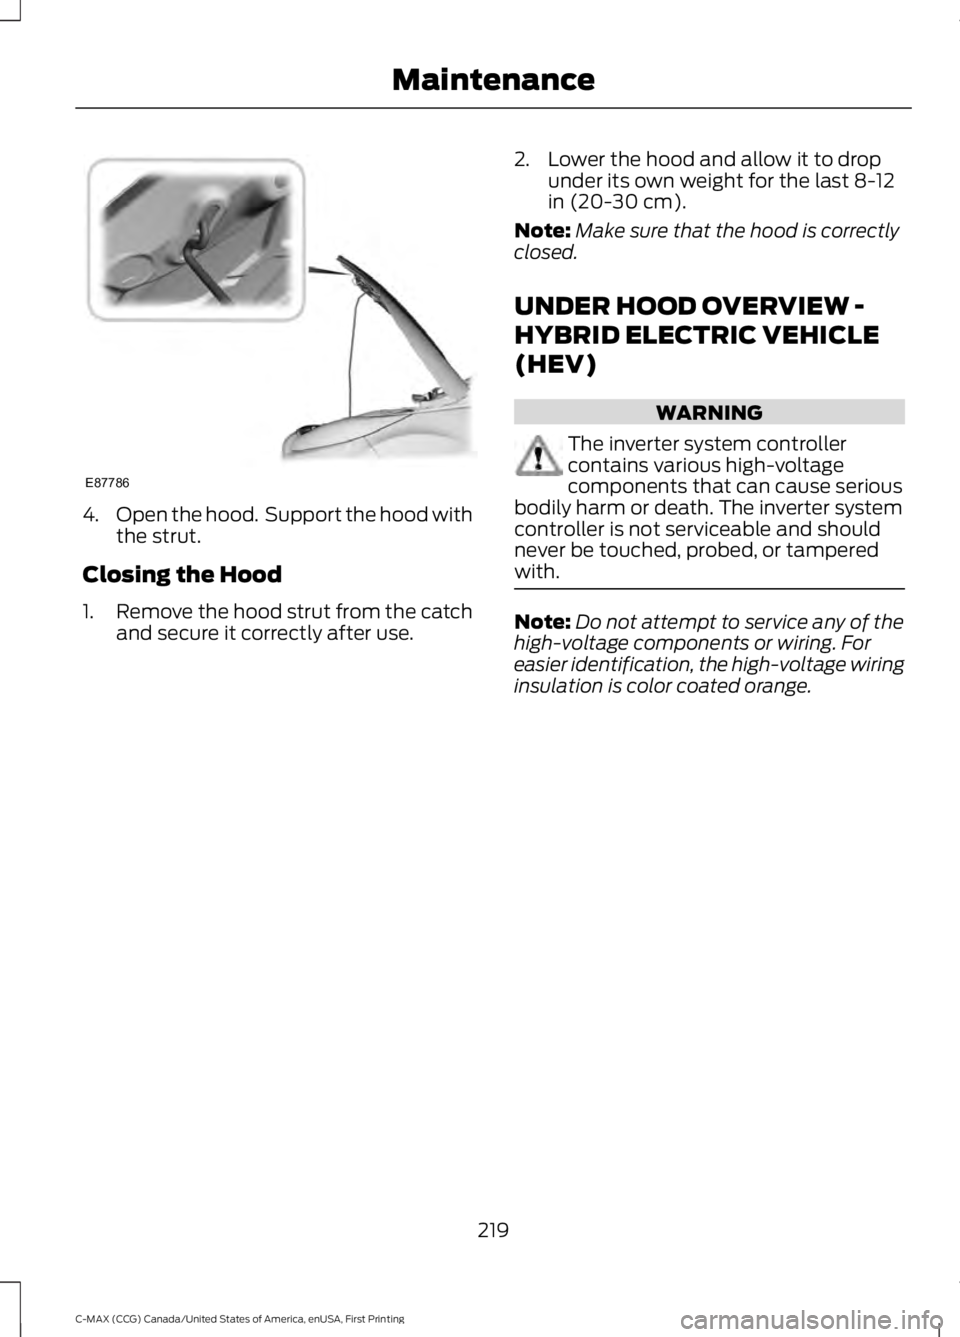
4.Open the hood. Support the hood withthe strut.
Closing the Hood
1.Remove the hood strut from the catchand secure it correctly after use.
2. Lower the hood and allow it to dropunder its own weight for the last 8-12in (20-30 cm).
Note:Make sure that the hood is correctlyclosed.
UNDER HOOD OVERVIEW -
HYBRID ELECTRIC VEHICLE
(HEV)
WARNING
The inverter system controllercontains various high-voltagecomponents that can cause seriousbodily harm or death. The inverter systemcontroller is not serviceable and shouldnever be touched, probed, or tamperedwith.
Note:Do not attempt to service any of thehigh-voltage components or wiring. Foreasier identification, the high-voltage wiringinsulation is color coated orange.
219
C-MAX (CCG) Canada/United States of America, enUSA, First Printing
MaintenanceE87786
Page 234 of 395
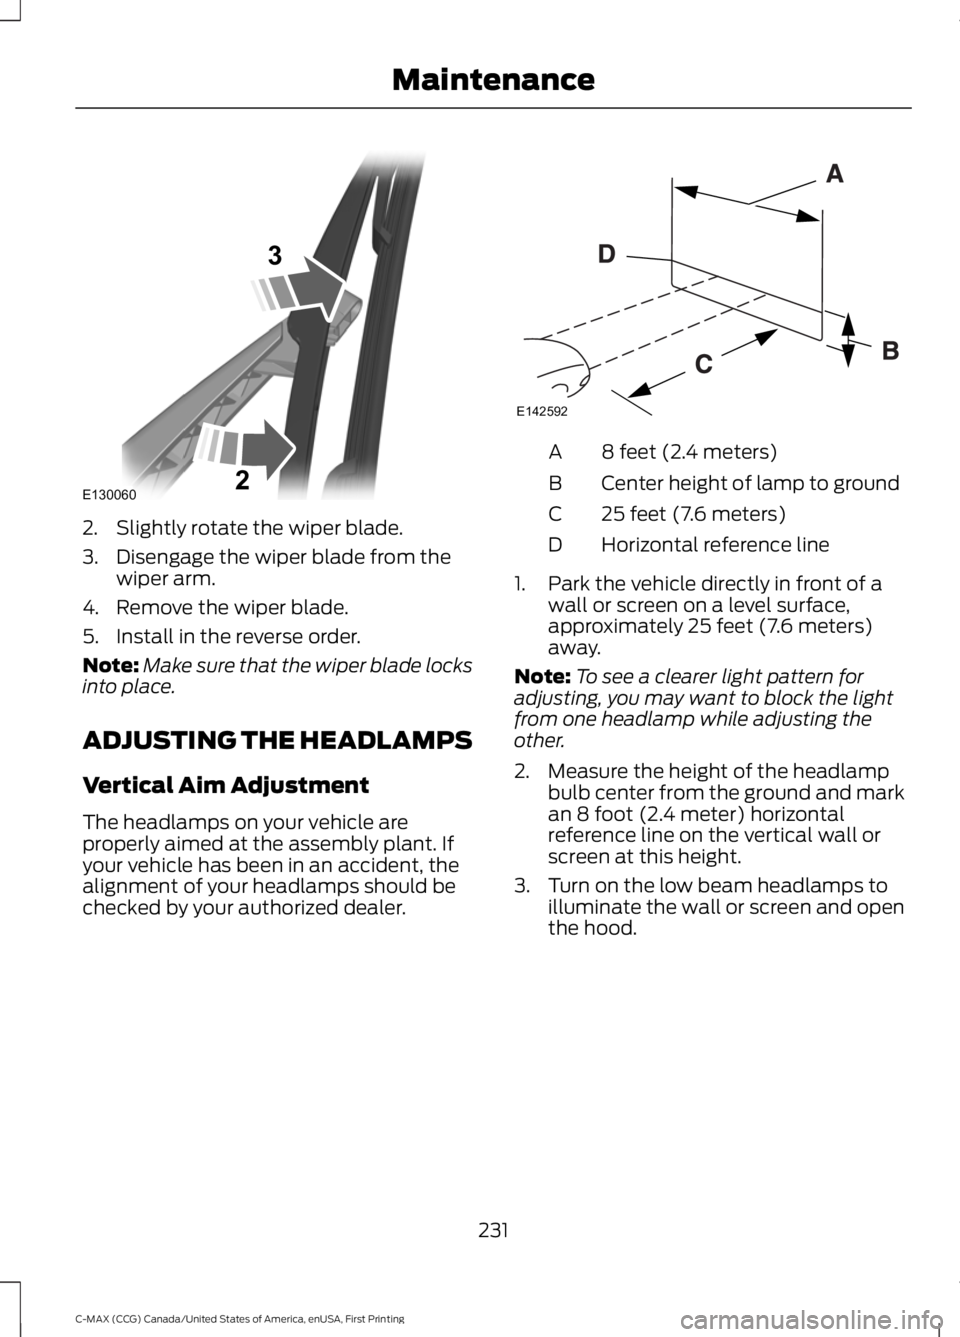
2. Slightly rotate the wiper blade.
3. Disengage the wiper blade from thewiper arm.
4. Remove the wiper blade.
5. Install in the reverse order.
Note:Make sure that the wiper blade locksinto place.
ADJUSTING THE HEADLAMPS
Vertical Aim Adjustment
The headlamps on your vehicle areproperly aimed at the assembly plant. Ifyour vehicle has been in an accident, thealignment of your headlamps should bechecked by your authorized dealer.
8 feet (2.4 meters)A
Center height of lamp to groundB
25 feet (7.6 meters)C
Horizontal reference lineD
1. Park the vehicle directly in front of awall or screen on a level surface,approximately 25 feet (7.6 meters)away.
Note:To see a clearer light pattern foradjusting, you may want to block the lightfrom one headlamp while adjusting theother.
2. Measure the height of the headlampbulb center from the ground and markan 8 foot (2.4 meter) horizontalreference line on the vertical wall orscreen at this height.
3. Turn on the low beam headlamps toilluminate the wall or screen and openthe hood.
231
C-MAX (CCG) Canada/United States of America, enUSA, First Printing
MaintenanceE130060
3
2 E142592