ECO mode FORD C MAX HYBRID 2014 2.G Owner's Manual
[x] Cancel search | Manufacturer: FORD, Model Year: 2014, Model line: C MAX HYBRID, Model: FORD C MAX HYBRID 2014 2.GPages: 447, PDF Size: 8.06 MB
Page 107 of 447
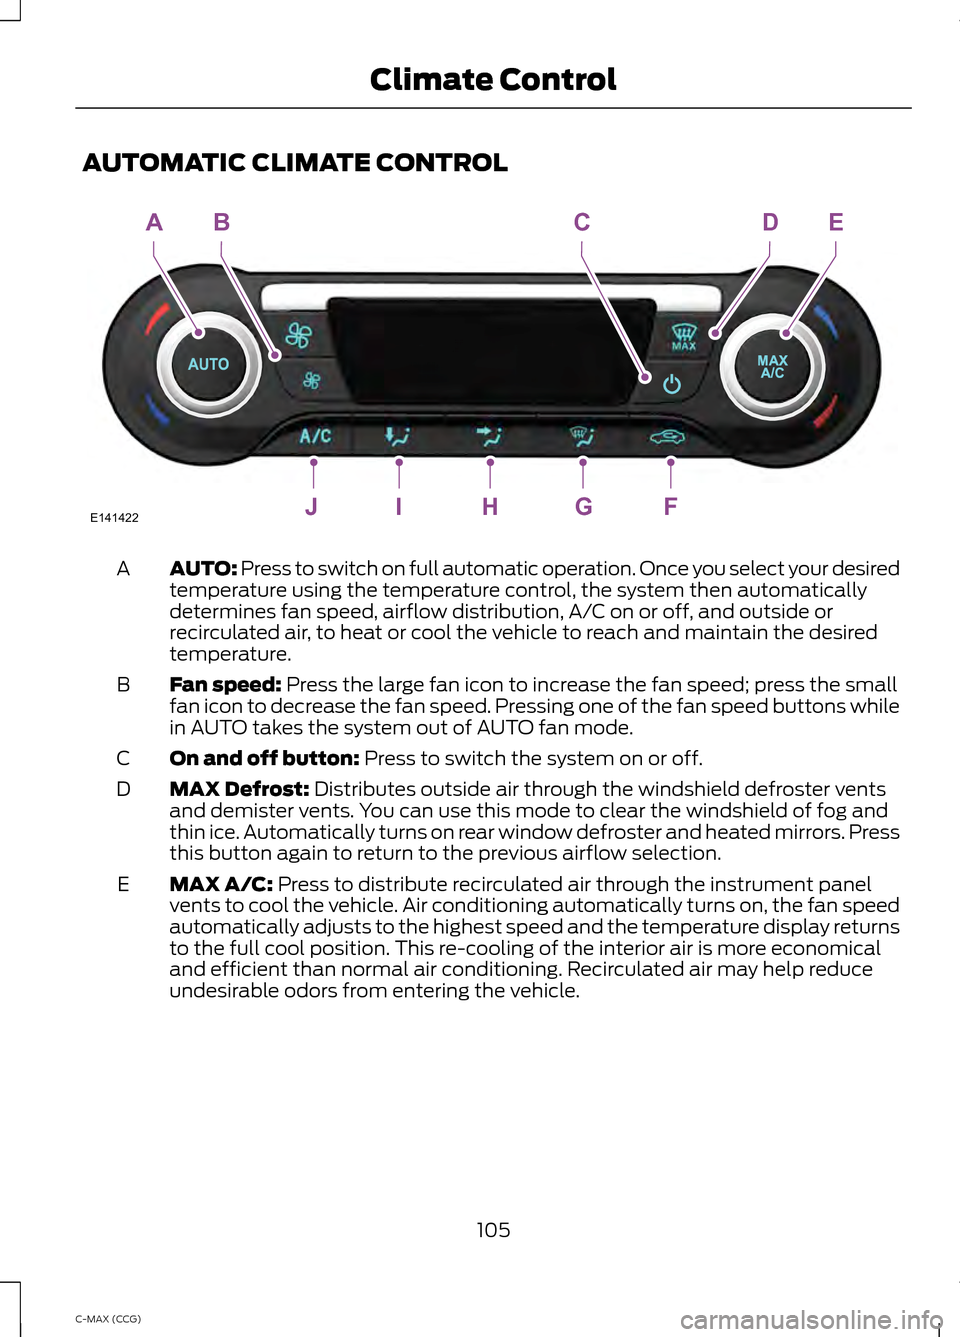
AUTOMATIC CLIMATE CONTROL
AUTO: Press to switch on full automatic operation. Once you select your desired
temperature using the temperature control, the system then automatically
determines fan speed, airflow distribution, A/C on or off, and outside or
recirculated air, to heat or cool the vehicle to reach and maintain the desired
temperature.
A
Fan speed: Press the large fan icon to increase the fan speed; press the small
fan icon to decrease the fan speed. Pressing one of the fan speed buttons while
in AUTO takes the system out of AUTO fan mode.
B
On and off button:
Press to switch the system on or off.
C
MAX Defrost:
Distributes outside air through the windshield defroster vents
and demister vents. You can use this mode to clear the windshield of fog and
thin ice. Automatically turns on rear window defroster and heated mirrors. Press
this button again to return to the previous airflow selection.
D
MAX A/C:
Press to distribute recirculated air through the instrument panel
vents to cool the vehicle. Air conditioning automatically turns on, the fan speed
automatically adjusts to the highest speed and the temperature display returns
to the full cool position. This re-cooling of the interior air is more economical
and efficient than normal air conditioning. Recirculated air may help reduce
undesirable odors from entering the vehicle.
E
105
C-MAX (CCG) Climate ControlE141422JIHGF
ABCDE
Page 109 of 447
Switching Back to Single Zone
Temperature Control
Press and hold AUTO for 2-4 seconds. The
passenger ’s side temperature switches to
the driver ’s side temperature setting.
HINTS ON CONTROLLING THE
INTERIOR CLIMATE
General Hints
Note: Prolonged use of recirculated air may
cause the windows to fog up.
Note: You may feel a small amount of air
from the footwell air vents regardless of the
air distribution setting.
Note: To reduce humidity build-up inside
your vehicle, do not drive with the system
switched off or with recirculated air always
switched on.
Note: Do not place objects under the front
seats as this may interfere with the airflow
to the rear seats.
Note: Remove any snow, ice or leaves from
the air intake area at the base of the
windshield.
Note: Do not adjust the settings when your
vehicle interior is extremely hot or cold. The
system automatically adjusts to the
previously stored settings. For the system
to function efficiently, the instrument panel
and side air vents should be fully open.
Note: At low ambient temperatures with
AUTO selected, the system directs the air
stream toward the windshield and side
windows for as long as the engine remains
cold.
Note: When you switch off the system,
outside air does not enter your vehicle. Note:
When the system is in AUTO mode,
and the interior and exterior temperatures
are high, the system automatically selects
recirculated air to maximize cooling of the
interior. When the interior reaches the
selected temperature, the system
automatically selects outside air.
Note: When you select windshield
defrosting and defogging, the instrument
panel and footwell level functions switch
off automatically and air conditioning
switches on. Outside air flows into your
vehicle.
For maximum cooling performance, press
MAX A/C
.
To aid in side window defogging and
demisting in cold weather, press the floor
vent button.
In mild weather, you can improve your fuel
economy when using the climate control
system by using outside air instead of air
conditioning.
• Turn the temperature control knob(s)
so the interior temperature is set to
60°F (15.5°C).
• Set the air distribution to panel or floor
(or both).
• Press
A/C so that A/C OFF appears
in the display.
• Press the recirculated air button so
fresh air enters the vehicle.
• Press the small fan button until the fan
is at its lowest setting.
HEATED WINDOWS AND
MIRRORS
(IF EQUIPPED)
Heated Rear Window
Note: You must switch the ignition on to
use this feature.
107
C-MAX (CCG) Climate Control
Page 121 of 447
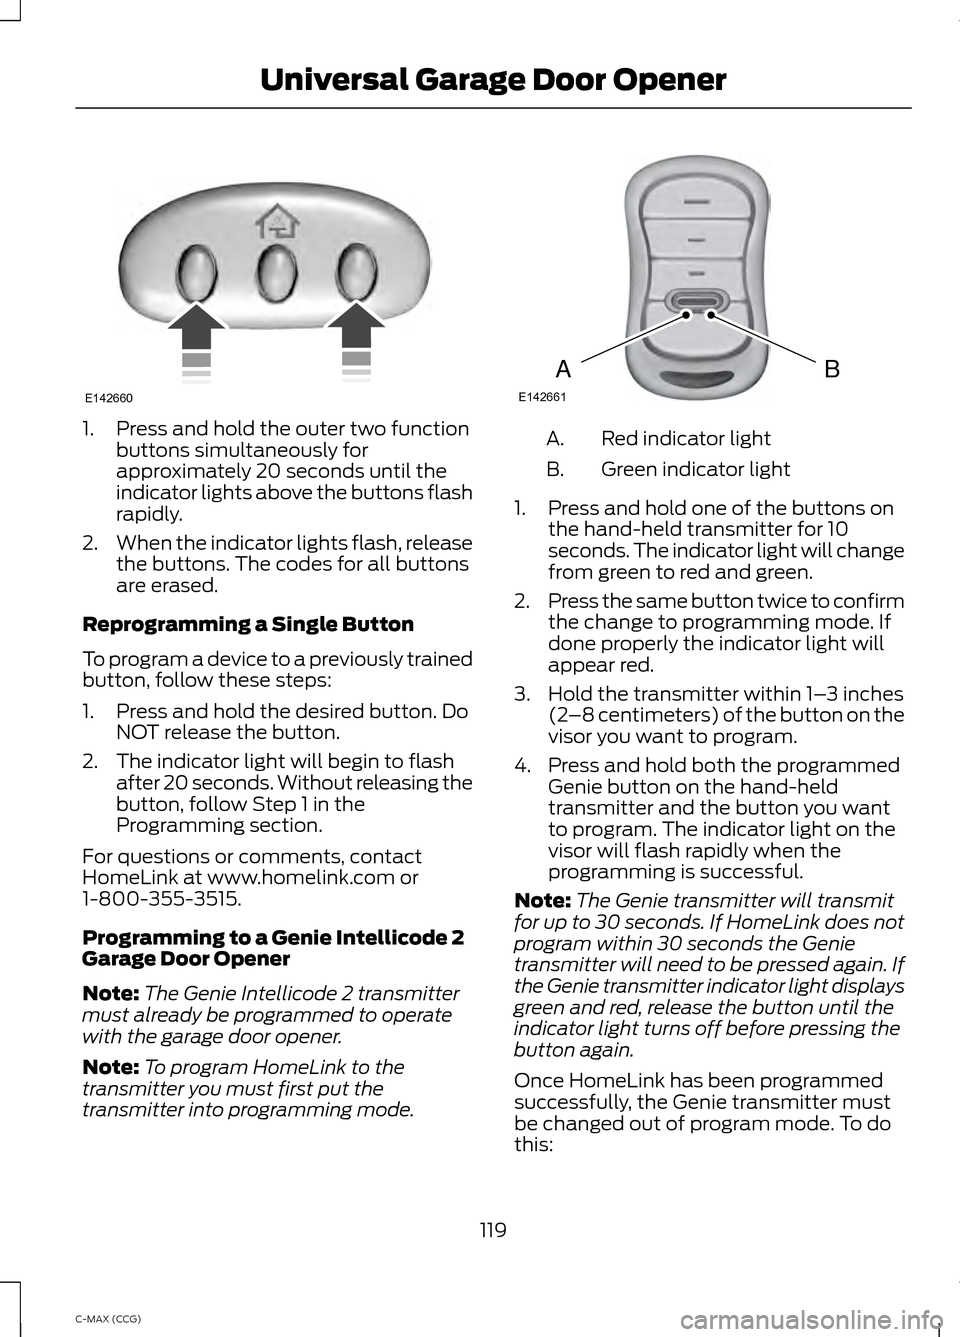
1. Press and hold the outer two function
buttons simultaneously for
approximately 20 seconds until the
indicator lights above the buttons flash
rapidly.
2. When the indicator lights flash, release
the buttons. The codes for all buttons
are erased.
Reprogramming a Single Button
To program a device to a previously trained
button, follow these steps:
1. Press and hold the desired button. Do NOT release the button.
2. The indicator light will begin to flash after 20 seconds. Without releasing the
button, follow Step 1 in the
Programming section.
For questions or comments, contact
HomeLink at www.homelink.com or
1-800-355-3515.
Programming to a Genie Intellicode 2
Garage Door Opener
Note: The Genie Intellicode 2 transmitter
must already be programmed to operate
with the garage door opener.
Note: To program HomeLink to the
transmitter you must first put the
transmitter into programming mode. Red indicator light
A.
Green indicator light
B.
1. Press and hold one of the buttons on the hand-held transmitter for 10
seconds. The indicator light will change
from green to red and green.
2. Press the same button twice to confirm
the change to programming mode. If
done properly the indicator light will
appear red.
3. Hold the transmitter within 1– 3 inches
(2 –8 centimeters) of the button on the
visor you want to program.
4. Press and hold both the programmed Genie button on the hand-held
transmitter and the button you want
to program. The indicator light on the
visor will flash rapidly when the
programming is successful.
Note: The Genie transmitter will transmit
for up to 30 seconds. If HomeLink does not
program within 30 seconds the Genie
transmitter will need to be pressed again. If
the Genie transmitter indicator light displays
green and red, release the button until the
indicator light turns off before pressing the
button again.
Once HomeLink has been programmed
successfully, the Genie transmitter must
be changed out of program mode. To do
this:
119
C-MAX (CCG) Universal Garage Door OpenerE142660 BAE142661
Page 122 of 447
1. Press and hold the previously
programmed Genie button on the
hand-held transmitter for 10 seconds.
The indicator light will change from red
to red and green.
2. Press the same button twice to confirm
the change. If done correctly the
indicator light will turn green.
Programming HomeLink to the Genie
Intellicode Garage Door Opener Motor
Note: You may need a ladder to access the
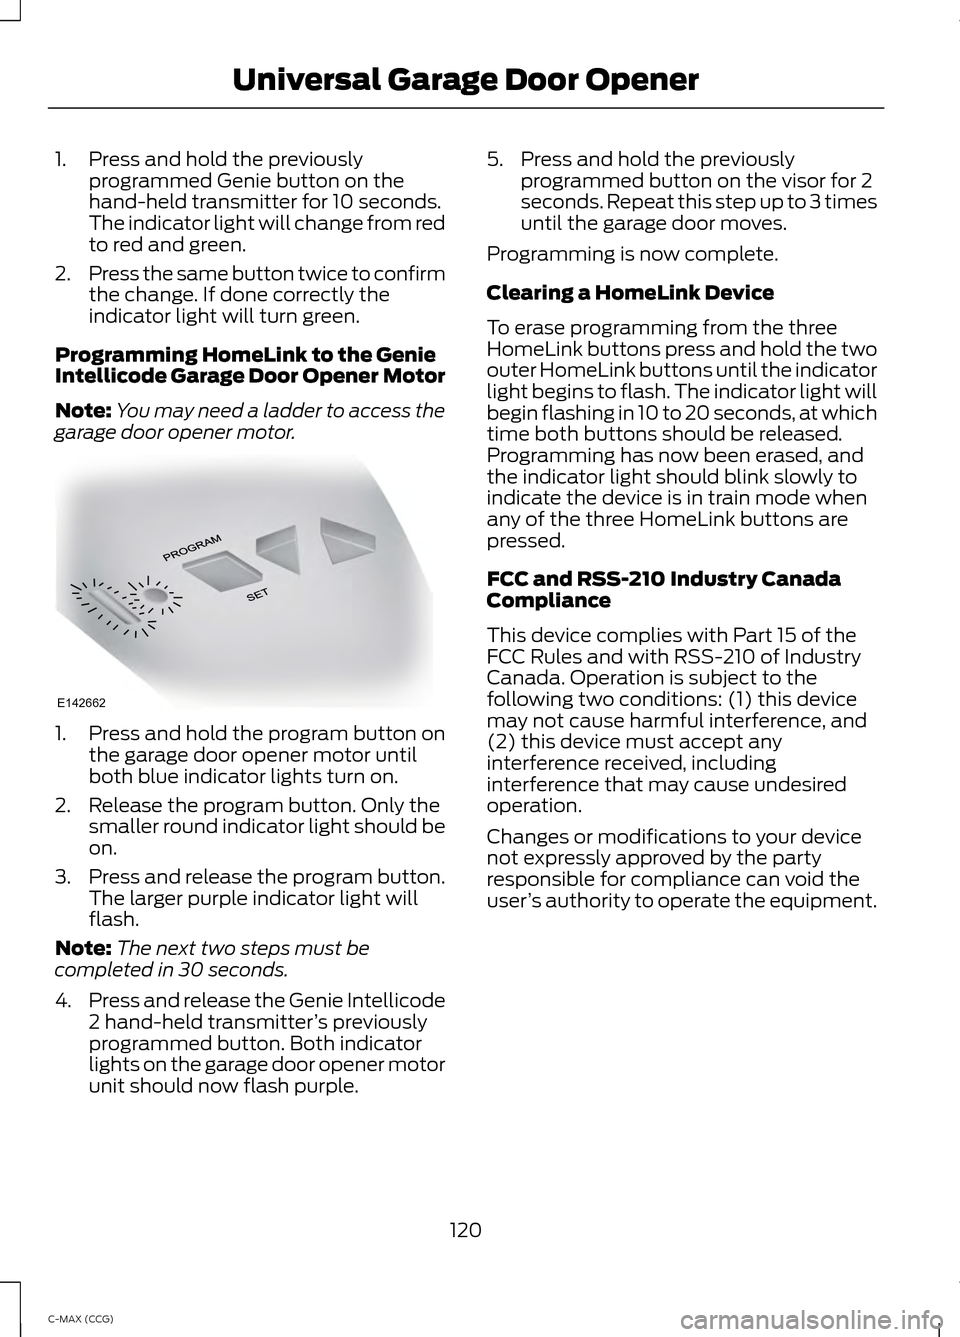
garage door opener motor. 1. Press and hold the program button on
the garage door opener motor until
both blue indicator lights turn on.
2. Release the program button. Only the smaller round indicator light should be
on.
3. Press and release the program button.
The larger purple indicator light will
flash.
Note: The next two steps must be
completed in 30 seconds.
4. Press and release the Genie Intellicode
2 hand-held transmitter ’s previously
programmed button. Both indicator
lights on the garage door opener motor
unit should now flash purple. 5. Press and hold the previously
programmed button on the visor for 2
seconds. Repeat this step up to 3 times
until the garage door moves.
Programming is now complete.
Clearing a HomeLink Device
To erase programming from the three
HomeLink buttons press and hold the two
outer HomeLink buttons until the indicator
light begins to flash. The indicator light will
begin flashing in 10 to 20 seconds, at which
time both buttons should be released.
Programming has now been erased, and
the indicator light should blink slowly to
indicate the device is in train mode when
any of the three HomeLink buttons are
pressed.
FCC and RSS-210 Industry Canada
Compliance
This device complies with Part 15 of the
FCC Rules and with RSS-210 of Industry
Canada. Operation is subject to the
following two conditions: (1) this device
may not cause harmful interference, and
(2) this device must accept any
interference received, including
interference that may cause undesired
operation.
Changes or modifications to your device
not expressly approved by the party
responsible for compliance can void the
user ’s authority to operate the equipment.
120
C-MAX (CCG) Universal Garage Door OpenerE142662
Page 127 of 447
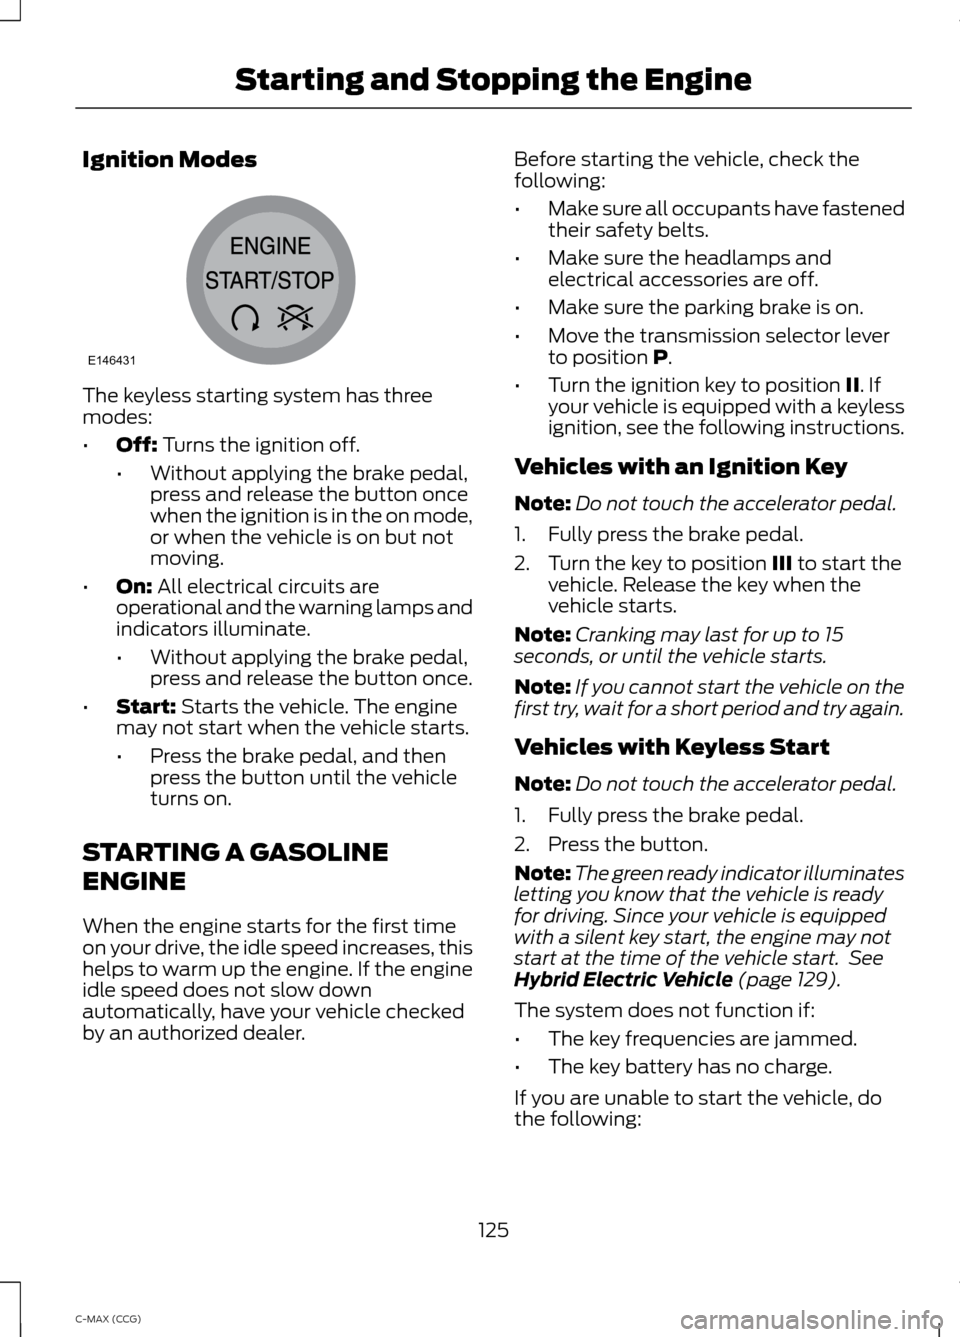
Ignition Modes
The keyless starting system has three
modes:
•
Off: Turns the ignition off.
• Without applying the brake pedal,
press and release the button once
when the ignition is in the on mode,
or when the vehicle is on but not
moving.
• On:
All electrical circuits are
operational and the warning lamps and
indicators illuminate.
• Without applying the brake pedal,
press and release the button once.
• Start:
Starts the vehicle. The engine
may not start when the vehicle starts.
• Press the brake pedal, and then
press the button until the vehicle
turns on.
STARTING A GASOLINE
ENGINE
When the engine starts for the first time
on your drive, the idle speed increases, this
helps to warm up the engine. If the engine
idle speed does not slow down
automatically, have your vehicle checked
by an authorized dealer. Before starting the vehicle, check the
following:
•
Make sure all occupants have fastened
their safety belts.
• Make sure the headlamps and
electrical accessories are off.
• Make sure the parking brake is on.
• Move the transmission selector lever
to position
P.
• Turn the ignition key to position
II. If
your vehicle is equipped with a keyless
ignition, see the following instructions.
Vehicles with an Ignition Key
Note: Do not touch the accelerator pedal.
1. Fully press the brake pedal.
2. Turn the key to position
III to start the
vehicle. Release the key when the
vehicle starts.
Note: Cranking may last for up to 15
seconds, or until the vehicle starts.
Note: If you cannot start the vehicle on the
first try, wait for a short period and try again.
Vehicles with Keyless Start
Note: Do not touch the accelerator pedal.
1. Fully press the brake pedal.
2. Press the button.
Note: The green ready indicator illuminates
letting you know that the vehicle is ready
for driving. Since your vehicle is equipped
with a silent key start, the engine may not
start at the time of the vehicle start. See
Hybrid Electric Vehicle
(page 129).
The system does not function if:
• The key frequencies are jammed.
• The key battery has no charge.
If you are unable to start the vehicle, do
the following:
125
C-MAX (CCG) Starting and Stopping the EngineE146431
Page 131 of 447
HYBRID ELECTRIC VEHICLE
Plug-in Power Mode and Hybrid
Mode (C-MAX Energi Only)
You must plug C-MAX Energi vehicles in
regularly for optimal use of the high
voltage battery's extended range
capability. When you charge your vehicle,
you add electrical energy that is then used
to propel the vehicle in plug-in power
mode. You can view your estimated
electric range in this mode from the
enhanced battery gauge on the instrument
panel display. The system maximizes the
use of electric-only operation in plug-in
power mode. System conditions may
require engine operation; however, the
system uses plug-in power whenever
possible.
When your plug-in power has been
depleted, the powertrain system will
automatically switch to hybrid mode. Your
battery gauge will show an electric range
of zero before transitioning to a simple
battery graphic upon entering hybrid mode.
Hybrid mode uses both the gasoline engine
and electric motor to power your vehicle
and maximize fuel economy as with
C-MAX Hybrid.
EV Modes (C-MAX Energi Only)
Your vehicle contains selectable
EV modes through the EV button
on the center console.
These modes are available when the
vehicle can run under high voltage battery
power. With the vehicle in driving mode,
you can change EV modes with each press
of the EV button. The current mode will be
displayed in the left hand instrument
cluster screen. Auto EV This mode provides an
automatic use of high voltage
battery power during the drive,
staying in electric mode when possible and
running the engine when needed. This
mode will be the only one available if the
plug-in power has been depleted.
EV Now This mode provides an electric
only driving experience. The
left-hand information display
will change to an Energy Use screen that
supplies EV specific tools and functions.
The vehicle may accelerate more slowly
and the top speed may be lower than in
Auto mode. Your engine may be enabled
at any time by using one of the following
methods:
1. Press the OK button on the left 5– way
steering wheel control while viewing
the EV screen. The vehicle will enable
the engine as needed, and will
automatically return to EV Now after
eight seconds or when the engine is no
longer needed.
2. Press the accelerator pedal fully. A pop
up message stating Press OK to
Enable Engine will appear. Press OK
on the left steering wheel button to
activate as needed. The message will
disappear if you release the accelerator
pedal.
3. Press the EV button. This will change the mode to EV Later and permit
engine operation.
The vehicle may automatically enter
Engine Enabled mode if system conditions
require it. A message Engine Enabled for
System Performance
will display if this
occurs. This is normal function, and your
vehicle will return to EV Now when
possible.
129
C-MAX (CCG) Unique Driving CharacteristicsE144814 E155152 E144814
Page 134 of 447
During certain events (such as vehicle
servicing) your low voltage 12-volt battery
may become disconnected or disabled.
Once the battery is reconnected and after
driving the vehicle, the engine may
continue to operate for three to five
seconds after the key is turned to off. This
is a normal condition.
Braking: Your hybrid is equipped with
standard hydraulic braking and
regenerative braking. Regenerative braking
is performed by your transmission and it
captures brake energy and stores it in your
high voltage battery.
Driving to optimize fuel economy
Note: Having your engine running is not
always an indication of inefficiency. In some
cases, it is actually more efficient than
driving in electric mode.
Your fuel economy should improve
throughout your hybrid's break-in period.
As with any vehicle, your driving habits and
accessory usage can significantly impact
your fuel economy. For best results, keep
in mind these tips:
• Keep the tires properly inflated and
only use the recommended size.
• Aggressive driving increases the
amount of energy required to move
your vehicle. In general, you can
achieve better fuel economy with mild
to moderate acceleration and
deceleration. Moderate braking is
particularly important since it allows
you to maximize the energy captured
by the regenerative braking system. Additional Tips:
•
Do not carry extra loads.
• Be mindful of adding external
accessories that may increase
aerodynamic drag.
• Observe posted speed limits.
• Perform all scheduled maintenance.
• There is no need to wait for your engine
to warm up. The vehicle is ready to
drive immediately after starting.
EV+ Mode
Your vehicle will recognize your frequent
destinations and allow for more EV driving
as you approach them. For example, when
nearing your home it should be easier to
stay in electric mode. The EV indicator will
display EV+ when this mode is active. You
should see this approximately 1/8 mile
(200 meters) from a frequent destination.
See
Information Displays (page 88).
Note: Frequent destinations are learned by
your vehicle after two to four weeks of use.
You can clear these destinations with a
Driving History reset through the Settings
menu.
Note: The EV+ feature can be turned on or
off through the Driver Assist section of the
Settings menu.
132
C-MAX (CCG) Unique Driving Characteristics
Page 138 of 447
FUEL QUALITY
Note:
Use of any fuel other than those
recommended may cause powertrain
damage, a loss of vehicle performance and
repairs may not be covered under warranty.
Choosing the Right Fuel
Use only UNLEADED gasoline or
UNLEADED gasoline blended with a
maximum of 15% ethanol in your gasoline
vehicle. If your vehicle is a Flex Fuel Vehicle
(FFV), it will have a yellow bezel placed
over the fuel fill inlet.
Do not use:
• fuels containing more than 15%
ethanol or E-85 fuel
• fuels containing methanol
• fuels containing metallic based
additives, including manganese-based
compounds
• fuels containing the octane booster
additive, methylcyclopentadienyl
manganese tricarbonyl (MMT)
• leaded-fuel (The use of leaded fuel is
prohibited by law)
Note: Use of any fuel other than the
recommended fuel can cause powertrain
damage, impair the emission control system
or cause loss of vehicle performance. Any
damage to the vehicle that is caused by the
use of fuel not recommended will not be
covered under warranty.
Octane Recommendations
Regular unleaded gasoline with a pump
(R+M)/2 octane rating of 87 is
recommended. Some fuel stations offer
fuels posted as regular with an octane
rating below 87, particularly in high altitude
areas. Fuels with octane levels below 87
are not recommended. Do not be concerned if your engine
sometimes knocks lightly. However, if it
knocks heavily while you are using fuel with
the recommended octane rating, see your
authorized dealer to prevent any engine
damage.
Fuel Freshness Mode (Energi
Vehicles Only)
This feature helps keeps the fuel system
functional and the fuel fresh.
If you operate your vehicle mainly in plug-in
power mode using electricity from plugging
in without refueling, the gasoline in your
tank eventually becomes old. Old fuel can
damage the engine and fuel system.
To prevent the fuel from becoming old,
your vehicle will automatically enter fuel
freshness mode. In fuel freshness mode
operates, your vehicle will operate in hybrid
mode causing the gasoline engine to run
in order to consume the fuel in the fuel
tank.
Note:
If new fuel is not added during an 18
month period, fuel freshness mode will
consume fuel until about 1 gallon (3.8 liters)
is left in the tank.
During fuel freshness mode:
• The information display screen will
indicate that fuel freshness mode is
active.
• The vehicle will only run in hybrid mode.
EV Now will not be available.
• Most of the plug-in power will be
stored until fuel freshness mode is
completed.
Note: EV Now can resume if less than 1
gallon (3.8 liters) of fuel is left in the tank.
Note: In most cases, when the fuel level is
below 1/4 tank, refueling the vehicle will end
fuel freshness mode and EV Now will now
become available. Refueling after
consuming a full tank in fuel freshness mode
will end the mode.
136
C-MAX (CCG) Fuel and Refueling
Page 187 of 447
•
Use the recommended engine oil.
• Perform all regularly scheduled
maintenance.
• Use the coach and brake coach display
to get feedback on your economical
drive style. For more information, See
Information Displays (page 88).
Avoid these actions; they reduce your fuel
economy:
• Avoid sudden accelerations or hard
accelerations. Accelerate and slow
down in a smooth, moderate fashion.
• Avoid revving the engine before turning
off your vehicle.
• Avoid long idle periods.
• Do not warm up your vehicle on cold
mornings.
• Do not rest your foot on the brake
pedal while driving.
• Avoid carrying unnecessary weight.
Approximately 1 mile per gallon (0.4
kilometers per liter) is lost for every
400 pounds (180 kilograms) of weight
carried.
• Avoid adding particular accessories to
your vehicle (bug deflectors, car top
carriers, ski or bike racks).
• Avoid driving with the wheels out of
alignment.
Things to keep in mind when you refuel
your vehicle:
• Fuel generates fewer vapors when it is
cool and dark outside. Fill your vehicle
up in the early morning or late evening.
• Use the recommended octane-rated
fuel. Using fuel below the
recommended rating will lower your
fuel economy. DRIVING THROUGH WATER
Note:
Driving through deep water above
the recommended levels can cause vehicle
damage.
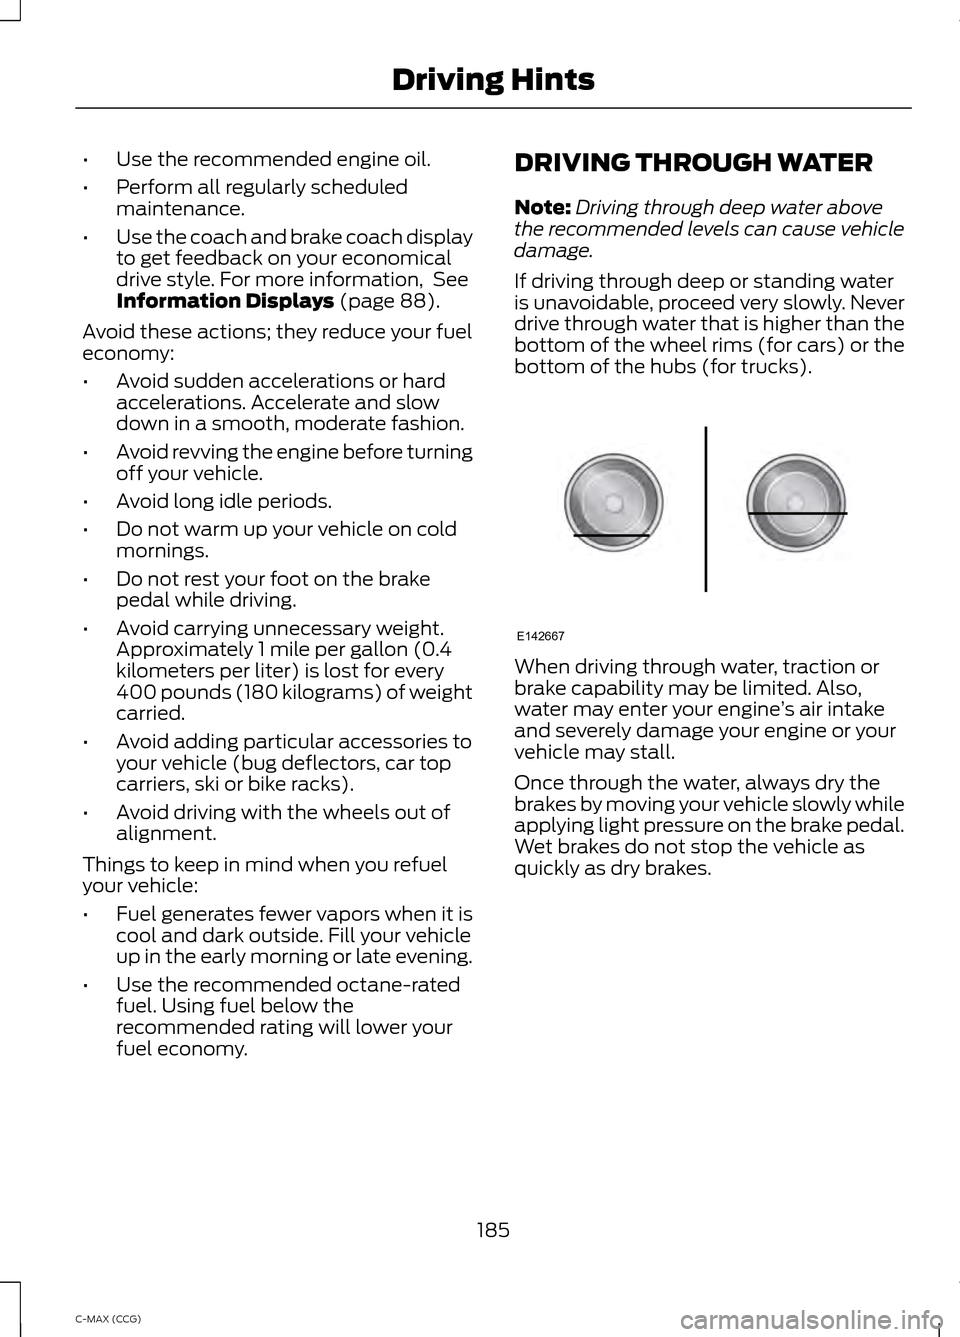
If driving through deep or standing water
is unavoidable, proceed very slowly. Never
drive through water that is higher than the
bottom of the wheel rims (for cars) or the
bottom of the hubs (for trucks). When driving through water, traction or
brake capability may be limited. Also,
water may enter your engine
’s air intake
and severely damage your engine or your
vehicle may stall.
Once through the water, always dry the
brakes by moving your vehicle slowly while
applying light pressure on the brake pedal.
Wet brakes do not stop the vehicle as
quickly as dry brakes.
185
C-MAX (CCG) Driving HintsE142667
Page 190 of 447
HAZARD WARNING FLASHERS
Note:
If used when the vehicle is not
running, the battery will lose charge. There
may be insufficient power to restart your
vehicle. The hazard warning button is
located on the instrument panel.
Use it when your vehicle is
creating a safety hazard for other
motorists.
• Press the button to turn on the hazard
warning function, and the front and
rear direction indicators will flash.
• Press the button again to turn them
off.
FUEL SHUTOFF WARNING
Failure to inspect and, if necessary,
repair fuel leaks after a collision may
increase the risk of fire and serious
injury. Ford Motor Company recommends
that the fuel system be inspected by an
authorized dealer after any collision. In the event of a moderate to severe
collision, this vehicle is equipped with a
fuel pump shut-off feature that stops the
flow of fuel to the engine. Not every impact
will cause a shut-off.
Should your vehicle shut off after a
collision, you may restart your vehicle by
doing the following:
1. Turn the ignition off.
2. Turn the ignition to crank.
3. Turn the ignition off.
4.
Turn the ignition on again to re-enable
the fuel pump.
For vehicles equipped with a push button
start system: 1. Press the START/STOP button to
turn the ignition off.
2. Press the brake pedal and press the START/STOP
button (crank
attempt).
3. Remove your foot from the brake pedal
and press the
START/STOP button
(ignition off).
4. Press the
START/STOP button again
to re-enable the fuel system.
JUMP-STARTING THE VEHICLE WARNINGS
The gases around the battery can
explode if exposed to flames, sparks
or lit cigarettes. An explosion could
result in injury or vehicle damage. Batteries contain sulfuric acid which
can burn skin, eyes and clothing, if
contacted.
Do not attempt to push-start your
automatic transmission vehicle. Automatic
transmissions do not have push-start
capability. Attempting to push-start a
vehicle with an automatic transmission
may cause transmission damage.
Preparing Your Vehicle
Note:
Use only a 12-volt supply to start your
vehicle.
Note: Do not disconnect the battery of the
disabled vehicle as this could damage the
vehicle's electrical system.
1. Park the booster vehicle close to the hood of the disabled vehicle making
sure the two vehicles do not touch. Set
the parking brake on both vehicles and
stay clear of the engine cooling fan and
other moving parts.
188
C-MAX (CCG) Roadside Emergencies