remove seats FORD C MAX HYBRID 2017 2.G User Guide
[x] Cancel search | Manufacturer: FORD, Model Year: 2017, Model line: C MAX HYBRID, Model: FORD C MAX HYBRID 2017 2.GPages: 497, PDF Size: 6.3 MB
Page 118 of 497
WARNINGS
Install the head restraint properly to
help minimize the risk of neck injury
in the event of a crash.
Note:
Adjust the seatback to an upright
driving position before adjusting the head
restraint. Adjust the head restraint so that
the top of it is level with the top of your head
and as far forward as possible. Make sure
that you remain comfortable. If you are
extremely tall, adjust the head restraint to
its highest position.
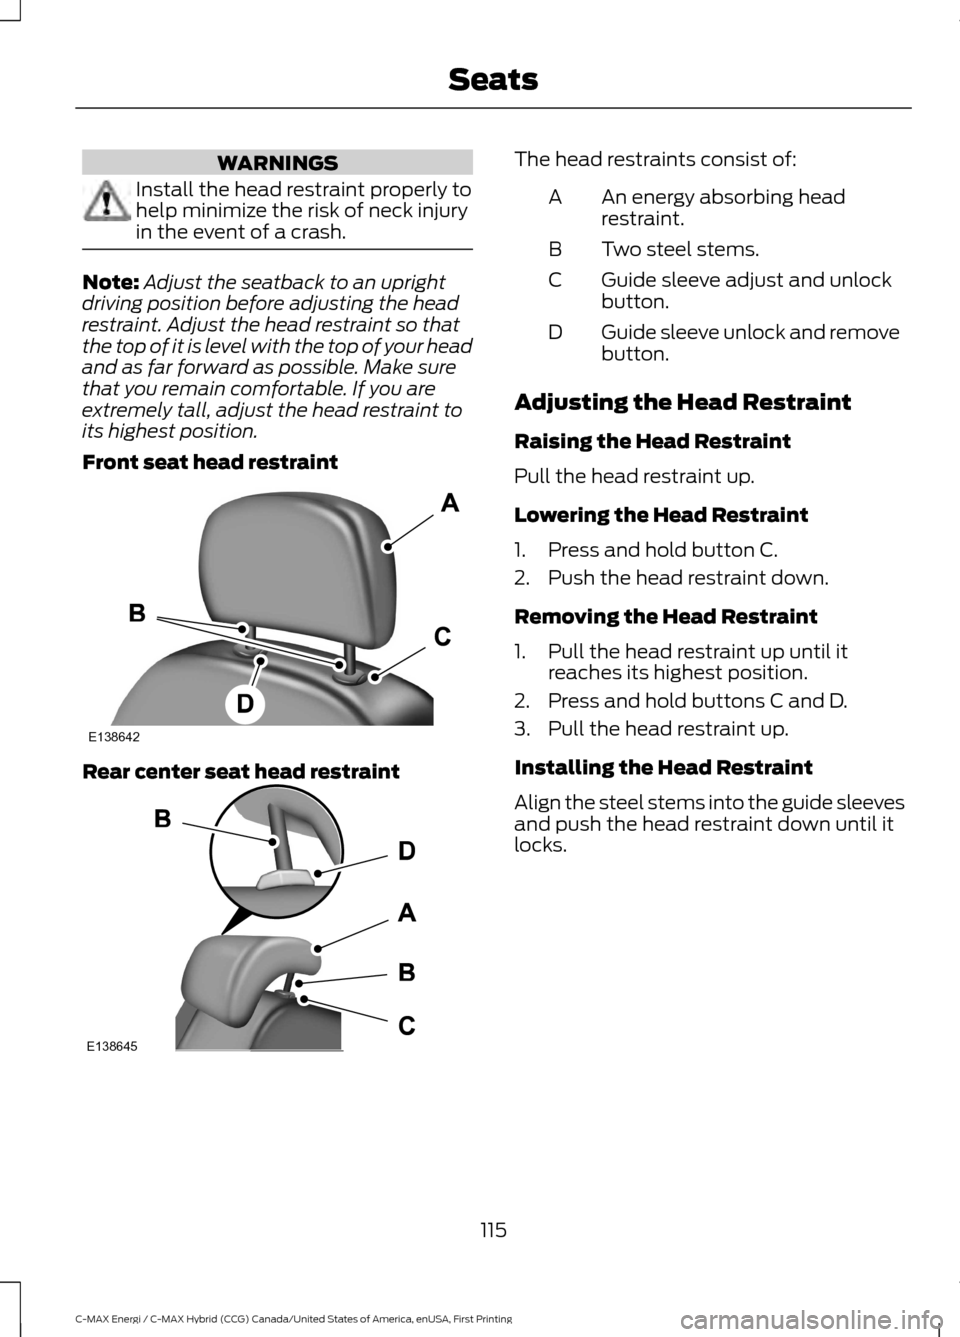
Front seat head restraint Rear center seat head restraint The head restraints consist of:
An energy absorbing head
restraint.
A
Two steel stems.
B
Guide sleeve adjust and unlock
button.
C
Guide sleeve unlock and remove
button.
D
Adjusting the Head Restraint
Raising the Head Restraint
Pull the head restraint up.
Lowering the Head Restraint
1. Press and hold button C.
2. Push the head restraint down.
Removing the Head Restraint
1. Pull the head restraint up until it reaches its highest position.
2. Press and hold buttons C and D.
3. Pull the head restraint up.
Installing the Head Restraint
Align the steel stems into the guide sleeves
and push the head restraint down until it
locks.
115
C-MAX Energi / C-MAX Hybrid (CCG) Canada/United States of America, enUSA, First Printing SeatsE138642 E138645
Page 119 of 497
Rear Seat Outboard Head Restraints
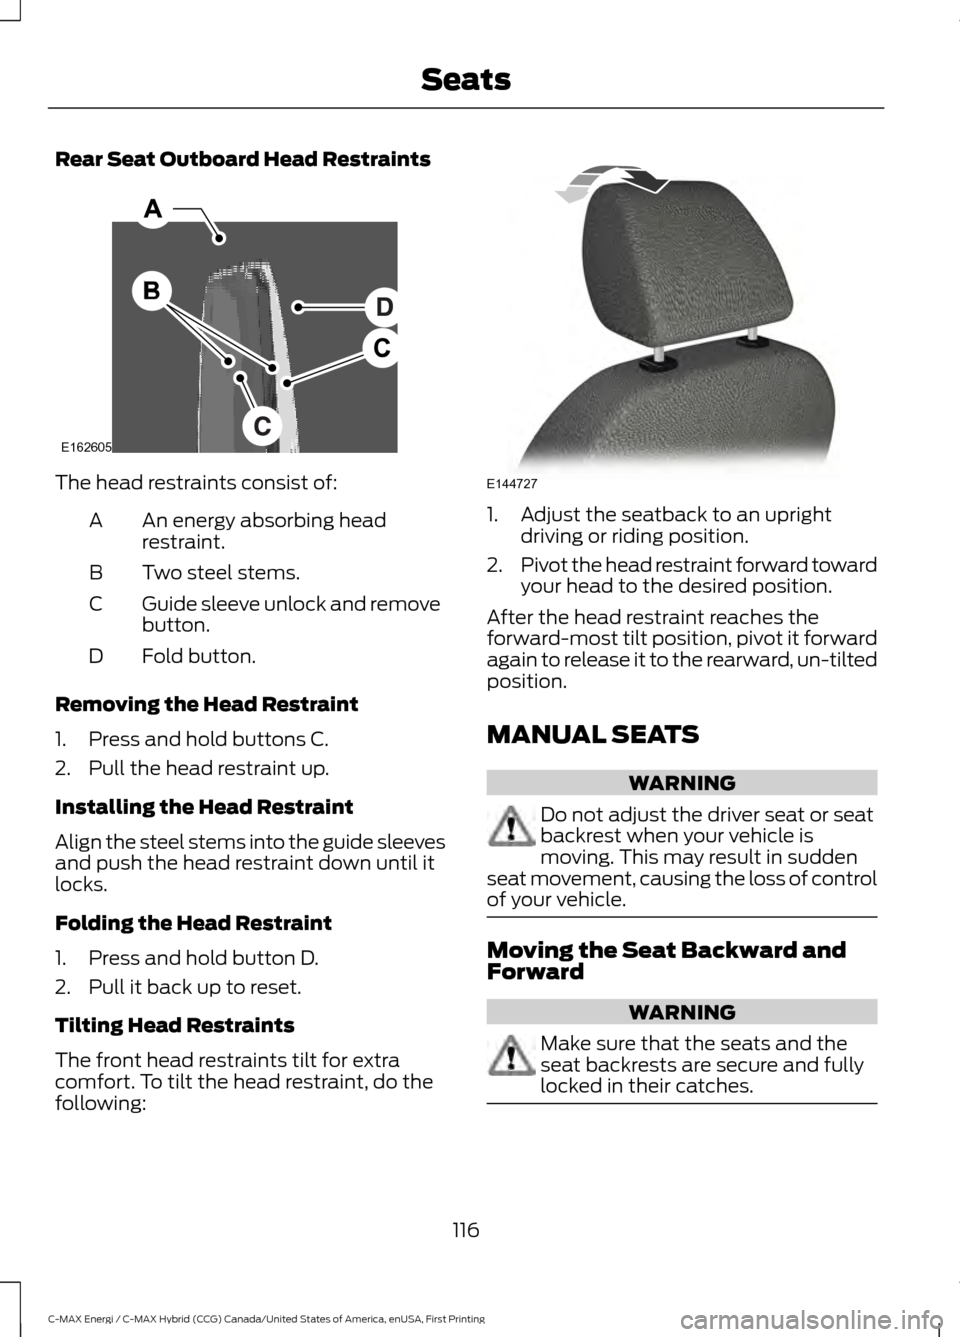
The head restraints consist of:
An energy absorbing head
restraint.
A
Two steel stems.
B
Guide sleeve unlock and remove
button.
C
Fold button.
D
Removing the Head Restraint
1. Press and hold buttons C.
2. Pull the head restraint up.
Installing the Head Restraint
Align the steel stems into the guide sleeves
and push the head restraint down until it
locks.
Folding the Head Restraint
1. Press and hold button D.
2. Pull it back up to reset.
Tilting Head Restraints
The front head restraints tilt for extra
comfort. To tilt the head restraint, do the
following: 1. Adjust the seatback to an upright
driving or riding position.
2. Pivot the head restraint forward toward
your head to the desired position.
After the head restraint reaches the
forward-most tilt position, pivot it forward
again to release it to the rearward, un-tilted
position.
MANUAL SEATS WARNING
Do not adjust the driver seat or seat
backrest when your vehicle is
moving. This may result in sudden
seat movement, causing the loss of control
of your vehicle. Moving the Seat Backward and
Forward
WARNING
Make sure that the seats and the
seat backrests are secure and fully
locked in their catches.
116
C-MAX Energi / C-MAX Hybrid (CCG) Canada/United States of America, enUSA, First Printing SeatsE162605 E144727
Page 155 of 497
Note:
The service disconnect has an outer
lever to aid in the proper seating of the
service disconnect lever. Remove this to
disconnect the high-voltage service
disconnect.
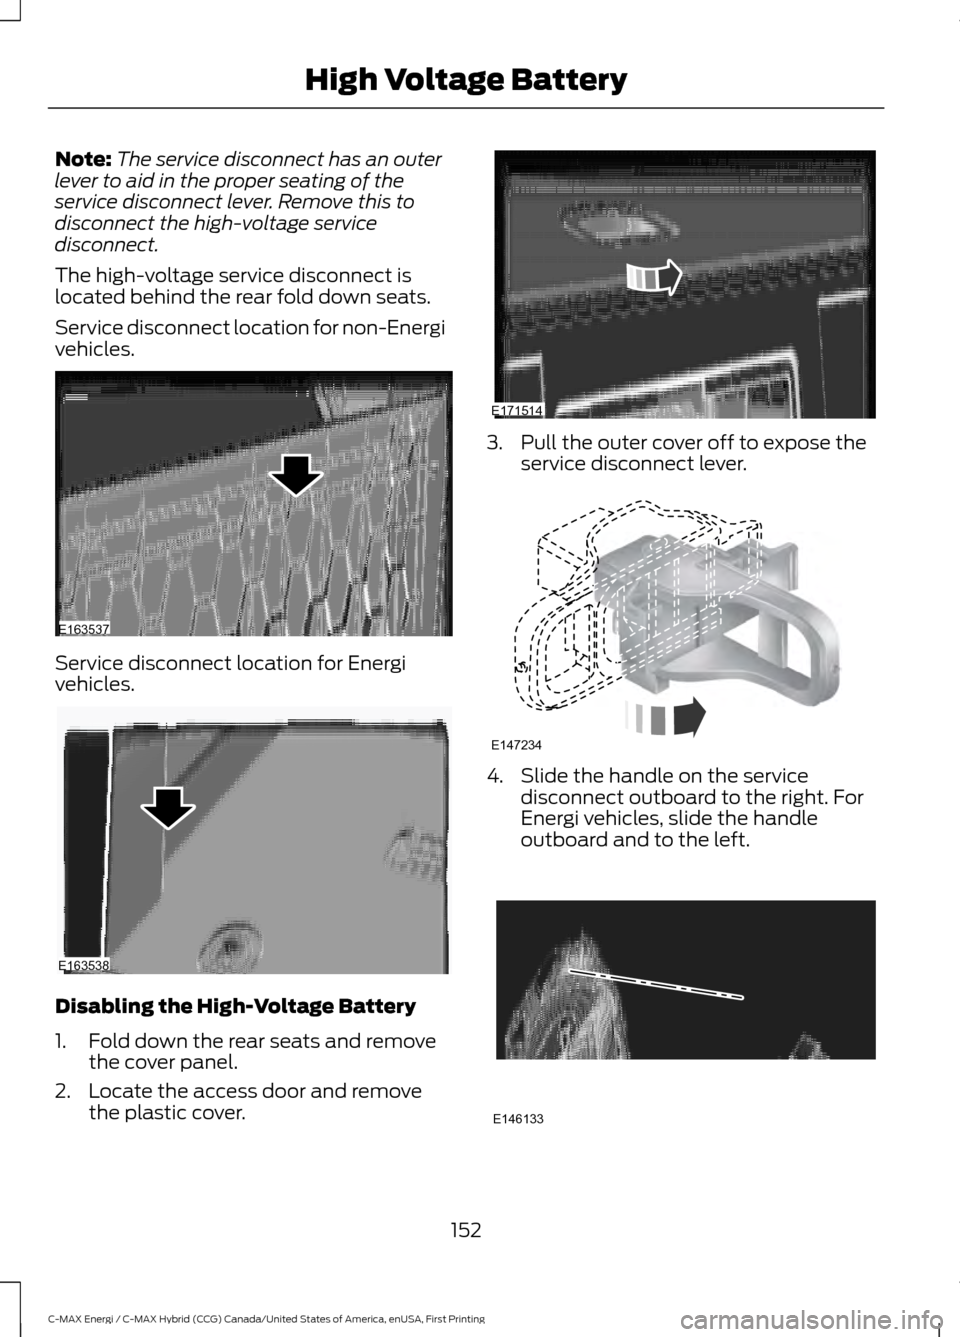
The high-voltage service disconnect is
located behind the rear fold down seats.
Service disconnect location for non-Energi
vehicles. Service disconnect location for Energi
vehicles.
Disabling the High-Voltage Battery
1. Fold down the rear seats and remove
the cover panel.
2. Locate the access door and remove the plastic cover. 3. Pull the outer cover off to expose the
service disconnect lever. 4. Slide the handle on the service
disconnect outboard to the right. For
Energi vehicles, slide the handle
outboard and to the left. 152
C-MAX Energi / C-MAX Hybrid (CCG) Canada/United States of America, enUSA, First Printing High Voltage BatteryE163537 E163538 E171514 E147234 E146133
Page 253 of 497
CLEANING THE INTERIOR
Note:
Do not allow air fresheners and hand
sanitizers to spill on interior surfaces. If a
spill occurs, wipe off immediately. Damage
may not be covered by your warranty.
Note: Do not use household cleaning
products or glass cleaners, which can stain
and discolor the fabric and affect the flame
retardant abilities of the seat materials.
Note: We recommend distilled water when
cleaning.
Fabric, Carpets, Cloth Seats,
Headliners and Floor Mats
Note: Avoid soaking any surface.
Note: To avoid spots or discoloration, clean
the entire surface.
To clean:
• Remove dust and loose dirt with a
vacuum cleaner or brush.
• Wipe the surface with a soft, damp
cloth and a mild soap and water
solution. Dry the area with a clean, soft
cloth.
• If a ring forms on the fabric after spot
cleaning, clean the entire area
immediately, but do not soak or the
ring will set.
Seatbelts WARNINGS
Do not use cleaning solvents, bleach
or dye on the vehicle
’s seatbelts, as
these actions may weaken the belt
webbing. On vehicles equipped with
seat-mounted airbags, do not use
chemical solvents or strong
detergents. Such products could
contaminate the side airbag system and
affect performance of the side airbag in a
crash. Note:
Do not use abrasives, or chemical
solvents to clean them.
Note: Do not allow moisture to penetrate
the seatbelt retractor mechanism.
Cleaning may safely be carried out using
mild soap and water. Let them dry
naturally, away from artificial heat.
Leather Interior (If Equipped)
Follow the same procedure as cleaning
leather seats for cleaning leather
instrument panels and leather interior trim
surfaces.
Suede Micro Fiber Fabric
(If Equipped)
Note: Do not steam clean.
Note: To avoid spots or discoloration, clean
the entire surface.
Do not use the following products:
• Leather care products.
• Household cleaners.
• Alcoholic solutions.
• Spot removers.
• Shoe polish.
To clean:
• Remove dust and loose dirt with a
vacuum cleaner.
• Wipe the surface with a soft, damp
cloth and a mild soap and water
solution. Dry the area with a clean, soft
cloth.
• If a ring forms on the fabric after spot
cleaning, clean the entire area
immediately, but do not soak or the
ring will set.
250
C-MAX Energi / C-MAX Hybrid (CCG) Canada/United States of America, enUSA, First Printing Vehicle Care
Page 254 of 497
Instrument Cluster Screens, LCD
Screens and Radio Screens
Note:
Do not use abrasives, alcoholic
solvents or chemical solvents to clean the
instrument cluster screens, LCD screens or
radio screens. These cleaning products can
damage the screens.
Clean the instrument panel and cluster
lens with a clean, damp and soft cloth,
then use a clean, dry and soft cloth to dry
these areas.
Rear Windows
Note: Do not use any abrasive materials to
clean the interior of the rear windows.
Note: Do not install stickers or labels to the
interior of the rear windows.
Storage Compartments, Cup
Holders and Ashtrays
To clean:
• Take out any removable inserts.
• Wipe the surface with a soft, damp
cloth and a mild soap and water
solution. Dry the area with a clean, soft
cloth.
CLEANING THE INSTRUMENT
PANEL AND INSTRUMENT
CLUSTER LENS WARNING
Do not use chemical solvents or
strong detergents when cleaning the
steering wheel or instrument panel
to avoid contamination of the airbag
system. Note:
Follow the same procedure as
cleaning leather seats for cleaning leather
instrument panels and leather interior trim
surfaces. See Cleaning Leather Seats
(page 252).
Clean the instrument panel and cluster
lens with a clean, damp and soft cloth,
then use a clean, dry and soft cloth to dry
these areas.
• Avoid cleaners or polishes that increase
the gloss of the upper portion of the
instrument panel. The dull finish in this
area helps protect you from
undesirable windshield reflection.
• Do not use any household cleaning
products or glass cleaners as these
may damage the finish of the
instrument panel, interior trim and
cluster lens.
• Wash or wipe your hands clean if you
have been in contact with certain
products such as insect repellent and
suntan lotion to avoid possible damage
to the interior painted surfaces.
• Do not allow air fresheners and hand
sanitizers to spill onto interior surfaces.
If a spill occurs, wipe off immediately.
Your warranty may not cover these
damages.
If a staining liquid like coffee or juice has
been spilled on the instrument panel or on
interior trim surfaces:
1. Wipe up spilled liquid using a clean, soft cloth as quickly as possible.
2. Use Motorcraft Premium Leather and Vinyl Cleaner or a commercially
available leather cleaning product for
automotive interiors. Test any cleaner
or stain remover on an inconspicuous
area.
3. Alternatively, wipe the surface with a clean, soft cloth and a mild soap and
water solution. Dry the area with a
clean, soft cloth.
251
C-MAX Energi / C-MAX Hybrid (CCG) Canada/United States of America, enUSA, First Printing Vehicle Care
Page 255 of 497
4. If necessary, apply more soap and
water solution or cleaning product to
a clean, soft cloth and press it onto the
soiled area. Allow this to set at room
temperature for 30 minutes.
5. Remove the soaked cloth, then with a clean, damp cloth, use a rubbing
motion for 60 seconds on the soiled
area.
6. Dry the area with a clean, soft cloth.
CLEANING LEATHER SEATS (If
Equipped)
Note: Follow the same procedure as
cleaning leather seats for cleaning leather
instrument panels and leather interior trim
surfaces.
For routine cleaning, wipe the surface with
a soft, damp cloth and a mild soap and
water solution. Dry the area with a clean,
soft cloth.
For cleaning and removing stains such as
dye transfer, use Motorcraft Premium
Leather and Vinyl Cleaner or a
commercially available leather cleaning
product for automotive interiors.
Note: Test any cleaner or stain remover on
an inconspicuous area.
You should:
• Remove dust and loose dirt with a
vacuum cleaner.
• Clean and treat spills and stains as
soon as possible.
Do not use the following products as these
may damage the leather:
• Oil and petroleum or silicone-based
leather conditioners.
• Household cleaners. •
Alcohol solutions.
• Solvents or cleaners intended
specifically for rubber, vinyl and
plastics.
REPAIRING MINOR PAINT
DAMAGE
You should repair paintwork damage
caused by stones from the road or minor
scratches as soon as possible. A choice of
products are available from an authorized
dealer.
Remove particles such as bird droppings,
tree sap, insect deposits, tar spots, road
salt and industrial fallout before repairing
paint chips.
Always read and follow the manufacturer ’s
instructions before using the products.
CLEANING THE WHEELS
Note: Do not apply a cleaning chemical to
warm or hot wheel rims and covers.
Note: Industrial-strength (heavy-duty)
cleaners, or cleaning chemicals, in
combination with brush agitation to remove
brake dust and dirt, could wear away the
clear coat finish over a period of time.
Note: Do not use hydrofluoric acid-based
or high caustic-based wheel cleaners, steel
wool, fuels or strong household detergent.
Note: If you intend parking your vehicle for
an extended period after cleaning the
wheels with a wheel cleaner, drive your
vehicle for a few minutes before doing so.
This will reduce the risk of increased
corrosion of the brake discs, brake pads and
linings.
Note: Some automatic car washes may
cause damage to the finish on your wheel
rims and covers.
252
C-MAX Energi / C-MAX Hybrid (CCG) Canada/United States of America, enUSA, First Printing Vehicle Care