battery FORD CROWN VICTORIA 1998 2.G Owners Manual
[x] Cancel search | Manufacturer: FORD, Model Year: 1998, Model line: CROWN VICTORIA, Model: FORD CROWN VICTORIA 1998 2.GPages: 160, PDF Size: 1.24 MB
Page 9 of 160

Anti-lock brake system (ABS) (If equipped)
Momentarily illuminates when the
ignition is turned on and the engine
is off. If the light does not illuminate
momentarily at start up, remains on
or continues to flash, the ABS needs
to be serviced. With the ABS light on, the anti-lock brake system is
disabled and normal braking is still effective unless the brake warning
light also remains illuminated with parking brake released.
Turn signal
Illuminates when the left or right
turn signal or the hazard lights are
turned on. If one or both of the
indicators stay on continuously or
flash faster, check for a burned-out
turn signal bulb. Refer toExterior bulbsin theMaintenance and care
chapter.
High beams
Illuminates when the high beam
headlamps are turned on.
Charging system
Illuminates when the ignition is
turned to the ON position and the
engine is off. The light also
illuminates when the battery is not
charging properly, requiring
electrical system service.
ABS
Instrumentation
9
Page 16 of 160
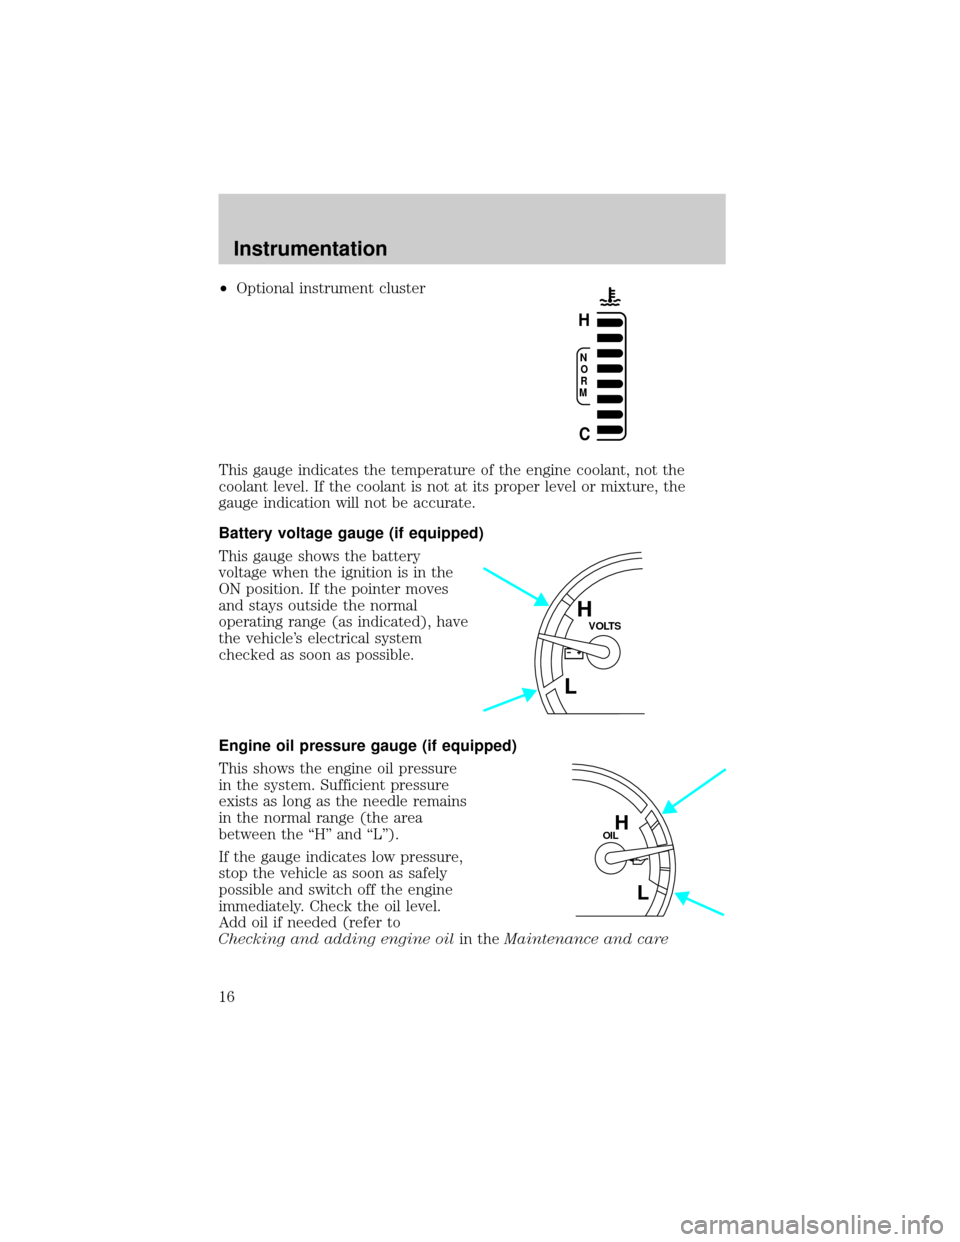
²Optional instrument cluster
This gauge indicates the temperature of the engine coolant, not the
coolant level. If the coolant is not at its proper level or mixture, the
gauge indication will not be accurate.
Battery voltage gauge (if equipped)
This gauge shows the battery
voltage when the ignition is in the
ON position. If the pointer moves
and stays outside the normal
operating range (as indicated), have
the vehicle's electrical system
checked as soon as possible.
Engine oil pressure gauge (if equipped)
This shows the engine oil pressure
in the system. Sufficient pressure
exists as long as the needle remains
in the normal range (the area
between the ªHº and ªLº).
If the gauge indicates low pressure,
stop the vehicle as soon as safely
possible and switch off the engine
immediately. Check the oil level.
Add oil if needed (refer to
Checking and adding engine oilin theMaintenance and care
N
O
R
M
H
C
VOLTSH
L
OILH
L
Instrumentation
16
Page 52 of 160
The inside lights will not turn off if:
²they have been turned on with the dimmer control or
²any door is open.
The battery saver will shut off the interior lamps 30 minutes after the
last door is closed or after 10 minutes if the door is left open.
Replacing the battery
The transmitter is powered by one coin type three-volt lithium battery
CR2032 or equivalent. Typical operating range will allow you to be up to
10 meters (33 feet) away from your vehicle. A decrease in operating
range can be caused by:
²battery weakness due to time and use
²weather conditions
²nearby radio towers
²structures around the vehicle
²other vehicles parked next to the vehicle
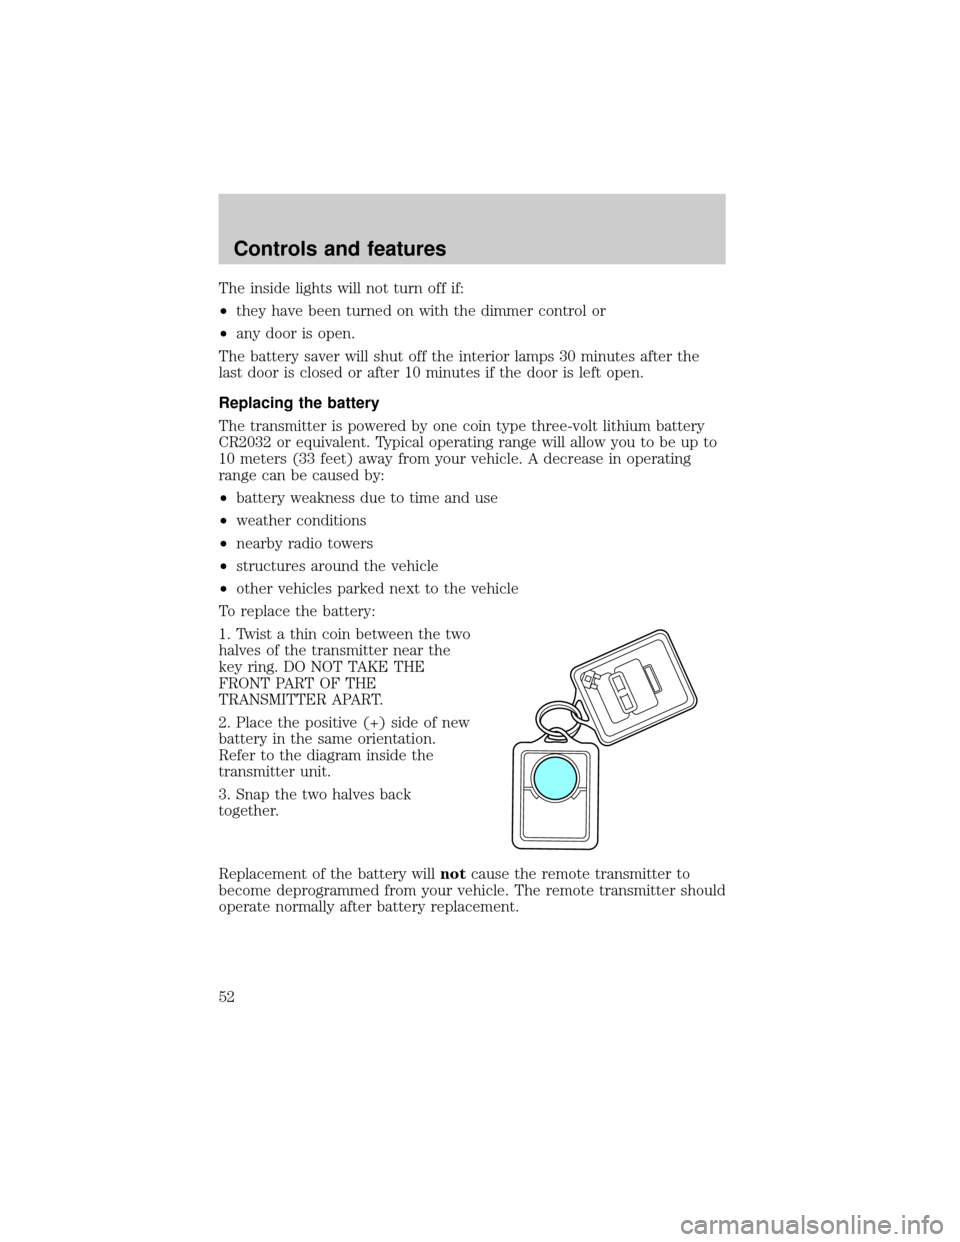
To replace the battery:
1. Twist a thin coin between the two
halves of the transmitter near the
key ring. DO NOT TAKE THE
FRONT PART OF THE
TRANSMITTER APART.
2. Place the positive (+) side of new
battery in the same orientation.
Refer to the diagram inside the
transmitter unit.
3. Snap the two halves back
together.
Replacement of the battery willnotcause the remote transmitter to
become deprogrammed from your vehicle. The remote transmitter should
operate normally after battery replacement.
Controls and features
52
Page 99 of 160
Fuse/Relay
LocationFuse Amp
RatingDescription
8 15A Lighting Control Module, Power Mirrors,
PATS Module, Keyless Entry, Clock
Memory, Electronic Automatic Temperature
Control (EATC), Power Windows, Police
Spot Light, SecuriLock
9 30A Blower Motor, A/C-Heater Mode Switch
10 10A Air Bag Module
11 5A Radio
12 18A CB Lighting Control Module, Flash-to-Pass,
Main Light Switch
13 15A Warning Lamps, Analog Cluster Gauges and
Indicators, Electronic Automatic
Transmission, Lighting Control Module
14 20A CB Window/Door Lock Control, Driver's Door
Module, One Touch Down
15 10A Anti-Lock Brakes, Instrument Cluster,
Transmission Control Switch
16 20A Cigar Lighter
17 10A Rear Defrost
18 10A Air Bag Module
Power distribution box
The power distribution box is located in the engine compartment. The
power distribution box contains high-current fuses that protect your
vehicle's main electrical systems from overloads.
Always disconnect the battery before servicing high current
fuses.
Always replace the cover to the Power Distribution Box before
reconnecting the battery or refilling fluid reservoirs.
Roadside emergencies
99
Page 105 of 160
JUMP STARTING YOUR VEHICLE
The gases around the battery can explode if exposed to flames,
sparks, or lit cigarettes. An explosion could result in injury or
vehicle damage.
Do not push start your vehicle. You could damage the catalytic
converter.
Batteries contain sulfuric acid which burns skin, eyes, and
clothing.
Preparing your vehicle
Also see the label on the battery.
1. Use only a 12±volt supply to start your vehicle.If you connect your
battery to a 24±volt power supply you can damage your starter,
ignition system and other electrical components.
2. Do not disconnect the battery of the disabled vehicle as this could
damage the vehicle's electrical system.
3. Park the booster vehicle close to the hood of the disabled vehicle
making sure theydo nottouch. Set the parking brake on both vehicles
and stay clear of the engine cooling fan and other moving parts.
4. Check all battery terminals and remove any excessive corrosion before
you attach the battery cables.
5. Turn the heater fan on in both vehicles to protect any electrical
surges. Turn all other accessories off.
Roadside emergencies
105
Page 106 of 160
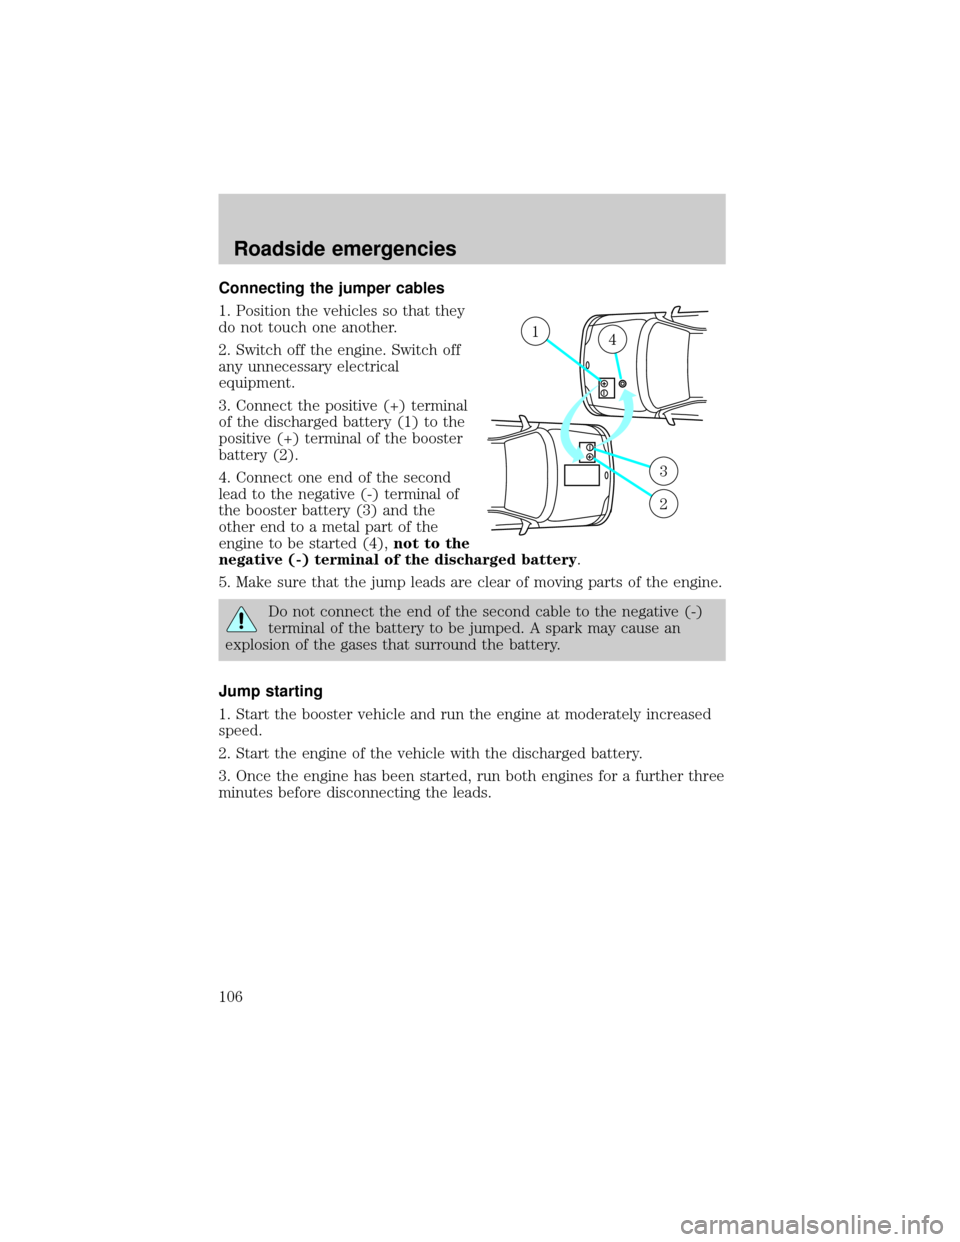
Connecting the jumper cables
1. Position the vehicles so that they
do not touch one another.
2. Switch off the engine. Switch off
any unnecessary electrical
equipment.
3. Connect the positive (+) terminal
of the discharged battery (1) to the
positive (+) terminal of the booster
battery (2).
4. Connect one end of the second
lead to the negative (-) terminal of
the booster battery (3) and the
other end to a metal part of the
engine to be started (4),not to the
negative (-) terminal of the discharged battery.
5. Make sure that the jump leads are clear of moving parts of the engine.
Do not connect the end of the second cable to the negative (-)
terminal of the battery to be jumped. A spark may cause an
explosion of the gases that surround the battery.
Jump starting
1. Start the booster vehicle and run the engine at moderately increased
speed.
2. Start the engine of the vehicle with the discharged battery.
3. Once the engine has been started, run both engines for a further three
minutes before disconnecting the leads.
+–
+–
14
3
2
Roadside emergencies
106
Page 107 of 160
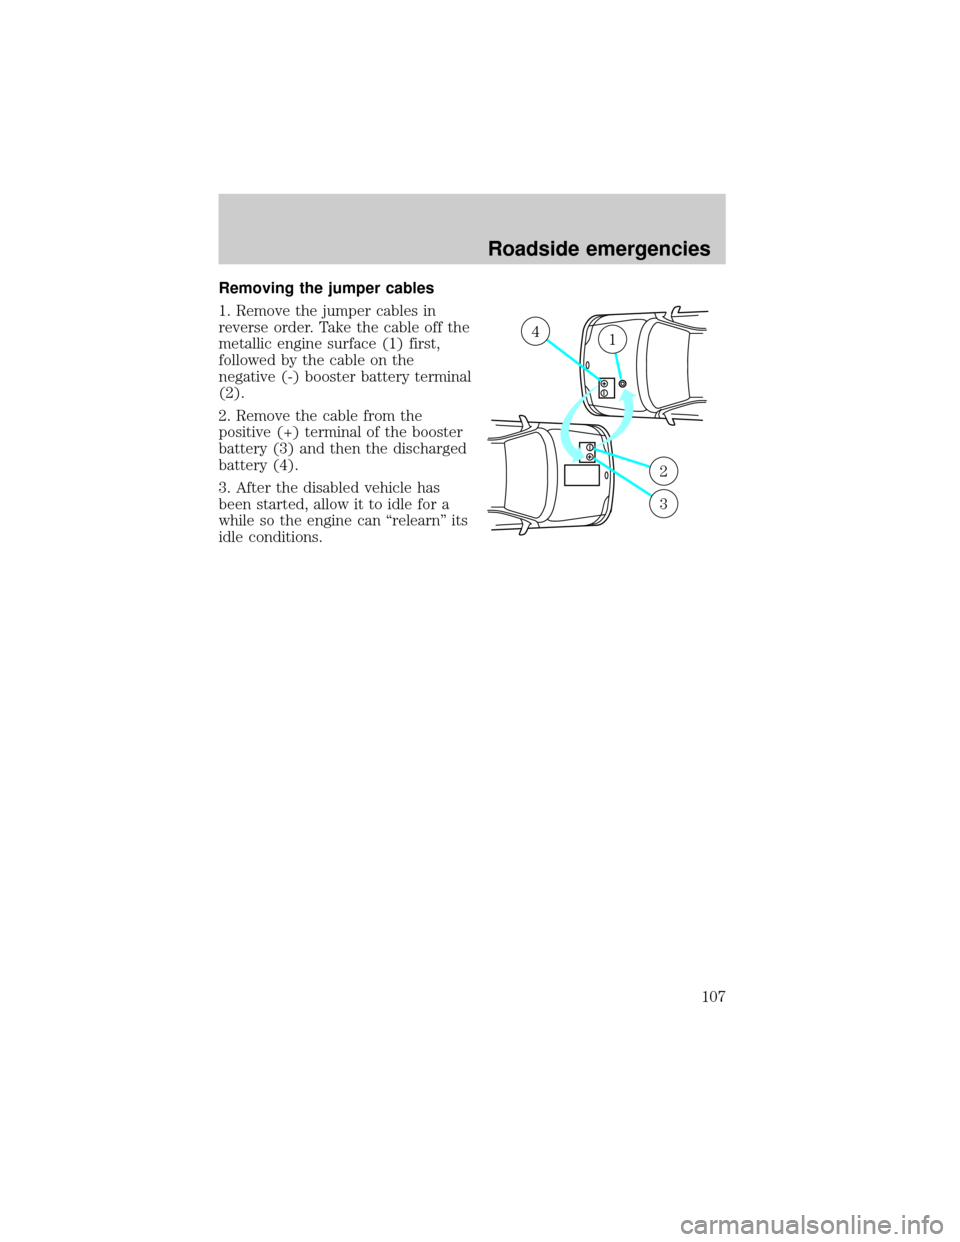
Removing the jumper cables
1. Remove the jumper cables in
reverse order. Take the cable off the
metallic engine surface (1) first,
followed by the cable on the
negative (-) booster battery terminal
(2).
2. Remove the cable from the
positive (+) terminal of the booster
battery (3) and then the discharged
battery (4).
3. After the disabled vehicle has
been started, allow it to idle for a
while so the engine can ªrelearnº its
idle conditions.
+–
+–
41
2
3
Roadside emergencies
107
Page 109 of 160

SERVICE RECOMMENDATIONS
To help you service your vehicle:
²We highlight do-it-yourself items in the engine compartment for easy
location.
²We provide a ªService Guideº which makes tracking routine service
easy.
If your vehicle requires professional service, your dealership can provide
necessary parts and service. Check your ªWarranty Guideº to find out
which parts and services are covered.
Use only recommended fuels, lubricants, fluids and service parts
conforming to specifications. Motorcraft parts are designed and built to
provide the best performance in your vehicle.
PRECAUTIONS WHEN SERVICING YOUR VEHICLE
Be especially careful when inspecting or servicing your vehicle.
²Do not work on a hot engine.
²When the engine is running, avoid wearing loose clothing, jewelry or
long hair that could get caught up in moving parts.
²Do not work on a vehicle with the engine running in an enclosed
space, unless you are sure you have enough ventilation.
²Keep all lit cigarettes, open flames and other lit material away from
the battery and all fuel related parts.
If you disconnect the battery, the engine must ªrelearnº its idle
conditions before your vehicle will drive properly, as explained in the
Batterysection in this chapter.
Working with the engine off
1. Set the parking brake and ensure the gearshift is securely latched in
P (Park).
2. Turn off the engine and remove the key.
3. Block the wheels to prevent the vehicle from moving unexpectedly.
Maintenance and care
109
Page 111 of 160
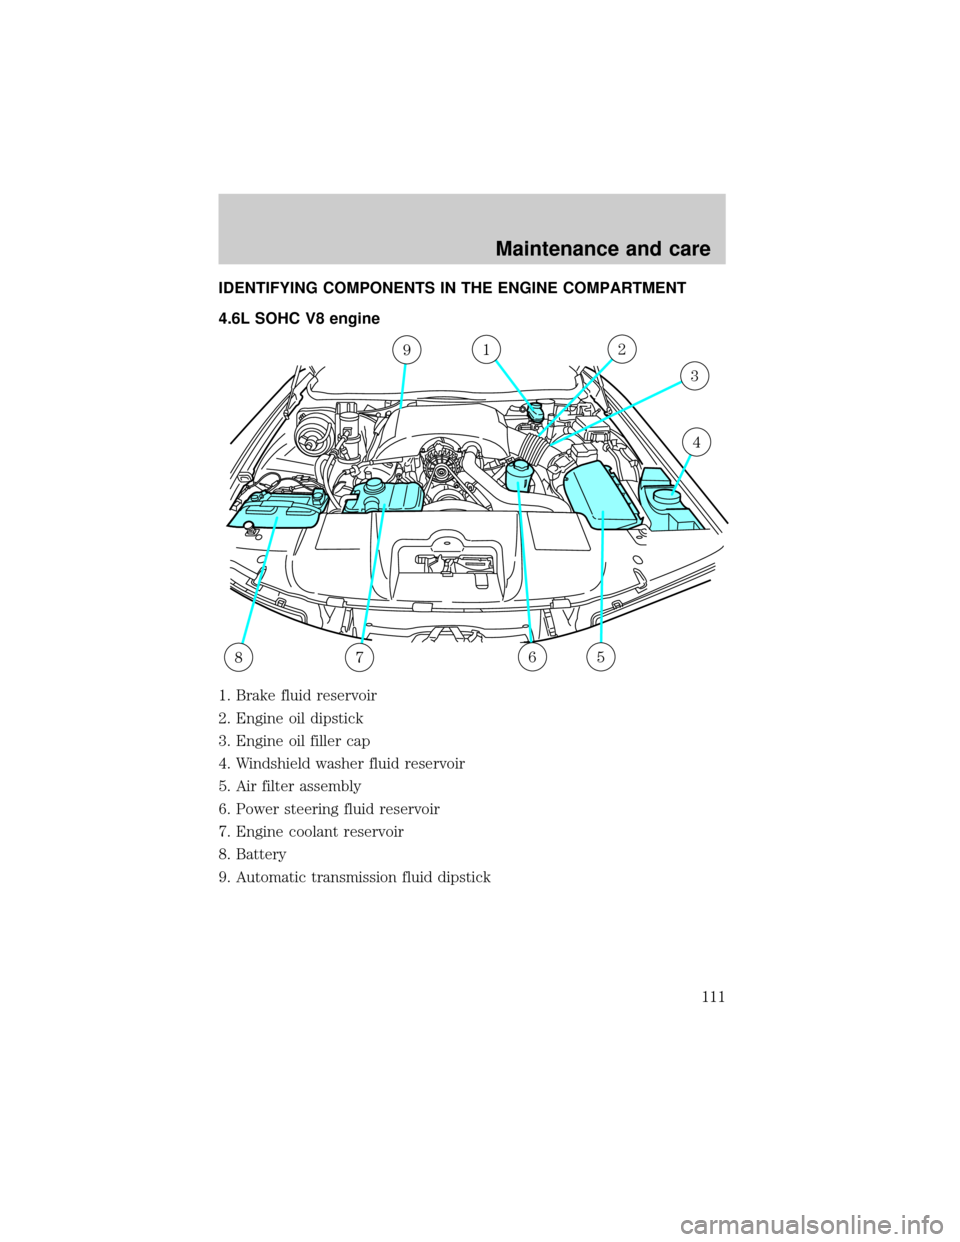
IDENTIFYING COMPONENTS IN THE ENGINE COMPARTMENT
4.6L SOHC V8 engine
1. Brake fluid reservoir
2. Engine oil dipstick
3. Engine oil filler cap
4. Windshield washer fluid reservoir
5. Air filter assembly
6. Power steering fluid reservoir
7. Engine coolant reservoir
8. Battery
9. Automatic transmission fluid dipstick
912
3
6578
4
Maintenance and care
111
Page 124 of 160
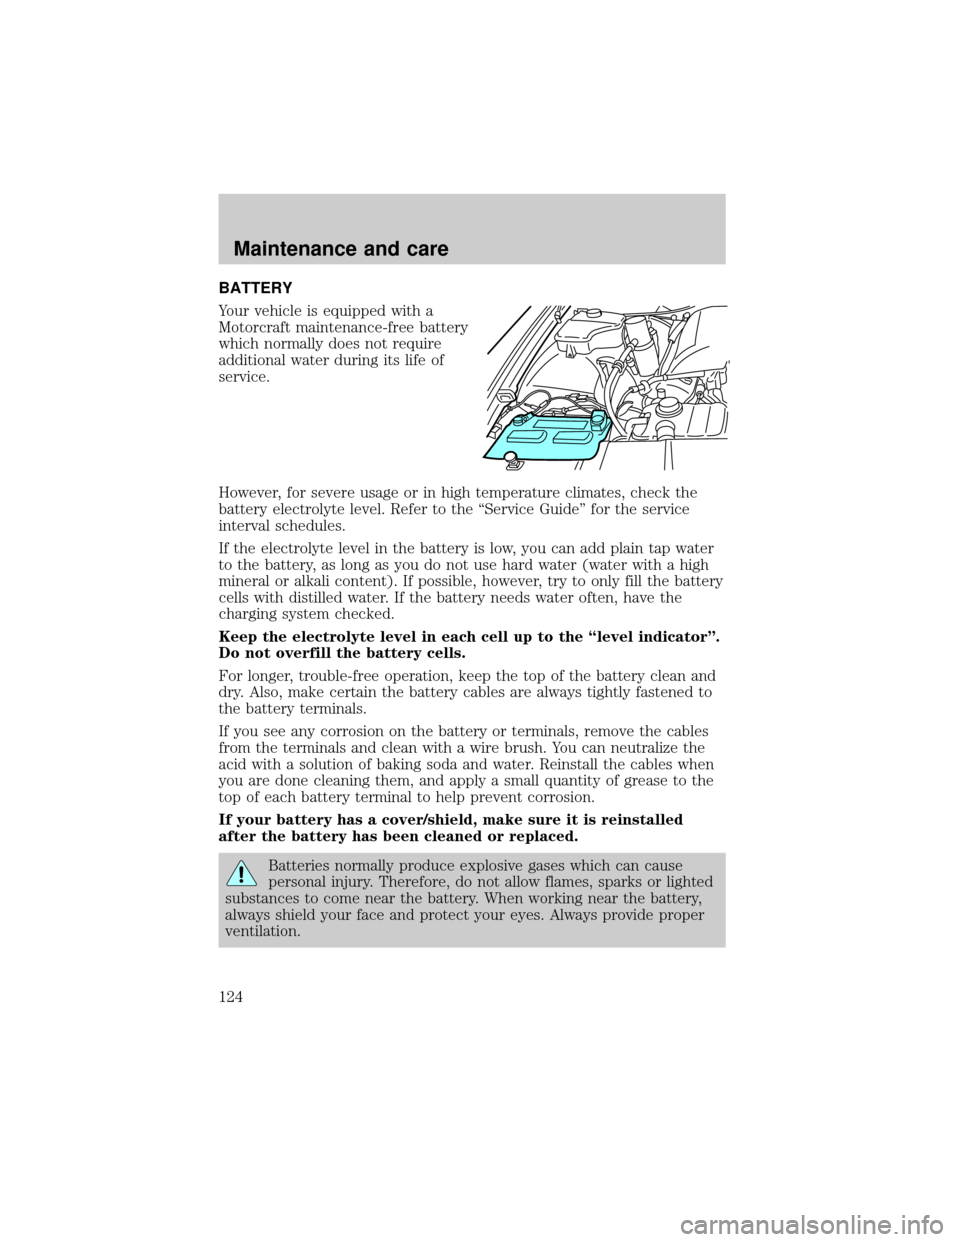
BATTERY
Your vehicle is equipped with a
Motorcraft maintenance-free battery
which normally does not require
additional water during its life of
service.
However, for severe usage or in high temperature climates, check the
battery electrolyte level. Refer to the ªService Guideº for the service
interval schedules.
If the electrolyte level in the battery is low, you can add plain tap water
to the battery, as long as you do not use hard water (water with a high
mineral or alkali content). If possible, however, try to only fill the battery
cells with distilled water. If the battery needs water often, have the
charging system checked.
Keep the electrolyte level in each cell up to the ªlevel indicatorº.
Do not overfill the battery cells.
For longer, trouble-free operation, keep the top of the battery clean and
dry. Also, make certain the battery cables are always tightly fastened to
the battery terminals.
If you see any corrosion on the battery or terminals, remove the cables
from the terminals and clean with a wire brush. You can neutralize the
acid with a solution of baking soda and water. Reinstall the cables when
you are done cleaning them, and apply a small quantity of grease to the
top of each battery terminal to help prevent corrosion.
If your battery has a cover/shield, make sure it is reinstalled
after the battery has been cleaned or replaced.
Batteries normally produce explosive gases which can cause
personal injury. Therefore, do not allow flames, sparks or lighted
substances to come near the battery. When working near the battery,
always shield your face and protect your eyes. Always provide proper
ventilation.
Maintenance and care
124