parking brake FORD CROWN VICTORIA 1998 2.G Owners Manual
[x] Cancel search | Manufacturer: FORD, Model Year: 1998, Model line: CROWN VICTORIA, Model: FORD CROWN VICTORIA 1998 2.GPages: 160, PDF Size: 1.24 MB
Page 8 of 160
Light is blinking:
Engine misfire is occurring which could damage your catalytic converter.
You should drive in a moderate fashion (avoid heavy acceleration and
deceleration) and have your vehicle serviced at the first available
opportunity.
Under engine misfire conditions, excessive exhaust temperatures
could damage the catalytic converter, the fuel system, interior
floor coverings or other vehicle components, possibly causing a fire.
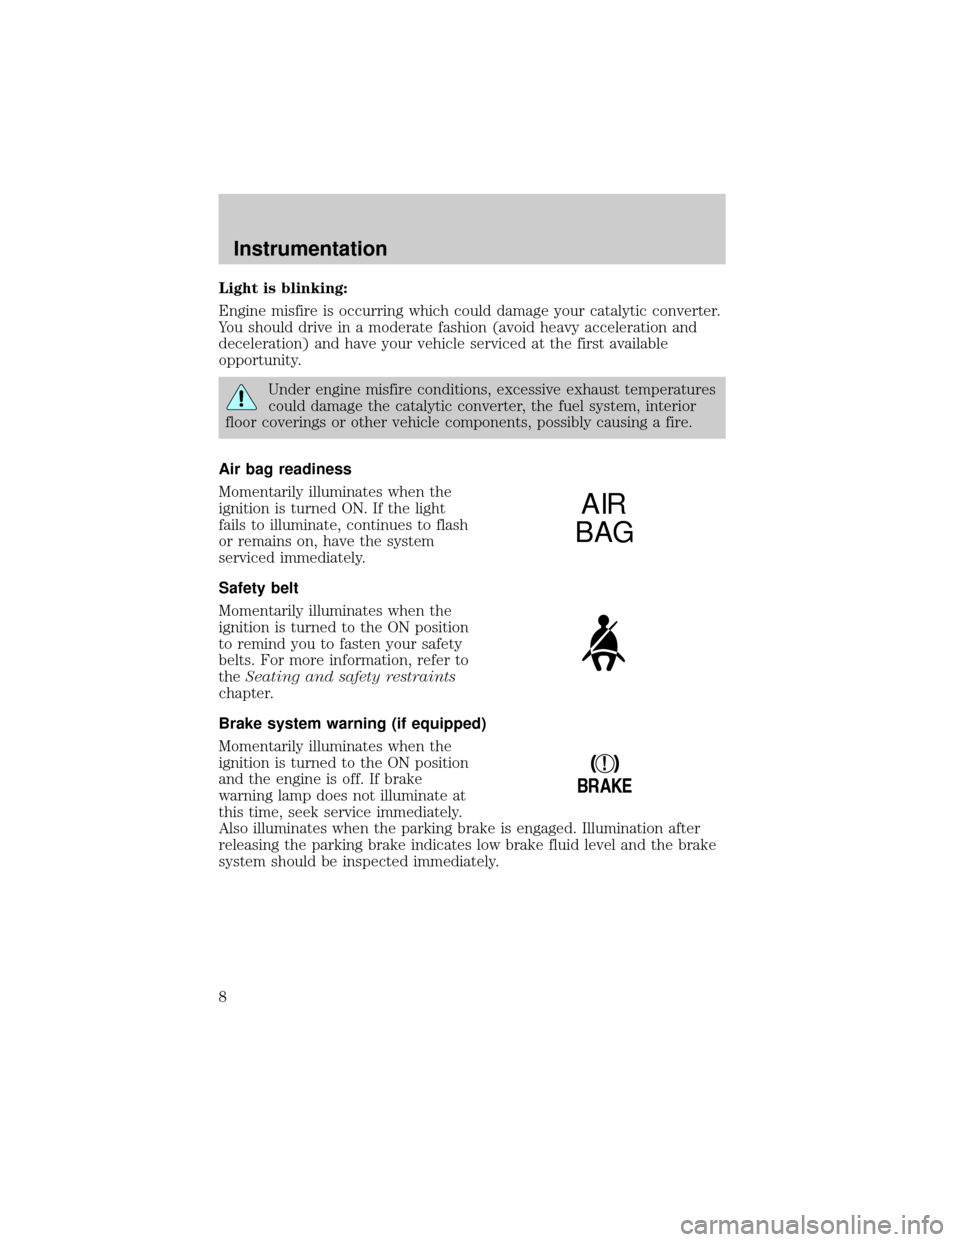
Air bag readiness
Momentarily illuminates when the
ignition is turned ON. If the light
fails to illuminate, continues to flash
or remains on, have the system
serviced immediately.
Safety belt
Momentarily illuminates when the
ignition is turned to the ON position
to remind you to fasten your safety
belts. For more information, refer to
theSeating and safety restraints
chapter.
Brake system warning (if equipped)
Momentarily illuminates when the
ignition is turned to the ON position
and the engine is off. If brake
warning lamp does not illuminate at
this time, seek service immediately.
Also illuminates when the parking brake is engaged. Illumination after
releasing the parking brake indicates low brake fluid level and the brake
system should be inspected immediately.
AIR
BAG
!
BRAKE
Instrumentation
8
Page 9 of 160

Anti-lock brake system (ABS) (If equipped)
Momentarily illuminates when the
ignition is turned on and the engine
is off. If the light does not illuminate
momentarily at start up, remains on
or continues to flash, the ABS needs
to be serviced. With the ABS light on, the anti-lock brake system is
disabled and normal braking is still effective unless the brake warning
light also remains illuminated with parking brake released.
Turn signal
Illuminates when the left or right
turn signal or the hazard lights are
turned on. If one or both of the
indicators stay on continuously or
flash faster, check for a burned-out
turn signal bulb. Refer toExterior bulbsin theMaintenance and care
chapter.
High beams
Illuminates when the high beam
headlamps are turned on.
Charging system
Illuminates when the ignition is
turned to the ON position and the
engine is off. The light also
illuminates when the battery is not
charging properly, requiring
electrical system service.
ABS
Instrumentation
9
Page 12 of 160
Headlamps on warning chime
Sounds when the headlamps or parking lamps are on, the ignition is off
(and the key is not in the ignition) and either front door is opened.
Turn signal chime
Sounds when the turn signal lever has been activated to signal a turn.
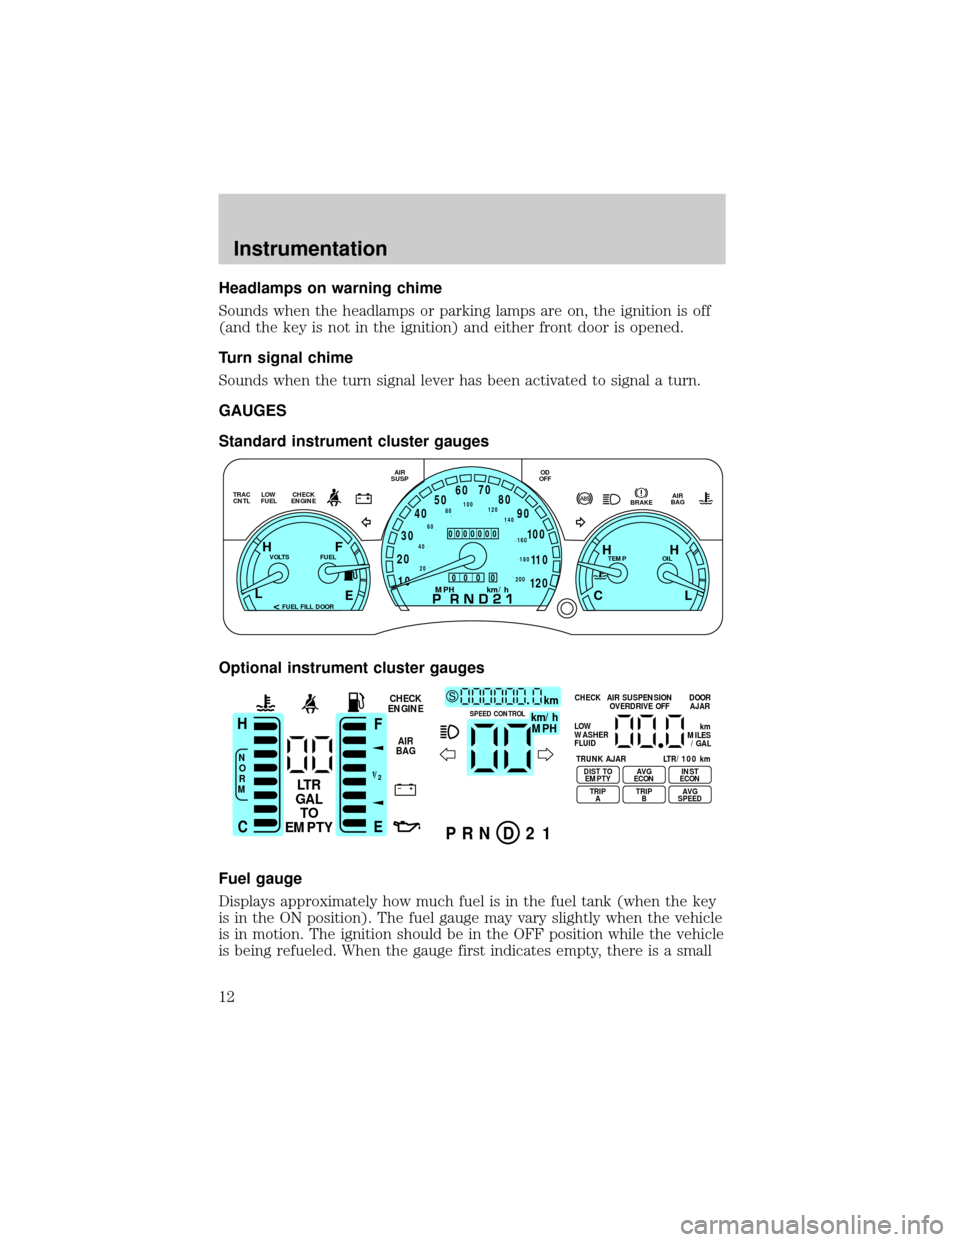
GAUGES
Standard instrument cluster gauges
Optional instrument cluster gauges
Fuel gauge
Displays approximately how much fuel is in the fuel tank (when the key
is in the ON position). The fuel gauge may vary slightly when the vehicle
is in motion. The ignition should be in the OFF position while the vehicle
is being refueled. When the gauge first indicates empty, there is a small
E
LOW
FUEL TRAC
CNTLCHECK
ENGINEAIR
SUSPOD
OFF
BRAKEAIR
BAG
TEMP OIL VOLTS FUEL
MPH km/h10 203040506070
80
90
10 0
11 0
12 020 406080100
120
140
160
180
200
H H
L C F H
L
< FUEL FILL DOOR
0000000
0
0 0 0
+ –
F
E
/2 1
N
O
R
M
H
C
LT R
GAL
TO
EMPTY
km/h
MPH
km SCHECK
ENGINE
AIR
BAGSPEED CONTROL
P R N D 2 1
CHECK
TRUNK AJAR LTR/100 kmAIR SUSPENSION
OVERDRIVE OFFDOOR
AJAR
LOW
WASHER
FLUID
DIST TO
EMPTY
TRIP
AAVG
ECON
TRIP
BINST
ECON
AVG
SPEED
km
MILES
/GAL
Instrumentation
12
Page 22 of 160
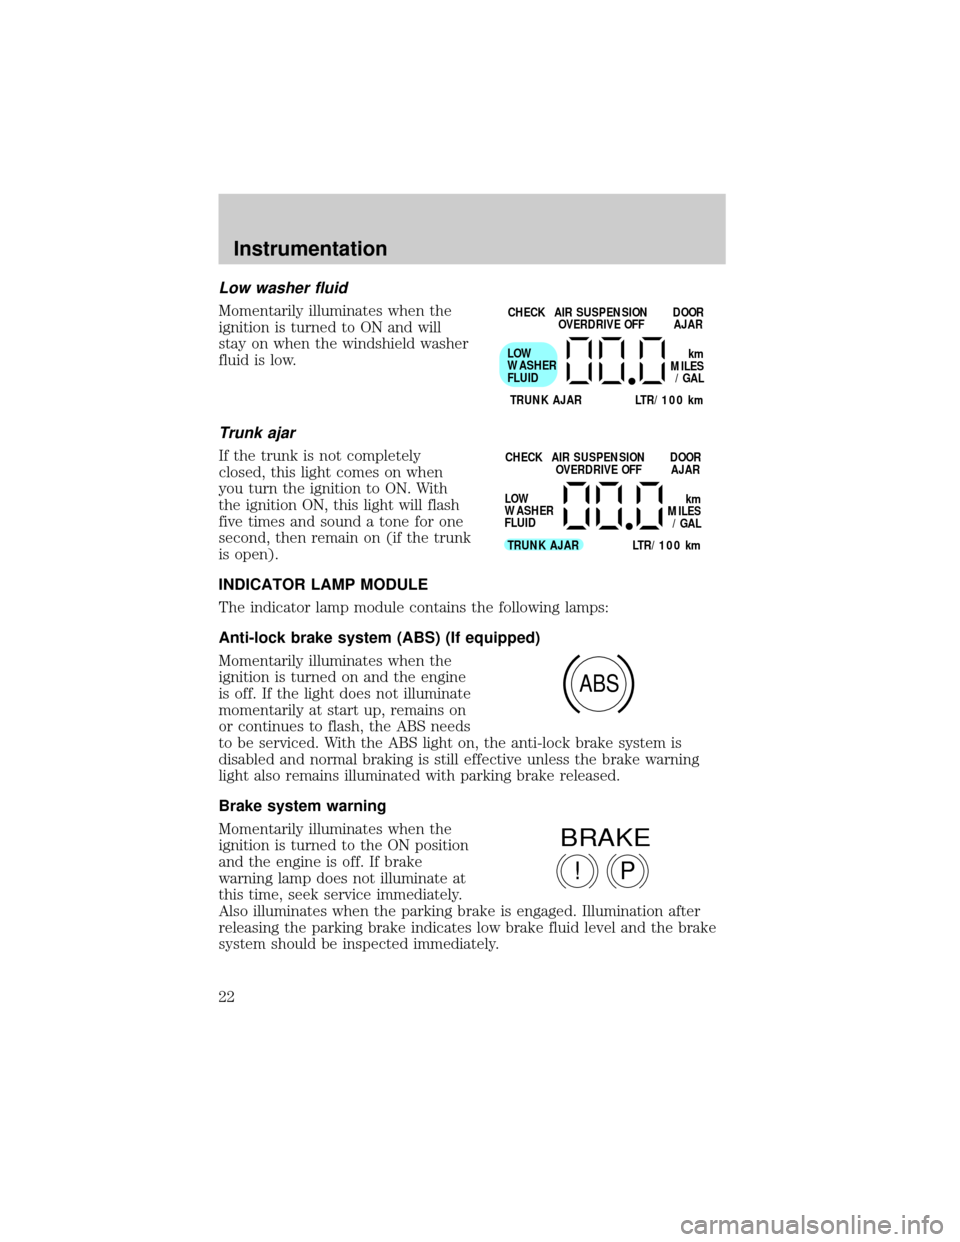
Low washer fluid
Momentarily illuminates when the
ignition is turned to ON and will
stay on when the windshield washer
fluid is low.
Trunk ajar
If the trunk is not completely
closed, this light comes on when
you turn the ignition to ON. With
the ignition ON, this light will flash
five times and sound a tone for one
second, then remain on (if the trunk
is open).
INDICATOR LAMP MODULE
The indicator lamp module contains the following lamps:
Anti-lock brake system (ABS) (If equipped)
Momentarily illuminates when the
ignition is turned on and the engine
is off. If the light does not illuminate
momentarily at start up, remains on
or continues to flash, the ABS needs
to be serviced. With the ABS light on, the anti-lock brake system is
disabled and normal braking is still effective unless the brake warning
light also remains illuminated with parking brake released.
Brake system warning
Momentarily illuminates when the
ignition is turned to the ON position
and the engine is off. If brake
warning lamp does not illuminate at
this time, seek service immediately.
Also illuminates when the parking brake is engaged. Illumination after
releasing the parking brake indicates low brake fluid level and the brake
system should be inspected immediately.
CHECK
TRUNK AJAR LTR/100 kmAIR SUSPENSION
OVERDRIVE OFFDOOR
AJAR
LOW
WASHER
FLUID
km
MILES
/GAL
CHECK
TRUNK AJAR LTR/100 kmAIR SUSPENSION
OVERDRIVE OFFDOOR
AJAR
LOW
WASHER
FLUID
km
MILES
/GAL
ABS
P!
BRAKE
Instrumentation
22
Page 24 of 160
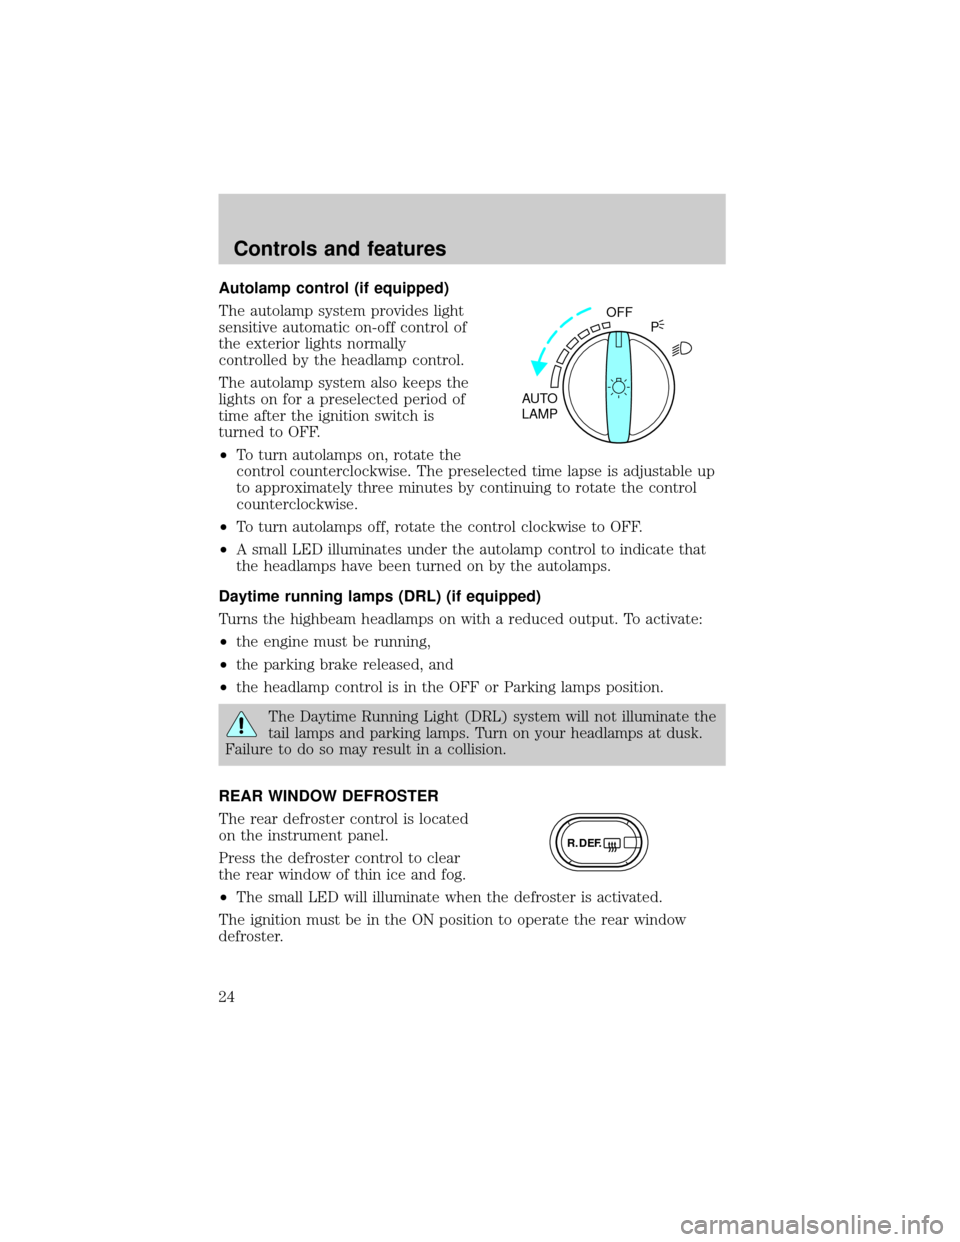
Autolamp control (if equipped)
The autolamp system provides light
sensitive automatic on-off control of
the exterior lights normally
controlled by the headlamp control.
The autolamp system also keeps the
lights on for a preselected period of
time after the ignition switch is
turned to OFF.
²To turn autolamps on, rotate the
control counterclockwise. The preselected time lapse is adjustable up
to approximately three minutes by continuing to rotate the control
counterclockwise.
²To turn autolamps off, rotate the control clockwise to OFF.
²A small LED illuminates under the autolamp control to indicate that
the headlamps have been turned on by the autolamps.
Daytime running lamps (DRL) (if equipped)
Turns the highbeam headlamps on with a reduced output. To activate:
²the engine must be running,
²the parking brake released, and
²the headlamp control is in the OFF or Parking lamps position.
The Daytime Running Light (DRL) system will not illuminate the
tail lamps and parking lamps. Turn on your headlamps at dusk.
Failure to do so may result in a collision.
REAR WINDOW DEFROSTER
The rear defroster control is located
on the instrument panel.
Press the defroster control to clear
the rear window of thin ice and fog.
²The small LED will illuminate when the defroster is activated.
The ignition must be in the ON position to operate the rear window
defroster.
OFF
AUTO
LAMPP
R.DEF.
Controls and features
24
Page 79 of 160
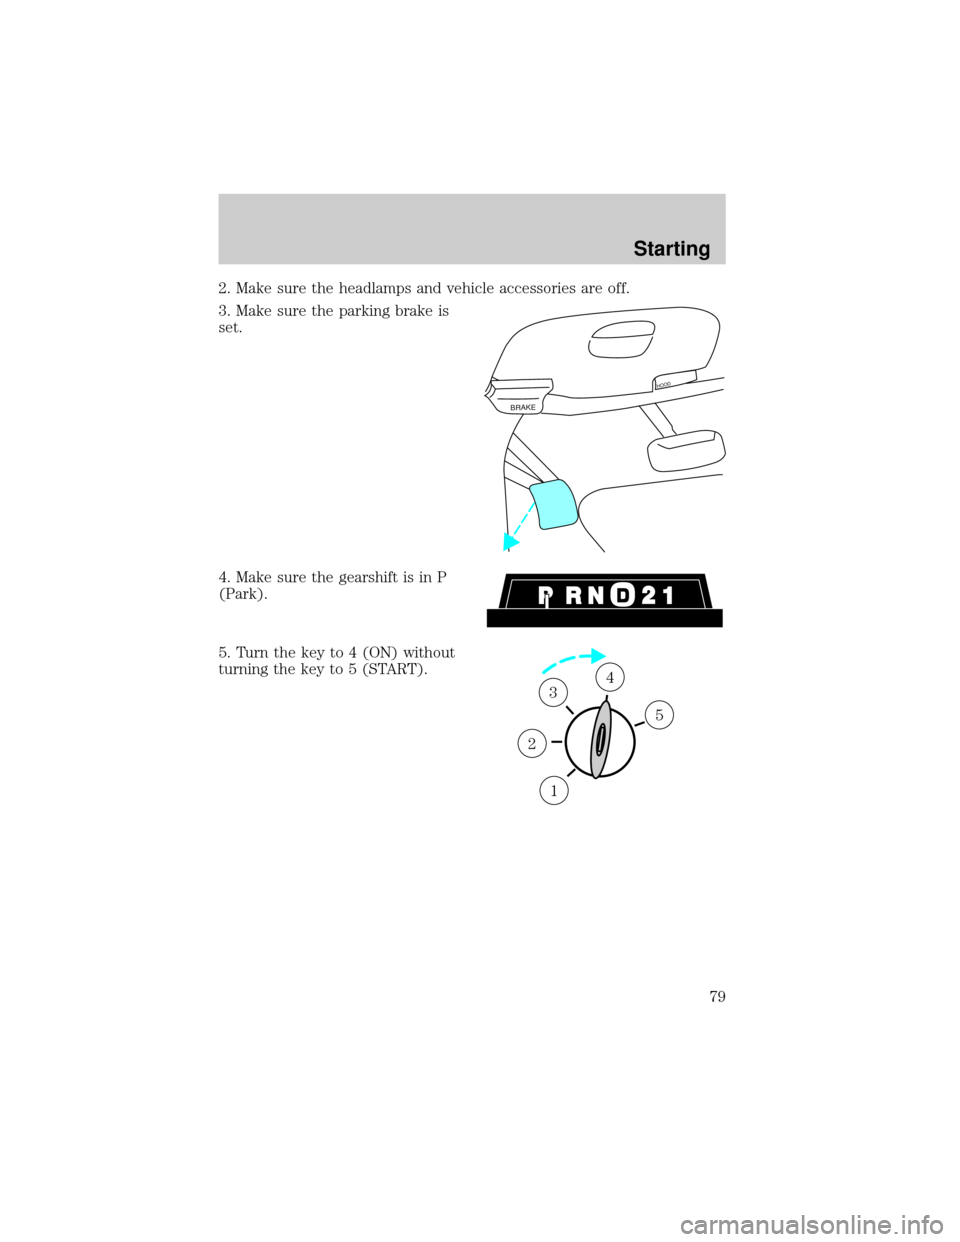
2. Make sure the headlamps and vehicle accessories are off.
3. Make sure the parking brake is
set.
4. Make sure the gearshift is in P
(Park).
5. Turn the key to 4 (ON) without
turning the key to 5 (START).
BRAKE
HOOD
1
2
34
5
Starting
79
Page 81 of 160
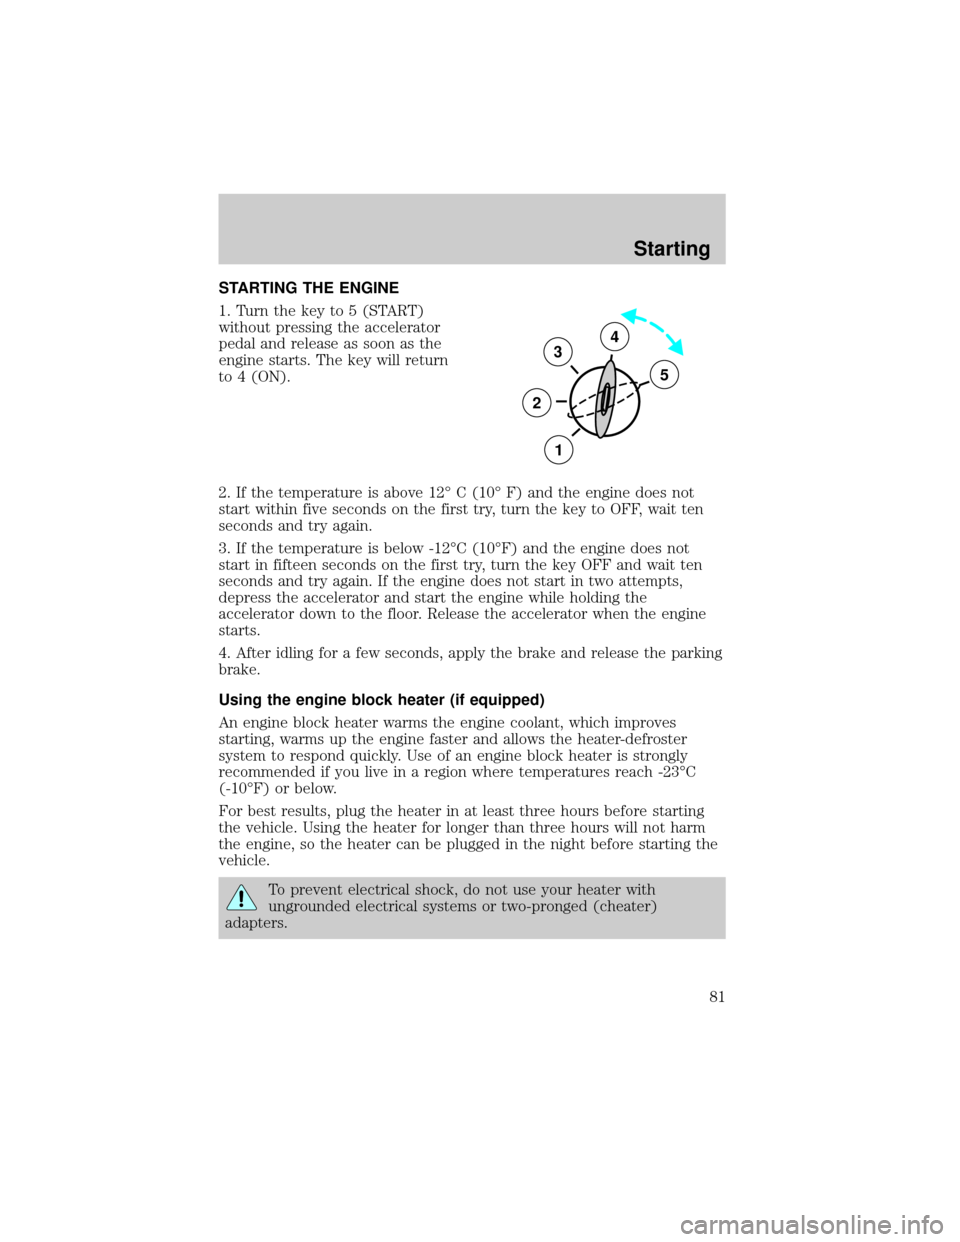
STARTING THE ENGINE
1. Turn the key to 5 (START)
without pressing the accelerator
pedal and release as soon as the
engine starts. The key will return
to 4 (ON).
2. If the temperature is above 12É C (10É F) and the engine does not
start within five seconds on the first try, turn the key to OFF, wait ten
seconds and try again.
3. If the temperature is below -12ÉC (10ÉF) and the engine does not
start in fifteen seconds on the first try, turn the key OFF and wait ten
seconds and try again. If the engine does not start in two attempts,
depress the accelerator and start the engine while holding the
accelerator down to the floor. Release the accelerator when the engine
starts.
4. After idling for a few seconds, apply the brake and release the parking
brake.
Using the engine block heater (if equipped)
An engine block heater warms the engine coolant, which improves
starting, warms up the engine faster and allows the heater-defroster
system to respond quickly. Use of an engine block heater is strongly
recommended if you live in a region where temperatures reach -23ÉC
(-10ÉF) or below.
For best results, plug the heater in at least three hours before starting
the vehicle. Using the heater for longer than three hours will not harm
the engine, so the heater can be plugged in the night before starting the
vehicle.
To prevent electrical shock, do not use your heater with
ungrounded electrical systems or two-pronged (cheater)
adapters.
3
2
1
5
4
Starting
81
Page 84 of 160
ABS warning lamp
The
ABSwarning lamp in the instrument cluster illuminates for about
five seconds when starting the vehicle. If an ABS fault is detected, the
light will remain on, the ABS system is disabled with normal braking still
effective, and your vehicle should be serviced as soon as possible.
Normal braking is still effective
unless the BRAKE warning lamp is
also illuminated.
Using ABS
²In an emergency or when maximum efficiency from the ABS is
required, apply continuous full force on the brake. The ABS will be
activated immediately, thus allowing you to retain full steering control
of your vehicle and, providing there is sufficient space, will enable you
to avoid obstacles and bring the vehicle to a controlled stop.
²The Anti-Lock system does not decrease the time necessary to apply
the brakes or always reduce stopping distance. Always leave enough
room between your vehicle and the vehicle in front of you to stop.
²We recommend that you familiarize yourself with this braking
technique. However, avoid taking any unnecessary risks.
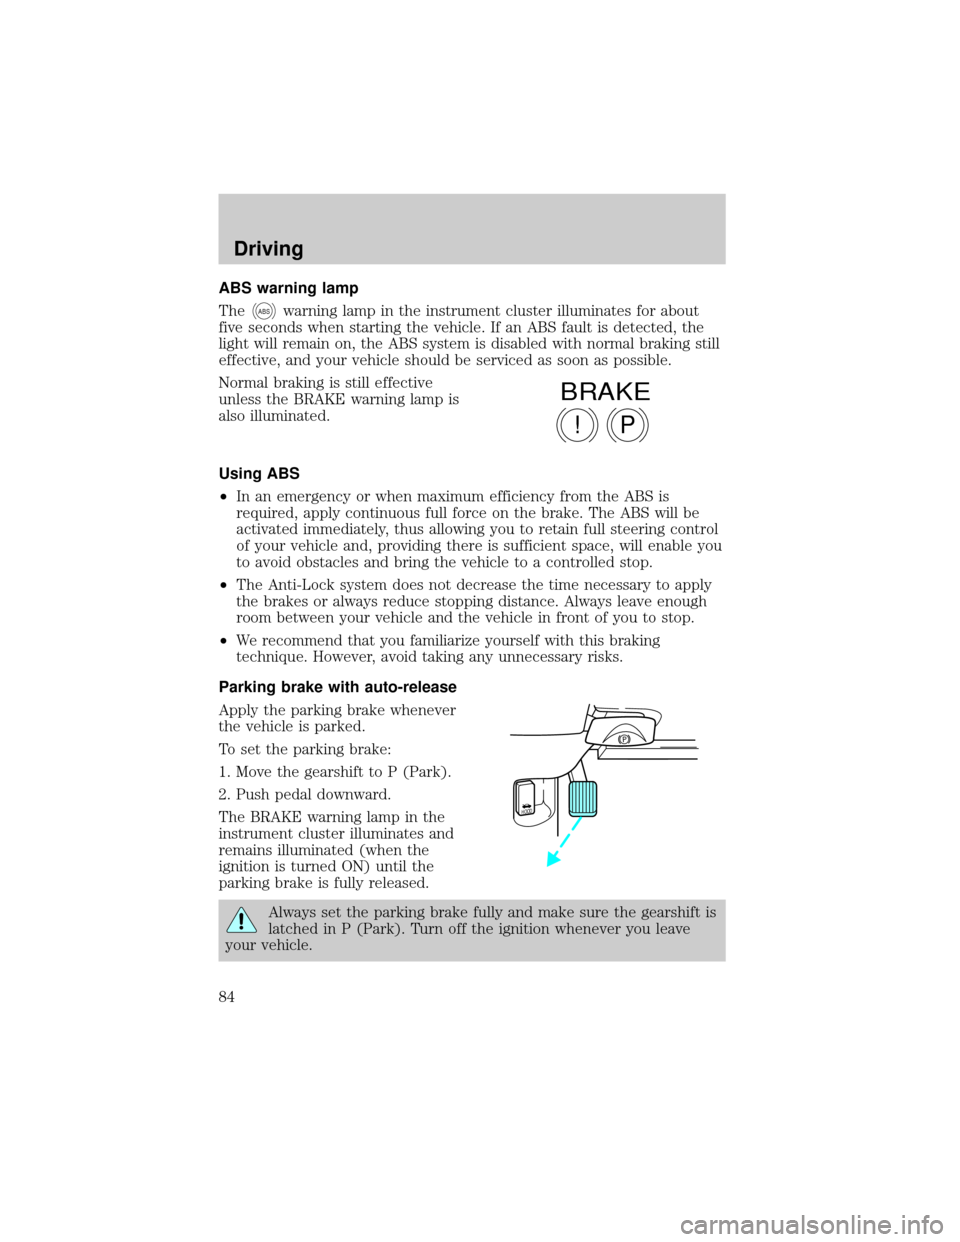
Parking brake with auto-release
Apply the parking brake whenever
the vehicle is parked.
To set the parking brake:
1. Move the gearshift to P (Park).
2. Push pedal downward.
The BRAKE warning lamp in the
instrument cluster illuminates and
remains illuminated (when the
ignition is turned ON) until the
parking brake is fully released.
Always set the parking brake fully and make sure the gearshift is
latched in P (Park). Turn off the ignition whenever you leave
your vehicle.
P!
BRAKE
HOOD
Driving
84
Page 85 of 160
The parking brake is not designed to stop a moving vehicle. However, if
the normal brakes fail, the parking brake can be used to stop your
vehicle in an emergency. Since the parking brake applies only the rear
brakes, the vehicle's stopping distance will increase greatly and the
handling of your vehicle will be adversely affected.
Your vehicle has an automatic parking brake release. To release the
parking brake:
1. Turn the ignition to the RUN position.
2. Press the brake pedal.
3. Move the gearshift from the P (Park) position to one of the forward
gears (the parking brake will not release automatically when you shift
into reverse). The brake pedal must remain pressed while the gearshift is
moved.
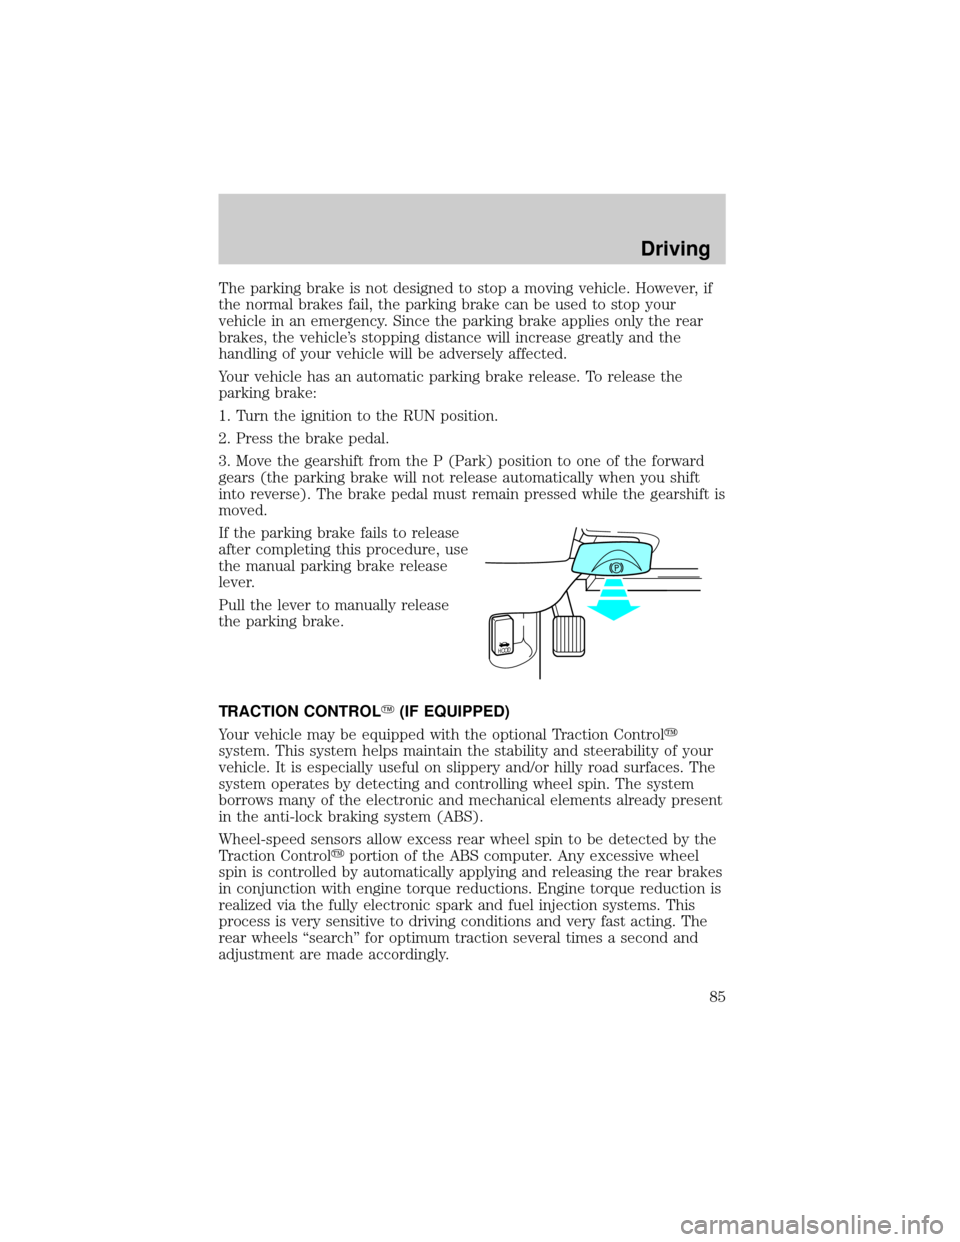
If the parking brake fails to release
after completing this procedure, use
the manual parking brake release
lever.
Pull the lever to manually release
the parking brake.
TRACTION CONTROLY(IF EQUIPPED)
Your vehicle may be equipped with the optional Traction Controly
system. This system helps maintain the stability and steerability of your
vehicle. It is especially useful on slippery and/or hilly road surfaces. The
system operates by detecting and controlling wheel spin. The system
borrows many of the electronic and mechanical elements already present
in the anti-lock braking system (ABS).
Wheel-speed sensors allow excess rear wheel spin to be detected by the
Traction Controlyportion of the ABS computer. Any excessive wheel
spin is controlled by automatically applying and releasing the rear brakes
in conjunction with engine torque reductions. Engine torque reduction is
realized via the fully electronic spark and fuel injection systems. This
process is very sensitive to driving conditions and very fast acting. The
rear wheels ªsearchº for optimum traction several times a second and
adjustment are made accordingly.
HOOD
Driving
85
Page 88 of 160
TRANSMISSION OPERATION
Brake-shift interlock
This vehicle is equipped with a brake-shift interlock feature that prevents
the gearshift from being moved from P (Park) unless the brake pedal is
depressed.
If you cannot move the gearshift out of P (Park) with the brake pedal
depressed:
1. Apply the parking brake, turn ignition key to LOCK, then remove the
key.
2. Insert the key and turn it to OFF. Apply the brake pedal and shift to N
(Neutral).
3. Start the vehicle.
If it is necessary to use the above procedure to move the gearshift, it is
possible that a fuse has blown and the vehicle's brakelamps may not be
operating properly. Refer toFuses and relaysin theRoadside
emergencieschapter.
Do not drive your vehicle until you verify that the brakelamps
are working.
If your vehicle gets stuck in mud or snow it may be rocked out by
shifting from forward and reverse gears, stopping between shifts, in a
steady pattern. Press lightly on the accelerator in each gear.
Do not rock the vehicle for more than a few minutes. The
transmission and tires may be damaged or the engine may
overheat.
Always set the parking brake fully and make sure the gearshift is
latched in P (Park). Turn off the ignition whenever you leave
your vehicle.
Driving with a 4±speed automatic transmission
Understanding gearshift positions
Pull the gearshift lever towards you and downward to move the
automatic gearshift.
Driving
88