ECU FORD E-250 2000 User Guide
[x] Cancel search | Manufacturer: FORD, Model Year: 2000, Model line: E-250, Model: FORD E-250 2000Pages: 232, PDF Size: 2.75 MB
Page 150 of 232
SERVICE RECOMMENDATIONS
To help you service your vehicle:
²We highlight do-it-yourself items in the engine compartment for easy
location.
²We provide a Scheduled Maintenance Guide which makes tracking
routine service easy.
If your vehicle requires professional service, your dealership can provide
necessary parts and service. Check your ªWarranty Guideº to find out
which parts and services are covered.
Use only recommended fuels, lubricants, fluids and service parts
conforming to specifications. Motorcraft parts are designed and built to
provide the best performance in your vehicle.
PRECAUTIONS WHEN SERVICING YOUR VEHICLE
Be especially careful when inspecting or servicing your vehicle.
²Do not work on a hot engine.
²When the engine is running, make sure that loose clothing, jewelry or
long hair does not get caught up in moving parts.
²Do not work on a vehicle with the engine running in an enclosed
space, unless you are sure you have enough ventilation.
²Keep all lit cigarettes, open flames and other lit material away from
the battery and all fuel related parts.
If you disconnect the battery, the engine must ªrelearnº its idle
conditions before your vehicle will drive properly, as explained inBattery
in this chapter.
Working with the engine off
1. Set the parking brake and ensure the gearshift is securely latched in
P (Park).
2. Turn off the engine and remove the key.
3. Block the wheels to prevent the vehicle from moving unexpectedly.
Working with the engine on
1. Set the parking brake and ensure the gearshift is securely latched in
P (Park).
2. Block the wheels to prevent the vehicle from moving unexpectedly.
Maintenance and care
150
ProCarManuals.com
Page 151 of 232
Do not start your engine with the air cleaner removed and do
not remove it while the engine is running.
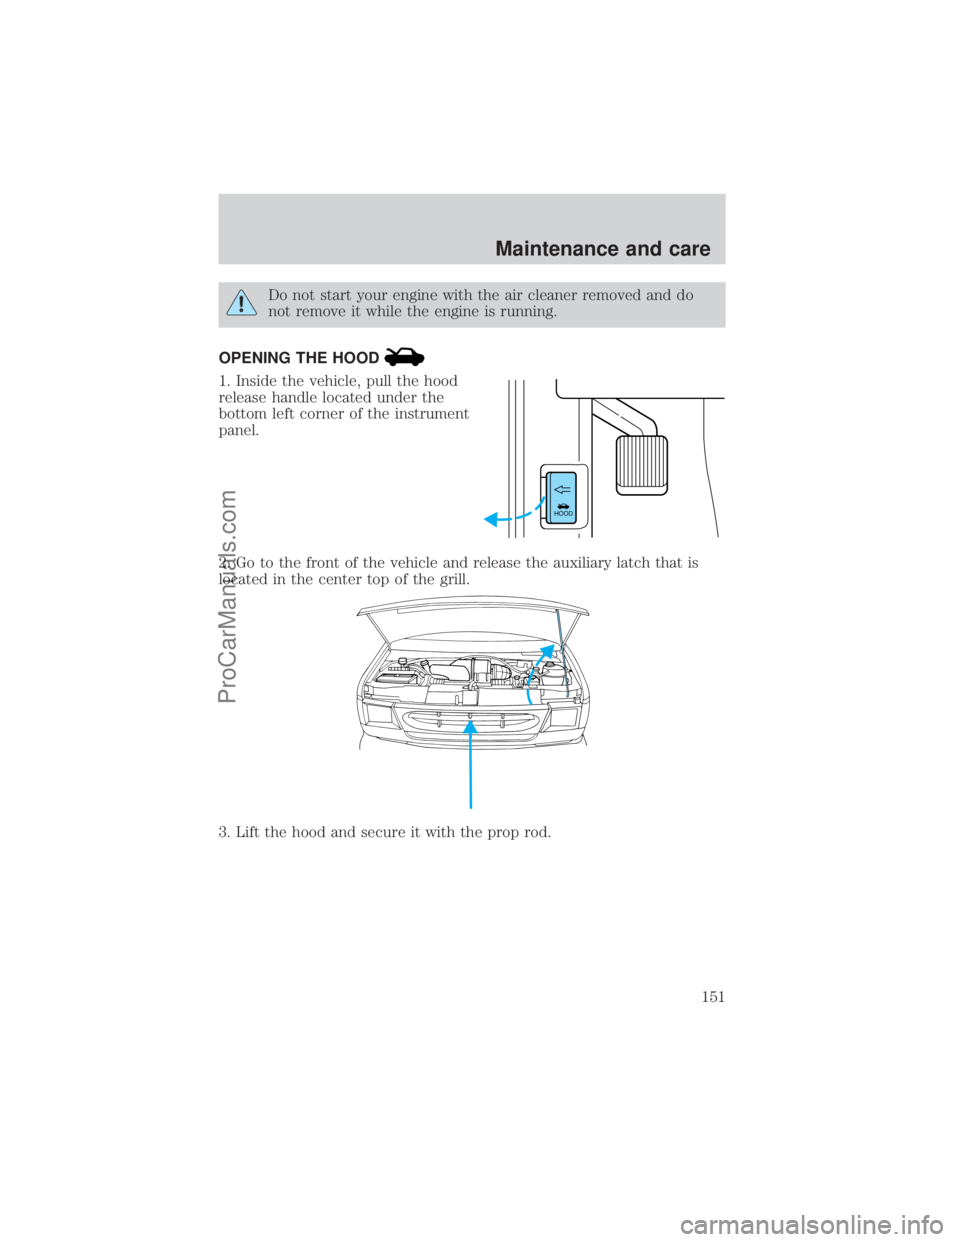
OPENING THE HOOD
1. Inside the vehicle, pull the hood
release handle located under the
bottom left corner of the instrument
panel.
2. Go to the front of the vehicle and release the auxiliary latch that is
located in the center top of the grill.
3. Lift the hood and secure it with the prop rod.
HOOD
Maintenance and care
151
ProCarManuals.com
Page 153 of 232
1. Make sure the vehicle is on level ground.
2. Turn the engine off and wait a few minutes for the oil to drain into the
oil pan.
3. Set the parking brake and ensure the gearshift is securely latched in P
(Park).
4. Open the hood. Protect yourself from engine heat.
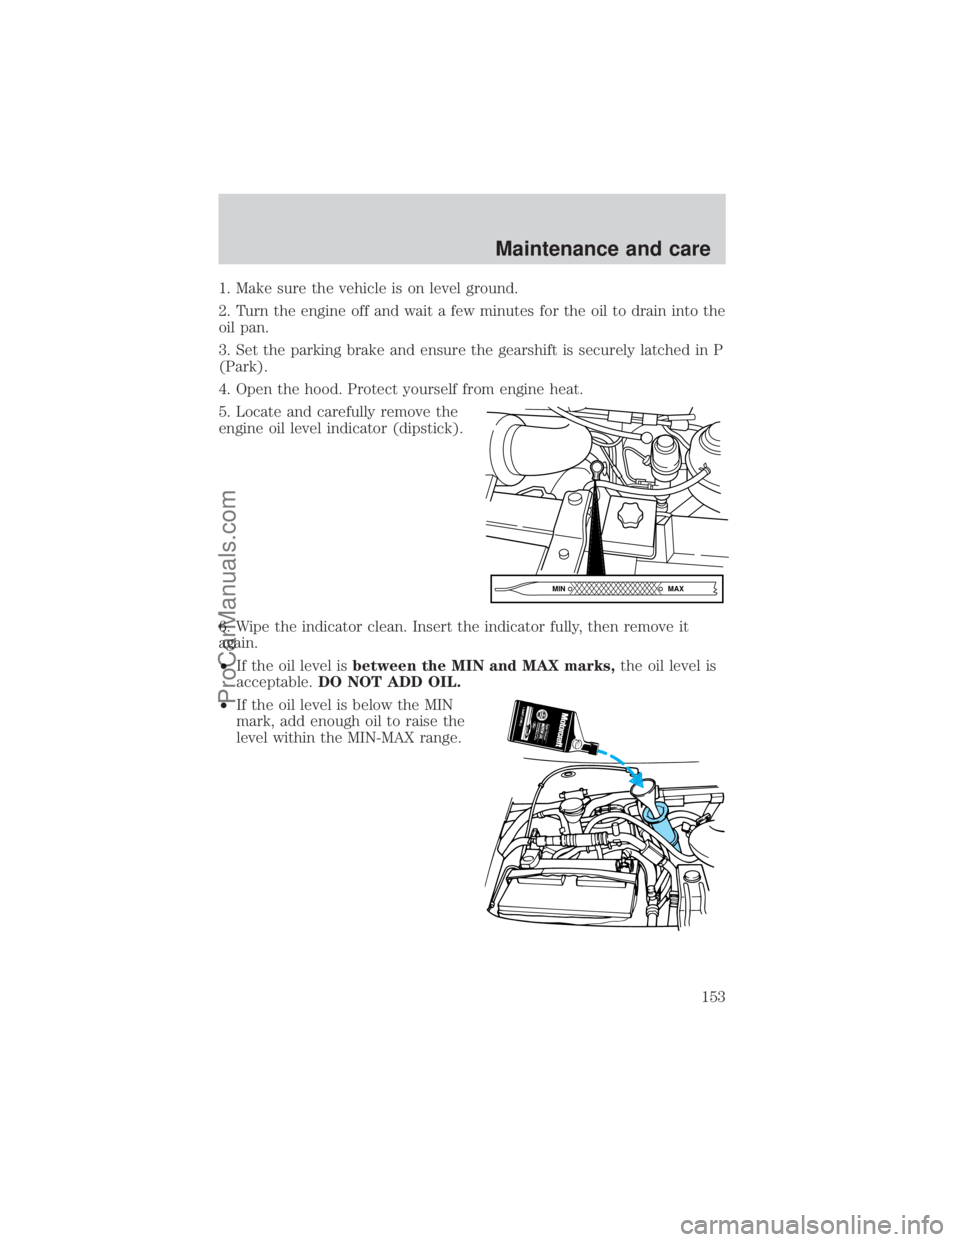
5. Locate and carefully remove the
engine oil level indicator (dipstick).
6. Wipe the indicator clean. Insert the indicator fully, then remove it
again.
²If the oil level isbetween the MIN and MAX marks,the oil level is
acceptable.DO NOT ADD OIL.
²If the oil level is below the MIN
mark, add enough oil to raise the
level within the MIN-MAX range.
MAX MIN
Maintenance and care
153
ProCarManuals.com
Page 155 of 232
Change your engine oil and filter according to the appropriate schedule
listed in the Scheduled Maintenance Guide.
Ford production and aftermarket (Motorcraft) oil filters are designed for
added engine protection and long life. If a replacement oil filter is used
that does not meet Ford material and design specifications, start-up
engine noises or knock may be experienced.
It is recommended you use the appropriate Motorcraft oil filter (or
another brand meeting Ford specifications) for your engine application.
AIR FILTER MAINTENANCE
Refer to the Scheduled Maintenance Guide for the appropriate intervals
for changing the air filter element.
When changing the air filter element, use only the Motorcraft air filter
element listed. Refer toMotorcraft Part Numbersin theCapacities and
specificationschapter.
Do not start your engine with the air cleaner removed and do
not remove it while the engine is running.
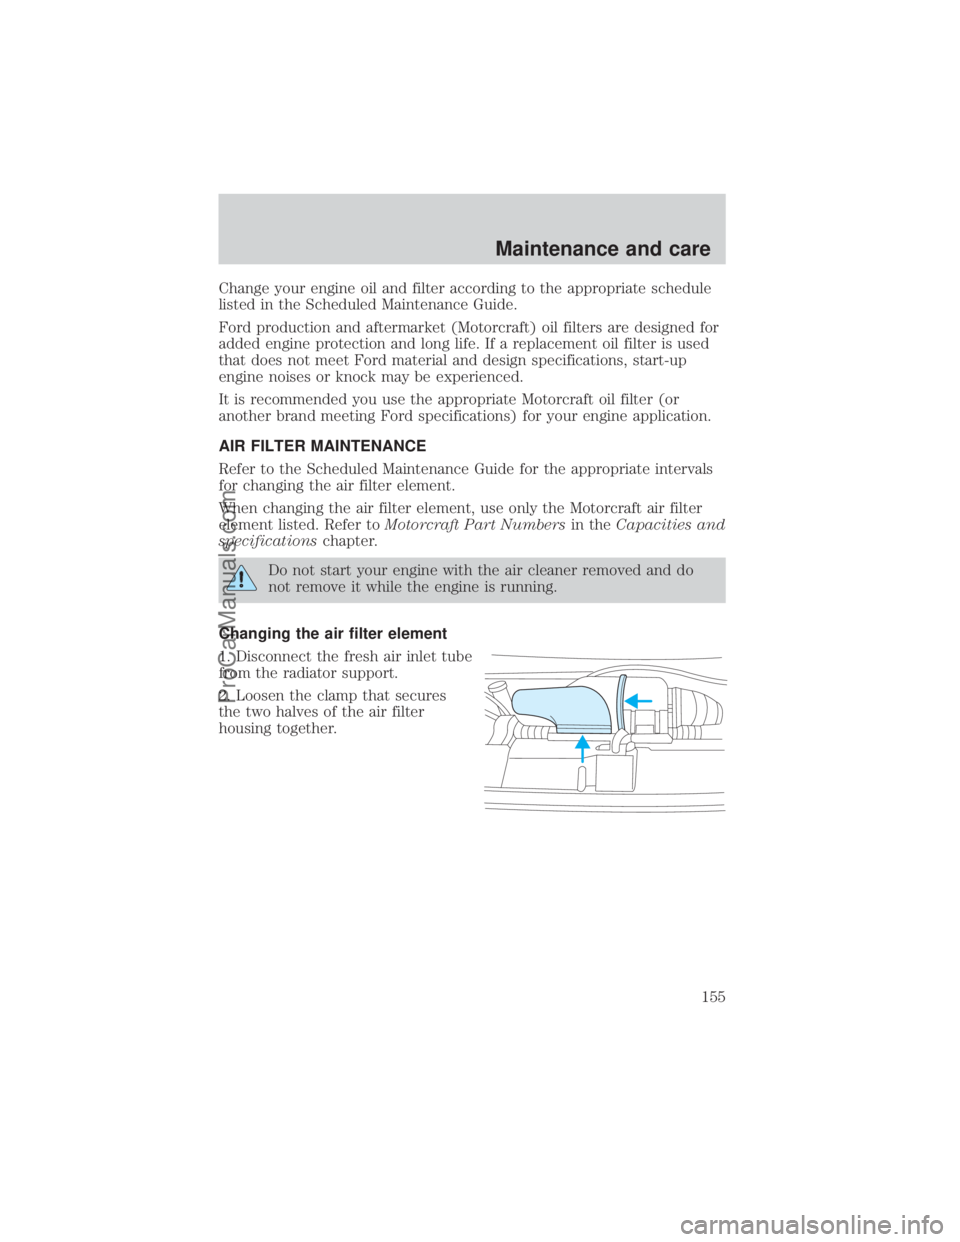
Changing the air filter element
1. Disconnect the fresh air inlet tube
from the radiator support.
2. Loosen the clamp that secures
the two halves of the air filter
housing together.
Maintenance and care
155
ProCarManuals.com
Page 156 of 232
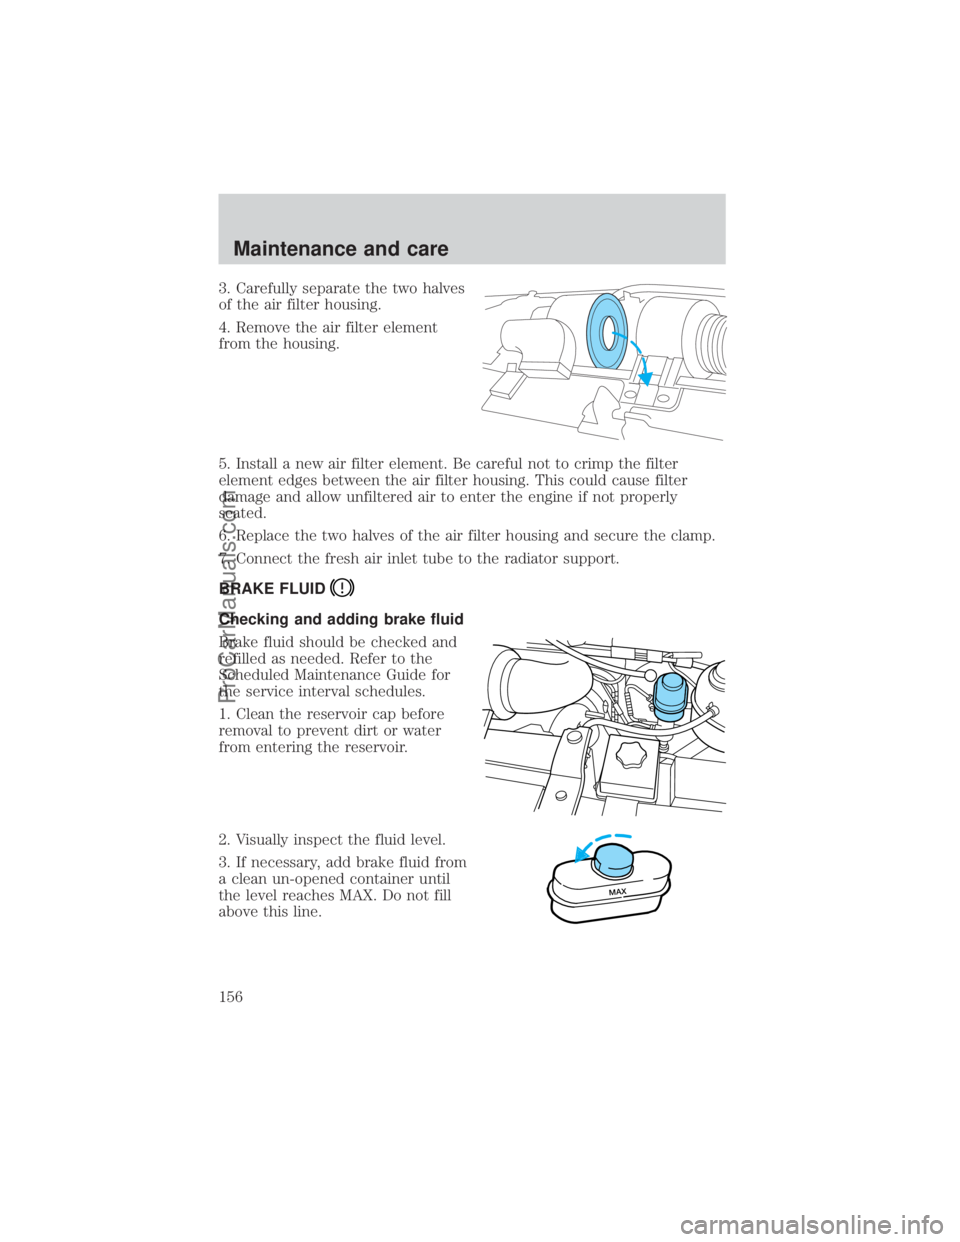
3. Carefully separate the two halves
of the air filter housing.
4. Remove the air filter element
from the housing.
5. Install a new air filter element. Be careful not to crimp the filter
element edges between the air filter housing. This could cause filter
damage and allow unfiltered air to enter the engine if not properly
seated.
6. Replace the two halves of the air filter housing and secure the clamp.
7. Connect the fresh air inlet tube to the radiator support.
BRAKE FLUID
Checking and adding brake fluid
Brake fluid should be checked and
refilled as needed. Refer to the
Scheduled Maintenance Guide for
the service interval schedules.
1. Clean the reservoir cap before
removal to prevent dirt or water
from entering the reservoir.
2. Visually inspect the fluid level.
3. If necessary, add brake fluid from
a clean un-opened container until
the level reaches MAX. Do not fill
above this line.
MAX
Maintenance and care
156
ProCarManuals.com
Page 178 of 232
Do not replace your tires with ªhigh performanceº tires or larger
size tires.
Failure to follow these precautions may adversely affect the
handling of the vehicle and make it easier for the driver to lose
control and roll over.
Tires that are larger or smaller than your vehicle's original tires may also
affect the accuracy of your speedometer.
SNOW TIRES AND CHAINS
Snow tires must be the same size and grade as the tires you
currently have on your vehicle.
The tires on your vehicle have all weather treads to provide traction in
rain and snow. However, in some climates, you may need to use snow
tires and chains. If you need to use chains, it is recommended that steel
wheels (of the same size and specifications) be used as chains may chip
aluminum wheels.
Follow these guidelines when using snow tires and chains:
²Use only SAE Class S chains.
²Install chains securely, verifying that the chains do not touch any
wiring, brake lines or fuel lines.
²Drive cautiously. If you hear the chains rub or bang against your
vehicle, stop and re-tighten the chains. If this does not work, remove
the chains to prevent damage to your vehicle.
²If possible, avoid fully loading your vehicle.
²Remove the tire chains when they are no longer needed. Do not use
tire chains on dry roads.
²The suspension insulation and bumpers will help prevent vehicle
damage. Do not remove these components from your vehicle when
using snow tires and chains.
Maintenance and care
178
ProCarManuals.com
Page 190 of 232
2. Install the bulb retaining ring over the plastic base until it contacts the
rear of the lamp assembly by rotating clockwise until you feel a ªstop.º
3. Install the electrical connector into the rear of the plastic base until it
snaps, locking it into position.
4. Install the headlamp assembly into the vehicle and secure it with the
clip tabs.
5. Turn the headlamps on and make sure they work properly. If the
headlamp was correctly aligned before you changed the bulb, you should
not need to align it again.
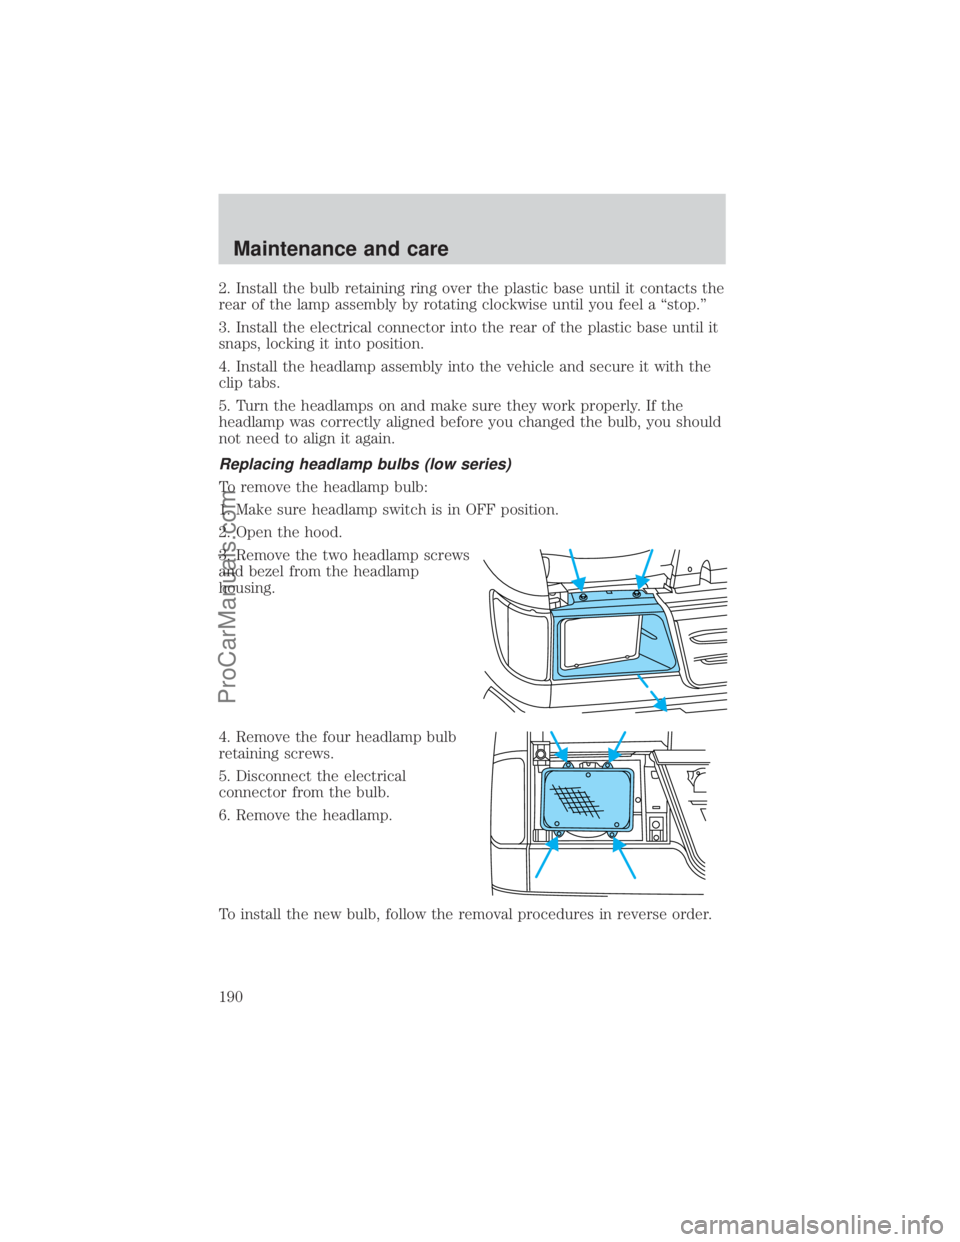
Replacing headlamp bulbs (low series)
To remove the headlamp bulb:
1. Make sure headlamp switch is in OFF position.
2. Open the hood.
3. Remove the two headlamp screws
and bezel from the headlamp
housing.
4. Remove the four headlamp bulb
retaining screws.
5. Disconnect the electrical
connector from the bulb.
6. Remove the headlamp.
To install the new bulb, follow the removal procedures in reverse order.
Maintenance and care
190
ProCarManuals.com
Page 192 of 232
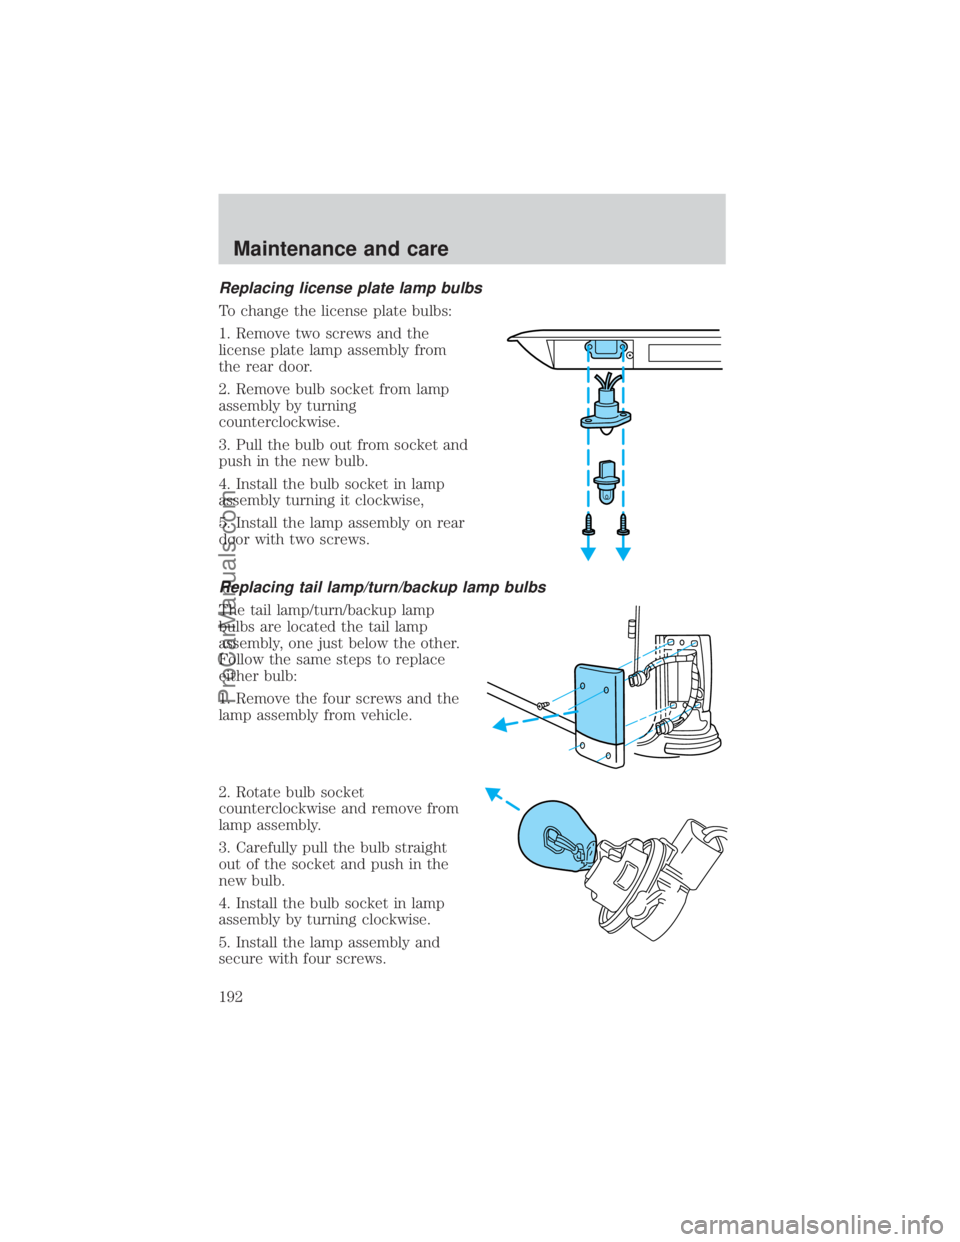
Replacing license plate lamp bulbs
To change the license plate bulbs:
1. Remove two screws and the
license plate lamp assembly from
the rear door.
2. Remove bulb socket from lamp
assembly by turning
counterclockwise.
3. Pull the bulb out from socket and
push in the new bulb.
4. Install the bulb socket in lamp
assembly turning it clockwise,
5. Install the lamp assembly on rear
door with two screws.
Replacing tail lamp/turn/backup lamp bulbs
The tail lamp/turn/backup lamp
bulbs are located the tail lamp
assembly, one just below the other.
Follow the same steps to replace
either bulb:
1. Remove the four screws and the
lamp assembly from vehicle.
2. Rotate bulb socket
counterclockwise and remove from
lamp assembly.
3. Carefully pull the bulb straight
out of the socket and push in the
new bulb.
4. Install the bulb socket in lamp
assembly by turning clockwise.
5. Install the lamp assembly and
secure with four screws.
Maintenance and care
192
ProCarManuals.com
Page 211 of 232
If you have questions or concerns, or are unsatisfied with the service you
are receiving, follow these steps:
1. Contact your Sales Representative or Service Advisor at your
selling/servicing dealership.
2. If your inquiry or concern remains unresolved, contact the Sales
Manager or Service Manager at the dealership.
3. If the inquiry or concern cannot be resolved at the dealership level,
please contact the Ford Customer Assistance Center.
Ford Motor Company and Ford of Canada dealerships also carry quality
parts and accessories, providing you with equipment reliability.
Away from home
If you own a Ford or Mercury vehicle and are away from home when
your vehicle needs service, or if you need more help than the dealership
could provide, after following the steps described above, contact the
Ford Customer Assistance Center to find an authorized dealership to
help you. In the United States:
Ford Motor Company
Customer Assistance Center
16800 Executive Plaza Drive
P.O. Box 6248
Dearborn, Michigan 48121
1-800-392-3673 (FORD)
(TDD for the hearing impaired: 1-800-232-5952)
In Canada:
Customer Assistance Centre
Ford Motor Company of Canada, Limited
P.O. Box 2000
Oakville, Ontario L6J 5E4
1-800-565-3673 (FORD)
Customer assistance
211
ProCarManuals.com
Page 212 of 232
If you own a Lincoln vehicle and are away from home when your vehicle
needs service, or if you need more help than the dealership could
provide, after following the steps described above, contact the Ford
Customer Assistance Center to find an authorized dealership to help you.
In the United States:
Ford Motor Company
Customer Assistance Center
16800 Executive Plaza Drive
P.O. Box 6248
Dearborn, Michigan 48121
1-800-521-4140
(TDD for the hearing impaired: 1-800-232-5952)
In Canada:
Customer Assistance Centre
Ford Motor Company of Canada, Limited
P.O. Box 2000
Oakville, Ontario L6J 5E4
1-800-565-3673 (FORD)
In order to help you service your Ford or Lincoln Mercury vehicle, please
have the following information available when contacting a Customer
Assistance Center:
²Your telephone number (home and business)
²The name of the dealer and the city where the dealership is located
²The year and make of your vehicle
²The date of vehicle purchase
²The current odometer reading
²The vehicle identification number (VIN)
If you still have a complaint involving a warranty dispute, you may wish
to contact the Dispute Settlement Board (U.S.) or the
Mediation/Arbitration Program (Canada).
In some states (in the U.S.) you must directly notify Ford in writing
before pursuing remedies under your state's warranty laws. Ford is also
allowed a final repair attempt in some states.
In the United States, a warranty dispute must be submitted to the
Dispute Settlement Board before taking action under the Magnuson-Moss
Warranty Act, or to the extent allowed by state law, before pursuing
replacement or repurchase remedies provided by certain state laws. This
Customer assistance
212
ProCarManuals.com