change wheel FORD E-250 2002 Owners Manual
[x] Cancel search | Manufacturer: FORD, Model Year: 2002, Model line: E-250, Model: FORD E-250 2002Pages: 256, PDF Size: 3.52 MB
Page 154 of 256
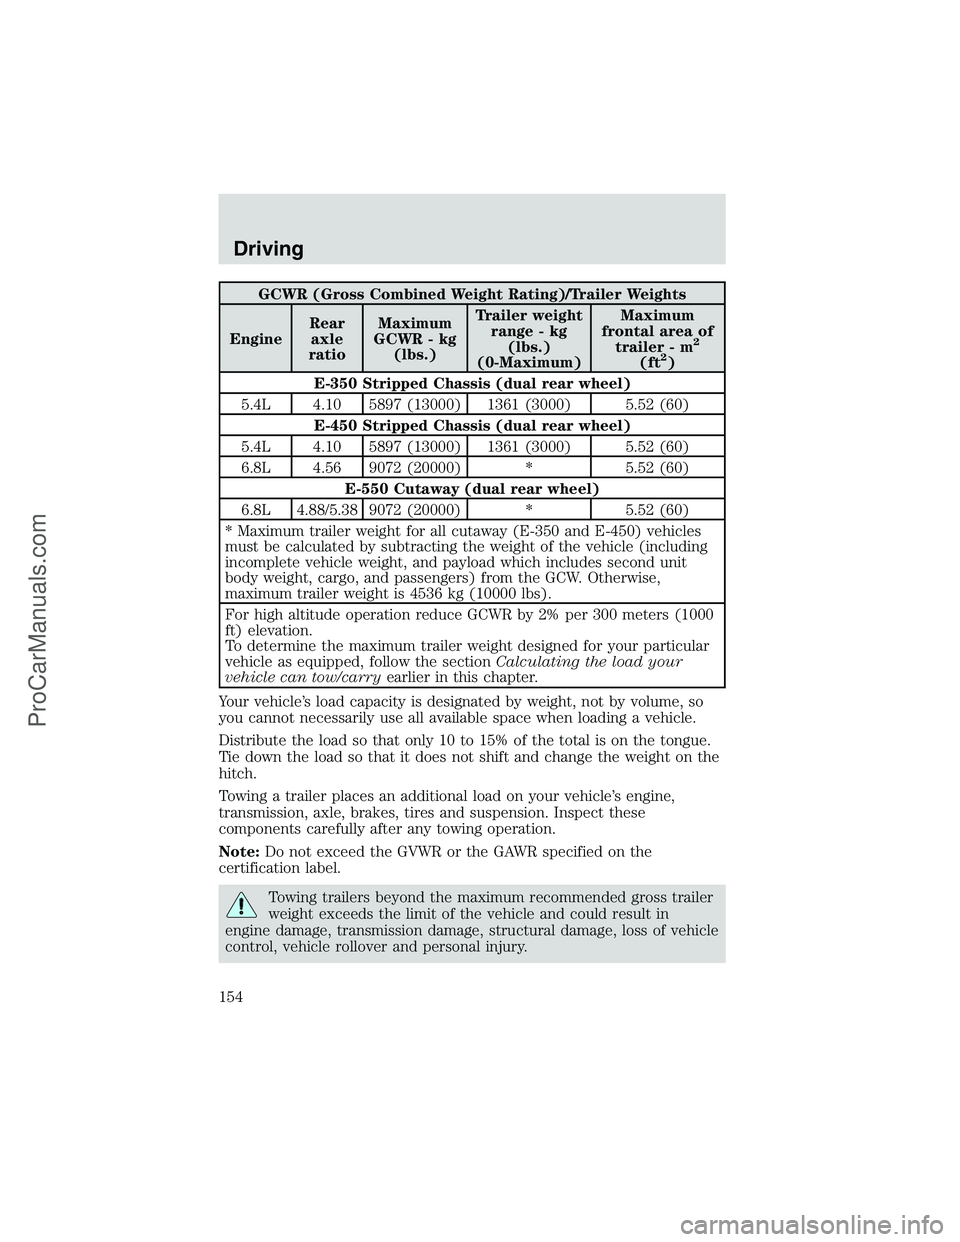
GCWR (Gross Combined Weight Rating)/Trailer Weights
EngineRear
axle
ratioMaximum
GCWR - kg
(lbs.)Trailer weight
range - kg
(lbs.)
(0-Maximum)Maximum
frontal area of
trailer - m
2
(ft2)
E-350 Stripped Chassis (dual rear wheel)
5.4L 4.10 5897 (13000) 1361 (3000) 5.52 (60)
E-450 Stripped Chassis (dual rear wheel)
5.4L 4.10 5897 (13000) 1361 (3000) 5.52 (60)
6.8L 4.56 9072 (20000) * 5.52 (60)
E-550 Cutaway (dual rear wheel)
6.8L 4.88/5.38 9072 (20000) * 5.52 (60)
* Maximum trailer weight for all cutaway (E-350 and E-450) vehicles
must be calculated by subtracting the weight of the vehicle (including
incomplete vehicle weight, and payload which includes second unit
body weight, cargo, and passengers) from the GCW. Otherwise,
maximum trailer weight is 4536 kg (10000 lbs).
For high altitude operation reduce GCWR by 2% per 300 meters (1000
ft) elevation.
To determine the maximum trailer weight designed for your particular
vehicle as equipped, follow the sectionCalculating the load your
vehicle can tow/carryearlier in this chapter.
Your vehicle’s load capacity is designated by weight, not by volume, so
you cannot necessarily use all available space when loading a vehicle.
Distribute the load so that only 10 to 15% of the total is on the tongue.
Tie down the load so that it does not shift and change the weight on the
hitch.
Towing a trailer places an additional load on your vehicle’s engine,
transmission, axle, brakes, tires and suspension. Inspect these
components carefully after any towing operation.
Note:Do not exceed the GVWR or the GAWR specified on the
certification label.
Towing trailers beyond the maximum recommended gross trailer
weight exceeds the limit of the vehicle and could result in
engine damage, transmission damage, structural damage, loss of vehicle
control, vehicle rollover and personal injury.
Driving
154
ProCarManuals.com
Page 157 of 256
•Vehicles with trailers should not be parked on a grade. If you must
park on a grade, place wheel chocks under the trailer’s wheels.
Launching or retrieving a boat
Disconnect the wiring to the trailer before backing the trailer
into the water. Reconnect the wiring to the trailer after the
trailer is removed from the water.
When backing down a ramp during boat launching or retrieval:
•do not allow the static water level to rise above the bottom edge of
the rear bumper.
•do not allow waves to break higher than 15 cm (6 inches) above the
bottom edge of the rear bumper.
Exceeding these limits may allow water to enter vehicle components:
•causing internal damage to the components.
•affecting driveability, emissions and reliability.
Replace the rear axle lubricant any time the axle has been submerged in
water. Rear axle lubricant quantities are not to be checked or changed
unless a leak is suspected or repair required.
RECREATIONAL TOWING (ALL WHEELS ON THE GROUND)
An example of recreational towing would be towing your vehicle on a
trip behind a motorhome. Follow these guidelines if you have the need
for recreational towing your vehicle with all four wheels on the ground.
These guidelines are designed to ensure that your transmission is not
damaged.
2WD vehicles (with automatic transmissions):
•Place the transmission in N (Neutral)
•Maximum speed is 56 km (35 mph)
•Maximum distance is 80 km (50 miles)
If a distance of 80 km (50 miles) or a speed of 56 km (35 mph) must be
exceeded, the drive shaft will have to be removed.
Ford recommends the driveshaft be removed/installed only by a qualified
technician. See your local dealer for driveshaft removal/installation.
Improper removal/installation of the driveshaft can cause
transmission fluid loss, damage to the driveshaft and internal
transmission components.
Driving
157
ProCarManuals.com
Page 170 of 256
Make sure the spare tire and jacking equipment are stowed and
secured in the proper storage location.
Never run the engine with one wheel off the ground.
Tire change procedure
Preparing to change the tire
To prevent the vehicle from moving when you change a tire, be
sure the parking brake is set, then block (in both directions) the
wheel that is diagonally opposite (other side and end of the vehicle) to
the tire being changed.
1. Park on a level surface.
2. Activate the warning flashers.
3. Place the gearshift in P (Park).
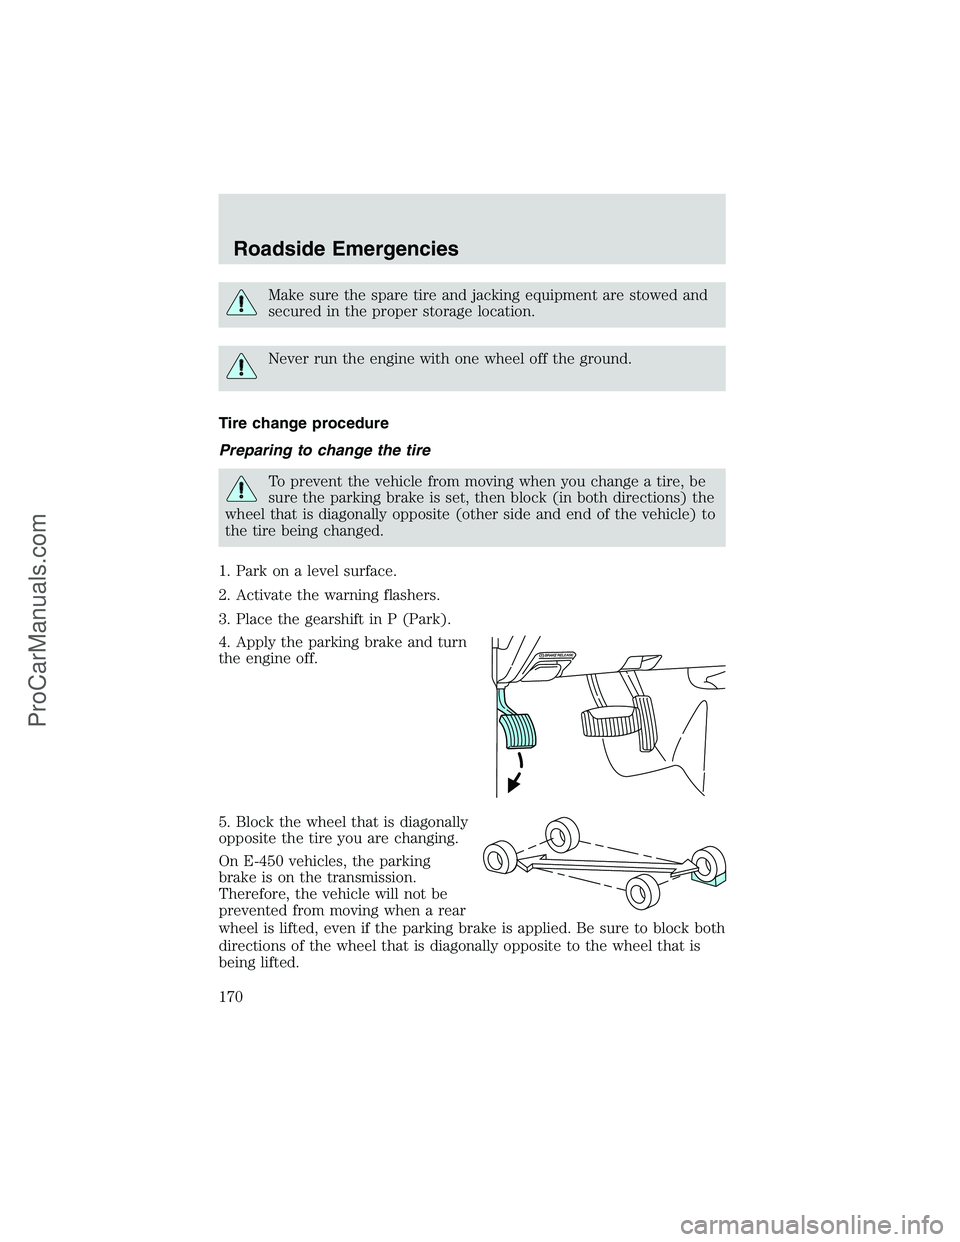
4. Apply the parking brake and turn
the engine off.
5. Block the wheel that is diagonally
opposite the tire you are changing.
On E-450 vehicles, the parking
brake is on the transmission.
Therefore, the vehicle will not be
prevented from moving when a rear
wheel is lifted, even if the parking brake is applied. Be sure to block both
directions of the wheel that is diagonally opposite to the wheel that is
being lifted.
Roadside Emergencies
170
ProCarManuals.com
Page 174 of 256
3. Use the lug nut wrench to screw the lug nut snugly against the wheel.
4. Lower the vehicle by turning the jack handle counterclockwise.
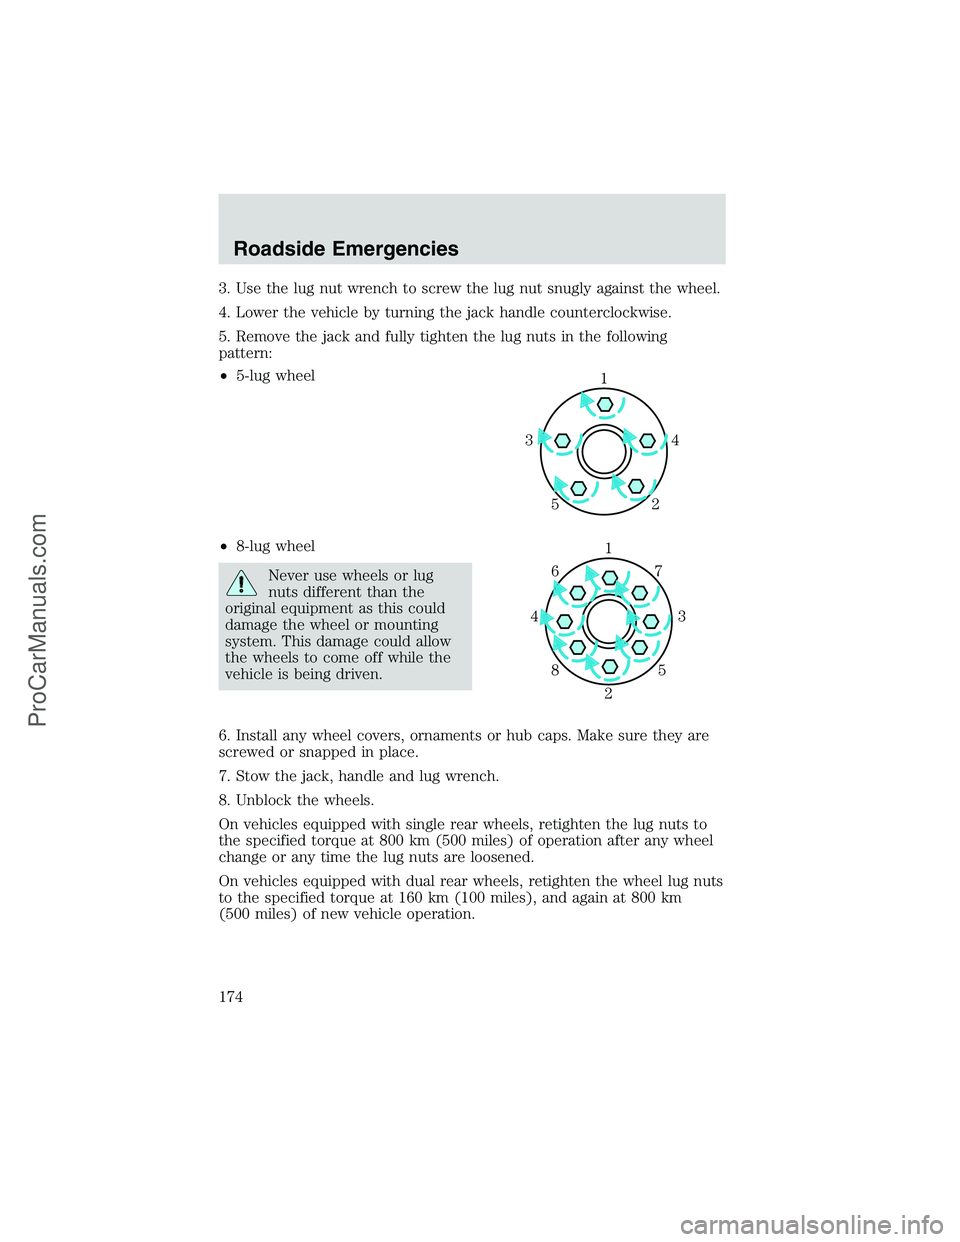
5. Remove the jack and fully tighten the lug nuts in the following
pattern:
•5-lug wheel
•8-lug wheel
Never use wheels or lug
nuts different than the
original equipment as this could
damage the wheel or mounting
system. This damage could allow
the wheels to come off while the
vehicle is being driven.
6. Install any wheel covers, ornaments or hub caps. Make sure they are
screwed or snapped in place.
7. Stow the jack, handle and lug wrench.
8. Unblock the wheels.
On vehicles equipped with single rear wheels, retighten the lug nuts to
the specified torque at 800 km (500 miles) of operation after any wheel
change or any time the lug nuts are loosened.
On vehicles equipped with dual rear wheels, retighten the wheel lug nuts
to the specified torque at 160 km (100 miles), and again at 800 km
(500 miles) of new vehicle operation.
1
4 3
2 5
1
3 4
27 6
5 8
Roadside Emergencies
174
ProCarManuals.com
Page 222 of 256
economy under current driving conditions. Additionally, keeping records
during summer and winter will show how temperature impacts fuel
economy. In general, lower temperatures give lower fuel economy.
Driving style—good driving and fuel economy habits
Give consideration to the lists that follow and you may be able to change
a number of variables and improve your fuel economy.
Habits
•Smooth, moderate operation can yield up to 10% savings in fuel.
•Steady speeds without stopping will usually give the best fuel
economy.
•Idling for long periods of time (greater than one minute) may waste
fuel.
•Anticipate stopping; slowing down may eliminate the need to stop.
•Sudden or hard accelerations may reduce fuel economy.
•Slow down gradually.
•Driving at reasonable speeds (traveling at 88 km/h [55 mph] uses 15%
less fuel than traveling at 105 km/h [65 mph]).
•Revving the engine before turning it off may reduce fuel economy.
•Using the air conditioner or defroster may reduce fuel economy.
•You may want to turn off the speed control in hilly terrain if
unnecessary shifting between third and fourth gear occurs.
Unnecessary shifting of this type could result in reduced fuel
economy.
•Warming up a vehicle on cold mornings is not required and may
reduce fuel economy.
•Resting your foot on the brake pedal while driving may reduce fuel
economy.
•Combine errands and minimize stop-and-go driving.
Maintenance
•Keep tires properly inflated and use only recommended size.
•Operating a vehicle with the wheels out of alignment will reduce fuel
economy.
•Use recommended engine oil. Refer toLubricant specificationsin
this chapter.
Maintenance and Specifications
222
ProCarManuals.com