clock FORD E-350 2002 User Guide
[x] Cancel search | Manufacturer: FORD, Model Year: 2002, Model line: E-350, Model: FORD E-350 2002Pages: 256, PDF Size: 3.52 MB
Page 78 of 256
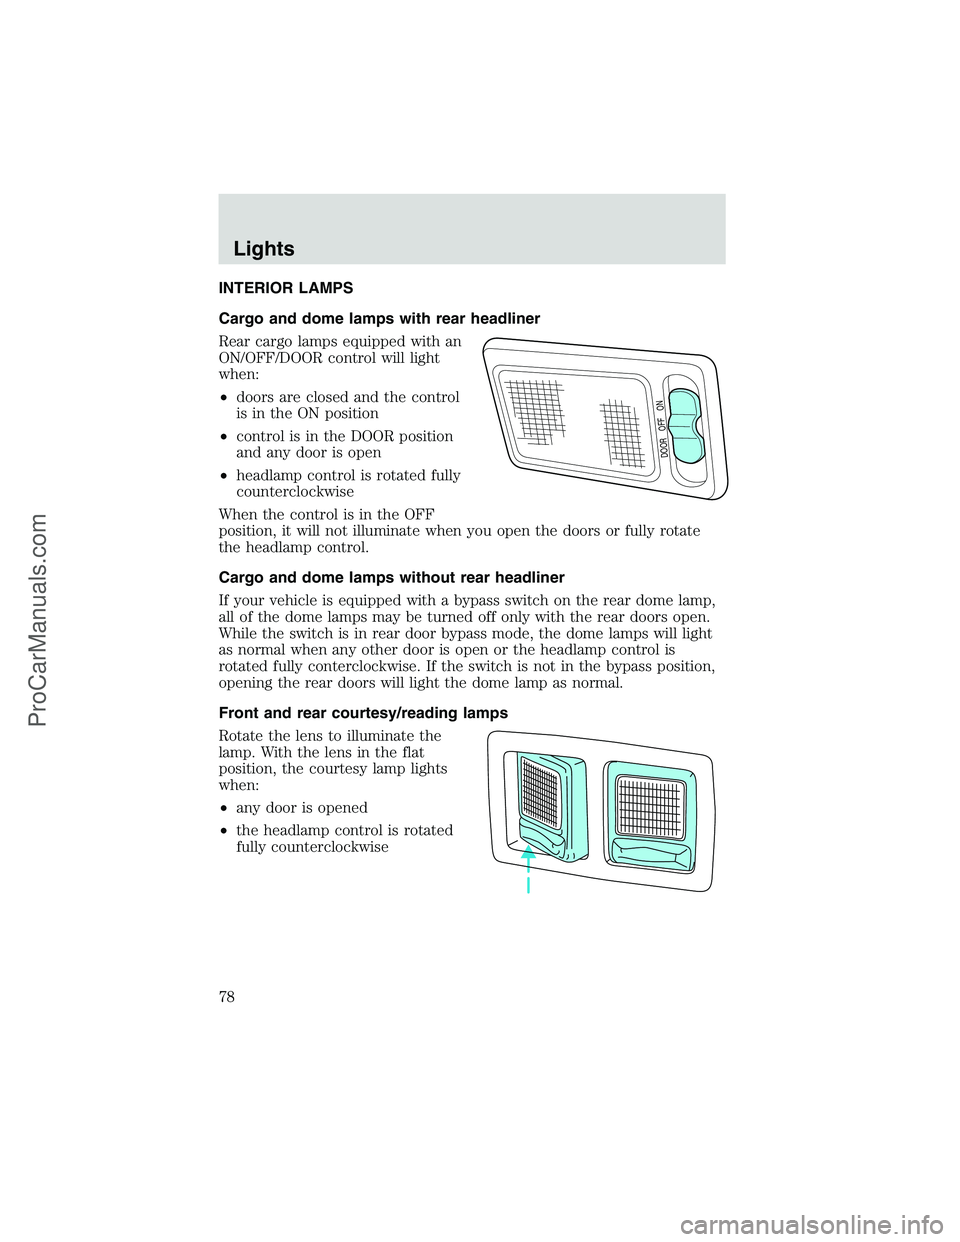
INTERIOR LAMPS
Cargo and dome lamps with rear headliner
Rear cargo lamps equipped with an
ON/OFF/DOOR control will light
when:
•doors are closed and the control
is in the ON position
•control is in the DOOR position
and any door is open
•headlamp control is rotated fully
counterclockwise
When the control is in the OFF
position, it will not illuminate when you open the doors or fully rotate
the headlamp control.
Cargo and dome lamps without rear headliner
If your vehicle is equipped with a bypass switch on the rear dome lamp,
all of the dome lamps may be turned off only with the rear doors open.
While the switch is in rear door bypass mode, the dome lamps will light
as normal when any other door is open or the headlamp control is
rotated fully conterclockwise. If the switch is not in the bypass position,
opening the rear doors will light the dome lamp as normal.
Front and rear courtesy/reading lamps
Rotate the lens to illuminate the
lamp. With the lens in the flat
position, the courtesy lamp lights
when:
•any door is opened
•the headlamp control is rotated
fully counterclockwise
DOOR OFF ON
Lights
78
ProCarManuals.com
Page 80 of 256
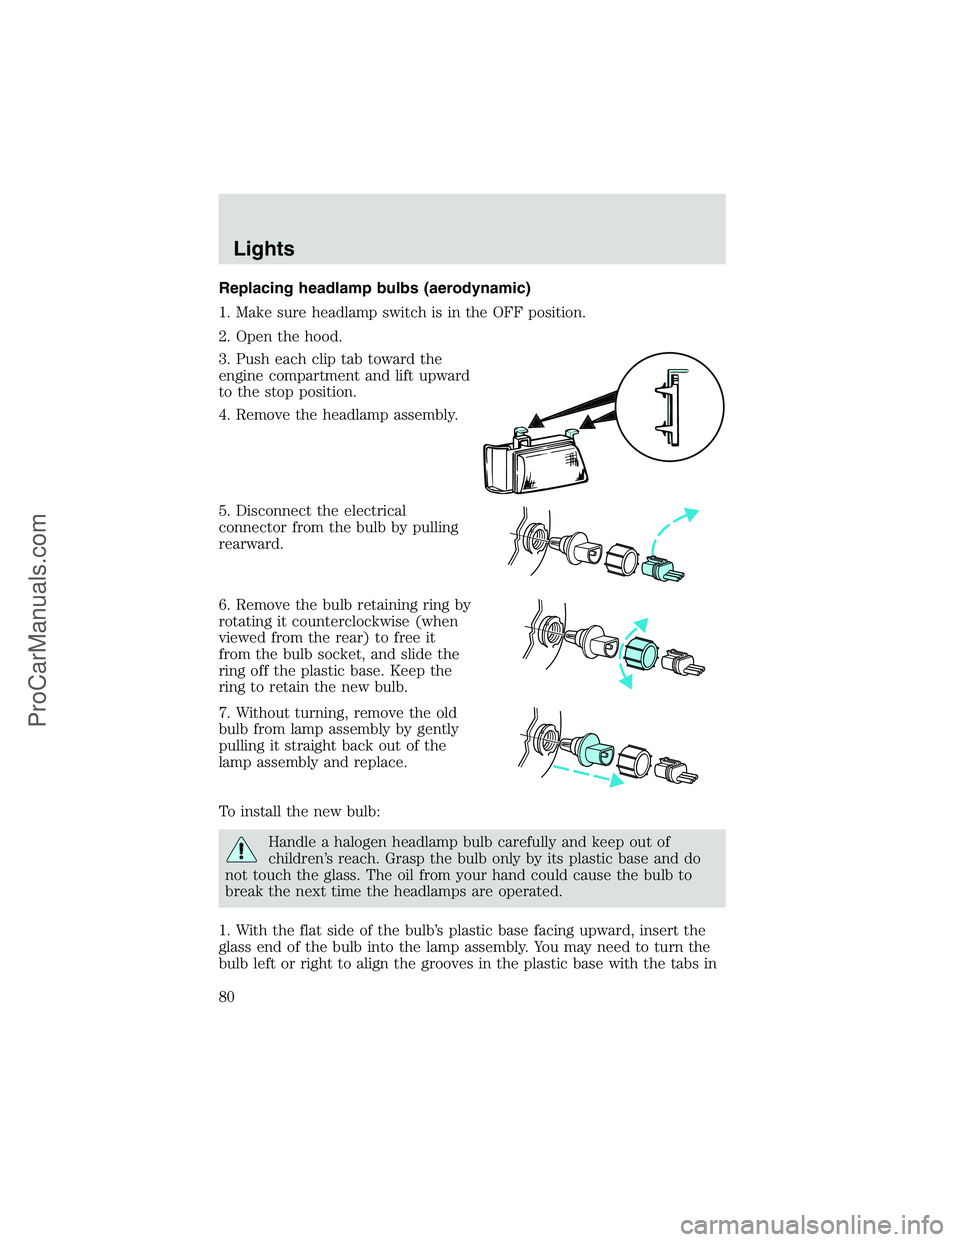
Replacing headlamp bulbs (aerodynamic)
1. Make sure headlamp switch is in the OFF position.
2. Open the hood.
3. Push each clip tab toward the
engine compartment and lift upward
to the stop position.
4. Remove the headlamp assembly.
5. Disconnect the electrical
connector from the bulb by pulling
rearward.
6. Remove the bulb retaining ring by
rotating it counterclockwise (when
viewed from the rear) to free it
from the bulb socket, and slide the
ring off the plastic base. Keep the
ring to retain the new bulb.
7. Without turning, remove the old
bulb from lamp assembly by gently
pulling it straight back out of the
lamp assembly and replace.
To install the new bulb:
Handle a halogen headlamp bulb carefully and keep out of
children’s reach. Grasp the bulb only by its plastic base and do
not touch the glass. The oil from your hand could cause the bulb to
break the next time the headlamps are operated.
1. With the flat side of the bulb’s plastic base facing upward, insert the
glass end of the bulb into the lamp assembly. You may need to turn the
bulb left or right to align the grooves in the plastic base with the tabs in
Lights
80
ProCarManuals.com
Page 81 of 256
the lamp assembly. When the grooves are aligned, push the bulb into the
socket until the plastic base contacts the rear of the lamp assembly.
2. Install the bulb retaining ring over the plastic base until it contacts the
rear of the lamp assembly by rotating clockwise until you feel a“stop.”
3. Install the electrical connector into the rear of the plastic base until it
snaps, locking it into position.
4. Install the headlamp assembly into the vehicle and secure it with the
clip tabs.
5. Turn the headlamps on and make sure they work properly. If the
headlamp was correctly aligned before you changed the bulb, you should
not need to align it again.
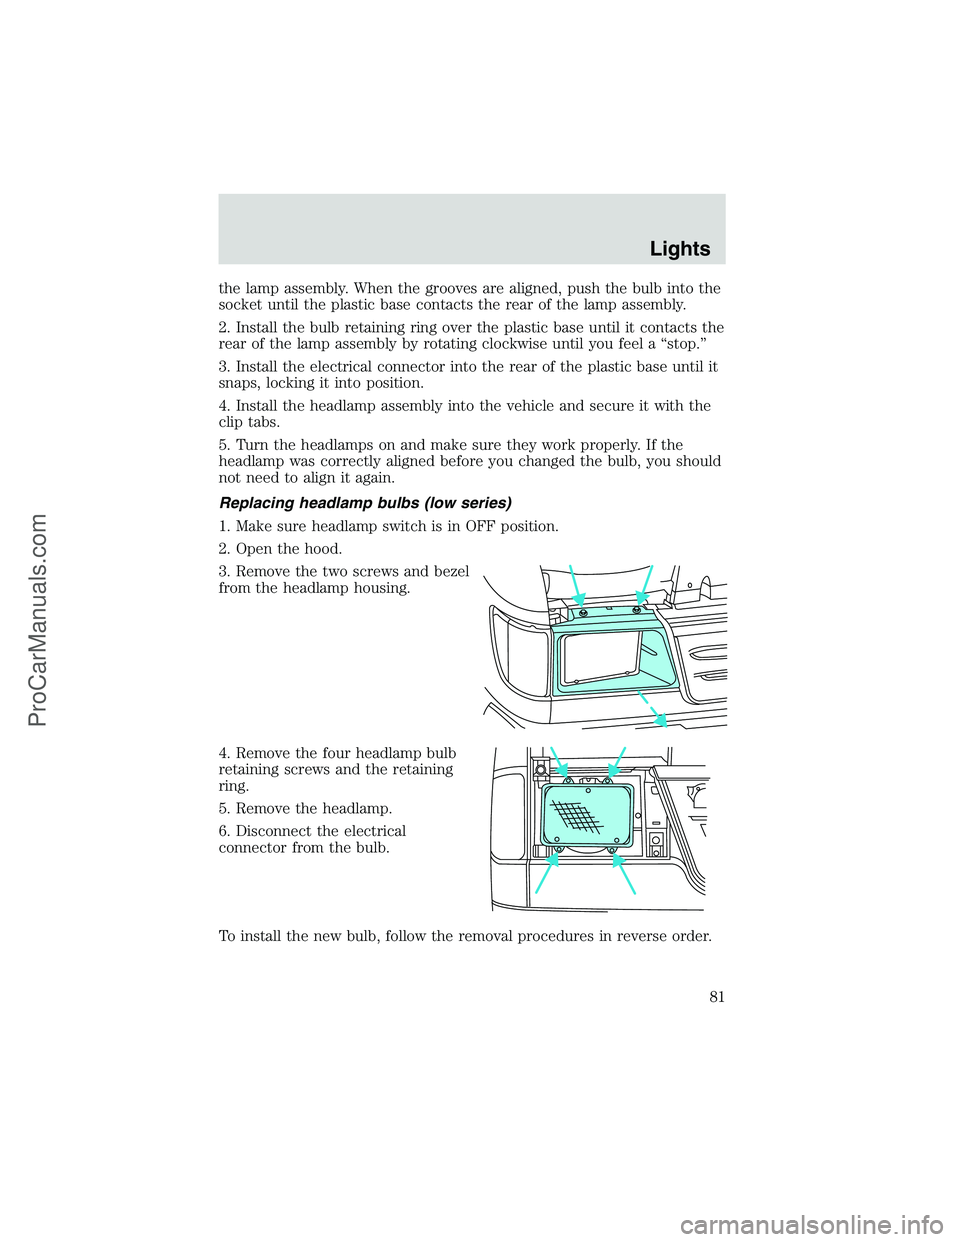
Replacing headlamp bulbs (low series)
1. Make sure headlamp switch is in OFF position.
2. Open the hood.
3. Remove the two screws and bezel
from the headlamp housing.
4. Remove the four headlamp bulb
retaining screws and the retaining
ring.
5. Remove the headlamp.
6. Disconnect the electrical
connector from the bulb.
To install the new bulb, follow the removal procedures in reverse order.
Lights
81
ProCarManuals.com
Page 82 of 256
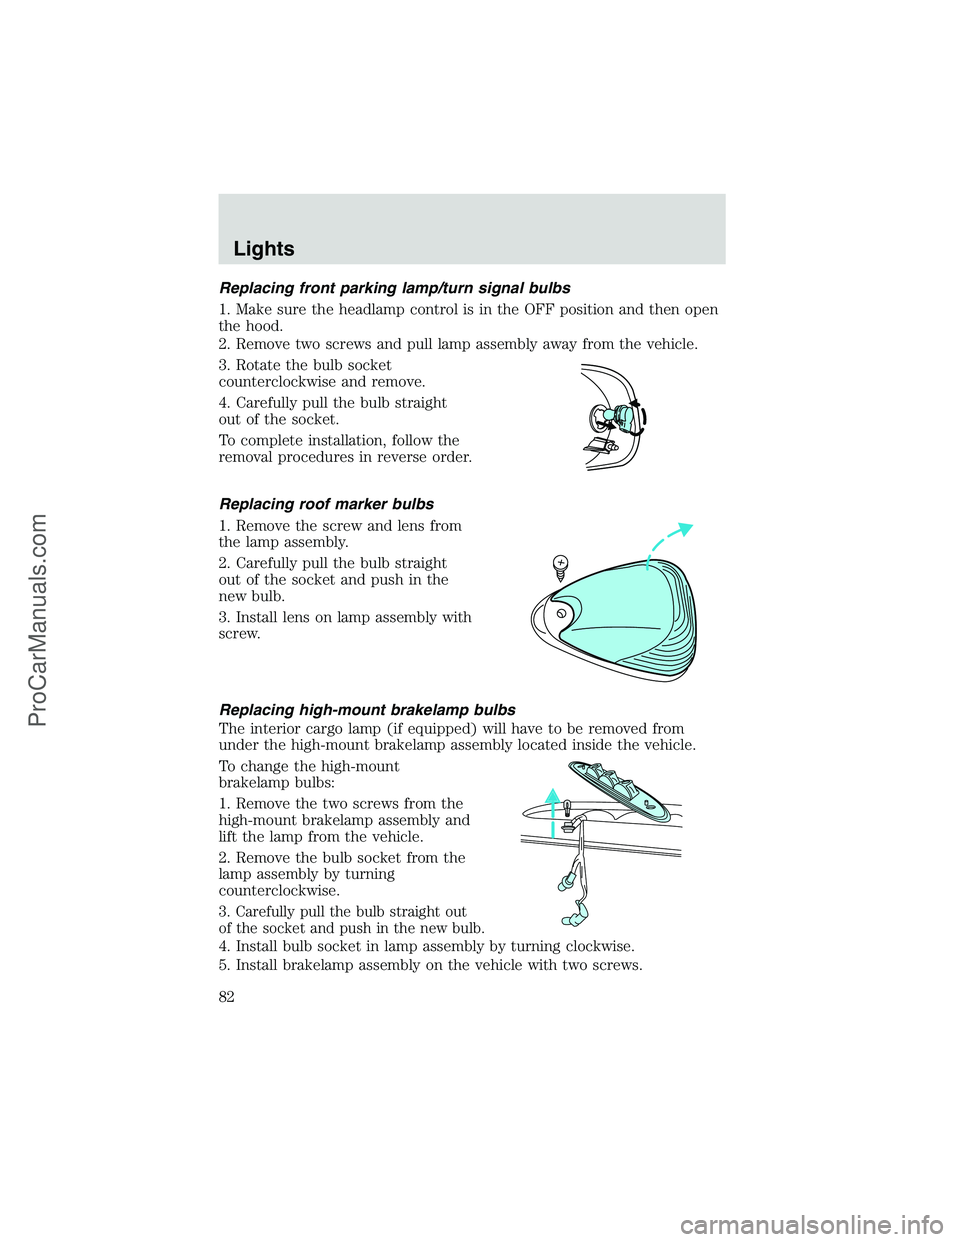
Replacing front parking lamp/turn signal bulbs
1. Make sure the headlamp control is in the OFF position and then open
the hood.
2. Remove two screws and pull lamp assembly away from the vehicle.
3. Rotate the bulb socket
counterclockwise and remove.
4. Carefully pull the bulb straight
out of the socket.
To complete installation, follow the
removal procedures in reverse order.
Replacing roof marker bulbs
1. Remove the screw and lens from
the lamp assembly.
2. Carefully pull the bulb straight
out of the socket and push in the
new bulb.
3. Install lens on lamp assembly with
screw.
Replacing high-mount brakelamp bulbs
The interior cargo lamp (if equipped) will have to be removed from
under the high-mount brakelamp assembly located inside the vehicle.
To change the high-mount
brakelamp bulbs:
1. Remove the two screws from the
high-mount brakelamp assembly and
lift the lamp from the vehicle.
2. Remove the bulb socket from the
lamp assembly by turning
counterclockwise.
3. Carefully pull the bulb straight out
of the socket and push in the new bulb.
4. Install bulb socket in lamp assembly by turning clockwise.
5. Install brakelamp assembly on the vehicle with two screws.
Lights
82
ProCarManuals.com
Page 83 of 256
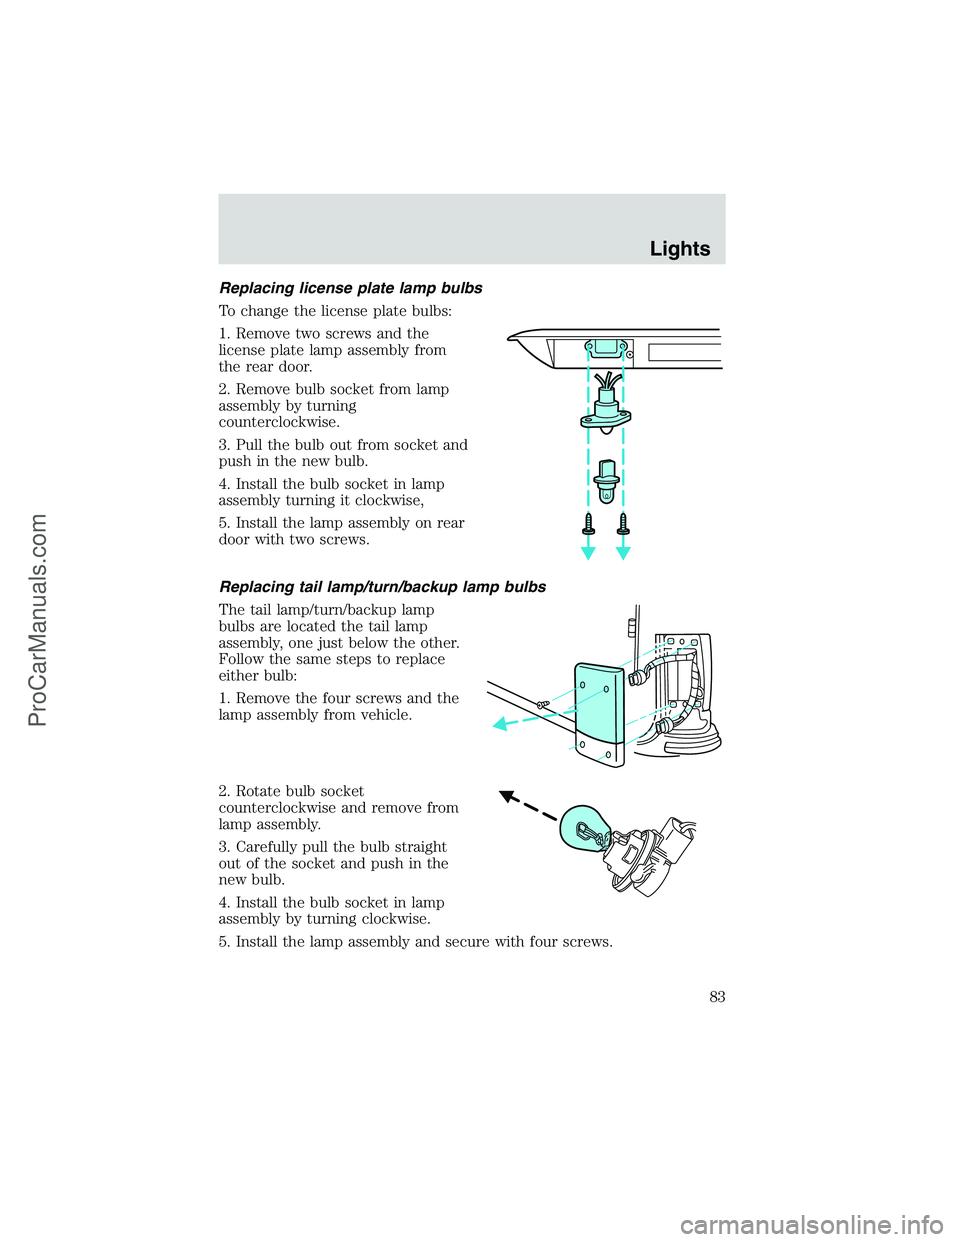
Replacing license plate lamp bulbs
To change the license plate bulbs:
1. Remove two screws and the
license plate lamp assembly from
the rear door.
2. Remove bulb socket from lamp
assembly by turning
counterclockwise.
3. Pull the bulb out from socket and
push in the new bulb.
4. Install the bulb socket in lamp
assembly turning it clockwise,
5. Install the lamp assembly on rear
door with two screws.
Replacing tail lamp/turn/backup lamp bulbs
The tail lamp/turn/backup lamp
bulbs are located the tail lamp
assembly, one just below the other.
Follow the same steps to replace
either bulb:
1. Remove the four screws and the
lamp assembly from vehicle.
2. Rotate bulb socket
counterclockwise and remove from
lamp assembly.
3. Carefully pull the bulb straight
out of the socket and push in the
new bulb.
4. Install the bulb socket in lamp
assembly by turning clockwise.
5. Install the lamp assembly and secure with four screws.
Lights
83
ProCarManuals.com
Page 102 of 256
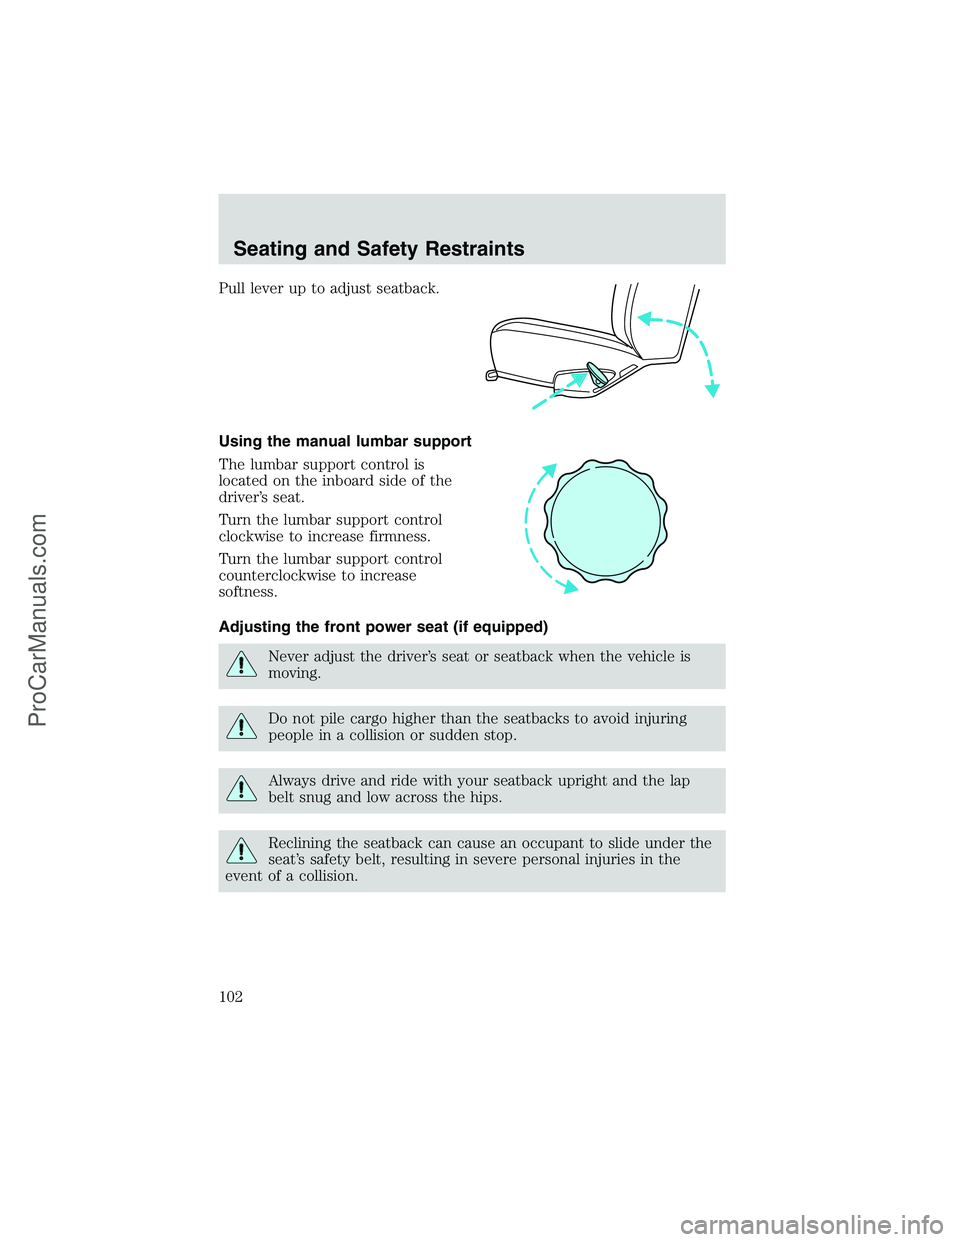
Pull lever up to adjust seatback.
Using the manual lumbar support
The lumbar support control is
located on the inboard side of the
driver’s seat.
Turn the lumbar support control
clockwise to increase firmness.
Turn the lumbar support control
counterclockwise to increase
softness.
Adjusting the front power seat (if equipped)
Never adjust the driver’s seat or seatback when the vehicle is
moving.
Do not pile cargo higher than the seatbacks to avoid injuring
people in a collision or sudden stop.
Always drive and ride with your seatback upright and the lap
belt snug and low across the hips.
Reclining the seatback can cause an occupant to slide under the
seat’s safety belt, resulting in severe personal injuries in the
event of a collision.
Seating and Safety Restraints
102
ProCarManuals.com
Page 169 of 256
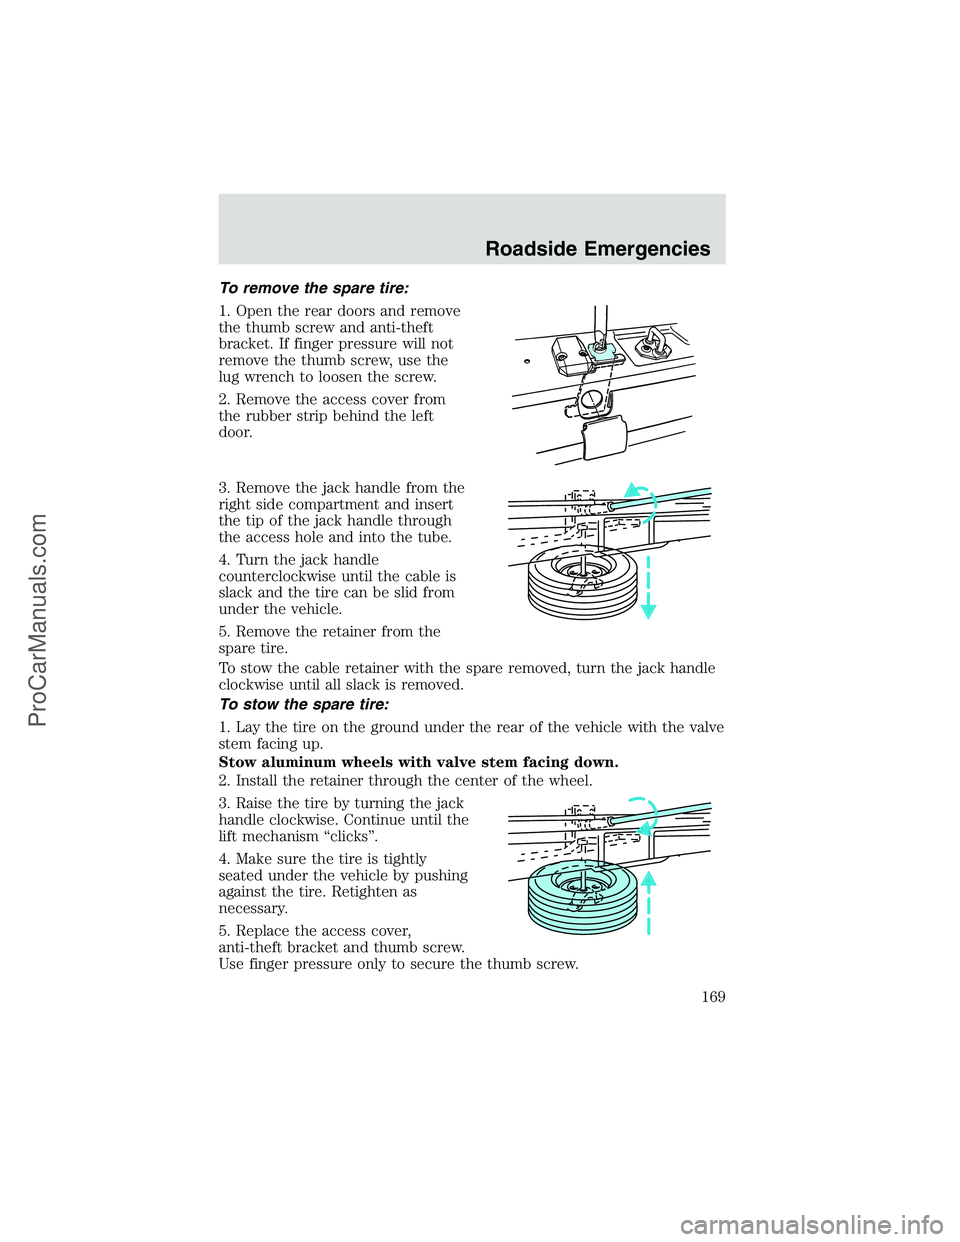
To remove the spare tire:
1. Open the rear doors and remove
the thumb screw and anti-theft
bracket. If finger pressure will not
remove the thumb screw, use the
lug wrench to loosen the screw.
2. Remove the access cover from
the rubber strip behind the left
door.
3. Remove the jack handle from the
right side compartment and insert
the tip of the jack handle through
the access hole and into the tube.
4. Turn the jack handle
counterclockwise until the cable is
slack and the tire can be slid from
under the vehicle.
5. Remove the retainer from the
spare tire.
To stow the cable retainer with the spare removed, turn the jack handle
clockwise until all slack is removed.
To stow the spare tire:
1. Lay the tire on the ground under the rear of the vehicle with the valve
stem facing up.
Stow aluminum wheels with valve stem facing down.
2. Install the retainer through the center of the wheel.
3. Raise the tire by turning the jack
handle clockwise. Continue until the
lift mechanism“clicks”.
4. Make sure the tire is tightly
seated under the vehicle by pushing
against the tire. Retighten as
necessary.
5. Replace the access cover,
anti-theft bracket and thumb screw.
Use finger pressure only to secure the thumb screw.
Roadside Emergencies
169
ProCarManuals.com
Page 171 of 256
If the vehicle slips off the jack, you or someone else could be
seriously injured.
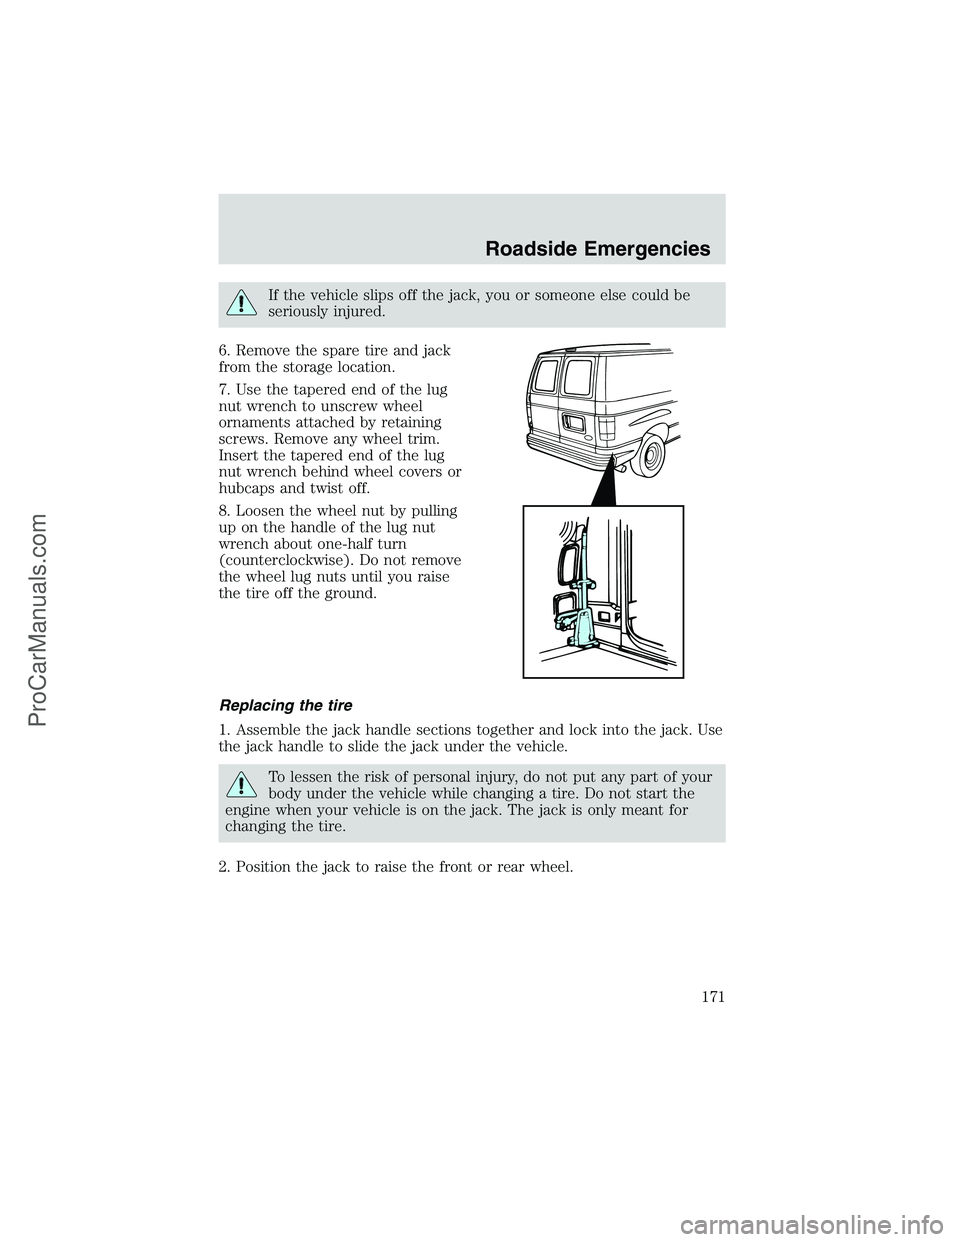
6. Remove the spare tire and jack
from the storage location.
7. Use the tapered end of the lug
nut wrench to unscrew wheel
ornaments attached by retaining
screws. Remove any wheel trim.
Insert the tapered end of the lug
nut wrench behind wheel covers or
hubcaps and twist off.
8. Loosen the wheel nut by pulling
up on the handle of the lug nut
wrench about one-half turn
(counterclockwise). Do not remove
the wheel lug nuts until you raise
the tire off the ground.
Replacing the tire
1. Assemble the jack handle sections together and lock into the jack. Use
the jack handle to slide the jack under the vehicle.
To lessen the risk of personal injury, do not put any part of your
body under the vehicle while changing a tire. Do not start the
engine when your vehicle is on the jack. The jack is only meant for
changing the tire.
2. Position the jack to raise the front or rear wheel.
Roadside Emergencies
171
ProCarManuals.com
Page 173 of 256
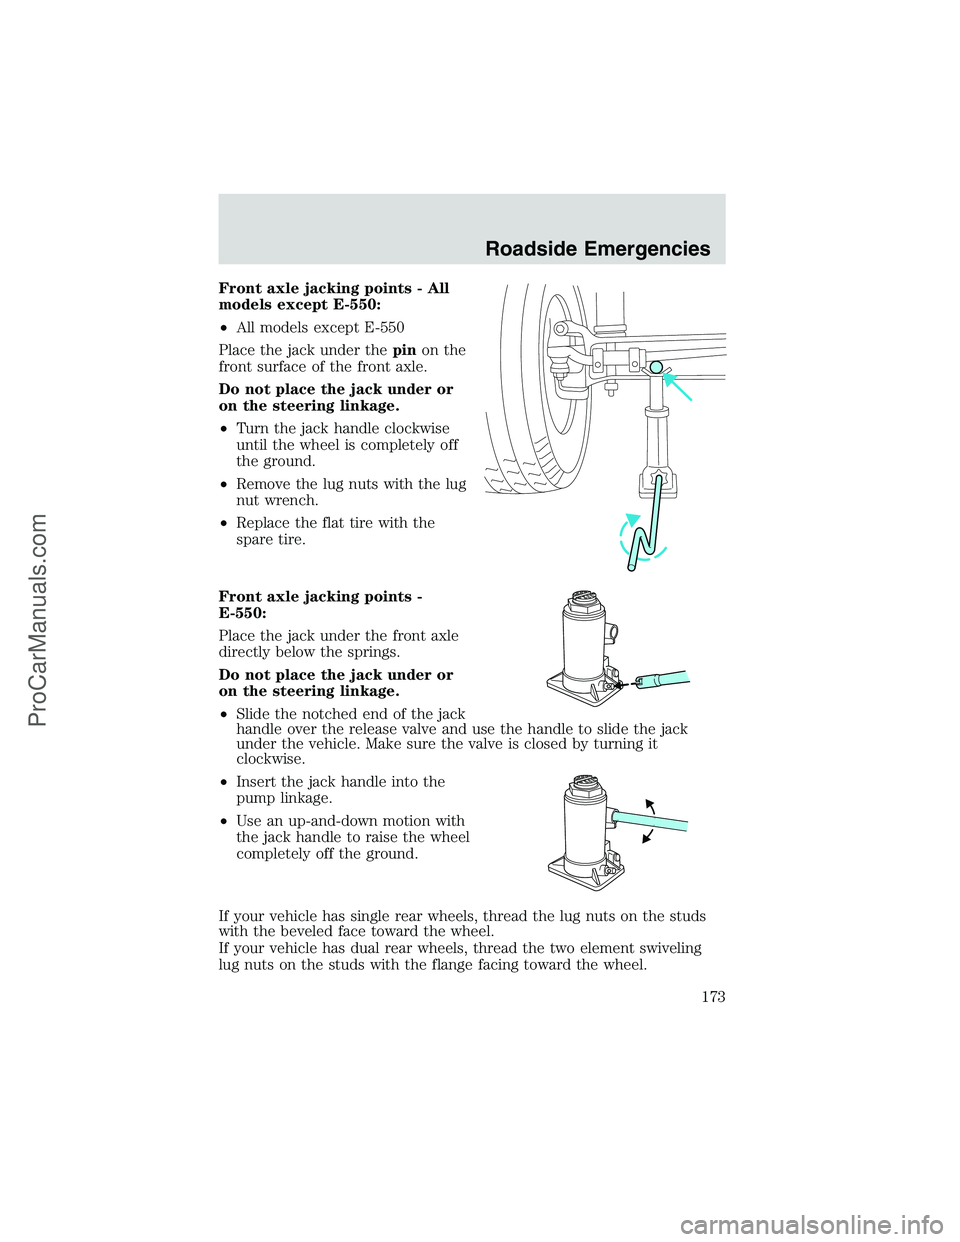
Front axle jacking points - All
models except E-550:
•All models except E-550
Place the jack under thepinon the
front surface of the front axle.
Do not place the jack under or
on the steering linkage.
•Turn the jack handle clockwise
until the wheel is completely off
the ground.
•Remove the lug nuts with the lug
nut wrench.
•Replace the flat tire with the
spare tire.
Front axle jacking points -
E-550:
Place the jack under the front axle
directly below the springs.
Do not place the jack under or
on the steering linkage.
•Slide the notched end of the jack
handle over the release valve and use the handle to slide the jack
under the vehicle. Make sure the valve is closed by turning it
clockwise.
•Insert the jack handle into the
pump linkage.
•Use an up-and-down motion with
the jack handle to raise the wheel
completely off the ground.
If your vehicle has single rear wheels, thread the lug nuts on the studs
with the beveled face toward the wheel.
If your vehicle has dual rear wheels, thread the two element swiveling
lug nuts on the studs with the flange facing toward the wheel.
Roadside Emergencies
173
ProCarManuals.com
Page 174 of 256
3. Use the lug nut wrench to screw the lug nut snugly against the wheel.
4. Lower the vehicle by turning the jack handle counterclockwise.
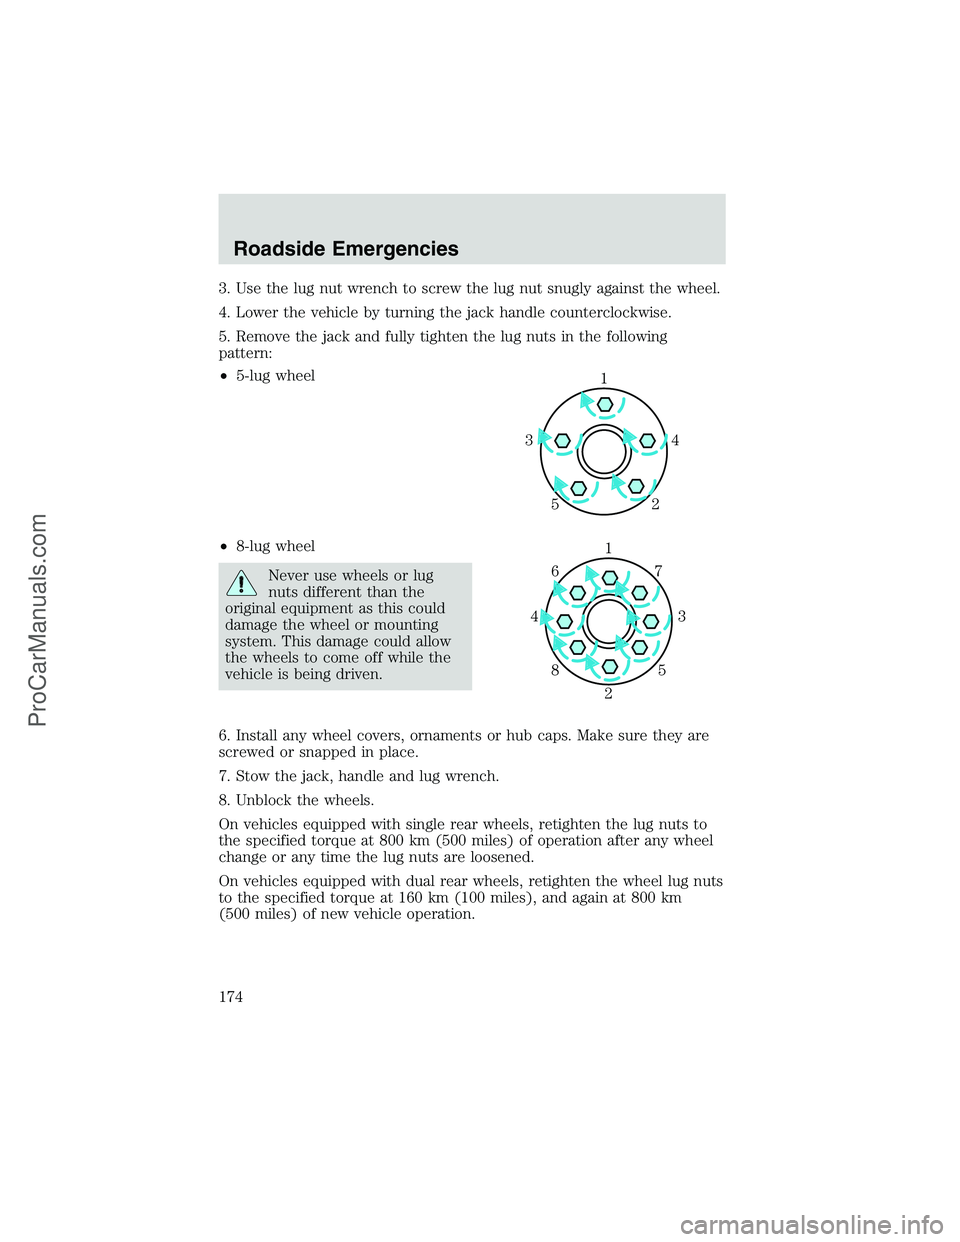
5. Remove the jack and fully tighten the lug nuts in the following
pattern:
•5-lug wheel
•8-lug wheel
Never use wheels or lug
nuts different than the
original equipment as this could
damage the wheel or mounting
system. This damage could allow
the wheels to come off while the
vehicle is being driven.
6. Install any wheel covers, ornaments or hub caps. Make sure they are
screwed or snapped in place.
7. Stow the jack, handle and lug wrench.
8. Unblock the wheels.
On vehicles equipped with single rear wheels, retighten the lug nuts to
the specified torque at 800 km (500 miles) of operation after any wheel
change or any time the lug nuts are loosened.
On vehicles equipped with dual rear wheels, retighten the wheel lug nuts
to the specified torque at 160 km (100 miles), and again at 800 km
(500 miles) of new vehicle operation.
1
4 3
2 5
1
3 4
27 6
5 8
Roadside Emergencies
174
ProCarManuals.com