instrument panel FORD E-350 2004 Owners Manual
[x] Cancel search | Manufacturer: FORD, Model Year: 2004, Model line: E-350, Model: FORD E-350 2004Pages: 256, PDF Size: 2.42 MB
Page 52 of 256
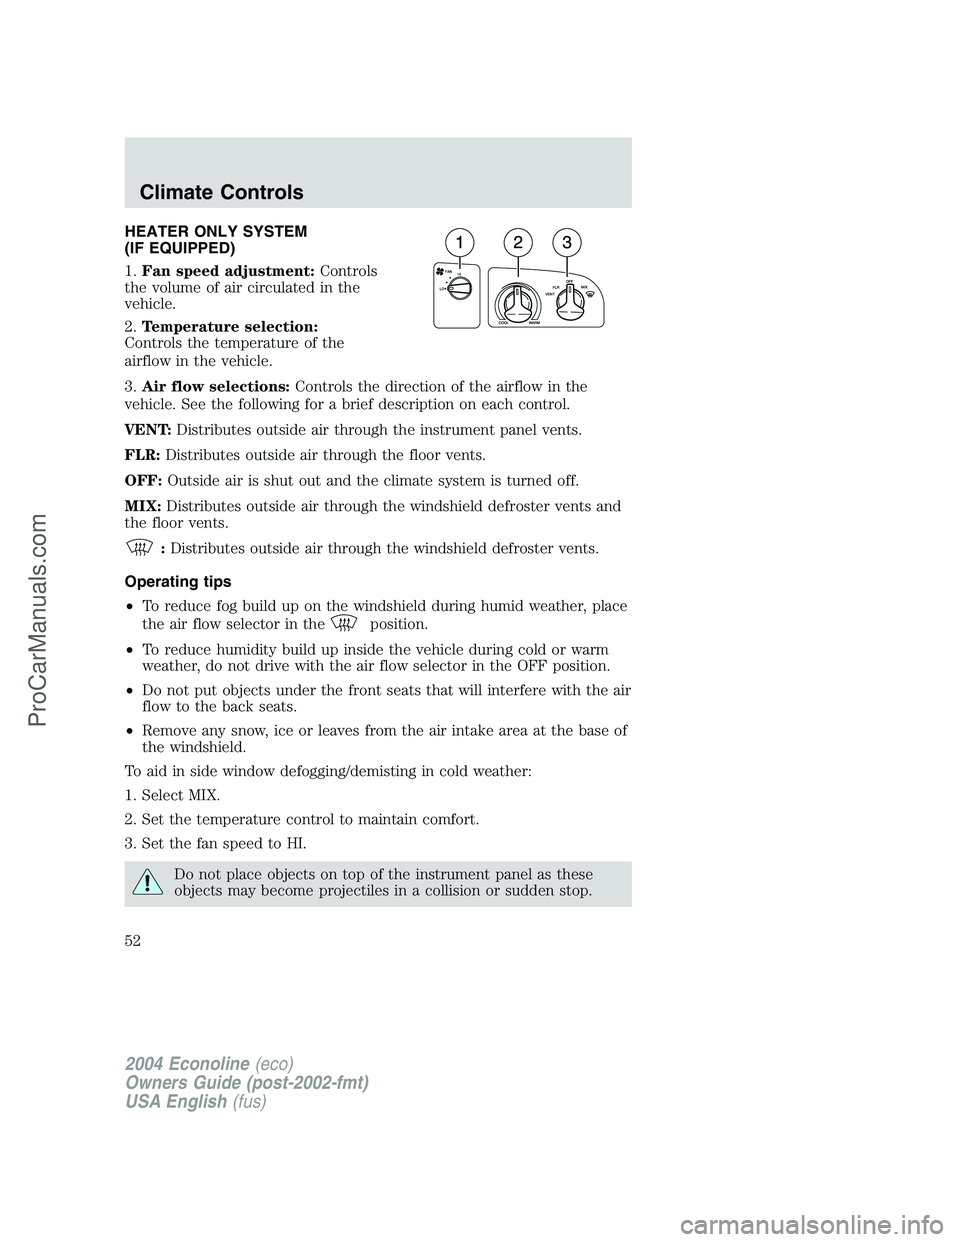
HEATER ONLY SYSTEM
(IF EQUIPPED)
1.Fan speed adjustment:Controls
the volume of air circulated in the
vehicle.
2.Temperature selection:
Controls the temperature of the
airflow in the vehicle.
3.Air flow selections:Controls the direction of the airflow in the
vehicle. See the following for a brief description on each control.
VENT:Distributes outside air through the instrument panel vents.
FLR:Distributes outside air through the floor vents.
OFF:Outside air is shut out and the climate system is turned off.
MIX:Distributes outside air through the windshield defroster vents and
the floor vents.
:Distributes outside air through the windshield defroster vents.
Operating tips
•To reduce fog build up on the windshield during humid weather, place
the air flow selector in the
position.
•To reduce humidity build up inside the vehicle during cold or warm
weather, do not drive with the air flow selector in the OFF position.
•Do not put objects under the front seats that will interfere with the air
flow to the back seats.
•Remove any snow, ice or leaves from the air intake area at the base of
the windshield.
To aid in side window defogging/demisting in cold weather:
1. Select MIX.
2. Set the temperature control to maintain comfort.
3. Set the fan speed to HI.
Do not place objects on top of the instrument panel as these
objects may become projectiles in a collision or sudden stop.
2004 Econoline(eco)
Owners Guide (post-2002-fmt)
USA English(fus)
Climate Controls
Climate Controls
52
ProCarManuals.com
Page 53 of 256
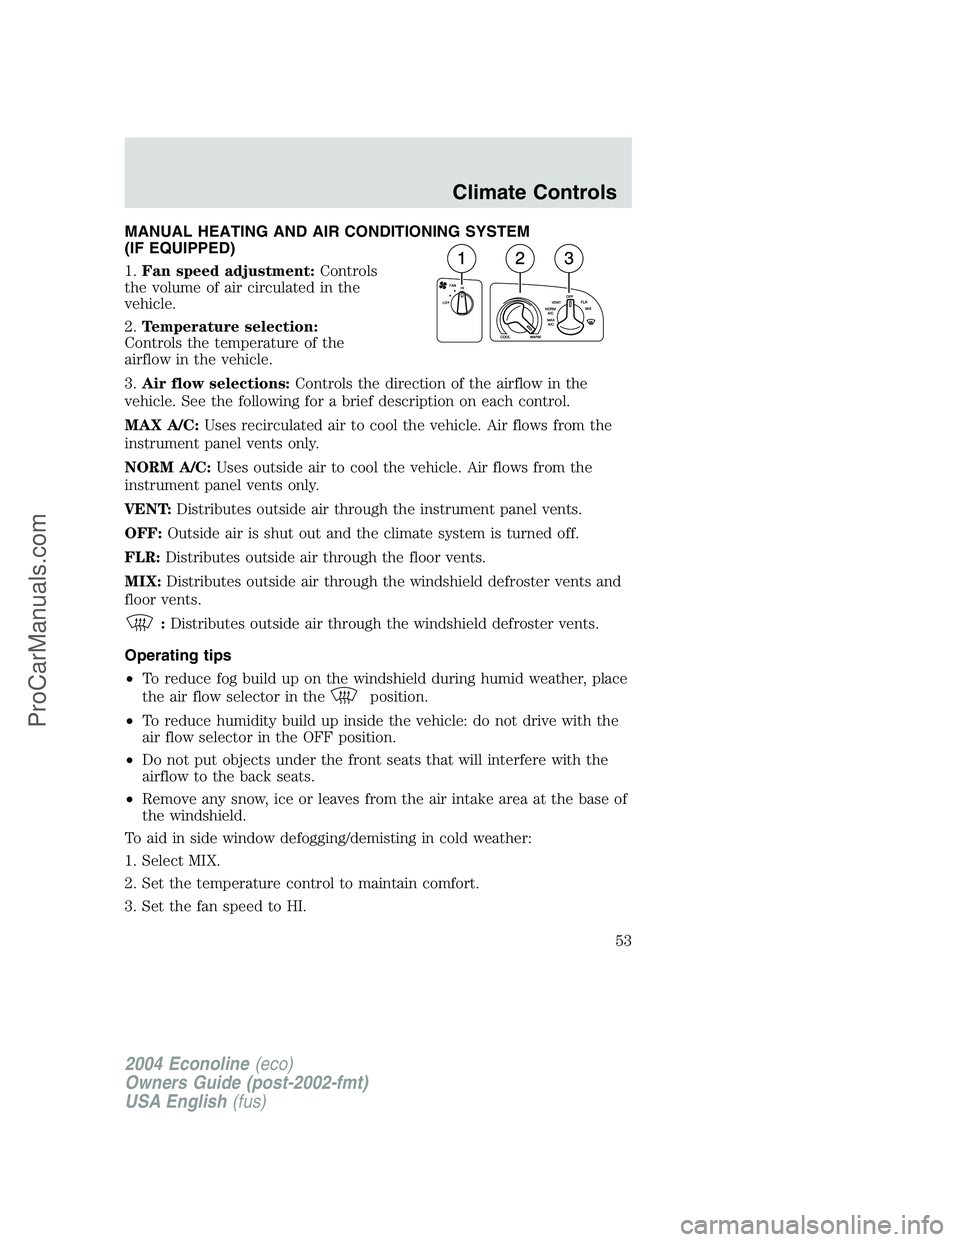
MANUAL HEATING AND AIR CONDITIONING SYSTEM
(IF EQUIPPED)
1.Fan speed adjustment:Controls
the volume of air circulated in the
vehicle.
2.Temperature selection:
Controls the temperature of the
airflow in the vehicle.
3.Air flow selections:Controls the direction of the airflow in the
vehicle. See the following for a brief description on each control.
MAX A/C:Uses recirculated air to cool the vehicle. Air flows from the
instrument panel vents only.
NORM A/C:Uses outside air to cool the vehicle. Air flows from the
instrument panel vents only.
VENT:Distributes outside air through the instrument panel vents.
OFF:Outside air is shut out and the climate system is turned off.
FLR:Distributes outside air through the floor vents.
MIX:Distributes outside air through the windshield defroster vents and
floor vents.
:Distributes outside air through the windshield defroster vents.
Operating tips
•To reduce fog build up on the windshield during humid weather, place
the air flow selector in the
position.
•To reduce humidity build up inside the vehicle: do not drive with the
air flow selector in the OFF position.
•Do not put objects under the front seats that will interfere with the
airflow to the back seats.
•Remove any snow, ice or leaves from the air intake area at the base of
the windshield.
To aid in side window defogging/demisting in cold weather:
1. Select MIX.
2. Set the temperature control to maintain comfort.
3. Set the fan speed to HI.
2004 Econoline(eco)
Owners Guide (post-2002-fmt)
USA English(fus)
Climate Controls
53
ProCarManuals.com
Page 54 of 256
Do not place objects on top of the instrument panel as these
objects may become projectiles in a collision or sudden stop.
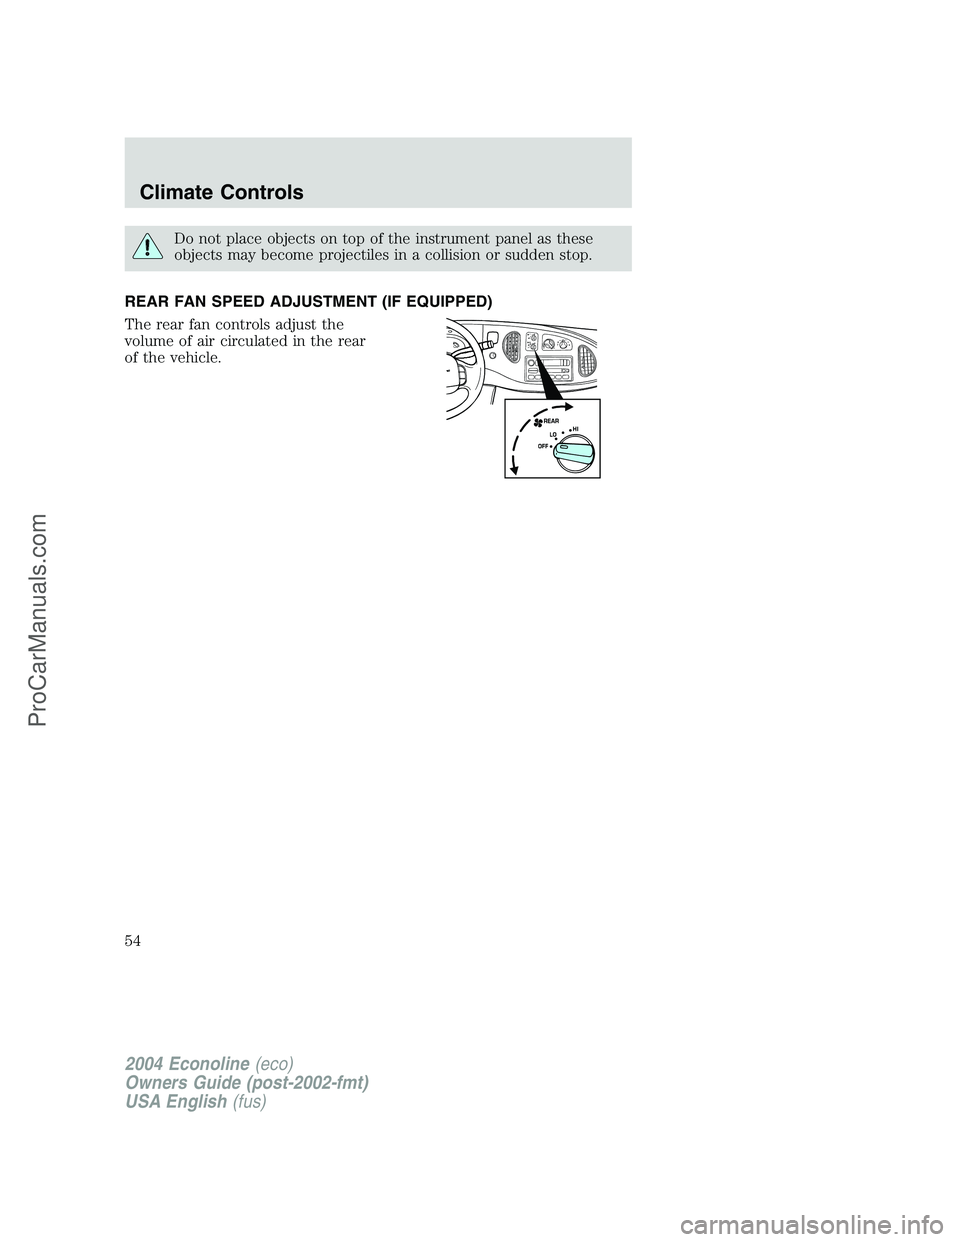
REAR FAN SPEED ADJUSTMENT (IF EQUIPPED)
The rear fan controls adjust the
volume of air circulated in the rear
of the vehicle.
2004 Econoline(eco)
Owners Guide (post-2002-fmt)
USA English(fus)
Climate Controls
54
ProCarManuals.com
Page 56 of 256
Always remember to turn on your headlamps at dusk or during
inclement weather. The Daytime Running Lamp (DRL) system
does not activate with your tail lamps and generally may not provide
adequate lighting during these conditions. Failure to activate your
headlamps under these conditions may result in a collision.
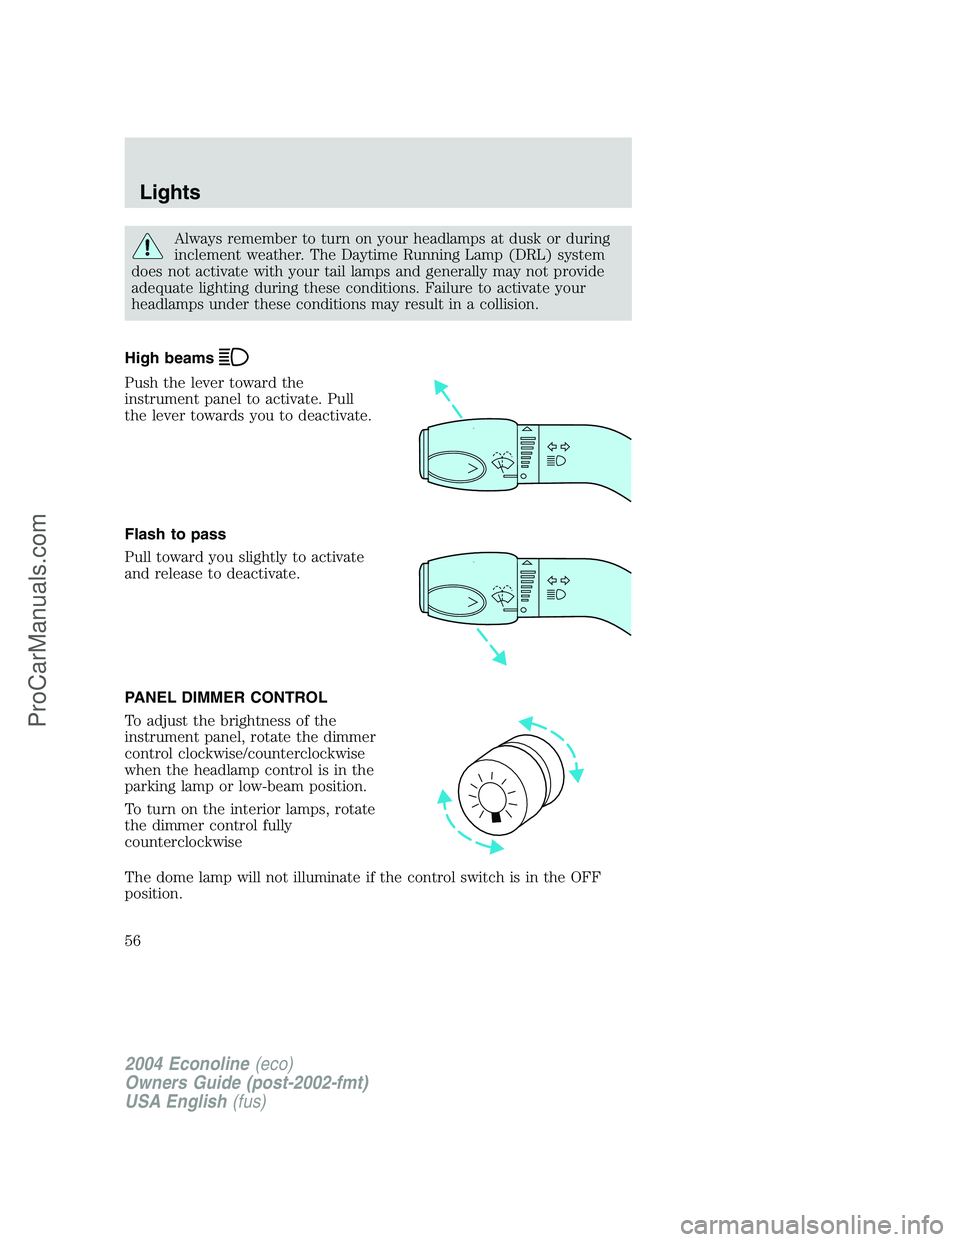
High beams
Push the lever toward the
instrument panel to activate. Pull
the lever towards you to deactivate.
Flash to pass
Pull toward you slightly to activate
and release to deactivate.
PANEL DIMMER CONTROL
To adjust the brightness of the
instrument panel, rotate the dimmer
control clockwise/counterclockwise
when the headlamp control is in the
parking lamp or low-beam position.
To turn on the interior lamps, rotate
the dimmer control fully
counterclockwise
The dome lamp will not illuminate if the control switch is in the OFF
position.
2004 Econoline(eco)
Owners Guide (post-2002-fmt)
USA English(fus)
Lights
56
ProCarManuals.com
Page 60 of 256
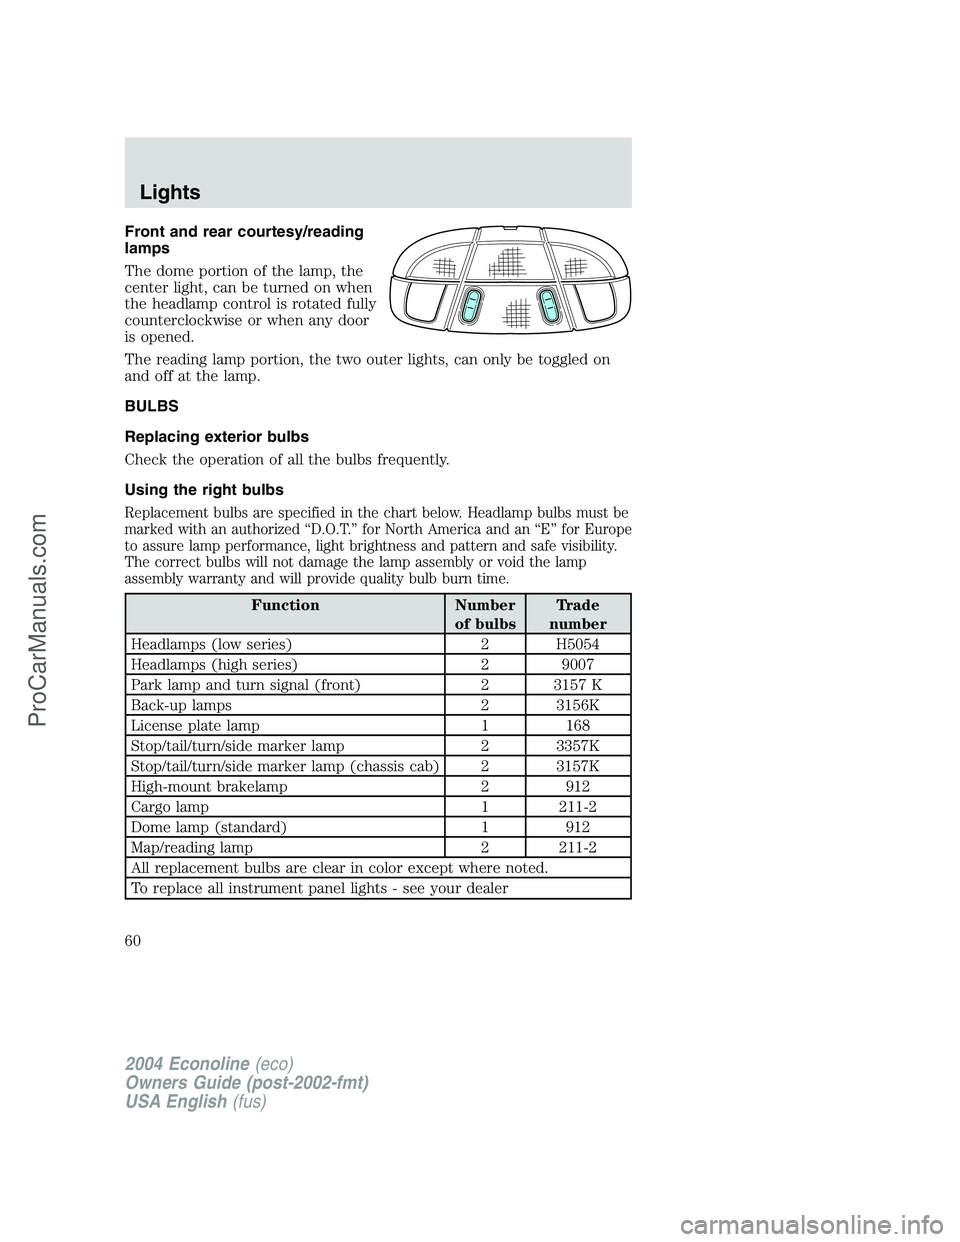
Front and rear courtesy/reading
lamps
The dome portion of the lamp, the
center light, can be turned on when
the headlamp control is rotated fully
counterclockwise or when any door
is opened.
The reading lamp portion, the two outer lights, can only be toggled on
and off at the lamp.
BULBS
Replacing exterior bulbs
Check the operation of all the bulbs frequently.
Using the right bulbs
Replacement bulbs are specified in the chart below. Headlamp bulbs must be
marked with an authorized“D.O.T.”for North America and an“E”for Europe
to assure lamp performance, light brightness and pattern and safe visibility.
The correct bulbs will not damage the lamp assembly or void the lamp
assembly warranty and will provide quality bulb burn time.
Function Number
of bulbsTrade
number
Headlamps (low series) 2 H5054
Headlamps (high series) 2 9007
Park lamp and turn signal (front) 2 3157 K
Back-up lamps 2 3156K
License plate lamp 1 168
Stop/tail/turn/side marker lamp 2 3357K
Stop/tail/turn/side marker lamp (chassis cab) 2 3157K
High-mount brakelamp 2 912
Cargo lamp 1 211-2
Dome lamp (standard) 1 912
Map/reading lamp 2 211-2
All replacement bulbs are clear in color except where noted.
To replace all instrument panel lights - see your dealer
2004 Econoline(eco)
Owners Guide (post-2002-fmt)
USA English(fus)
Lights
60
ProCarManuals.com
Page 69 of 256
CELL PHONE USE
The use of Mobile Communications Equipment has become increasingly
important in the conduct of business and personal affairs. However,
drivers must not compromise their own or others’safety when using
such equipment. Mobile Communications can enhance personal safety
and security when appropriately used, particularly in emergency
situations. Safety must be paramount when using mobile communications
equipment to avoid negating these benefits.
Mobile Communication Equipment includes, but is not limited to cellular
phones, pagers, portable email devices, in vehicle communications
systems, telematics devices and portable two-way radios.
A driver’s first responsibility is the safe operation of the vehicle.
The most important thing you can do to prevent a crash is to
avoid distractions and pay attention to the road. Wait until it is safe to
operate Mobile Communications Equipment.
AUXILIARY POWER POINT
Power outlets are designed for
accessory plugs only. Do not
hang any type of accessory or
accessory bracket from the plug.
Improper use of the power
outlet can cause damage not
covered by your warranty.
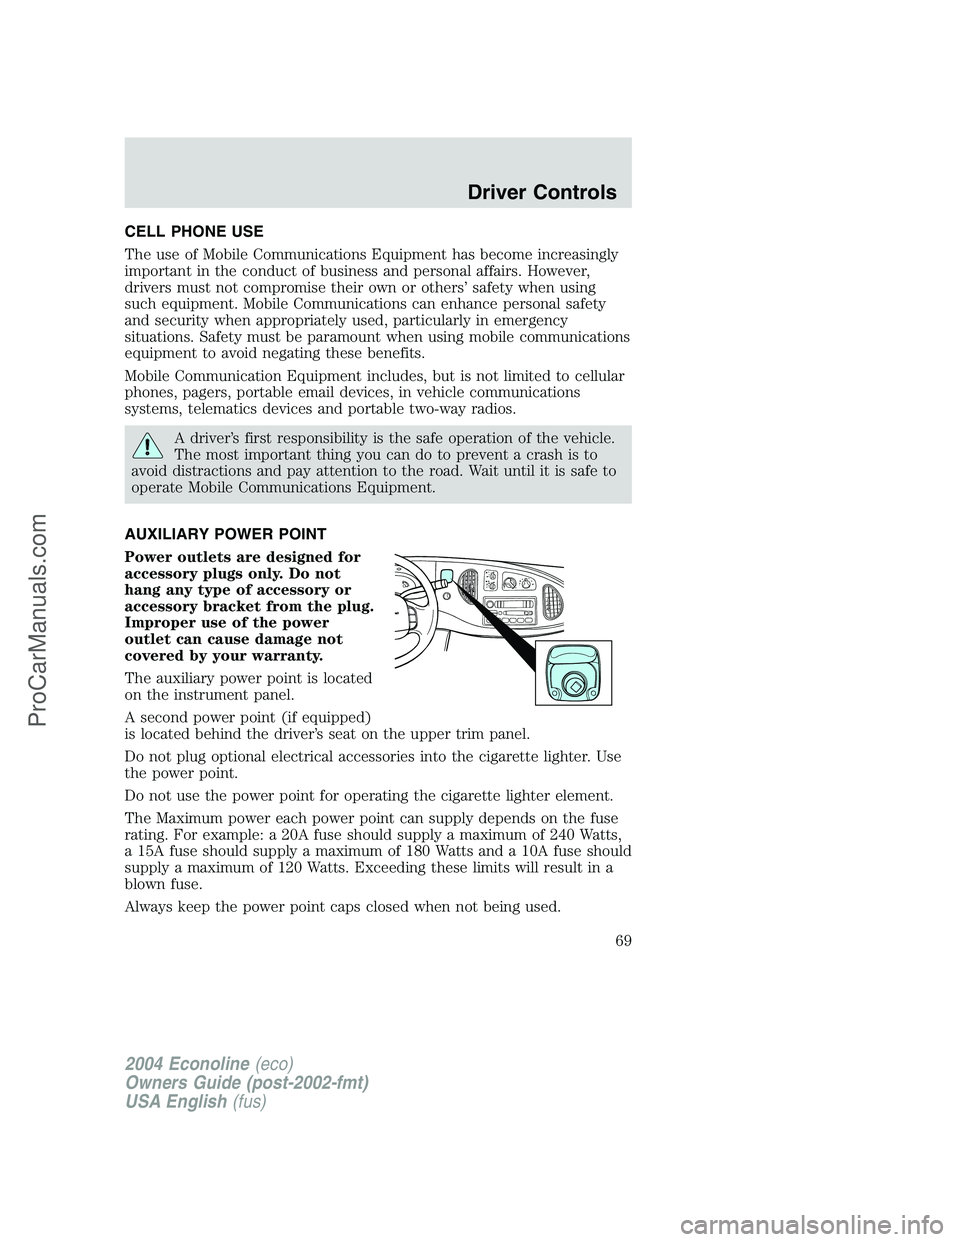
The auxiliary power point is located
on the instrument panel.
A second power point (if equipped)
is located behind the driver’s seat on the upper trim panel.
Do not plug optional electrical accessories into the cigarette lighter. Use
the power point.
Do not use the power point for operating the cigarette lighter element.
The Maximum power each power point can supply depends on the fuse
rating. For example: a 20A fuse should supply a maximum of 240 Watts,
a 15A fuse should supply a maximum of 180 Watts and a 10A fuse should
supply a maximum of 120 Watts. Exceeding these limits will result in a
blown fuse.
Always keep the power point caps closed when not being used.
2004 Econoline(eco)
Owners Guide (post-2002-fmt)
USA English(fus)
Driver Controls
69
ProCarManuals.com
Page 108 of 256
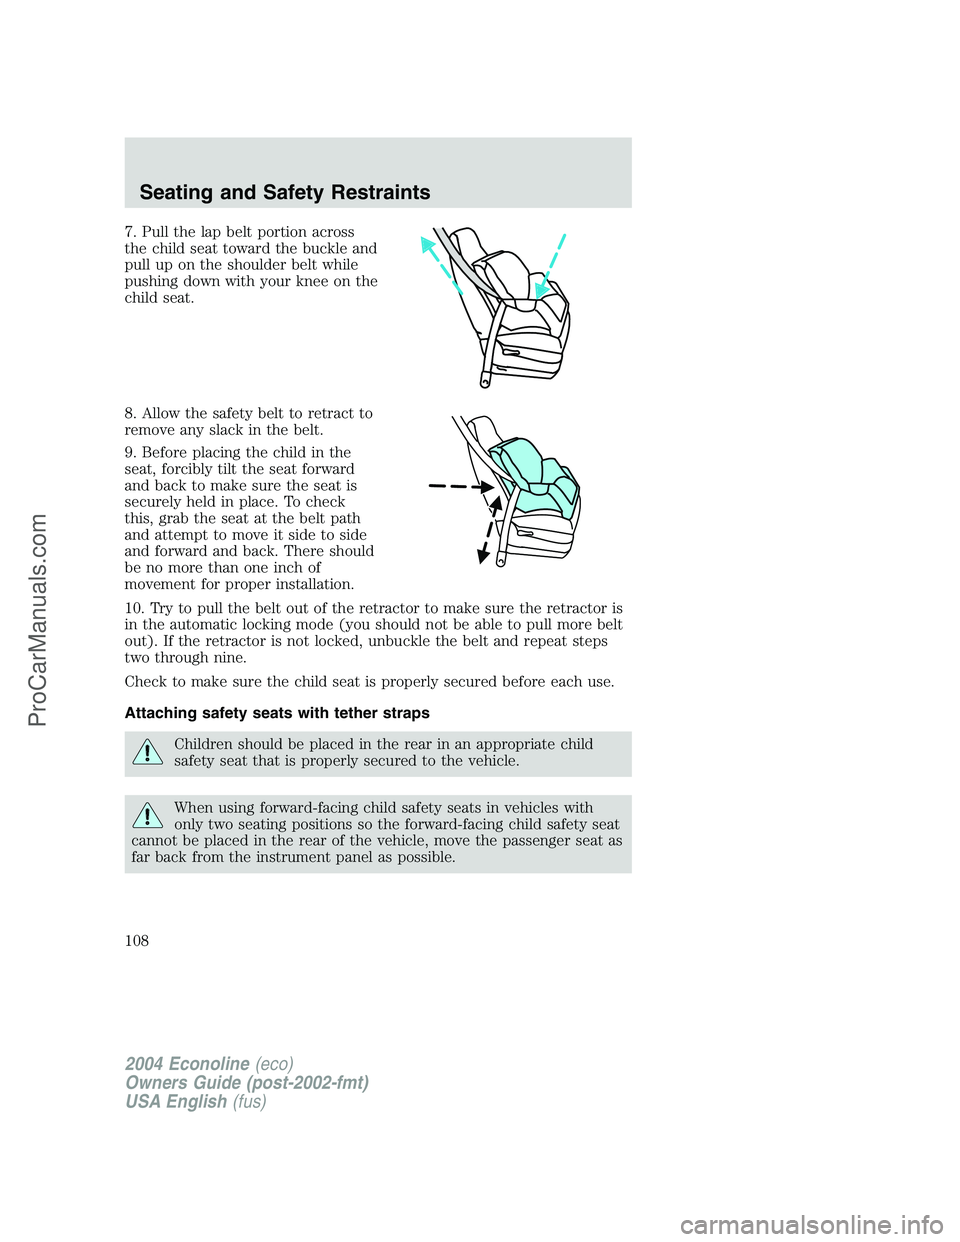
7. Pull the lap belt portion across
the child seat toward the buckle and
pull up on the shoulder belt while
pushing down with your knee on the
child seat.
8. Allow the safety belt to retract to
remove any slack in the belt.
9. Before placing the child in the
seat, forcibly tilt the seat forward
and back to make sure the seat is
securely held in place. To check
this, grab the seat at the belt path
and attempt to move it side to side
and forward and back. There should
be no more than one inch of
movement for proper installation.
10. Try to pull the belt out of the retractor to make sure the retractor is
in the automatic locking mode (you should not be able to pull more belt
out). If the retractor is not locked, unbuckle the belt and repeat steps
two through nine.
Check to make sure the child seat is properly secured before each use.
Attaching safety seats with tether straps
Children should be placed in the rear in an appropriate child
safety seat that is properly secured to the vehicle.
When using forward-facing child safety seats in vehicles with
only two seating positions so the forward-facing child safety seat
cannot be placed in the rear of the vehicle, move the passenger seat as
far back from the instrument panel as possible.
2004 Econoline(eco)
Owners Guide (post-2002-fmt)
USA English(fus)
Seating and Safety Restraints
108
ProCarManuals.com
Page 150 of 256
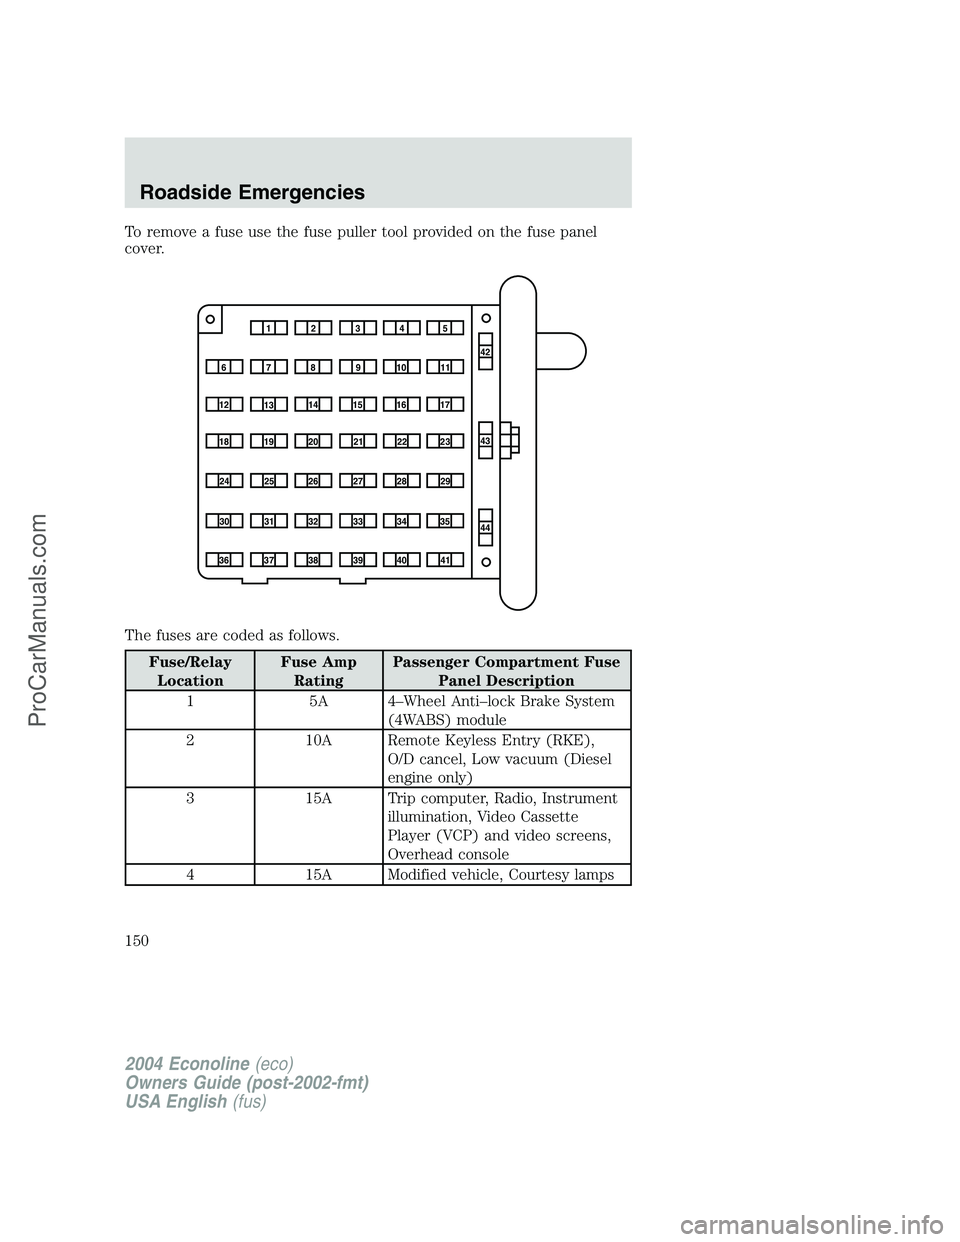
To remove a fuse use the fuse puller tool provided on the fuse panel
cover.
The fuses are coded as follows.
Fuse/Relay
LocationFuse Amp
RatingPassenger Compartment Fuse
Panel Description
15A4–Wheel Anti–lock Brake System
(4WABS) module
2 10A Remote Keyless Entry (RKE),
O/D cancel, Low vacuum (Diesel
engine only)
3 15A Trip computer, Radio, Instrument
illumination, Video Cassette
Player (VCP) and video screens,
Overhead console
4 15A Modified vehicle, Courtesy lamps
1234
5
7
689101142
43
44 13 12 14
15 16 17
19 18
2021 22 23
25 24
26 27 28 29
31 30 32 33 3435
37
3638 3940
41
2004 Econoline(eco)
Owners Guide (post-2002-fmt)
USA English(fus)
Roadside Emergencies
150
ProCarManuals.com
Page 151 of 256
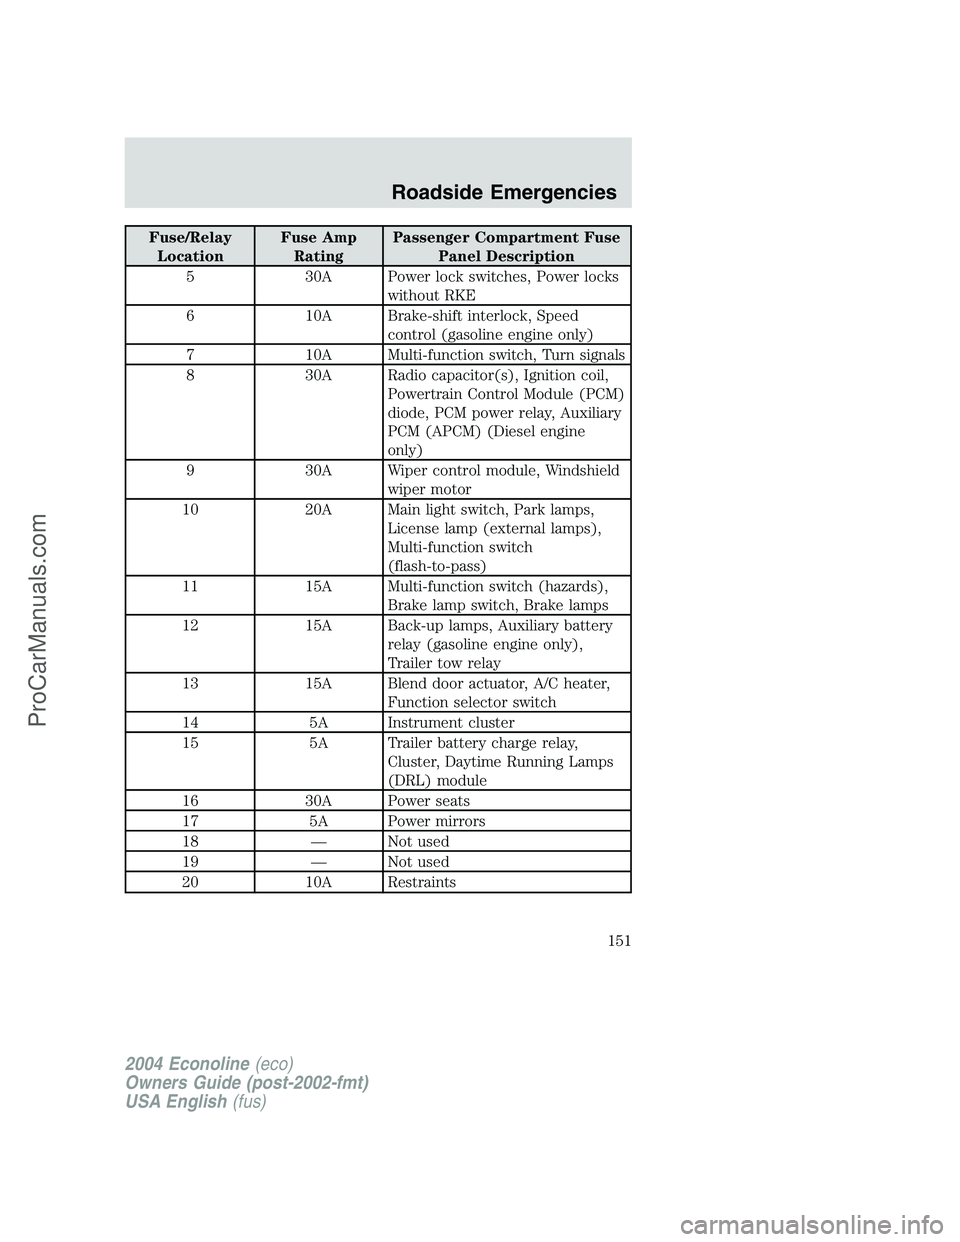
Fuse/Relay
LocationFuse Amp
RatingPassenger Compartment Fuse
Panel Description
5 30A Power lock switches, Power locks
without RKE
6 10A Brake-shift interlock, Speed
control (gasoline engine only)
7 10A Multi-function switch, Turn signals
8 30A Radio capacitor(s), Ignition coil,
Powertrain Control Module (PCM)
diode, PCM power relay, Auxiliary
PCM (APCM) (Diesel engine
only)
9 30A Wiper control module, Windshield
wiper motor
10 20A Main light switch, Park lamps,
License lamp (external lamps),
Multi-function switch
(flash-to-pass)
11 15A Multi-function switch (hazards),
Brake lamp switch, Brake lamps
12 15A Back-up lamps, Auxiliary battery
relay (gasoline engine only),
Trailer tow relay
13 15A Blend door actuator, A/C heater,
Function selector switch
14 5A Instrument cluster
15 5A Trailer battery charge relay,
Cluster, Daytime Running Lamps
(DRL) module
16 30A Power seats
17 5A Power mirrors
18—Not used
19—Not used
20 10A Restraints
2004 Econoline(eco)
Owners Guide (post-2002-fmt)
USA English(fus)
Roadside Emergencies
151
ProCarManuals.com
Page 152 of 256
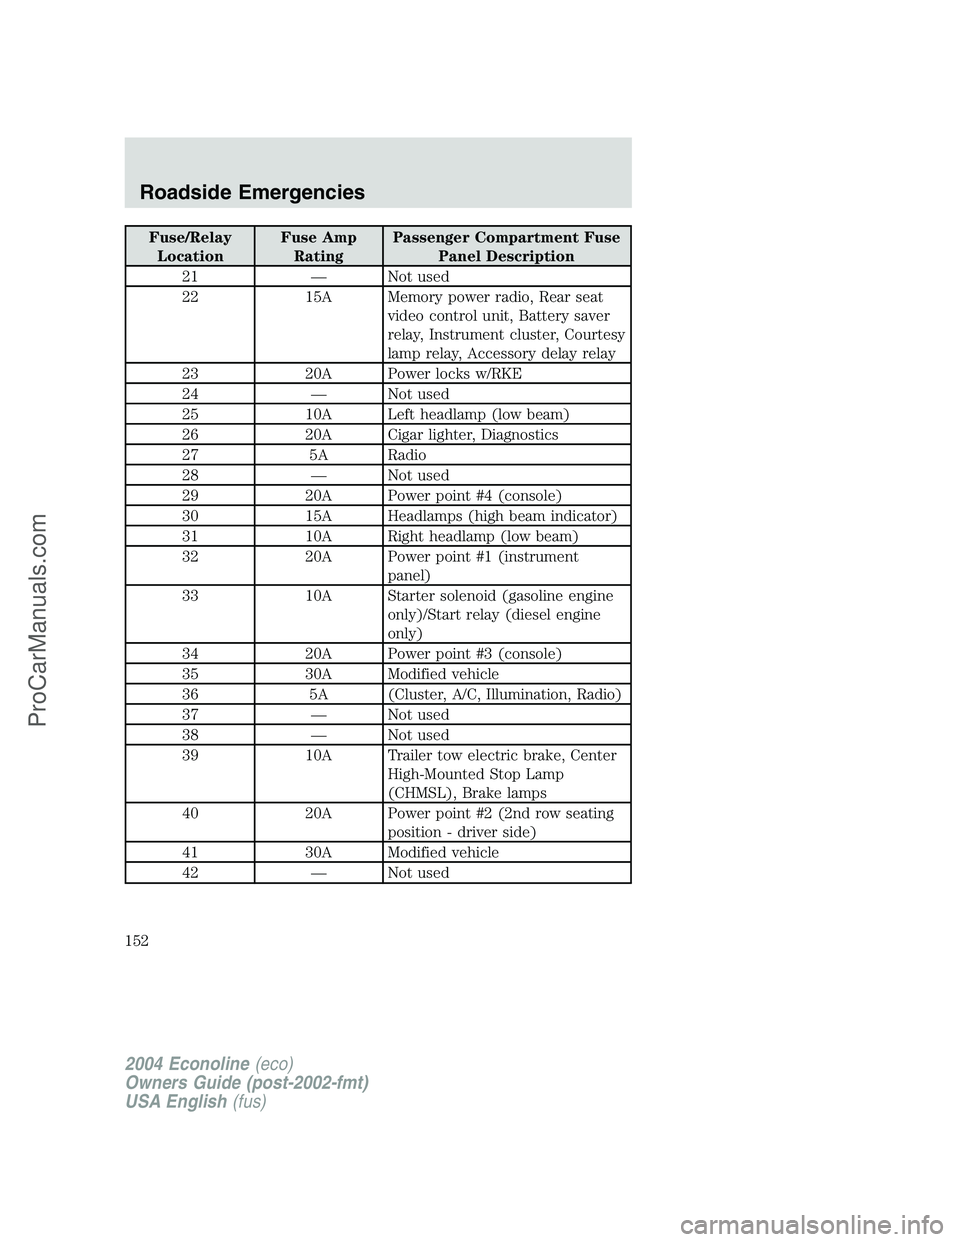
Fuse/Relay
LocationFuse Amp
RatingPassenger Compartment Fuse
Panel Description
21—Not used
22 15A Memory power radio, Rear seat
video control unit, Battery saver
relay, Instrument cluster, Courtesy
lamp relay, Accessory delay relay
23 20A Power locks w/RKE
24—Not used
25 10A Left headlamp (low beam)
26 20A Cigar lighter, Diagnostics
27 5A Radio
28—Not used
29 20A Power point #4 (console)
30 15A Headlamps (high beam indicator)
31 10A Right headlamp (low beam)
32 20A Power point #1 (instrument
panel)
33 10A Starter solenoid (gasoline engine
only)/Start relay (diesel engine
only)
34 20A Power point #3 (console)
35 30A Modified vehicle
36 5A (Cluster, A/C, Illumination, Radio)
37—Not used
38—Not used
39 10A Trailer tow electric brake, Center
High-Mounted Stop Lamp
(CHMSL), Brake lamps
40 20A Power point #2 (2nd row seating
position - driver side)
41 30A Modified vehicle
42—Not used
2004 Econoline(eco)
Owners Guide (post-2002-fmt)
USA English(fus)
Roadside Emergencies
152
ProCarManuals.com