windshield washer FORD E-350 2022 Owners Manual
[x] Cancel search | Manufacturer: FORD, Model Year: 2022, Model line: E-350, Model: FORD E-350 2022Pages: 296, PDF Size: 3.91 MB
Page 4 of 296
Introduction
About This Manual
..........................................7
Symbols Glossary ............................................
7
Data Recording .................................................
9
Perchlorate .......................................................
13
Ford Credit ........................................................
14
Replacement Parts Recommendation ........................................................................\
...
14
Special Notices ...............................................
14
Mobile Communications Equipment ........................................................................\
...
16
Environment
Protecting the Environment .......................
17
At a Glance
Instrument Panel ...........................................
18
Child Safety
General Information .....................................
20
Installing Child Restraints ..........................
22
Booster Seats .................................................
26
Child Restraint Positioning ........................
28
Seatbelts
Principle of Operation .................................
30
Fastening the Seatbelts ...............................
31
Seatbelt Height Adjustment .....................
33
Seatbelt Warning Lamp and Indicator Chime ............................................................
33
Child Restraint and Seatbelt Maintenance ...............................................
34
Seatbelt Extensions .....................................
34
Supplementary Restraints System
Principle of Operation .................................
35
Driver and Passenger Airbags ..................
36
Crash Sensors and Airbag Indicator ......
40
Airbag Disposal ...............................................
41Keys and Remote Controls
General Information on Radio
Frequencies .................................................
42
Remote Control .............................................
42
Replacing a Lost Key or Remote Control ........................................................................\
..
44
Doors and Locks
Locking and Unlocking ................................
45
Security
Passive Anti-Theft System .......................
48
Steering Wheel
Adjusting the Steering Wheel ..................
49
Cruise Control - Vehicles With: Adaptive Cruise Control ............................................
49
Cruise Control - Vehicles With: Cruise Control ..........................................................
49
Information Display Control .....................
50
Horn ...................................................................
50
Wipers and Washers
Windshield Wipers .........................................
51
Windshield Washers .....................................
51
Lighting
General Information .....................................
52
Lighting Control .............................................
52
Autolamps .......................................................
53
Instrument Lighting Dimmer ....................
53
Daytime Running Lamps - Vehicles With: Daytime Running Lamps (DRL) ..........
53
Daytime Running Lamps ............................
54
Direction Indicators ......................................
54
Automatic High Beam Control
What Is Automatic High Beam Control ........................................................................\
..
55
1
E-Series (TE4) Canada/United States of America, enUSA, Edition date: 202010, Second-Printing Table of Contents
Page 54 of 296
WINDSHIELD WIPERS
Note:
Fully defrost the windshield before
you switch the windshield wipers on.
Note: Make sure you switch the windshield
wipers off before entering a car wash.
Note: If streaks or smears appear on the
windshield, clean the windshield and the
wiper blades. If that does not resolve the
issue, install new wiper blades.
Note: Do not operate the wipers on a dry
windshield. This may scratch the glass,
damage the wiper blades or cause the wiper
motor to burn out. Always use the
windshield washers before wiping a dry
windshield. •
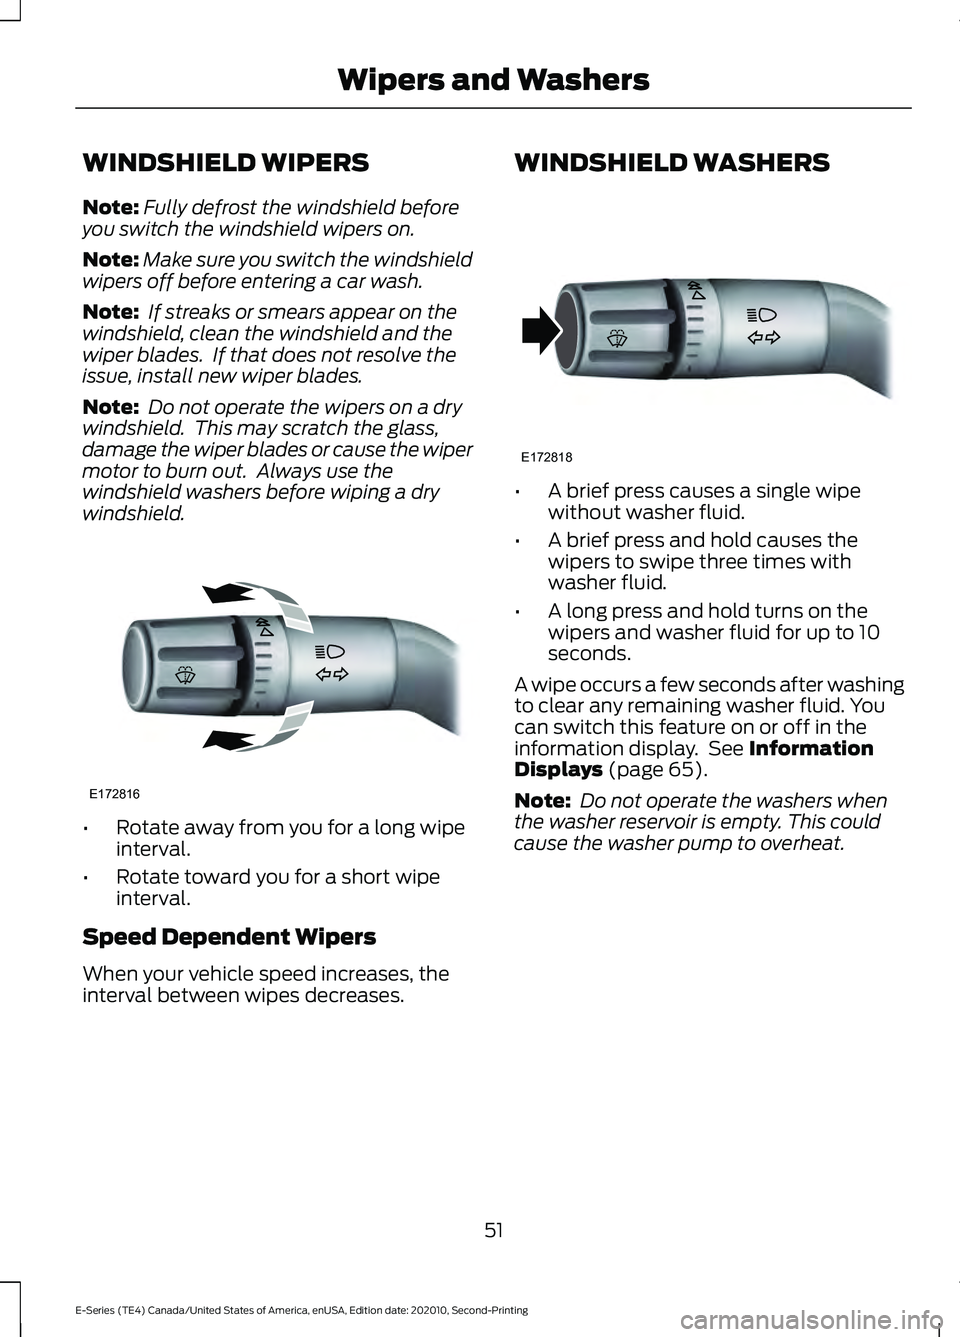
Rotate away from you for a long wipe
interval.
• Rotate toward you for a short wipe
interval.
Speed Dependent Wipers
When your vehicle speed increases, the
interval between wipes decreases. WINDSHIELD WASHERS
•
A brief press causes a single wipe
without washer fluid.
• A brief press and hold causes the
wipers to swipe three times with
washer fluid.
• A long press and hold turns on the
wipers and washer fluid for up to 10
seconds.
A wipe occurs a few seconds after washing
to clear any remaining washer fluid. You
can switch this feature on or off in the
information display. See Information
Displays (page 65).
Note: Do not operate the washers when
the washer reservoir is empty. This could
cause the washer pump to overheat.
51
E-Series (TE4) Canada/United States of America, enUSA, Edition date: 202010, Second-Printing Wipers and WashersE172816 E172818
Page 56 of 296
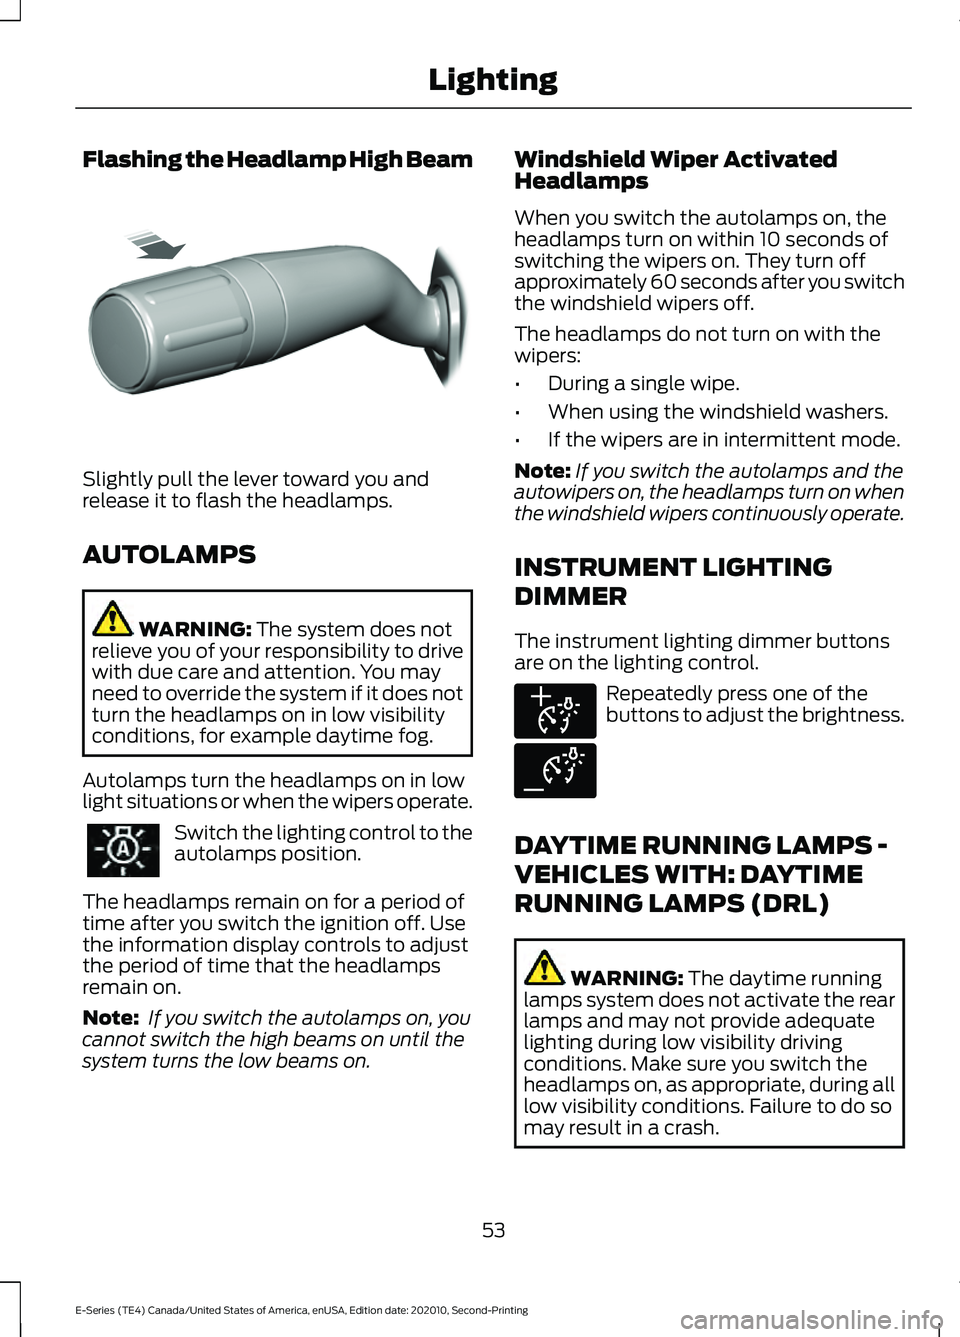
Flashing the Headlamp High Beam
Slightly pull the lever toward you and
release it to flash the headlamps.
AUTOLAMPS
WARNING: The system does not
relieve you of your responsibility to drive
with due care and attention. You may
need to override the system if it does not
turn the headlamps on in low visibility
conditions, for example daytime fog.
Autolamps turn the headlamps on in low
light situations or when the wipers operate. Switch the lighting control to the
autolamps position.
The headlamps remain on for a period of
time after you switch the ignition off. Use
the information display controls to adjust
the period of time that the headlamps
remain on.
Note: If you switch the autolamps on, you
cannot switch the high beams on until the
system turns the low beams on. Windshield Wiper Activated
Headlamps
When you switch the autolamps on, the
headlamps turn on within 10 seconds of
switching the wipers on. They turn off
approximately 60 seconds after you switch
the windshield wipers off.
The headlamps do not turn on with the
wipers:
•
During a single wipe.
• When using the windshield washers.
• If the wipers are in intermittent mode.
Note: If you switch the autolamps and the
autowipers on, the headlamps turn on when
the windshield wipers continuously operate.
INSTRUMENT LIGHTING
DIMMER
The instrument lighting dimmer buttons
are on the lighting control. Repeatedly press one of the
buttons to adjust the brightness.
DAYTIME RUNNING LAMPS -
VEHICLES WITH: DAYTIME
RUNNING LAMPS (DRL) WARNING:
The daytime running
lamps system does not activate the rear
lamps and may not provide adequate
lighting during low visibility driving
conditions. Make sure you switch the
headlamps on, as appropriate, during all
low visibility conditions. Failure to do so
may result in a crash.
53
E-Series (TE4) Canada/United States of America, enUSA, Edition date: 202010, Second-Printing LightingE311233 E291299 E291298
Page 169 of 296
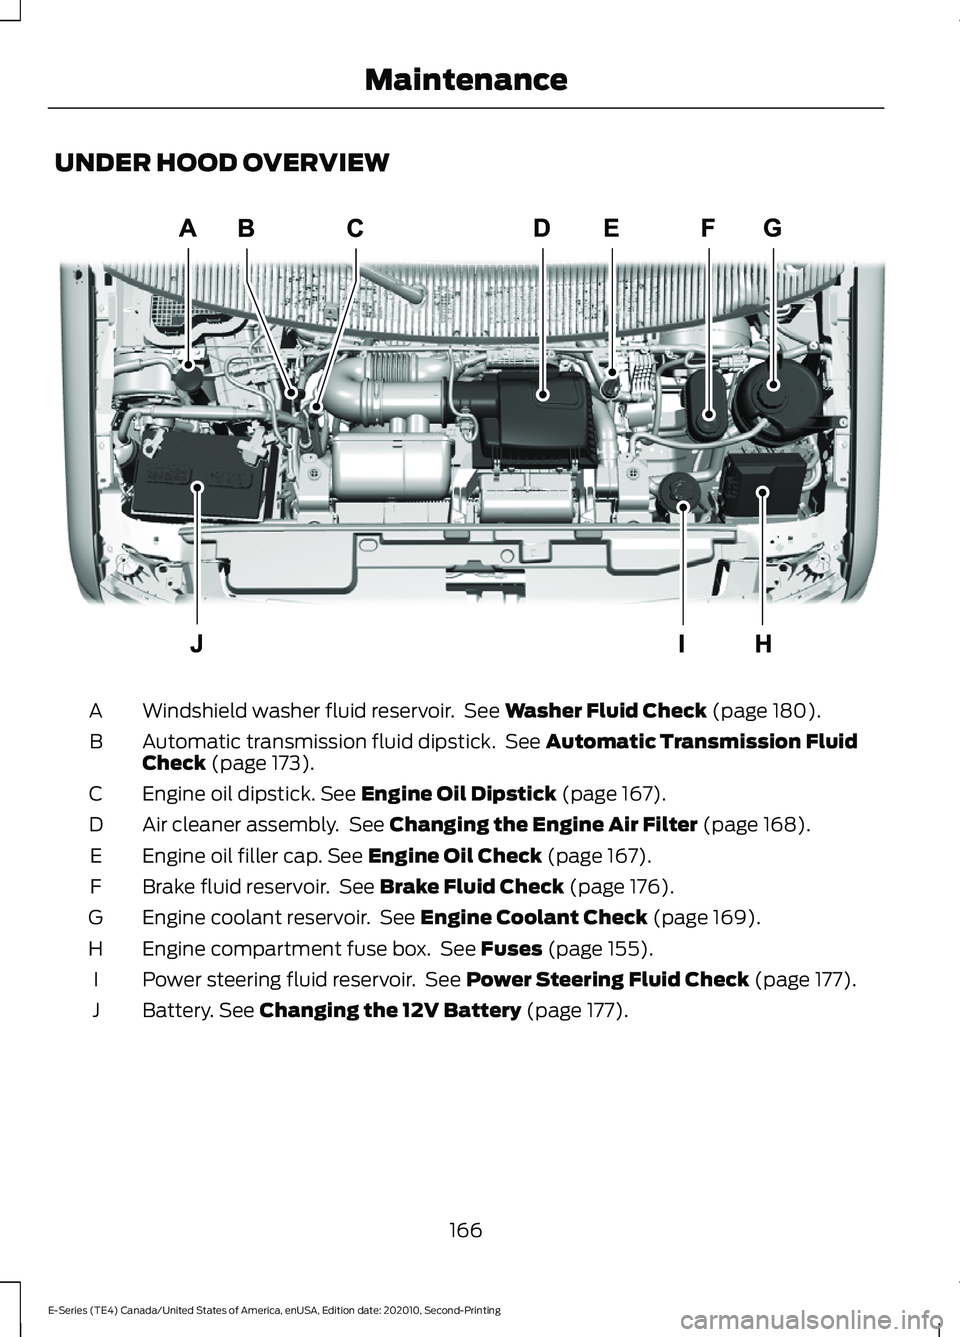
UNDER HOOD OVERVIEW
Windshield washer fluid reservoir. See Washer Fluid Check (page 180).
A
Automatic transmission fluid dipstick. See
Automatic Transmission Fluid
Check (page 173).
B
Engine oil dipstick.
See Engine Oil Dipstick (page 167).
C
Air cleaner assembly. See
Changing the Engine Air Filter (page 168).
D
Engine oil filler cap.
See Engine Oil Check (page 167).
E
Brake fluid reservoir. See
Brake Fluid Check (page 176).
F
Engine coolant reservoir. See
Engine Coolant Check (page 169).
G
Engine compartment fuse box. See
Fuses (page 155).
H
Power steering fluid reservoir. See
Power Steering Fluid Check (page 177).
I
Battery.
See Changing the 12V Battery (page 177).
J
166
E-Series (TE4) Canada/United States of America, enUSA, Edition date: 202010, Second-Printing MaintenanceE312299
Page 172 of 296
Note:
Failure to use the correct air filter
element may result in severe engine
damage. The customer warranty may be
void for any damage to the engine if the
correct air filter element is not used.
When changing the air filter element, use
only the air filter element listed. See
Motorcraft Parts (page 223). The air filter
element should be replaced at the
appropriate intervals. See Normal
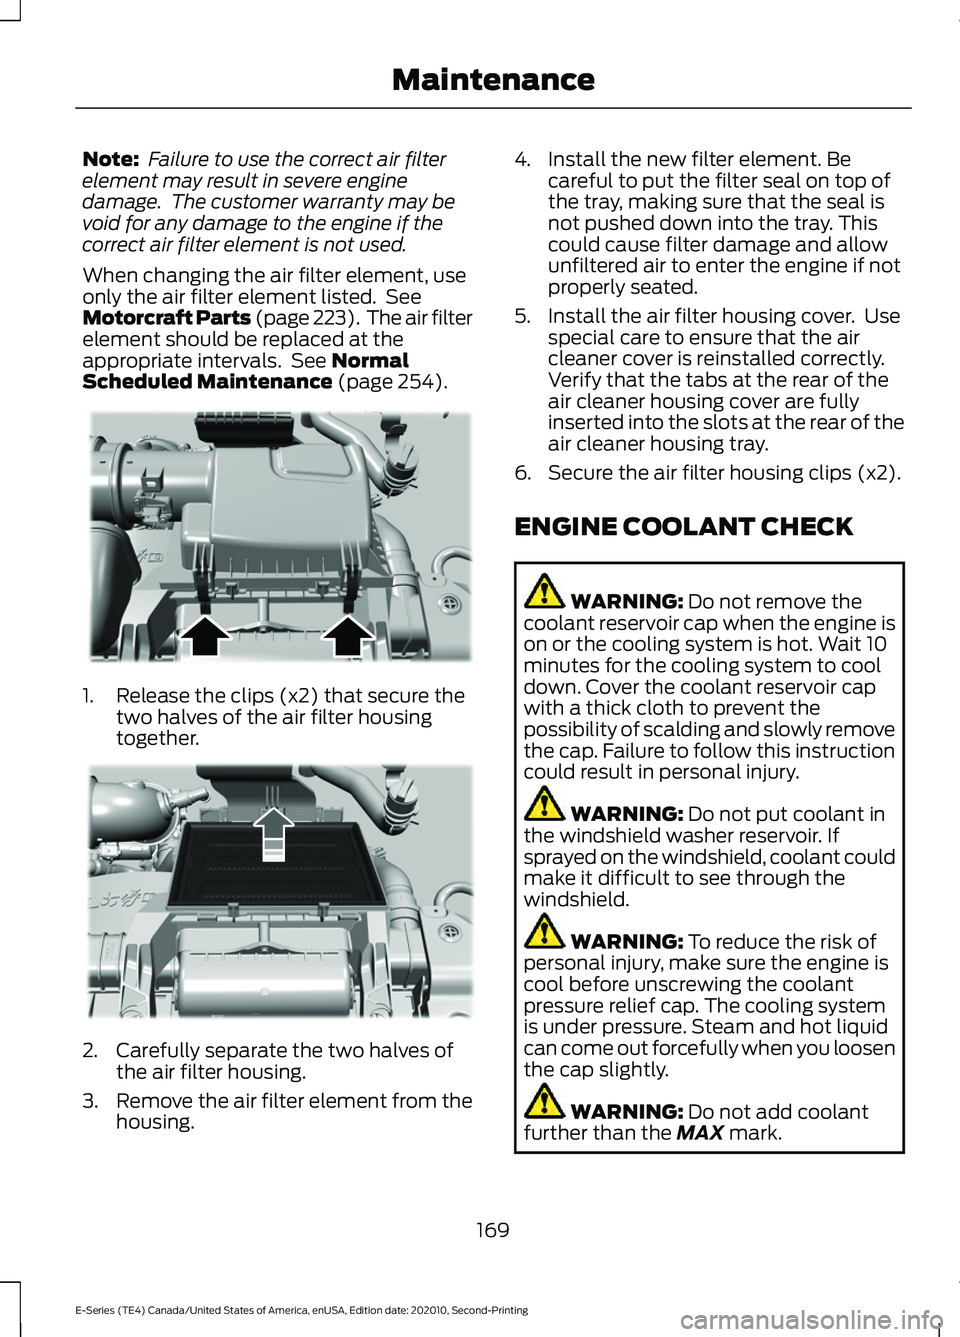
Scheduled Maintenance (page 254). 1. Release the clips (x2) that secure the
two halves of the air filter housing
together. 2. Carefully separate the two halves of
the air filter housing.
3. Remove the air filter element from the
housing. 4. Install the new filter element. Be
careful to put the filter seal on top of
the tray, making sure that the seal is
not pushed down into the tray. This
could cause filter damage and allow
unfiltered air to enter the engine if not
properly seated.
5. Install the air filter housing cover. Use special care to ensure that the air
cleaner cover is reinstalled correctly.
Verify that the tabs at the rear of the
air cleaner housing cover are fully
inserted into the slots at the rear of the
air cleaner housing tray.
6. Secure the air filter housing clips (x2).
ENGINE COOLANT CHECK WARNING:
Do not remove the
coolant reservoir cap when the engine is
on or the cooling system is hot. Wait 10
minutes for the cooling system to cool
down. Cover the coolant reservoir cap
with a thick cloth to prevent the
possibility of scalding and slowly remove
the cap. Failure to follow this instruction
could result in personal injury. WARNING:
Do not put coolant in
the windshield washer reservoir. If
sprayed on the windshield, coolant could
make it difficult to see through the
windshield. WARNING:
To reduce the risk of
personal injury, make sure the engine is
cool before unscrewing the coolant
pressure relief cap. The cooling system
is under pressure. Steam and hot liquid
can come out forcefully when you loosen
the cap slightly. WARNING:
Do not add coolant
further than the MAX mark.
169
E-Series (TE4) Canada/United States of America, enUSA, Edition date: 202010, Second-Printing MaintenanceE310547 E310548
Page 173 of 296
When the engine is cold, check the
concentration and level of the coolant at
the intervals listed in the scheduled
maintenance information. See Scheduled
Maintenance (page 251).
Note: Make sure that the coolant level is
between the
MIN and MAX marks on the
coolant reservoir.
Note: Coolant expands when it is hot. The
level may extend beyond the
MAX mark.
Maintain coolant concentration within
48% to 50%, which equates to a freeze
point between
-29°F (-34°C) and -35°F
(-37°C). Coolant concentration should be
checked using a refractometer. We do not
recommend the use of hydrometers or
coolant test strips for measuring coolant
concentration.
Adding Coolant WARNING:
Do not add engine
coolant when the engine is on or the
cooling system is hot. Failure to follow
this instruction could result in personal
injury. WARNING:
Do not remove the
coolant reservoir cap when the engine is
on or the cooling system is hot. Wait 10
minutes for the cooling system to cool
down. Cover the coolant reservoir cap
with a thick cloth to prevent the
possibility of scalding and slowly remove
the cap. Failure to follow this instruction
could result in personal injury.
Note: Automotive fluids are not
interchangeable. Do not use coolant or
windshield washer fluid outside of its
specified function and vehicle location. Note:
Do not use stop leak pellets, cooling
system sealants, or non-specified additives
as they can cause damage to the engine
cooling or heating systems. Resulting
component damage may not be covered by
the vehicle Warranty.
It is very important to use prediluted
coolant approved to the correct
specification in order to avoid plugging the
small passageways in the engine cooling
system. See
Capacities and
Specifications (page 223). Do not mix
different colors or types of coolant in your
vehicle. Mixing of engine coolants or using
an incorrect coolant may harm the engine
or cooling system components and may
not be covered by the vehicle Warranty.
Note: If prediluted coolant is not available,
use the approved concentrated coolant
diluting it to 50/50 with distilled water. See
Capacities and Specifications (page 223
).
Using water that has not been deionized
may contribute to deposit formation,
corrosion and plugging of the small cooling
system passageways.
Note: Coolants marketed for all makes and
models may not be approved to Ford
specifications and may cause damage to
the cooling system. Resulting component
damage may not be covered by the vehicle
Warranty.
If the coolant level is at or below the
minimum mark, add prediluted coolant
immediately.
To top up the coolant level do the
following:
1. Unscrew the cap slowly. Any pressure escapes as you unscrew the cap.
2. Add prediluted coolant approved to the correct specification. See
Capacities and Specifications (page
223
).
3. Add enough prediluted coolant to reach the correct level.
170
E-Series (TE4) Canada/United States of America, enUSA, Edition date: 202010, Second-Printing Maintenance
Page 183 of 296
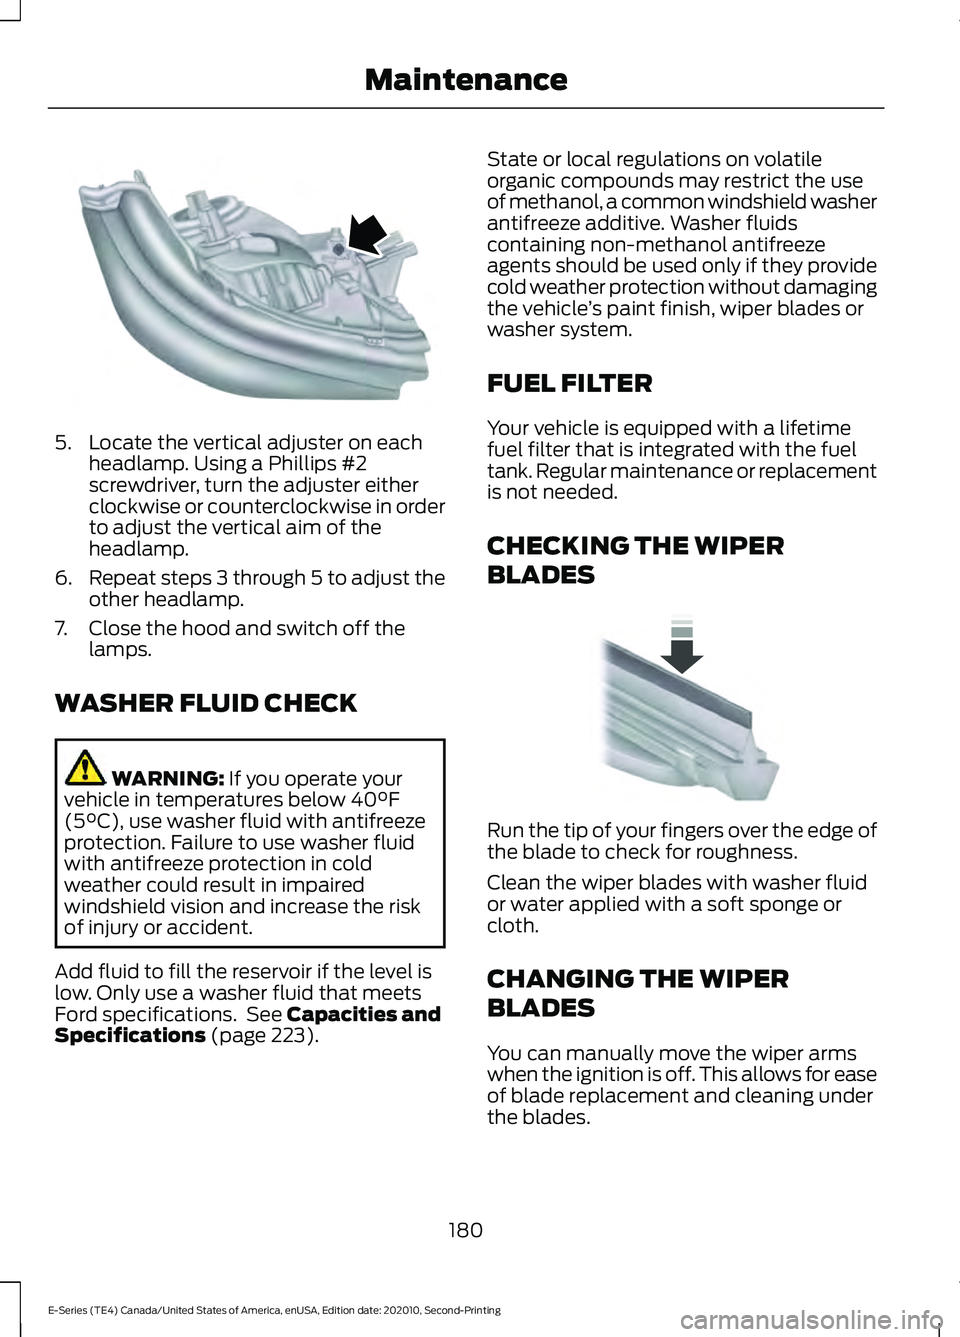
5. Locate the vertical adjuster on each
headlamp. Using a Phillips #2
screwdriver, turn the adjuster either
clockwise or counterclockwise in order
to adjust the vertical aim of the
headlamp.
6. Repeat steps 3 through 5 to adjust the
other headlamp.
7. Close the hood and switch off the lamps.
WASHER FLUID CHECK WARNING: If you operate your
vehicle in temperatures below 40°F
(5°C), use washer fluid with antifreeze
protection. Failure to use washer fluid
with antifreeze protection in cold
weather could result in impaired
windshield vision and increase the risk
of injury or accident.
Add fluid to fill the reservoir if the level is
low. Only use a washer fluid that meets
Ford specifications. See
Capacities and
Specifications (page 223). State or local regulations on volatile
organic compounds may restrict the use
of methanol, a common windshield washer
antifreeze additive. Washer fluids
containing non-methanol antifreeze
agents should be used only if they provide
cold weather protection without damaging
the vehicle
’s paint finish, wiper blades or
washer system.
FUEL FILTER
Your vehicle is equipped with a lifetime
fuel filter that is integrated with the fuel
tank. Regular maintenance or replacement
is not needed.
CHECKING THE WIPER
BLADES Run the tip of your fingers over the edge of
the blade to check for roughness.
Clean the wiper blades with washer fluid
or water applied with a soft sponge or
cloth.
CHANGING THE WIPER
BLADES
You can manually move the wiper arms
when the ignition is off. This allows for ease
of blade replacement and cleaning under
the blades.
180
E-Series (TE4) Canada/United States of America, enUSA, Edition date: 202010, Second-Printing MaintenanceE163806 E142463
Page 187 of 296
GENERAL INFORMATION
Your dealer has many quality products
available to clean your vehicle and protect
its finishes.
CLEANING PRODUCTS
Materials
For best results, use the following products
or products of equivalent quality:
For additional information and assistance,
we recommend that you contact an
authorized dealer. Specification
Name
Motorcraft® Bug and Tar Remover, ZC-42 (U.S. & Canada) ESR-M5B194-B
Motorcraft® Custom Bright Metal Cleaner, ZC-15 (U.S. & Canada)
ESR-M14P4-A
Motorcraft® Detail Wash, ZC-3-A (U.S. & Canada)
ESR-M14P3-A
Motorcraft® Engine Shampoo and Degreaser, ZC-20 (U.S.)
Motorcraft® Engine Shampoo, CXC-66-A (Canada)
Motorcraft® Premium Leather and Vinyl Cleaner, ZC-56 (U.S. &
Canada)
Motorcraft® Multi-Purpose Cleaner, CXC-101 (Canada)
WSS-M14P19-A
Motorcraft® Premium Windshield Wash Concentrate with
Bitterant, ZC-32-B2 (U.S.)
WSS-M14P19-A
Motorcraft® Premium Quality Windshield Washer Fluid, CXC-37-
F/M (Canada)
Motorcraft® Professional Strength Carpet & Upholstery Cleaner,
ZC-54 (U.S. & Canada)
ESR-M14P5-A
Motorcraft® Premium Glass Cleaner, CXC-100 (Canada)
Motorcraft® Spot and Stain Remover, ZC-14 (U.S.)
ESR-M14P5-A
Motorcraft® Ultra-Clear Spray Glass Cleaner, ZC-23 (U.S.)
Motorcraft® Wheel and Tire Cleaner, ZC-37-A (U.S. & Canada)
184
E-Series (TE4) Canada/United States of America, enUSA, Edition date: 202010, Second-Printing Vehicle Care
Page 189 of 296
•
Use a spray with a 40 degree wide
spray angle pattern.
• Keep the nozzle at a 12 in (305 mm)
distance and 90 degree angle to your
vehicle's surface.
Note: Holding the pressure washer nozzle
at an angle to the vehicle's surface may
damage graphics and cause the edges to
peel away from the vehicle's surface.
Underbody
Regularly clean the underside of your
vehicle using water. Keep body and door
drain holes free of debris or foreign
material.
Under Hood
For removing black rubber marks from
under the hood we recommend Motorcraft
Wheel and Tire Cleaner or Motorcraft Bug
and Tar Remover.
WAXING
Regular waxing is necessary to protect your
car's paint from the elements. We
recommend that you wash and wax the
painted surface once or twice a year.
When washing and waxing, park your
vehicle in a shaded area out of direct
sunlight. Always wash your vehicle before
applying wax.
• Use a quality wax that does not contain
abrasives.
• Follow the manufacturer ’s instructions
to apply and remove the wax.
• Apply a small amount of wax in a
back-and-forth motion, not in circles. •
Do not allow wax to come in contact
with any non-body (low-gloss black)
colored trim. The wax will discolor or
stain the parts over time.
•Roof racks.
• Bumpers.
• Grained door handles.
• Side moldings.
• Mirror housings.
• Windshield cowl area.
• Do not apply wax to glass areas.
• After waxing, your car's paint should
feel smooth, and be free of streaks and
smudges.
CLEANING THE ENGINE
Engines are more efficient when they are
clean because grease and dirt buildup keep
the engine warmer than normal.
When washing:
• Take care when using a power washer
to clean the engine. The high-pressure
fluid could penetrate the sealed parts
and cause damage.
• Do not spray a hot engine with cold
water to avoid cracking the engine
block or other engine components.
• Spray Motorcraft Engine Shampoo and
Degreaser on all parts that require
cleaning and pressure rinse clean. In
Canada, use Motorcraft Engine
Shampoo.
Note: If your vehicle has an engine cover
remove the cover before application of
Motorcraft Engine Shampoo and Degreaser.
Immediately rinse away any over spray.
186
E-Series (TE4) Canada/United States of America, enUSA, Edition date: 202010, Second-Printing Vehicle Care
Page 190 of 296
•
Never wash or rinse the engine while it
is hot or running; water in the running
engine may cause internal damage.
• Never wash or rinse any ignition coil,
spark plug wire or spark plug well, or
the area in and around these locations.
• Cover the battery, power distribution
box, and air filter assembly to prevent
water damage when cleaning the
engine.
CLEANING THE WINDOWS AND
WIPER BLADES
Car wash chemicals and environmental
fallout can result in windshield and wiper
blade contamination. Dirty windshield and
wipers will result in poor windshield wiper
operation. Keep the windshield and wiper
blades clean to maintain windshield wiper
performance.
To clean the windshield and wiper blades:
• Clean the windshield with a
non-abrasive glass cleaner. When
cleaning the interior of the windshield,
avoid getting any glass cleaner on the
instrument panel or door panels. Wipe
any glass cleaner off these surfaces
immediately.
• For windshields contaminated with
tree sap, chemicals, wax or bugs, clean
the entire windshield using steel wool
(no greater than 0000 grade) in a
circular motion and rinse with water.
• Clean the wiper blades with isopropyl
rubbing alcohol or windshield washer
concentrate.
Note: Do not use razor blades or other
sharp objects to clean or remove decals
from the inside of the heated rear window.
The vehicle warranty does not cover
damage caused to the heated rear window
grid lines. CLEANING THE INTERIOR WARNING: Do not use cleaning
solvents, bleach or dye on the vehicle's
seatbelts, as these actions may weaken
the belt webbing. WARNING:
On vehicles equipped
with seat-mounted airbags, do not use
chemical solvents or strong detergents.
Such products could contaminate the
side airbag system and affect
performance of the side airbag in a crash.
For fabric, carpets, cloth seats and seats
equipped with side airbags:
• Remove dust and loose dirt with a
vacuum cleaner.
• Remove light stains and soil with
Motorcraft Professional Strength
Carpet & Upholstery Cleaner.
• If grease or tar is present on the
material, spot-clean the area first with
Motorcraft Spot and Stain Remover. In
Canada, use Motorcraft Multi-Purpose
Cleaner.
• If a ring forms on the fabric after spot
cleaning, clean the entire area
immediately (but do not oversaturate)
or the ring will set.
• Do not use household cleaning
products or glass cleaners, which can
stain and discolor the fabric and affect
the flame retardant abilities of the seat
materials.
Mirrors
Do not clean the housing or glass of any
mirror with harsh abrasives, fuel or other
petroleum or ammonia-based cleaning
products.
187
E-Series (TE4) Canada/United States of America, enUSA, Edition date: 202010, Second-Printing Vehicle Care