FORD E-450 2000 Owners Manual
Manufacturer: FORD, Model Year: 2000, Model line: E-450, Model: FORD E-450 2000Pages: 232, PDF Size: 2.75 MB
Page 131 of 232
Always replace a fuse with one that has the specified amperage
rating. Using a fuse with a higher amperage rating can cause
severe wire damage and could start a fire.
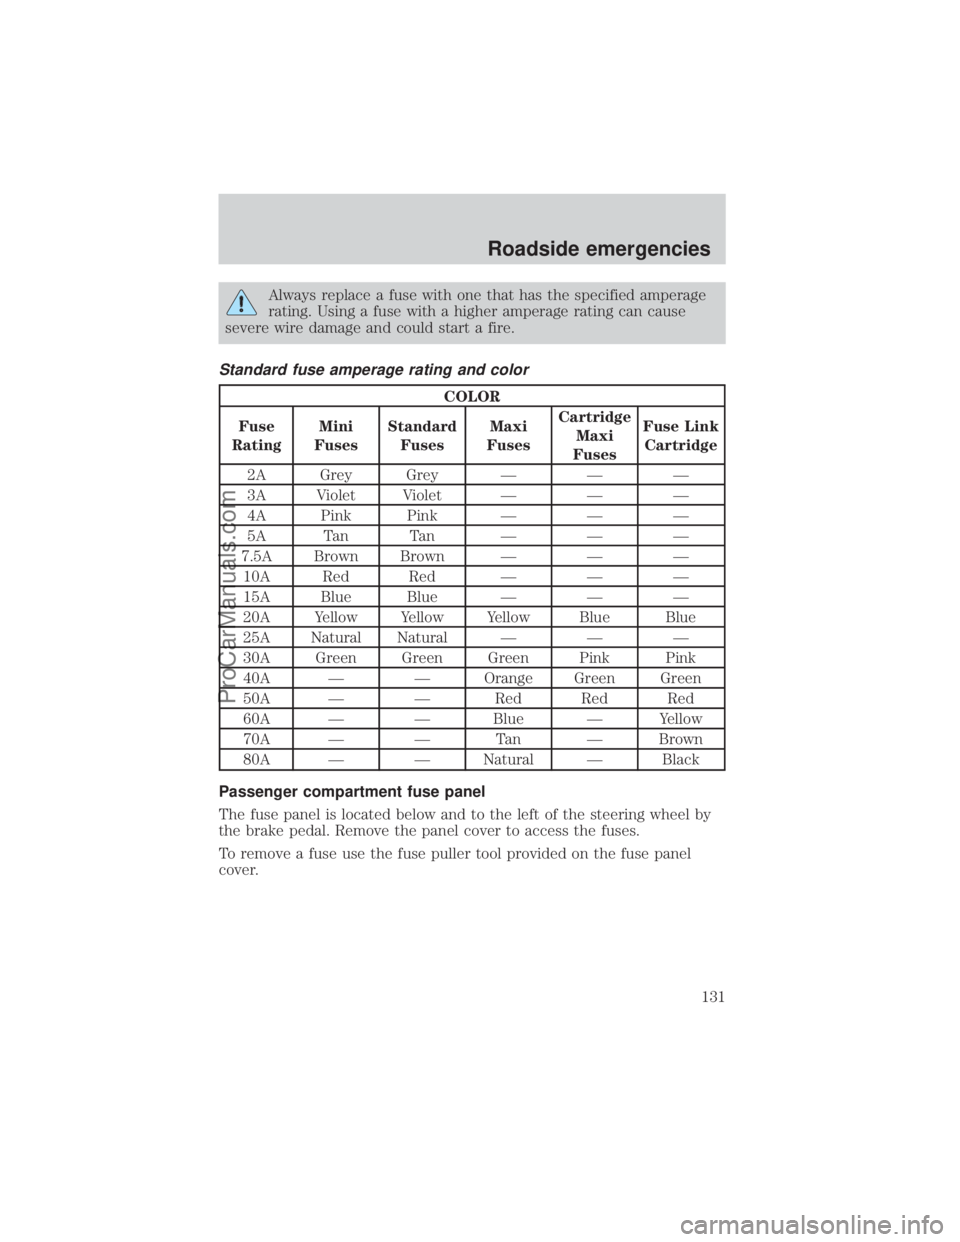
Standard fuse amperage rating and color
COLOR
Fuse
RatingMini
FusesStandard
FusesMaxi
FusesCartridge
Maxi
FusesFuse Link
Cartridge
2A Grey Grey Ð Ð Ð
3A Violet Violet Ð Ð Ð
4A Pink Pink Ð Ð Ð
5A Tan Tan Ð Ð Ð
7.5A Brown Brown Ð Ð Ð
10A Red Red Ð Ð Ð
15A Blue Blue Ð Ð Ð
20A Yellow Yellow Yellow Blue Blue
25A Natural Natural Ð Ð Ð
30A Green Green Green Pink Pink
40A Ð Ð Orange Green Green
50A Ð Ð Red Red Red
60A Ð Ð Blue Ð Yellow
70A Ð Ð Tan Ð Brown
80A Ð Ð Natural Ð Black
Passenger compartment fuse panel
The fuse panel is located below and to the left of the steering wheel by
the brake pedal. Remove the panel cover to access the fuses.
To remove a fuse use the fuse puller tool provided on the fuse panel
cover.
Roadside emergencies
131
ProCarManuals.com
Page 132 of 232
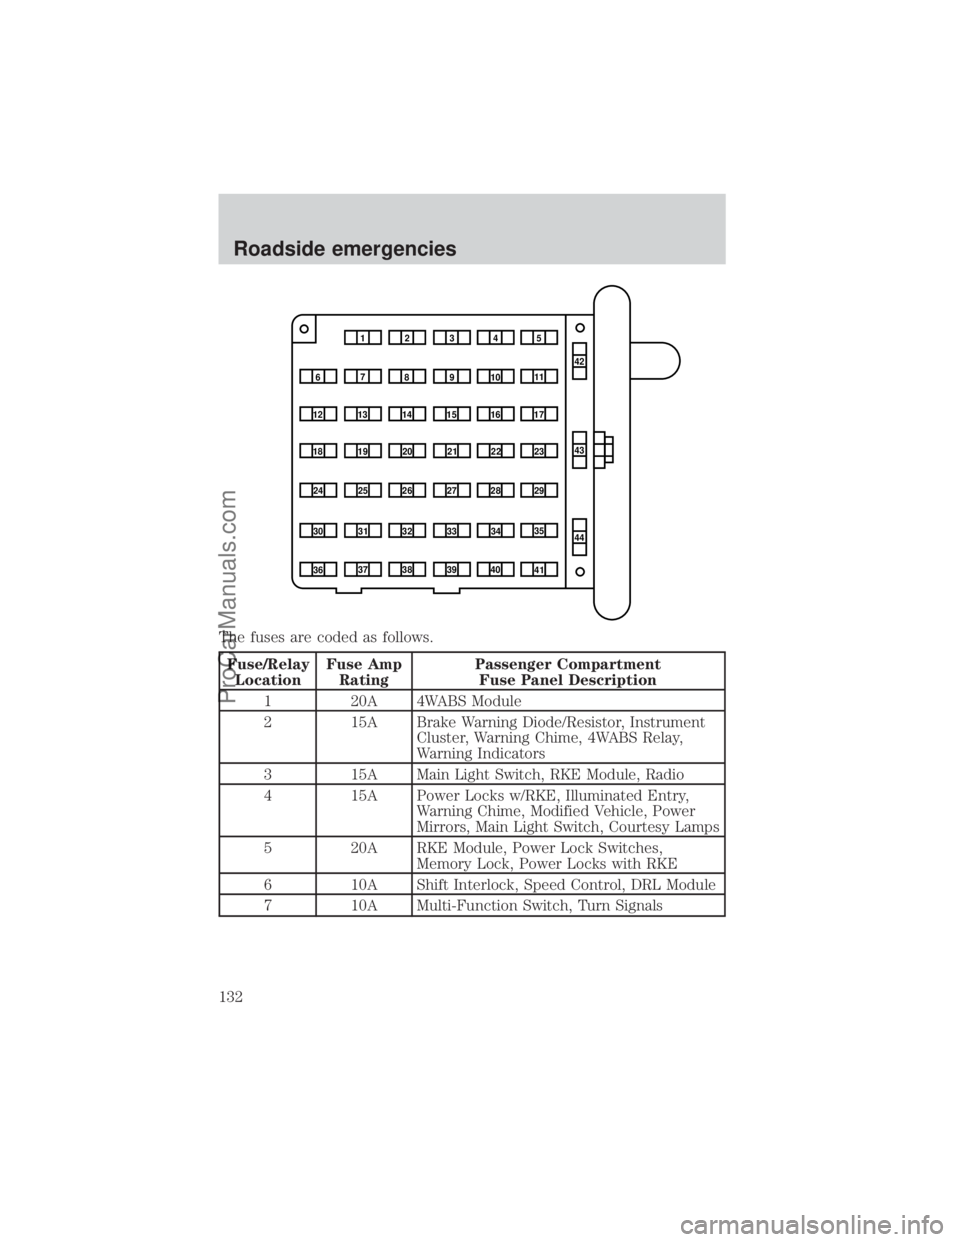
The fuses are coded as follows.
Fuse/Relay
LocationFuse Amp
RatingPassenger Compartment
Fuse Panel Description
1 20A 4WABS Module
2 15A Brake Warning Diode/Resistor, Instrument
Cluster, Warning Chime, 4WABS Relay,
Warning Indicators
3 15A Main Light Switch, RKE Module, Radio
4 15A Power Locks w/RKE, Illuminated Entry,
Warning Chime, Modified Vehicle, Power
Mirrors, Main Light Switch, Courtesy Lamps
5 20A RKE Module, Power Lock Switches,
Memory Lock, Power Locks with RKE
6 10A Shift Interlock, Speed Control, DRL Module
7 10A Multi-Function Switch, Turn Signals
1234
5
7
689101142
43
44 13 12 14
15 16 17
19 18
2021 22 23
25 24
26 27 28 29
31 30 32 33 3435
37
3638 3940
41
Roadside emergencies
132
ProCarManuals.com
Page 133 of 232
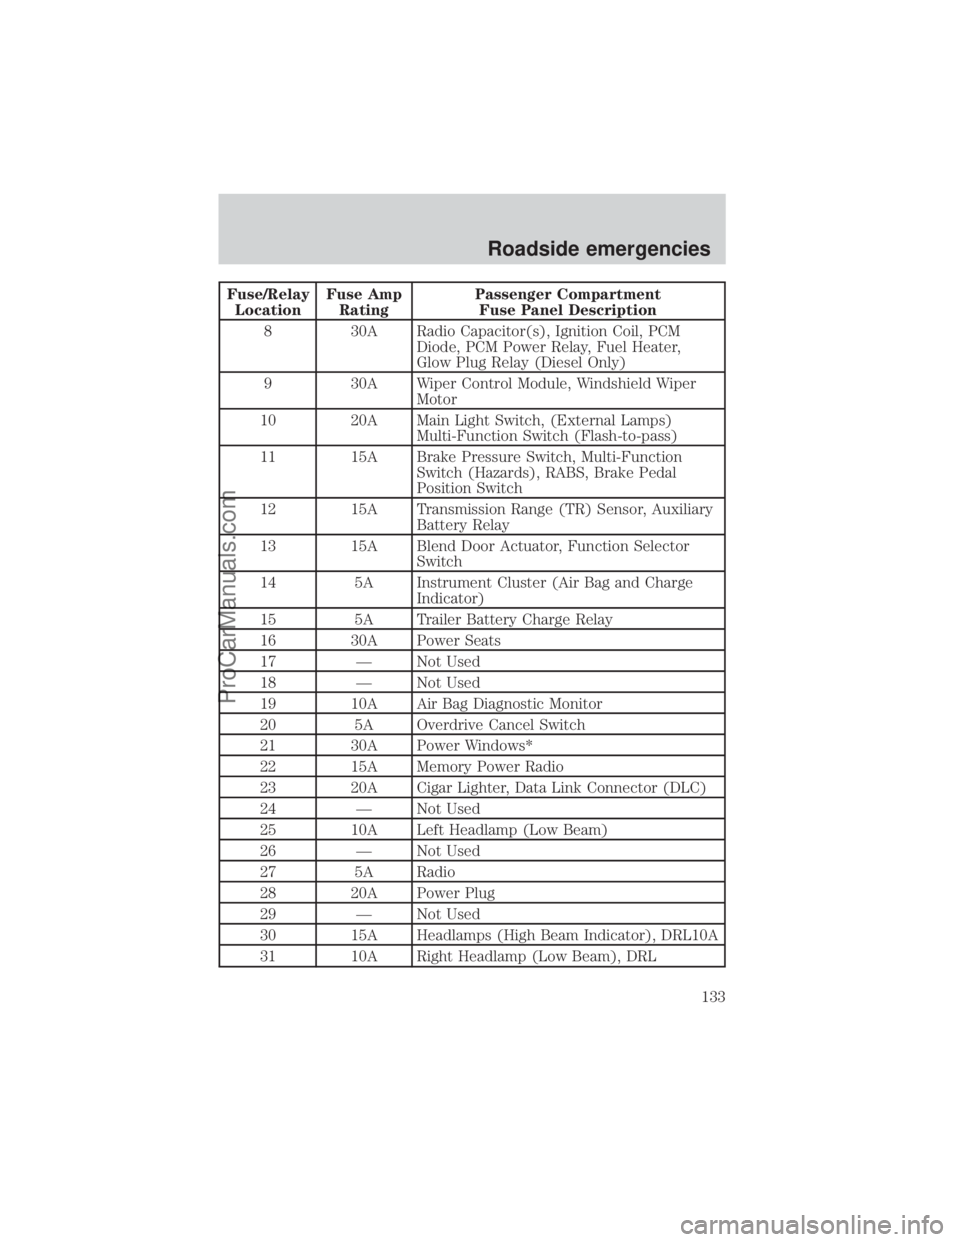
Fuse/Relay
LocationFuse Amp
RatingPassenger Compartment
Fuse Panel Description
8 30A Radio Capacitor(s), Ignition Coil, PCM
Diode, PCM Power Relay, Fuel Heater,
Glow Plug Relay (Diesel Only)
9 30A Wiper Control Module, Windshield Wiper
Motor
10 20A Main Light Switch, (External Lamps)
Multi-Function Switch (Flash-to-pass)
11 15A Brake Pressure Switch, Multi-Function
Switch (Hazards), RABS, Brake Pedal
Position Switch
12 15A Transmission Range (TR) Sensor, Auxiliary
Battery Relay
13 15A Blend Door Actuator, Function Selector
Switch
14 5A Instrument Cluster (Air Bag and Charge
Indicator)
15 5A Trailer Battery Charge Relay
16 30A Power Seats
17 Ð Not Used
18 Ð Not Used
19 10A Air Bag Diagnostic Monitor
20 5A Overdrive Cancel Switch
21 30A Power Windows*
22 15A Memory Power Radio
23 20A Cigar Lighter, Data Link Connector (DLC)
24 Ð Not Used
25 10A Left Headlamp (Low Beam)
26 Ð Not Used
27 5A Radio
28 20A Power Plug
29 Ð Not Used
30 15A Headlamps (High Beam Indicator), DRL10A
31 10A Right Headlamp (Low Beam), DRL
Roadside emergencies
133
ProCarManuals.com
Page 134 of 232
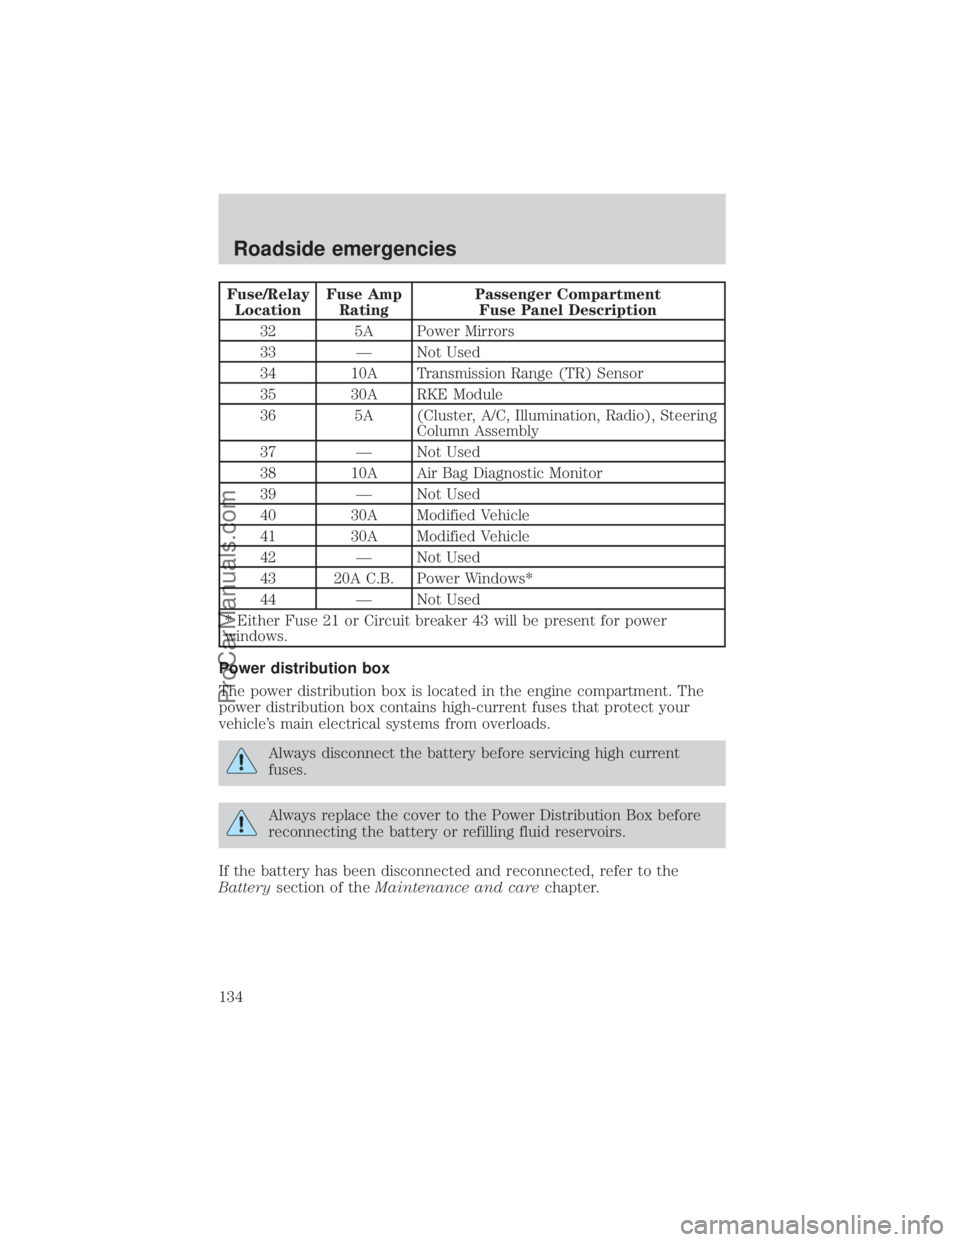
Fuse/Relay
LocationFuse Amp
RatingPassenger Compartment
Fuse Panel Description
32 5A Power Mirrors
33 Ð Not Used
34 10A Transmission Range (TR) Sensor
35 30A RKE Module
36 5A (Cluster, A/C, Illumination, Radio), Steering
Column Assembly
37 Ð Not Used
38 10A Air Bag Diagnostic Monitor
39 Ð Not Used
40 30A Modified Vehicle
41 30A Modified Vehicle
42 Ð Not Used
43 20A C.B. Power Windows*
44 Ð Not Used
* Either Fuse 21 or Circuit breaker 43 will be present for power
windows.
Power distribution box
The power distribution box is located in the engine compartment. The
power distribution box contains high-current fuses that protect your
vehicle's main electrical systems from overloads.
Always disconnect the battery before servicing high current
fuses.
Always replace the cover to the Power Distribution Box before
reconnecting the battery or refilling fluid reservoirs.
If the battery has been disconnected and reconnected, refer to the
Batterysection of theMaintenance and carechapter.
Roadside emergencies
134
ProCarManuals.com
Page 135 of 232
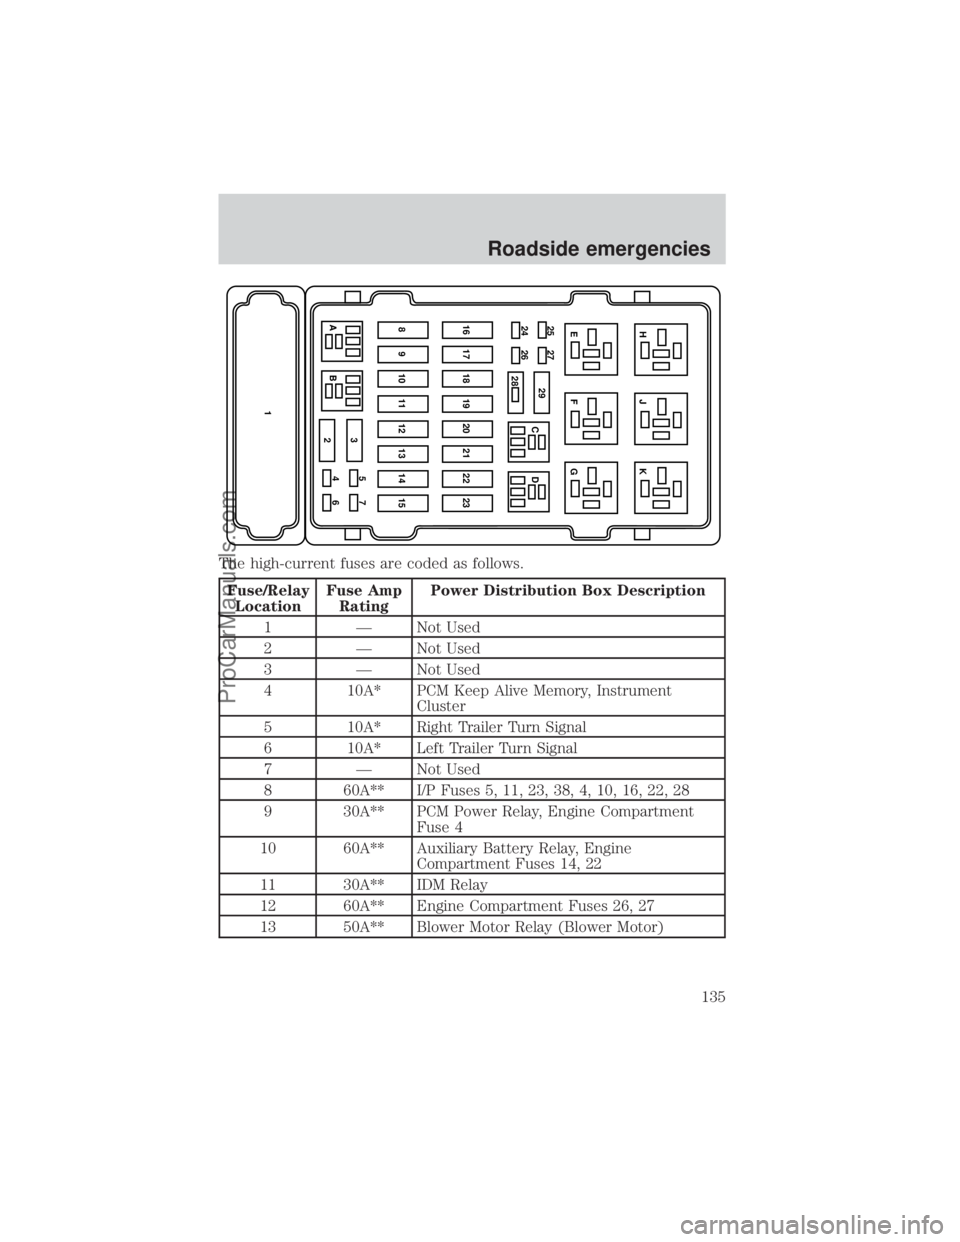
The high-current fuses are coded as follows.
Fuse/Relay
LocationFuse Amp
RatingPower Distribution Box Description
1 Ð Not Used
2 Ð Not Used
3 Ð Not Used
4 10A* PCM Keep Alive Memory, Instrument
Cluster
5 10A* Right Trailer Turn Signal
6 10A* Left Trailer Turn Signal
7 Ð Not Used
8 60A** I/P Fuses 5, 11, 23, 38, 4, 10, 16, 22, 28
9 30A** PCM Power Relay, Engine Compartment
Fuse 4
10 60A** Auxiliary Battery Relay, Engine
Compartment Fuses 14, 22
11 30A** IDM Relay
12 60A** Engine Compartment Fuses 26, 27
13 50A** Blower Motor Relay (Blower Motor)
AB3
2
146 5715 14 13 12 11 10 9 823 22 21 20 19 18 17 1624 26 25 27
29
CDG F EK J H
28
Roadside emergencies
135
ProCarManuals.com
Page 136 of 232
Fuse/Relay
LocationFuse Amp
RatingPower Distribution Box Description
14 30A** Trailer Running Lamps Relay, Trailer
Backup Lamps Relay
15 40A** Main Light Switch
16 50A** RKE Module, Auxiliary Blower Motor Relay
17 30A** Fuel Pump Relay, IDM (Diesel)
18 60A** I/P Fuses 40, 41
19 60A** 4WABS Module
20 20A** Electric Brake Controller
21 50A** Modified Vehicle Power
22 40A** Trailer Battery Charge Relay (Modified
Vehicles Only)
23 60A** Ignition Switch
24 Ð Not Used
25 20A* NGV Module
26 10A* Generator/Voltage Regulator (Diesel Only)
27 15A* DRL Module, Horn Relay
28 Ð PCM Diode
29 Ð Not Used
A Ð Not Used
B Ð Not Used
C Ð Trailer Backup Lamps Relay
D Ð Trailer Running Lamps Relay
E Ð Trailer Running Lamps Relay
F Ð IDM Relay
G Ð PCM Relay
H Ð Blower Motor Relay
J Ð Horn Relay
K Ð Fuel Pump Relay, IDM Relay (Diesel)
* Mini Fuses ** Maxi Fuses
Roadside emergencies
136
ProCarManuals.com
Page 137 of 232
Relays
Relays are located in the power distribution box and should be replaced
by qualified technicians.
CHANGING THE TIRES
If you get a flat tire while driving, do not apply the brake heavily.
Instead, gradually decrease your speed. Hold the steering wheel firmly
and slowly move to a safe place on the side of the road.
Spare tire information
The spare tire for your vehicle is stowed under the rear of your vehicle
(except cutaway and stripped chassis models).
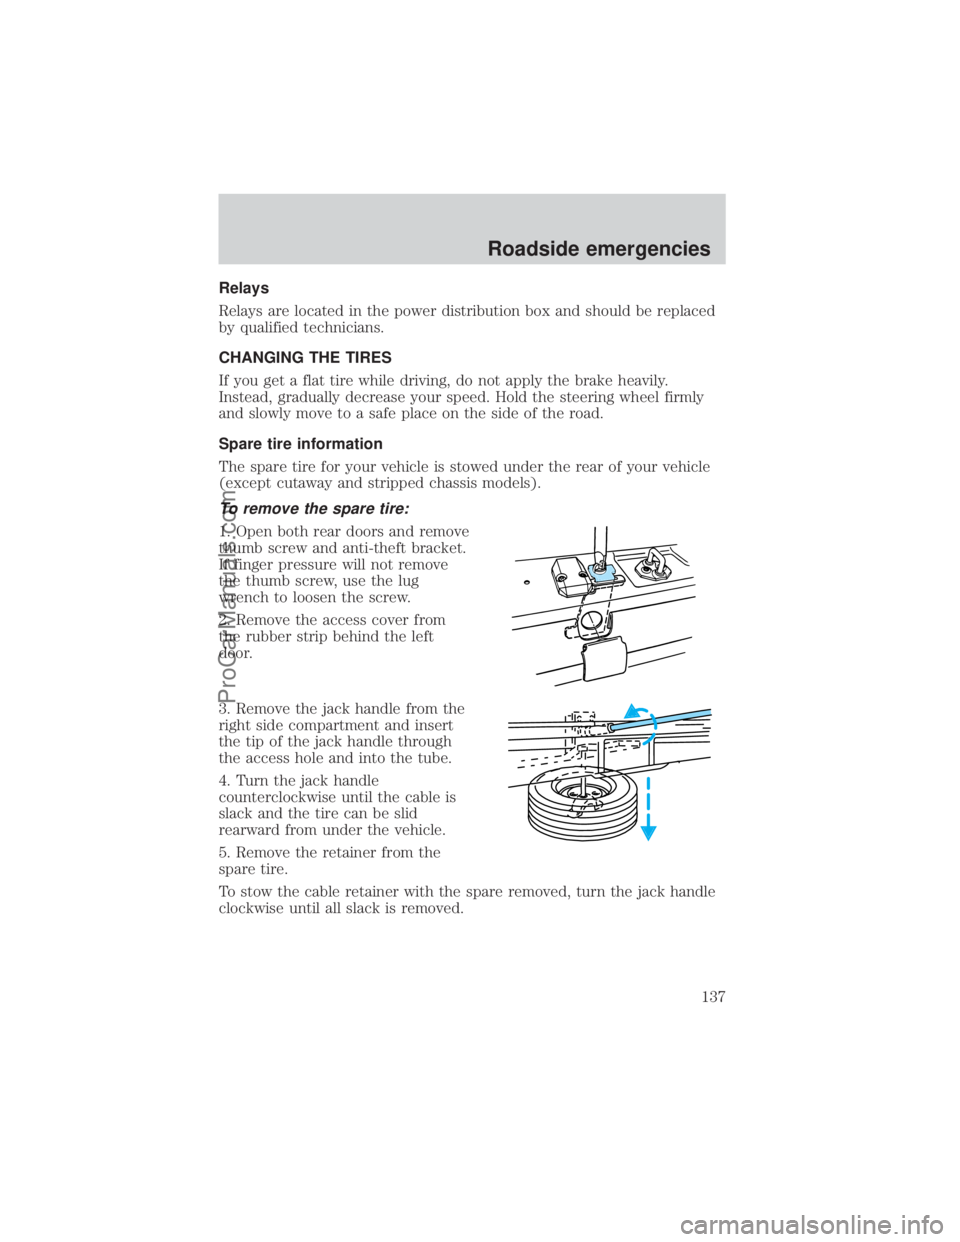
To remove the spare tire:
1. Open both rear doors and remove
thumb screw and anti-theft bracket.
If finger pressure will not remove
the thumb screw, use the lug
wrench to loosen the screw.
2. Remove the access cover from
the rubber strip behind the left
door.
3. Remove the jack handle from the
right side compartment and insert
the tip of the jack handle through
the access hole and into the tube.
4. Turn the jack handle
counterclockwise until the cable is
slack and the tire can be slid
rearward from under the vehicle.
5. Remove the retainer from the
spare tire.
To stow the cable retainer with the spare removed, turn the jack handle
clockwise until all slack is removed.
Roadside emergencies
137
ProCarManuals.com
Page 138 of 232
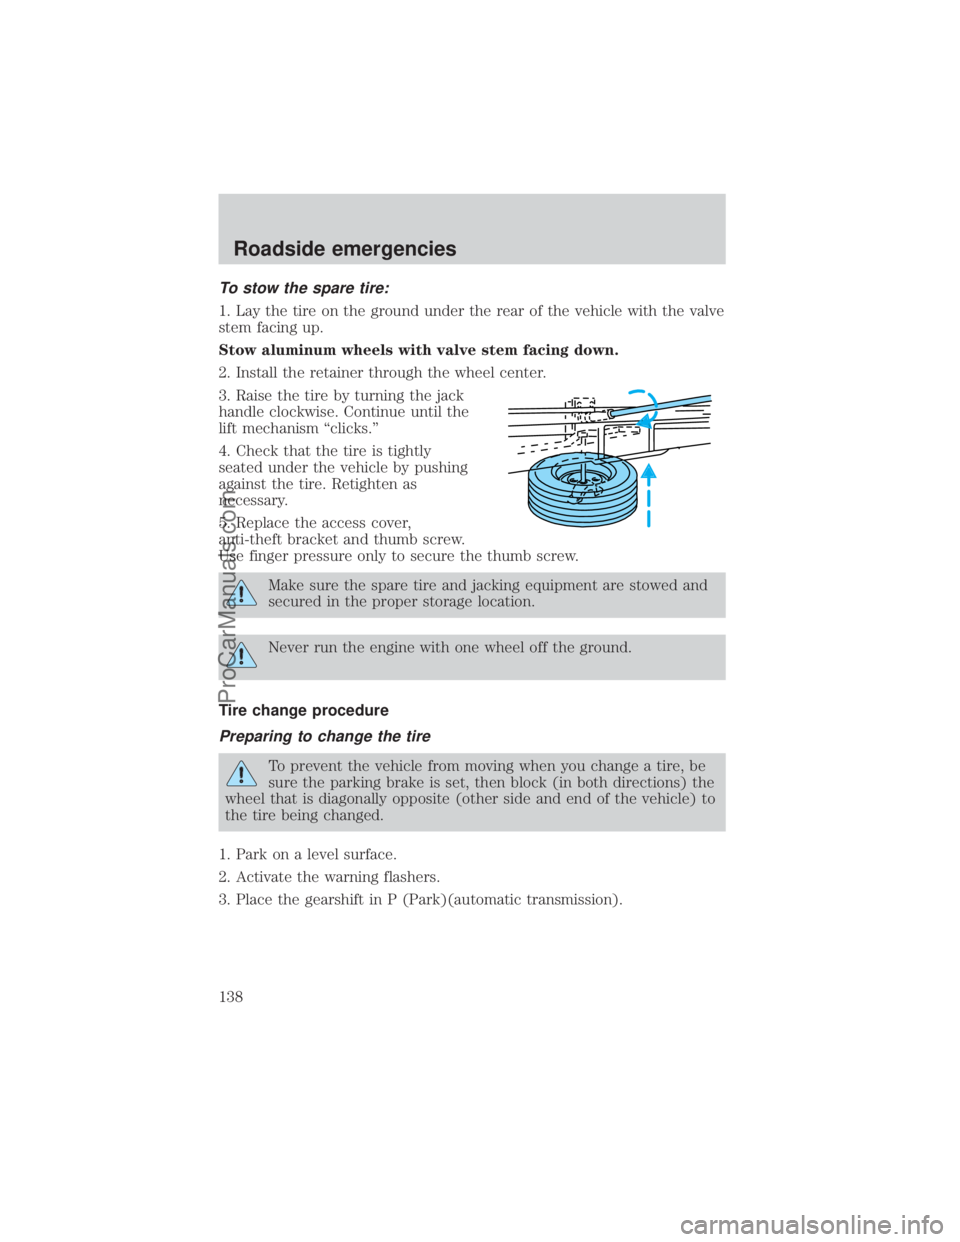
To stow the spare tire:
1. Lay the tire on the ground under the rear of the vehicle with the valve
stem facing up.
Stow aluminum wheels with valve stem facing down.
2. Install the retainer through the wheel center.
3. Raise the tire by turning the jack
handle clockwise. Continue until the
lift mechanism ªclicks.º
4. Check that the tire is tightly
seated under the vehicle by pushing
against the tire. Retighten as
necessary.
5. Replace the access cover,
anti-theft bracket and thumb screw.
Use finger pressure only to secure the thumb screw.
Make sure the spare tire and jacking equipment are stowed and
secured in the proper storage location.
Never run the engine with one wheel off the ground.
Tire change procedure
Preparing to change the tire
To prevent the vehicle from moving when you change a tire, be
sure the parking brake is set, then block (in both directions) the
wheel that is diagonally opposite (other side and end of the vehicle) to
the tire being changed.
1. Park on a level surface.
2. Activate the warning flashers.
3. Place the gearshift in P (Park)(automatic transmission).
Roadside emergencies
138
ProCarManuals.com
Page 139 of 232
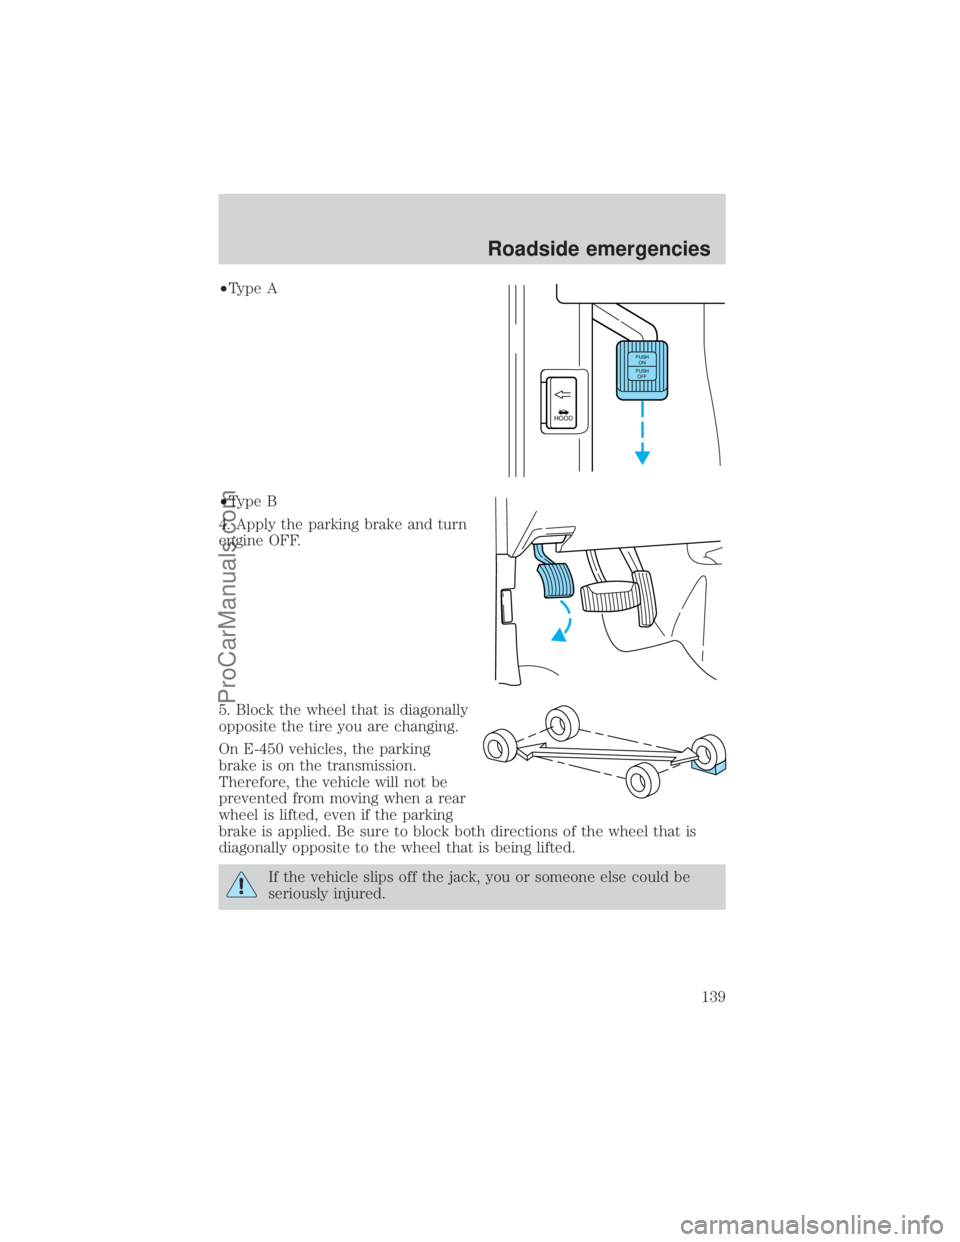
²Type A
²Type B
4. Apply the parking brake and turn
engine OFF.
5. Block the wheel that is diagonally
opposite the tire you are changing.
On E-450 vehicles, the parking
brake is on the transmission.
Therefore, the vehicle will not be
prevented from moving when a rear
wheel is lifted, even if the parking
brake is applied. Be sure to block both directions of the wheel that is
diagonally opposite to the wheel that is being lifted.
If the vehicle slips off the jack, you or someone else could be
seriously injured.
HOOD
PUSH
ON
PUSH
OFF
Roadside emergencies
139
ProCarManuals.com
Page 140 of 232
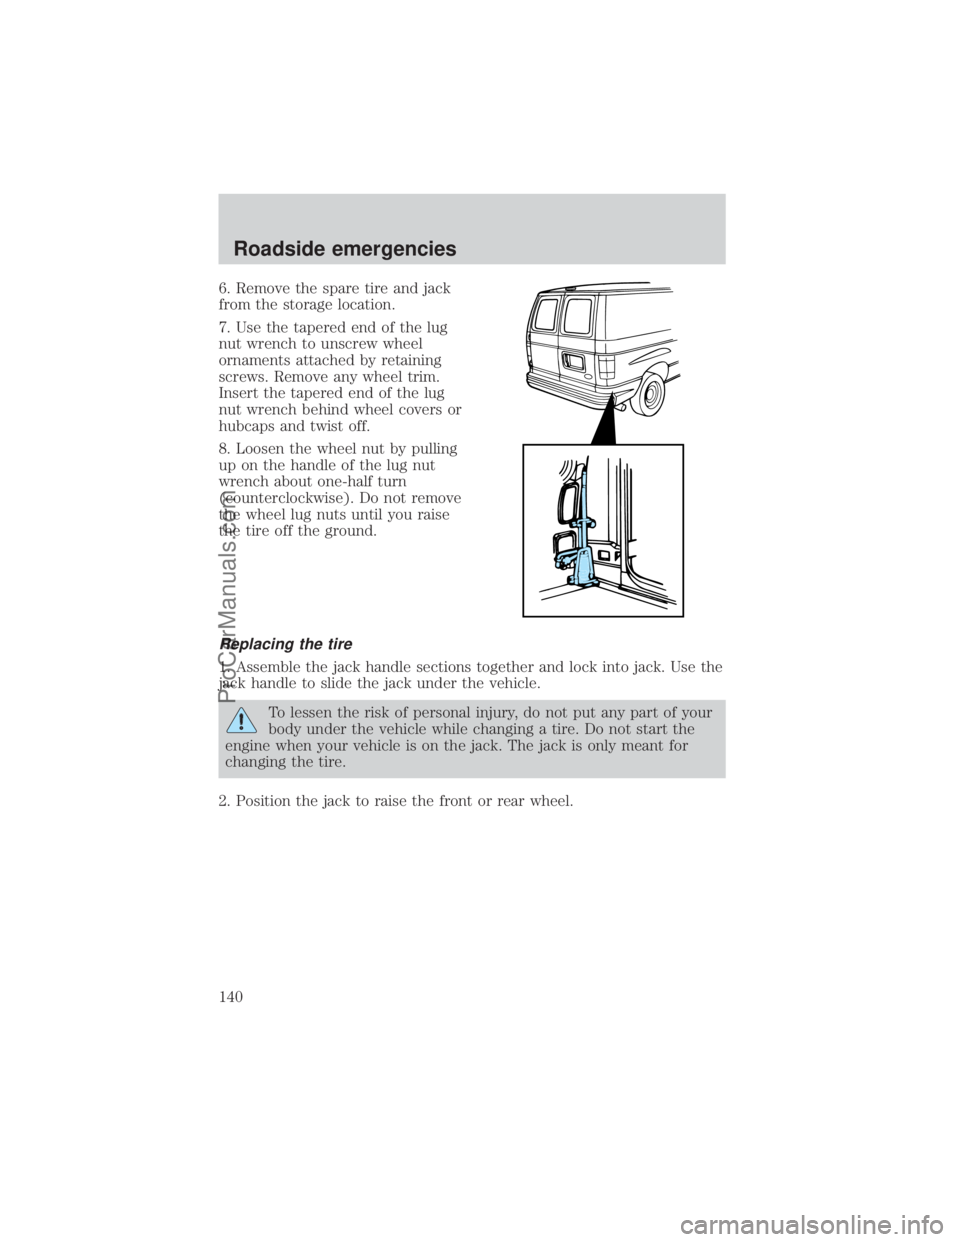
6. Remove the spare tire and jack
from the storage location.
7. Use the tapered end of the lug
nut wrench to unscrew wheel
ornaments attached by retaining
screws. Remove any wheel trim.
Insert the tapered end of the lug
nut wrench behind wheel covers or
hubcaps and twist off.
8. Loosen the wheel nut by pulling
up on the handle of the lug nut
wrench about one-half turn
(counterclockwise). Do not remove
the wheel lug nuts until you raise
the tire off the ground.
Replacing the tire
1. Assemble the jack handle sections together and lock into jack. Use the
jack handle to slide the jack under the vehicle.
To lessen the risk of personal injury, do not put any part of your
body under the vehicle while changing a tire. Do not start the
engine when your vehicle is on the jack. The jack is only meant for
changing the tire.
2. Position the jack to raise the front or rear wheel.
Roadside emergencies
140
ProCarManuals.com