ECO mode FORD E-450 2003 Owner's Guide
[x] Cancel search | Manufacturer: FORD, Model Year: 2003, Model line: E-450, Model: FORD E-450 2003Pages: 232, PDF Size: 3.56 MB
Page 133 of 232
Using a step bumper (if equipped)
The rear bumper is equipped with an integral hitch and only requires a ball
with a 25.4 mm (one inch) shank diameter. The bumper has a 2,270 kg
(5,000 lb.) trailer weight and 227 kg (500 lb.) tongue weight capacity.
If it is necessary to relocate the trailer hitch ball position, a
frame-mounted trailer hitch must be installed.
Driving while you tow
When towing a trailer:
•Turn off the speed control. The speed control may shut off
automatically when you are towing on long, steep grades.
•Consult your local motor vehicle speed regulations for towing a trailer.
•To eliminate excessive shifting, use a lower gear. This will also assist
in transmission cooling.
•Anticipate stops and brake gradually.
When descending long, steep downhill grades, always use a lower gear to
provide engine braking to save wear on brakes. Use Drive (Overdrive
OFF) on moderately steep hills, Second (2) on steep hills, and First (1)
on very steep hills.Do not apply your brakes continuously, as they
may overheat and become less effective.
Servicing after towing
If you tow a trailer for long distances, your vehicle will require more
frequent service intervals. Refer to your scheduled maintenance guide for
more information.
Trailer towing tips
•Practice turning, stopping and backing up before starting on a trip to
get the feel of the vehicle trailer combination. When turning, make
wider turns so the trailer wheels will clear curbs and other obstacles.
•Allow more distance for stopping with a trailer attached.
•
The trailer tongue weight should be 10–15% of the loaded trailer weight.
•If you will be towing a trailer frequently in hot weather, hilly conditions,
at GCW, or any combination of these factors, consider refilling your rear
axle with synthetic gear lube. Refer to theMaintenance and
specificationschapter for the lubricant specification.
•After you have traveled 80 km (50 miles), thoroughly check your
hitch, electrical connections and trailer wheel lug nuts.
2003 Econoline(eco)
Owners Guide (post-2002-fmt)
USA English(fus)
Driving
133
ProCarManuals.com
Page 144 of 232
CHANGING A FLAT TIRE
If you get a flat tire while driving:
•do not brake heavily.
•gradually decrease the vehicle’s speed.
•hold the steering wheel firmly.
•slowly move to a safe place on the side of the road.
The use of tire sealants is not recommended and may
compromise the integrity of your tires.
Spare tire information
The spare tire for your vehicle is stowed under the rear of your vehicle
(except cutaway and stripped chassis models).
To remove the spare tire:
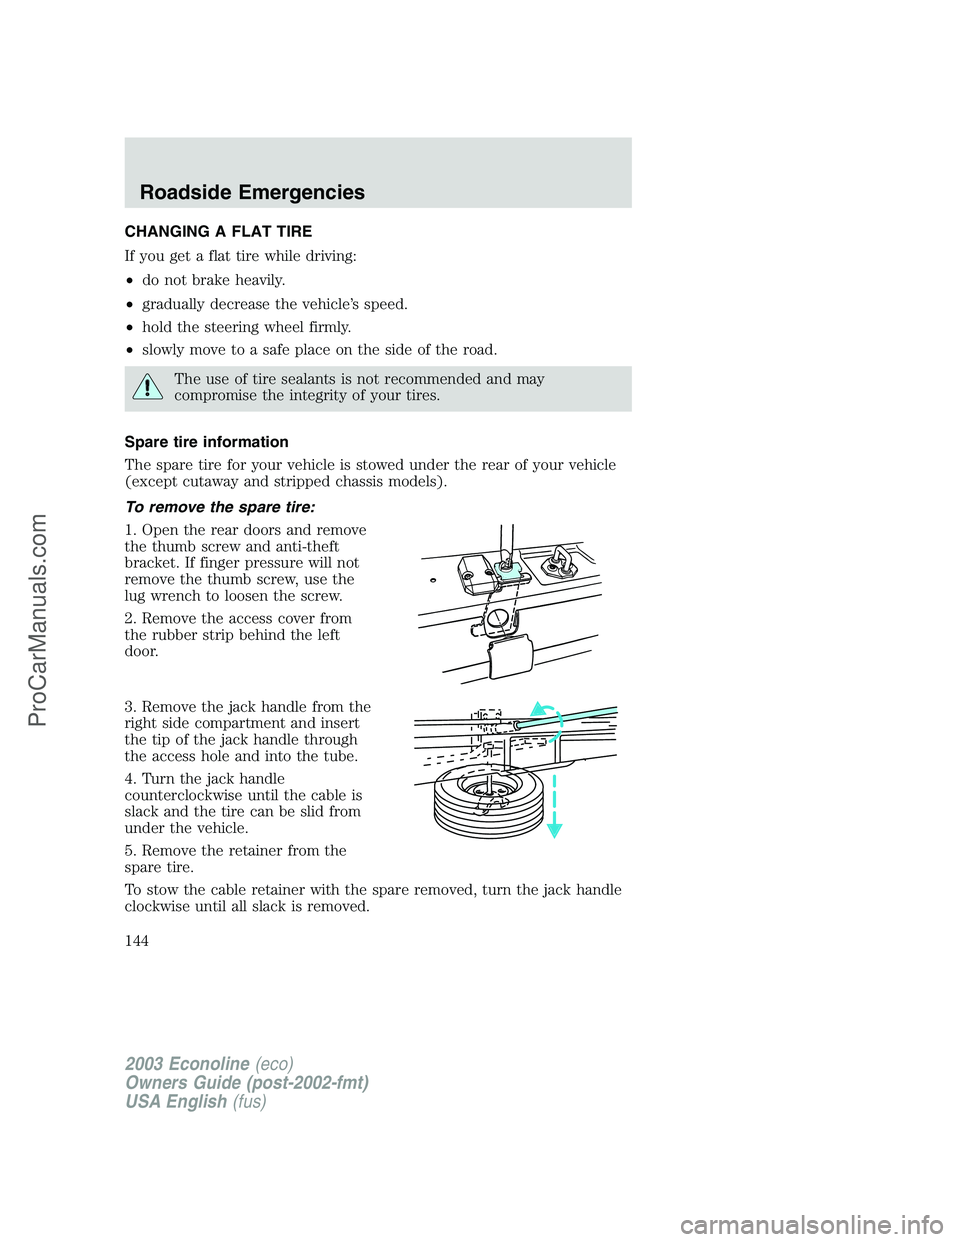
1. Open the rear doors and remove
the thumb screw and anti-theft
bracket. If finger pressure will not
remove the thumb screw, use the
lug wrench to loosen the screw.
2. Remove the access cover from
the rubber strip behind the left
door.
3. Remove the jack handle from the
right side compartment and insert
the tip of the jack handle through
the access hole and into the tube.
4. Turn the jack handle
counterclockwise until the cable is
slack and the tire can be slid from
under the vehicle.
5. Remove the retainer from the
spare tire.
To stow the cable retainer with the spare removed, turn the jack handle
clockwise until all slack is removed.
2003 Econoline(eco)
Owners Guide (post-2002-fmt)
USA English(fus)
Roadside Emergencies
144
ProCarManuals.com
Page 148 of 232
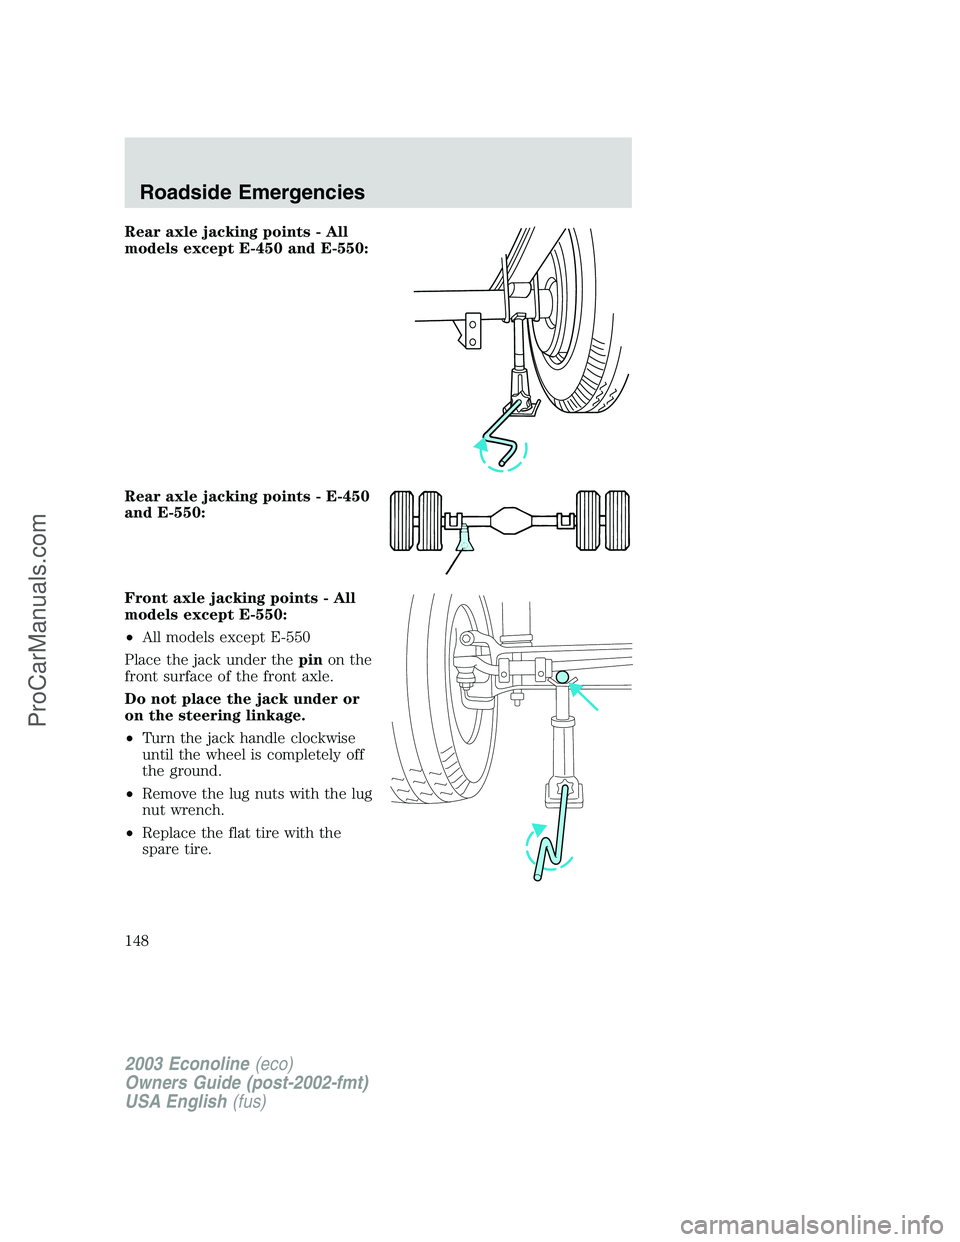
Rear axle jacking points - All
models except E-450 and E-550:
Rear axle jacking points - E-450
and E-550:
Front axle jacking points - All
models except E-550:
•All models except E-550
Place the jack under thepinon the
front surface of the front axle.
Do not place the jack under or
on the steering linkage.
•Turn the jack handle clockwise
until the wheel is completely off
the ground.
•Remove the lug nuts with the lug
nut wrench.
•Replace the flat tire with the
spare tire.
2003 Econoline(eco)
Owners Guide (post-2002-fmt)
USA English(fus)
Roadside Emergencies
148
ProCarManuals.com
Page 150 of 232
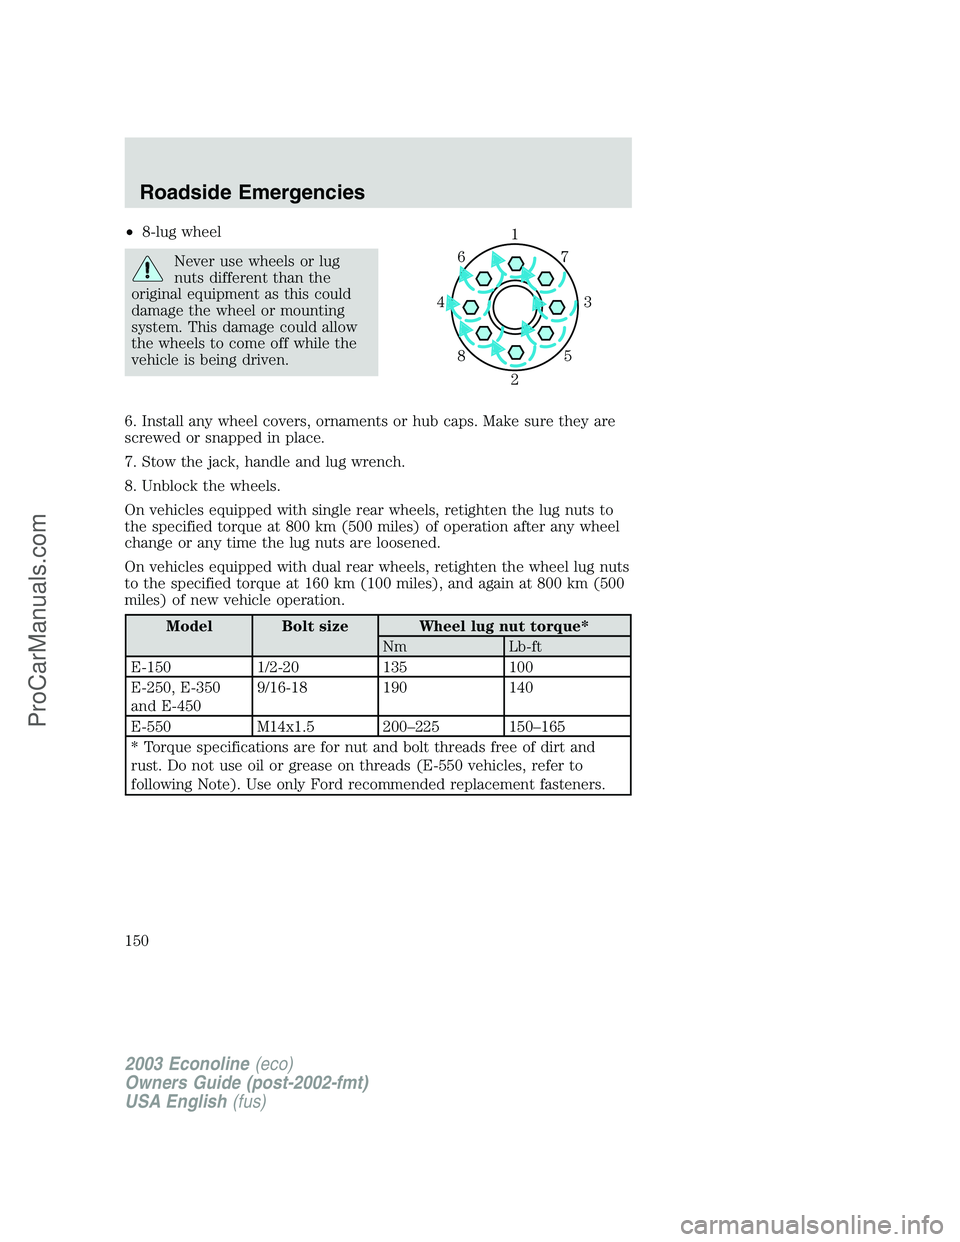
•8-lug wheel
Never use wheels or lug
nuts different than the
original equipment as this could
damage the wheel or mounting
system. This damage could allow
the wheels to come off while the
vehicle is being driven.
6. Install any wheel covers, ornaments or hub caps. Make sure they are
screwed or snapped in place.
7. Stow the jack, handle and lug wrench.
8. Unblock the wheels.
On vehicles equipped with single rear wheels, retighten the lug nuts to
the specified torque at 800 km (500 miles) of operation after any wheel
change or any time the lug nuts are loosened.
On vehicles equipped with dual rear wheels, retighten the wheel lug nuts
to the specified torque at 160 km (100 miles), and again at 800 km (500
miles) of new vehicle operation.
Model Bolt size Wheel lug nut torque*
Nm Lb-ft
E-150 1/2-20 135 100
E-250, E-350
and E-4509/16-18 190 140
E-550 M14x1.5 200–225 150–165
* Torque specifications are for nut and bolt threads free of dirt and
rust. Do not use oil or grease on threads (E-550 vehicles, refer to
following Note). Use only Ford recommended replacement fasteners.
1
3 4
27 6
5 8
2003 Econoline(eco)
Owners Guide (post-2002-fmt)
USA English(fus)
Roadside Emergencies
150
ProCarManuals.com
Page 154 of 232
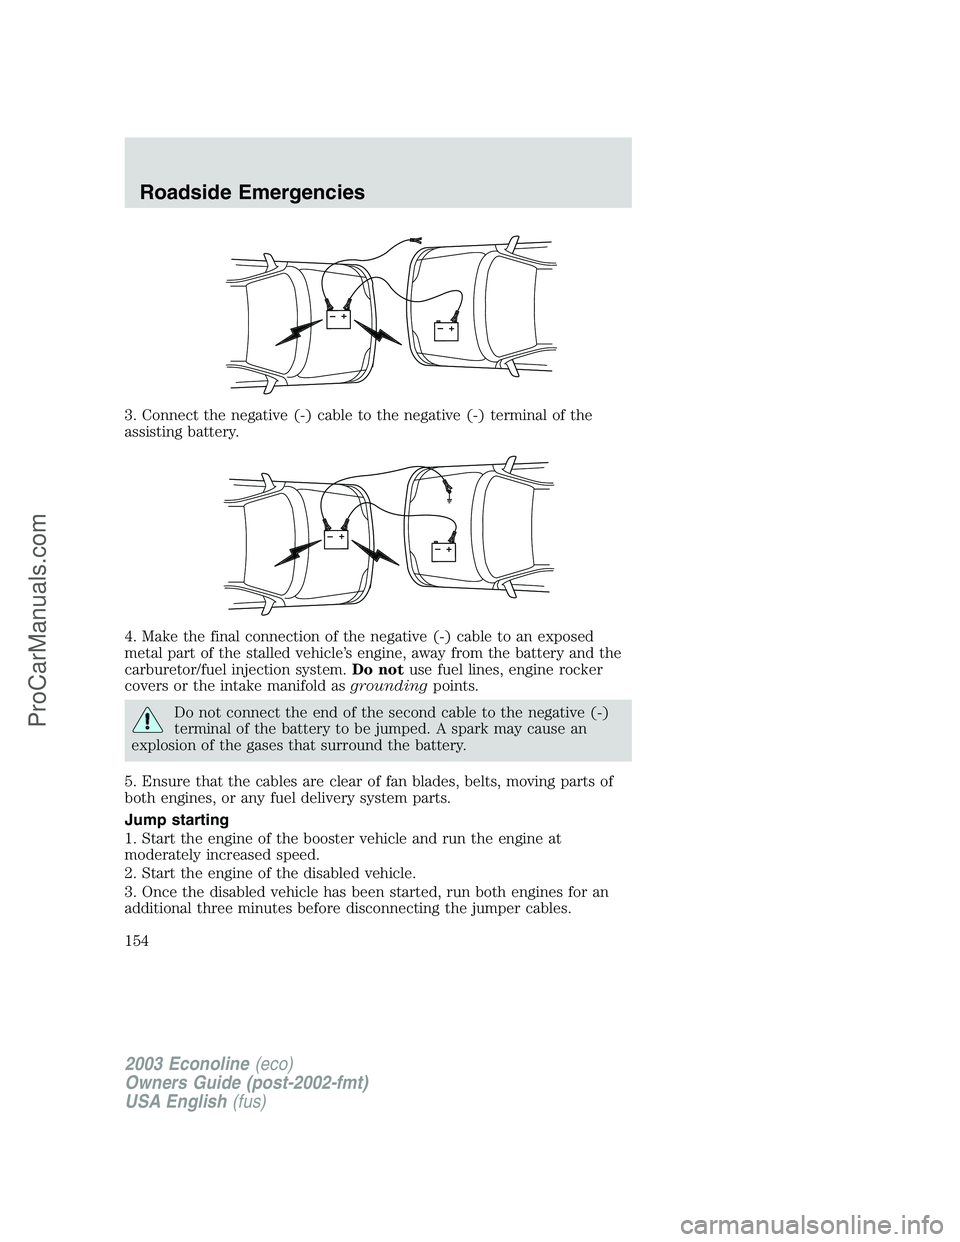
3. Connect the negative (-) cable to the negative (-) terminal of the
assisting battery.
4. Make the final connection of the negative (-) cable to an exposed
metal part of the stalled vehicle’s engine, away from the battery and the
carburetor/fuel injection system.Do notuse fuel lines, engine rocker
covers or the intake manifold asgroundingpoints.
Do not connect the end of the second cable to the negative (-)
terminal of the battery to be jumped. A spark may cause an
explosion of the gases that surround the battery.
5. Ensure that the cables are clear of fan blades, belts, moving parts of
both engines, or any fuel delivery system parts.
Jump starting
1. Start the engine of the booster vehicle and run the engine at
moderately increased speed.
2. Start the engine of the disabled vehicle.
3. Once the disabled vehicle has been started, run both engines for an
additional three minutes before disconnecting the jumper cables.
+–+–
+–+–
2003 Econoline(eco)
Owners Guide (post-2002-fmt)
USA English(fus)
Roadside Emergencies
154
ProCarManuals.com
Page 162 of 232
Board membership
The Board consists of:
•Three consumer representatives
•A Ford or Lincoln Mercury dealership representative
Consumer candidates for Board membership are recruited and trained by
an independent consulting firm. The dealership Board member is chosen
from Ford and Lincoln Mercury dealership management, recognized for
their business leadership qualities.
What the Board needs
To have your case reviewed you must complete the application in the
DSB brochure and mail it to the address provided on the application
form. Some states will require you to use certified mail, with return
receipt requested.
Your application is reviewed and, if it is determined to be eligible, you
will receive an acknowledgment indicating:
•The file number assigned to your application.
•The toll-free phone number of the DSB’s independent administrator.
Your dealership and a Ford Motor Company representative will then be
asked to submit statements.
To properly review your case, the Board needs the following information:
•Legible copies of all documents and maintenance or repair orders
relevant to the case.
•The year, make, model, and Vehicle Identification Number (VIN) listed
on your vehicle ownership license.
•The date of repair(s) and mileage at the time of occurrence(s).
•The current mileage.
•The name of the dealer(s) who sold or serviced the vehicle.
•A brief description of your unresolved concern.
•A brief summary of the action taken by the dealer(s) and Ford Motor
Company.
•The names (if known) of all the people you contacted at the
dealership(s).
•A description of the action you expect to resolve your concern.
You will receive a letter of explanation if your application does not
qualify for Board review.
2003 Econoline(eco)
Owners Guide (post-2002-fmt)
USA English(fus)
Customer Assistance
162
ProCarManuals.com
Page 190 of 232
When fail-safe mode is activated
You have limited engine power when in the fail-safe mode, so drive the
vehicle with caution. The vehicle will not be able to maintain high-speed
operation and the engine will run rough. Remember that the engine is
capable of completely shutting down automatically to prevent engine
damage, therefore:
1. Pull off the road as soon as safely possible and turn off the engine.
2. Arrange for the vehicle to be taken to a service facility.
3. If this is not possible, wait a short period for the engine to cool.
4. Check the coolant level and replenish if low.
Never remove the coolant reservoir cap while the engine is
running or hot.
5. Re-start the engine and take your vehicle to a service facility.
Driving the vehicle without repairing the engine problem
increases the chance of engine damage. Take your vehicle to a
service facility as soon as possible.
WHAT YOU SHOULD KNOW ABOUT AUTOMOTIVE FUELS
Important safety precautions
Do not overfill the fuel tank. The pressure in an overfilled tank
may cause leakage and lead to fuel spray and fire.
The fuel system may be under pressure. If the fuel filler cap is
venting vapor or if you hear a hissing sound, wait until it stops
before completely removing the fuel filler cap. Otherwise, fuel may
spray out and injure you or others.
If you do not use the proper fuel filler cap, excessive pressure or
vacuum in the fuel tank may damage the fuel system or cause
the fuel cap to disengage in a collision, which may result in possible
personal injury.
Automotive fuels can cause serious injury or death if misused or
mishandled.
2003 Econoline(eco)
Owners Guide (post-2002-fmt)
USA English(fus)
Maintenance and Specifications
190
ProCarManuals.com
Page 196 of 232
5. Follow one of the simple calculations in order to determine fuel
economy:
Calculation 1:Multiply liters used by 100, then divide by total
kilometers traveled.
Calculation 2:Divide total miles traveled by total gallons used.
Keep a record for at least one month and record the type of driving (city
or highway). This will provide an accurate estimate of the vehicle’s fuel
economy under current driving conditions. Additionally, keeping records
during summer and winter will show how temperature impacts fuel
economy. In general, lower temperatures give lower fuel economy.
Driving style—good driving and fuel economy habits
Give consideration to the lists that follow and you may be able to change
a number of variables and improve your fuel economy.
Habits
•Smooth, moderate operation can yield up to 10% savings in fuel.
•Steady speeds without stopping will usually give the best fuel
economy.
•Idling for long periods of time (greater than one minute) may waste
fuel.
•Anticipate stopping; slowing down may eliminate the need to stop.
•Sudden or hard accelerations may reduce fuel economy.
•Slow down gradually.
•Driving at reasonable speeds (traveling at 88 km/h [55 mph] uses 15%
less fuel than traveling at 105 km/h [65 mph]).
•Revving the engine before turning it off may reduce fuel economy.
•Using the air conditioner or defroster may reduce fuel economy.
•You may want to turn off the speed control in hilly terrain if
unnecessary shifting between third and fourth gear occurs.
Unnecessary shifting of this type could result in reduced fuel
economy.
•Warming up a vehicle on cold mornings is not required and may
reduce fuel economy.
•Resting your foot on the brake pedal while driving may reduce fuel
economy.
•Combine errands and minimize stop-and-go driving.
2003 Econoline(eco)
Owners Guide (post-2002-fmt)
USA English(fus)
Maintenance and Specifications
196
ProCarManuals.com
Page 218 of 232
3Add 237 ml (8 oz.) of Additive Friction Modifier C8AZ-19B546-A or
equivalent meeting Ford specification EST-M2C118-A for complete refill
of Dana Traction-Lok rear axles.
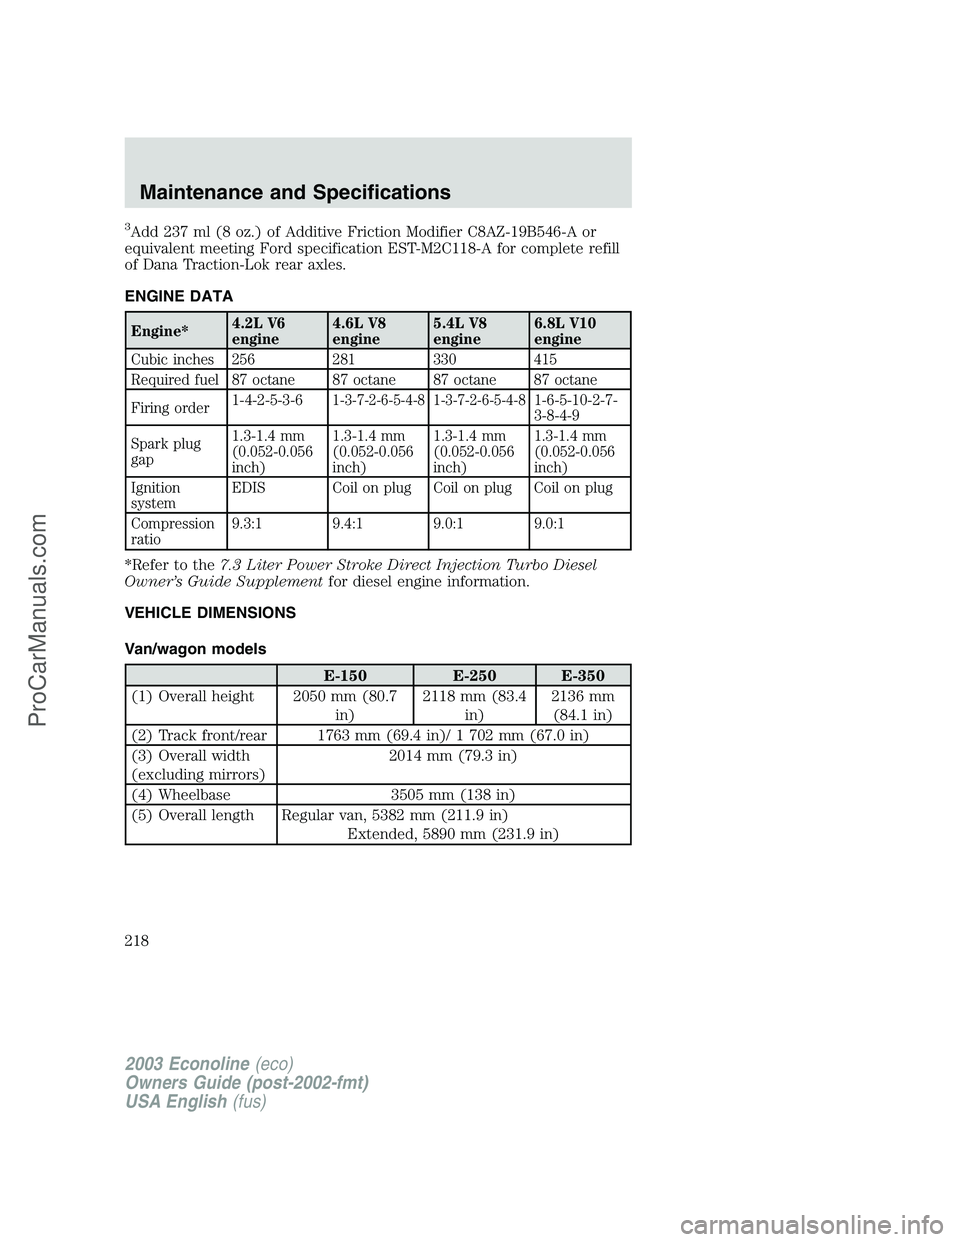
ENGINE DATA
Engine*4.2L V6
engine4.6L V8
engine5.4L V8
engine6.8L V10
engine
Cubic inches 256 281 330 415
Required fuel 87 octane 87 octane 87 octane 87 octane
Firing order1-4-2-5-3-6
1-3-7-2-6-5-4-8 1-3-7-2-6-5-4-81-6-5-10-2-7-
3-8-4-9
Spark plug
gap1.3-1.4 mm
(0.052-0.056
inch)1.3-1.4 mm
(0.052-0.056
inch)1.3-1.4 mm
(0.052-0.056
inch)1.3-1.4 mm
(0.052-0.056
inch)
Ignition
systemEDIS Coil on plug Coil on plug Coil on plug
Compression
ratio9.3:1 9.4:1 9.0:1 9.0:1
*Refer to the7.3 Liter Power Stroke Direct Injection Turbo Diesel
Owner’s Guide Supplementfor diesel engine information.
VEHICLE DIMENSIONS
Van/wagon models
E-150 E-250 E-350
(1) Overall height 2050 mm (80.7
in)2118 mm (83.4
in)2136 mm
(84.1 in)
(2) Track front/rear 1763 mm (69.4 in)/ 1 702 mm (67.0 in)
(3) Overall width
(excluding mirrors)2014 mm (79.3 in)
(4) Wheelbase 3505 mm (138 in)
(5) Overall length Regular van, 5382 mm (211.9 in)
Extended, 5890 mm (231.9 in)
2003 Econoline(eco)
Owners Guide (post-2002-fmt)
USA English(fus)
Maintenance and Specifications
218
ProCarManuals.com
Page 220 of 232
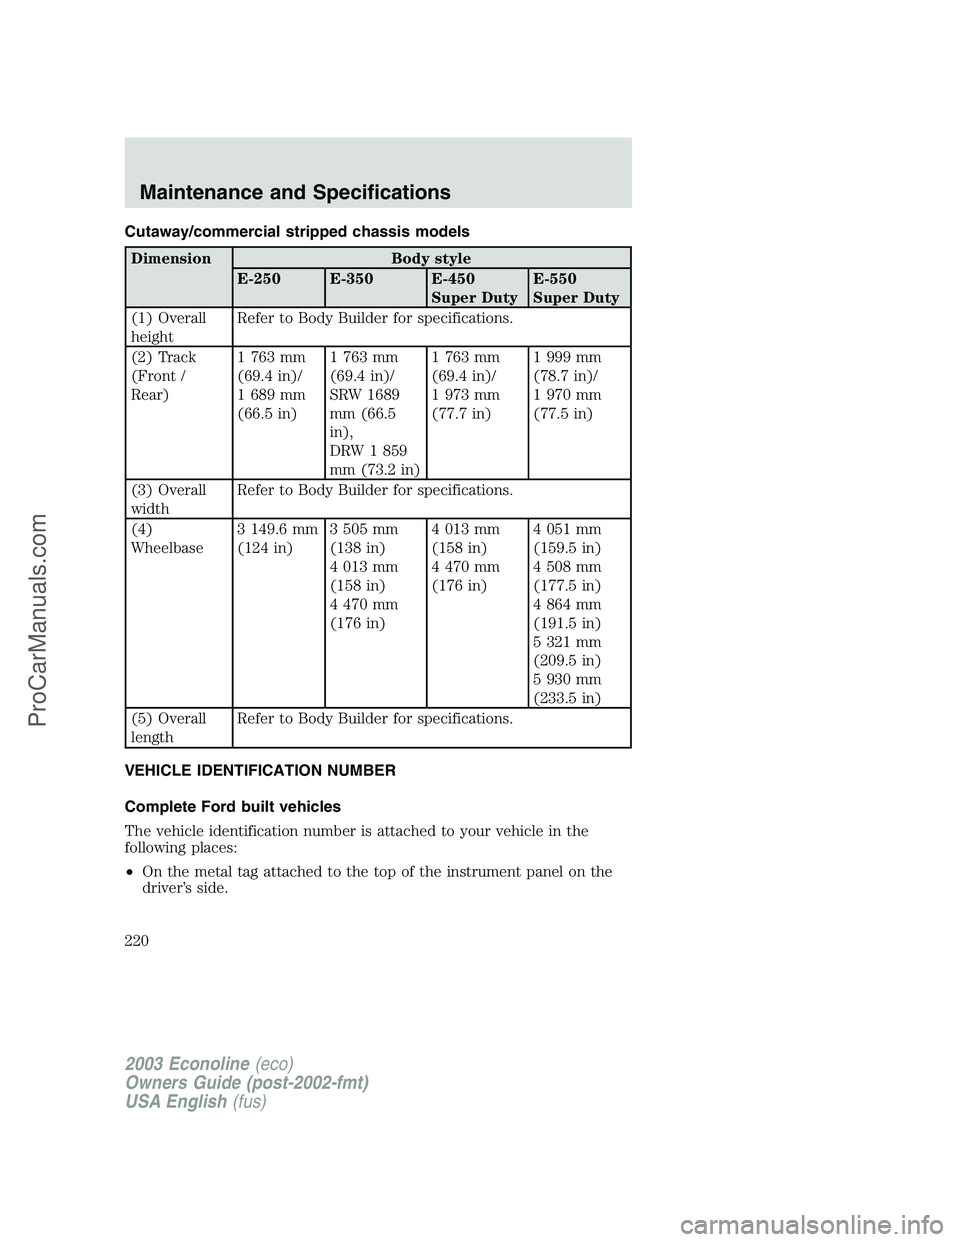
Cutaway/commercial stripped chassis models
Dimension Body style
E-250 E-350 E-450
Super DutyE-550
Super Duty
(1) Overall
heightRefer to Body Builder for specifications.
(2) Track
(Front /
Rear)1 763 mm
(69.4 in)/
1 689 mm
(66.5 in)1 763 mm
(69.4 in)/
SRW 1689
mm (66.5
in),
DRW 1 859
mm (73.2 in)1 763 mm
(69.4 in)/
1 973 mm
(77.7 in)1 999 mm
(78.7 in)/
1 970 mm
(77.5 in)
(3) Overall
widthRefer to Body Builder for specifications.
(4)
Wheelbase3 149.6 mm
(124 in)3 505 mm
(138 in)
4 013 mm
(158 in)
4 470 mm
(176 in)4 013 mm
(158 in)
4 470 mm
(176 in)4 051 mm
(159.5 in)
4 508 mm
(177.5 in)
4 864 mm
(191.5 in)
5 321 mm
(209.5 in)
5 930 mm
(233.5 in)
(5) Overall
lengthRefer to Body Builder for specifications.
VEHICLE IDENTIFICATION NUMBER
Complete Ford built vehicles
The vehicle identification number is attached to your vehicle in the
following places:
•On the metal tag attached to the top of the instrument panel on the
driver’s side.
2003 Econoline(eco)
Owners Guide (post-2002-fmt)
USA English(fus)
Maintenance and Specifications
220
ProCarManuals.com