automatic transmission FORD E-450 2019 Owners Manual
[x] Cancel search | Manufacturer: FORD, Model Year: 2019, Model line: E-450, Model: FORD E-450 2019Pages: 329, PDF Size: 6.24 MB
Page 5 of 329
Information Displays
General Information
.....................................58
Information Messages ................................
63
Climate Control
Manual Climate Control .............................
66
Hints on Controlling the Interior Climate ........................................................................\
...
67
Rear Passenger Climate Controls ...........
68
Seats
Sitting in the Correct Position ..................
69
Head Restraints .............................................
69
Manual Seats ..................................................
70
Power Seats ......................................................
71
Auxiliary Power Points
Auxiliary Power Points .................................
72
Starting and Stopping the Engine
General Information .....................................
74
Ignition Switch ................................................
74
Starting a Gasoline Engine ........................
74
Engine Block Heater .....................................
76
Fuel and Refueling
Safety Precautions ........................................
77
Fuel Quality - E85 ..........................................
77
Fuel Quality - Gasoline ................................
79
Running Out of Fuel .....................................
79
Refueling ..........................................................
80
Fuel Consumption .........................................
81
Engine Emission Control
Emission Law ..................................................
83
Catalytic Converter ......................................
84Transmission
Automatic Transmission
............................
87
Rear Axle
Limited Slip Differential .............................
90
Brakes
General Information ......................................
91
Hints on Driving With Anti-Lock Brakes ........................................................................\
...
91
Parking Brake ..................................................
92
Traction Control
Principle of Operation .................................
93
Using Traction Control ................................
93
Parking Aids
Rear View Camera ........................................
94
Cruise Control
Principle of Operation .................................
96
Using Cruise Control ....................................
96
Driving Aids
Steering ............................................................
98
Load Carrying
Load Limit ........................................................
99
Towing
Towing a Trailer ............................................
104
Recommended Towing Weights ...........
105
Essential Towing Checks .........................
108
Towing the Vehicle on Four Wheels ......
115
Driving Hints
Breaking-In ......................................................
116
Reduced Engine Performance .................
116
Economical Driving ......................................
116
2
E-Series (TE4) Canada/United States of America, enUSA, Edition date: 201804, Second-Printing Table of Contents
Page 6 of 329
Driving Through Water
................................117
Floor Mats ........................................................
117
Roadside Emergencies
Roadside Assistance ...................................
119
Hazard Flashers ...........................................
120
Fuel Shutoff ...................................................
120
Jump Starting the Vehicle .........................
121
Transporting the Vehicle ...........................
123
Customer Assistance
Getting the Services You Need ...............
124
In California (U.S. Only) .............................
125
The Better Business Bureau (BBB) Auto Line Program (U.S. Only) .....................
126
Utilizing the Mediation/Arbitration Program (Canada Only) ........................
127
Getting Assistance Outside the U.S. and Canada .........................................................
127
Ordering Additional Owner's Literature ........................................................................\
.
129
Reporting Safety Defects (U.S. Only) ........................................................................\
.
129
Reporting Safety Defects (Canada Only) ........................................................................\
.
129
Fuses
Fuse Specification Chart ............................
131
Changing a Fuse ..........................................
139
Maintenance
General Information ....................................
141
Opening and Closing the Hood ...............
141
Under Hood Overview ...............................
142
Engine Oil Dipstick ......................................
143
Engine Oil Check ..........................................
143
Oil Change Indicator Reset ......................
144
Engine Coolant Check ...............................
144
Automatic Transmission Fluid Check ........................................................................\
.
149
Brake Fluid Check ........................................
152Power Steering Fluid Check
.....................
152
Washer Fluid Check ....................................
153
Changing the 12V Battery .........................
153
Checking the Wiper Blades ......................
155
Changing the Wiper Blades .....................
155
Adjusting the Headlamps ........................
156
Removing a Headlamp ..............................
157
Changing a Bulb ...........................................
157
Changing the Engine Air Filter ................
159
Vehicle Care
General Information ...................................
160
Cleaning Products ......................................
160
Cleaning the Exterior .................................
160
Waxing .............................................................
162
Cleaning the Engine ....................................
162
Cleaning the Windows and Wiper Blades ........................................................................\
.
162
Cleaning the Interior ...................................
163
Cleaning the Instrument Panel and Instrument Cluster Lens .......................
163
Cleaning Leather Seats .............................
164
Repairing Minor Paint Damage ..............
165
Cleaning the Wheels ..................................
165
Vehicle Storage ............................................
165
Wheels and Tires
General Information ...................................
168
Tire Care ..........................................................
169
Using Snow Chains .....................................
187
Tire Pressure Monitoring System ..........
188
Changing a Road Wheel ...........................
192
Technical Specifications ..........................
196
Capacities and Specifications
Engine Specifications - 6.2L ...................
198
Engine Specifications - 6.8L ...................
198
Motorcraft Parts - 6.2L ..............................
199
Motorcraft Parts - 6.8L ............................
200
3
E-Series (TE4) Canada/United States of America, enUSA, Edition date: 201804, Second-Printing Table of Contents
Page 19 of 329
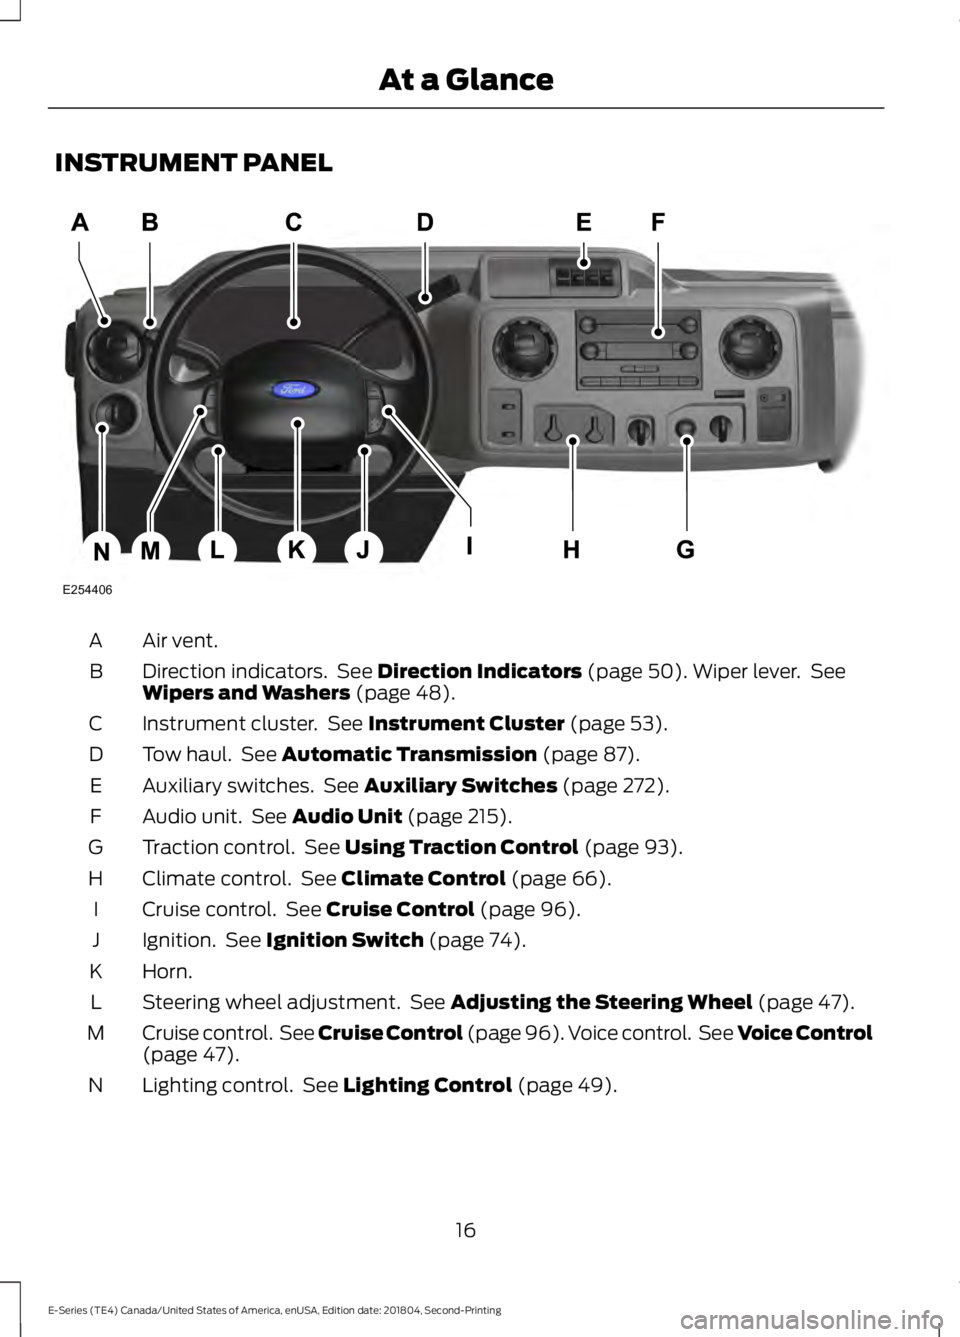
INSTRUMENT PANEL
Air vent.
A
Direction indicators. See Direction Indicators (page 50). Wiper lever. See
Wipers and Washers (page 48).
B
Instrument cluster. See
Instrument Cluster (page 53).
C
Tow haul. See
Automatic Transmission (page 87).
D
Auxiliary switches. See
Auxiliary Switches (page 272).
E
Audio unit. See
Audio Unit (page 215).
F
Traction control. See
Using Traction Control (page 93).
G
Climate control. See
Climate Control (page 66).
H
Cruise control. See
Cruise Control (page 96).
I
Ignition. See
Ignition Switch (page 74).
J
Horn.
K
Steering wheel adjustment. See
Adjusting the Steering Wheel (page 47).
L
Cruise control. See Cruise Control (page 96). Voice control. See Voice Control
(page
47).
M
Lighting control. See
Lighting Control (page 49).
N
16
E-Series (TE4) Canada/United States of America, enUSA, Edition date: 201804, Second-Printing At a GlanceE254406
Page 90 of 329
AUTOMATIC TRANSMISSION
WARNING: Always fully apply the
parking brake. Make sure you shift into
park (P) for vehicles with an automatic
transmission. Switch the ignition off and
remove the key whenever you leave your
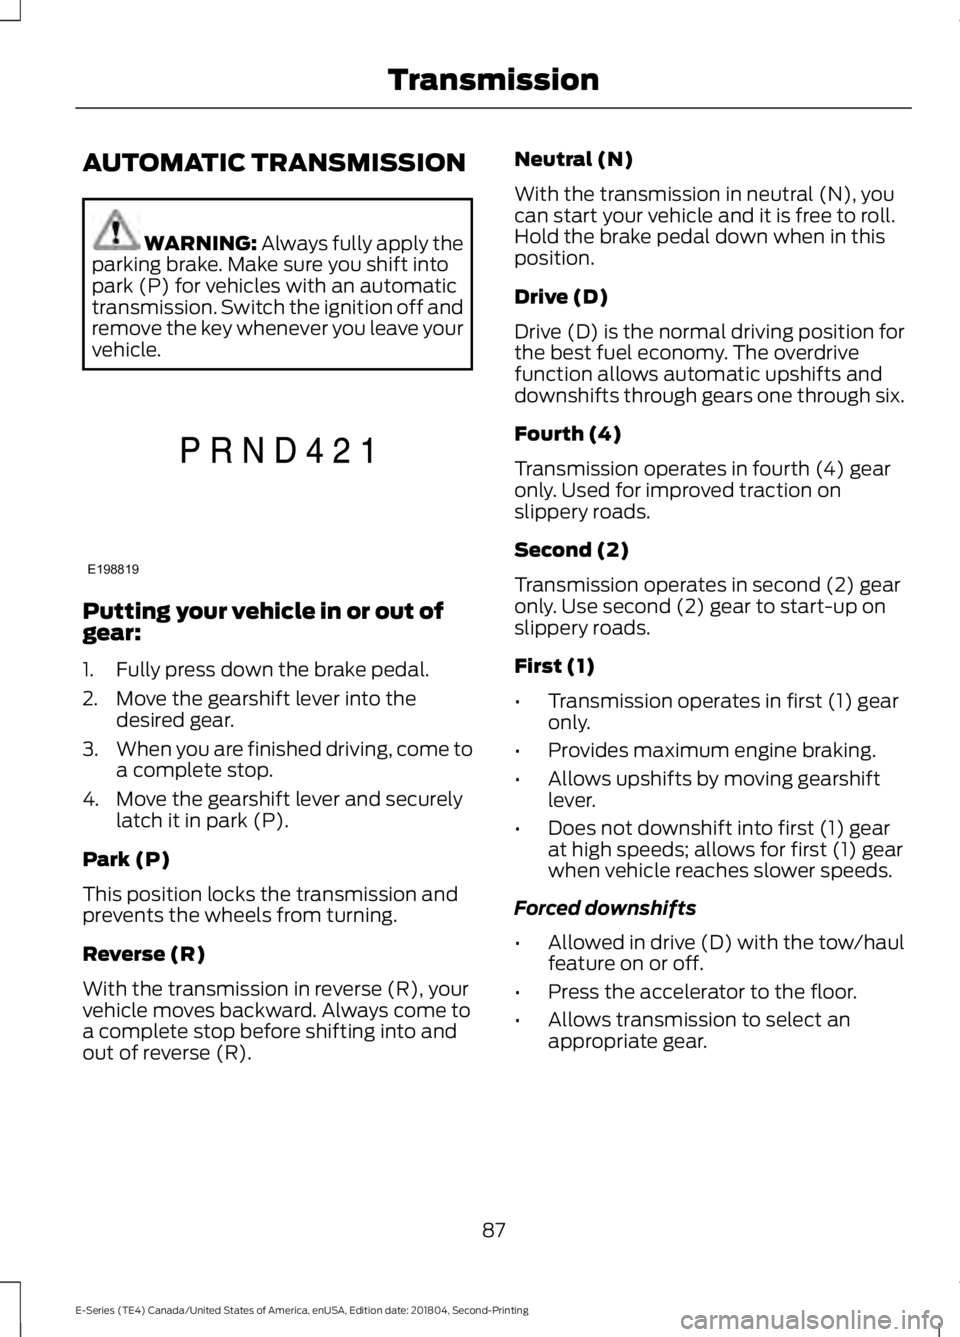
vehicle. Putting your vehicle in or out of
gear:
1. Fully press down the brake pedal.
2. Move the gearshift lever into the
desired gear.
3. When you are finished driving, come to
a complete stop.
4. Move the gearshift lever and securely latch it in park (P).
Park (P)
This position locks the transmission and
prevents the wheels from turning.
Reverse (R)
With the transmission in reverse (R), your
vehicle moves backward. Always come to
a complete stop before shifting into and
out of reverse (R). Neutral (N)
With the transmission in neutral (N), you
can start your vehicle and it is free to roll.
Hold the brake pedal down when in this
position.
Drive (D)
Drive (D) is the normal driving position for
the best fuel economy. The overdrive
function allows automatic upshifts and
downshifts through gears one through six.
Fourth (4)
Transmission operates in fourth (4) gear
only. Used for improved traction on
slippery roads.
Second (2)
Transmission operates in second (2) gear
only. Use second (2) gear to start-up on
slippery roads.
First (1)
•
Transmission operates in first (1) gear
only.
• Provides maximum engine braking.
• Allows upshifts by moving gearshift
lever.
• Does not downshift into first (1) gear
at high speeds; allows for first (1) gear
when vehicle reaches slower speeds.
Forced downshifts
• Allowed in drive (D) with the tow/haul
feature on or off.
• Press the accelerator to the floor.
• Allows transmission to select an
appropriate gear.
87
E-Series (TE4) Canada/United States of America, enUSA, Edition date: 201804, Second-Printing TransmissionE198819
Page 95 of 329
•
You take corners too fast.
• The road surface is poor.
Note: If the system activates, the brake
pedal may pulse and may travel further.
Maintain pressure on the brake pedal. You
may also hear a noise from the system. This
is normal.
PARKING BRAKE WARNING: Always fully apply the
parking brake. Make sure you shift into
park (P) for vehicles with an automatic
transmission. Switch the ignition off and
remove the key whenever you leave your
vehicle.
Apply the parking brake whenever you park
your vehicle.
• For vehicles with a foot operated
parking brake, press the pedal down.
• For vehicles with a hand operated
parking brake, pull the parking brake
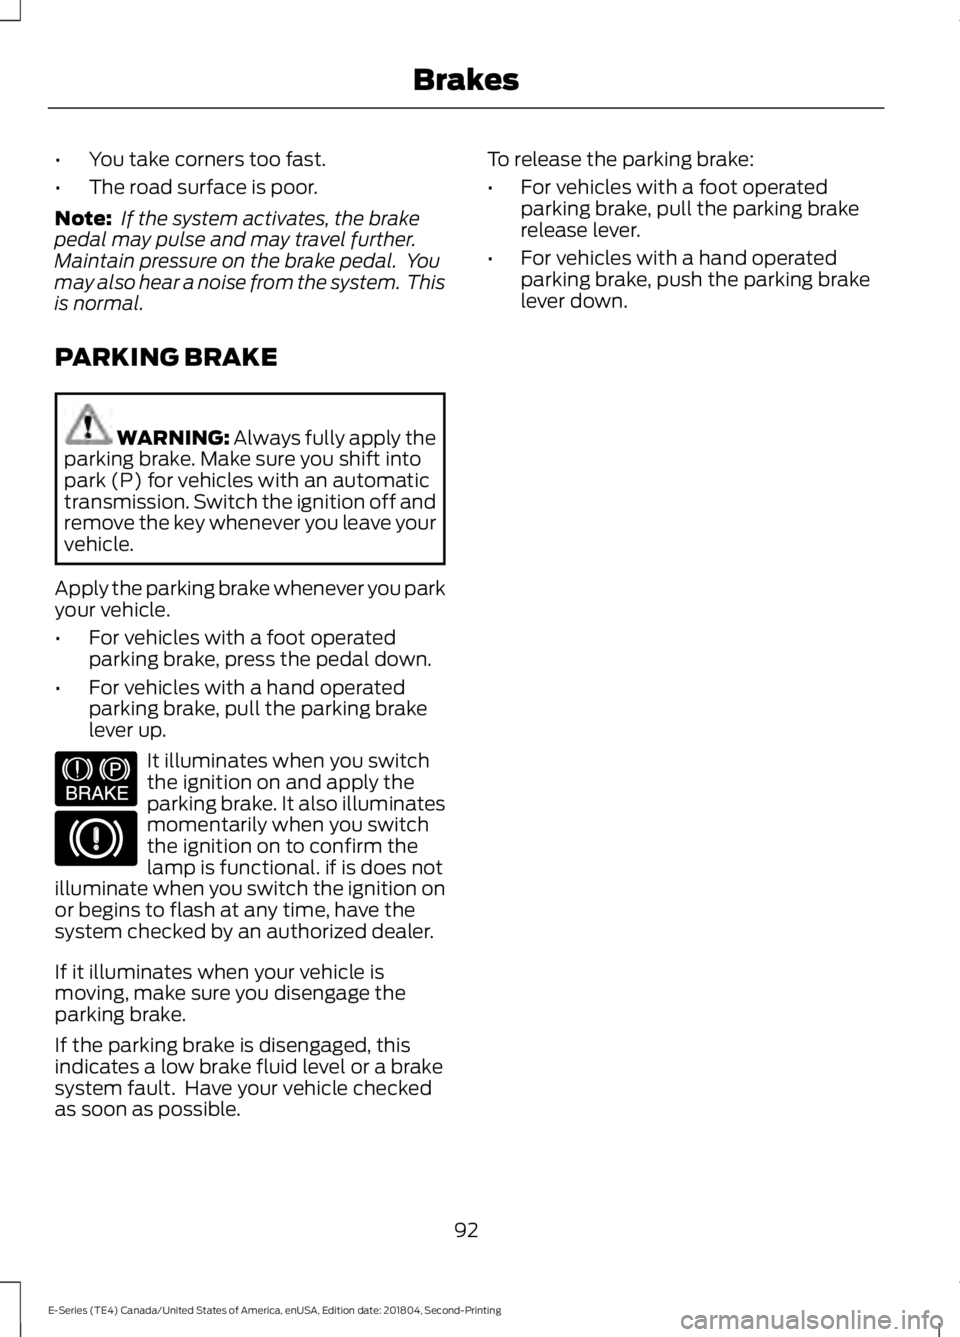
lever up. It illuminates when you switch
the ignition on and apply the
parking brake. It also illuminates
momentarily when you switch
the ignition on to confirm the
lamp is functional. if is does not
illuminate when you switch the ignition on
or begins to flash at any time, have the
system checked by an authorized dealer.
If it illuminates when your vehicle is
moving, make sure you disengage the
parking brake.
If the parking brake is disengaged, this
indicates a low brake fluid level or a brake
system fault. Have your vehicle checked
as soon as possible. To release the parking brake:
•
For vehicles with a foot operated
parking brake, pull the parking brake
release lever.
• For vehicles with a hand operated
parking brake, push the parking brake
lever down.
92
E-Series (TE4) Canada/United States of America, enUSA, Edition date: 201804, Second-Printing BrakesE144522
Page 117 of 329
•
When stopped in congested or heavy
traffic during hot weather, place the
gearshift in position P to aid engine and
transmission cooling and to help A/C
performance.
• Switch off the speed control with
heavy loads or in hilly terrain. The
speed control may turn off
automatically when you are towing on
long, steep grades.
• Shift to a lower gear when driving down
a long or steep hill. Do not apply the
brakes continuously, as they may
overheat and become less effective.
• If your transmission is equipped with a
Grade Assist or Tow/Haul feature, use
this feature when towing. This provides
engine braking and helps eliminate
excessive transmission shifting for
optimum fuel economy and
transmission cooling.
• If your vehicle is equipped with
AdvanceTrac with RSC, this system
may turn on during typical cornering
maneuvers with a heavily loaded trailer.
This is normal. Turning the corner at a
slower speed while towing may reduce
this tendency.
• If you are towing a trailer frequently in
hot weather, hilly conditions, at the
gross combined weight rating (or any
combination of these factors), consider
refilling your rear axle with synthetic
gear lubricant. See Capacities and
Specifications (page 198).
• Allow more distance for stopping with
a trailer attached. Anticipate stops and
brake gradually.
• Avoid parking on a grade. However, if
you must park on a grade:
1. Turn the steering wheel to point your vehicle tires away from traffic flow.
2. Set your vehicle parking brake.
3. Place the automatic transmission in position
P. 4. Place wheel chocks in front and back
of the trailer wheels. (Chocks not
included with vehicle.)
Your vehicle may be equipped with a
temporary or conventional spare tire. A
"temporary" spare tire is different in size
(diameter or width), tread-type
(All-Season or All Terrain) or is from a
different manufacturer than the road tires
on your vehicle. Consult information on the
tire label or Safety Compliance label for
limitations when using.
Launching or Retrieving a Boat or
Personal Watercraft (PWC)
Note: Disconnect the wiring to the trailer
before
backing the trailer into the water.
Note: Reconnect the wiring to the trailer
after
removing the trailer from the water.
When backing down a ramp during boat
launching or retrieval:
• Do not allow the static water level to
rise above the bottom edge of the rear
bumper.
• Do not allow waves to break higher
than
6 in (15 cm) above the bottom
edge of the rear bumper.
Exceeding these limits may allow water to
enter vehicle components:
• Causing internal damage to the
components.
• Affecting driveability, emissions and
reliability.
Replace the rear axle lubricant anytime
the rear axle has been submerged in water.
Water may have contaminated the rear
axle lubricant, which is not normally
checked or changed unless a leak is
suspected or other axle repair is required.
114
E-Series (TE4) Canada/United States of America, enUSA, Edition date: 201804, Second-Printing Towing
Page 124 of 329
JUMP STARTING THE VEHICLE
WARNING: Batteries normally
produce explosive gases which can
cause personal injury. Therefore, do not
allow flames, sparks or lighted
substances to come near the battery.
When working near the battery, always
shield your face and protect your eyes.
Always provide correct ventilation. WARNING:
Keep batteries out of
reach of children. Batteries contain
sulfuric acid. Avoid contact with skin,
eyes or clothing. Shield your eyes when
working near the battery to protect
against possible splashing of acid
solution. In case of acid contact with skin
or eyes, flush immediately with water for
a minimum of 15 minutes and get prompt
medical attention. If acid is swallowed,
call a physician immediately. WARNING:
Use only adequately
sized cables with insulated clamps.
Preparing Your Vehicle
Do not attempt to push-start your
automatic transmission vehicle.
Note: Attempting to push-start a vehicle
with an automatic transmission may cause
transmission damage.
Note: Use only a 12-volt supply to start your
vehicle.
Note: Do not disconnect the battery of the
disabled vehicle as this could damage the
vehicle electrical system.
Park the booster vehicle close to the hood
of the disabled vehicle, making sure the
two vehicles do not touch. Connecting the Jumper Cables WARNING:
Do not attach the
cables to fuel lines, engine rocker covers,
the intake manifold or electrical
components as grounding points. Stay
clear of moving parts. To avoid reverse
polarity connections, make sure that you
correctly identify the positive (+) and
negative (-) terminals on both the
disabled and booster vehicles before
connecting the cables. WARNING:
Do not attach the end
of the positive cable to the studs or
L-shaped eyelet located above the
positive (+) terminal of your vehicle ’s
battery. High current may flow through
and cause damage to the fuses. WARNING:
Do not connect the
end of the second cable to the negative
(-) terminal of the battery to be jumped.
A spark may cause an explosion of the
gases that surround the battery.
Note: In the illustration, the bottom vehicle
represents the booster vehicle.
121
E-Series (TE4) Canada/United States of America, enUSA, Edition date: 201804, Second-Printing Roadside Emergencies
Page 145 of 329
UNDER HOOD OVERVIEW
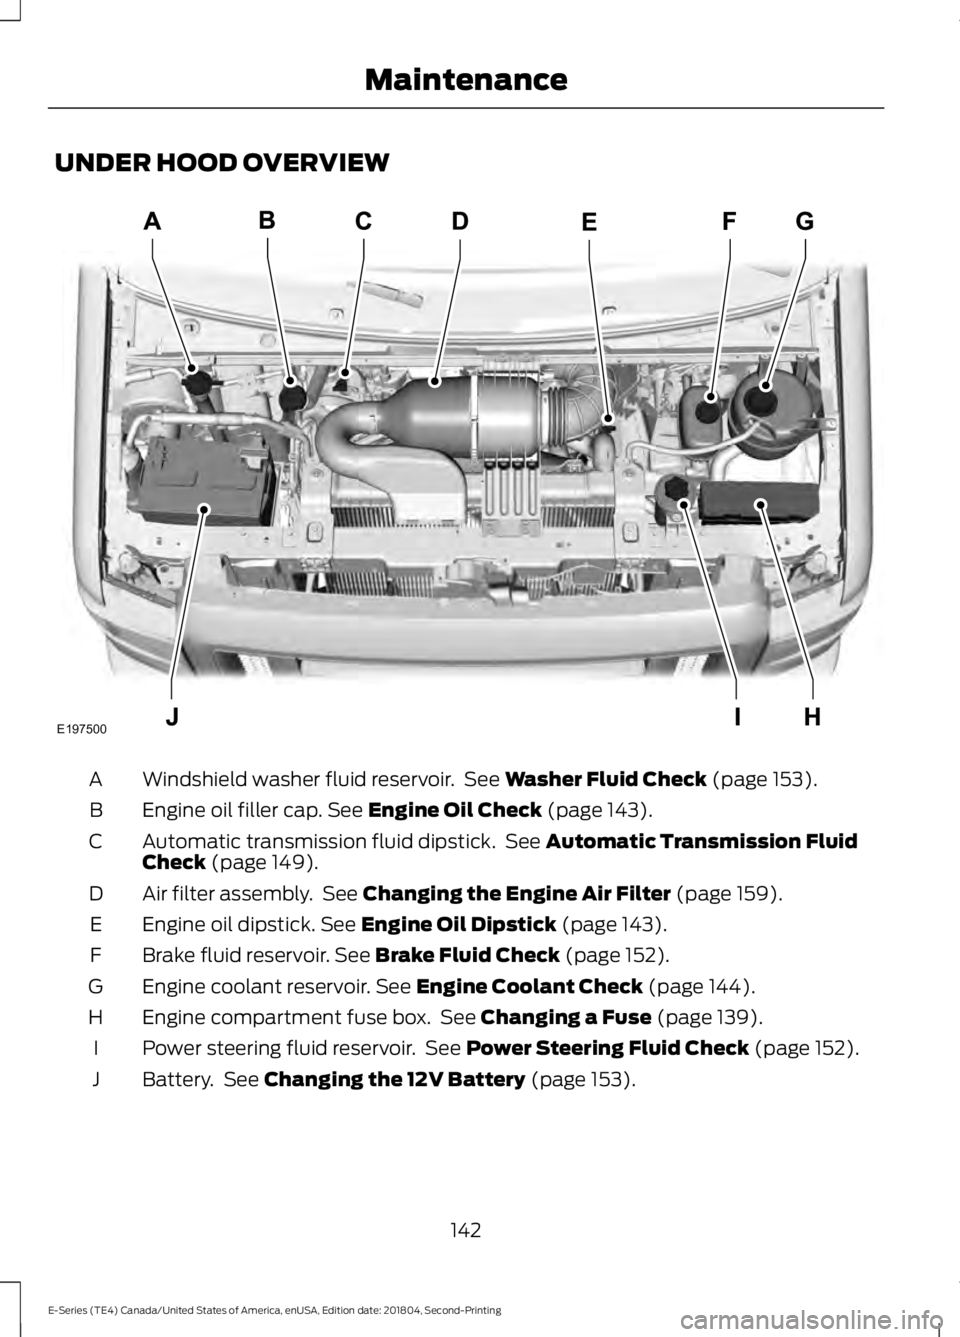
Windshield washer fluid reservoir. See Washer Fluid Check (page 153).
A
Engine oil filler cap.
See Engine Oil Check (page 143).
B
Automatic transmission fluid dipstick. See
Automatic Transmission Fluid
Check (page 149).
C
Air filter assembly. See
Changing the Engine Air Filter (page 159).
D
Engine oil dipstick.
See Engine Oil Dipstick (page 143).
E
Brake fluid reservoir.
See Brake Fluid Check (page 152).
F
Engine coolant reservoir.
See Engine Coolant Check (page 144).
G
Engine compartment fuse box. See
Changing a Fuse (page 139).
H
Power steering fluid reservoir. See
Power Steering Fluid Check (page 152).
I
Battery. See
Changing the 12V Battery (page 153).
J
142
E-Series (TE4) Canada/United States of America, enUSA, Edition date: 201804, Second-Printing MaintenanceE197500
Page 152 of 329
1. Pull off the road as soon as safely
possible and shift the transmission into
park (P).
2. Leave the engine running until the coolant temperature gauge needle
returns to the normal position. If the
temperature does not drop after
several minutes, follow the remaining
steps.
3. Switch the engine off and wait for it to
cool. Check the coolant level.
4. If the coolant level is at or below the minimum mark, immediately add
prediluted coolant.
5. If the coolant level is normal, restart the engine and continue driving.
AUTOMATIC TRANSMISSION
FLUID CHECK
Have an authorized dealer check and
change the transmission fluid and filter at
the correct service interval. See
Scheduled Maintenance (page 276).
Do not use supplemental transmission
fluid additives, treatments or cleaning
agents. The use of these materials may
affect transmission operation and result
in damage to internal transmission
components.
Checking Automatic Transmission
Fluid
For scheduled intervals of the fluid checks
and changes, See
Scheduled
Maintenance (page 276). Your
transmission does not consume fluid.
However, the fluid level should be checked
if the transmission is not working properly,
i.e., if the transmission slips or shifts slowly
or if you notice some sign of fluid leakage. Automatic transmission fluid expands
when warmed. To obtain an accurate fluid
check, drive the vehicle until it is at normal
operating temperature (approximately
19 mi (30 km)
). Verify that the
transmission fluid temperature gauge,
located on the instrument cluster, is within
normal range.
1. Drive the vehicle
19 mi (30 km) until it
reaches normal operating temperature.
2. Park the vehicle on a level surface and
engage the parking brake.
3. With the engine running, parking brake
engaged and your foot on the brake
pedal, move the gearshift lever through
all of the gear ranges. Allow sufficient
time for each gear to engage.
4. Put the transmission in park (P) and leave the engine running.
5. Remove the dipstick, wiping it clean with a clean, dry lint free rag. If
necessary, refer to the Under Hood
Overview in this chapter for the
location of the dipstick.
6. Install the dipstick making sure it is fully
seated in the filler tube.
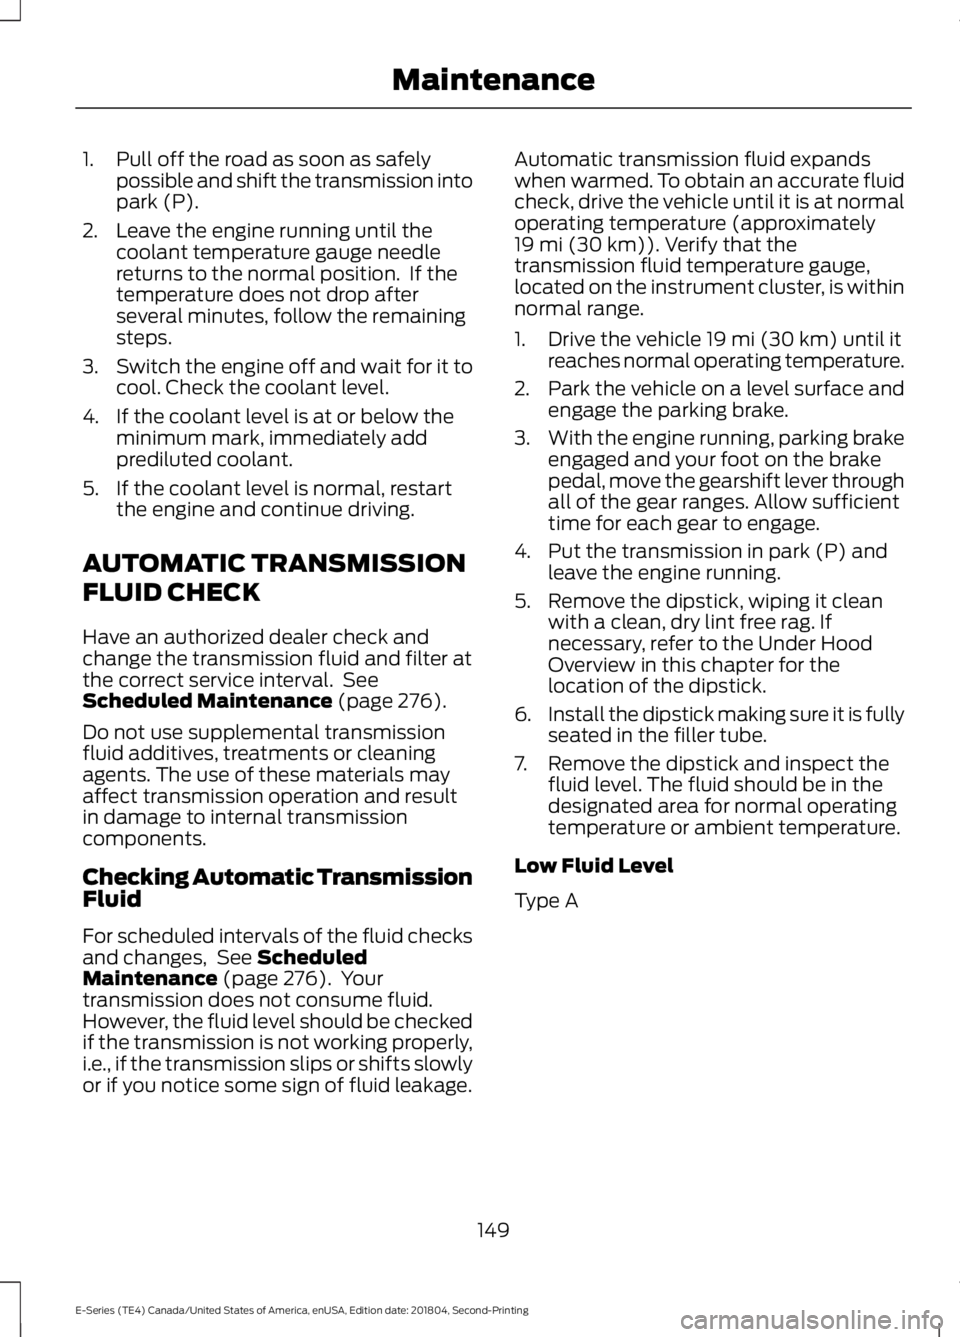
7. Remove the dipstick and inspect the fluid level. The fluid should be in the
designated area for normal operating
temperature or ambient temperature.
Low Fluid Level
Type A
149
E-Series (TE4) Canada/United States of America, enUSA, Edition date: 201804, Second-Printing Maintenance
Page 154 of 329
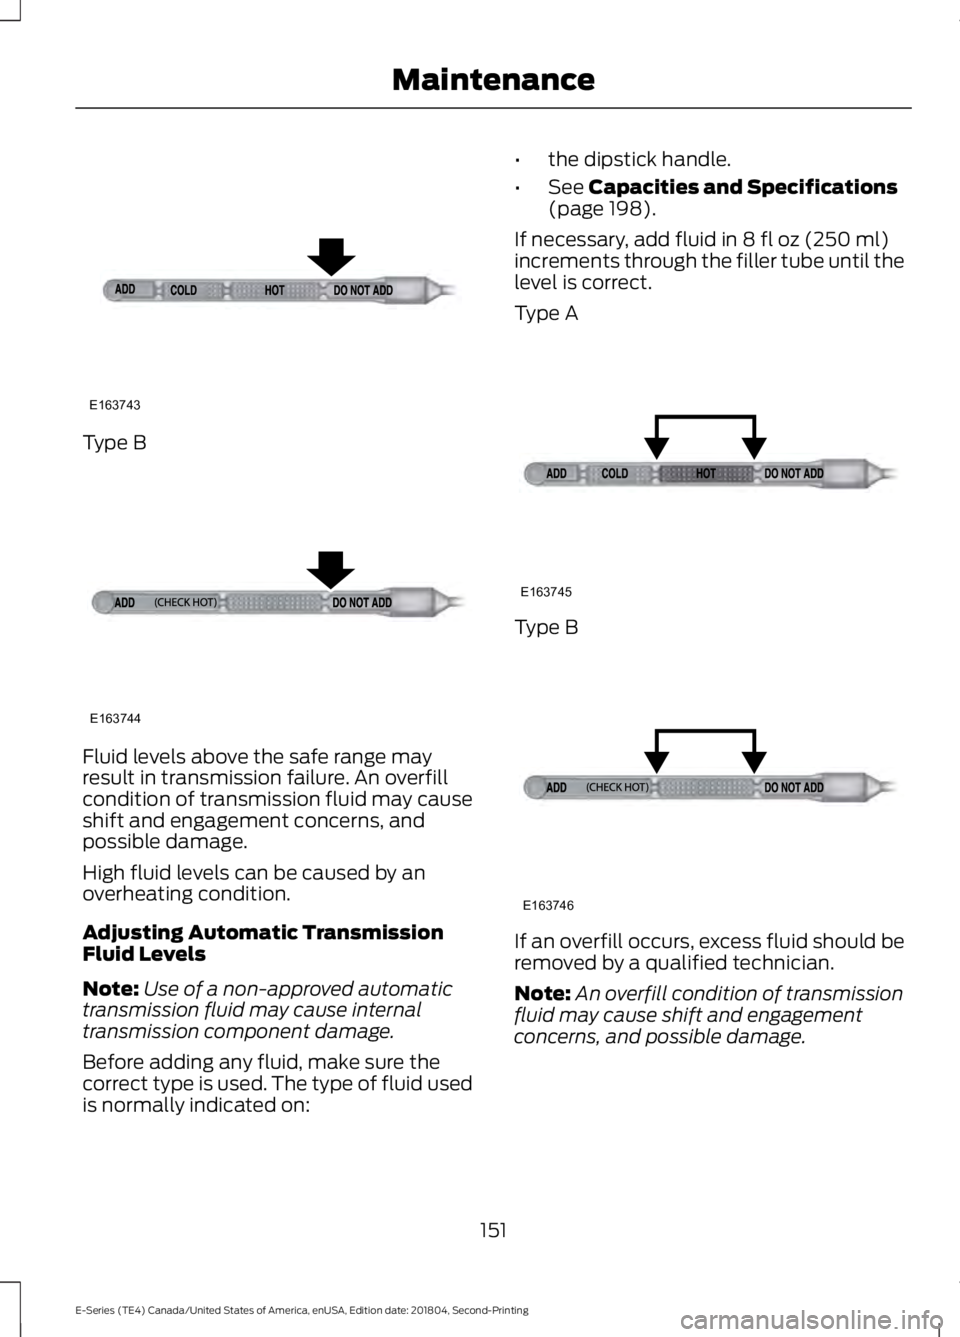
Type B
Fluid levels above the safe range may
result in transmission failure. An overfill
condition of transmission fluid may cause
shift and engagement concerns, and
possible damage.
High fluid levels can be caused by an
overheating condition.
Adjusting Automatic Transmission
Fluid Levels
Note:
Use of a non-approved automatic
transmission fluid may cause internal
transmission component damage.
Before adding any fluid, make sure the
correct type is used. The type of fluid used
is normally indicated on: •
the dipstick handle.
• See Capacities and Specifications
(page 198).
If necessary, add fluid in
8 fl oz (250 ml)
increments through the filler tube until the
level is correct.
Type A Type B
If an overfill occurs, excess fluid should be
removed by a qualified technician.
Note:
An overfill condition of transmission
fluid may cause shift and engagement
concerns, and possible damage.
151
E-Series (TE4) Canada/United States of America, enUSA, Edition date: 201804, Second-Printing MaintenanceE163743 E163744 E163745 E163746