tire FORD E-450 2022 Owners Manual
[x] Cancel search | Manufacturer: FORD, Model Year: 2022, Model line: E-450, Model: FORD E-450 2022Pages: 296, PDF Size: 3.91 MB
Page 7 of 296
Vehicle Care
General Information
...................................184
Cleaning Products .......................................
184
Cleaning the Exterior ..................................
185
Waxing .............................................................
186
Cleaning the Engine ...................................
186
Cleaning the Windows and Wiper Blades ........................................................................\
.
187
Cleaning the Interior ...................................
187
Cleaning the Instrument Panel and Instrument Cluster Lens .......................
188
Cleaning Leather Seats .............................
188
Repairing Minor Paint Damage ..............
189
Cleaning the Wheels ..................................
189
Vehicle Storage ............................................
189
Wheels and Tires
General Information ...................................
192
Tire Care ..........................................................
193
Using Snow Chains ......................................
211
Tire Pressure Monitoring System ...........
212
Changing a Road Wheel ............................
217
Technical Specifications ...........................
221
Capacities and Specifications
Engine Specifications ................................
223
Motorcraft Parts ..........................................
223
Bulb Specification Chart ..........................
225
Engine Oil Capacity and Specification ........................................................................\
226
Cooling System Capacity and Specification .............................................
227
Fuel Tank Capacity .....................................
228
Air Conditioning System Capacity and Specification ............................................
229
Washer Fluid Specification .....................
229
Automatic Transmission Fluid Capacity and Specification ...................................
230
Brake Fluid Specification ..........................
231Rear Axle Fluid Capacity and
Specification ..............................................
231
Hydraulic Power Steering Fluid Capacity and Specification ....................................
233
Vehicle Identification
Vehicle Identification Number ...............
234
Connected Vehicle
Connected Vehicle Requirements ........
235
Connected Vehicle Limitations .............
235
Connecting the Vehicle to a Mobile Network ......................................................
235
Connected Vehicle – Troubleshooting ........................................................................\
235
Audio System
General Information ..................................
236
Audio Unit ......................................................
236
Digital Radio .................................................
239
Connecting a Bluetooth® Device ..........
241
Satellite Radio .............................................
242
Streaming Bluetooth Audio ....................
244
Playing Media From a USB Device .......
244
USB Port ........................................................
245
Using Voice Recognition ..........................
245
Accessories
Accessories ...................................................
246
Auxiliary Switches .......................................
247
Ford Protect
Ford Protect ..................................................
249
Scheduled Maintenance
General Maintenance Information ........
251
Normal Scheduled Maintenance .........
254
Special Operating Conditions Scheduled Maintenance ............................................
256
4
E-Series (TE4) Canada/United States of America, enUSA, Edition date: 202010, Second-Printing Table of Contents
Page 11 of 296
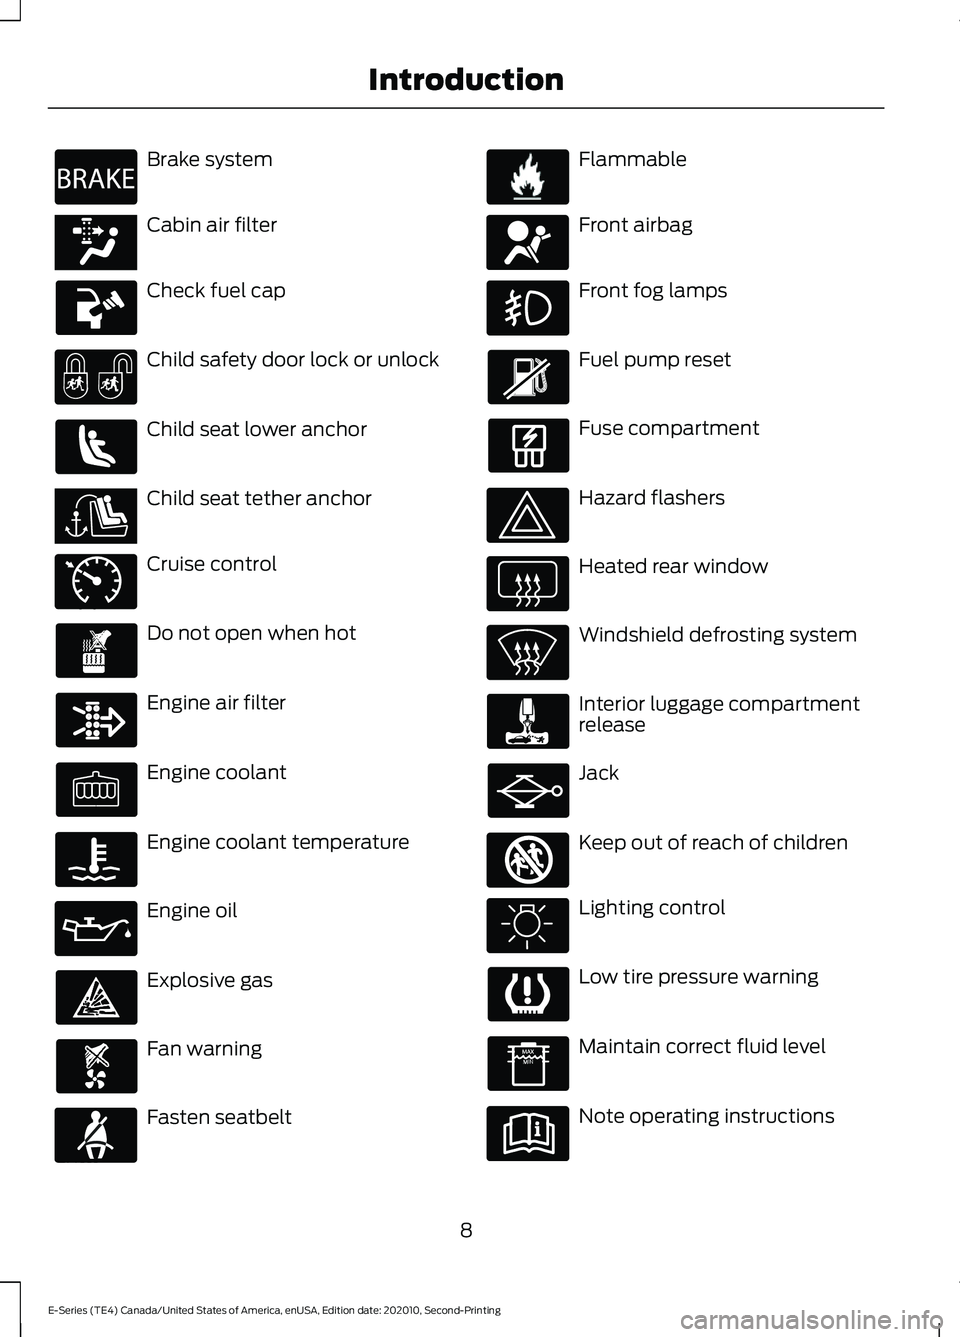
Brake system
Cabin air filter
Check fuel cap
Child safety door lock or unlock
Child seat lower anchor
Child seat tether anchor
Cruise control
Do not open when hot
Engine air filter
Engine coolant
Engine coolant temperature
Engine oil
Explosive gas
Fan warning
Fasten seatbelt Flammable
Front airbag
Front fog lamps
Fuel pump reset
Fuse compartment
Hazard flashers
Heated rear window
Windshield defrosting system
Interior luggage compartment
release
Jack
Keep out of reach of children
Lighting control
Low tire pressure warning
Maintain correct fluid level
Note operating instructions
8
E-Series (TE4) Canada/United States of America, enUSA, Edition date: 202010, Second-Printing IntroductionE270480 E139223 E141128 E71340 E71880 E231160 E67017 E161353
Page 13 of 296
Your vehicle has electronic control units
that have data recording functionality and
the ability to permanently or temporarily
store data. This data could include
information on the condition and status of
your vehicle, vehicle maintenance
requirements, events and malfunctions.
The types of data that can be recorded are
described in this section. Some of the data
recorded is stored in event logs or error
logs.
Note:
Error logs are reset following a service
or repair.
Note: We may provide information in
response to requests from law enforcement,
other government authorities and third
parties acting with lawful authority or
through a legal process. Such information
could be used by them in legal proceedings.
Data recorded includes, for example:
• Operating states of system
components, for example, fuel level,
tire pressure and battery charge level.
• Vehicle and component status, for
example, wheel speed, deceleration,
lateral acceleration and seatbelt
status.
• Events or errors in essential systems,
for example, headlamps and brakes.
• System responses to driving situations,
for example, airbag deployment and
stability control.
• Environmental conditions, for example,
temperature.
Some of this data, when used in
combination with other information, for
example, an accident report, damage to a
vehicle or eyewitness statements, could
be associated with a specific person. Service Data
Service data recorders in your vehicle are
capable of collecting and storing
diagnostic information about your vehicle.
This potentially includes information about
the performance or status of various
systems and modules in the vehicle, such
as engine, throttle, steering or brake
systems. In order to properly diagnose and
service your vehicle, Ford Motor Company
(Ford of Canada in Canada), and service
and repair facilities may access or share
among them vehicle diagnostic
information received through a direct
connection to your vehicle when
diagnosing or servicing your vehicle.
Additionally, Ford Motor Company (Ford
of Canada, in Canada) may, where
permitted by law, use vehicle diagnostic
information for vehicle improvement or
with other information we may have about
you, for example, your contact information,
to offer you products or services that may
interest you. Data may be provided to our
service providers such as part suppliers
that may help diagnose malfunctions, and
who are similarly obligated to protect data.
We retain this data only as long as
necessary to perform these functions or to
comply with law. We may provide
information where required in response to
official requests to law enforcement or
other government authorities or third
parties acting with lawful authority or court
order, and such information may be used
in legal proceedings. For U.S. only (if
equipped), if you choose to use connected
apps and services, you consent that certain
diagnostic information may also be
accessed electronically by Ford Motor
Company and Ford authorized service
facilities, and that the diagnostic
information may be used to provide
services to you, personalizing your
experience, troubleshoot, and to improve
products and services and offer you
products and services that may interest
10
E-Series (TE4) Canada/United States of America, enUSA, Edition date: 202010, Second-Printing Introduction
Page 35 of 296
Pregnant women should always wear their
seatbelt. Position the lap belt portion of a
combination lap and shoulder belt low
across the hips below the belly and worn
as tight as comfort allows. Position the
shoulder belt to cross the middle of the
shoulder and the center of the chest.
Seatbelt Locking Modes
WARNING: If your vehicle is
involved in a crash, have the seatbelts
and associated components inspected
as soon as possible. Failure to follow this
instruction could result in personal injury
or death.
All safety restraints in the vehicle are
combination lap and shoulder belts. The
driver seatbelt has the first type of locking
mode. The front outboard passenger
seatbelt has both types of locking modes
described as follows:
Vehicle Sensitive Mode
This is the normal retractor mode, which
allows free shoulder belt length
adjustment to your movements and
locking in response to vehicle movement.
For example, if the driver brakes suddenly
or turns a corner sharply, or the vehicle
receives an impact of about
5 mph
(8 km/h) or more, the combination
seatbelts lock to help reduce forward
movement of the driver and passengers.
In addition, the retractor is designed to lock
if you pull the webbing out too quickly. If
the seatbelt retractor locks, slowly lower
the height adjuster to allow the seatbelt
to retract. If the retractor does not unlock,
pull the seatbelt out slowly then feed a small length of webbing back toward the
stowed position. For rear seatbelts, recline
the rear seat backrest or push the seat
backrest cushion away from the seatbelt.
Feed a small length of webbing back
toward the stowed position.
Automatic Locking Mode
In this mode, the shoulder belt
automatically pre-locks. The belt will still
retract to remove any slack in the shoulder
belt. The automatic locking mode is not
available on the driver seatbelt.
When to Use the Automatic Locking
Mode
Use this mode any time a child safety seat,
except a booster, is installed in the
passenger front seating position. See
Child Safety
(page 20).
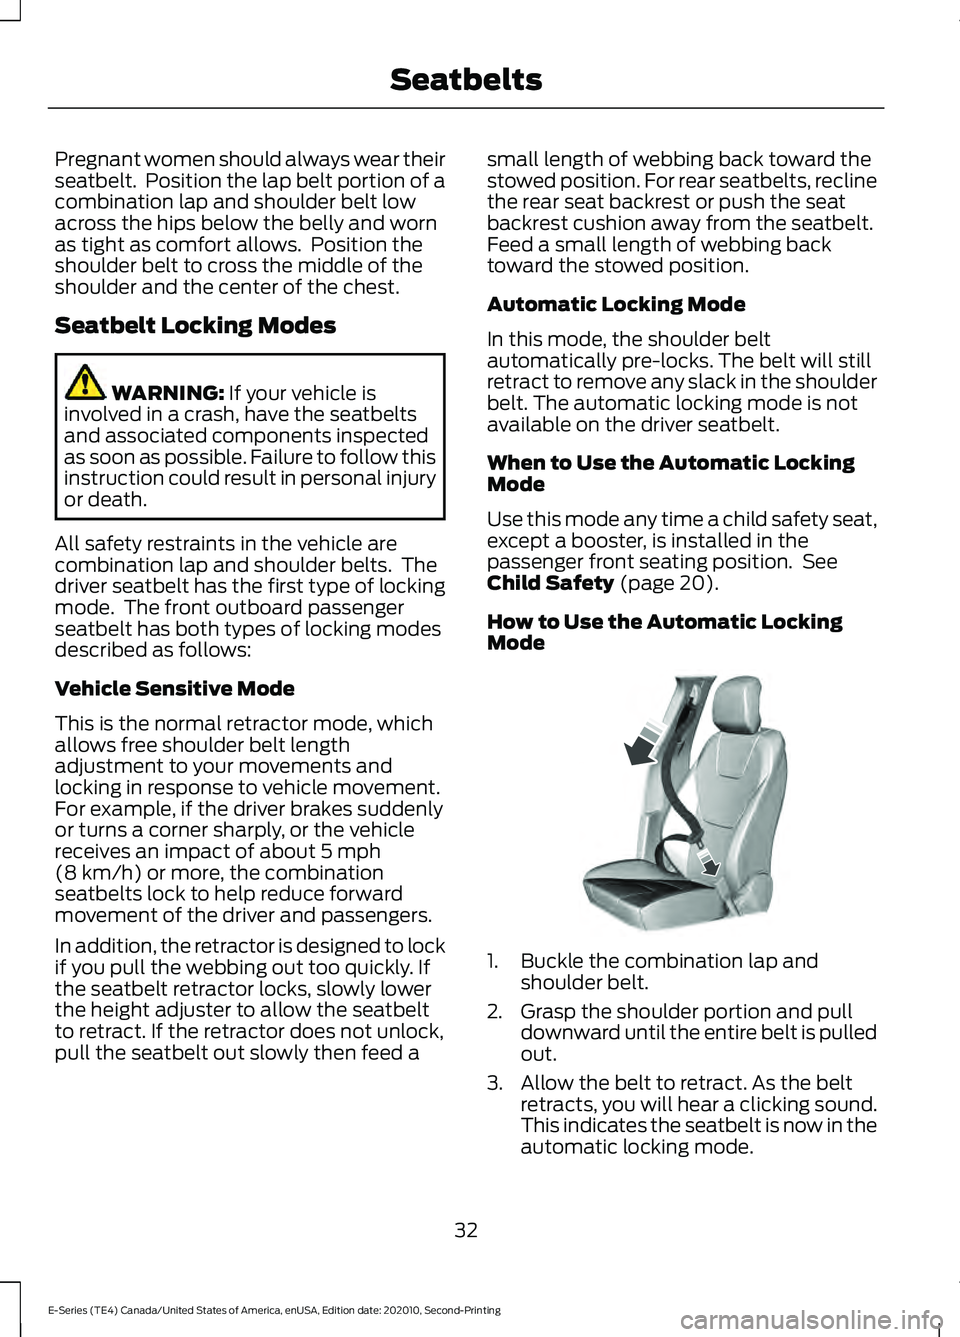
How to Use the Automatic Locking
Mode 1. Buckle the combination lap and
shoulder belt.
2. Grasp the shoulder portion and pull downward until the entire belt is pulled
out.
3. Allow the belt to retract. As the belt retracts, you will hear a clicking sound.
This indicates the seatbelt is now in the
automatic locking mode.
32
E-Series (TE4) Canada/United States of America, enUSA, Edition date: 202010, Second-Printing SeatbeltsE142591
Page 58 of 296
WHAT IS AUTOMATIC HIGH
BEAM CONTROL
The system turns on high beams if it is dark
enough and no other traffic is present. If it
detects an approaching vehicle
’s
headlamps or tail lamps, or street lighting
ahead, the system turns the high beams
off. Low beams remain on.
A camera sensor, centrally mounted
behind the windshield of your vehicle,
continuously monitors conditions to turn
the high beams on and off.
SWITCHING AUTOMATIC HIGH
BEAM CONTROL ON AND OFF
Switch the system on or off using the
information display. See General
Information (page 65).
Activating the Automatic High
Beam Control Switch the lighting control to the
autolamps position to activate.
See
Autolamps (page 53).
Note: Automatic high beams are not
available when you do not turn on
autolamps.
When active, the high beams turn on if all
of the following occur:
• The ambient light level is low enough.
• There is no traffic in front of your
vehicle.
• The vehicle speed is greater than
approximately
32 mph (52 km/h).
When active, the high beams turn off if any
of the following occur:
• The ambient light level is high enough
that it does not require high beams.
• The system detects an approaching
vehicle's headlamps or tail lamps. •
The system detects severe rain, snow
or fog.
• The camera is blocked.
• The vehicle speed falls below
approximately
27 mph (44 km/h).
Note: The deactivation speed is lower on
curves.
Note: There could be a delay in high beam
reactivation in certain curvy road situations.
Note: If you have a blocked sensor, the
system may not operate properly. Keep the
windshield free from obstruction or damage.
Note: The system may not operate properly
in cold or inclement conditions. You can
switch on the high beams by overriding the
system.
Note: If the system detects a blockage, for
example bird droppings, bug splatter, snow
or ice, the system goes into low beam mode
until you clear the blockage. If you have a
blocked camera, a message may appear in
the information display.
Note: Using much larger tires or equipping
vehicle accessories such as snowplows can
modify your vehicle's ride height and
degrade automatic high beam control
performance.
AUTOMATIC HIGH BEAM
CONTROL INDICATORS The indicator illuminates to
confirm when the system is
ready to assist.
55
E-Series (TE4) Canada/United States of America, enUSA, Edition date: 202010, Second-Printing Automatic High Beam Control
(If Equipped)
Page 66 of 296
Engine Coolant Temperature
Warning Lamp
If it illuminates when your vehicle
is moving, this indicates that the
engine is overheating. Stop your
vehicle as soon as it is safe to do so and
switch the engine off. Have your vehicle
checked as soon as possible.
Engine Oil It illuminates when you switch
the ignition on.
If it illuminates when the engine
is running this indicates a malfunction.
Stop your vehicle as soon as it is safe to
do so and switch the engine off. Check the
engine oil level. If the oil level is sufficient,
this indicates a system malfunction. Have
your vehicle checked as soon as possible.
See Engine Oil Check (page 167).
Fasten Seatbelt Warning Lamp It illuminates and a tone sounds
until you fasten the seatbelts.
Headlamp High Beam Indicator It illuminates when you switch
the headlamp high beam on.
Low Fuel Level Warning Lamp If it illuminates when you are
driving, refuel as soon as
possible.
Low Tire Pressure Warning Lamp
(If Equipped) It illuminates if the tire pressure
in one or more tires is below the
correct tire pressure. It also illuminates momentarily when you
switch the ignition on to confirm the lamp
is functional. If it does not illuminate when
you switch the ignition on, or begins to
flash at any time, have the system checked
by your authorized dealer.
Powertrain
Malfunction/Electronic Throttle
Control
Illuminates when the system
detects a powertrain fault, have
an authorized dealer check the
system as soon as possible.
Service Engine Soon If it illuminates when the engine
is running this indicates a
malfunction. The On Board
Diagnostics system has detected a
malfunction of the vehicle emission control
system.
If it flashes, engine misfire may be
occurring. Increased exhaust gas
temperatures could damage the catalytic
converter or other vehicle components.
Avoid heavy acceleration and deceleration
and have your vehicle serviced
immediately.
It illuminates when you switch the ignition
on prior to engine start to check the bulb
and to indicate whether your vehicle is
ready for Inspection and Maintenance
(I/M) testing.
Normally, it illuminates until the engine is
cranked and automatically turns off if no
malfunctions are present. However, if after
15 seconds it flashes eight times, this
indicates that your vehicle is not ready for
Inspection and Maintenance (I/M) testing.
See
Emission Law (page 92).
63
E-Series (TE4) Canada/United States of America, enUSA, Edition date: 202010, Second-Printing Instrument Cluster E71880
Page 71 of 296
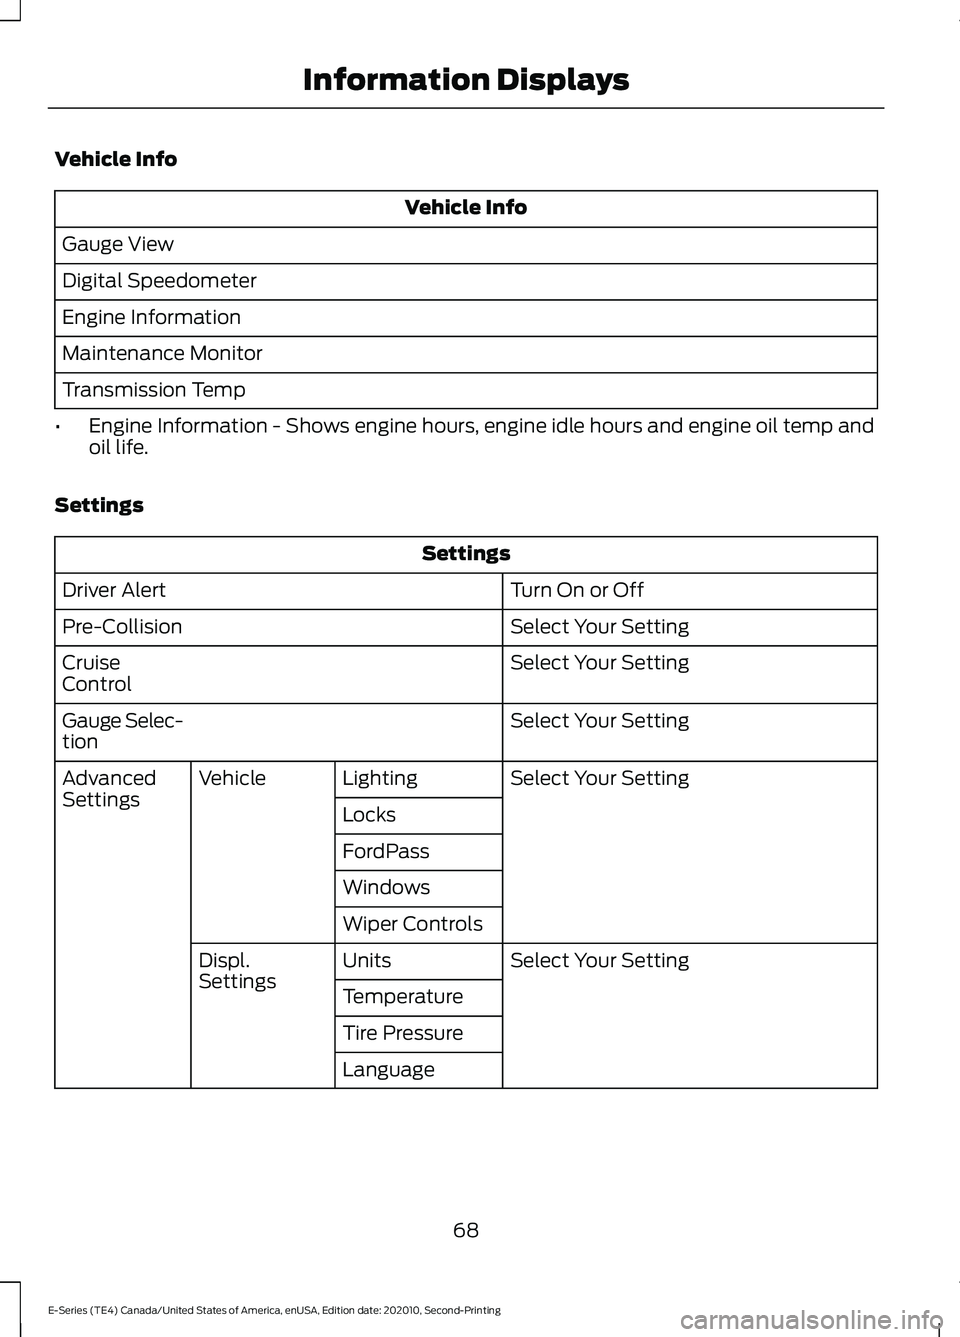
Vehicle Info
Vehicle Info
Gauge View
Digital Speedometer
Engine Information
Maintenance Monitor
Transmission Temp
• Engine Information - Shows engine hours, engine idle hours and engine oil temp and
oil life.
Settings Settings
Turn On or Off
Driver Alert
Select Your Setting
Pre-Collision
Select Your Setting
Cruise
Control
Select Your Setting
Gauge Selec-
tion
Select Your Setting
Lighting
Vehicle
Advanced
Settings
Locks
FordPass
Windows
Wiper Controls
Select Your Setting
Units
Displ.
Settings
Temperature
Tire Pressure
Language
68
E-Series (TE4) Canada/United States of America, enUSA, Edition date: 202010, Second-Printing Information Displays
Page 93 of 296
Fuel Filler Cap
WARNING: The fuel system may
be under pressure. If you hear a hissing
sound near the fuel filler inlet, do not
refuel until the sound stops. Otherwise,
fuel may spray out, which could cause
serious personal injury.
Note: If you must replace the fuel filler cap,
replace it with a fuel filler cap that is
designed for your vehicle. The customer
warranty may be void for any damage to the
fuel tank or fuel system if the correct
genuine Ford, Motorcraft or other certified
fuel filler cap is not used.
Your vehicle has a threaded fuel filler cap.
When fueling your vehicle:
1. Put your vehicle in park (P).
2. Switch the engine off.
3. Carefully turn the filler cap counterclockwise until it spins off.
4. Pull to remove the cap from the fuel filler pipe and place on the fuel door
hanging hook if equipped.
5. To install the fuel filler cap, hold the cap by the cover handle and place the
threaded end of the cap into filler pipe.
Turn the cap clockwise until it clicks at
least once.
If the Check Fuel Cap light or a Check Fuel
Cap message appears in the instrument
cluster and stays on after you start the
engine, you may not have installed the fuel
filler properly. If the fuel cap light remains on, at the next
opportunity, safely pull off of the road,
remove the fuel filler cap, align the cap
properly and reinstall it. The check fuel cap
light or Check fuel cap message may not
reset immediately. It may take several
driving cycles for the indicators to turn off.
A driving cycle consists of an engine
start-up (after four or more hours with the
engine off) followed by normal city and
highway driving.
FUEL CONSUMPTION
Advertised Capacity
The advertised capacity is the maximum
amount of fuel that you can add to the fuel
tank after running out of fuel. Included in
the advertised capacity is an empty
reserve. The empty reserve is an
unspecified amount of fuel that remains
in the fuel tank when the fuel gauge
indicates empty.
Note:
The amount of fuel in the empty
reserve varies and should not be relied upon
to increase driving range.
Fuel Economy
Your vehicle calculates fuel economy
figures through the trip computer average
fuel function. See
General Information
(page 65).
The first
1,000 mi (1,500 km) of driving is
the break-in period of the engine. A more
accurate measurement is obtained after
2,000 mi (3,000 km)
.
Impacting Fuel Economy
• Incorrect tire inflation pressures.
• Fully loading your vehicle.
• Carrying unnecessary weight.
90
E-Series (TE4) Canada/United States of America, enUSA, Edition date: 202010, Second-Printing Fuel and Refueling
Page 102 of 296
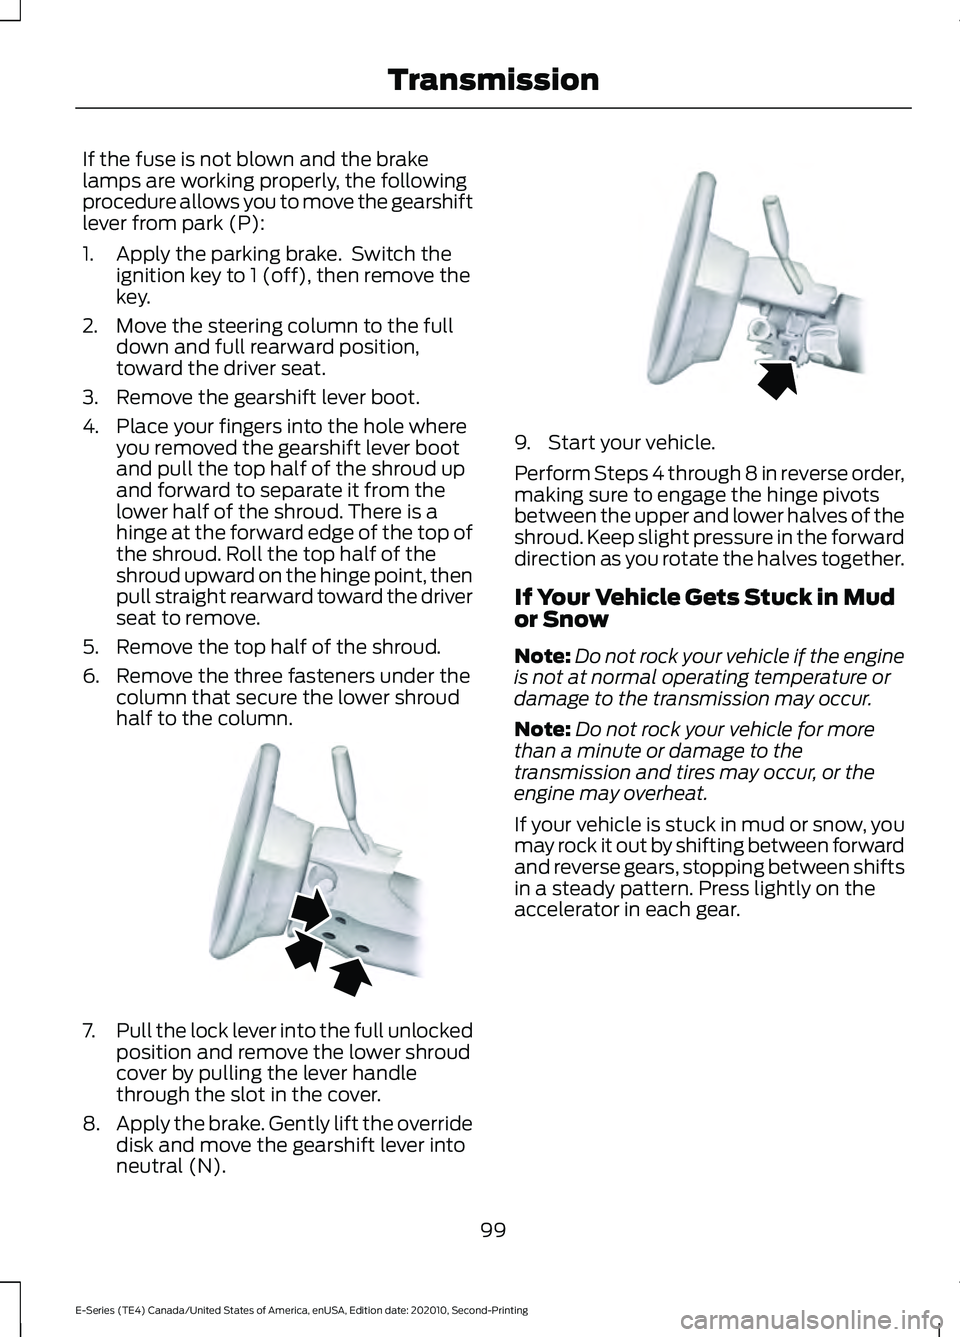
If the fuse is not blown and the brake
lamps are working properly, the following
procedure allows you to move the gearshift
lever from park (P):
1. Apply the parking brake. Switch the
ignition key to 1 (off), then remove the
key.
2. Move the steering column to the full down and full rearward position,
toward the driver seat.
3. Remove the gearshift lever boot.
4. Place your fingers into the hole where you removed the gearshift lever boot
and pull the top half of the shroud up
and forward to separate it from the
lower half of the shroud. There is a
hinge at the forward edge of the top of
the shroud. Roll the top half of the
shroud upward on the hinge point, then
pull straight rearward toward the driver
seat to remove.
5. Remove the top half of the shroud.
6. Remove the three fasteners under the column that secure the lower shroud
half to the column. 7.
Pull the lock lever into the full unlocked
position and remove the lower shroud
cover by pulling the lever handle
through the slot in the cover.
8. Apply the brake. Gently lift the override
disk and move the gearshift lever into
neutral (N). 9. Start your vehicle.
Perform Steps 4 through 8 in reverse order,
making sure to engage the hinge pivots
between the upper and lower halves of the
shroud. Keep slight pressure in the forward
direction as you rotate the halves together.
If Your Vehicle Gets Stuck in Mud
or Snow
Note:
Do not rock your vehicle if the engine
is not at normal operating temperature or
damage to the transmission may occur.
Note: Do not rock your vehicle for more
than a minute or damage to the
transmission and tires may occur, or the
engine may overheat.
If your vehicle is stuck in mud or snow, you
may rock it out by shifting between forward
and reverse gears, stopping between shifts
in a steady pattern. Press lightly on the
accelerator in each gear.
99
E-Series (TE4) Canada/United States of America, enUSA, Edition date: 202010, Second-Printing TransmissionE163185 E163186
Page 108 of 296
PRINCIPLE OF OPERATION
WARNING: Vehicle modifications
involving braking system, aftermarket
roof racks, suspension, steering system,
tire construction and wheel and tire size
may change the handling characteristics
of your vehicle and may adversely affect
the performance of the electronic
stability control system. In addition,
installing any stereo loudspeakers may
interfere with and adversely affect the
electronic stability control system. Install
any aftermarket stereo loudspeaker as
far as possible from the front center
console, the tunnel, and the front seats
in order to minimize the risk of interfering
with the electronic stability control
sensors. Reducing the effectiveness of
the electronic stability control system
could lead to an increased risk of loss of
vehicle control, vehicle rollover, personal
injury and death. WARNING:
Remember that even
advanced technology cannot defy the
laws of physics. It’ s always possible to
lose control of a vehicle due to
inappropriate driver input for the
conditions. Aggressive driving on any
road condition can cause you to lose
control of your vehicle increasing the risk
of personal injury or property damage.
Activation of the electronic stability
control system is an indication that at
least some of the tires have exceeded
their ability to grip the road; this could
reduce the operator ’s ability to control
the vehicle potentially resulting in a loss
of vehicle control, vehicle rollover,
personal injury and death. If your
electronic stability control system
activates, SLOW DOWN.
The system automatically turns on each
time you switch the ignition on. If a fault occurs in either the stability
control or the traction control system, you
may experience the following conditions:
•
The stability and traction control light
illuminates steadily.
• The stability control and traction
control systems do not enhance your
vehicle's ability to maintain traction of
the wheels.
If a driving condition activates either the
stability control or the traction control
system you may experience the following
conditions:
• The stability and traction control light
flashes.
• Your vehicle slows down.
• Reduced engine power.
• A vibration in the brake pedal.
• The brake pedal is stiffer than usual.
• If the driving condition is severe and
your foot is not on the brake, the brake
pedal may move as the system applies
higher brake force.
The stability control system has several
features built into it to help you maintain
control of your vehicle:
Electronic Stability Control
The system enhances your vehicle ’s ability
to prevent skids or lateral slides by
applying brakes to one or more of the
wheels individually and, if necessary,
reducing engine power.
Traction Control
The system enhances your vehicle ’s ability
to maintain traction of the wheels by
detecting and controlling wheel spin.
See
Using Traction Control (page 104).
105
E-Series (TE4) Canada/United States of America, enUSA, Edition date: 202010, Second-Printing Stability Control