accessory power FORD E-450 2022 Owners Manual
[x] Cancel search | Manufacturer: FORD, Model Year: 2022, Model line: E-450, Model: FORD E-450 2022Pages: 296, PDF Size: 3.91 MB
Page 48 of 296
LOCKING AND UNLOCKING
You can use the power door lock control
or the remote control to lock and unlock
your vehicle.
Note:
Do not use the door latch assembly
to attach any accessory, such as handles or
steps, as this can cause damage to your
vehicle.
Power Door Locks (If Equipped)
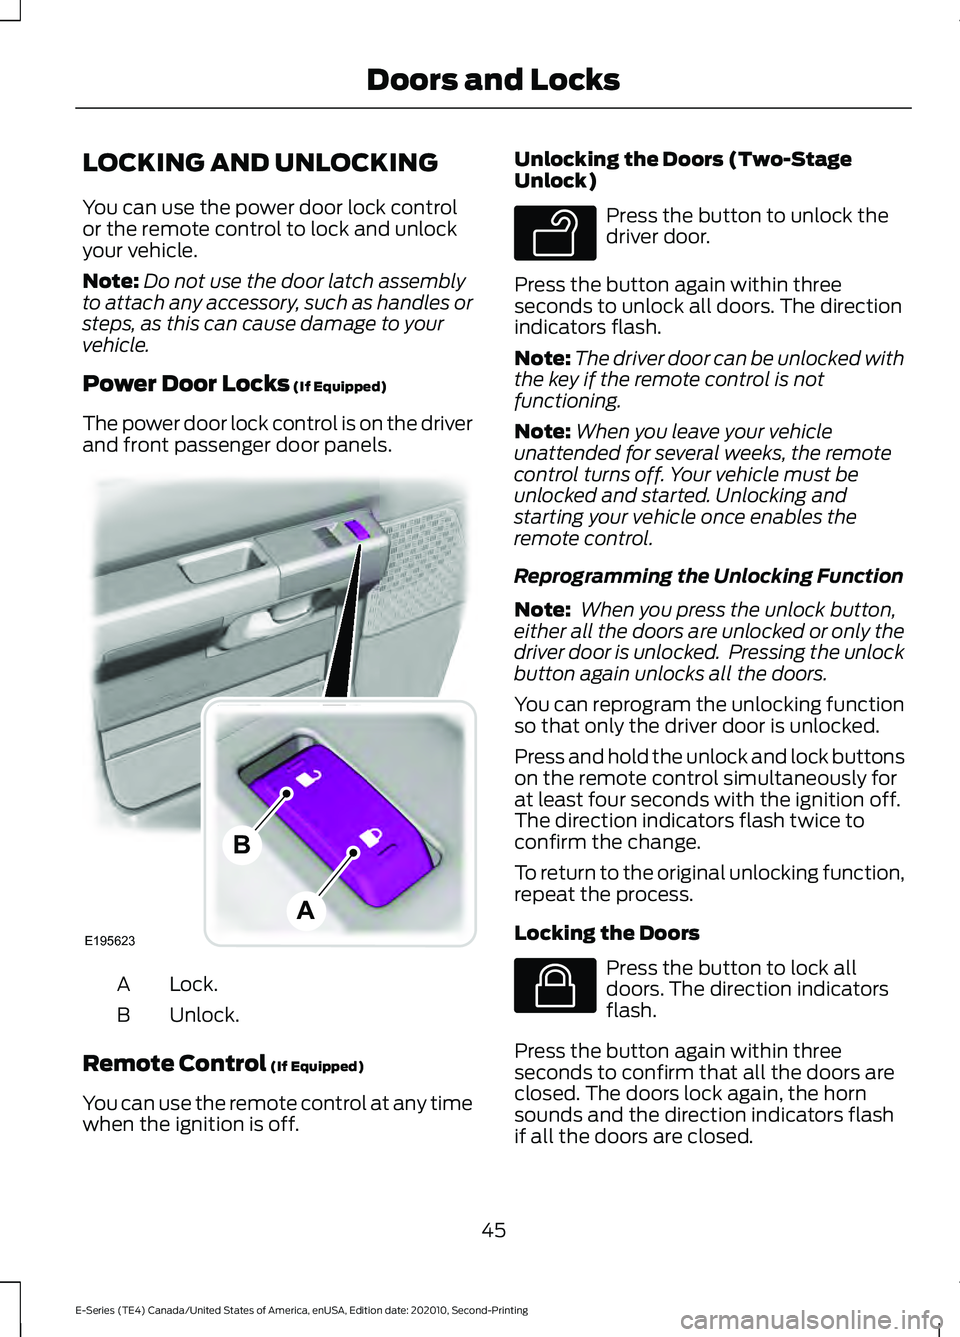
The power door lock control is on the driver
and front passenger door panels. Lock.
A
Unlock.
B
Remote Control
(If Equipped)
You can use the remote control at any time
when the ignition is off. Unlocking the Doors (Two-Stage
Unlock) Press the button to unlock the
driver door.
Press the button again within three
seconds to unlock all doors. The direction
indicators flash.
Note: The driver door can be unlocked with
the key if the remote control is not
functioning.
Note: When you leave your vehicle
unattended for several weeks, the remote
control turns off. Your vehicle must be
unlocked and started. Unlocking and
starting your vehicle once enables the
remote control.
Reprogramming the Unlocking Function
Note: When you press the unlock button,
either all the doors are unlocked or only the
driver door is unlocked. Pressing the unlock
button again unlocks all the doors.
You can reprogram the unlocking function
so that only the driver door is unlocked.
Press and hold the unlock and lock buttons
on the remote control simultaneously for
at least four seconds with the ignition off.
The direction indicators flash twice to
confirm the change.
To return to the original unlocking function,
repeat the process.
Locking the Doors Press the button to lock all
doors. The direction indicators
flash.
Press the button again within three
seconds to confirm that all the doors are
closed. The doors lock again, the horn
sounds and the direction indicators flash
if all the doors are closed.
45
E-Series (TE4) Canada/United States of America, enUSA, Edition date: 202010, Second-Printing Doors and LocksE195623
A
B E138629 E138623
Page 49 of 296
Note:
If any door is open, the horn sounds
twice and the direction indicators do not
flash.
Autolock Feature
The autolock feature locks all the doors
when:
• All doors are closed.
• The ignition is on.
• You shift into any gear putting your
vehicle in motion.
• The ignition is on, all the doors are
closed and your vehicle has been in
motion at a speed greater than 12 mph
(20 km/h).
Autounlock Feature
The autounlock feature unlocks all the
doors when:
• Your vehicle comes to a stop and you
switch the ignition off or to accessory.
• You open the driver door within 10
minutes of switching the ignition off or
to accessory.
Note: If you electronically lock your vehicle
after you switch the ignition off with the
driver door closed, the doors do not
autounlock.
Enabling or Disabling Autolock and
Autounlock
You can enable or disable the autolock and
autounlock features independently of each
other.
To enable or disable autolock, do the
following:
1. Switch the ignition on.
2. Press the power door unlock control three times.
3. Switch the ignition off. 4. Press the power door unlock control
three times.
5. Switch the ignition on. The horn sounds
indicating your vehicle is in
programming mode.
6. Press the power door unlock control and within five seconds, press the
power door lock control. The horn
sounds once if disabled or twice if
enabled.
7. Switch the ignition off. The horn sounds
indicating programming is complete.
Note: You can also switch this feature on
or off using the information display. See
Information Displays (page 65).
To enable or disable autounlock, do the
following:
1. Switch the ignition on.
2. Press the power door unlock control three times.
3. Switch the ignition off.
4. Press the power door unlock control three times.
5. Switch the ignition on. The horn sounds
indicating your vehicle is in
programming mode.
6. Press the power door lock control and within five seconds, press the power
door unlock control. The horn sounds
once if disabled or twice if enabled.
7. Switch the ignition off. The horn sounds
indicating programming is complete.
Note: You can also switch this feature on
or off using the information display. See
Information Displays
(page 65).
Illuminated Entry
The interior lamps and some exterior
lamps illuminate when you unlock the
doors with the remote control.
46
E-Series (TE4) Canada/United States of America, enUSA, Edition date: 202010, Second-Printing Doors and Locks
Page 60 of 296

POWER WINDOWS (IF EQUIPPED)
WARNING:
Do not leave children
unattended in your vehicle and do not
let them play with the power windows.
They may seriously injure themselves. WARNING:
When closing the
power windows, you should verify they
are free of obstructions and make sure
that children and pets are not in the
proximity of the window openings. Note:
You may hear a pulsing noise when
just one of the windows is open. Lower the
opposite window slightly to reduce this
noise.
Press the switch to open the window.
Lift the switch to close the window.
One-Touch Down
Press the switch fully and release it. Press
again or lift it to stop the window.
Accessory Delay
You can use the window switches for
several minutes when you switch the
ignition off or until you open either front
door. EXTERIOR MIRRORS
(IF EQUIPPED)
Power Exterior Mirrors
(If Equipped) WARNING:
Do not adjust the
mirrors when your vehicle is moving. Left mirror.
A
Off.B
Right mirror.
C
To adjust your mirrors:
1. Select the mirror you want to adjust.
2. Move the control in the direction you want to tilt the mirror.
3. Return the control to the center position to lock the mirrors in place.
Fold-Away Exterior Mirrors
Push the mirror toward the door window
glass. Make sure that you fully engage the
mirror in its support when returning it to its
original position.
57
E-Series (TE4) Canada/United States of America, enUSA, Edition date: 202010, Second-Printing Windows and MirrorsE163056 E163059
B
AC
Page 83 of 296
12 Volt DC Power Point
WARNING: Do not plug optional
electrical accessories into the cigar
lighter socket. Incorrect use of the cigar
lighter can cause damage not covered
by the vehicle warranty, and can result
in fire or serious injury.
Note: When you switch the ignition on, you
can use the socket to power 12 volt
appliances with a maximum current rating
of 15 amps.
If the power supply does not work after you
switch the ignition off, switch the ignition
on.
Note: Do not hang any accessory from the
accessory plug.
Note: Do not use the power point over the
vehicle capacity of 12 volt DC 180 watts or
a fuse may blow.
Note: Always keep the power point caps
closed when not in use.
Do not insert objects other than an
accessory plug into the power point. This
damages the power point and may blow
the fuse.
Run the vehicle for full capacity use of the
power point.
To prevent the battery from running out of
charge:
• Do not use the power point longer than
necessary when the vehicle is not
running.
• Do not leave devices plugged in
overnight or when you park your vehicle
for extended periods. Locations
Power points may be in the following
locations:
•
On the instrument panel.
• Inside the glove box.
• Behind the driver's seat, upper trim
panel.
110 Volt AC Power Point
(If Equipped) WARNING:
Do not keep electrical
devices plugged in the power point
whenever the device is not in use. Do not
use any extension cord with the 110 volt
AC power point, since it will defeat the
safety protection design. Doing so may
cause the power point to overload due
to powering multiple devices that can
reach beyond the 150 watt load limit and
could result in fire or serious injury.
Note: The power point turns off when you
switch the ignition off, or when the battery
voltage drops below 11 volts.
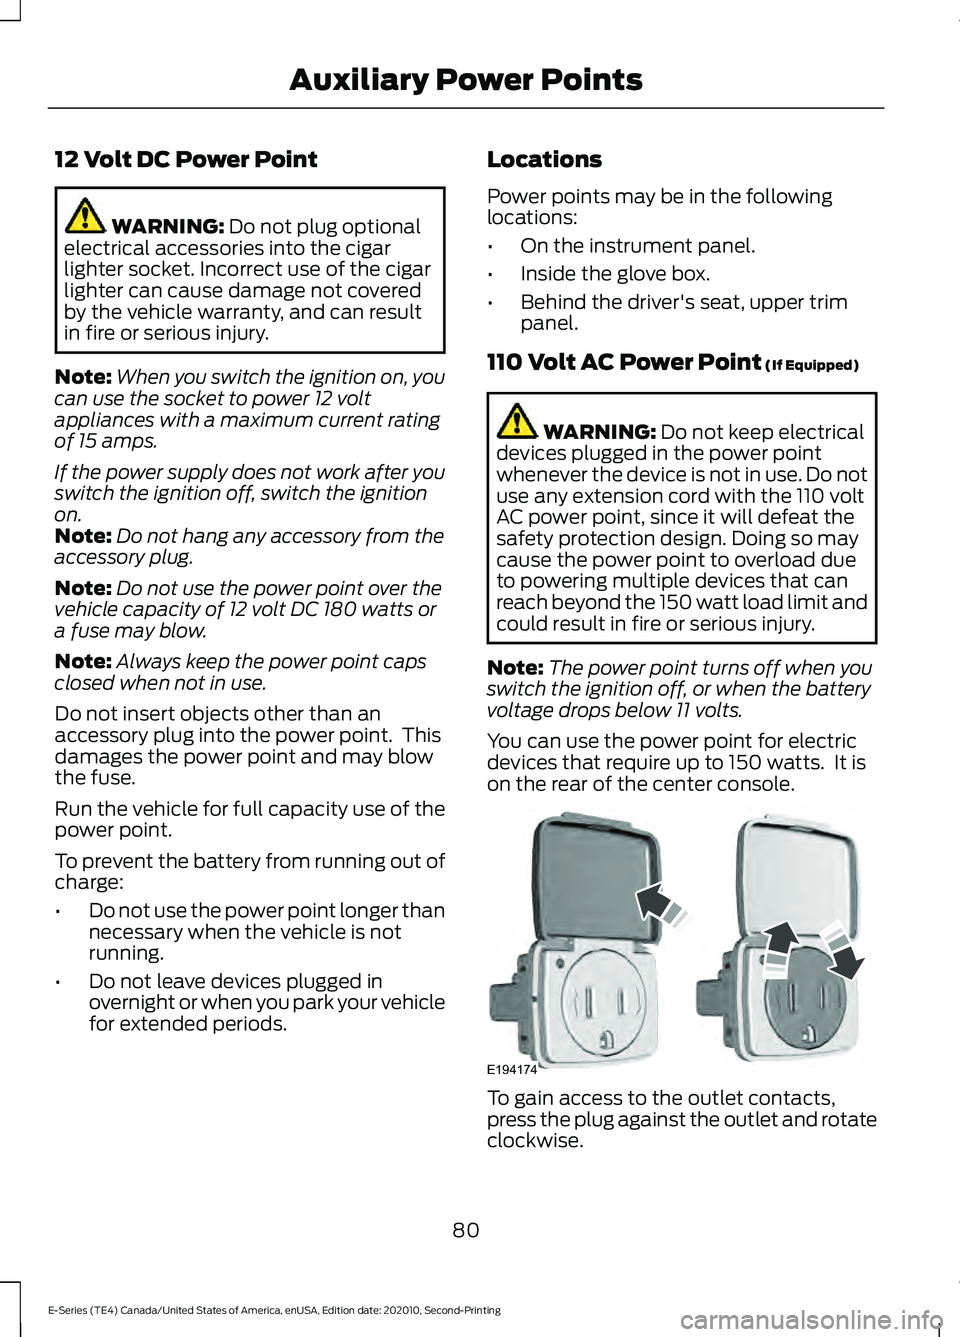
You can use the power point for electric
devices that require up to 150 watts. It is
on the rear of the center console. To gain access to the outlet contacts,
press the plug against the outlet and rotate
clockwise.
80
E-Series (TE4) Canada/United States of America, enUSA, Edition date: 202010, Second-Printing Auxiliary Power PointsE194174
Page 85 of 296
GENERAL INFORMATION
WARNING: Extended idling at high
engine speeds can produce very high
temperatures in the engine and exhaust
system, creating the risk of fire or other
damage. WARNING:
Do not park, idle or
drive your vehicle on dry grass or other
dry ground cover. The emission system
heats up the engine compartment and
exhaust system, creating the risk of fire. WARNING: Do not start the engine
in a closed garage or in other enclosed
areas. Exhaust fumes can be toxic.
Always open the garage door before you
start the engine. WARNING:
Exhaust leaks may
result in entry of harmful and potentially
lethal fumes into the passenger
compartment. If you smell exhaust
fumes inside your vehicle, have your
vehicle inspected immediately. Do not
drive if you smell exhaust fumes.
If you disconnect the battery, your vehicle
may exhibit some unusual driving
characteristics for approximately
5 mi
(8 km) after you reconnect it. This is
because the engine management system
must realign itself with the engine. You
can disregard any unusual driving
characteristics during this period.
The powertrain control system meets all
Canadian interference-causing equipment
standard requirements regulating the
impulse electrical field or radio noise.
When you start the engine, avoid pressing
the accelerator pedal before and during
operation. Only use the accelerator pedal
when you have difficulty starting the
engine. IGNITION SWITCH
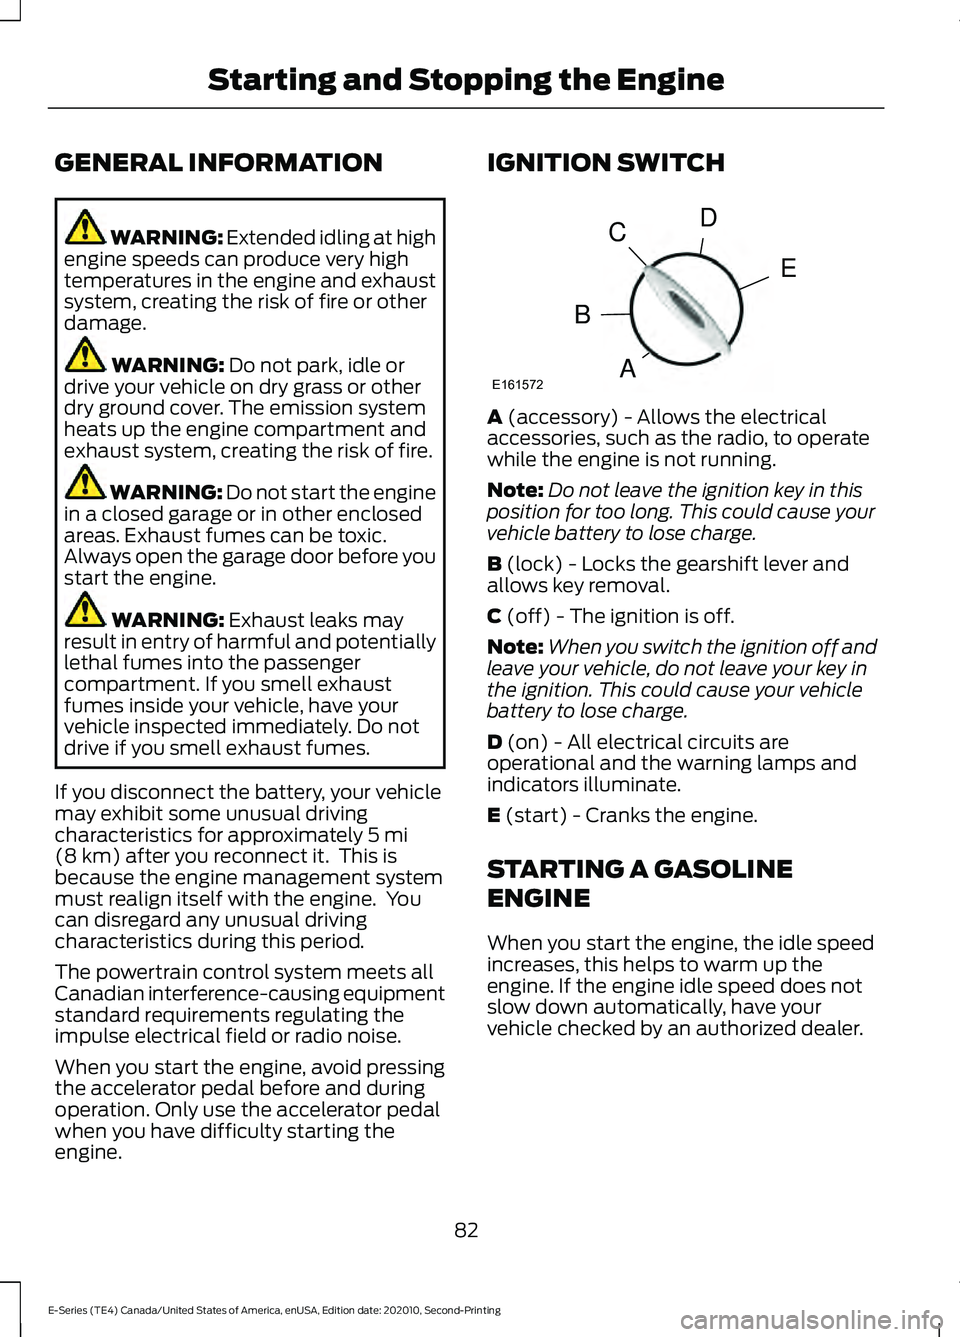
A
(accessory) - Allows the electrical
accessories, such as the radio, to operate
while the engine is not running.
Note: Do not leave the ignition key in this
position for too long. This could cause your
vehicle battery to lose charge.
B
(lock) - Locks the gearshift lever and
allows key removal.
C
(off) - The ignition is off.
Note: When you switch the ignition off and
leave your vehicle, do not leave your key in
the ignition. This could cause your vehicle
battery to lose charge.
D
(on) - All electrical circuits are
operational and the warning lamps and
indicators illuminate.
E
(start) - Cranks the engine.
STARTING A GASOLINE
ENGINE
When you start the engine, the idle speed
increases, this helps to warm up the
engine. If the engine idle speed does not
slow down automatically, have your
vehicle checked by an authorized dealer.
82
E-Series (TE4) Canada/United States of America, enUSA, Edition date: 202010, Second-Printing Starting and Stopping the EngineE161572
D
E
C
B
A
Page 143 of 296
TOWING THE VEHICLE ON
FOUR WHEELS
Emergency Towing
WARNING: If your vehicle has a
steering wheel lock make sure the
ignition is in the accessory or on position
when being towed.
You can flat-tow (all wheels on the
ground, regardless of the powertrain or
transmission configuration) your disabled
vehicle (without access to wheel dollies
or vehicle transport trailer) under the
following conditions:
• Your vehicle is facing forward so you
tow it in a forward direction.
• You shift into Neutral (N). If you cannot
shift into Neutral (N), you may need to
override the transmission. See
Transmission
(page 96).
• Maximum speed is 35 mph (56 km/h).
• Maximum distance is
50 mi (80 km).
Recreational Towing
Note: Put your climate control system in
recirculated air mode to prevent exhaust
fumes from entering the vehicle. See
Climate Control
(page 74).
Follow these guidelines if you have a need
for recreational (RV) towing. An example
of recreational towing would be towing
your vehicle behind a motorhome. These
guidelines are to make sure you do not
damage the transmission during towing.
Do not tow your vehicle with any wheels
on the ground, as vehicle or transmission
damage may occur. It is recommended to
tow your vehicle with all four wheels off
the ground, for example when using a
vehicle transport trailer. Otherwise, you
cannot tow your vehicle.
140
E-Series (TE4) Canada/United States of America, enUSA, Edition date: 202010, Second-Printing Towing
Page 256 of 296
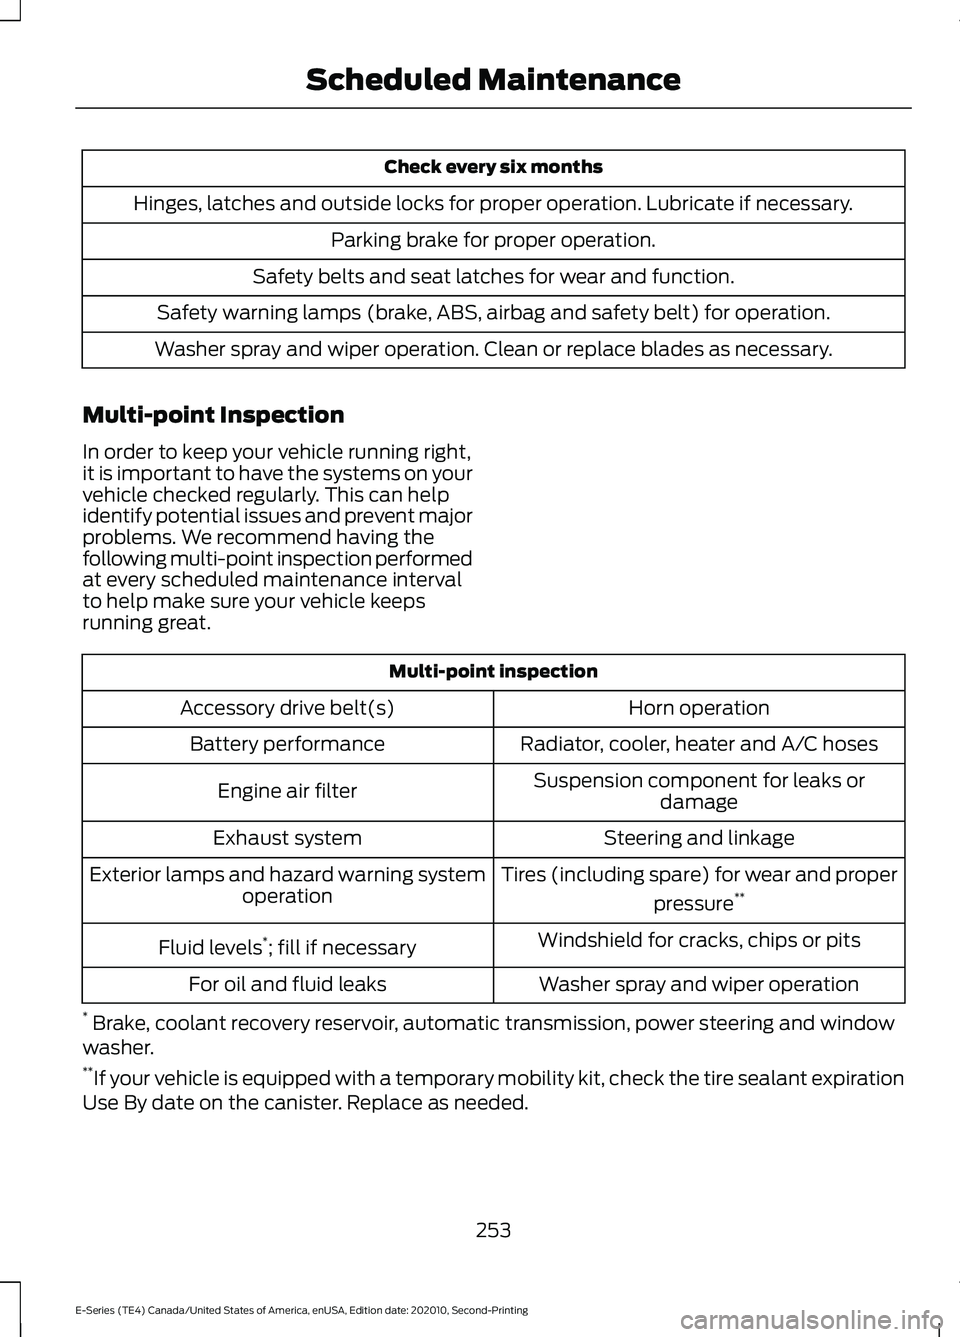
Check every six months
Hinges, latches and outside locks for proper operation. Lubricate if necessary. Parking brake for proper operation.
Safety belts and seat latches for wear and function.
Safety warning lamps (brake, ABS, airbag and safety belt) for operation.
Washer spray and wiper operation. Clean or replace blades as necessary.
Multi-point Inspection
In order to keep your vehicle running right,
it is important to have the systems on your
vehicle checked regularly. This can help
identify potential issues and prevent major
problems. We recommend having the
following multi-point inspection performed
at every scheduled maintenance interval
to help make sure your vehicle keeps
running great. Multi-point inspection
Horn operation
Accessory drive belt(s)
Radiator, cooler, heater and A/C hoses
Battery performance
Suspension component for leaks ordamage
Engine air filter
Steering and linkage
Exhaust system
Tires (including spare) for wear and properpressure**
Exterior lamps and hazard warning system
operation
Windshield for cracks, chips or pits
Fluid levels *
; fill if necessary
Washer spray and wiper operation
For oil and fluid leaks
* Brake, coolant recovery reservoir, automatic transmission, power steering and window
washer.
** If your vehicle is equipped with a temporary mobility kit, check the tire sealant expiration
Use By date on the canister. Replace as needed.
253
E-Series (TE4) Canada/United States of America, enUSA, Edition date: 202010, Second-Printing Scheduled Maintenance