tow FORD E SERIES 1998 4.G Owner's Manual
[x] Cancel search | Manufacturer: FORD, Model Year: 1998, Model line: E SERIES, Model: FORD E SERIES 1998 4.GPages: 144, PDF Size: 2.14 MB
Page 76 of 144

Trailer towing tips
²Practice turning, stopping and backing up in an area before starting on
a trip to get the feel of the vehicle trailer combination. When turning,
make wider turns so the trailer wheels will clear curbs and other
obstacles.
²Allow more distance for stopping with a trailer attached.
²The trailer tongue weight should be 10±15% of the loaded trailer
weight.
²After you have traveled 80 km (50 miles), thoroughly check your
hitch, electrical connections and trailer wheel lug nuts.
²When stopped in traffic for long periods of time in hot weather, place
the gearshift in P (Park) and increase idle speed. This aids engine
cooling and air conditioner efficiency.
²Vehicles with trailers should not be parked on a grade. If you must
park on a grade, place wheel chocks under the trailer's wheels.
Launching or retrieving a boat
When backing down a ramp during boat launching or retrieval,
²Do not allow the static water level to rise above the bottom edge of
the rear bumper and
²Do not allow waves to break higher than 15 cm (six inches) above the
bottom edge of the rear bumper.
Exceeding these limits may allow water to enter critical vehicle
components, adversely affecting driveability, emissions and reliability.
If the rear axle is submerged in water, the rear axle lubricant should be
changed. Axle lubricant quantities are not to be checked unless a leak is
suspected.
FUEL CONSUMPTION
Fuel economy can be improved by avoiding:
²lack of regular, scheduled maintenance.
²excessive speed.
²rapid acceleration.
²extended idle.
Driving
76
Page 85 of 144
CHANGING THE TIRES
If you get a flat tire while driving, do not apply the brake heavily.
Instead, gradually decrease your speed. Hold the steering wheel firmly
and slowly move to a safe place on the side of the road.
Spare tire information
The spare tire for your vehicle is stowed under the rear of your vehicle
(except cutaway and stripped chassis models).
To remove the spare tire:
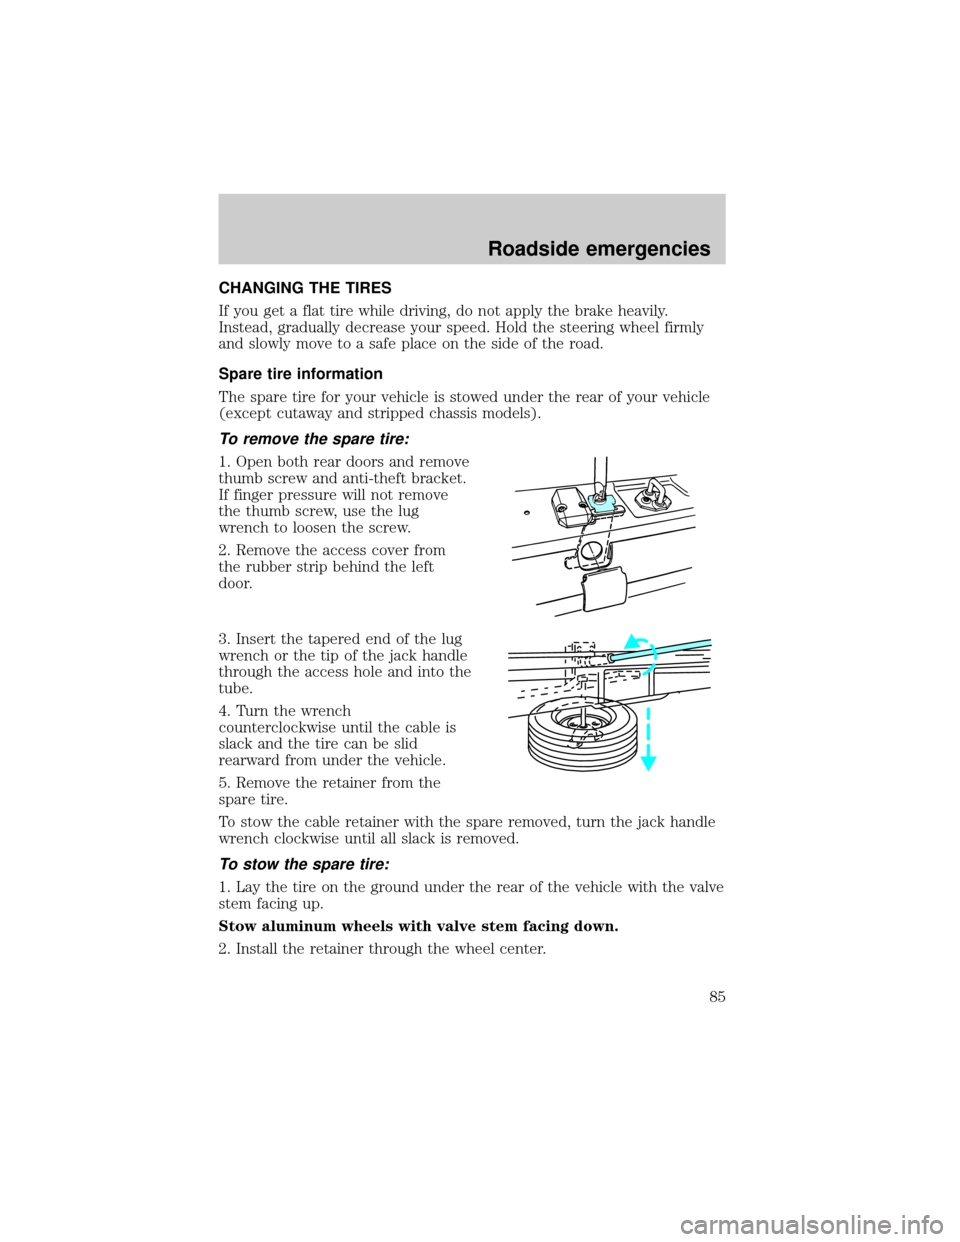
1. Open both rear doors and remove
thumb screw and anti-theft bracket.
If finger pressure will not remove
the thumb screw, use the lug
wrench to loosen the screw.
2. Remove the access cover from
the rubber strip behind the left
door.
3. Insert the tapered end of the lug
wrench or the tip of the jack handle
through the access hole and into the
tube.
4. Turn the wrench
counterclockwise until the cable is
slack and the tire can be slid
rearward from under the vehicle.
5. Remove the retainer from the
spare tire.
To stow the cable retainer with the spare removed, turn the jack handle
wrench clockwise until all slack is removed.
To stow the spare tire:
1. Lay the tire on the ground under the rear of the vehicle with the valve
stem facing up.
Stow aluminum wheels with valve stem facing down.
2. Install the retainer through the wheel center.
Roadside emergencies
85
Page 86 of 144
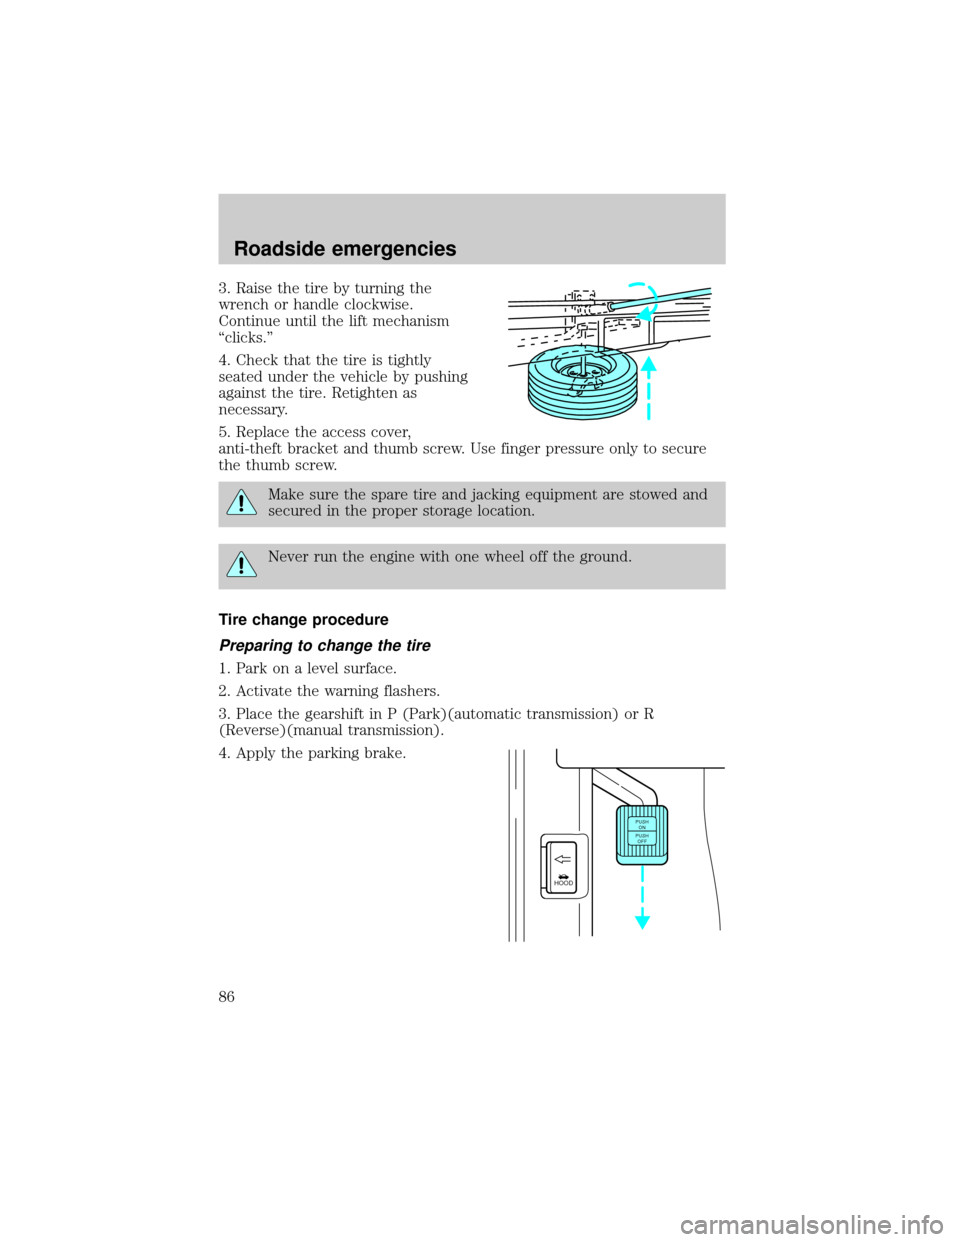
3. Raise the tire by turning the
wrench or handle clockwise.
Continue until the lift mechanism
ªclicks.º
4. Check that the tire is tightly
seated under the vehicle by pushing
against the tire. Retighten as
necessary.
5. Replace the access cover,
anti-theft bracket and thumb screw. Use finger pressure only to secure
the thumb screw.
Make sure the spare tire and jacking equipment are stowed and
secured in the proper storage location.
Never run the engine with one wheel off the ground.
Tire change procedure
Preparing to change the tire
1. Park on a level surface.
2. Activate the warning flashers.
3. Place the gearshift in P (Park)(automatic transmission) or R
(Reverse)(manual transmission).
4. Apply the parking brake.
HOOD
PUSH
ON
PUSH
OFF
Roadside emergencies
86
Page 89 of 144
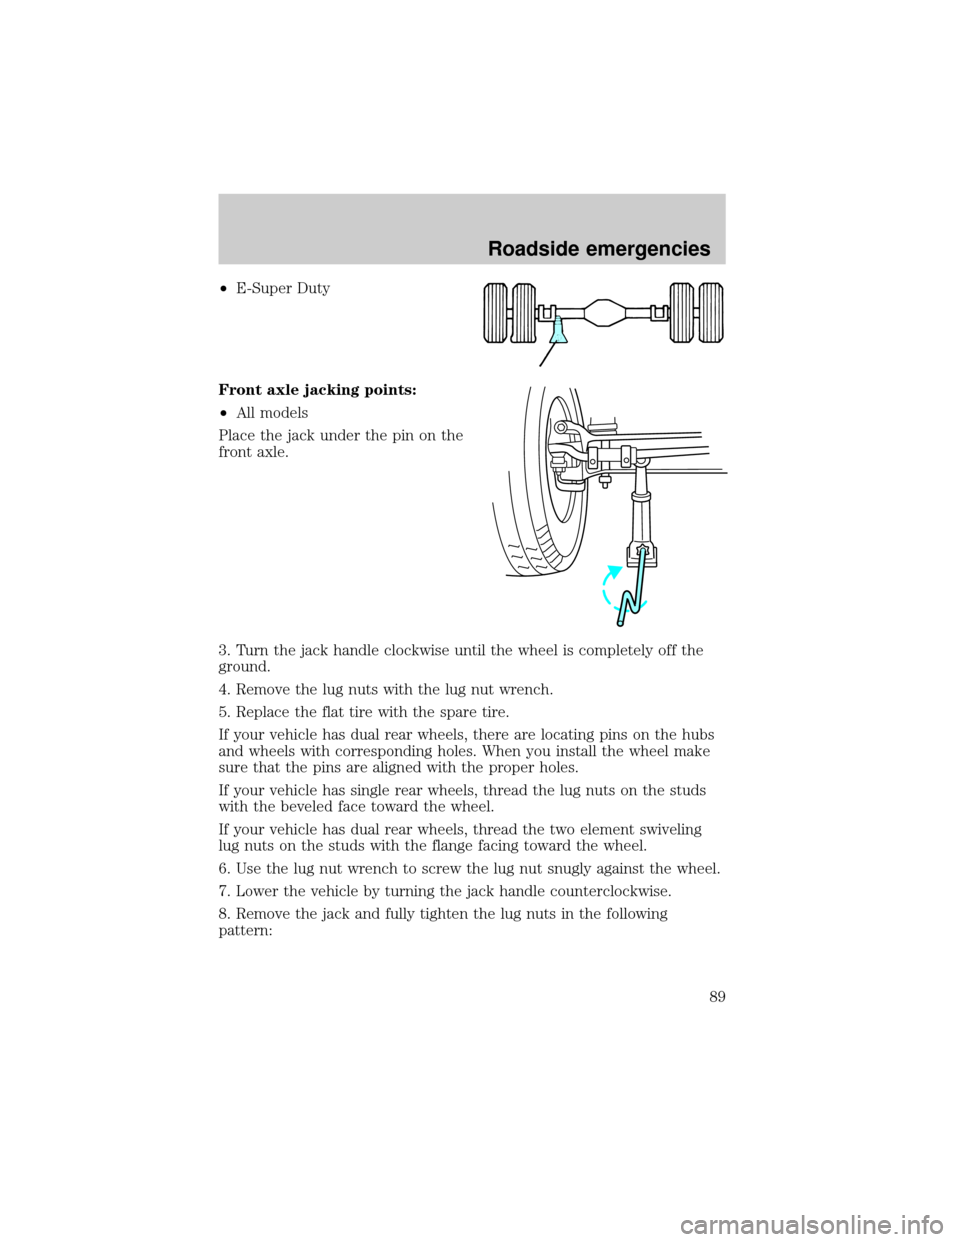
²E-Super Duty
Front axle jacking points:
²All models
Place the jack under the pin on the
front axle.
3. Turn the jack handle clockwise until the wheel is completely off the
ground.
4. Remove the lug nuts with the lug nut wrench.
5. Replace the flat tire with the spare tire.
If your vehicle has dual rear wheels, there are locating pins on the hubs
and wheels with corresponding holes. When you install the wheel make
sure that the pins are aligned with the proper holes.
If your vehicle has single rear wheels, thread the lug nuts on the studs
with the beveled face toward the wheel.
If your vehicle has dual rear wheels, thread the two element swiveling
lug nuts on the studs with the flange facing toward the wheel.
6. Use the lug nut wrench to screw the lug nut snugly against the wheel.
7. Lower the vehicle by turning the jack handle counterclockwise.
8. Remove the jack and fully tighten the lug nuts in the following
pattern:
Roadside emergencies
89
Page 90 of 144
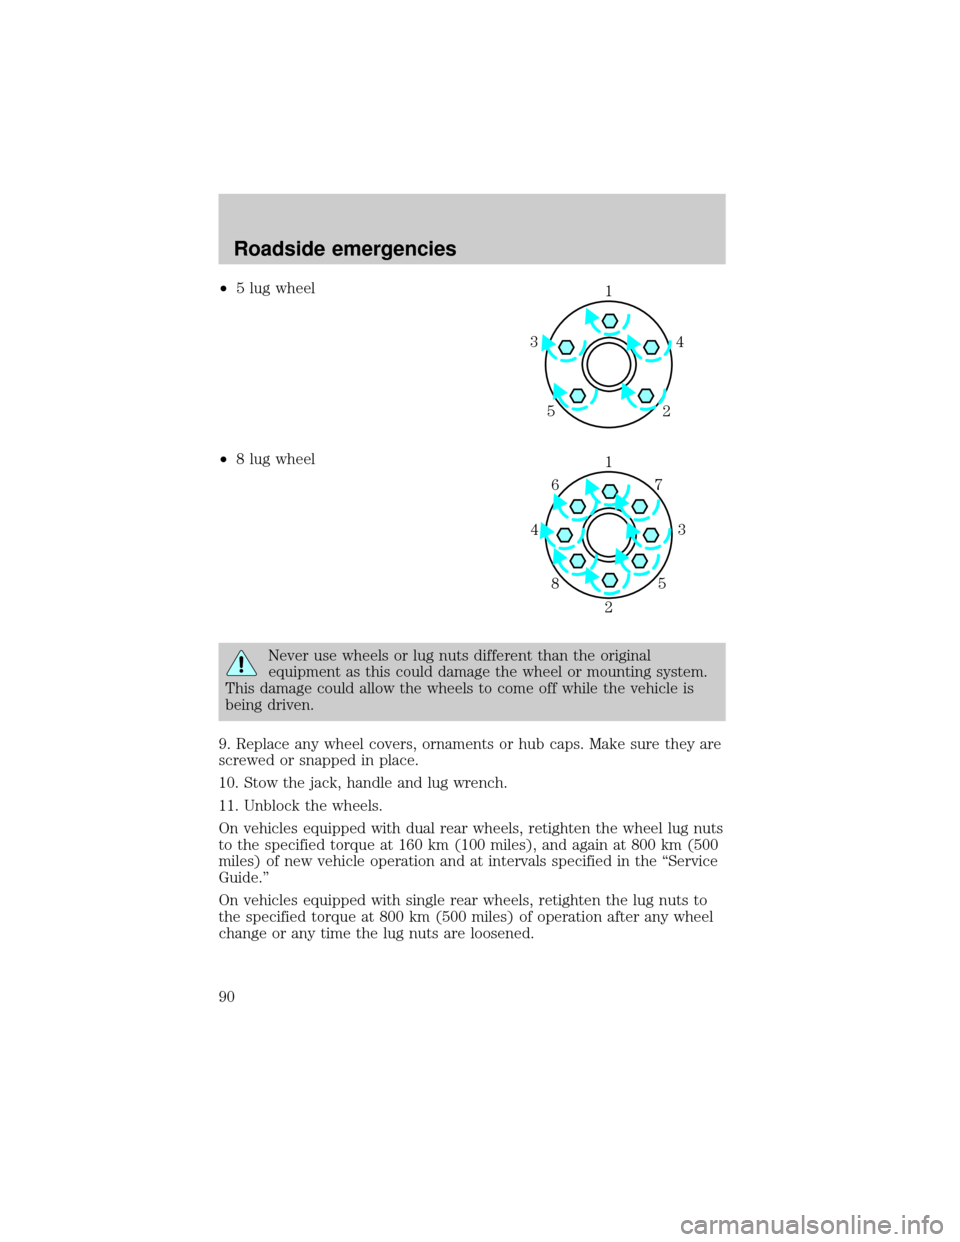
²5 lug wheel
²8 lug wheel
Never use wheels or lug nuts different than the original
equipment as this could damage the wheel or mounting system.
This damage could allow the wheels to come off while the vehicle is
being driven.
9. Replace any wheel covers, ornaments or hub caps. Make sure they are
screwed or snapped in place.
10. Stow the jack, handle and lug wrench.
11. Unblock the wheels.
On vehicles equipped with dual rear wheels, retighten the wheel lug nuts
to the specified torque at 160 km (100 miles), and again at 800 km (500
miles) of new vehicle operation and at intervals specified in the ªService
Guide.º
On vehicles equipped with single rear wheels, retighten the lug nuts to
the specified torque at 800 km (500 miles) of operation after any wheel
change or any time the lug nuts are loosened.
1
4 3
52
1
3 4
27 6
5 8
Roadside emergencies
90
Page 94 of 144

WRECKER TOWING
If you need to have your vehicle towed, contact a professional towing
service or, if you are a member, your roadside assistance center. It is
recommended that your vehicle be towed with a wheel lift or flatbed
equipment.
When calling for a tow truck, tell the operator what kind of vehicle you
have. A towing manual is available from Ford Motor Company for all
authorized tow truck operators. Have your tow truck driver refer to this
manual for proper hook-up and towing procedures for your vehicle.
Roadside emergencies
94
Page 113 of 144
WINDSHIELD WIPER BLADES
Check the wiper blades at least twice a year or when they seem less
effective. Substances such as tree sap and some hot wax treatments used
by commercial car washes reduce the effectiveness of wiper blades.
Checking the wiper blades
If the wiper blades do not wipe properly, clean both the windshield and
wiper blades using undiluted windshield wiper solution or a mild
detergent. Rinse thoroughly with clean water. To avoid damaging the
blades, do not use fuel, kerosene, paint thinner or other solvents.
Changing the wiper blades
When replacing wiper blade assemblies, always use a Motorcraft part or
equivalent. To make replacing the wipers easy, turn the ignition to ACC,
then turn the wipers on. When the wipers reach the vertical position,
turn the ignition to LOCK.
To replace the wiper blades:
1. Pull the wiper arm away from the
windshield and lock into the service
position.
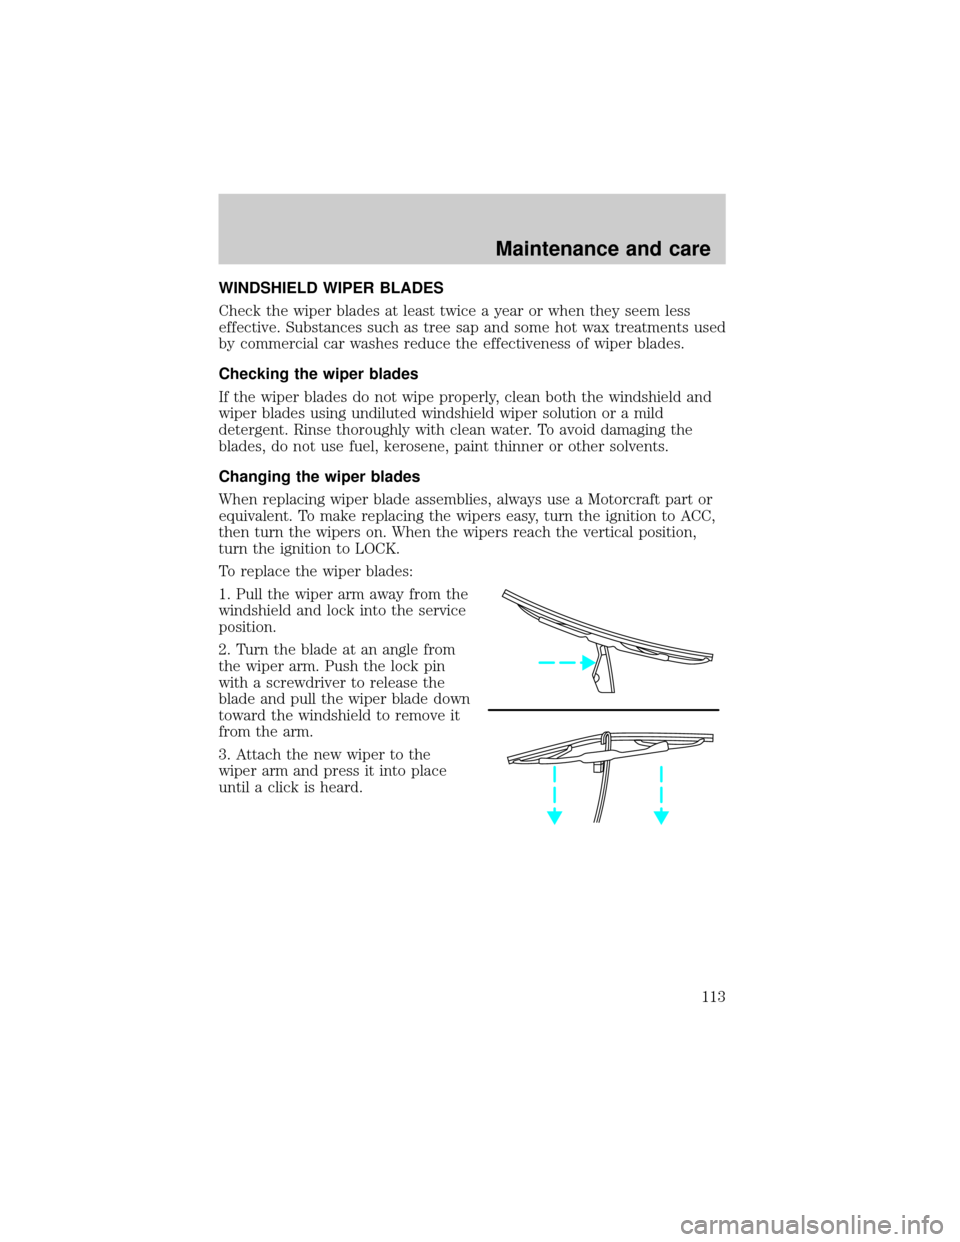
2. Turn the blade at an angle from
the wiper arm. Push the lock pin
with a screwdriver to release the
blade and pull the wiper blade down
toward the windshield to remove it
from the arm.
3. Attach the new wiper to the
wiper arm and press it into place
until a click is heard.
Maintenance and care
113
Page 123 of 144
²Turn signals
²Backup lamps
²License plate lamp
Do not remove lamp bulbs unless they will be replaced immediately. If a
bulb is removed for an extended period of time, contaminants may enter
the lamp housings and affect performance.
Replacing headlamp bulbs (aerodynamic)
Handle a halogen headlamp bulb carefully and keep out of
children's reach. Grasp the bulb only by its plastic base and do
not touch the glass. The oil from your hand could cause the bulb to
break the next time the headlamps are operated.
To remove the headlamp bulb:
1. Make sure headlamp switch is in OFF position.
2. Open the hood.
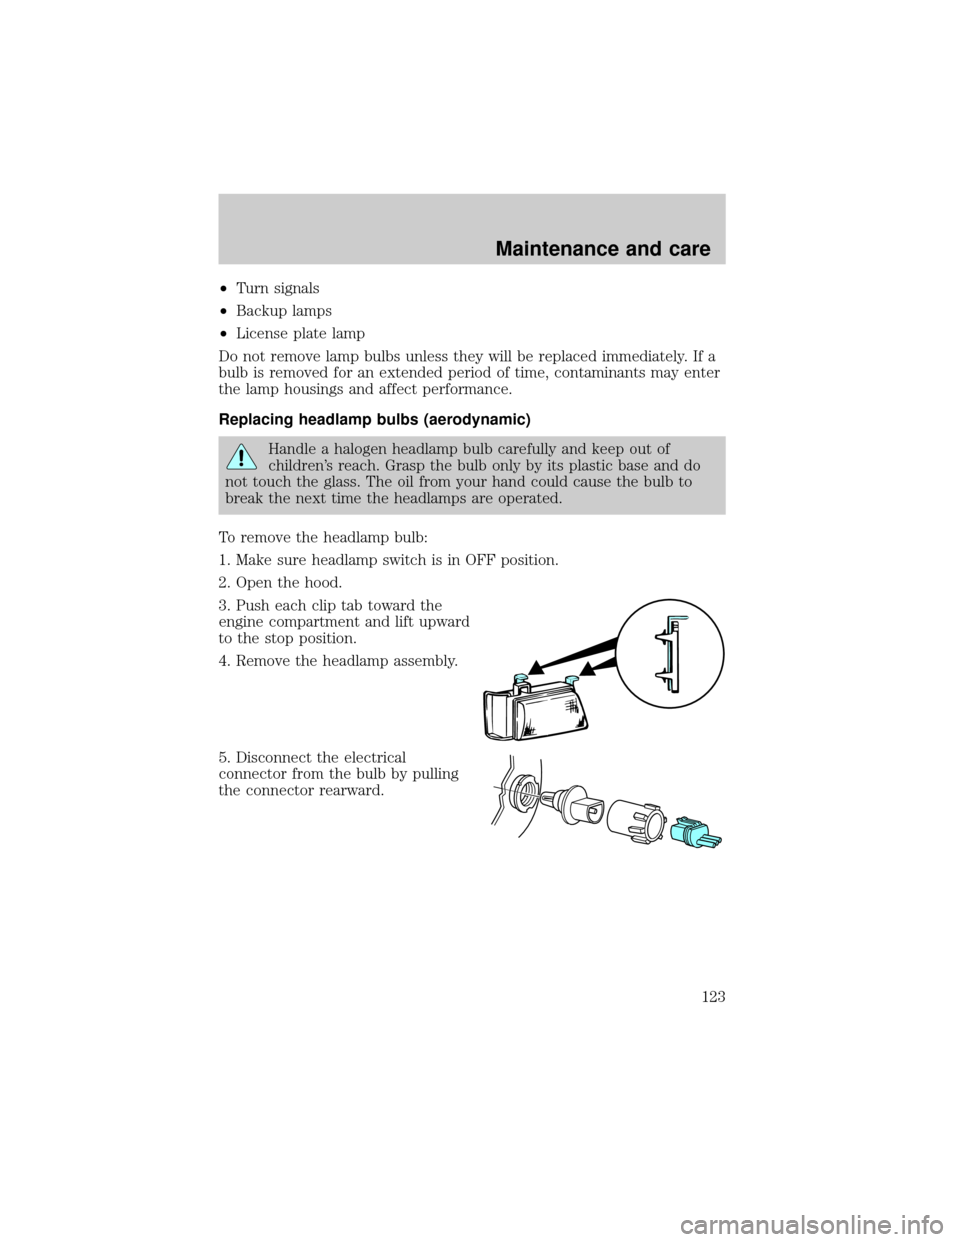
3. Push each clip tab toward the
engine compartment and lift upward
to the stop position.
4. Remove the headlamp assembly.
5. Disconnect the electrical
connector from the bulb by pulling
the connector rearward.
Maintenance and care
123
Page 128 of 144

Cleaning the exterior lamps
Wash with the same detergent as the exterior of your vehicle. Use glass
cleaner or tar remover if necessary.
To avoid scratching the lamps, do not use a dry paper towel, chemical
solvents or abrasive cleaners.
Cleaning the wiper blades
If the wiper blades do not wipe properly, clean the windshield and wiper
blades with undiluted windshield wiper solution or a mild detergent.
Rinse thoroughly with clean water. To avoid damaging the blades, do not
use fuel, kerosene, paint thinner or other solvents.
Cleaning the instrument panel
Clean with a damp cloth, then dry with a dry cloth.
Avoid cleaner or polish that increases the gloss of the upper portion of
the instrument panel. The dull finish in this area helps protect the driver
from undesirable windshield reflection.
Cleaning the interior fabric
Remove dust and loose dirt with a whisk broom or a vacuum cleaner.
Remove fresh spots immediately. Follow the directions that come with
the cleaner.
Cleaning and maintaining the safety belts
Clean the safety belts with a mild soap solution recommended for
cleaning upholstery or carpets. Do not bleach or dye the belts, because
these actions may weaken the belt webbing.
Check the safety belt system periodically to make sure there are no
nicks, wear or cuts. If your vehicle has been involved in an accident,
refer to theSafety belt maintenancesection in theSeating and safety
restraintschapter.
Underbody
Flush the complete underside of vehicle frequently. Keep body drain
holes unplugged. Inspect for road damage.
Inside windows
Use glass cleaner for the inside windows if they become fogged.
Maintenance and care
128
Page 141 of 144

Hood
release lever ..............................96
Ignition
positions of the ignition ...........21
Instrument panel
lighting up panel and interior .14
Jump-starting your vehicle ...91,93
attaching cables ........................92
disconnecting cables ................93
Keys
key in ignition chime .................9
Lamps
interior lamps ....................28,124
Lights, warning and indicator
air bag ..........................................8
anti-lock brakes (ABS) ..............6
brake ............................................6
charging system ..........................8
engine oil pressure .....................9
safety belt ...................................8
service engine soon .................6,7
turn signal indicator ...................8
Load limits
trailer towing ............................69
Lubricant specifications ...........132
Mirrors
side view mirrors (power) .......30
Odometer .....................................12
Overdrive .....................................27
Panic alarm feature, remote
entry system ................................31
Parking brake ..............................64
Parts (see Motorcraft parts) ....129
Power door locks ........................29
Power steering
fluid, checking and adding ....105
Refill capacities for fluids ........129
Relays .....................................79,84
Remote entry system .................30
illuminated entry .................33,34
locking/unlocking doors ......30,31replacement/additional
transmitters ...............................32
replacing the batteries .............31
Reporting safety defects ..........139
Safety restraints
extension assembly ..................44
for children ...............................49
lap and shoulder belts ...40,41,42
maintenance ..............................45
proper use .................................39
warning light and chime ..9,44,45
Safety seats for children
attaching with tether straps ....54
tether anchorage
hardware .........................54,55,57
Seats
adjusting the seat, manual .......34
adjusting the seat, power ........35
bench seat ............................36,37
lumbar support .........................36
quick release rear captain's
chair ......................................38,39
Servicing your vehicle ................95
precautions when servicing .....95
Snowplowing .................................3
Special notice
ambulance conversions ..............3
diesel-powered vehicles .............3
Speed control ..............................22
canceling a set speed ...............25
resuming a set speed ...............25
tap up/tap down ..................23,24
turning off .................................22
Speedometer ...............................10
Starting your vehicle .............59,61
Tilt steering wheel ......................26
Tires ....................................114,115
changing ...............................85,86
checking the pressure ............115
replacing .............................88,117
rotating ....................................115
snow tires and chains ............117
Index
141