engine FORD E SERIES 2004 4.G Owner's Guide
[x] Cancel search | Manufacturer: FORD, Model Year: 2004, Model line: E SERIES, Model: FORD E SERIES 2004 4.GPages: 240, PDF Size: 3.62 MB
Page 130 of 240
•To eliminate excessive shifting, use a lower gear. This will also assist
in transmission cooling.
•Anticipate stops and brake gradually.
When descending long, steep downhill grades, always use a lower gear to
provide engine braking to save wear on brakes. Use Drive (Overdrive
OFF) on moderately steep hills, Second (2) on steep hills, and First (1)
on very steep hills.Do not apply your brakes continuously, as they
may overheat and become less effective.
Servicing after towing
If you tow a trailer for long distances, your vehicle will require more
frequent service intervals. Refer to your scheduled maintenance guide for
more information.
Trailer towing tips
•Practice turning, stopping and backing up before starting on a trip to
get the feel of the vehicle trailer combination. When turning, make
wider turns so the trailer wheels will clear curbs and other obstacles.
•Allow more distance for stopping with a trailer attached.
•The trailer tongue weight should be 10–15% of the loaded trailer
weight.
•If you will be towing a trailer frequently in hot weather, hilly
conditions, at GCW, or any combination of these factors, consider
refilling your rear axle with synthetic gear lube. Refer to the
Maintenance and specificationschapter for the lubricant
specification.
•After you have traveled 80 km (50 miles), thoroughly check your
hitch, electrical connections and trailer wheel lug nuts.
•When stopped in traffic for long periods of time in hot weather, place
the gearshift in P (Park) and increase idle speed. This aids engine
cooling and air conditioner efficiency.
•Vehicles with trailers should not be parked on a grade. If you must
park on a grade, place wheel chocks under the trailer’s wheels.
Launching or retrieving a boat
Disconnect the wiring to the trailer before backing the trailer
into the water. Reconnect the wiring to the trailer after the
trailer is removed from the water.
2004 Econoline(eco)
Owners Guide (post-2002-fmt)
USA English(fus)
Driving
130
Page 133 of 240
Canadian customers who require roadside assistance, call
1–800–665–2006.
If you need to arrange roadside assistance for yourself, Ford Motor
Company will reimburse a reasonable amount. To obtain reimbursement
information, U.S. Ford or Mercury vehicles customers call
1-800-241-3673; Lincoln vehicle customers call 1–800–521–4140.
Canadian customers who need to obtain reimbursement information, call
1–800–665–2006.
ROADSIDE COVERAGE BEYOND BASIC WARRANTY
In the United States, you may purchase additional roadside assistance
coverage beyond this period through the Ford Auto Club by contacting
your Ford or Lincoln Mercury dealer.
Similarly in Canada, for uninterrupted Roadside Assistance coverage, you
may purchase extended coverage prior to your Basic Warranty’s Roadside
Assistance expiring. For more information and enrollment, contact
1–877–294–2582 or visit our website at www.ford.ca.
HAZARD FLASHER
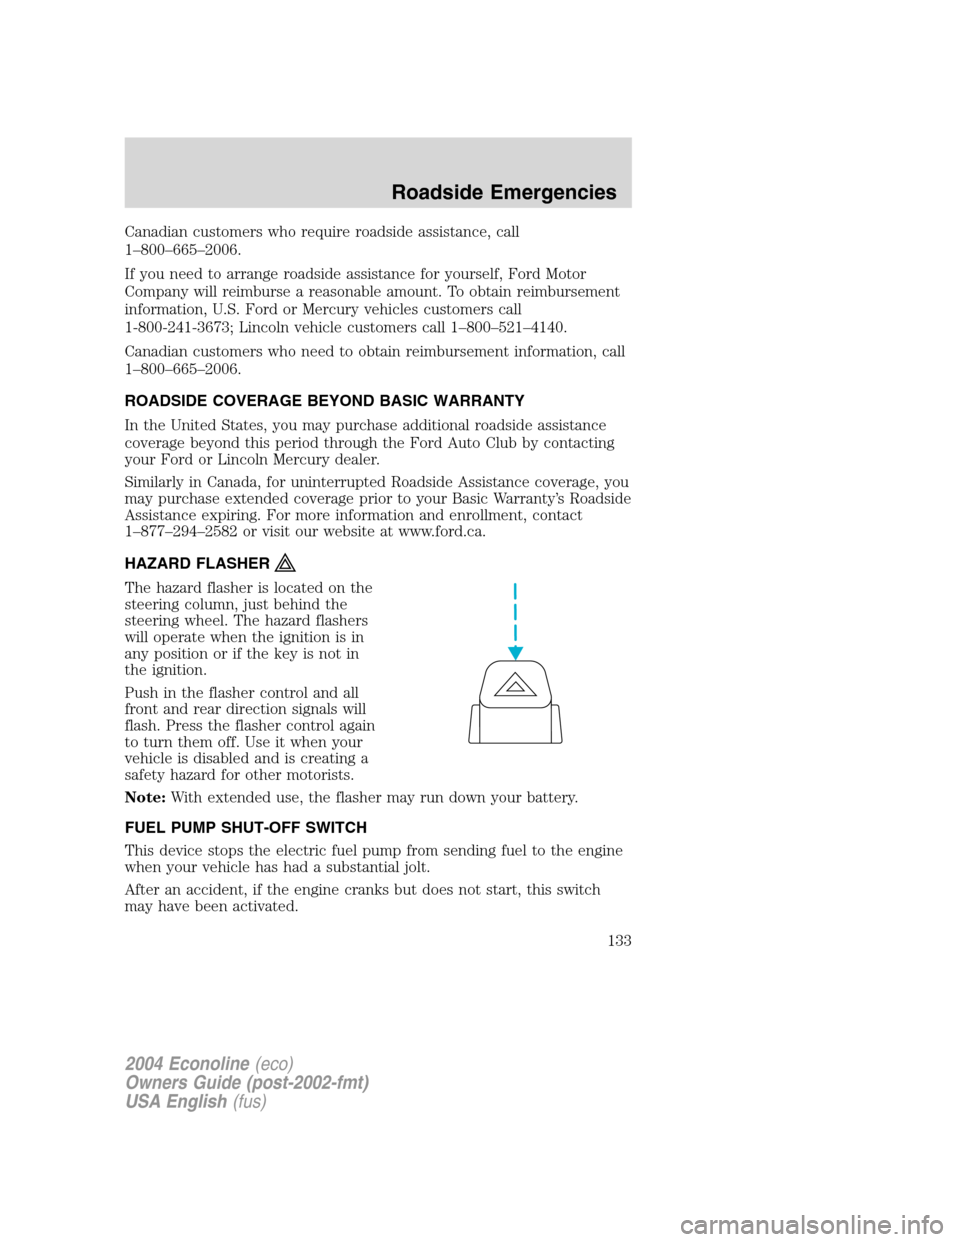
The hazard flasher is located on the
steering column, just behind the
steering wheel. The hazard flashers
will operate when the ignition is in
any position or if the key is not in
the ignition.
Push in the flasher control and all
front and rear direction signals will
flash. Press the flasher control again
to turn them off. Use it when your
vehicle is disabled and is creating a
safety hazard for other motorists.
Note:With extended use, the flasher may run down your battery.
FUEL PUMP SHUT-OFF SWITCH
This device stops the electric fuel pump from sending fuel to the engine
when your vehicle has had a substantial jolt.
After an accident, if the engine cranks but does not start, this switch
may have been activated.
2004 Econoline(eco)
Owners Guide (post-2002-fmt)
USA English(fus)
Roadside Emergencies
133
Page 136 of 240
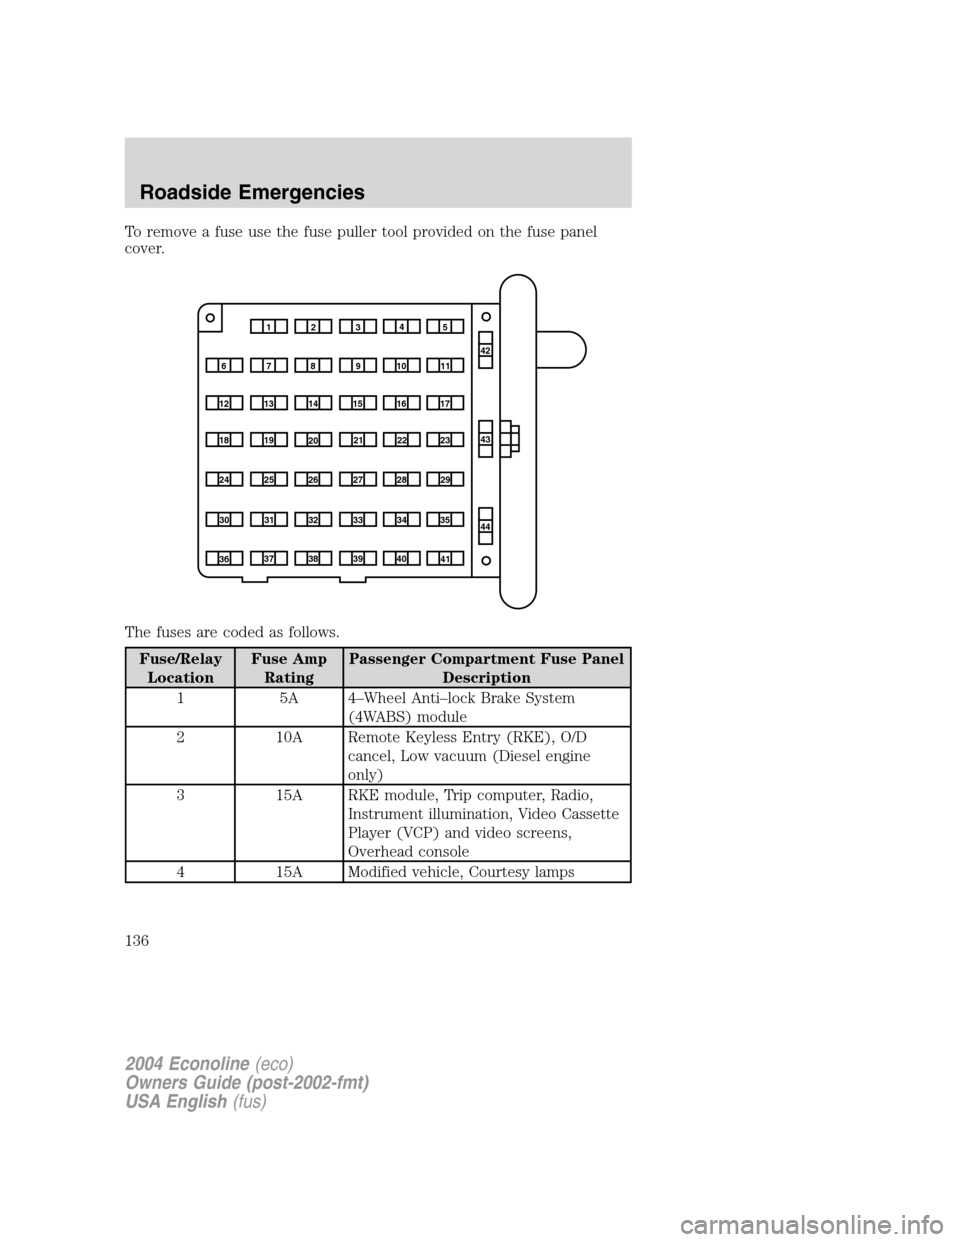
To remove a fuse use the fuse puller tool provided on the fuse panel
cover.
The fuses are coded as follows.
Fuse/RelayLocation Fuse Amp
Rating Passenger Compartment Fuse Panel
Description
1 5A 4–Wheel Anti–lock Brake System (4WABS) module
2 10A Remote Keyless Entry (RKE), O/D cancel, Low vacuum (Diesel engine
only)
3 15A RKE module, Trip computer, Radio, Instrument illumination, Video Cassette
Player (VCP) and video screens,
Overhead console
4 15A Modified vehicle, Courtesy lamps
1234 5
7
68910 1142
43
44
13
12 14
15 16 17
19
18
2021 22 23
25
24
26 27 28 29
31
30 32 33 34 35
37
36 38 39
40
41
2004 Econoline (eco)
Owners Guide (post-2002-fmt)
USA English (fus)
Roadside Emergencies
136
Page 137 of 240
Fuse/RelayLocation Fuse Amp
Rating Passenger Compartment Fuse Panel
Description
5 30A Power lock switches, Power locks without RKE
6 10A Brake-shift interlock, Speed control (gasoline engine only)
7 10A Multi-function switch, Turn signals
8 30A Radio capacitor(s), Ignition coil, Powertrain Control Module (PCM)
diode, PCM power relay, Auxiliary PCM
(APCM) (Diesel engine only)
9 30A Wiper control module, Windshield wiper motor
10 20A Main light switch, Park lamps, License lamp (external lamps), Multi-function
switch (flash-to-pass)
11 15A Multi-function switch (hazards), Brake lamp switch, Brake lamps
12 15A Back-up lamps, Auxiliary battery relay (gasoline engine only), Trailer tow relay
13 15A Blend door actuator, A/C heater, Function selector switch
14 5A Instrument cluster
15 5A Trailer battery charge relay, Cluster, Daytime Running Lamps (DRL) module
16 30A Power seats
17 5A Power mirrors
18 —Not used
19 —Not used
20 10A Restraints
21 —Not used
2004 Econoline (eco)
Owners Guide (post-2002-fmt)
USA English (fus)
Roadside Emergencies
137
Page 139 of 240
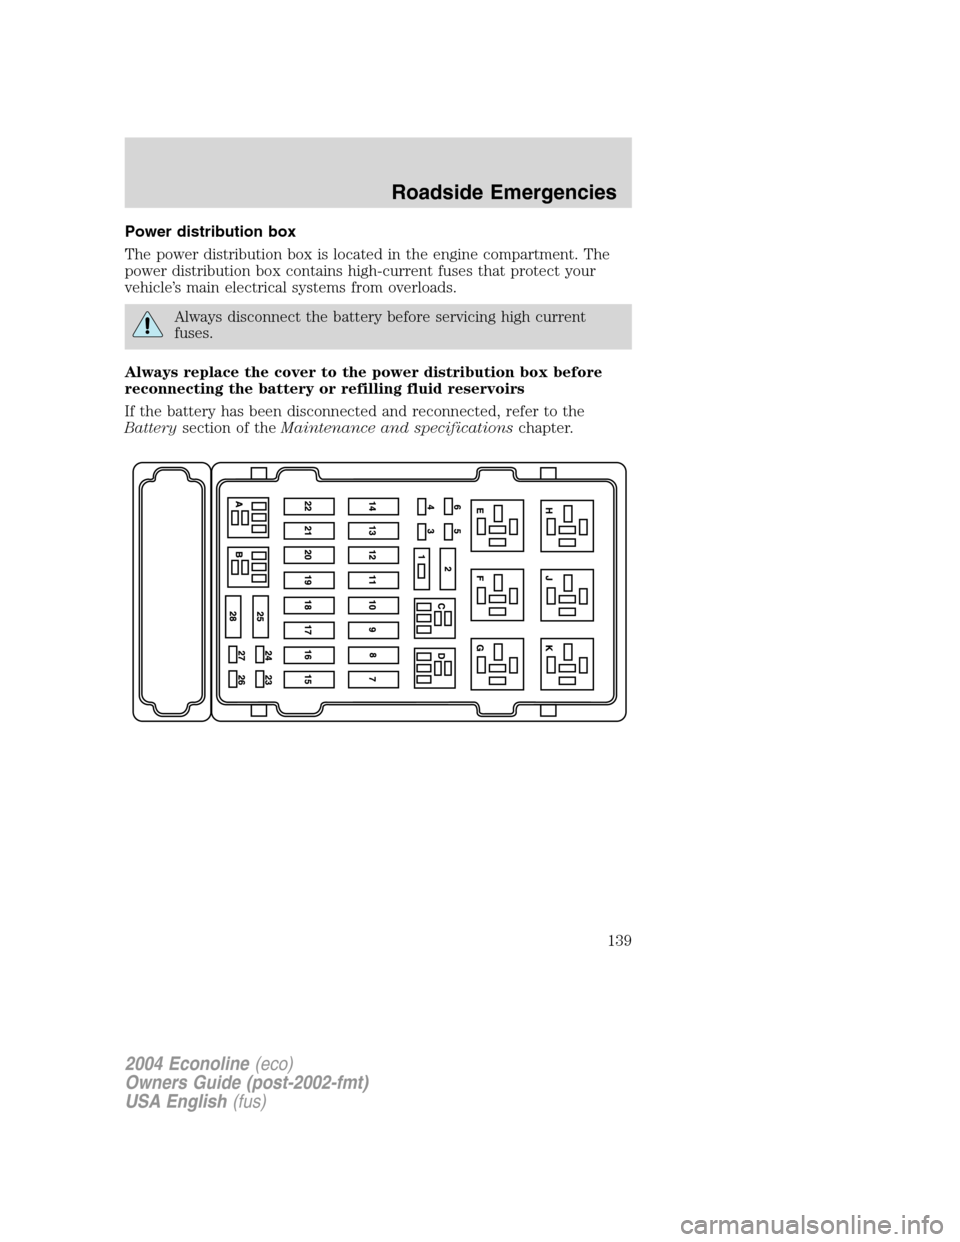
Power distribution box
The power distribution box is located in the engine compartment. The
power distribution box contains high-current fuses that protect your
vehicle’s main electrical systems from overloads.
Always disconnect the battery before servicing high current
fuses.
Always replace the cover to the power distribution box before
reconnecting the battery or refilling fluid reservoirs
If the battery has been disconnected and reconnected, refer to the
Batterysection of theMaintenance and specificationschapter.
2004 Econoline(eco)
Owners Guide (post-2002-fmt)
USA English(fus)
Roadside Emergencies
139
Page 140 of 240
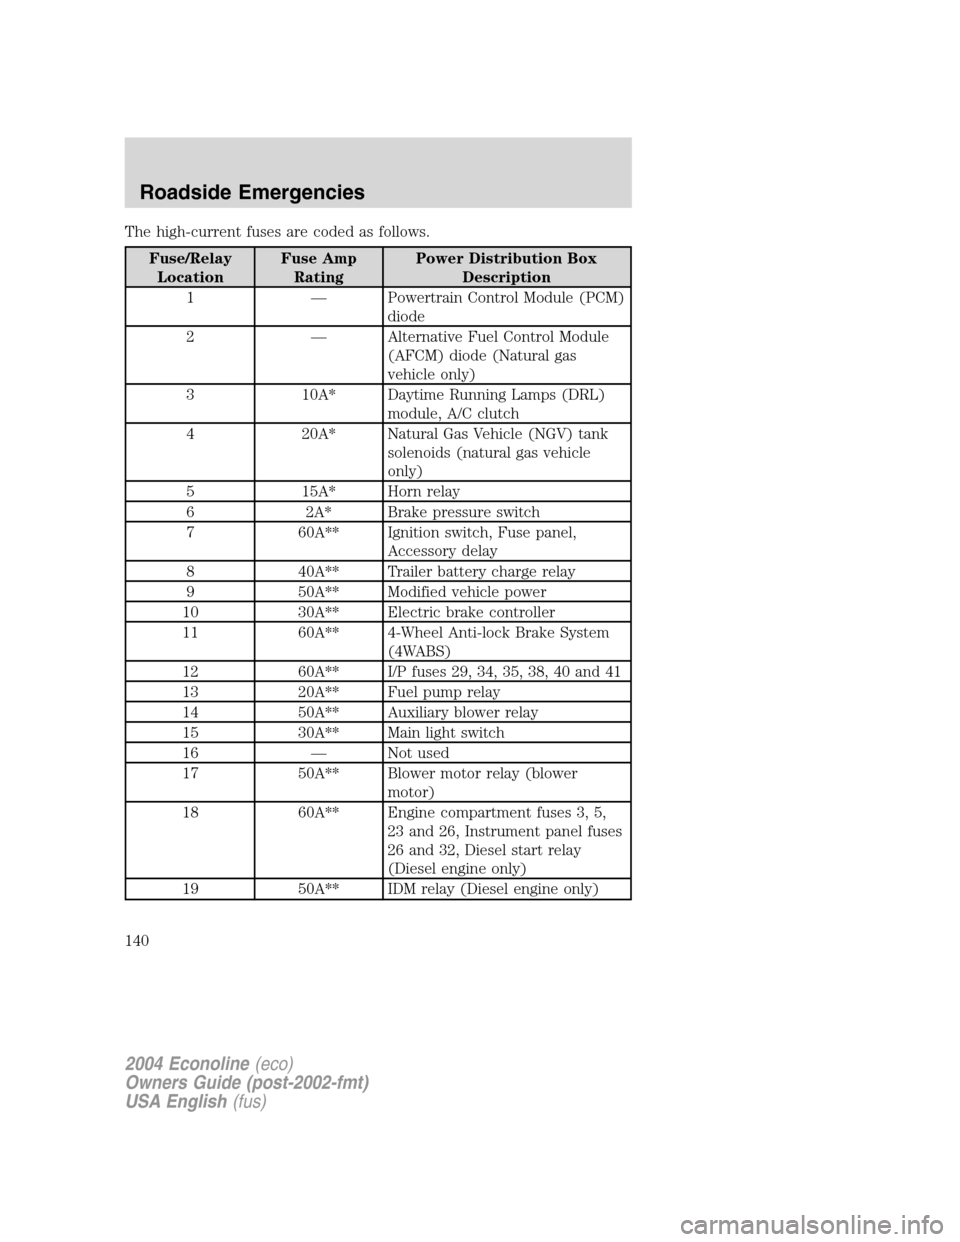
The high-current fuses are coded as follows.
Fuse/RelayLocation Fuse Amp
Rating Power Distribution Box
Description
1 — Powertrain Control Module (PCM) diode
2 — Alternative Fuel Control Module (AFCM) diode (Natural gas
vehicle only)
3 10A* Daytime Running Lamps (DRL) module, A/C clutch
4 20A* Natural Gas Vehicle (NGV) tank solenoids (natural gas vehicle
only)
5 15A* Horn relay
6 2A* Brake pressure switch
7 60A** Ignition switch, Fuse panel, Accessory delay
8 40A** Trailer battery charge relay
9 50A** Modified vehicle power
10 30A** Electric brake controller
11 60A** 4-Wheel Anti-lock Brake System (4WABS)
12 60A** I/P fuses 29, 34, 35, 38, 40 and 41
13 20A** Fuel pump relay
14 50A** Auxiliary blower relay
15 30A** Main light switch
16 — Not used
17 50A** Blower motor relay (blower motor)
18 60A** Engine compartment fuses 3, 5, 23 and 26, Instrument panel fuses
26 and 32, Diesel start relay
(Diesel engine only)
19 50A** IDM relay (Diesel engine only)
2004 Econoline (eco)
Owners Guide (post-2002-fmt)
USA English (fus)
Roadside Emergencies
140
Page 141 of 240
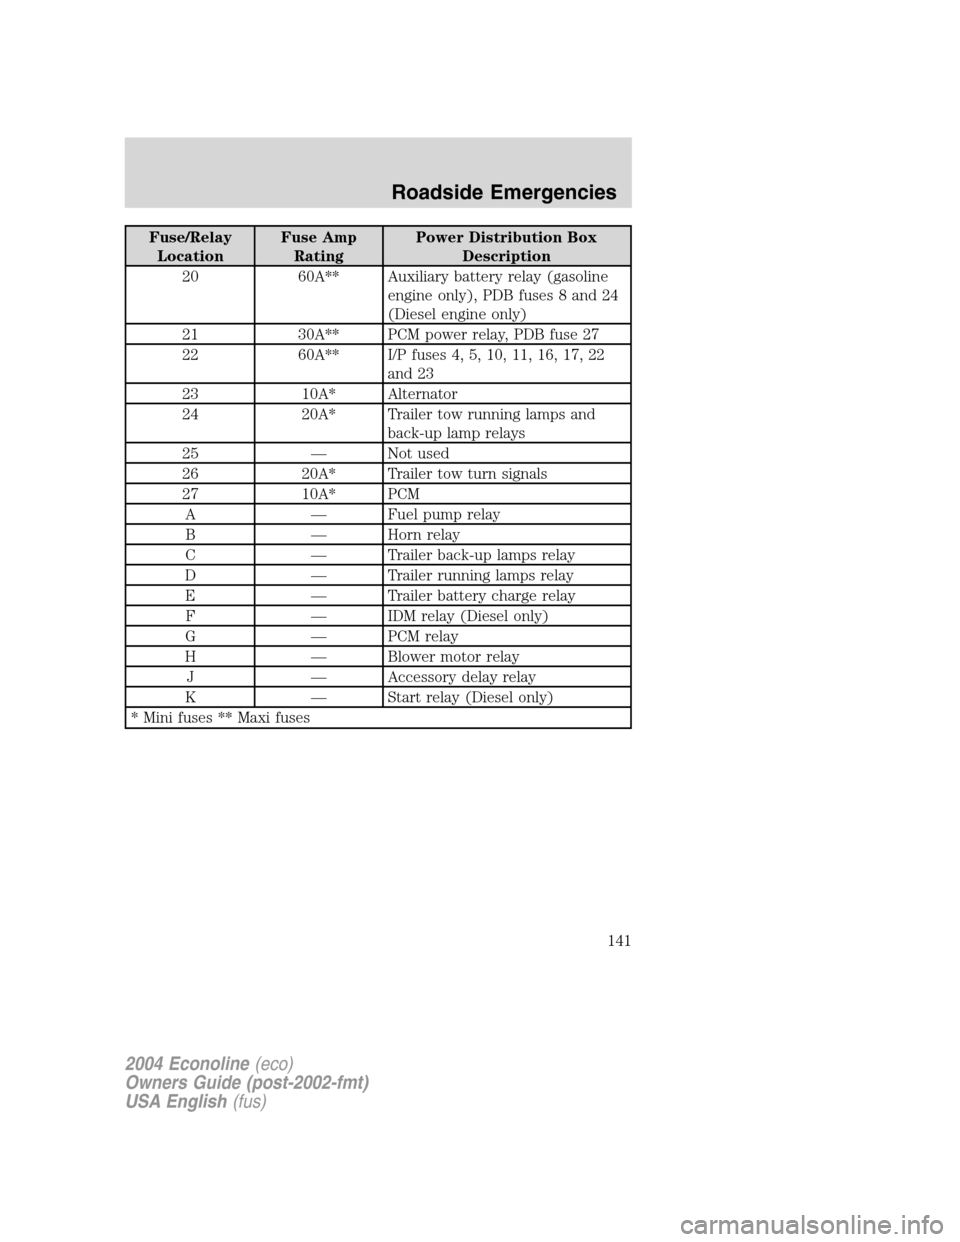
Fuse/Relay
LocationFuse Amp
RatingPower Distribution Box
Description
20 60A** Auxiliary battery relay (gasoline
engine only), PDB fuses 8 and 24
(Diesel engine only)
21 30A** PCM power relay, PDB fuse 27
22 60A** I/P fuses 4, 5, 10, 11, 16, 17, 22
and 23
23 10A* Alternator
24 20A* Trailer tow running lamps and
back-up lamp relays
25—Not used
26 20A* Trailer tow turn signals
27 10A* PCM
A—Fuel pump relay
B—Horn relay
C—Trailer back-up lamps relay
D—Trailer running lamps relay
E—Trailer battery charge relay
F—IDM relay (Diesel only)
G—PCM relay
H—Blower motor relay
J—Accessory delay relay
K—Start relay (Diesel only)
* Mini fuses ** Maxi fuses
2004 Econoline(eco)
Owners Guide (post-2002-fmt)
USA English(fus)
Roadside Emergencies
141
Page 142 of 240
Relay modules
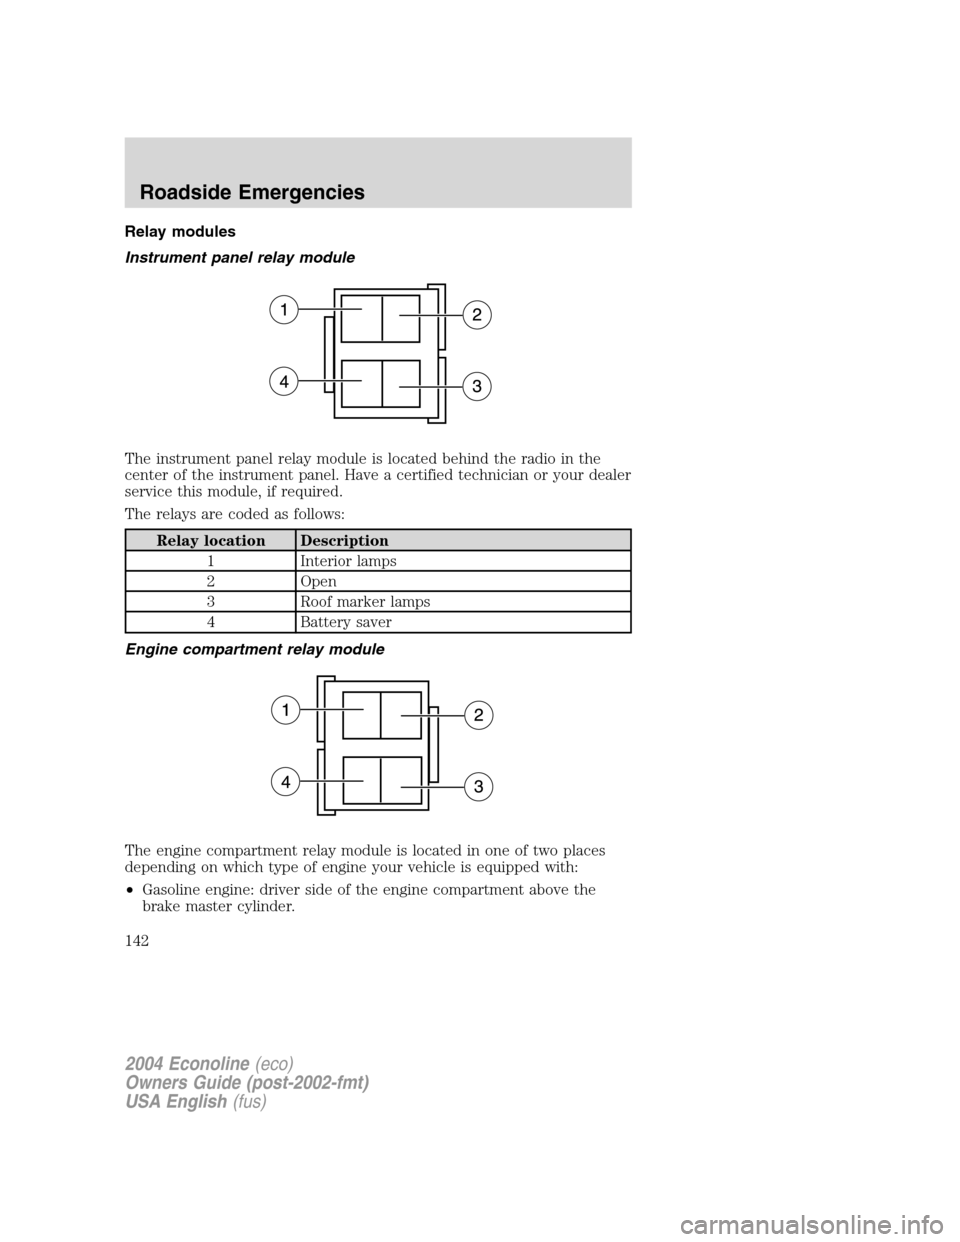
Instrument panel relay module
The instrument panel relay module is located behind the radio in the
center of the instrument panel. Have a certified technician or your dealer
service this module, if required.
The relays are coded as follows:
Relay location Description
1 Interior lamps
2 Open
3 Roof marker lamps
4 Battery saver
Engine compartment relay module
The engine compartment relay module is located in one of two places
depending on which type of engine your vehicle is equipped with:
•Gasoline engine: driver side of the engine compartment above the
brake master cylinder.
2004 Econoline(eco)
Owners Guide (post-2002-fmt)
USA English(fus)
Roadside Emergencies
142
Page 143 of 240
•Diesel engine: passenger side of the engine compartment behind the
power distribution box.
Have a certified technician or your dealer service this module, if
required.
The relays are coded as follows:
Relay location Description
1 Trailer tow left turn
2 A/C control
3 PCM back-up lamp
4 Trailer tow right turn
CHANGING A FLAT TIRE
If you get a flat tire while driving:
•do not brake heavily.
•gradually decrease the vehicle’s speed.
•hold the steering wheel firmly.
•slowly move to a safe place on the side of the road.
The use of tire sealants may damage your tires.
Spare tire information
The spare tire for your vehicle is stowed under the rear of your vehicle
(except cutaway and stripped chassis models or if equipped on E-350
Chassis Cab vehicles).
2004 Econoline(eco)
Owners Guide (post-2002-fmt)
USA English(fus)
Roadside Emergencies
143
Page 145 of 240
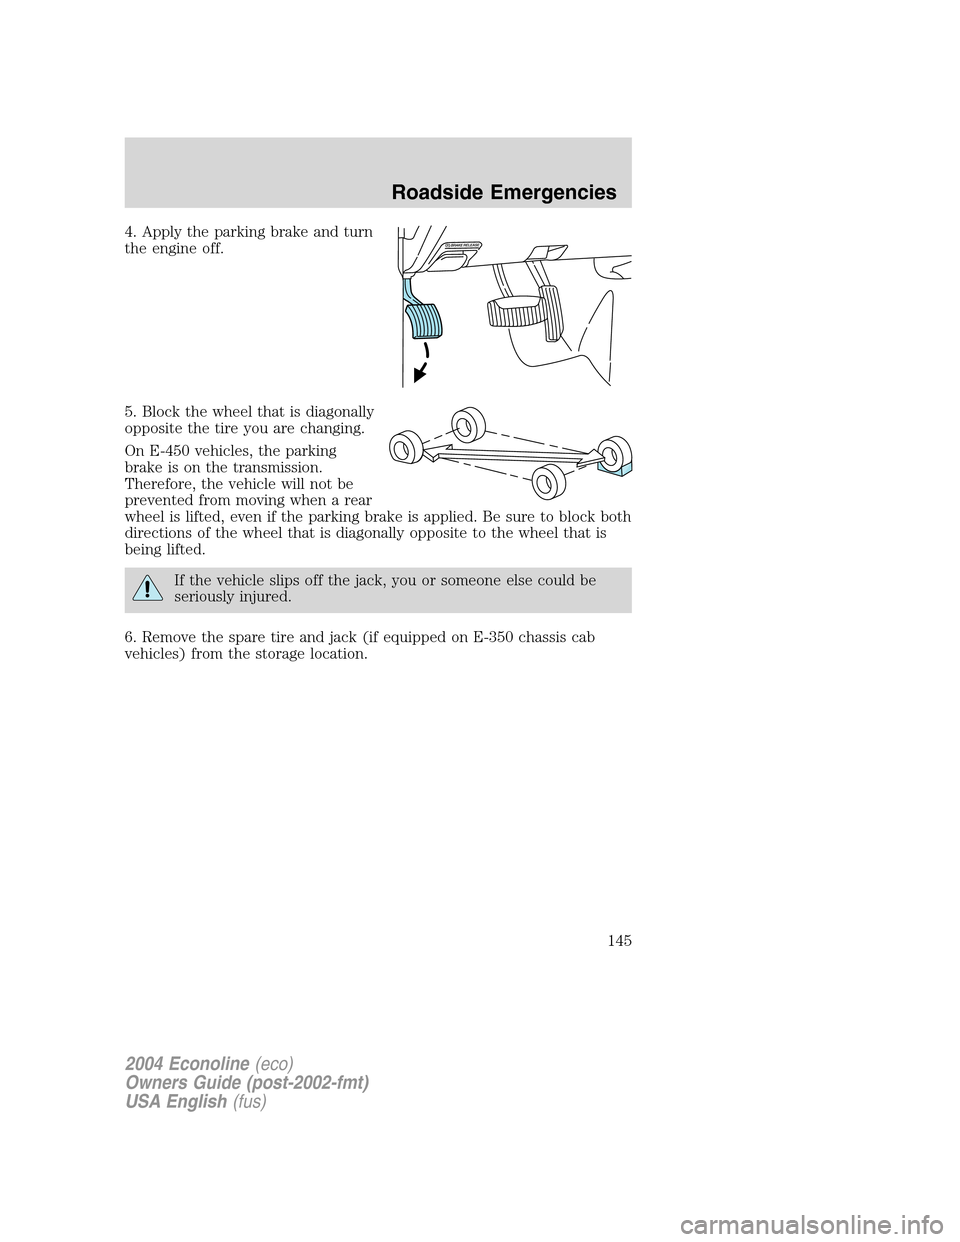
4. Apply the parking brake and turn
the engine off.
5. Block the wheel that is diagonally
opposite the tire you are changing.
On E-450 vehicles, the parking
brake is on the transmission.
Therefore, the vehicle will not be
prevented from moving when a rear
wheel is lifted, even if the parking brake is applied. Be sure to block both
directions of the wheel that is diagonally opposite to the wheel that is
being lifted.
If the vehicle slips off the jack, you or someone else could be
seriously injured.
6. Remove the spare tire and jack (if equipped on E-350 chassis cab
vehicles) from the storage location.
2004 Econoline(eco)
Owners Guide (post-2002-fmt)
USA English(fus)
Roadside Emergencies
145