clock FORD E SERIES 2005 4.G User Guide
[x] Cancel search | Manufacturer: FORD, Model Year: 2005, Model line: E SERIES, Model: FORD E SERIES 2005 4.GPages: 248, PDF Size: 5.53 MB
Page 49 of 248
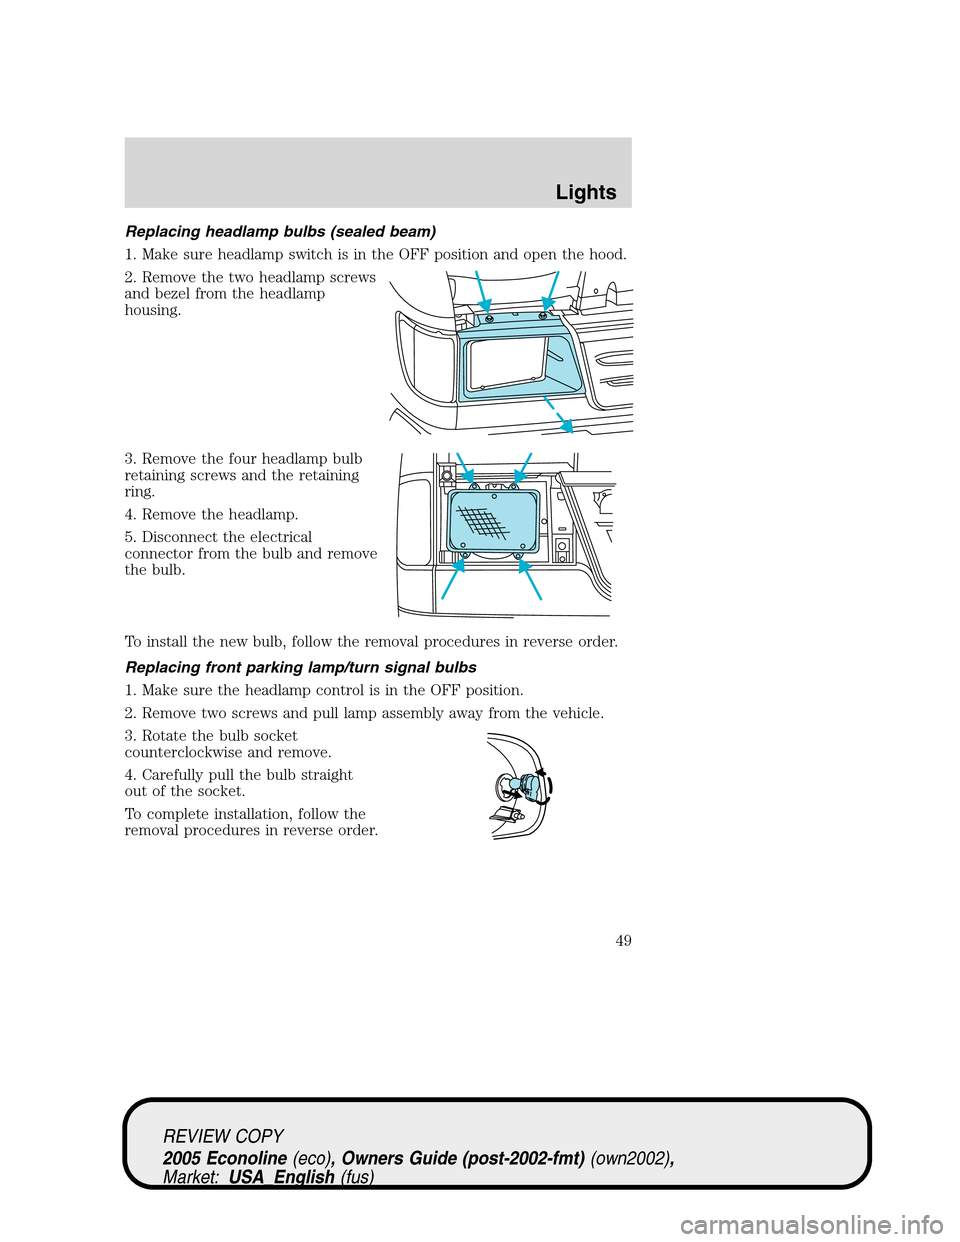
Replacing headlamp bulbs (sealed beam)
1. Make sure headlamp switch is in the OFF position and open the hood.
2. Remove the two headlamp screws
and bezel from the headlamp
housing.
3. Remove the four headlamp bulb
retaining screws and the retaining
ring.
4. Remove the headlamp.
5. Disconnect the electrical
connector from the bulb and remove
the bulb.
To install the new bulb, follow the removal procedures in reverse order.
Replacing front parking lamp/turn signal bulbs
1. Make sure the headlamp control is in the OFF position.
2. Remove two screws and pull lamp assembly away from the vehicle.
3. Rotate the bulb socket
counterclockwise and remove.
4. Carefully pull the bulb straight
out of the socket.
To complete installation, follow the
removal procedures in reverse order.
REVIEW COPY
2005 Econoline(eco), Owners Guide (post-2002-fmt)(own2002),
Market:USA_English(fus)
Lights
49
Page 50 of 248
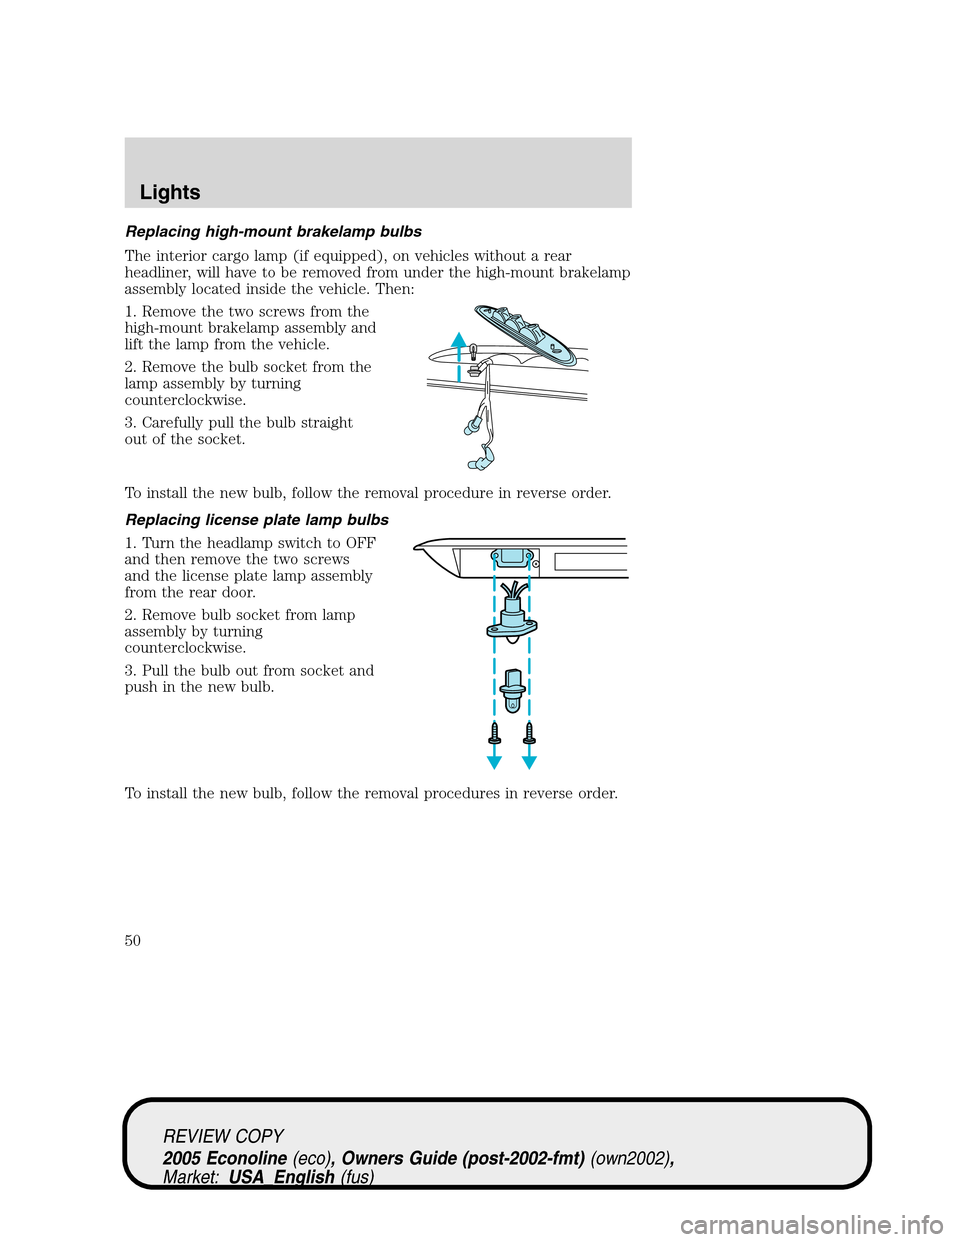
Replacing high-mount brakelamp bulbs
The interior cargo lamp (if equipped), on vehicles without a rear
headliner, will have to be removed from under the high-mount brakelamp
assembly located inside the vehicle. Then:
1. Remove the two screws from the
high-mount brakelamp assembly and
lift the lamp from the vehicle.
2. Remove the bulb socket from the
lamp assembly by turning
counterclockwise.
3. Carefully pull the bulb straight
out of the socket.
To install the new bulb, follow the removal procedure in reverse order.
Replacing license plate lamp bulbs
1. Turn the headlamp switch to OFF
and then remove the two screws
and the license plate lamp assembly
from the rear door.
2. Remove bulb socket from lamp
assembly by turning
counterclockwise.
3. Pull the bulb out from socket and
push in the new bulb.
To install the new bulb, follow the removal procedures in reverse order.
REVIEW COPY
2005 Econoline(eco), Owners Guide (post-2002-fmt)(own2002),
Market:USA_English(fus)
Lights
50
Page 51 of 248
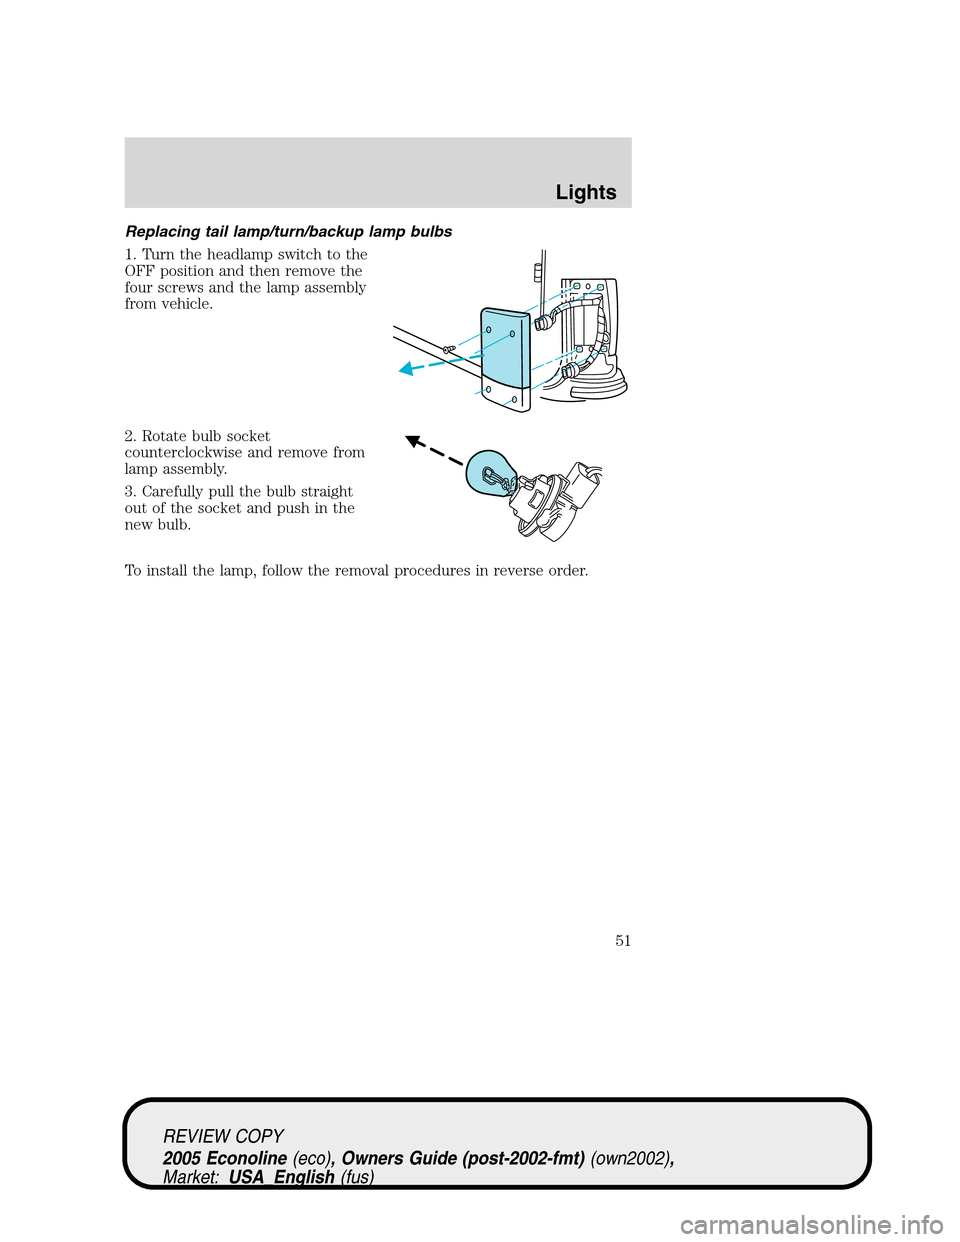
Replacing tail lamp/turn/backup lamp bulbs
1. Turn the headlamp switch to the
OFF position and then remove the
four screws and the lamp assembly
from vehicle.
2. Rotate bulb socket
counterclockwise and remove from
lamp assembly.
3. Carefully pull the bulb straight
out of the socket and push in the
new bulb.
To install the lamp, follow the removal procedures in reverse order.
REVIEW COPY
2005 Econoline(eco), Owners Guide (post-2002-fmt)(own2002),
Market:USA_English(fus)
Lights
51
Page 68 of 248
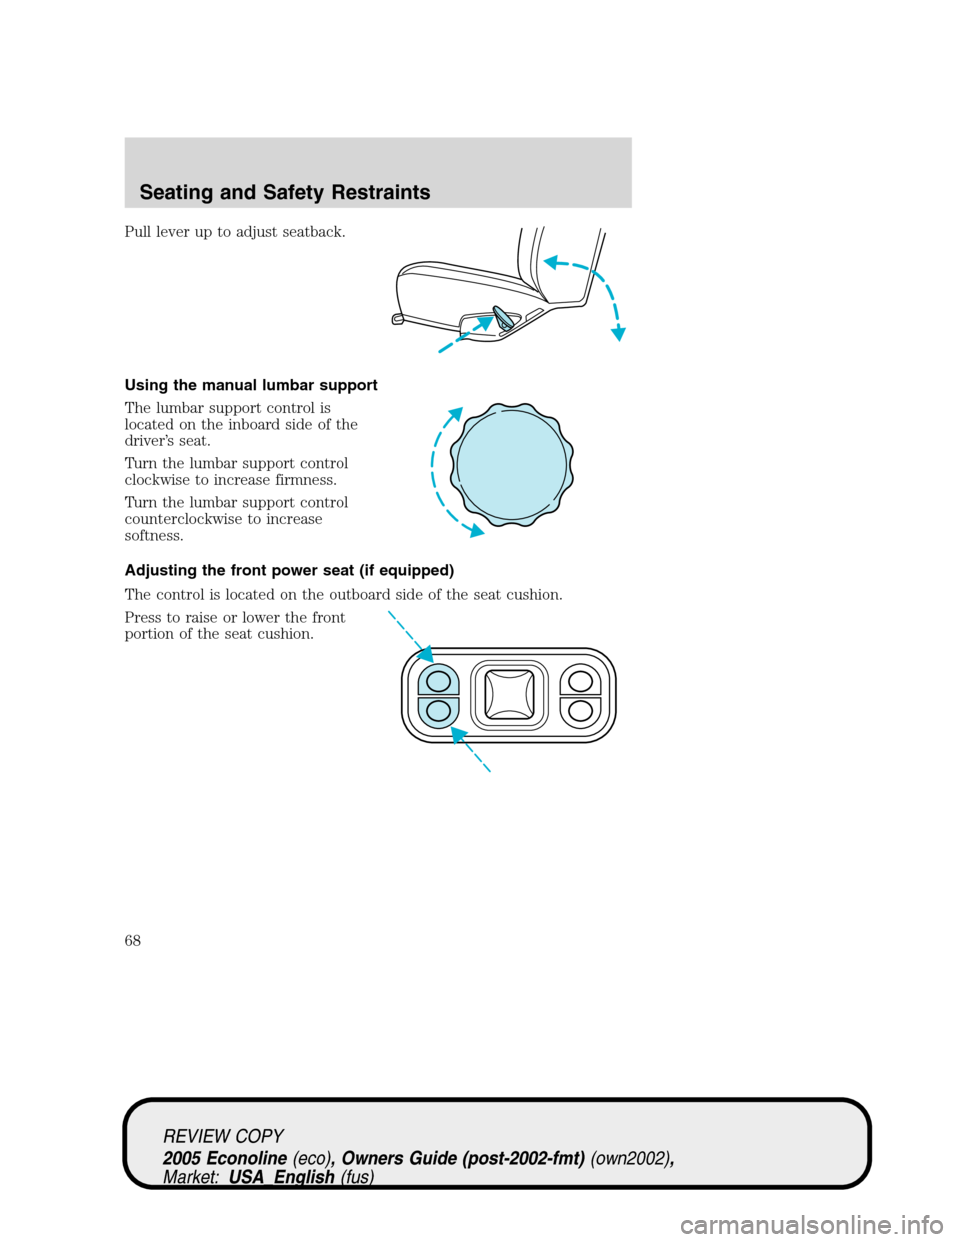
Pull lever up to adjust seatback.
Using the manual lumbar support
The lumbar support control is
located on the inboard side of the
driver’s seat.
Turn the lumbar support control
clockwise to increase firmness.
Turn the lumbar support control
counterclockwise to increase
softness.
Adjusting the front power seat (if equipped)
The control is located on the outboard side of the seat cushion.
Press to raise or lower the front
portion of the seat cushion.
REVIEW COPY
2005 Econoline(eco), Owners Guide (post-2002-fmt)(own2002),
Market:USA_English(fus)
Seating and Safety Restraints
68
Page 113 of 248
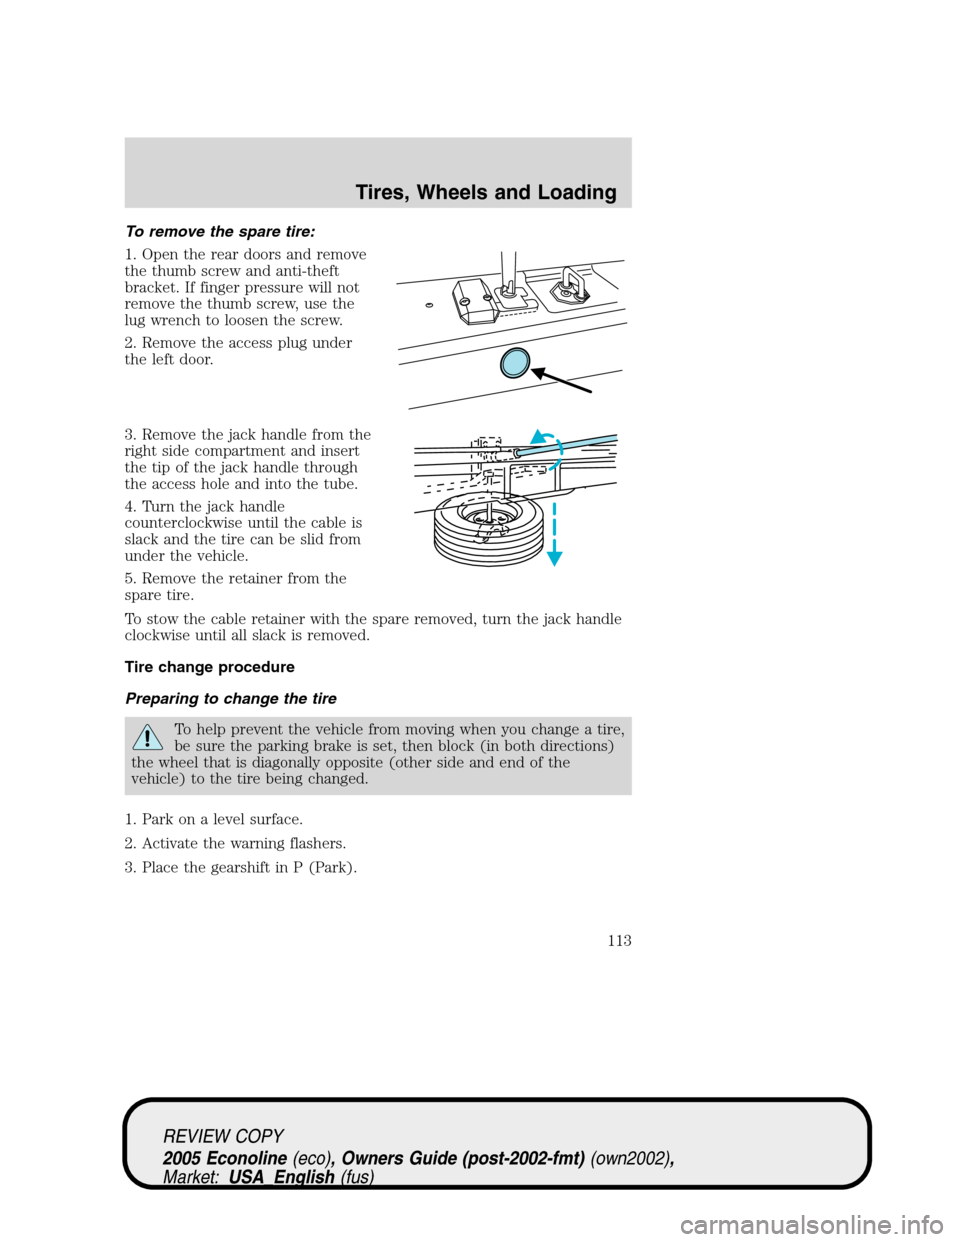
To remove the spare tire:
1. Open the rear doors and remove
the thumb screw and anti-theft
bracket. If finger pressure will not
remove the thumb screw, use the
lug wrench to loosen the screw.
2. Remove the access plug under
the left door.
3. Remove the jack handle from the
right side compartment and insert
the tip of the jack handle through
the access hole and into the tube.
4. Turn the jack handle
counterclockwise until the cable is
slack and the tire can be slid from
under the vehicle.
5. Remove the retainer from the
spare tire.
To stow the cable retainer with the spare removed, turn the jack handle
clockwise until all slack is removed.
Tire change procedure
Preparing to change the tire
To help prevent the vehicle from moving when you change a tire,
be sure the parking brake is set, then block (in both directions)
the wheel that is diagonally opposite (other side and end of the
vehicle) to the tire being changed.
1. Park on a level surface.
2. Activate the warning flashers.
3. Place the gearshift in P (Park).
REVIEW COPY
2005 Econoline(eco), Owners Guide (post-2002-fmt)(own2002),
Market:USA_English(fus)
Tires, Wheels and Loading
113
Page 115 of 248
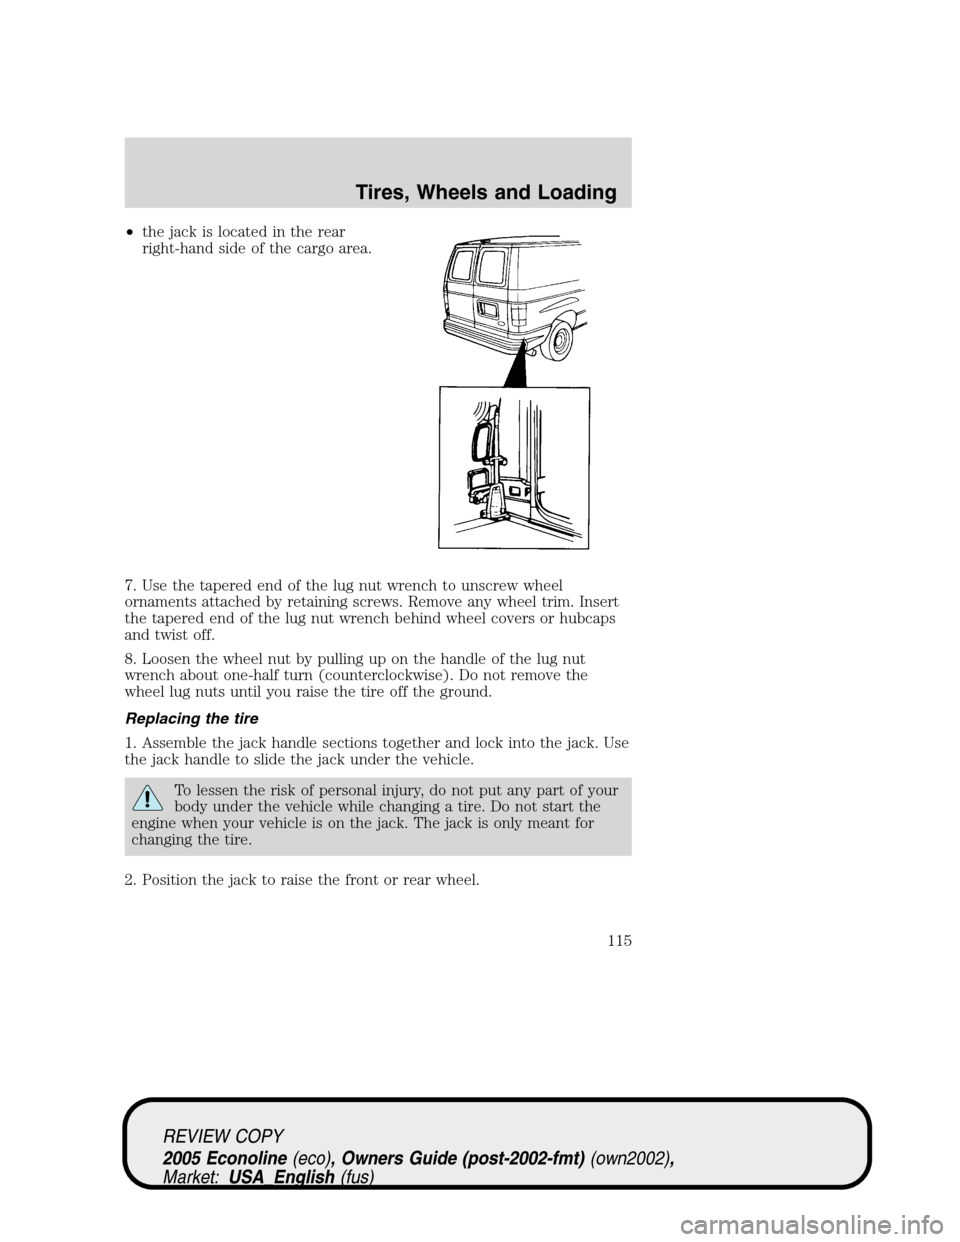
•the jack is located in the rear
right-hand side of the cargo area.
7. Use the tapered end of the lug nut wrench to unscrew wheel
ornaments attached by retaining screws. Remove any wheel trim. Insert
the tapered end of the lug nut wrench behind wheel covers or hubcaps
and twist off.
8. Loosen the wheel nut by pulling up on the handle of the lug nut
wrench about one-half turn (counterclockwise). Do not remove the
wheel lug nuts until you raise the tire off the ground.
Replacing the tire
1. Assemble the jack handle sections together and lock into the jack. Use
the jack handle to slide the jack under the vehicle.
To lessen the risk of personal injury, do not put any part of your
body under the vehicle while changing a tire. Do not start the
engine when your vehicle is on the jack. The jack is only meant for
changing the tire.
2. Position the jack to raise the front or rear wheel.
REVIEW COPY
2005 Econoline(eco), Owners Guide (post-2002-fmt)(own2002),
Market:USA_English(fus)
Tires, Wheels and Loading
115
Page 117 of 248
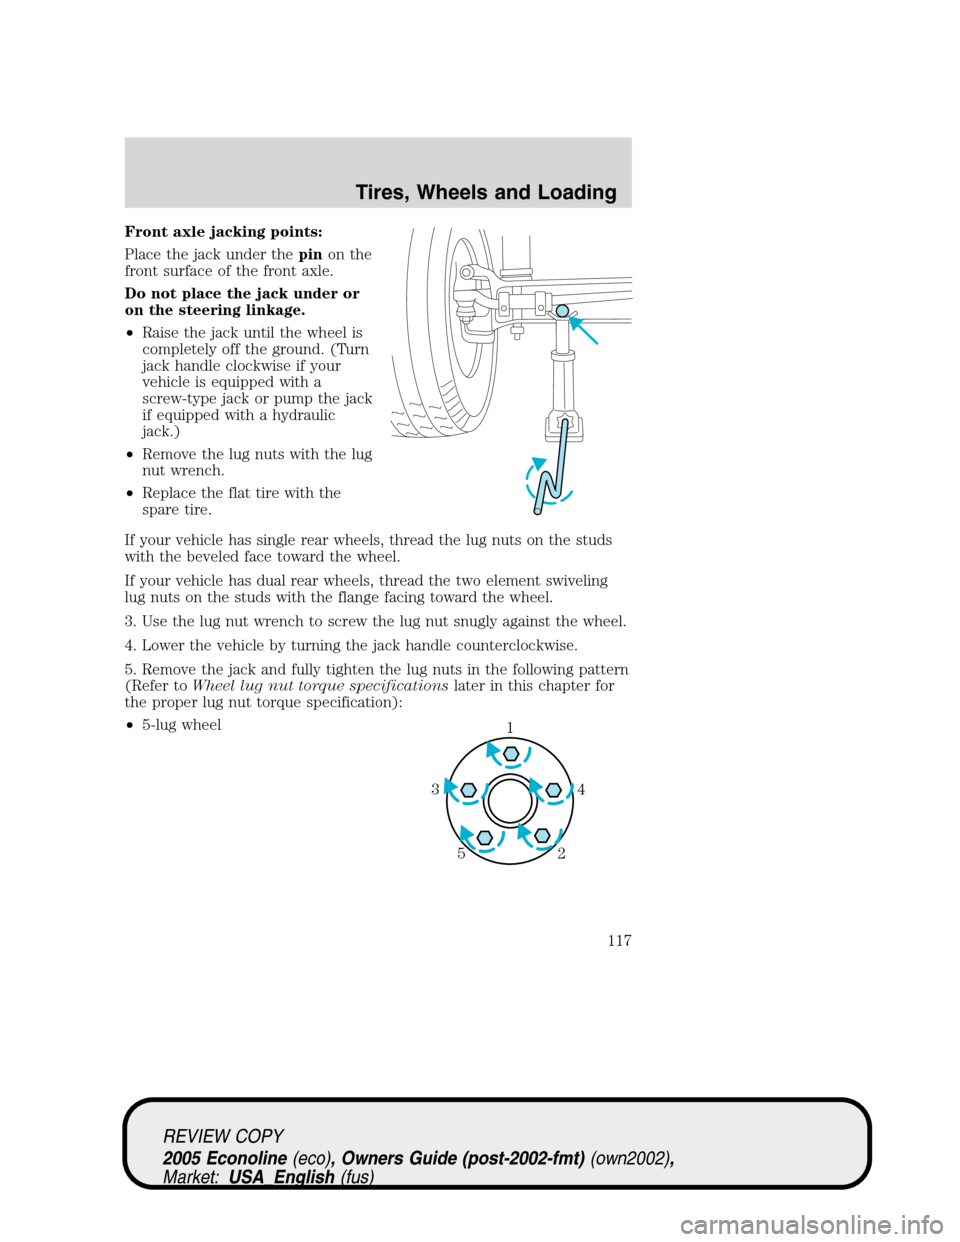
Front axle jacking points:
Place the jack under thepinon the
front surface of the front axle.
Do not place the jack under or
on the steering linkage.
•Raise the jack until the wheel is
completely off the ground. (Turn
jack handle clockwise if your
vehicle is equipped with a
screw-type jack or pump the jack
if equipped with a hydraulic
jack.)
•Remove the lug nuts with the lug
nut wrench.
•Replace the flat tire with the
spare tire.
If your vehicle has single rear wheels, thread the lug nuts on the studs
with the beveled face toward the wheel.
If your vehicle has dual rear wheels, thread the two element swiveling
lug nuts on the studs with the flange facing toward the wheel.
3. Use the lug nut wrench to screw the lug nut snugly against the wheel.
4. Lower the vehicle by turning the jack handle counterclockwise.
5. Remove the jack and fully tighten the lug nuts in the following pattern
(Refer toWheel lug nut torque specificationslater in this chapter for
the proper lug nut torque specification):
•5-lug wheel
1
4 3
2 5
REVIEW COPY
2005 Econoline(eco), Owners Guide (post-2002-fmt)(own2002),
Market:USA_English(fus)
Tires, Wheels and Loading
117
Page 118 of 248
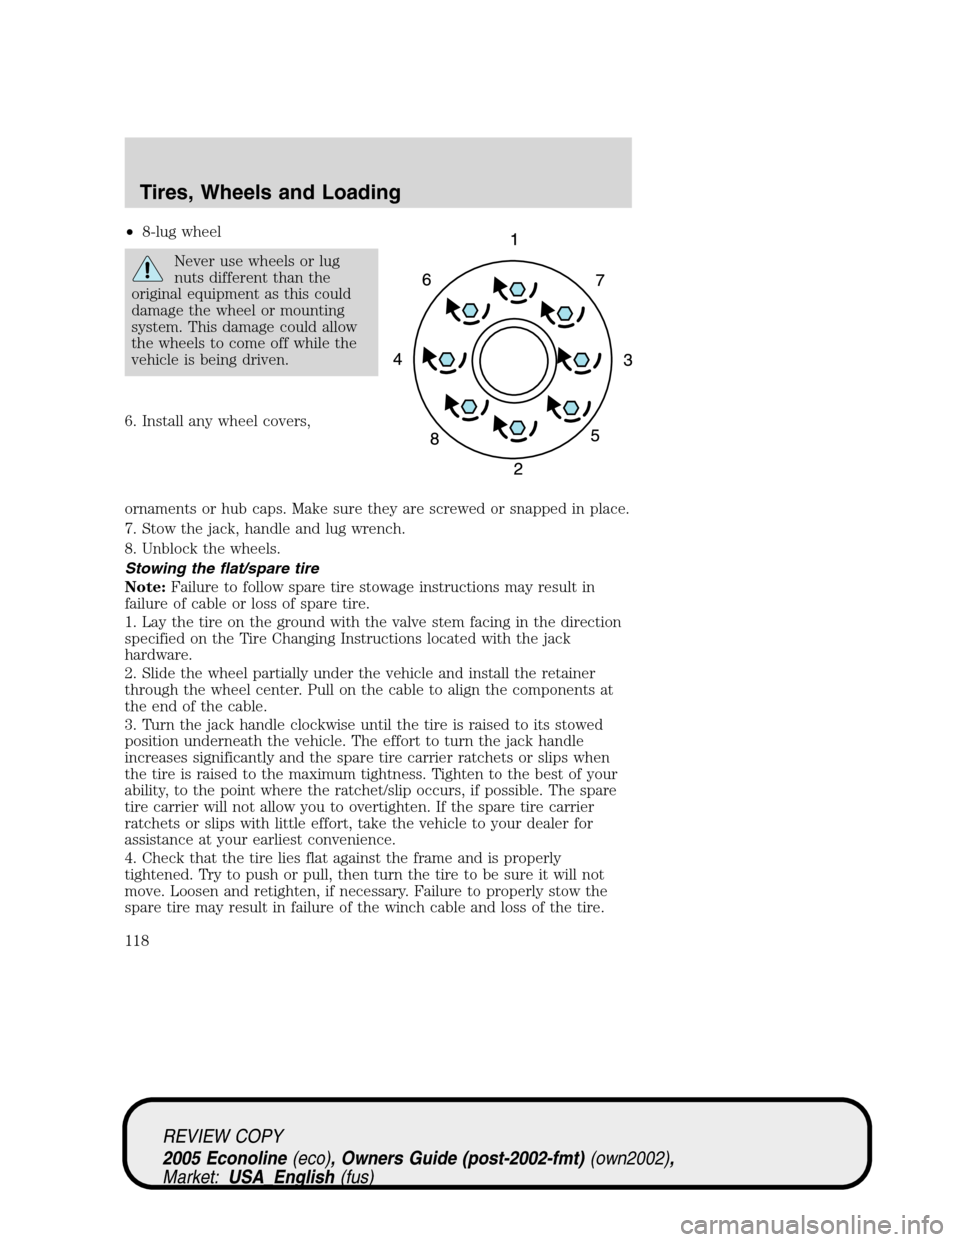
•8-lug wheel
Never use wheels or lug
nuts different than the
original equipment as this could
damage the wheel or mounting
system. This damage could allow
the wheels to come off while the
vehicle is being driven.
6. Install any wheel covers,
ornaments or hub caps. Make sure they are screwed or snapped in place.
7. Stow the jack, handle and lug wrench.
8. Unblock the wheels.
Stowing the flat/spare tire
Note:Failure to follow spare tire stowage instructions may result in
failure of cable or loss of spare tire.
1. Lay the tire on the ground with the valve stem facing in the direction
specified on the Tire Changing Instructions located with the jack
hardware.
2. Slide the wheel partially under the vehicle and install the retainer
through the wheel center. Pull on the cable to align the components at
the end of the cable.
3. Turn the jack handle clockwise until the tire is raised to its stowed
position underneath the vehicle. The effort to turn the jack handle
increases significantly and the spare tire carrier ratchets or slips when
the tire is raised to the maximum tightness. Tighten to the best of your
ability, to the point where the ratchet/slip occurs, if possible. The spare
tire carrier will not allow you to overtighten. If the spare tire carrier
ratchets or slips with little effort, take the vehicle to your dealer for
assistance at your earliest convenience.
4. Check that the tire lies flat against the frame and is properly
tightened. Try to push or pull, then turn the tire to be sure it will not
move. Loosen and retighten, if necessary. Failure to properly stow the
spare tire may result in failure of the winch cable and loss of the tire.
REVIEW COPY
2005 Econoline(eco), Owners Guide (post-2002-fmt)(own2002),
Market:USA_English(fus)
Tires, Wheels and Loading
118
Page 202 of 248
4. Install the indicator and ensure it is fully seated.
5. Fully install the engine oil filler cap by turning the filler cap clockwise
1/4 of a turn until three clicks are heard or until the cap is fully seated.
To avoid possible oil loss, DO NOT operate the vehicle with the
engine oil level indicator and/or the engine oil filler cap removed.
Engine oil and filter recommendations
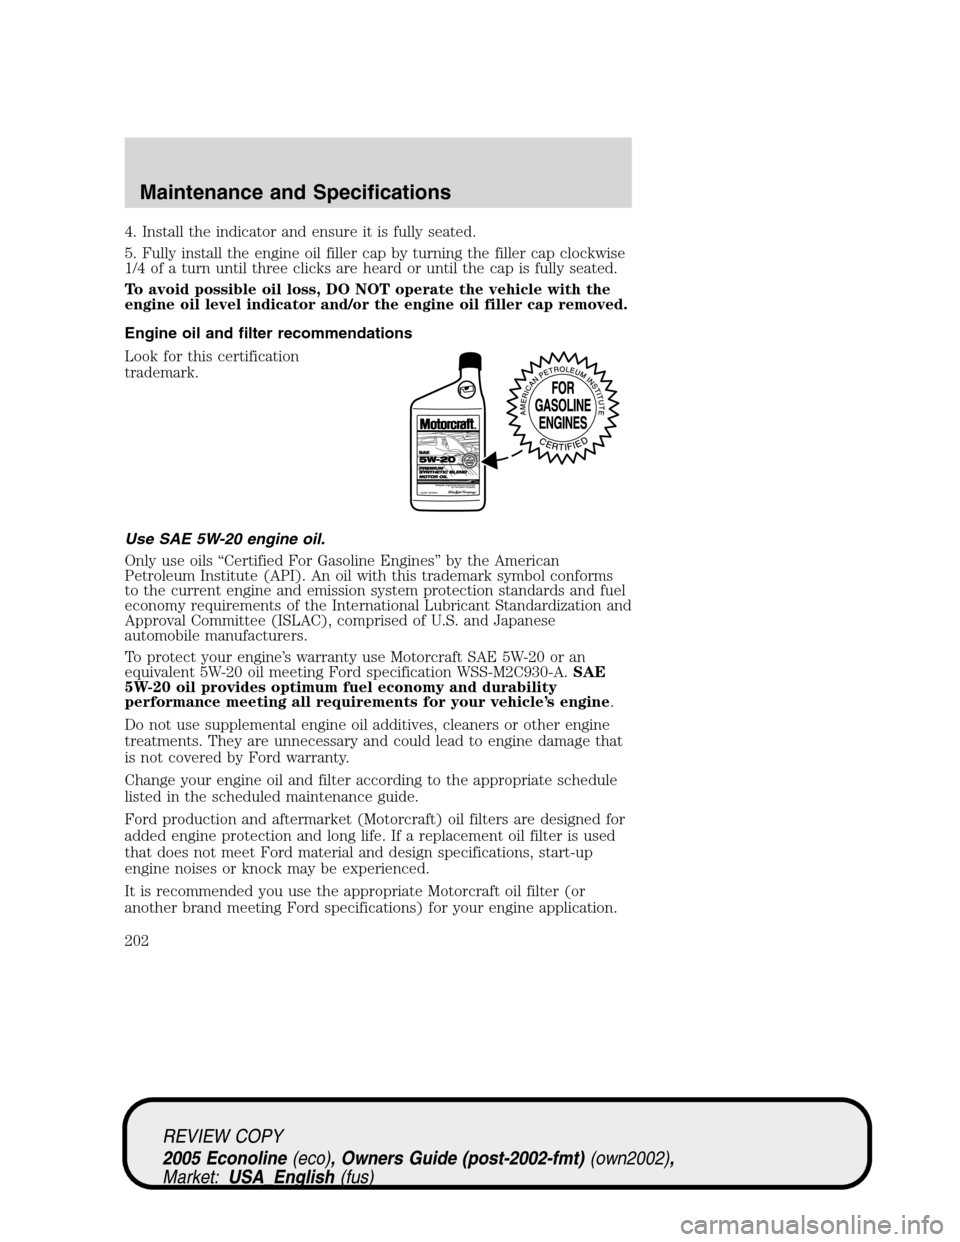
Look for this certification
trademark.
Use SAE 5W-20 engine oil.
Only use oils “Certified For Gasoline Engines” by the American
Petroleum Institute (API). An oil with this trademark symbol conforms
to the current engine and emission system protection standards and fuel
economy requirements of the International Lubricant Standardization and
Approval Committee (ISLAC), comprised of U.S. and Japanese
automobile manufacturers.
To protect your engine’s warranty use Motorcraft SAE 5W-20 or an
equivalent 5W-20 oil meeting Ford specification WSS-M2C930-A.SAE
5W-20 oil provides optimum fuel economy and durability
performance meeting all requirements for your vehicle’s engine.
Do not use supplemental engine oil additives, cleaners or other engine
treatments. They are unnecessary and could lead to engine damage that
is not covered by Ford warranty.
Change your engine oil and filter according to the appropriate schedule
listed in the scheduled maintenance guide.
Ford production and aftermarket (Motorcraft) oil filters are designed for
added engine protection and long life. If a replacement oil filter is used
that does not meet Ford material and design specifications, start-up
engine noises or knock may be experienced.
It is recommended you use the appropriate Motorcraft oil filter (or
another brand meeting Ford specifications) for your engine application.
REVIEW COPY
2005 Econoline(eco), Owners Guide (post-2002-fmt)(own2002),
Market:USA_English(fus)
Maintenance and Specifications
202
Page 205 of 248
7. Drive the vehicle to complete the relearning process.
•The vehicle may need to be driven 10 miles (16 km) or more to
relearn the idle and fuel trim strategy.
•If you do not allow the engine to relearn its idle trim, the idle
quality of your vehicle may be adversely affected until the idle
trim is eventually relearned.
If the battery has been disconnected or a new battery has been installed,
the clock and radio settings must be reset once the battery is
reconnected.
•Always dispose of automotive
batteries in a responsible manner.
Follow your local authorized
standards for disposal. Call your
local authorized recycling center
to find out more about recycling
automotive batteries.
ENGINE COOLANT
Checking engine coolant
The concentration and level of engine coolant should be checked at the
mileage intervals listed in theScheduled Maintenance Guide. The
coolant concentration should be maintained at 50/50 coolant and distilled
water, which equates to a freeze point of -34°F (-36°C). Coolant
concentration testing is possible with a hydrometer or antifreeze tester
(such as the Rotunda Battery and Antifreeze Tester, 014–R1060). The
level of coolant should be maintained at the “FULL COLD” level or
within the “COLD FILL RANGE” in the coolant reservoir. If the level falls
below, add coolant per the instructions in theAdding engine coolant
section.
Your vehicle was factory-filled with a 50/50 engine coolant and water
concentration. If the concentration of coolant falls below 40% or above
60%, the engine parts could become damaged or not work properly.A
50–50 mixture of coolant and water provides the following:
•Freeze protection down to -34°F (-36°C).
•Boiling protection up to 265°F (129°C).
•Protection against rust and other forms of corrosion.
LEAD
RETURN
RECYCLE
REVIEW COPY
2005 Econoline(eco), Owners Guide (post-2002-fmt)(own2002),
Market:USA_English(fus)
Maintenance and Specifications
205