tow FORD E SERIES 2005 4.G User Guide
[x] Cancel search | Manufacturer: FORD, Model Year: 2005, Model line: E SERIES, Model: FORD E SERIES 2005 4.GPages: 248, PDF Size: 5.53 MB
Page 70 of 248
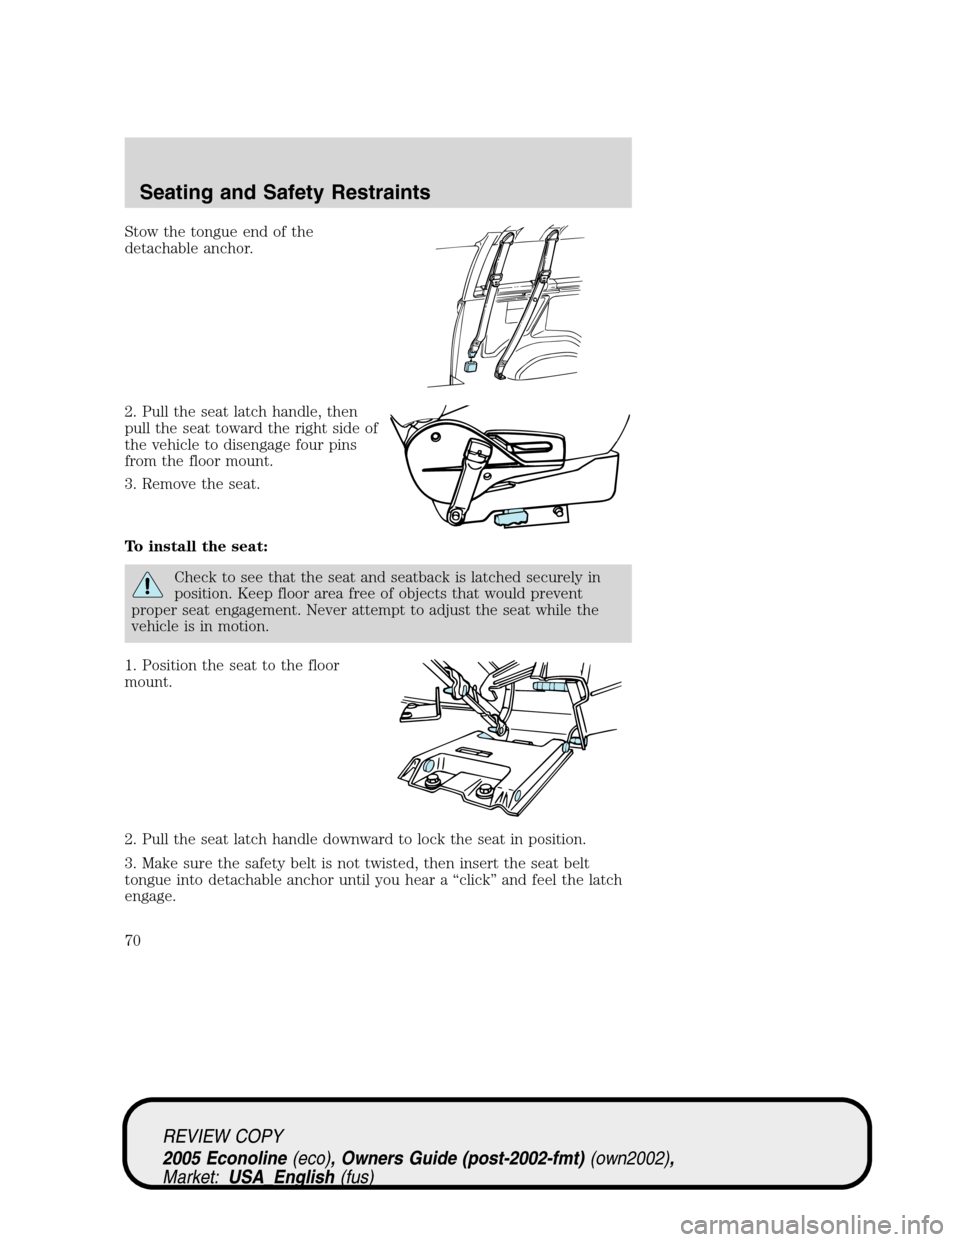
Stow the tongue end of the
detachable anchor.
2. Pull the seat latch handle, then
pull the seat toward the right side of
the vehicle to disengage four pins
from the floor mount.
3. Remove the seat.
To install the seat:
Check to see that the seat and seatback is latched securely in
position. Keep floor area free of objects that would prevent
proper seat engagement. Never attempt to adjust the seat while the
vehicle is in motion.
1. Position the seat to the floor
mount.
2. Pull the seat latch handle downward to lock the seat in position.
3. Make sure the safety belt is not twisted, then insert the seat belt
tongue into detachable anchor until you hear a “click” and feel the latch
engage.
REVIEW COPY
2005 Econoline(eco), Owners Guide (post-2002-fmt)(own2002),
Market:USA_English(fus)
Seating and Safety Restraints
70
Page 71 of 248
REAR SEATS
Accessing the 3rd, 4th and 5th row seats (if equipped)
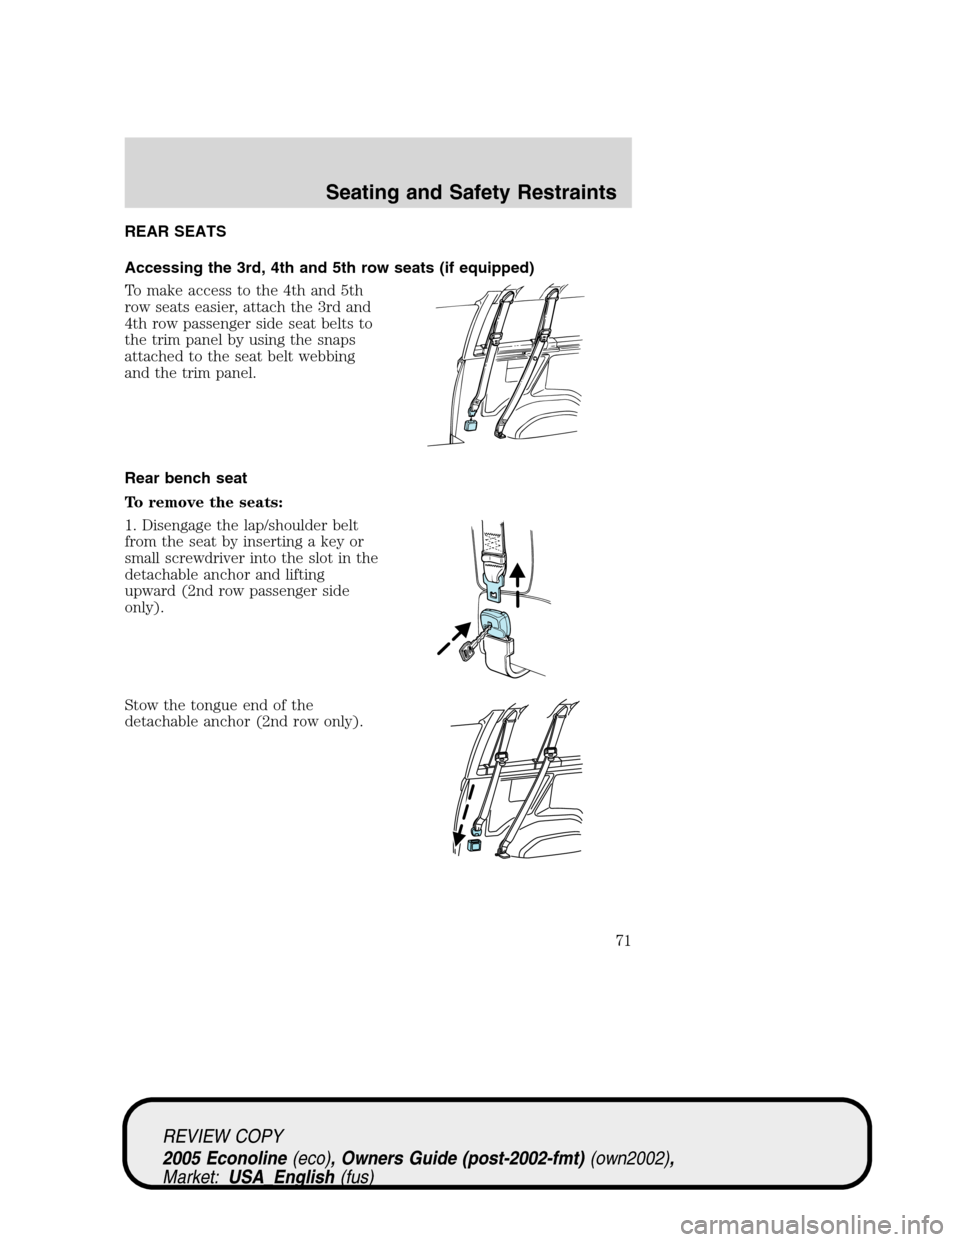
To make access to the 4th and 5th
row seats easier, attach the 3rd and
4th row passenger side seat belts to
the trim panel by using the snaps
attached to the seat belt webbing
and the trim panel.
Rear bench seat
To remove the seats:
1. Disengage the lap/shoulder belt
from the seat by inserting a key or
small screwdriver into the slot in the
detachable anchor and lifting
upward (2nd row passenger side
only).
Stow the tongue end of the
detachable anchor (2nd row only).
REVIEW COPY
2005 Econoline(eco), Owners Guide (post-2002-fmt)(own2002),
Market:USA_English(fus)
Seating and Safety Restraints
71
Page 84 of 248
The National Highway Traffic Safety Administration (NHTSA)
recommends a minimum distance of at least 25 cm (10 inches)
between an occupant’s chest and the driver air bag module.
Never place your arm over the air bag module as a deploying air
bag can result in serious arm fractures or other injuries.
To properly position yourself away from the air bag:
•Move your seat to the rear as far as you can while still reaching the
pedals comfortably.
•Recline the seat slightly one or two degrees from the upright position.
Do not put anything on or over the air bag module. Placing
objects on or over the air bag inflation area may cause those
objects to be propelled by the air bag into your face and torso causing
serious injury.
Do not attempt to service, repair, or modify the air bag
supplemental restraint systems or its fuses. See your Ford or
Lincoln Mercury dealer.
Modifying or adding equipment to the front end of the vehicle
(including frame, bumper, front end body structure and tow
hooks) may affect the performance of the air bag system, increasing
the risk of injury. Do not modify the front end of the vehicle.
Additional equipment may affect the performance of the air bag
sensors increasing the risk of injury. Please refer to theBody
Builders Layout Bookfor instructions about the appropriate
installation of additional equipment.
REVIEW COPY
2005 Econoline(eco), Owners Guide (post-2002-fmt)(own2002),
Market:USA_English(fus)
Seating and Safety Restraints
84
Page 91 of 248
Follow all instructions provided by the manufacturer of the
booster seat.
Never put the shoulder belt under a child’s arm or behind the
back because it eliminates the protection for the upper part of
the body and may increase the risk of injury or death in a collision.
Never use pillows, books, or towels to boost a child. They can
slide around and increase the likelihood of injury or death in a
collision.
SAFETY SEATS FOR CHILDREN
Child and infant or child safety seats
Use a safety seat that is recommended for the size and weight of the
child. Carefully follow all of the manufacturer’s instructions with the
safety seat you put in your vehicle. If you do not install and use the
safety seat properly, the child may be injured in a sudden stop or
collision.
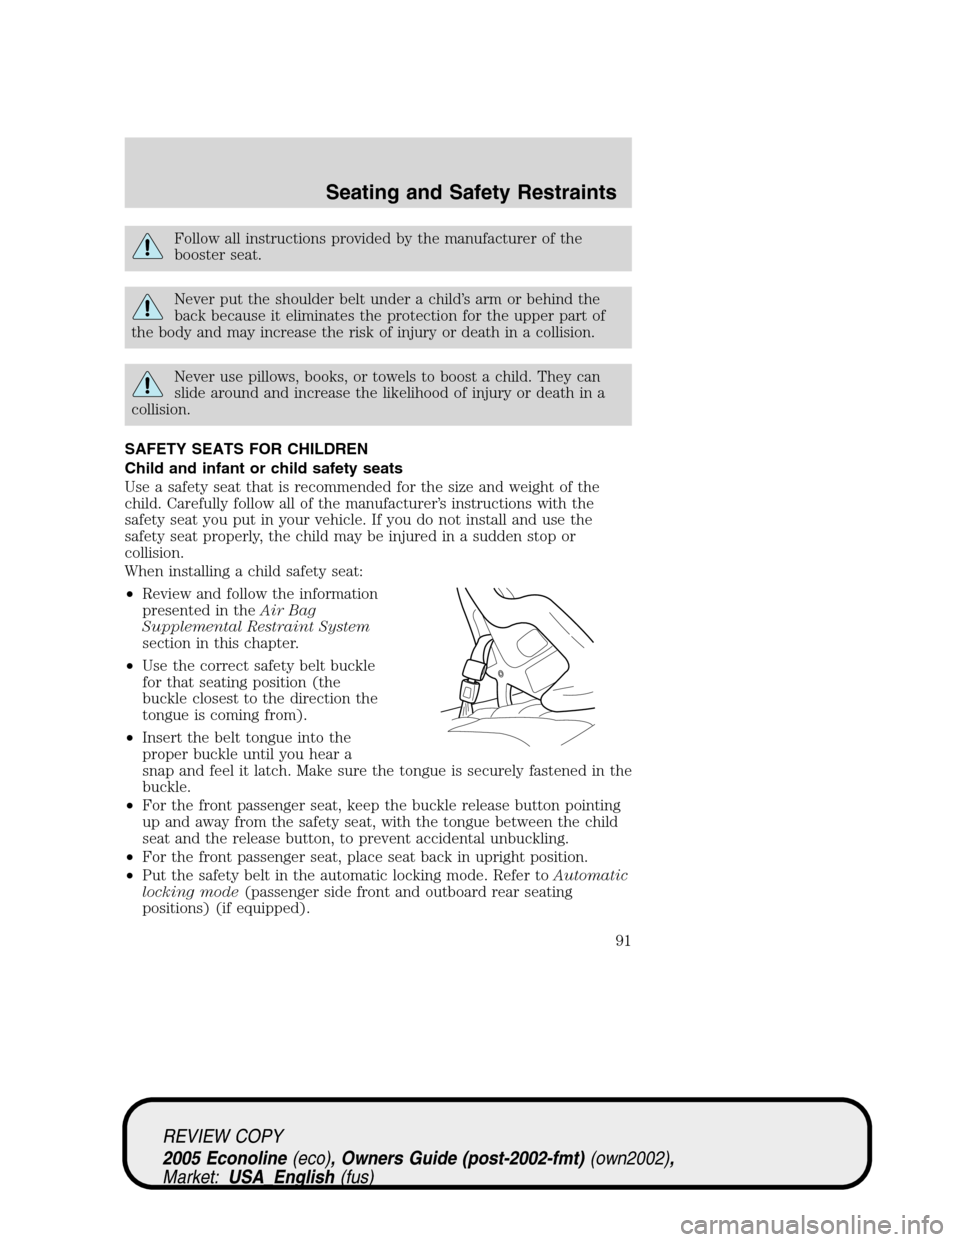
When installing a child safety seat:
•Review and follow the information
presented in theAir Bag
Supplemental Restraint System
section in this chapter.
•Use the correct safety belt buckle
for that seating position (the
buckle closest to the direction the
tongue is coming from).
•Insert the belt tongue into the
proper buckle until you hear a
snap and feel it latch. Make sure the tongue is securely fastened in the
buckle.
•For the front passenger seat, keep the buckle release button pointing
up and away from the safety seat, with the tongue between the child
seat and the release button, to prevent accidental unbuckling.
•For the front passenger seat, place seat back in upright position.
•Put the safety belt in the automatic locking mode. Refer toAutomatic
locking mode(passenger side front and outboard rear seating
positions) (if equipped).
REVIEW COPY
2005 Econoline(eco), Owners Guide (post-2002-fmt)(own2002),
Market:USA_English(fus)
Seating and Safety Restraints
91
Page 94 of 248
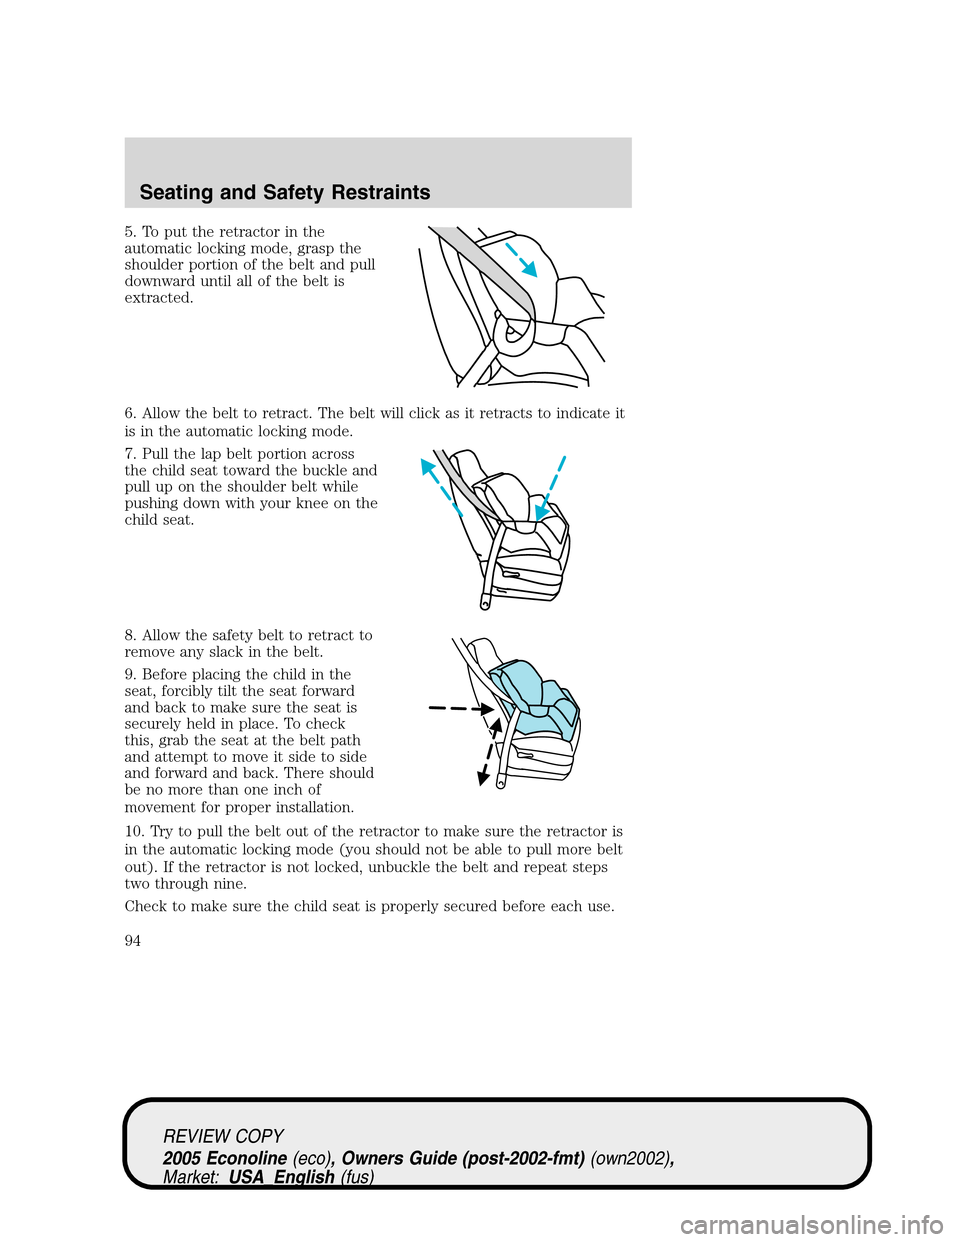
5. To put the retractor in the
automatic locking mode, grasp the
shoulder portion of the belt and pull
downward until all of the belt is
extracted.
6. Allow the belt to retract. The belt will click as it retracts to indicate it
is in the automatic locking mode.
7. Pull the lap belt portion across
the child seat toward the buckle and
pull up on the shoulder belt while
pushing down with your knee on the
child seat.
8. Allow the safety belt to retract to
remove any slack in the belt.
9. Before placing the child in the
seat, forcibly tilt the seat forward
and back to make sure the seat is
securely held in place. To check
this, grab the seat at the belt path
and attempt to move it side to side
and forward and back. There should
be no more than one inch of
movement for proper installation.
10. Try to pull the belt out of the retractor to make sure the retractor is
in the automatic locking mode (you should not be able to pull more belt
out). If the retractor is not locked, unbuckle the belt and repeat steps
two through nine.
Check to make sure the child seat is properly secured before each use.
REVIEW COPY
2005 Econoline(eco), Owners Guide (post-2002-fmt)(own2002),
Market:USA_English(fus)
Seating and Safety Restraints
94
Page 112 of 248
Your vehicle may be equipped with a dissimilar spare tire/wheel. A
dissimilar spare tire/wheel is defined as a spare tire and/or wheel that is
different in brand, size or appearance from the road tires and wheels. If
you have a dissimilar spare tire/wheel, then it is intended for temporary
use only. This means that if you need to use it, you should replace it as
soon as possible with a road tire/wheel that is the same size and type as
the road tires and wheels that were originally provided by Ford. If the
dissimilar spare tire or wheel is damaged, it should be replaced rather
than repaired.
When driving with the dissimilar spare tire/wheel,do not:
•Exceed 70 mph (113 km/h)
•Use more than one dissimilar spare tire/wheel at a time
•Use commercial car washing equipment
•Use snow chains on the end of the vehicle with the dissimilar spare
tire/wheel
The usage of a dissimilar spare tire/wheel can lead to impairment of the
following:
•Handling, stability and braking performance
•Comfort and noise
•Ground clearance and parking at curbs
•Winter weather driving capability
•Wet weather driving capability
•All-Wheel driving capability (if applicable)
•Load leveling adjustment (if applicable)
When driving with the dissimilar spare tire/wheel additional caution
should be given to:
•Towing a trailer
•Driving vehicles equipped with a camper body
•Driving vehicles with a load on the cargo rack
Drive cautiously when using a dissimilar spare tire/wheel and seek
service as soon as possible.
Spare tire information
The spare tire for your vehicle is stowed under the rear of your vehicle
(except cutaway and stripped chassis models).
REVIEW COPY
2005 Econoline(eco), Owners Guide (post-2002-fmt)(own2002),
Market:USA_English(fus)
Tires, Wheels and Loading
112
Page 113 of 248
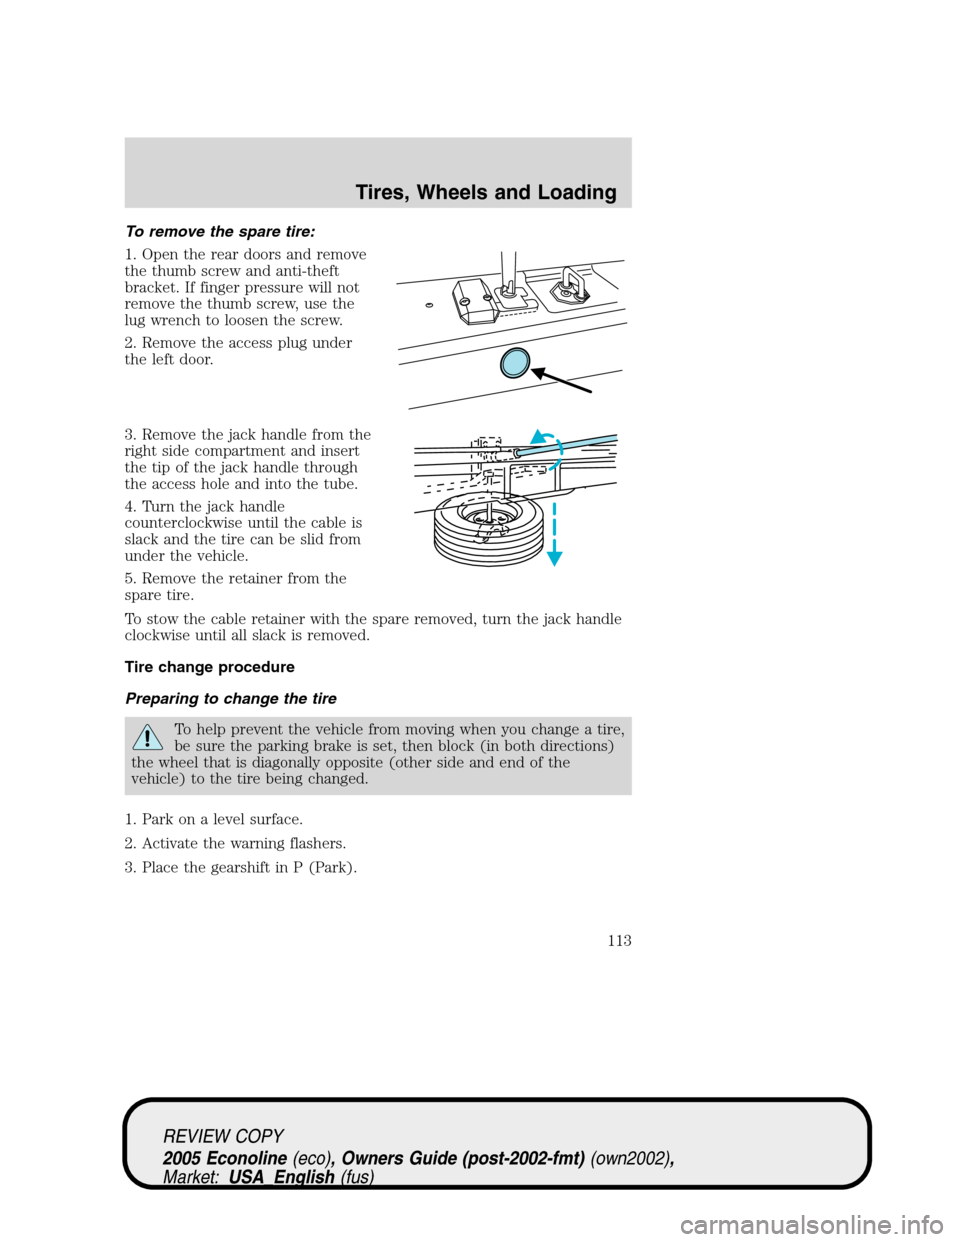
To remove the spare tire:
1. Open the rear doors and remove
the thumb screw and anti-theft
bracket. If finger pressure will not
remove the thumb screw, use the
lug wrench to loosen the screw.
2. Remove the access plug under
the left door.
3. Remove the jack handle from the
right side compartment and insert
the tip of the jack handle through
the access hole and into the tube.
4. Turn the jack handle
counterclockwise until the cable is
slack and the tire can be slid from
under the vehicle.
5. Remove the retainer from the
spare tire.
To stow the cable retainer with the spare removed, turn the jack handle
clockwise until all slack is removed.
Tire change procedure
Preparing to change the tire
To help prevent the vehicle from moving when you change a tire,
be sure the parking brake is set, then block (in both directions)
the wheel that is diagonally opposite (other side and end of the
vehicle) to the tire being changed.
1. Park on a level surface.
2. Activate the warning flashers.
3. Place the gearshift in P (Park).
REVIEW COPY
2005 Econoline(eco), Owners Guide (post-2002-fmt)(own2002),
Market:USA_English(fus)
Tires, Wheels and Loading
113
Page 117 of 248
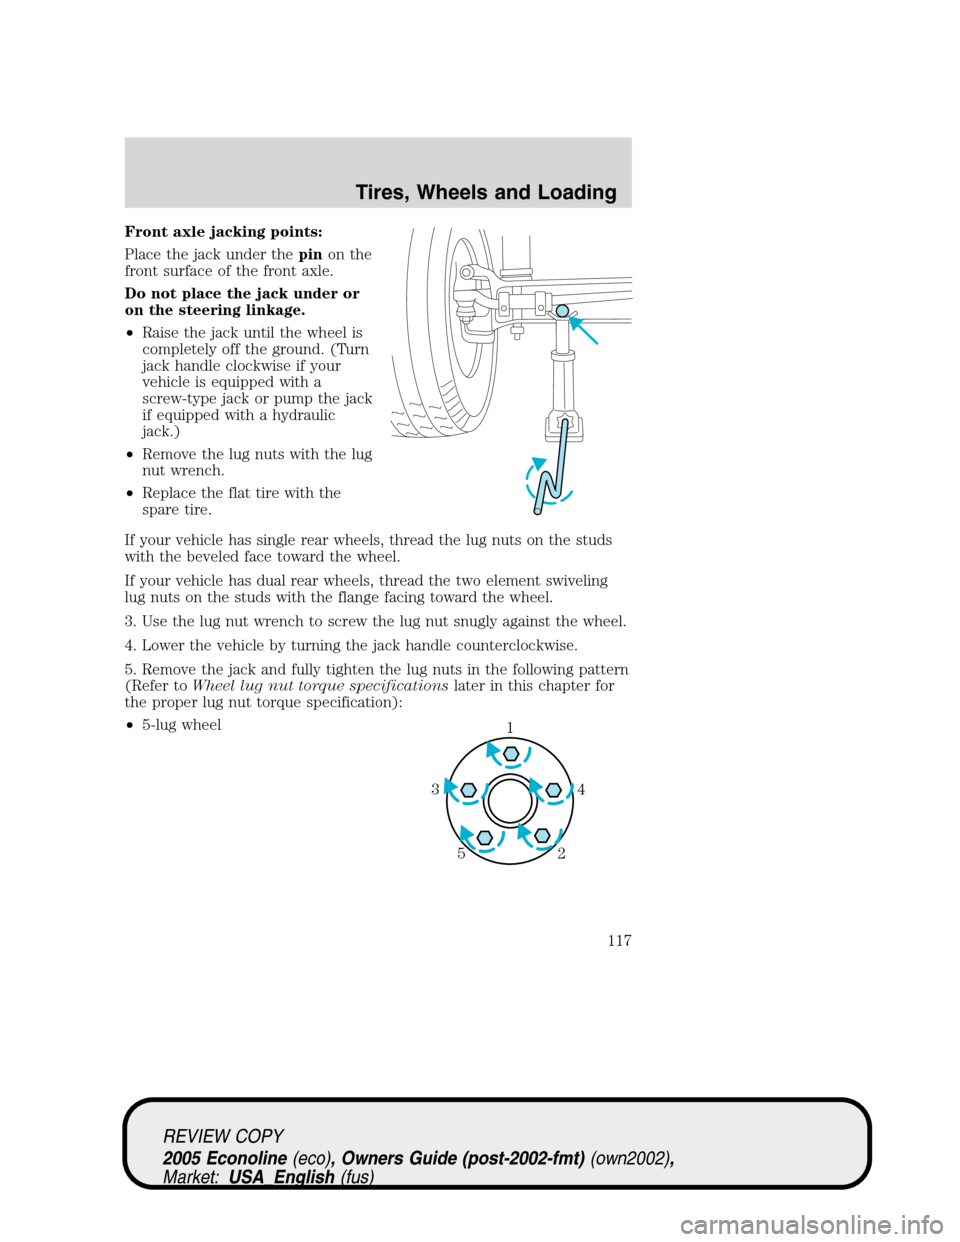
Front axle jacking points:
Place the jack under thepinon the
front surface of the front axle.
Do not place the jack under or
on the steering linkage.
•Raise the jack until the wheel is
completely off the ground. (Turn
jack handle clockwise if your
vehicle is equipped with a
screw-type jack or pump the jack
if equipped with a hydraulic
jack.)
•Remove the lug nuts with the lug
nut wrench.
•Replace the flat tire with the
spare tire.
If your vehicle has single rear wheels, thread the lug nuts on the studs
with the beveled face toward the wheel.
If your vehicle has dual rear wheels, thread the two element swiveling
lug nuts on the studs with the flange facing toward the wheel.
3. Use the lug nut wrench to screw the lug nut snugly against the wheel.
4. Lower the vehicle by turning the jack handle counterclockwise.
5. Remove the jack and fully tighten the lug nuts in the following pattern
(Refer toWheel lug nut torque specificationslater in this chapter for
the proper lug nut torque specification):
•5-lug wheel
1
4 3
2 5
REVIEW COPY
2005 Econoline(eco), Owners Guide (post-2002-fmt)(own2002),
Market:USA_English(fus)
Tires, Wheels and Loading
117
Page 118 of 248
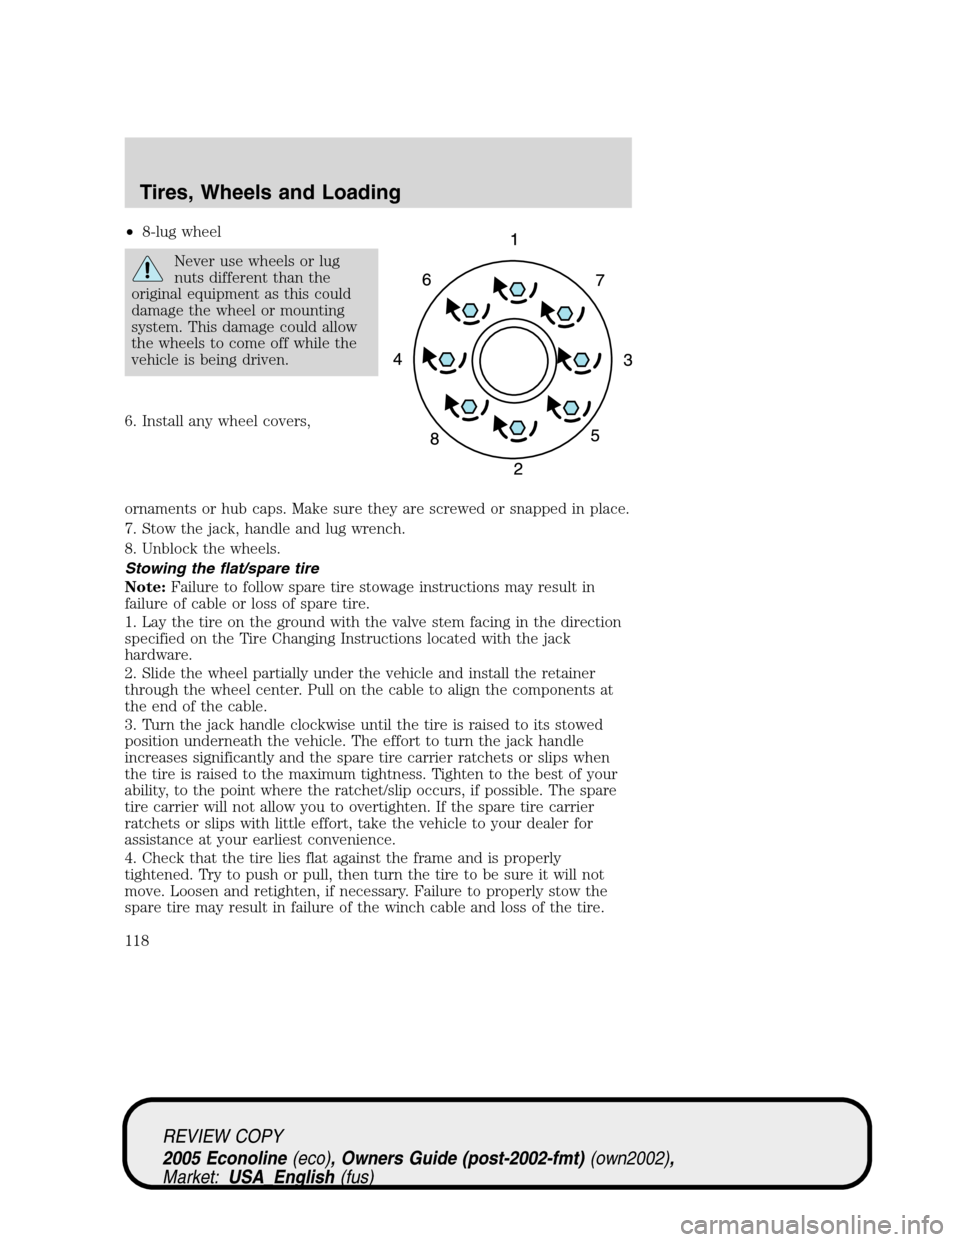
•8-lug wheel
Never use wheels or lug
nuts different than the
original equipment as this could
damage the wheel or mounting
system. This damage could allow
the wheels to come off while the
vehicle is being driven.
6. Install any wheel covers,
ornaments or hub caps. Make sure they are screwed or snapped in place.
7. Stow the jack, handle and lug wrench.
8. Unblock the wheels.
Stowing the flat/spare tire
Note:Failure to follow spare tire stowage instructions may result in
failure of cable or loss of spare tire.
1. Lay the tire on the ground with the valve stem facing in the direction
specified on the Tire Changing Instructions located with the jack
hardware.
2. Slide the wheel partially under the vehicle and install the retainer
through the wheel center. Pull on the cable to align the components at
the end of the cable.
3. Turn the jack handle clockwise until the tire is raised to its stowed
position underneath the vehicle. The effort to turn the jack handle
increases significantly and the spare tire carrier ratchets or slips when
the tire is raised to the maximum tightness. Tighten to the best of your
ability, to the point where the ratchet/slip occurs, if possible. The spare
tire carrier will not allow you to overtighten. If the spare tire carrier
ratchets or slips with little effort, take the vehicle to your dealer for
assistance at your earliest convenience.
4. Check that the tire lies flat against the frame and is properly
tightened. Try to push or pull, then turn the tire to be sure it will not
move. Loosen and retighten, if necessary. Failure to properly stow the
spare tire may result in failure of the winch cable and loss of the tire.
REVIEW COPY
2005 Econoline(eco), Owners Guide (post-2002-fmt)(own2002),
Market:USA_English(fus)
Tires, Wheels and Loading
118
Page 126 of 248
Safety practices
Driving habits have a great deal to do with your tire mileage and safety.
•Observe posted speed limits
•Avoid fast starts, stops and turns
•Avoid potholes and objects on the road
•Do not run over curbs or hit the tire against a curb when parking
If your vehicle is stuck in snow, mud, sand, etc.,do notrapidly
spin the tires; spinning the tires can tear the tire and cause an
explosion. A tire can explode in as little as three to five seconds.
Never spin the tires in excess of the 35 mph (55 km/h) point
indicated on the speedometer.
Highway hazards
No matter how carefully you drive there’s always the possibility that you
may eventually have a flat tire on the highway. Drive slowly to the
closest safe area out of traffic. This may further damage the flat tire, but
your safety is more important.
If you feel a sudden vibration or ride disturbance while driving, or you
suspect your tire or vehicle has been damaged, immediately reduce your
speed. Drive with caution until you can safely pull off the road. Stop and
inspect the tires for damage. If a tire is under-inflated or damaged,
deflate it, remove wheel and replace it with your spare tire and wheel. If
you cannot detect a cause, have the vehicle towed to the nearest repair
facility or tire dealer to have the vehicle inspected.
Tire and wheel alignment
A bad jolt from hitting a curb or pothole can cause the front end of your
vehicle to become misaligned or cause damage to your tires. If your
vehicle seems to pull to one side when you’re driving, the wheels may be
out of alignment. Have a qualified technician at a Ford or
Lincoln/Mercury dealer check the wheel alignment periodically.
Wheel misalignment in the front or the rear can cause uneven and rapid
treadwear of your tires and should be corrected by a qualified technician
at a Ford or Lincoln/Mercury dealer. Front wheel drive (FWD) vehicles
and those with an independent rear suspension (if equipped) may
require alignment of all four wheels.
REVIEW COPY
2005 Econoline(eco), Owners Guide (post-2002-fmt)(own2002),
Market:USA_English(fus)
Tires, Wheels and Loading
126