brake light FORD E SERIES 2005 4.G Owners Manual
[x] Cancel search | Manufacturer: FORD, Model Year: 2005, Model line: E SERIES, Model: FORD E SERIES 2005 4.GPages: 248, PDF Size: 5.53 MB
Page 10 of 248
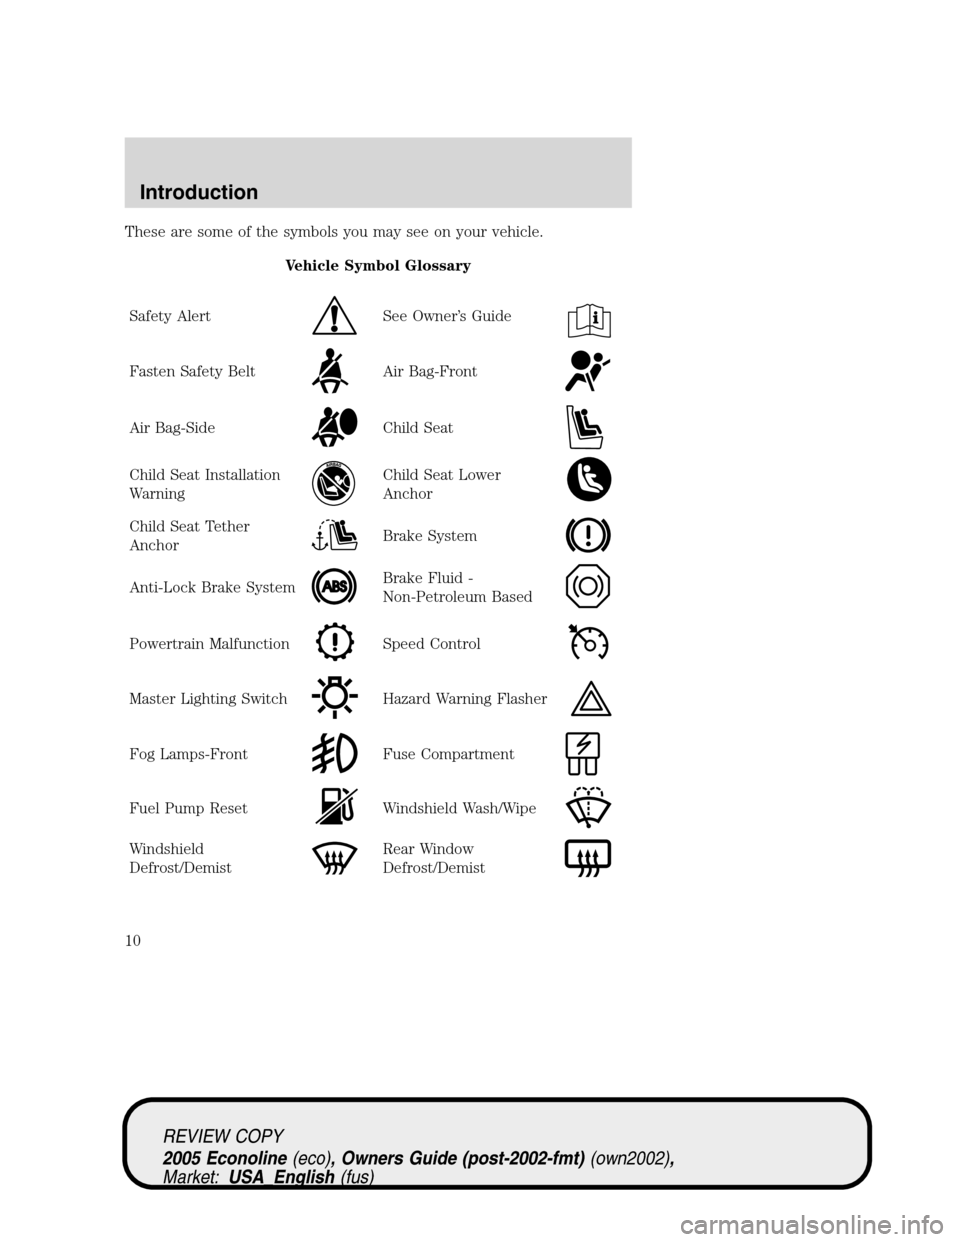
These are some of the symbols you may see on your vehicle.
Vehicle Symbol Glossary
Safety Alert
See Owner’s Guide
Fasten Safety BeltAir Bag-Front
Air Bag-SideChild Seat
Child Seat Installation
WarningChild Seat Lower
Anchor
Child Seat Tether
AnchorBrake System
Anti-Lock Brake SystemBrake Fluid -
Non-Petroleum Based
Powertrain MalfunctionSpeed Control
Master Lighting SwitchHazard Warning Flasher
Fog Lamps-FrontFuse Compartment
Fuel Pump ResetWindshield Wash/Wipe
Windshield
Defrost/DemistRear Window
Defrost/Demist
REVIEW COPY
2005 Econoline(eco), Owners Guide (post-2002-fmt)(own2002),
Market:USA_English(fus)
Introduction
10
Page 13 of 248
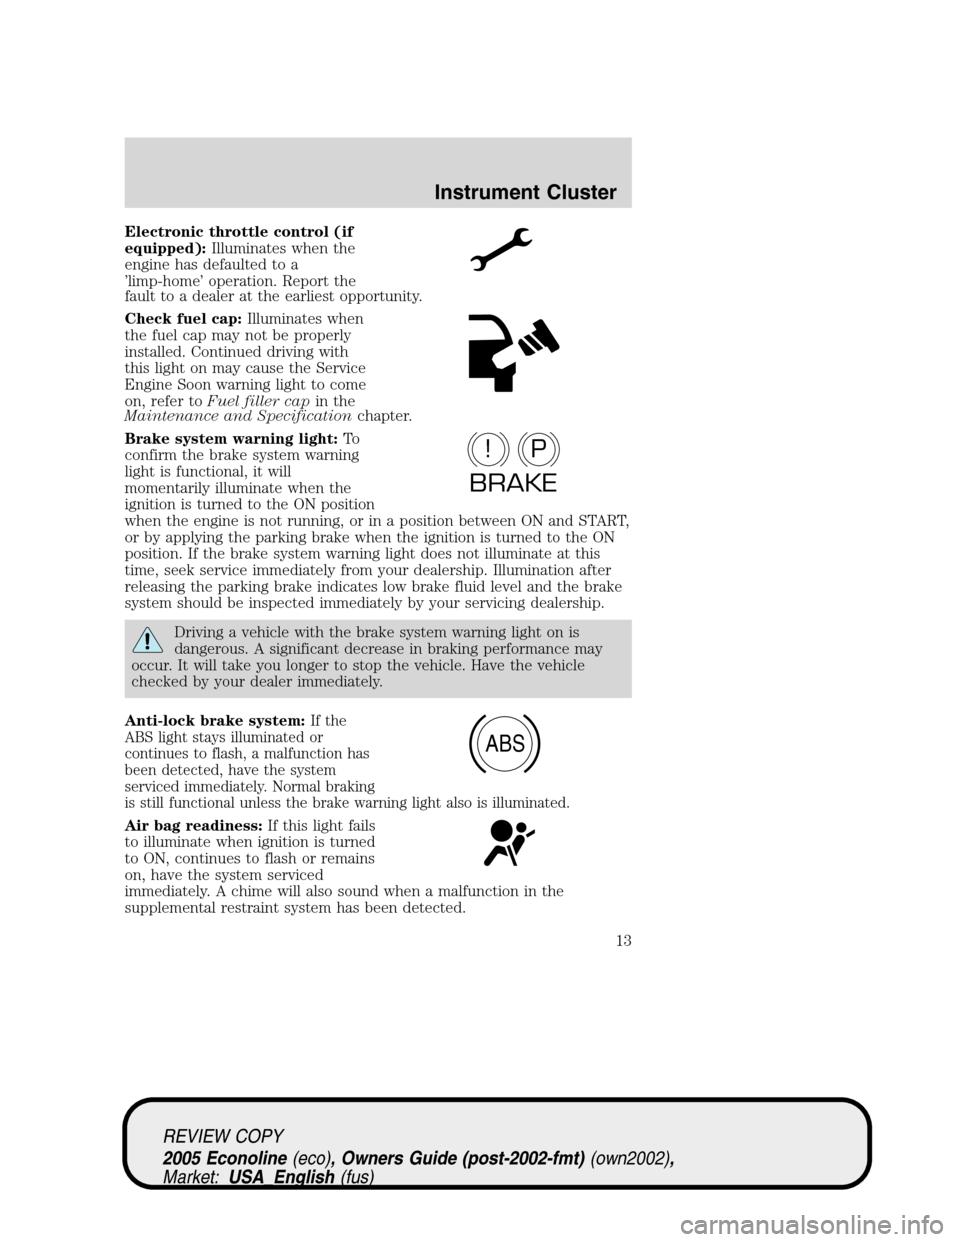
Electronic throttle control (if
equipped):Illuminates when the
engine has defaulted to a
’limp-home’ operation. Report the
fault to a dealer at the earliest opportunity.
Check fuel cap:Illuminates when
the fuel cap may not be properly
installed. Continued driving with
this light on may cause the Service
Engine Soon warning light to come
on, refer toFuel filler capin the
Maintenance and Specificationchapter.
Brake system warning light:To
confirm the brake system warning
light is functional, it will
momentarily illuminate when the
ignition is turned to the ON position
when the engine is not running, or in a position between ON and START,
or by applying the parking brake when the ignition is turned to the ON
position. If the brake system warning light does not illuminate at this
time, seek service immediately from your dealership. Illumination after
releasing the parking brake indicates low brake fluid level and the brake
system should be inspected immediately by your servicing dealership.
Driving a vehicle with the brake system warning light on is
dangerous. A significant decrease in braking performance may
occur. It will take you longer to stop the vehicle. Have the vehicle
checked by your dealer immediately.
Anti-lock brake system:
If the
ABS light stays illuminated or
continues to flash, a malfunction has
been detected, have the system
serviced immediately. Normal braking
is still functional unless the brake warning light also is illuminated.
Air bag readiness:If this light fails
to illuminate when ignition is turned
to ON, continues to flash or remains
on, have the system serviced
immediately. A chime will also sound when a malfunction in the
supplemental restraint system has been detected.
P!
BRAKE
ABS
REVIEW COPY
2005 Econoline(eco), Owners Guide (post-2002-fmt)(own2002),
Market:USA_English(fus)
Instrument Cluster
13
Page 42 of 248
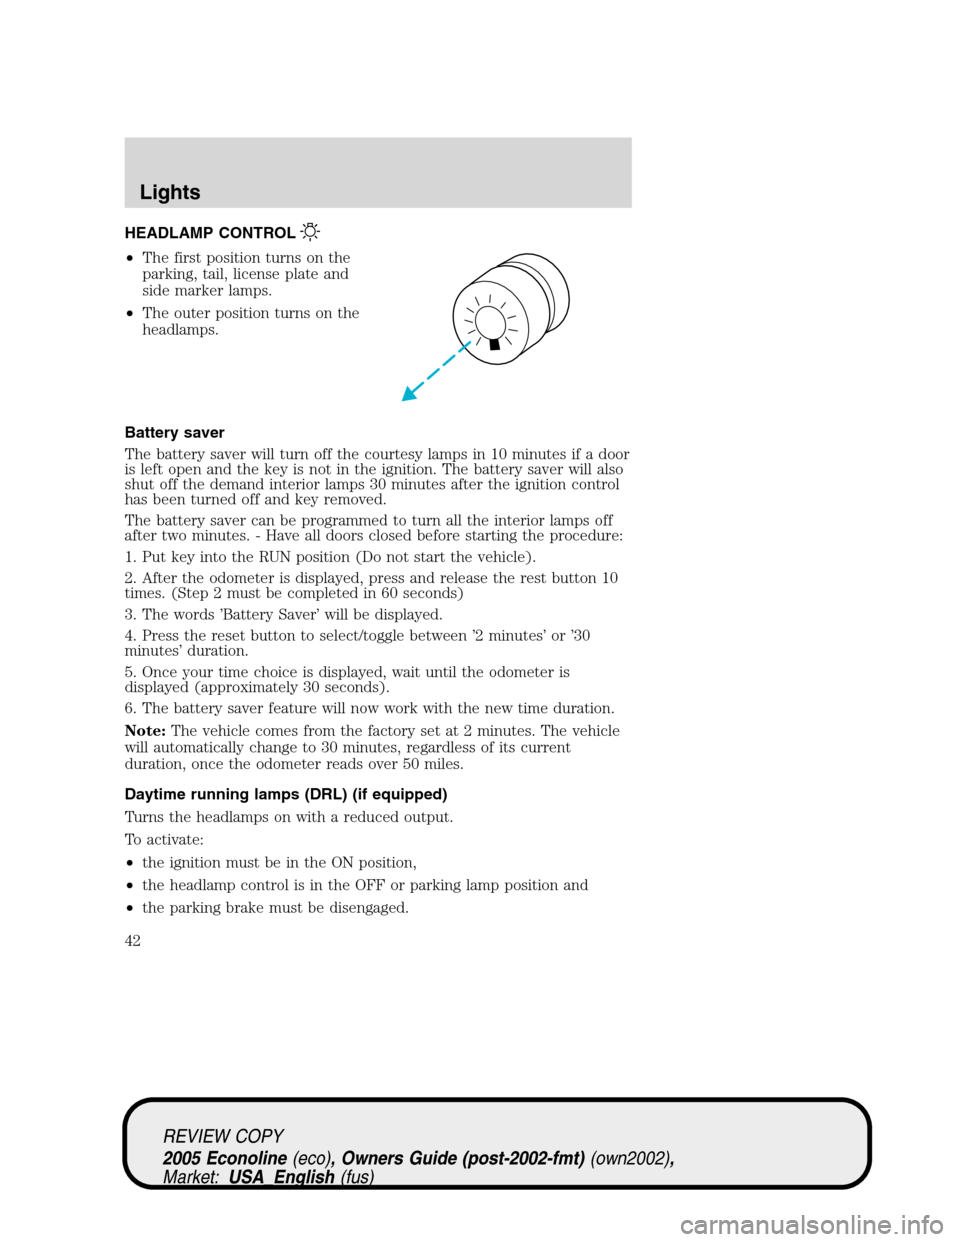
HEADLAMP CONTROL
•The first position turns on the
parking, tail, license plate and
side marker lamps.
•The outer position turns on the
headlamps.
Battery saver
The battery saver will turn off the courtesy lamps in 10 minutes if a door
is left open and the key is not in the ignition. The battery saver will also
shut off the demand interior lamps 30 minutes after the ignition control
has been turned off and key removed.
The battery saver can be programmed to turn all the interior lamps off
after two minutes. - Have all doors closed before starting the procedure:
1. Put key into the RUN position (Do not start the vehicle).
2. After the odometer is displayed, press and release the rest button 10
times. (Step 2 must be completed in 60 seconds)
3. The words ’Battery Saver’ will be displayed.
4. Press the reset button to select/toggle between ’2 minutes’ or ’30
minutes’ duration.
5. Once your time choice is displayed, wait until the odometer is
displayed (approximately 30 seconds).
6. The battery saver feature will now work with the new time duration.
Note:The vehicle comes from the factory set at 2 minutes. The vehicle
will automatically change to 30 minutes, regardless of its current
duration, once the odometer reads over 50 miles.
Daytime running lamps (DRL) (if equipped)
Turns the headlamps on with a reduced output.
To activate:
•the ignition must be in the ON position,
•the headlamp control is in the OFF or parking lamp position and
•the parking brake must be disengaged.
REVIEW COPY
2005 Econoline(eco), Owners Guide (post-2002-fmt)(own2002),
Market:USA_English(fus)
Lights
Lights
42
Page 47 of 248
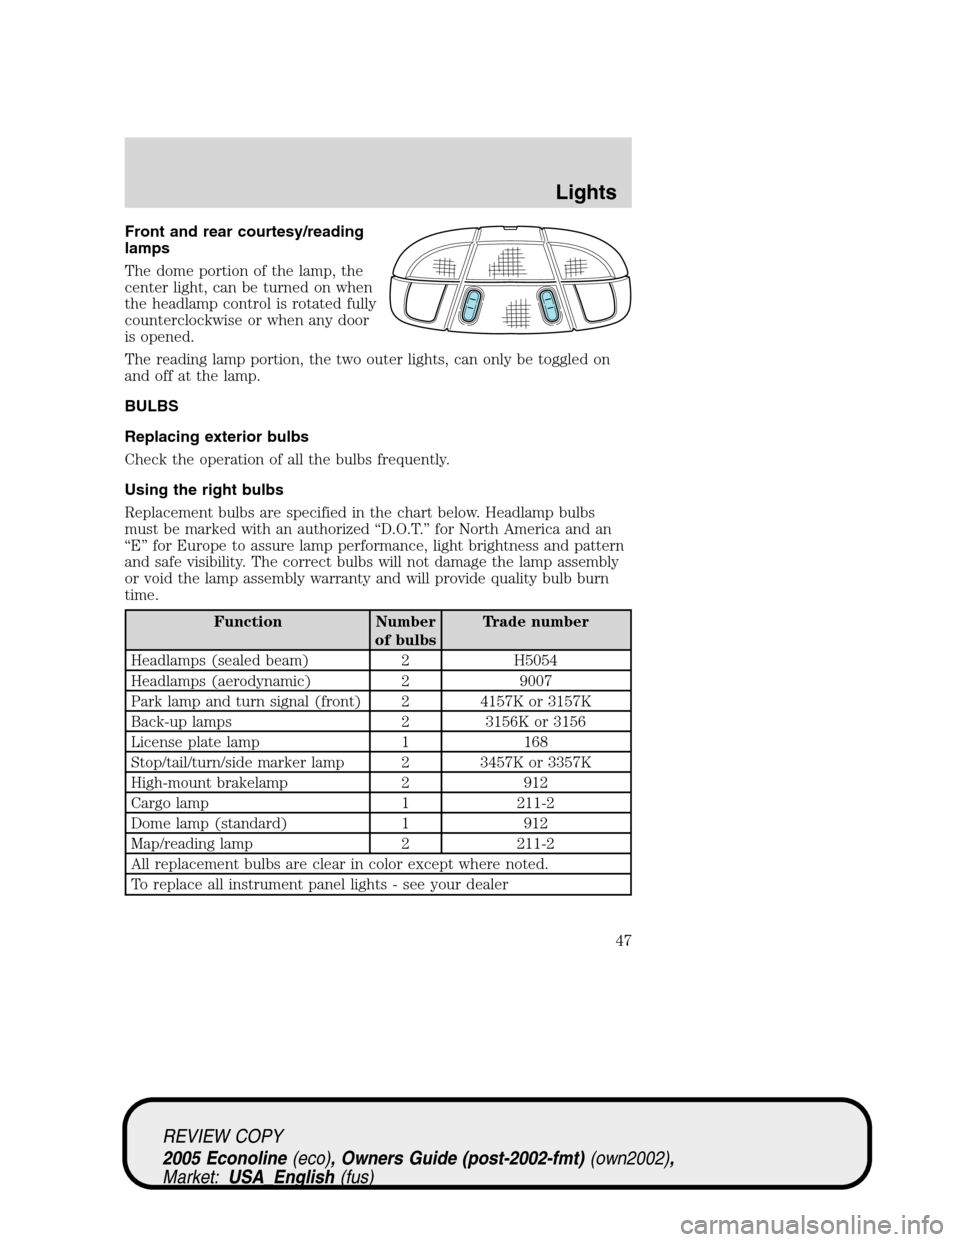
Front and rear courtesy/reading
lamps
The dome portion of the lamp, the
center light, can be turned on when
the headlamp control is rotated fully
counterclockwise or when any door
is opened.
The reading lamp portion, the two outer lights, can only be toggled on
and off at the lamp.
BULBS
Replacing exterior bulbs
Check the operation of all the bulbs frequently.
Using the right bulbs
Replacement bulbs are specified in the chart below. Headlamp bulbs
must be marked with an authorized “D.O.T.” for North America and an
“E” for Europe to assure lamp performance, light brightness and pattern
and safe visibility. The correct bulbs will not damage the lamp assembly
or void the lamp assembly warranty and will provide quality bulb burn
time.
Function Number
of bulbsTrade number
Headlamps (sealed beam) 2 H5054
Headlamps (aerodynamic) 2 9007
Park lamp and turn signal (front) 2 4157K or 3157K
Back-up lamps 2 3156K or 3156
License plate lamp 1 168
Stop/tail/turn/side marker lamp 2 3457K or 3357K
High-mount brakelamp 2 912
Cargo lamp 1 211-2
Dome lamp (standard) 1 912
Map/reading lamp 2 211-2
All replacement bulbs are clear in color except where noted.
To replace all instrument panel lights - see your dealer
REVIEW COPY
2005 Econoline(eco), Owners Guide (post-2002-fmt)(own2002),
Market:USA_English(fus)
Lights
47
Page 50 of 248
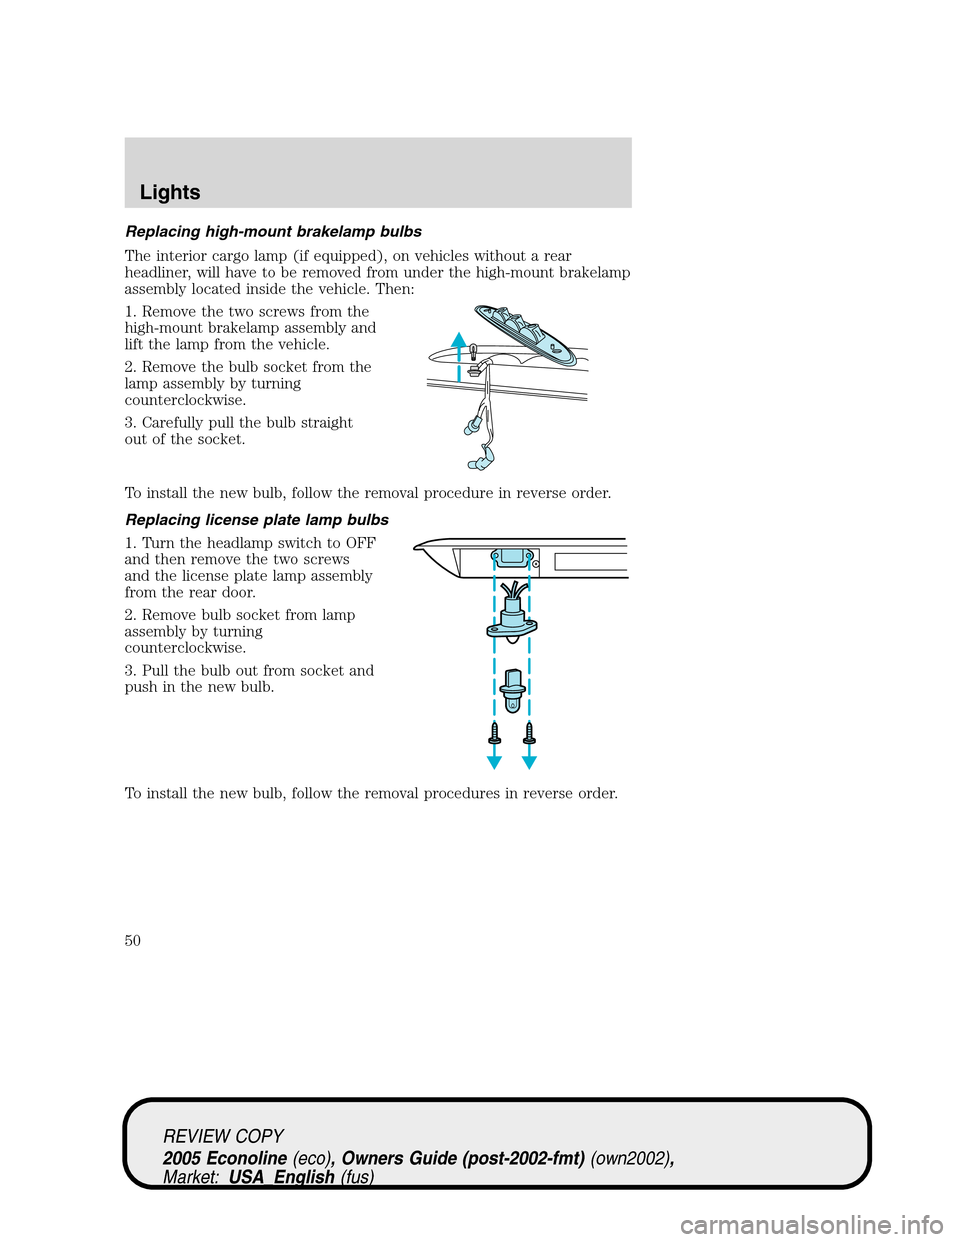
Replacing high-mount brakelamp bulbs
The interior cargo lamp (if equipped), on vehicles without a rear
headliner, will have to be removed from under the high-mount brakelamp
assembly located inside the vehicle. Then:
1. Remove the two screws from the
high-mount brakelamp assembly and
lift the lamp from the vehicle.
2. Remove the bulb socket from the
lamp assembly by turning
counterclockwise.
3. Carefully pull the bulb straight
out of the socket.
To install the new bulb, follow the removal procedure in reverse order.
Replacing license plate lamp bulbs
1. Turn the headlamp switch to OFF
and then remove the two screws
and the license plate lamp assembly
from the rear door.
2. Remove bulb socket from lamp
assembly by turning
counterclockwise.
3. Pull the bulb out from socket and
push in the new bulb.
To install the new bulb, follow the removal procedures in reverse order.
REVIEW COPY
2005 Econoline(eco), Owners Guide (post-2002-fmt)(own2002),
Market:USA_English(fus)
Lights
50
Page 81 of 248
Deactivating/activating the BeltMinder feature
Read steps1-5thoroughly before proceeding with the
deactivation/activation programming procedure.
The BeltMinder feature can be deactivated/activated by performing the
following procedure:
Before following the procedure, make sure that:
•the parking brake is set
•the gearshift is in P (Park) (automatic transmission)
•the ignition switch is in the OFF position
•all vehicle doors are closed
•the driver’s safety belt is unbuckled
•the parklamps/headlamps are in OFF position
To reduce the risk of injury, do not deactivate/activate the Belt
Minder feature while driving the vehicle.
1. Turn the ignition switch to the RUN (or ON) position. (DO NOT
START THE ENGINE.)
2. Wait until the safety belt warning light turns off. (Approximately 1
minute)
•Step 3 must be completed within 50 seconds after the safety belt
warning light turns off.
3. Buckle then unbuckle the safety belt 9 times, ending with the safety
belt in the unbuckled state.
•After step 3 is complete, the airbag warning light will be turned on for
3 seconds.
•Beltminder will automatically exit programming mode without
changing its enable status if step 4 does not occur within 10 seconds
of the end of step 3.
4. Within 10 seconds of the light turning on, buckle then unbuckle the
safety belt.
•This will disable the BeltMinder feature for that seating position if it is
currently enabled. As confirmation, the airbag warning light will flash
4 times per second for 3 seconds.
REVIEW COPY
2005 Econoline(eco), Owners Guide (post-2002-fmt)(own2002),
Market:USA_English(fus)
Seating and Safety Restraints
81
Page 120 of 248
When a wheel is installed, always remove any corrosion, dirt or
foreign materials present on the mounting surfaces of the wheel
or the surface of the front disc brake hub and rotor that contacts the
wheel. Installing wheels without correct metal-to-metal contact at the
wheel mounting surfaces can cause the wheel nuts to loosen and the
wheel to come off while the vehicle is in motion, resulting in loss of
control.
INFORMATION CONTAINED ON THE TIRE SIDEWALL
Federal law requires tire manufacturers to place standardized
information on the sidewall of all tires. This information identifies and
describes the fundamental characteristics of the tire and also provides a
U.S. DOT Tire Identification Number for safety standard certification and
in case of a recall.
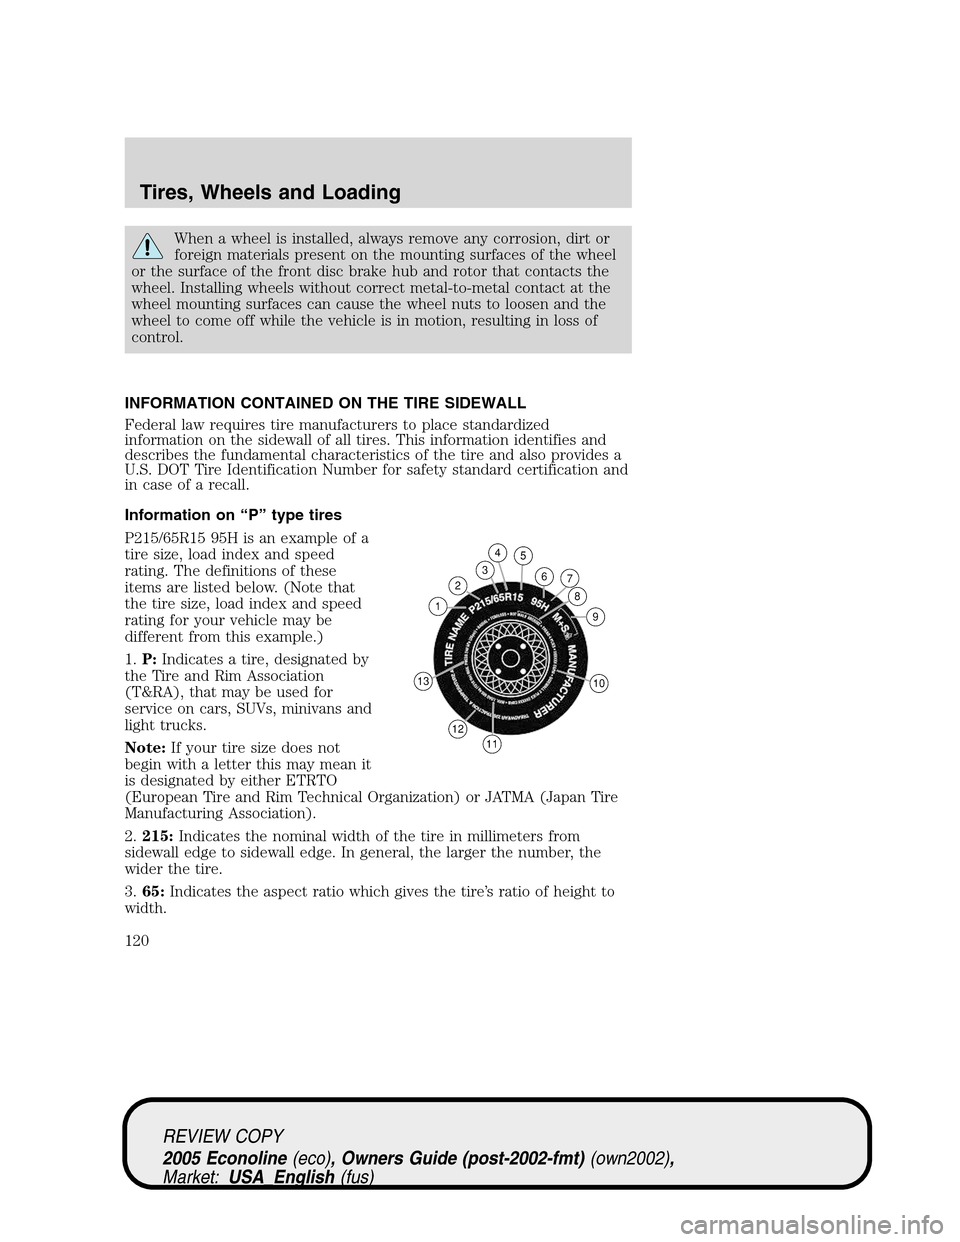
Information on “P” type tires
P215/65R15 95H is an example of a
tire size, load index and speed
rating. The definitions of these
items are listed below. (Note that
the tire size, load index and speed
rating for your vehicle may be
different from this example.)
1.P:Indicates a tire, designated by
the Tire and Rim Association
(T&RA), that may be used for
service on cars, SUVs, minivans and
light trucks.
Note:If your tire size does not
begin with a letter this may mean it
is designated by either ETRTO
(European Tire and Rim Technical Organization) or JATMA (Japan Tire
Manufacturing Association).
2.215:Indicates the nominal width of the tire in millimeters from
sidewall edge to sidewall edge. In general, the larger the number, the
wider the tire.
3.65:Indicates the aspect ratio which gives the tire’s ratio of height to
width.
REVIEW COPY
2005 Econoline(eco), Owners Guide (post-2002-fmt)(own2002),
Market:USA_English(fus)
Tires, Wheels and Loading
120
Page 143 of 248
Towing trailers beyond the maximum recommended gross trailer
weight exceeds the limit of the vehicle and could result in
engine damage, transmission damage, structural damage, loss of vehicle
control, vehicle rollover and personal injury.
Preparing to tow
Use the proper equipment for towing a trailer and make sure it is
properly attached to your vehicle. See your dealer or a reliable trailer
dealer if you require assistance.
Hitches
Do not use or install hitches that clamp onto the bumper or to the axle.
Underbody hitches are acceptable if installed properly.
Safety chains
Always connect the trailer’s safety chains to the frame or hook retainers
of the vehicle hitch. To connect the trailer’s safety chains, cross the
chains under the trailer tongue and allow slack for turning corners.
If you use a rental trailer, follow the instructions that the rental agency
gives to you.
Do not attach safety chains to the bumper.
Trailer brakes
Electric brakes and manual, automatic or surge-type trailer brakes are
safe if installed properly and adjusted to the manufacturer’s
specifications. The trailer brakes must meet local and Federal
regulations.
Do not connect a trailer’s hydraulic brake system directly to your
vehicle’s brake system. Your vehicle may not have enough
braking power and your chances of having a collision greatly increase.
The braking system of the tow vehicle is rated for operation at the
GVWR not GCWR.
Trailer lamps
Trailer lamps are required on most towed vehicles. Make sure all running
lights, brake lights, turn signals and hazard lights are working. See your
dealer or trailer rental agency for proper instructions and equipment for
hooking up trailer lamps.
REVIEW COPY
2005 Econoline(eco), Owners Guide (post-2002-fmt)(own2002),
Market:USA_English(fus)
Tires, Wheels and Loading
143
Page 147 of 248
STARTING
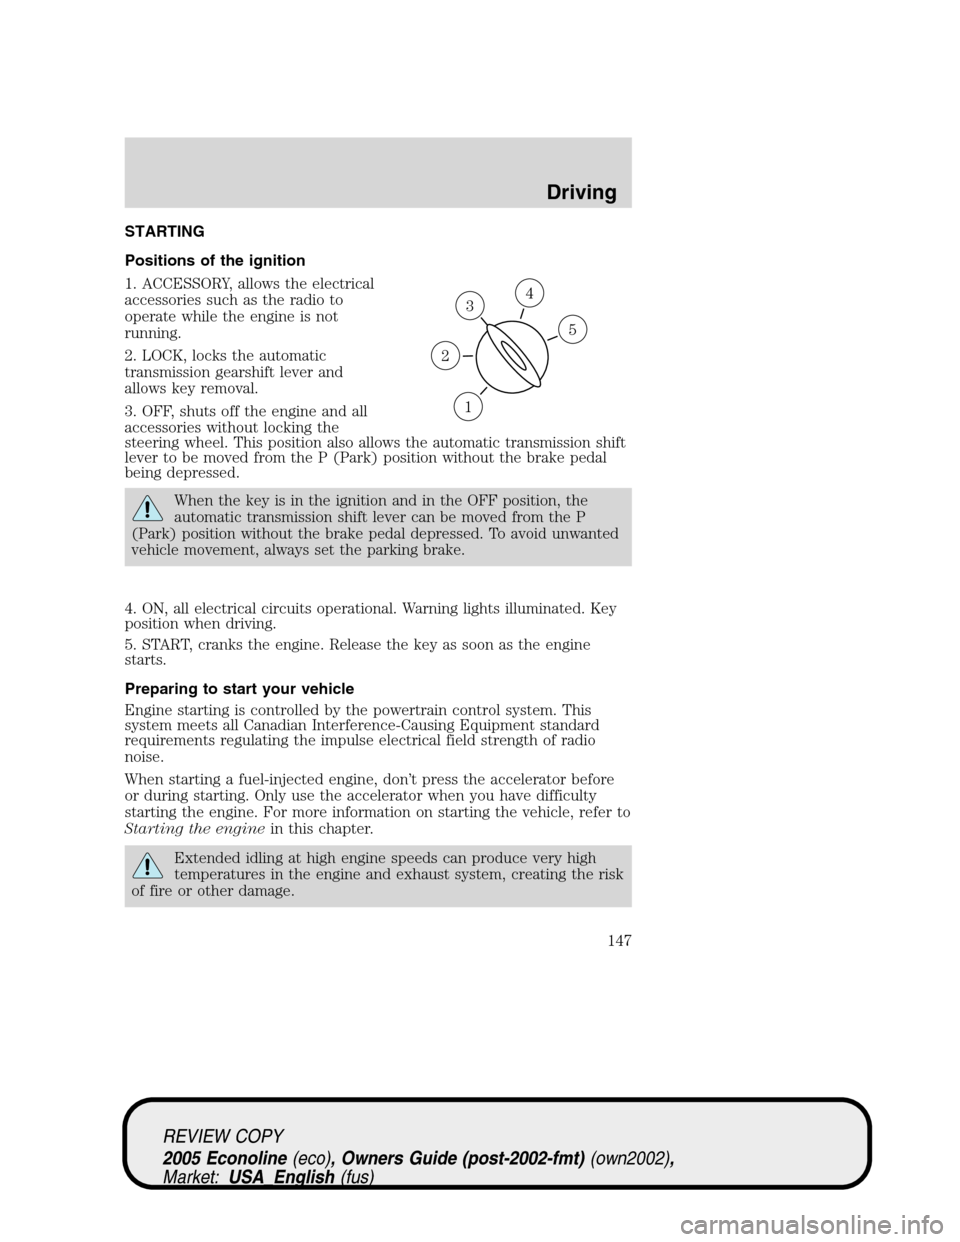
Positions of the ignition
1. ACCESSORY, allows the electrical
accessories such as the radio to
operate while the engine is not
running.
2. LOCK, locks the automatic
transmission gearshift lever and
allows key removal.
3. OFF, shuts off the engine and all
accessories without locking the
steering wheel. This position also allows the automatic transmission shift
lever to be moved from the P (Park) position without the brake pedal
being depressed.
When the key is in the ignition and in the OFF position, the
automatic transmission shift lever can be moved from the P
(Park) position without the brake pedal depressed. To avoid unwanted
vehicle movement, always set the parking brake.
4. ON, all electrical circuits operational. Warning lights illuminated. Key
position when driving.
5. START, cranks the engine. Release the key as soon as the engine
starts.
Preparing to start your vehicle
Engine starting is controlled by the powertrain control system. This
system meets all Canadian Interference-Causing Equipment standard
requirements regulating the impulse electrical field strength of radio
noise.
When starting a fuel-injected engine, don’t press the accelerator before
or during starting. Only use the accelerator when you have difficulty
starting the engine. For more information on starting the vehicle, refer to
Starting the enginein this chapter.
Extended idling at high engine speeds can produce very high
temperatures in the engine and exhaust system, creating the risk
of fire or other damage.
3
1
2
5
4
REVIEW COPY
2005 Econoline(eco), Owners Guide (post-2002-fmt)(own2002),
Market:USA_English(fus)
Driving
Driving
147
Page 149 of 248
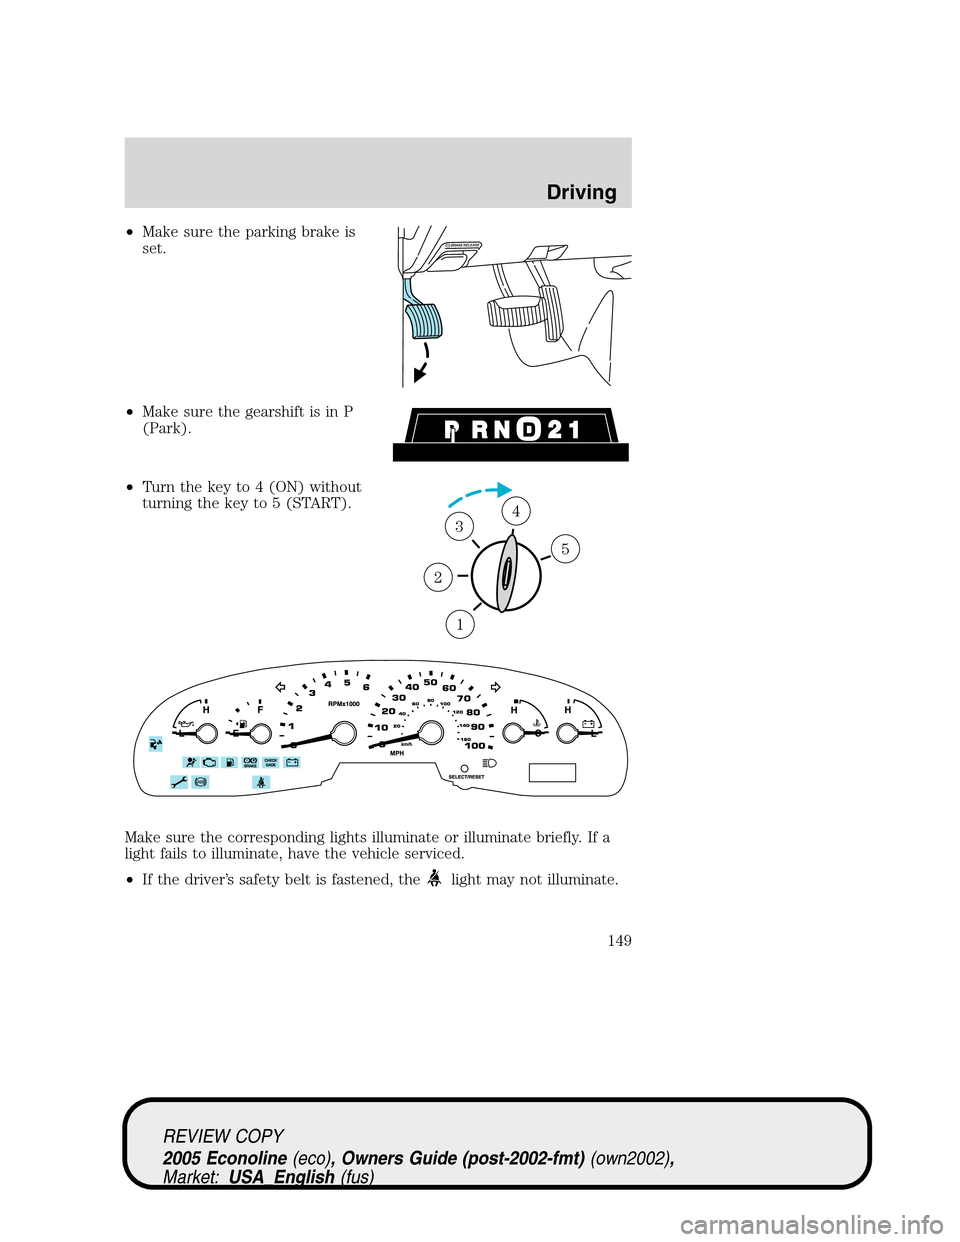
•Make sure the parking brake is
set.
•Make sure the gearshift is in P
(Park).
•Turn the key to 4 (ON) without
turning the key to 5 (START).
Make sure the corresponding lights illuminate or illuminate briefly. If a
light fails to illuminate, have the vehicle serviced.
•If the driver’s safety belt is fastened, the
light may not illuminate.
1
2
34
5
REVIEW COPY
2005 Econoline(eco), Owners Guide (post-2002-fmt)(own2002),
Market:USA_English(fus)
Driving
149