child lock FORD E SERIES 2006 4.G Owners Manual
[x] Cancel search | Manufacturer: FORD, Model Year: 2006, Model line: E SERIES, Model: FORD E SERIES 2006 4.GPages: 248, PDF Size: 2.54 MB
Page 10 of 248
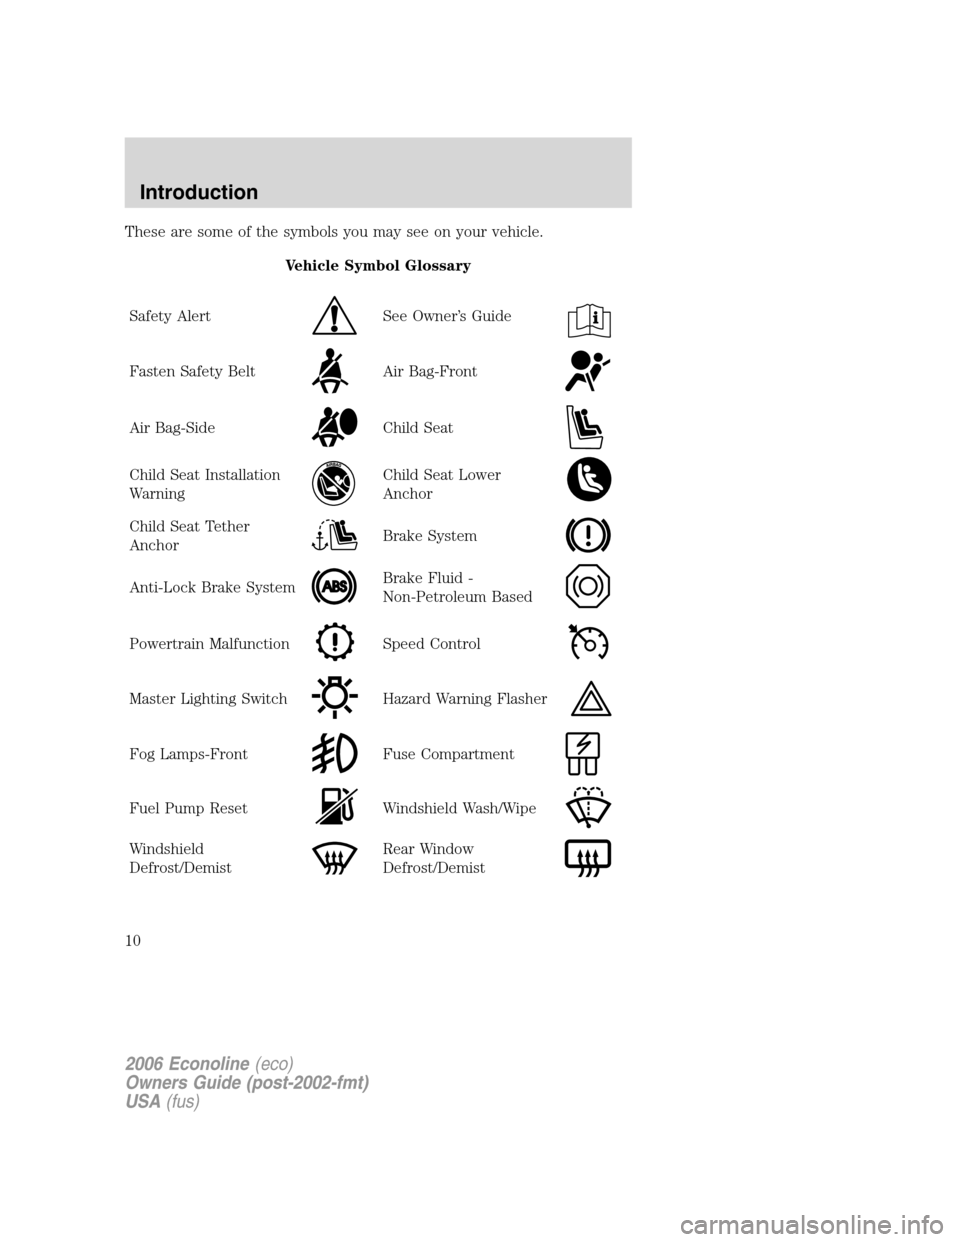
These are some of the symbols you may see on your vehicle.
Vehicle Symbol Glossary
Safety Alert
See Owner’s Guide
Fasten Safety BeltAir Bag-Front
Air Bag-SideChild Seat
Child Seat Installation
WarningChild Seat Lower
Anchor
Child Seat Tether
AnchorBrake System
Anti-Lock Brake SystemBrake Fluid -
Non-Petroleum Based
Powertrain MalfunctionSpeed Control
Master Lighting SwitchHazard Warning Flasher
Fog Lamps-FrontFuse Compartment
Fuel Pump ResetWindshield Wash/Wipe
Windshield
Defrost/DemistRear Window
Defrost/Demist
2006 Econoline(eco)
Owners Guide (post-2002-fmt)
USA(fus)
Introduction
10
Page 11 of 248
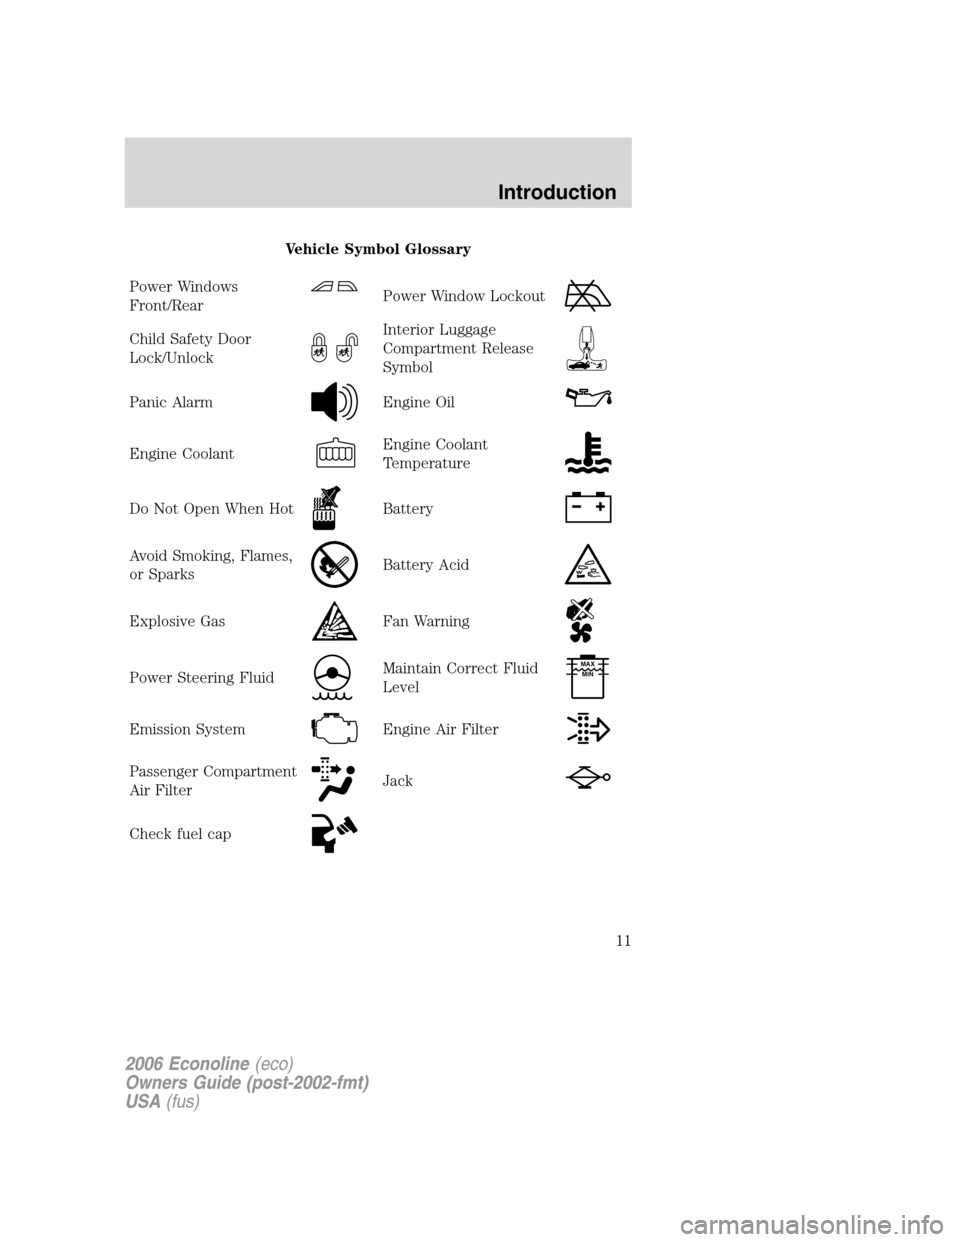
Vehicle Symbol Glossary
Power Windows
Front/Rear
Power Window Lockout
Child Safety Door
Lock/UnlockInterior Luggage
Compartment Release
Symbol
Panic AlarmEngine Oil
Engine CoolantEngine Coolant
Temperature
Do Not Open When HotBattery
Avoid Smoking, Flames,
or SparksBattery Acid
Explosive GasFan Warning
Power Steering FluidMaintain Correct Fluid
LevelMAX
MIN
Emission SystemEngine Air Filter
Passenger Compartment
Air FilterJack
Check fuel cap
2006 Econoline(eco)
Owners Guide (post-2002-fmt)
USA(fus)
Introduction
11
Page 40 of 248
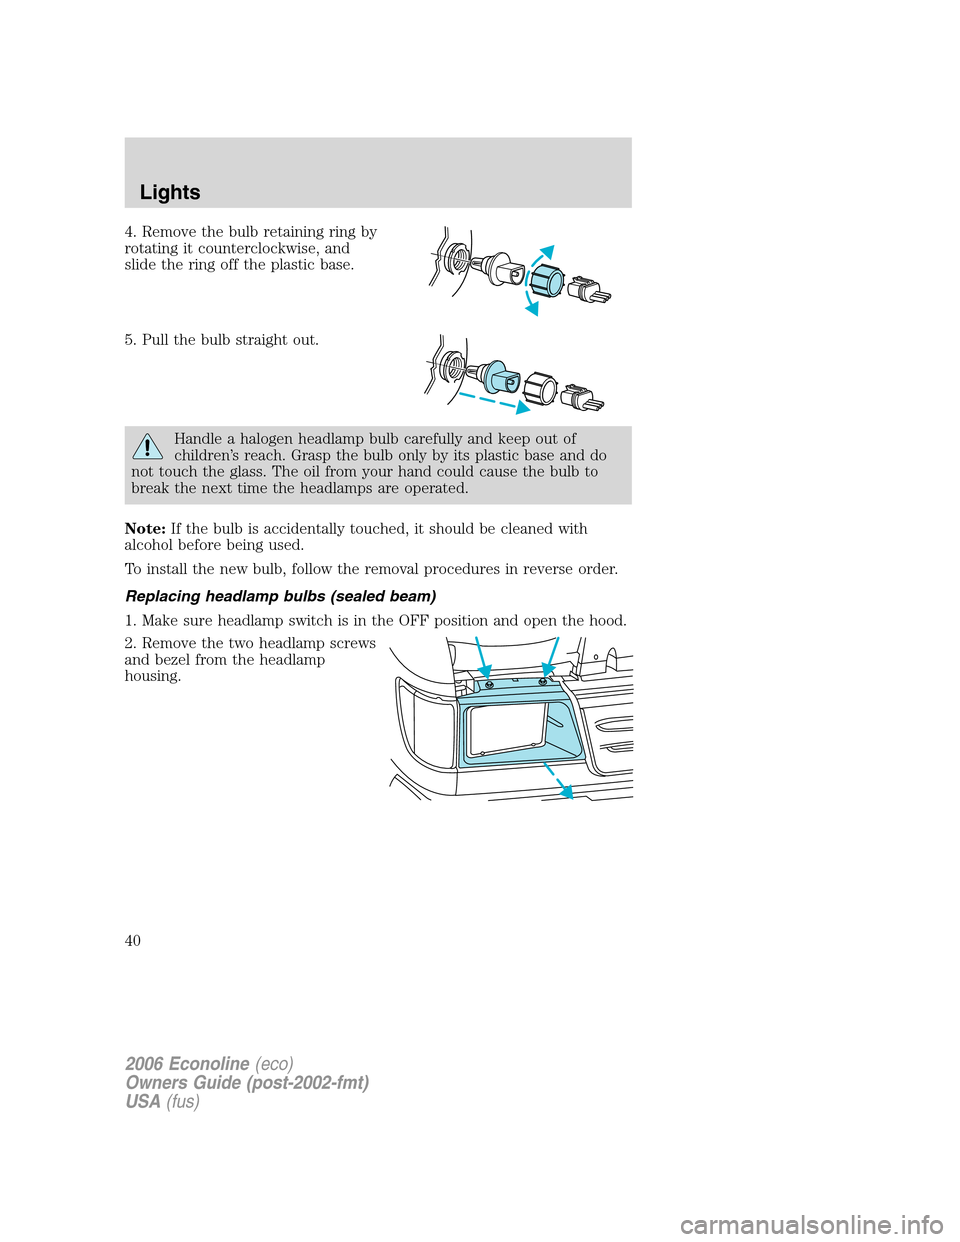
4. Remove the bulb retaining ring by
rotating it counterclockwise, and
slide the ring off the plastic base.
5. Pull the bulb straight out.
Handle a halogen headlamp bulb carefully and keep out of
children’s reach. Grasp the bulb only by its plastic base and do
not touch the glass. The oil from your hand could cause the bulb to
break the next time the headlamps are operated.
Note:If the bulb is accidentally touched, it should be cleaned with
alcohol before being used.
To install the new bulb, follow the removal procedures in reverse order.
Replacing headlamp bulbs (sealed beam)
1. Make sure headlamp switch is in the OFF position and open the hood.
2. Remove the two headlamp screws
and bezel from the headlamp
housing.
2006 Econoline(eco)
Owners Guide (post-2002-fmt)
USA(fus)
Lights
40
Page 65 of 248
Safety belts and seats can become hot in a vehicle that has been
closed up in sunny weather; they could burn a small child. Check
seat covers and buckles before you place a child anywhere near them.
Combination lap and shoulder belts
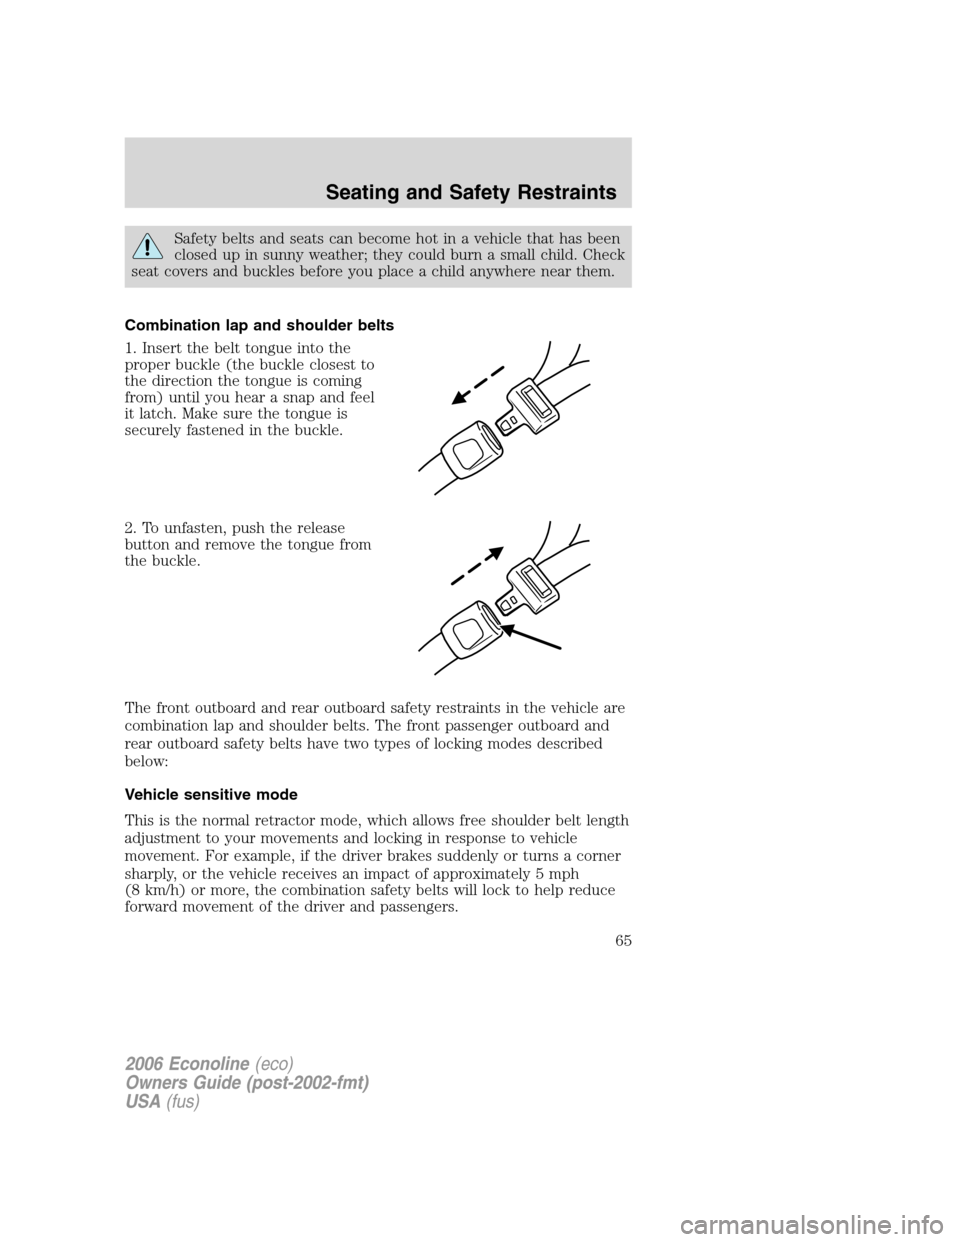
1. Insert the belt tongue into the
proper buckle (the buckle closest to
the direction the tongue is coming
from) until you hear a snap and feel
it latch. Make sure the tongue is
securely fastened in the buckle.
2. To unfasten, push the release
button and remove the tongue from
the buckle.
The front outboard and rear outboard safety restraints in the vehicle are
combination lap and shoulder belts. The front passenger outboard and
rear outboard safety belts have two types of locking modes described
below:
Vehicle sensitive mode
This is the normal retractor mode, which allows free shoulder belt length
adjustment to your movements and locking in response to vehicle
movement. For example, if the driver brakes suddenly or turns a corner
sharply, or the vehicle receives an impact of approximately 5 mph
(8 km/h) or more, the combination safety belts will lock to help reduce
forward movement of the driver and passengers.
2006 Econoline(eco)
Owners Guide (post-2002-fmt)
USA(fus)
Seating and Safety Restraints
65
Page 66 of 248
Automatic locking mode
When to use the automatic locking mode
In this mode, the shoulder belt is automatically pre-locked. The belt will
still retract to remove any slack in the shoulder belt. The automatic
locking mode is not available on the driver safety belt.
This mode should be usedany timea child safety seat is installed in a
passenger front or outboard rear seating position (if equipped). Children
12 years old and under should be properly restrained in the rear seat
whenever possible. Refer toSafety restraints for childrenorSafety
seats for childrenlater in this chapter.
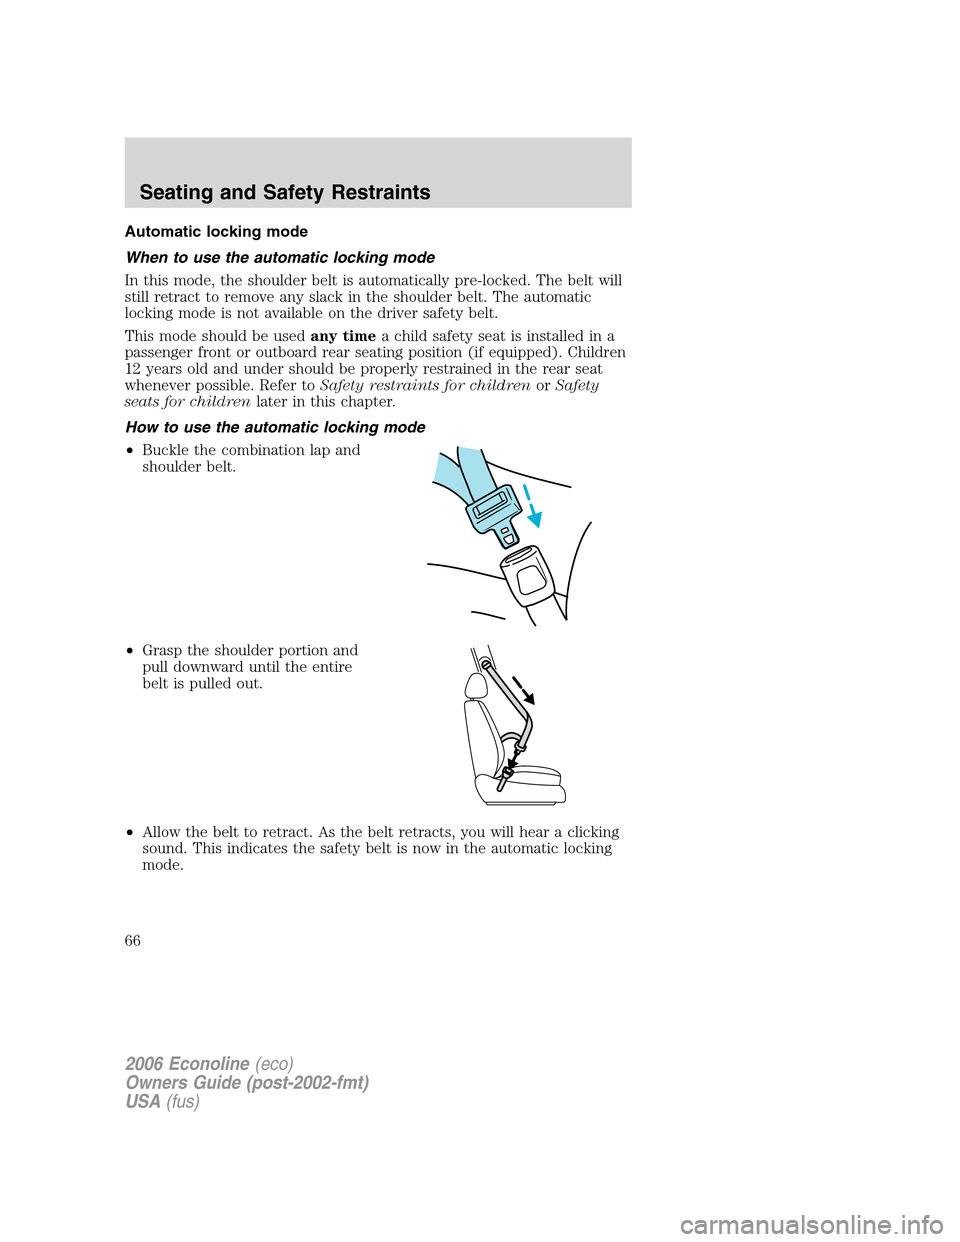
How to use the automatic locking mode
•Buckle the combination lap and
shoulder belt.
•Grasp the shoulder portion and
pull downward until the entire
belt is pulled out.
•Allow the belt to retract. As the belt retracts, you will hear a clicking
sound. This indicates the safety belt is now in the automatic locking
mode.
2006 Econoline(eco)
Owners Guide (post-2002-fmt)
USA(fus)
Seating and Safety Restraints
66
Page 67 of 248
How to disengage the automatic locking mode
Disconnect the combination lap/shoulder belt and allow it to retract
completely to disengage the automatic locking mode and activate the
vehicle sensitive (emergency) locking mode.
After any vehicle collision, the safety belt systems at all outboard
seating positions (except the driver position, which does not
have this feature) must be checked by a qualified technician to verify
that the automatic locking retractor feature for child seats is still
functioning properly. In addition, all seat belts should be checked for
proper function.
BELT AND RETRACTOR ASSEMBLY MUST BE REPLACED if
the seat belt assembly “automatic locking retractor” feature or
any other seat belt function is not operating properly when checked
according to the procedures in Workshop Manual. Failure to replace
the Belt and Retractor assembly could increase the risk of injury in
collisions.
Safety belt pretensioner
Your vehicle is equipped with safety belt pretensioners at the driver and
front outboard passenger seating positions.
The safety belt pretensioner is a device which removes excess webbing
from the safety belt system. The safety belt pretensioner uses the same
crash sensor system as the front airbag supplemental restraint system
(SRS). When the safety belt pretensioner deploys, webbing from the lap
and shoulder belt is tightened. Refer to theSafety belt maintenance
section in this chapter.
The driver and front passenger seat belt system (including
retractors, buckles and height adjusters) must be replaced if the
vehicle is involved in a collision that results in deployment of front
airbags and safety belt pretensioners.
2006 Econoline(eco)
Owners Guide (post-2002-fmt)
USA(fus)
Seating and Safety Restraints
67
Page 87 of 248
Follow all instructions provided by the manufacturer of the
booster seat.
Never put the shoulder belt under a child’s arm or behind the
back because it eliminates the protection for the upper part of
the body and may increase the risk of injury or death in a collision.
Never use pillows, books, or towels to boost a child. They can
slide around and increase the likelihood of injury or death in a
collision.
SAFETY SEATS FOR CHILDREN
Child and infant or child safety seats
Use a safety seat that is recommended for the size and weight of the
child. Carefully follow all of the manufacturer’s instructions with the
safety seat you put in your vehicle. If you do not install and use the
safety seat properly, the child may be injured in a sudden stop or
collision.
When installing a child safety seat:
•Review and follow the information
presented in theAirbag
Supplemental Restraint System
section in this chapter.
•Use the correct safety belt buckle
for that seating position (the
buckle closest to the direction the
tongue is coming from).
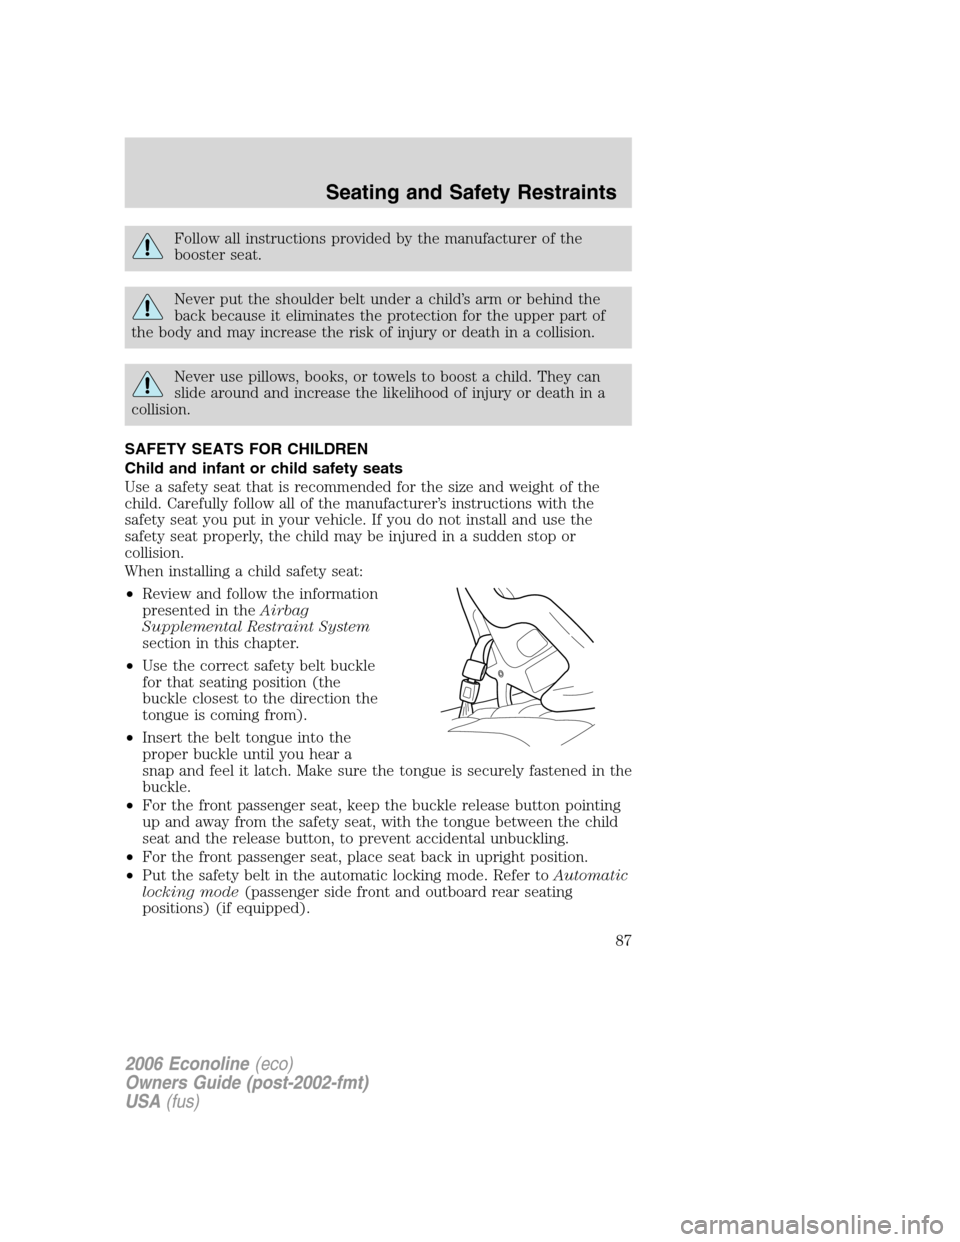
•Insert the belt tongue into the
proper buckle until you hear a
snap and feel it latch. Make sure the tongue is securely fastened in the
buckle.
•For the front passenger seat, keep the buckle release button pointing
up and away from the safety seat, with the tongue between the child
seat and the release button, to prevent accidental unbuckling.
•For the front passenger seat, place seat back in upright position.
•Put the safety belt in the automatic locking mode. Refer toAutomatic
locking mode(passenger side front and outboard rear seating
positions) (if equipped).
2006 Econoline(eco)
Owners Guide (post-2002-fmt)
USA(fus)
Seating and Safety Restraints
87
Page 90 of 248
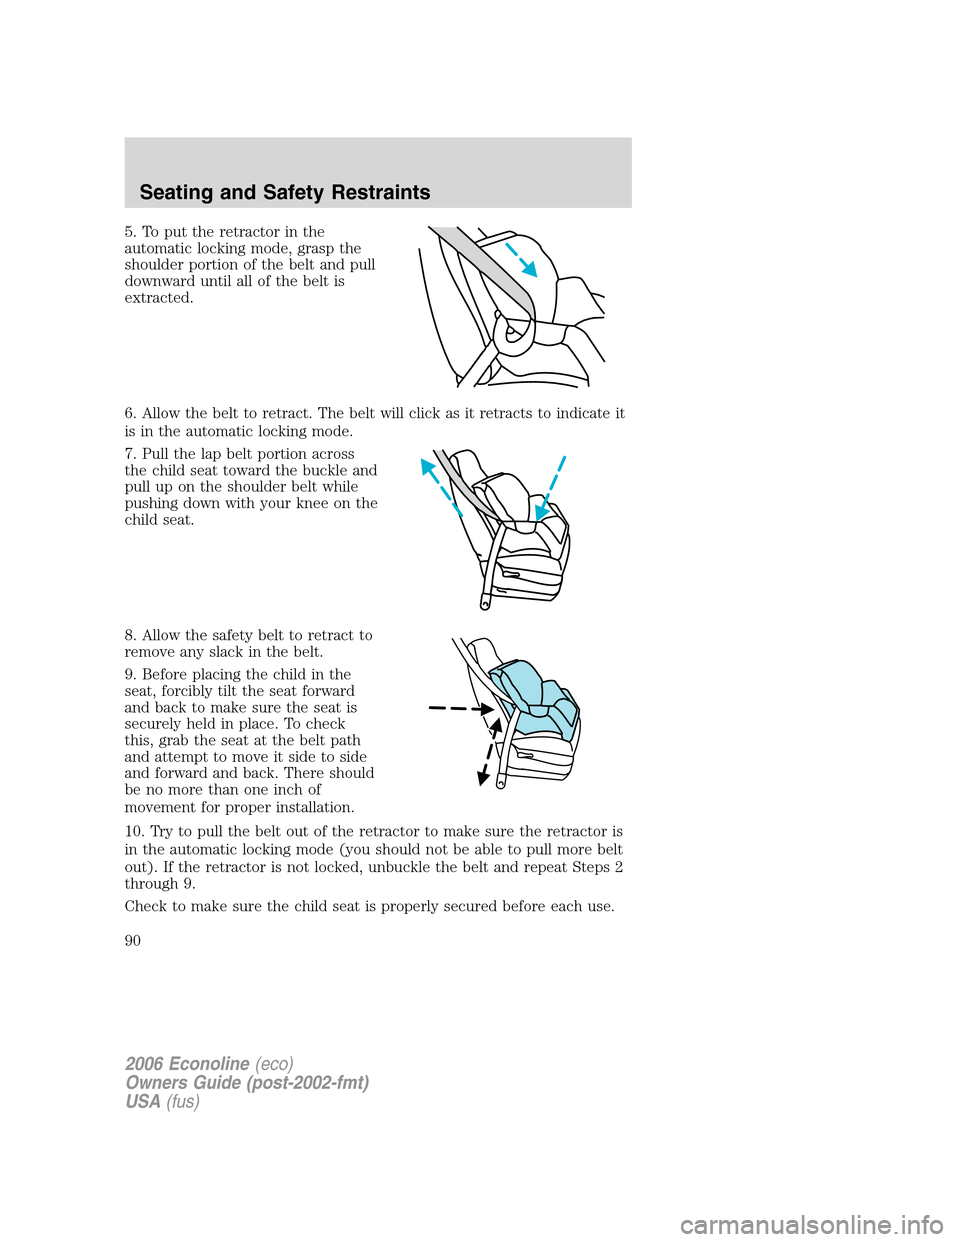
5. To put the retractor in the
automatic locking mode, grasp the
shoulder portion of the belt and pull
downward until all of the belt is
extracted.
6. Allow the belt to retract. The belt will click as it retracts to indicate it
is in the automatic locking mode.
7. Pull the lap belt portion across
the child seat toward the buckle and
pull up on the shoulder belt while
pushing down with your knee on the
child seat.
8. Allow the safety belt to retract to
remove any slack in the belt.
9. Before placing the child in the
seat, forcibly tilt the seat forward
and back to make sure the seat is
securely held in place. To check
this, grab the seat at the belt path
and attempt to move it side to side
and forward and back. There should
be no more than one inch of
movement for proper installation.
10. Try to pull the belt out of the retractor to make sure the retractor is
in the automatic locking mode (you should not be able to pull more belt
out). If the retractor is not locked, unbuckle the belt and repeat Steps 2
through 9.
Check to make sure the child seat is properly secured before each use.
2006 Econoline(eco)
Owners Guide (post-2002-fmt)
USA(fus)
Seating and Safety Restraints
90
Page 214 of 248
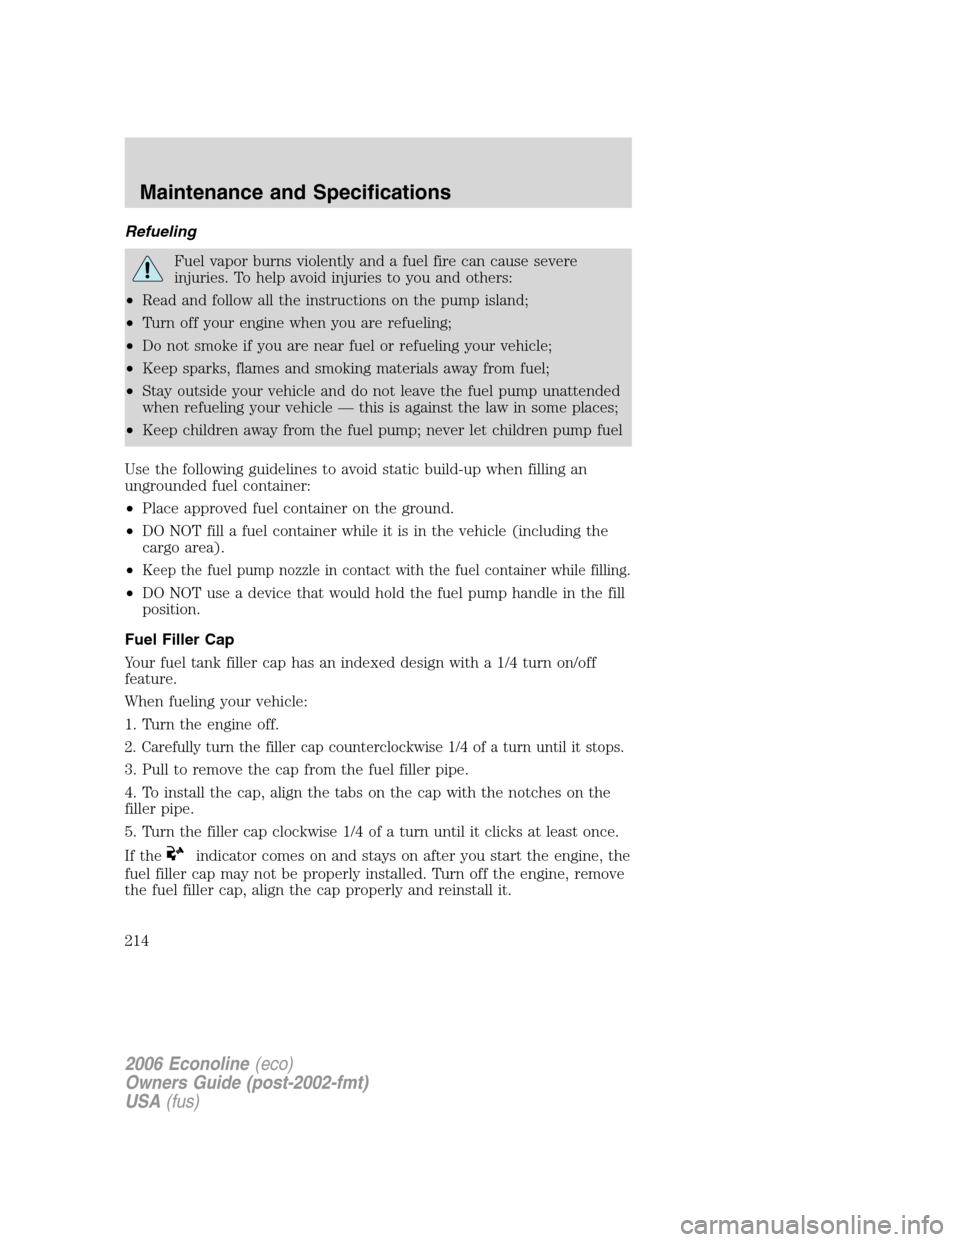
Refueling
Fuel vapor burns violently and a fuel fire can cause severe
injuries. To help avoid injuries to you and others:
•Read and follow all the instructions on the pump island;
•Turn off your engine when you are refueling;
•Do not smoke if you are near fuel or refueling your vehicle;
•Keep sparks, flames and smoking materials away from fuel;
•Stay outside your vehicle and do not leave the fuel pump unattended
when refueling your vehicle — this is against the law in some places;
•Keep children away from the fuel pump; never let children pump fuel
Use the following guidelines to avoid static build-up when filling an
ungrounded fuel container:
•Place approved fuel container on the ground.
•DO NOT fill a fuel container while it is in the vehicle (including the
cargo area).
•
Keep the fuel pump nozzle in contact with the fuel container while filling.
•DO NOT use a device that would hold the fuel pump handle in the fill
position.
Fuel Filler Cap
Your fuel tank filler cap has an indexed design with a 1/4 turn on/off
feature.
When fueling your vehicle:
1. Turn the engine off.
2. Carefully turn the filler cap counterclockwise 1/4 of a turn until it stops.
3. Pull to remove the cap from the fuel filler pipe.
4. To install the cap, align the tabs on the cap with the notches on the
filler pipe.
5. Turn the filler cap clockwise 1/4 of a turn until it clicks at least once.
If the
indicator comes on and stays on after you start the engine, the
fuel filler cap may not be properly installed. Turn off the engine, remove
the fuel filler cap, align the cap properly and reinstall it.
2006 Econoline(eco)
Owners Guide (post-2002-fmt)
USA(fus)
Maintenance and Specifications
214
Page 243 of 248
A
Accessory delay ..........................48
AdvanceTrac ..............................143
Air cleaner filter ...............227–228
Airbag supplemental restraint
system ..........................................74
and child safety seats ..............76
description ................................74
disposal ......................................78
driver airbag ..............................76
indicator light ...........................78
operation ...................................76
passenger airbag .......................76
passenger deactivation
switch ........................................79
Ambulance packages ....................7
Antifreeze
(see Engine coolant) ................206
Anti-lock brake system
(see Brakes) ..............................139
Audio system
(see Radio) ......................18, 20, 24
Automatic transmission
driving an automatic
overdrive .................147, 149, 152
fluid, adding ............................224
fluid, checking ........................224
fluid, refill capacities ..............230
fluid, specification ..................237
Auxiliary power point .................47
Axle
lubricant specifications ..234, 237
refill capacities ........................230
traction lok ..............................141
B
Battery .......................................203acid, treating emergencies .....203
jumping a disabled battery ....176
maintenance-free ....................203
replacement, specifications ...228
servicing ..................................203
BeltMinder ...................................69
Brakes ........................................139
anti-lock ...................................139
anti-lock brake system (ABS)
warning light ...........................139
fluid, checking and adding ....224
fluid, refill capacities ..............230
fluid, specifications .........234, 237
lubricant specifications ..234, 237
parking ....................................140
shift interlock ..........................146
Break-in period .............................5
Bulbs ............................................38
C
Capacities for refilling fluids ....230
Cell phone use ..............................8
Child safety restraints ................84
child safety belts ......................84
Child safety seats ........................87
in front seat ..............................88
in rear seat ................................88
tether anchorage hardware .....91
Cleaning your vehicle
engine compartment ..............192
exterior ....................................195
instrument panel ....................194
interior .....................................194
interior trim ............................194
plastic parts ............................193
safety belts ..............................194
washing ....................................191
waxing .....................................191
wheels ......................................192
2006 Econoline(eco)
Owners Guide (post-2002-fmt)
USA(fus)
Index
243