stop start FORD E SERIES 2009 4.G User Guide
[x] Cancel search | Manufacturer: FORD, Model Year: 2009, Model line: E SERIES, Model: FORD E SERIES 2009 4.GPages: 321, PDF Size: 2.31 MB
Page 224 of 321
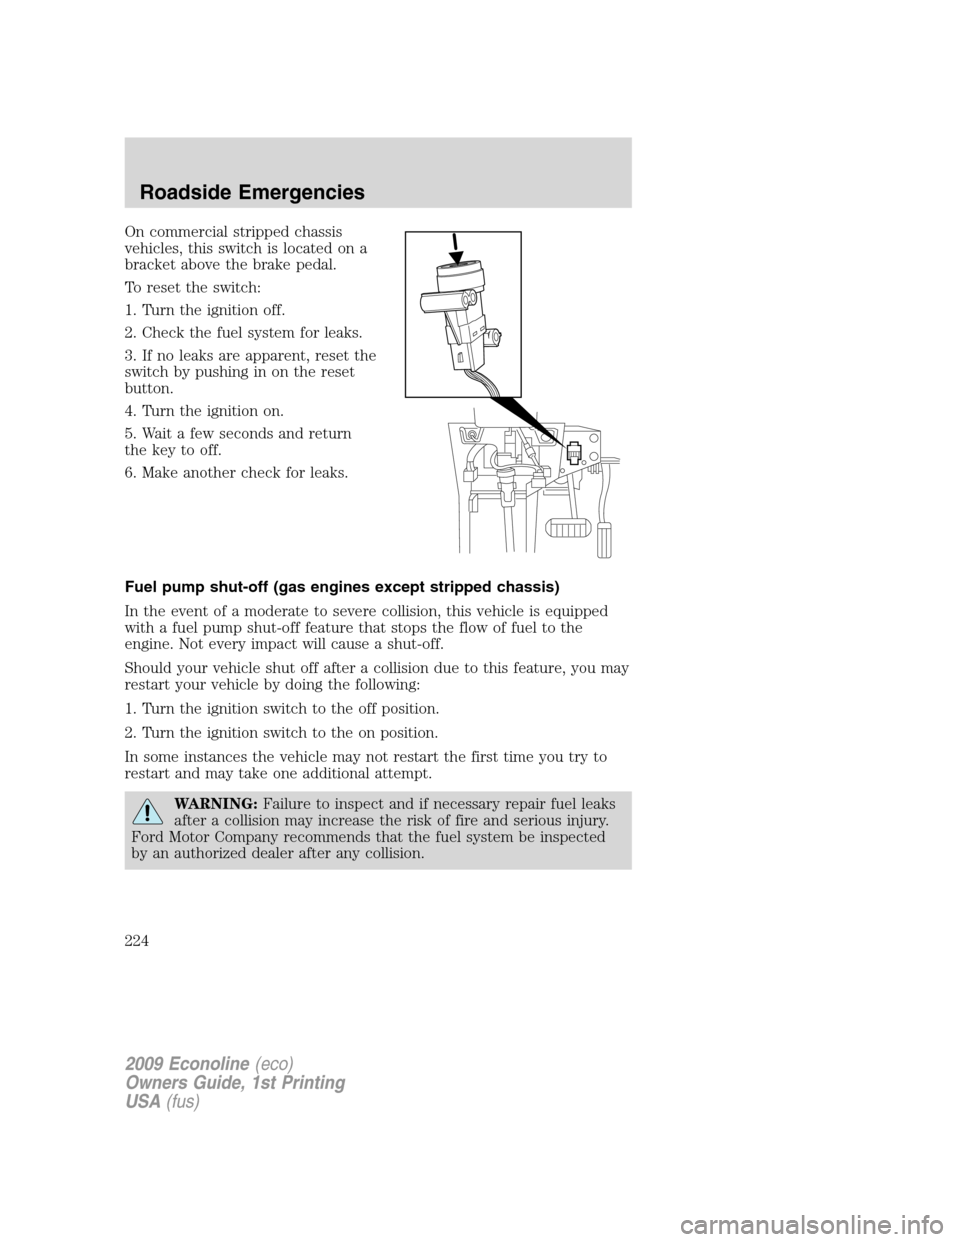
On commercial stripped chassis
vehicles, this switch is located on a
bracket above the brake pedal.
To reset the switch:
1. Turn the ignition off.
2. Check the fuel system for leaks.
3. If no leaks are apparent, reset the
switch by pushing in on the reset
button.
4. Turn the ignition on.
5. Wait a few seconds and return
the key to off.
6. Make another check for leaks.
Fuel pump shut-off (gas engines except stripped chassis)
In the event of a moderate to severe collision, this vehicle is equipped
with a fuel pump shut-off feature that stops the flow of fuel to the
engine. Not every impact will cause a shut-off.
Should your vehicle shut off after a collision due to this feature, you may
restart your vehicle by doing the following:
1. Turn the ignition switch to the off position.
2. Turn the ignition switch to the on position.
In some instances the vehicle may not restart the first time you try to
restart and may take one additional attempt.
WARNING:Failure to inspect and if necessary repair fuel leaks
after a collision may increase the risk of fire and serious injury.
Ford Motor Company recommends that the fuel system be inspected
by an authorized dealer after any collision.
2009 Econoline(eco)
Owners Guide, 1st Printing
USA(fus)
Roadside Emergencies
224
Page 227 of 321
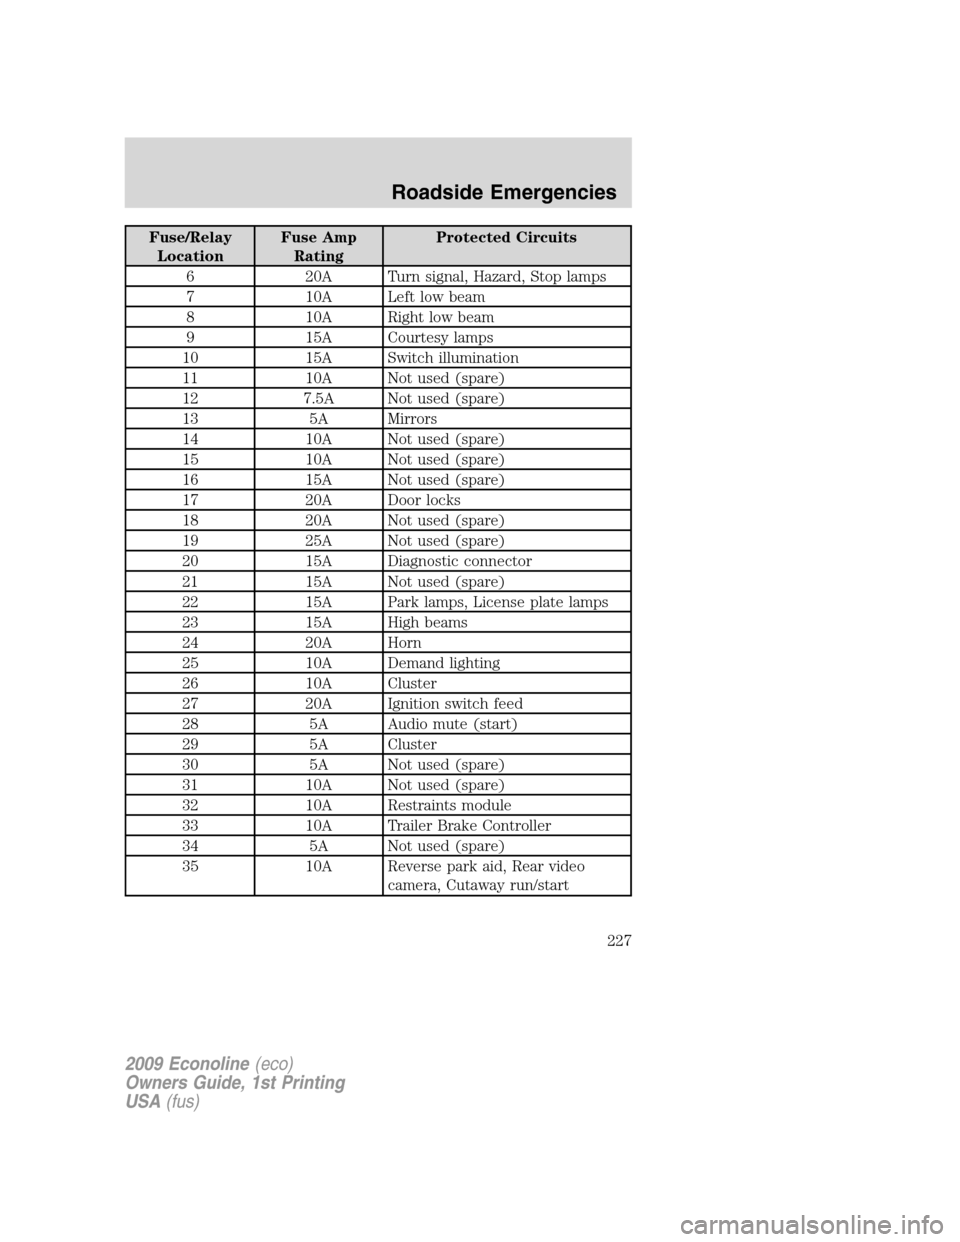
Fuse/Relay
LocationFuse Amp
RatingProtected Circuits
6 20A Turn signal, Hazard, Stop lamps
7 10A Left low beam
8 10A Right low beam
9 15A Courtesy lamps
10 15A Switch illumination
11 10A Not used (spare)
12 7.5A Not used (spare)
13 5A Mirrors
14 10A Not used (spare)
15 10A Not used (spare)
16 15A Not used (spare)
17 20A Door locks
18 20A Not used (spare)
19 25A Not used (spare)
20 15A Diagnostic connector
21 15A Not used (spare)
22 15A Park lamps, License plate lamps
23 15A High beams
24 20A Horn
25 10A Demand lighting
26 10A Cluster
27 20A Ignition switch feed
28 5A Audio mute (start)
29 5A Cluster
30 5A Not used (spare)
31 10A Not used (spare)
32 10A Restraints module
33 10A Trailer Brake Controller
34 5A Not used (spare)
35 10A Reverse park aid, Rear video
camera, Cutaway run/start
2009 Econoline(eco)
Owners Guide, 1st Printing
USA(fus)
Roadside Emergencies
227
Page 230 of 321
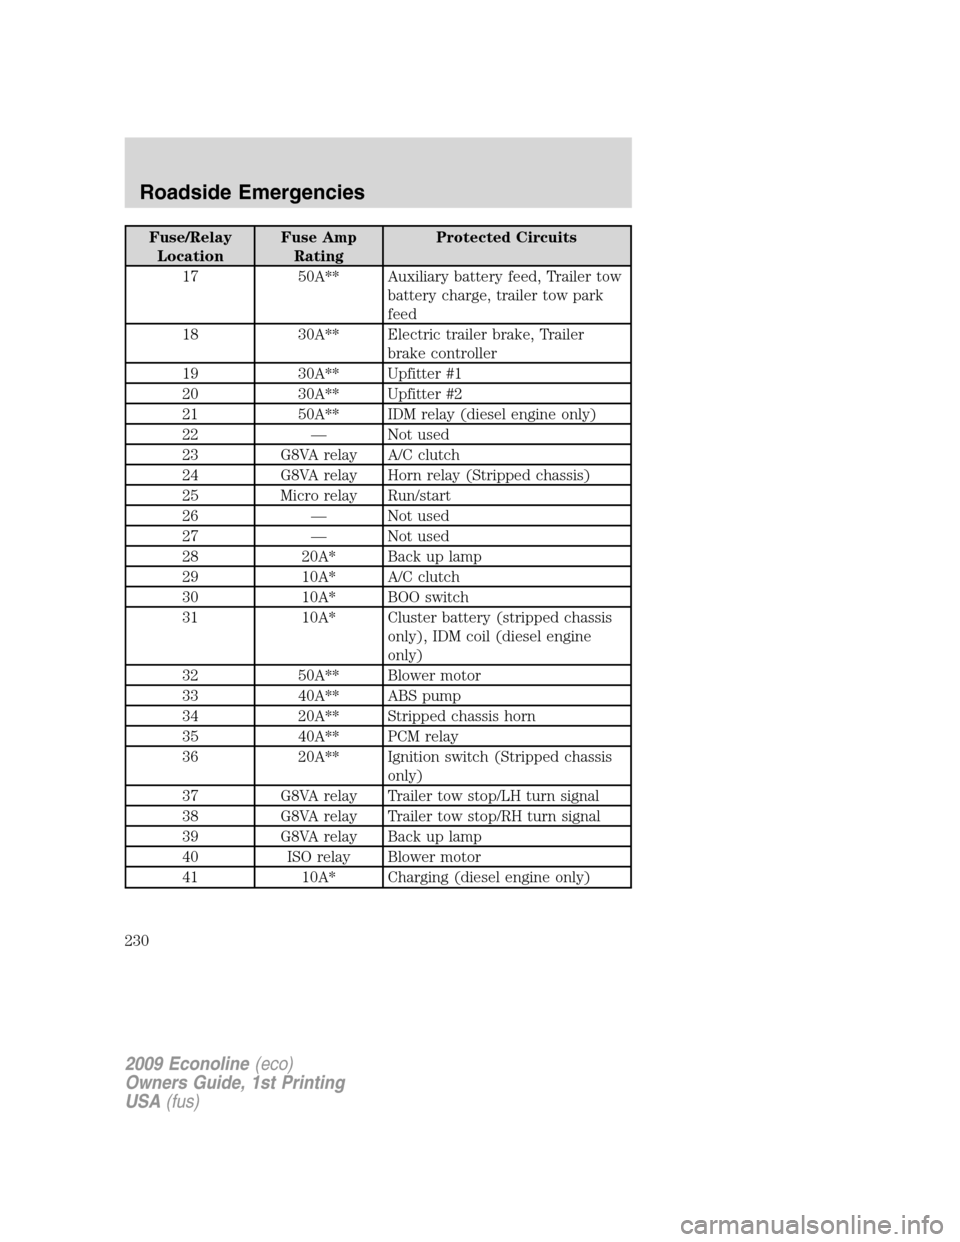
Fuse/Relay
LocationFuse Amp
RatingProtected Circuits
17 50A** Auxiliary battery feed, Trailer tow
battery charge, trailer tow park
feed
18 30A** Electric trailer brake, Trailer
brake controller
19 30A** Upfitter #1
20 30A** Upfitter #2
21 50A** IDM relay (diesel engine only)
22 — Not used
23 G8VA relay A/C clutch
24 G8VA relay Horn relay (Stripped chassis)
25 Micro relay Run/start
26 — Not used
27 — Not used
28 20A* Back up lamp
29 10A* A/C clutch
30 10A* BOO switch
31 10A* Cluster battery (stripped chassis
only), IDM coil (diesel engine
only)
32 50A** Blower motor
33 40A** ABS pump
34 20A** Stripped chassis horn
35 40A** PCM relay
36 20A** Ignition switch (Stripped chassis
only)
37 G8VA relay Trailer tow stop/LH turn signal
38 G8VA relay Trailer tow stop/RH turn signal
39 G8VA relay Back up lamp
40 ISO relay Blower motor
41 10A* Charging (diesel engine only)
2009 Econoline(eco)
Owners Guide, 1st Printing
USA(fus)
Roadside Emergencies
230
Page 231 of 321
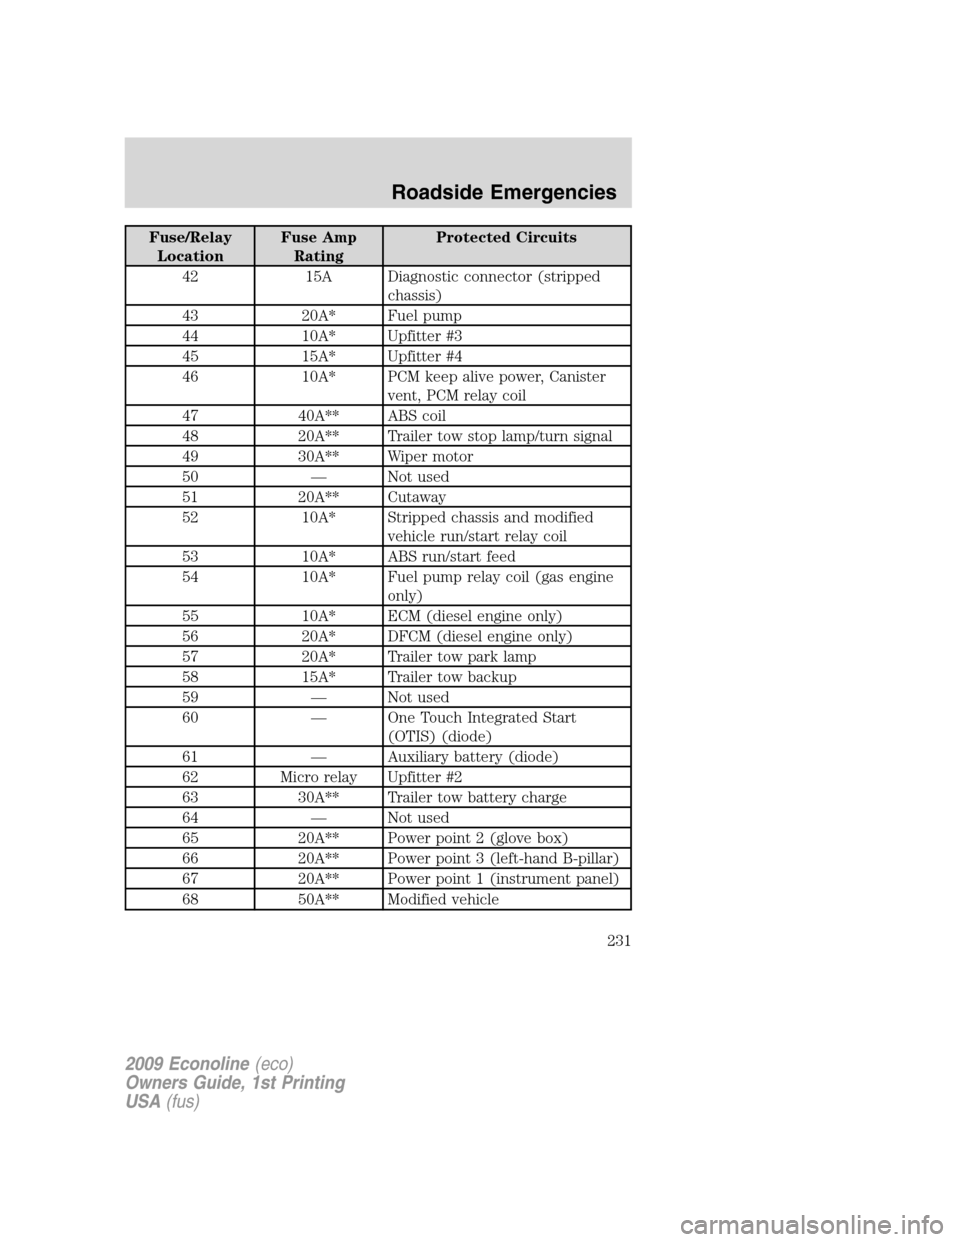
Fuse/Relay
LocationFuse Amp
RatingProtected Circuits
42 15A Diagnostic connector (stripped
chassis)
43 20A* Fuel pump
44 10A* Upfitter #3
45 15A* Upfitter #4
46 10A* PCM keep alive power, Canister
vent, PCM relay coil
47 40A** ABS coil
48 20A** Trailer tow stop lamp/turn signal
49 30A** Wiper motor
50 — Not used
51 20A** Cutaway
52 10A* Stripped chassis and modified
vehicle run/start relay coil
53 10A* ABS run/start feed
54 10A* Fuel pump relay coil (gas engine
only)
55 10A* ECM (diesel engine only)
56 20A* DFCM (diesel engine only)
57 20A* Trailer tow park lamp
58 15A* Trailer tow backup
59 — Not used
60 — One Touch Integrated Start
(OTIS) (diode)
61 — Auxiliary battery (diode)
62 Micro relay Upfitter #2
63 30A** Trailer tow battery charge
64 — Not used
65 20A** Power point 2 (glove box)
66 20A** Power point 3 (left-hand B-pillar)
67 20A** Power point 1 (instrument panel)
68 50A** Modified vehicle
2009 Econoline(eco)
Owners Guide, 1st Printing
USA(fus)
Roadside Emergencies
231
Page 274 of 321
Battery relearn
Because your vehicle’s engine is electronically controlled by a computer,
some control conditions are maintained by power from the battery. When
the battery is disconnected or a new battery is installed, the engine must
relearn its idle and fuel trim strategy for optimum driveability and
performance. Flexible fuel vehicles (FFV) must also relearn the ethanol
content of the fuel for optimum driveability and performance. To begin
this process:
1. With the vehicle at a complete stop, set the parking brake.
2. Put the gearshift in P (Park), turn off all accessories and start the
engine.
3. Run the engine until it reaches normal operating temperature.
4. Allow the engine to idle for at least one minute.
5. Turn the A/C on and allow the engine to idle for at least one minute.
6. Release the parking brake. With your foot on the brake pedal and with
the A/C on, put the vehicle in D (Drive) and allow the engine to idle for
at least one minute.
7. Drive the vehicle to complete the relearning process.
•The vehicle may need to be driven 10 miles (16 km) or more to
relearn the idle and fuel trim strategy along with the ethanol content
for flexible fuel vehicles.
•If you do not allow the engine to relearn its idle trim, the idle quality
of your vehicle may be adversely affected until the idle trim is
eventually relearned.
•For flexible fuel vehicles, if you are operating on E85, you may
experience poor starts or an inability to start the engine and
driveability problems until the fuel trim and ethanol content have been
relearned.
If the battery has been disconnected or a new battery has been installed,
the clock and radio settings must be reset once the battery is
reconnected.
2009 Econoline(eco)
Owners Guide, 1st Printing
USA(fus)
Maintenance and Specifications
274
Page 281 of 321
When fail-safe mode is activated
You have limited engine power when in the fail-safe mode, so drive the
vehicle with caution. The vehicle will not be able to maintain high-speed
operation and the engine will run rough. Remember that the engine is
capable of completely shutting down automatically to prevent engine
damage, therefore:
1. Pull off the road as soon as safely possible and turn off the engine.
2. Arrange for the vehicle to be taken to an authorized dealer.
3. If this is not possible, wait a short period for the engine to cool.
4. Check the coolant level and replenish if low.
WARNING:Never remove the coolant reservoir cap while the
engine is running or hot.
5. Re-start the engine and take your vehicle to an authorized dealer.
Driving the vehicle without repairing the engine problem
increases the chance of engine damage. Take your vehicle to an
authorized dealer as soon as possible.
FUEL FILTER
Your vehicle is equipped with a lifetime fuel filter that is integrated with
the fuel tank. Regular maintenance or replacement is not needed.
WHAT YOU SHOULD KNOW ABOUT AUTOMOTIVE FUELS
Important safety precautions
WARNING:Do not overfill the fuel tank. The pressure in an
overfilled tank may cause leakage and lead to fuel spray and fire.
WARNING:The fuel system may be under pressure. If the fuel
filler cap is venting vapor or if you hear a hissing sound, wait
until it stops before completely removing the fuel filler cap. Otherwise,
fuel may spray out and injure you or others.
WARNING:If you do not use the proper fuel filler cap,
excessive vacuum in the fuel tank may damage the fuel system
or cause the fuel cap to disengage in a collision, which may result in
serious personal injury.
2009 Econoline(eco)
Owners Guide, 1st Printing
USA(fus)
Maintenance and Specifications
281
Page 285 of 321
At the next opportunity, safely pull off of the road, remove the fuel filler
cap, align the cap properly and reinstall it. The check fuel cap
light
or “check fuel cap” message may not reset immediately; it may
take several driving cycles for the check fuel cap light
or “check fuel
cap” message to turn off. A driving cycle consists of an engine start-up
(after four or more hours with the engine off) followed by city and
highway driving.
Continuing to drive with the check fuel cap light
or “check fuel cap”
message on may cause the
light to turn on as well.
If you must replace the fuel filler cap, replace it with a fuel filler
cap that is designed for your vehicle. The customer warranty may
be void for any damage to the fuel tank or fuel system if the
correct genuine Ford, Motorcraft or other certified fuel filler cap
is not used.
WARNING:The fuel system may be under pressure. If the fuel
filler cap is venting vapor or if you hear a hissing sound, wait
until it stops before completely removing the fuel filler cap. Otherwise,
fuel may spray out and injure you or others.
WARNING:If you do not use the proper fuel filler cap,
excessive vacuum in the fuel tank may damage the fuel system
or cause the fuel cap to disengage in a collision, which may result in
personal injury.
FFV (Flex Fuel Vehicle) fuel cap
If your vehicle is FFV capable, it will have a yellow colored fuel cap.
2009 Econoline(eco)
Owners Guide, 1st Printing
USA(fus)
Maintenance and Specifications
285
Page 294 of 321
The OBD-II system is designed to check the emission control system
during normal driving. A complete check may take several days. If the
vehicle is not ready for I/M testing, the following driving cycle consisting
of mixed city and highway driving may be performed:
15 minutes of steady driving on an expressway/highway followed by
20 minutes of stop-and-go driving with at least four 30-second idle
periods.
Allow the vehicle to sit for at least eight hours without starting the
engine. Then, start the engine and complete the above driving cycle. The
engine must warm up to its normal operating temperature. Once started,
do not turn off the engine until the above driving cycle is complete. If
the vehicle is still not ready for I/M testing, the above driving cycle will
have to be repeated.
POWER STEERING FLUID
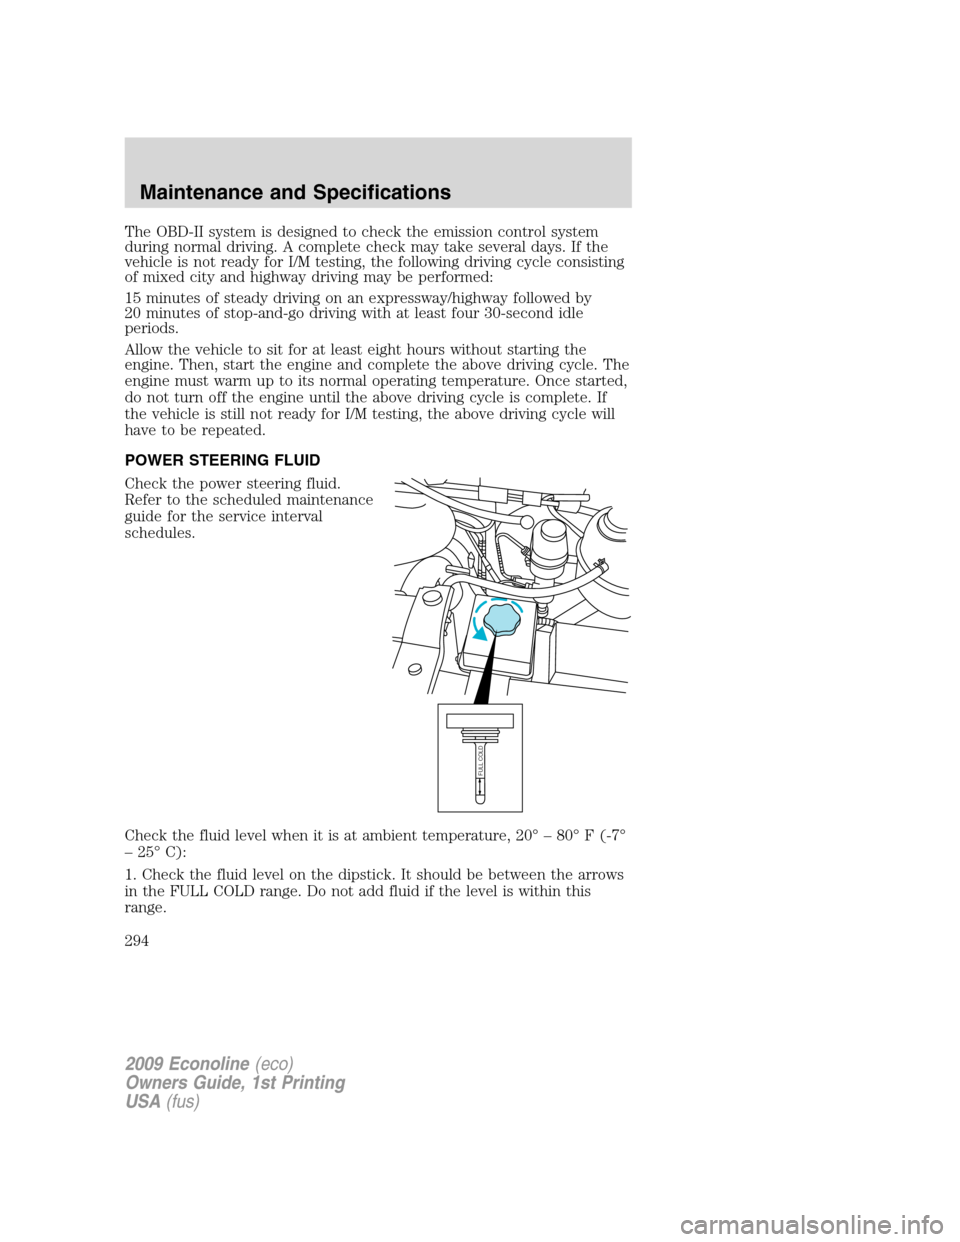
Check the power steering fluid.
Refer to the scheduled maintenance
guide for the service interval
schedules.
Check the fluid level when it is at ambient temperature, 20° – 80° F (-7°
– 25° C):
1. Check the fluid level on the dipstick. It should be between the arrows
in the FULL COLD range. Do not add fluid if the level is within this
range.
FULL COLD
2009 Econoline(eco)
Owners Guide, 1st Printing
USA(fus)
Maintenance and Specifications
294