check engine FORD E SERIES 2010 4.G Owner's Manual
[x] Cancel search | Manufacturer: FORD, Model Year: 2010, Model line: E SERIES, Model: FORD E SERIES 2010 4.GPages: 324, PDF Size: 2.6 MB
Page 271 of 324
CHANGING THE WIPER BLADES
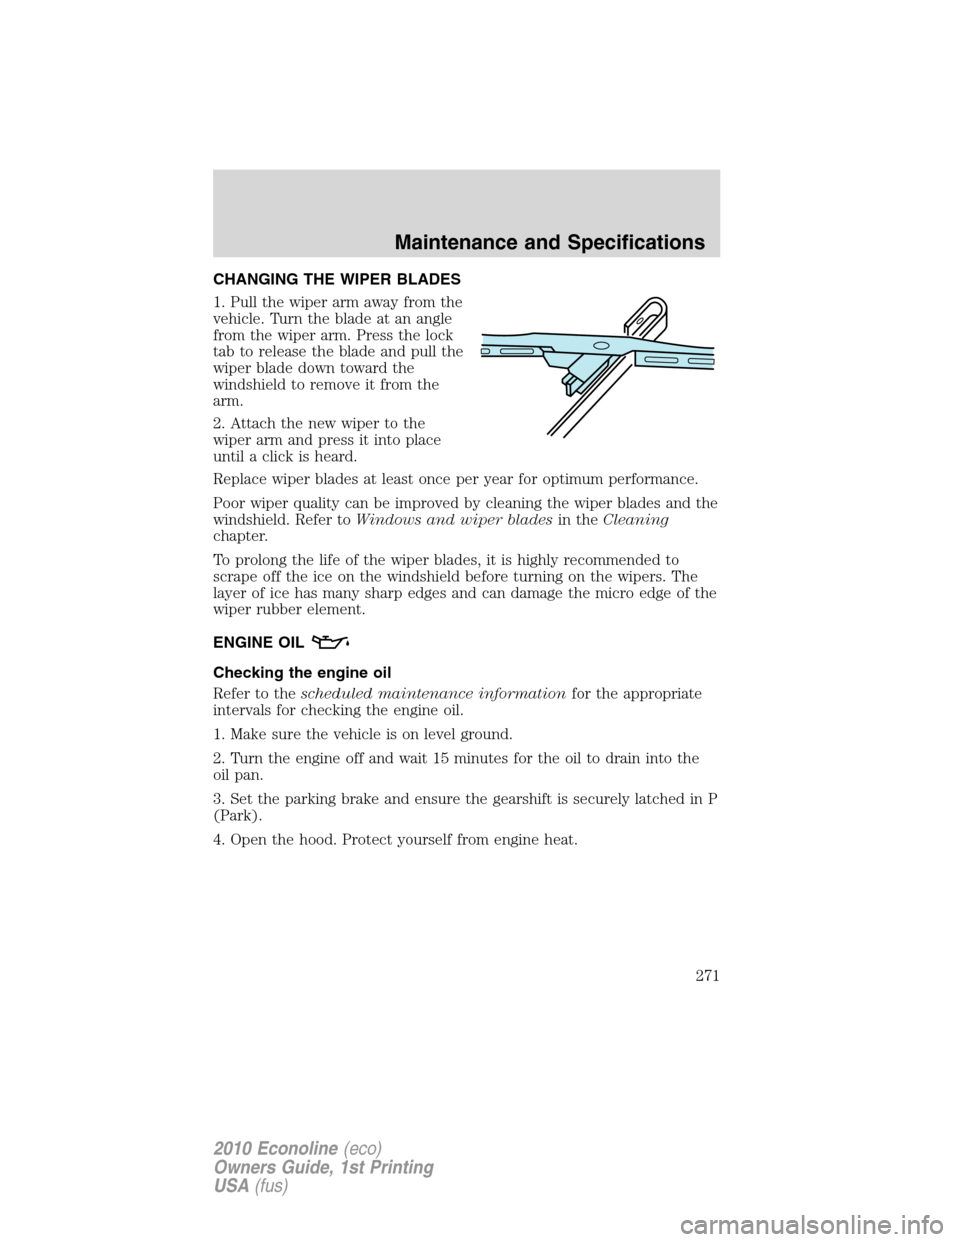
1. Pull the wiper arm away from the
vehicle. Turn the blade at an angle
from the wiper arm. Press the lock
tab to release the blade and pull the
wiper blade down toward the
windshield to remove it from the
arm.
2. Attach the new wiper to the
wiper arm and press it into place
until a click is heard.
Replace wiper blades at least once per year for optimum performance.
Poor wiper quality can be improved by cleaning the wiper blades and the
windshield. Refer toWindows and wiper bladesin theCleaning
chapter.
To prolong the life of the wiper blades, it is highly recommended to
scrape off the ice on the windshield before turning on the wipers. The
layer of ice has many sharp edges and can damage the micro edge of the
wiper rubber element.
ENGINE OIL
Checking the engine oil
Refer to thescheduled maintenance informationfor the appropriate
intervals for checking the engine oil.
1. Make sure the vehicle is on level ground.
2. Turn the engine off and wait 15 minutes for the oil to drain into the
oil pan.
3. Set the parking brake and ensure the gearshift is securely latched in P
(Park).
4. Open the hood. Protect yourself from engine heat.
Maintenance and Specifications
271
2010 Econoline(eco)
Owners Guide, 1st Printing
USA(fus)
Page 272 of 324
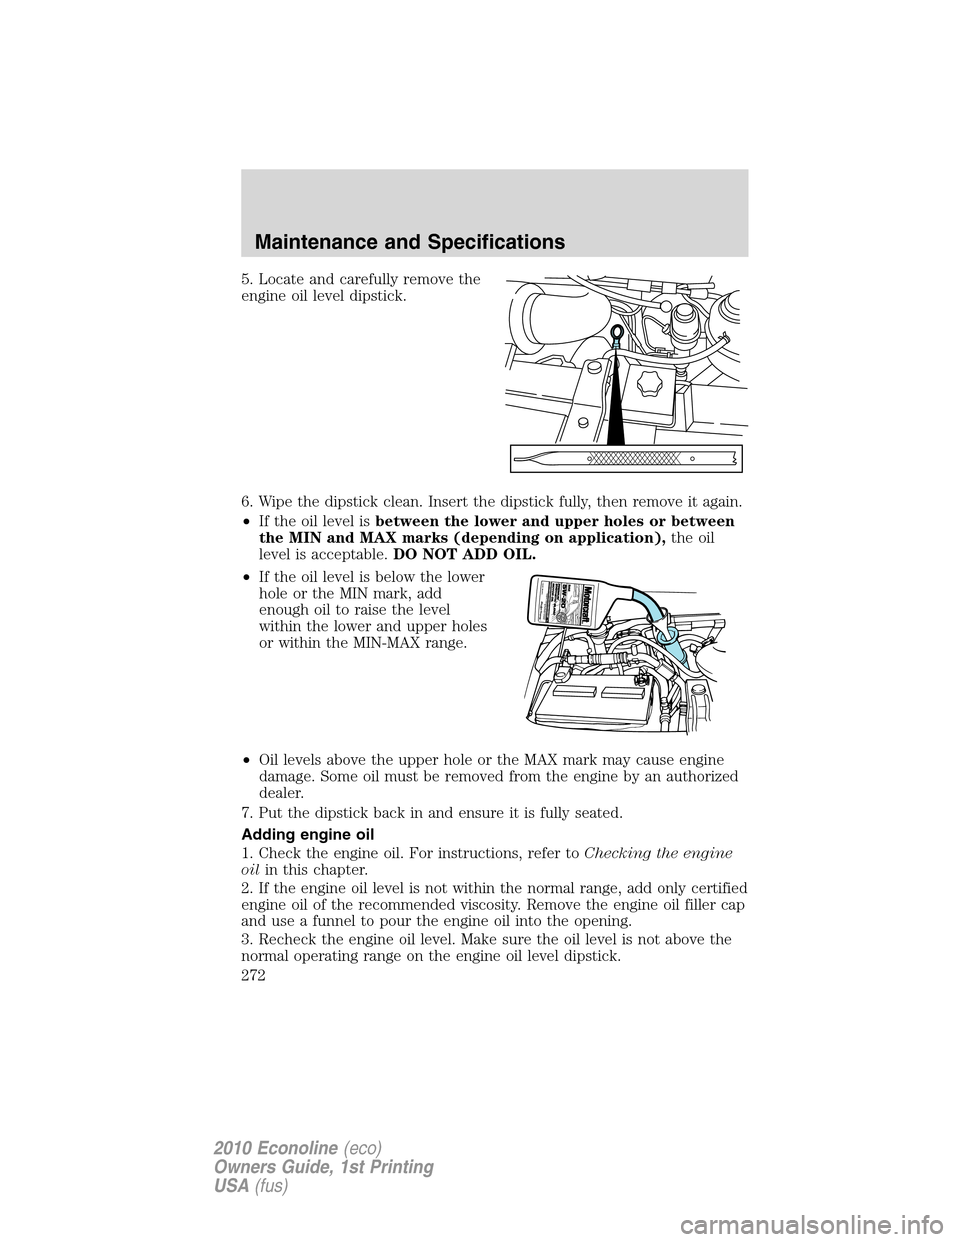
5. Locate and carefully remove the
engine oil level dipstick.
6. Wipe the dipstick clean. Insert the dipstick fully, then remove it again.
•If the oil level isbetween the lower and upper holes or between
the MIN and MAX marks (depending on application),the oil
level is acceptable.DO NOT ADD OIL.
•If the oil level is below the lower
hole or the MIN mark, add
enough oil to raise the level
within the lower and upper holes
or within the MIN-MAX range.
•Oil levels above the upper hole or the MAX mark may cause engine
damage. Some oil must be removed from the engine by an authorized
dealer.
7. Put the dipstick back in and ensure it is fully seated.
Adding engine oil
1. Check the engine oil. For instructions, refer toChecking the engine
oilin this chapter.
2. If the engine oil level is not within the normal range, add only certified
engine oil of the recommended viscosity. Remove the engine oil filler cap
and use a funnel to pour the engine oil into the opening.
3. Recheck the engine oil level. Make sure the oil level is not above the
normal operating range on the engine oil level dipstick.
Maintenance and Specifications
272
2010 Econoline(eco)
Owners Guide, 1st Printing
USA(fus)
Page 277 of 324
•Always dispose of automotive
batteries in a responsible manner.
Follow your local authorized
standards for disposal. Call your
local authorized recycling center
to find out more about recycling
automotive batteries.
ENGINE COOLANT
Checking engine coolant
The concentration and level of engine coolant should be checked at the
intervals listed inscheduled maintenance information.The coolant
concentration should be maintained at 50/50 coolant and distilled water,
which equates to a freeze point of -34°F (-36°C). Coolant concentration
testing is possible with a hydrometer or antifreeze tester. The level of
coolant should be maintained at the FULL COLD level or within the
COLD FILL RANGE in the coolant reservoir. If the level falls below, add
coolant per the instructions in theAdding engine coolantsection.
Your vehicle was factory-filled with a 50/50 engine coolant and water
concentration. If the concentration of coolant falls below 40% or above
60%, the engine parts could become damaged or not work properly.A
50/50 mixture of coolant and water provides the following:
•Freeze protection down to -34°F (-36°C).
•Boiling protection up to 265°F (129°C).
•Protection against rust and other forms of corrosion.
•Proper function of calibrated gauges.
L
E
A
D
RETURN
RECYCLE
Maintenance and Specifications
277
2010 Econoline(eco)
Owners Guide, 1st Printing
USA(fus)
Page 278 of 324

When the engine is cold, check the
level of the engine coolant in the
reservoir.
•The engine coolant should be at the FULL COLD level or within the
COLD FILL RANGE as listed on the engine coolant reservoir
(depending upon application).
•Refer toscheduled maintenance informationfor service interval
schedules.
•Be sure to read and understandPrecautions when servicing your
vehiclein this chapter.
If the engine coolant has not been checked at the recommended interval,
the engine coolant reservoir may become low or empty. If the reservoir is
low or empty, add engine coolant to the reservoir. Refer toAdding
engine coolantin this chapter.
Note:Automotive fluids are not interchangeable; do not use engine
coolant, antifreeze or windshield washer fluid outside of its specified
function and vehicle location.
Adding engine coolant
When adding coolant, make sure it is a 50/50 mixture of engine coolant
and distilled water. Add the mixture to the coolant reservoir,when the
engine is cool,until the appropriate fill level is obtained.
Maintenance and Specifications
278
2010 Econoline(eco)
Owners Guide, 1st Printing
USA(fus)
Page 280 of 324
Add the proper mixture of coolant and water to the cooling system by
following these steps:
1. Before you begin, turn the engine off and let it cool.
2. When the engine is cool, wrap a thick cloth around the coolant
pressure relief cap on the coolant reservoir (a translucent plastic bottle).
Slowly turn cap counterclockwise (left) until pressure begins to release.
3. Step back while the pressure releases.
4. When you are sure that all the pressure has been released, use the
cloth to turn it counterclockwise and remove the cap.
5. Fill the coolant reservoir slowly with the proper coolant mixture, to
within the COLD FILL RANGE or the FULL COLD level on the reservoir.
If you removed the radiator cap in an overflow system, fill the radiator
until the coolant is visible and radiator is almost full.
6. Replace the cap. Turn until tightly installed. Cap must be tightly
installed to prevent coolant loss.
After any coolant has been added, check the coolant concentration (refer
toChecking engine coolant). If the concentration is not 50/50
(protection to –34°F/–36°C), drain some coolant and adjust the
concentration. It may take several drains and additions to obtain a 50/50
coolant concentration.
Whenever coolant has been added, the coolant level in the coolant
reservoir should be checked the next few times you drive the vehicle. If
necessary, add enough 50/50 concentration of engine coolant and
distilled water to bring the liquid level to the proper level.
If you have to add more than 1.0 quart (1.0 liter) of engine coolant per
month, have your authorized dealer check the engine cooling system.
Your cooling system may have a leak. Operating an engine with a low
level of coolant can result in engine overheating and possible engine
damage.
Recycled engine coolant
Ford Motor Company does NOT recommend the use of recycled engine
coolant since a Ford-approved recycling process is not yet available.
Used engine coolant should be disposed of in an appropriate
manner. Follow your community’s regulations and standards for recycling
and disposing of automotive fluids.
Coolant refill capacity
To find out how much fluid your vehicle’s cooling system can hold, refer
toMaintenance product specifications and capacitiesin this chapter.
Maintenance and Specifications
280
2010 Econoline(eco)
Owners Guide, 1st Printing
USA(fus)
Page 282 of 324
WARNING:If fail-safe cooling activates, pull off the road as
soon as safely possible, and turn the engine off, because the
engine may automatically shut off while driving without further
indication.
How fail-safe cooling works
If the engine begins to overheat:
•The engine coolant temperature gauge will move to the red (hot)
area.
•The service engine soon
indicator light will illuminate.
•The engine coolant temperature
indicator light will illuminate.
If the engine reaches a preset over-temperature condition, the engine
will automatically switch to alternating cylinder operation. Each disabled
cylinder acts as an air pump and cools the engine.
When this occurs the vehicle will still operate. However:
•The engine power will be limited.
•The air conditioning system will be disabled.
Continued operation will increase the engine temperature and the engine
will completely shut down, causing steering and braking effort to
increase.
Once the engine temperature cools, the engine can be re-started. Take
your vehicle to an authorized dealer as soon as possible to minimize
engine damage.
When fail-safe mode is activated
You have limited engine power when in the fail-safe mode, so drive the
vehicle with caution. The vehicle will not be able to maintain high-speed
operation and the engine will run rough. Remember that the engine is
capable of completely shutting down automatically to prevent engine
damage, therefore:
1. Pull off the road as soon as safely possible and turn off the engine.
2. Arrange for the vehicle to be taken to an authorized dealer.
3. If this is not possible, wait a short period for the engine to cool.
4. Check the coolant level and replenish if low.
Maintenance and Specifications
282
2010 Econoline(eco)
Owners Guide, 1st Printing
USA(fus)
Page 286 of 324
Refueling
WARNING:Fuel vapor burns violently and a fuel fire can cause
severe injuries. To help avoid injuries to you and others:
•Read and follow all the instructions on the pump island;
•Turn off your engine when you are refueling;
•Do not smoke if you are near fuel or refueling your vehicle;
•Keep sparks, flames and smoking materials away from fuel;
•Stay outside your vehicle and do not leave the fuel pump unattended
when refueling your vehicle — this is against the law in some places;
•Keep children away from the fuel pump; never let children pump
fuel.
Use the following guidelines to avoid electrostatic charge build-up when
filling an ungrounded fuel container:
•Place approved fuel container on the ground.
•DO NOT fill a fuel container while it is in the vehicle (including the
cargo area).
•Keep the fuel pump nozzle in contact with the fuel container while
filling.
•DO NOT use a device that would hold the fuel pump handle in the fill
position.
Fuel filler cap
Your fuel tank filler cap has an indexed design with a 1/4 turn on/off
feature.
When fueling your vehicle:
1. Turn the engine off.
2. Carefully turn the filler cap counterclockwise until it spins off.
3. Pull to remove the cap from the fuel filler pipe.
4. To install the cap, align the tabs on the cap with the notches on the
filler pipe.
5. Turn the filler cap clockwise 1/4 of a turn until it clicks at least once.
If the check fuel cap light
or a “check fuel cap” message comes on,
the fuel filler cap may not be properly installed. The light or message can
come on after several driving events after you’ve refueled your vehicle.
Maintenance and Specifications
286
2010 Econoline(eco)
Owners Guide, 1st Printing
USA(fus)
Page 287 of 324
At the next opportunity, safely pull off of the road, remove the fuel filler
cap, align the cap properly and reinstall it. The check fuel cap
light
or “check fuel cap” message may not reset immediately; it may
take several driving cycles for the check fuel cap light
or “check fuel
cap” message to turn off. A driving cycle consists of an engine start-up
(after four or more hours with the engine off) followed by city and
highway driving.
Continuing to drive with the check fuel cap light
or “check fuel cap”
message on may cause the
light to turn on as well.
If you must replace the fuel filler cap, replace it with a fuel filler
cap that is designed for your vehicle. The customer warranty may
be void for any damage to the fuel tank or fuel system if the
correct genuine Ford, Motorcraft or other certified fuel filler cap
is not used.
WARNING:The fuel system may be under pressure. If the fuel
filler cap is venting vapor or if you hear a hissing sound, wait
until it stops before completely removing the fuel filler cap. Otherwise,
fuel may spray out and injure you or others.
WARNING:If you do not use the proper fuel filler cap,
excessive vacuum in the fuel tank may damage the fuel system
or cause the fuel cap to disengage in a collision, which may result in
personal injury.
FFV (Flex Fuel Vehicle) fuel cap
If your vehicle is FFV capable, it will have a yellow colored fuel cap.
Maintenance and Specifications
287
2010 Econoline(eco)
Owners Guide, 1st Printing
USA(fus)
Page 292 of 324
•You may want to turn off the speed control in hilly terrain if
unnecessary shifting between the top gears occurs. Unnecessary
shifting of this type could result in reduced fuel economy.
•Warming up a vehicle on cold mornings is not required and may
reduce fuel economy.
•Resting your foot on the brake pedal while driving may reduce fuel
economy.
•Combine errands and minimize stop-and-go driving.
Maintenance
•Keep tires properly inflated and use only recommended size.
•Operating a vehicle with the wheels out of alignment will reduce fuel
economy.
•Use recommended engine oil. Refer toMaintenance product
specifications and capacitiesin this chapter.
•Perform all regularly scheduled maintenance items. Follow the
recommended maintenance schedule and owner maintenance checks
found inscheduled maintenance information.
Conditions
•Heavily loading a vehicle or towing a trailer may reduce fuel economy
at any speed.
•Carrying unnecessary weight may reduce fuel economy (approximately
1 mpg [0.4 km/L] is lost for every 400 lb [180 kg] of weight carried).
•Adding certain accessories to your vehicle (for example bug
deflectors, rollbars/light bars, running boards, ski racks) may reduce
fuel economy.
•Using fuel blended with alcohol may lower fuel economy.
•Fuel economy may decrease with lower temperatures during the first
8–10 miles (12–16 km) of driving.
•Driving on flat terrain offers improved fuel economy as compared to
driving on hilly terrain.
•Transmissions give their best fuel economy when operated in the top
cruise gear and with steady pressure on the gas pedal.
•Close windows for high speed driving.
EPA fuel economy estimates
Every new vehicle should have a sticker on the window called the
Monroney Label which contains EPA fuel economy estimates. Contact
Maintenance and Specifications
292
2010 Econoline(eco)
Owners Guide, 1st Printing
USA(fus)
Page 295 of 324
detected by the OBD-II may not have symptoms that are apparent,
continued driving with the service engine soon
indicator on can
result in increased emissions, lower fuel economy, reduced engine and
transmission smoothness, and lead to more costly repairs.
Readiness for Inspection/Maintenance (I/M) testing
Some state/provincial and local governments may have
Inspection/Maintenance (I/M) programs to inspect the emission control
equipment on your vehicle. Failure to pass this inspection could prevent
you from getting a vehicle registration. Your vehicle may not pass the I/M
test if the service engine soon
indicator is on or not working
properly (bulb is burned out), or if the OBD-II system has determined
that some of the emission control systems have not been properly
checked. In this case, the vehicle is considered not ready for I/M testing.
If the service engine soon
indicator is on or the bulb does not
work, the vehicle may need to be serviced. Refer to the On board
diagnostics (OBD-II) description in this chapter.
If the vehicle’s engine or transmission has just been serviced, or the
battery has recently run down or been replaced, the OBD-II system may
indicate that the vehicle is not ready for I/M testing. To determine if the
vehicle is ready for I/M testing, turn the ignition key to the on position
for 15 seconds without cranking the engine. If the service engine
soon
indicator blinks eight times, it means that the vehicle is not
ready for I/M testing; if the service engine soon
indicator stays on
solid, it means that the vehicle is ready for I/M testing.
The OBD-II system is designed to check the emission control system
during normal driving. A complete check may take several days. If the
vehicle is not ready for I/M testing, the following driving cycle consisting
of mixed city and highway driving may be performed:
15 minutes of steady driving on an expressway/highway followed by
20 minutes of stop-and-go driving with at least four 30-second idle
periods.
Allow the vehicle to sit for at least eight hours without starting the
engine. Then, start the engine and complete the above driving cycle. The
engine must warm up to its normal operating temperature. Once started,
do not turn off the engine until the above driving cycle is complete. If
the vehicle is still not ready for I/M testing, the above driving cycle will
have to be repeated.
Maintenance and Specifications
295
2010 Econoline(eco)
Owners Guide, 1st Printing
USA(fus)