engine FORD E SERIES 2010 4.G Repair Manual
[x] Cancel search | Manufacturer: FORD, Model Year: 2010, Model line: E SERIES, Model: FORD E SERIES 2010 4.GPages: 324, PDF Size: 2.6 MB
Page 222 of 324
WARNING:Objects in the blind spot mirror are closer than they
appear.
VEHICLE USED AS A STATIONARY POWER SOURCE
Auxiliary equipment called power take-off or PTO, is often added to the
engine or transmission to operate utility equipment. Examples include a
wheel-lift for tow trucks, cranes, tools for construction or tire service and
pumping fluids. PTO applications draw auxiliary horsepower from the
powertrain, often while the vehicle is stationary. In this condition, there
is limited cooling air flow through the radiator and around the vehicle
that normally occurs when a vehicle is moving. The aftermarket PTO
system installer, having the most knowledge of the final application, is
responsible for determining whether additional chassis heat protection or
powertrain cooling is required, and alerting the user to the safe and
proper operation.
Your vehicle is qualified for use as a stationary power source, within
limits detailed in theFord Truck Body Builders Layout Book,found at
www.fleet.ford.com/truckbbas, and through the Ford Truck Body Builders
Advisory Service.
Gas engine vehicles are qualified for up to 10 minutes of continuous
operation as a stationary power source, due to the potential for the
normal venting of fuel vapors. For stationary PTO operation of extended
duration (beyond 10 minutes), diesel engine is recommended. Further
consult your aftermarket PTO installer, since the duration of operation
limit for the aftermarket PTO may be less than the vehicle is capable of.
Driving
222
2010 Econoline(eco)
Owners Guide, 1st Printing
USA(fus)
Page 223 of 324
DRIVING THROUGH WATER
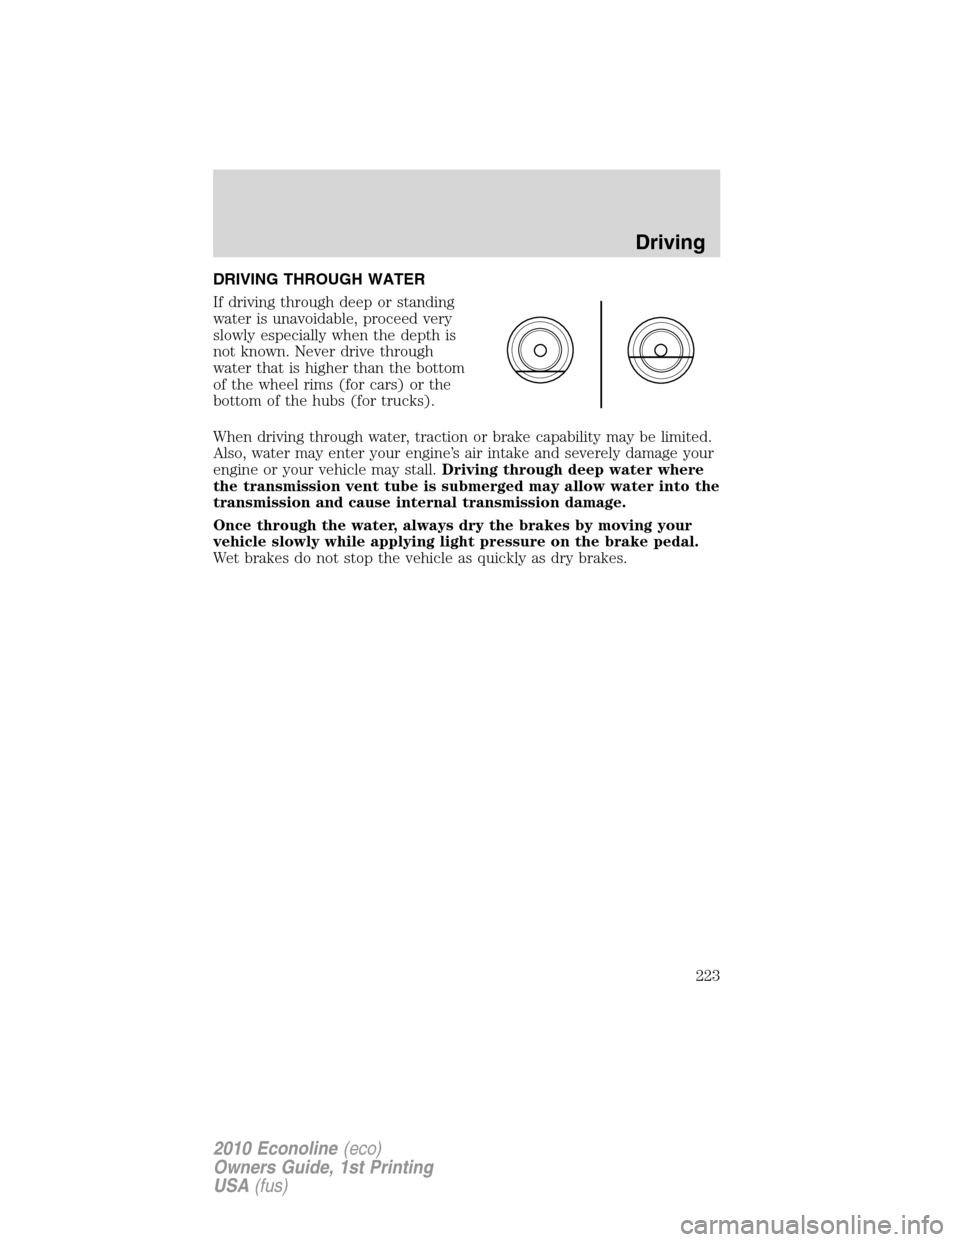
If driving through deep or standing
water is unavoidable, proceed very
slowly especially when the depth is
not known. Never drive through
water that is higher than the bottom
of the wheel rims (for cars) or the
bottom of the hubs (for trucks).
When driving through water, traction or brake capability may be limited.
Also, water may enter your engine’s air intake and severely damage your
engine or your vehicle may stall.Driving through deep water where
the transmission vent tube is submerged may allow water into the
transmission and cause internal transmission damage.
Once through the water, always dry the brakes by moving your
vehicle slowly while applying light pressure on the brake pedal.
Wet brakes do not stop the vehicle as quickly as dry brakes.
Driving
223
2010 Econoline(eco)
Owners Guide, 1st Printing
USA(fus)
Page 226 of 324
Note:With extended use, the flasher may run down your battery.
FUEL PUMP SHUT-OFF SWITCH
(DIESEL-POWERED AND STRIPPED CHASSIS VEHICLES ONLY)
This device stops the electric fuel pump from sending fuel to the engine
when your vehicle has had a substantial jolt.
After an accident, if the engine cranks but does not start, this switch
may have been activated.
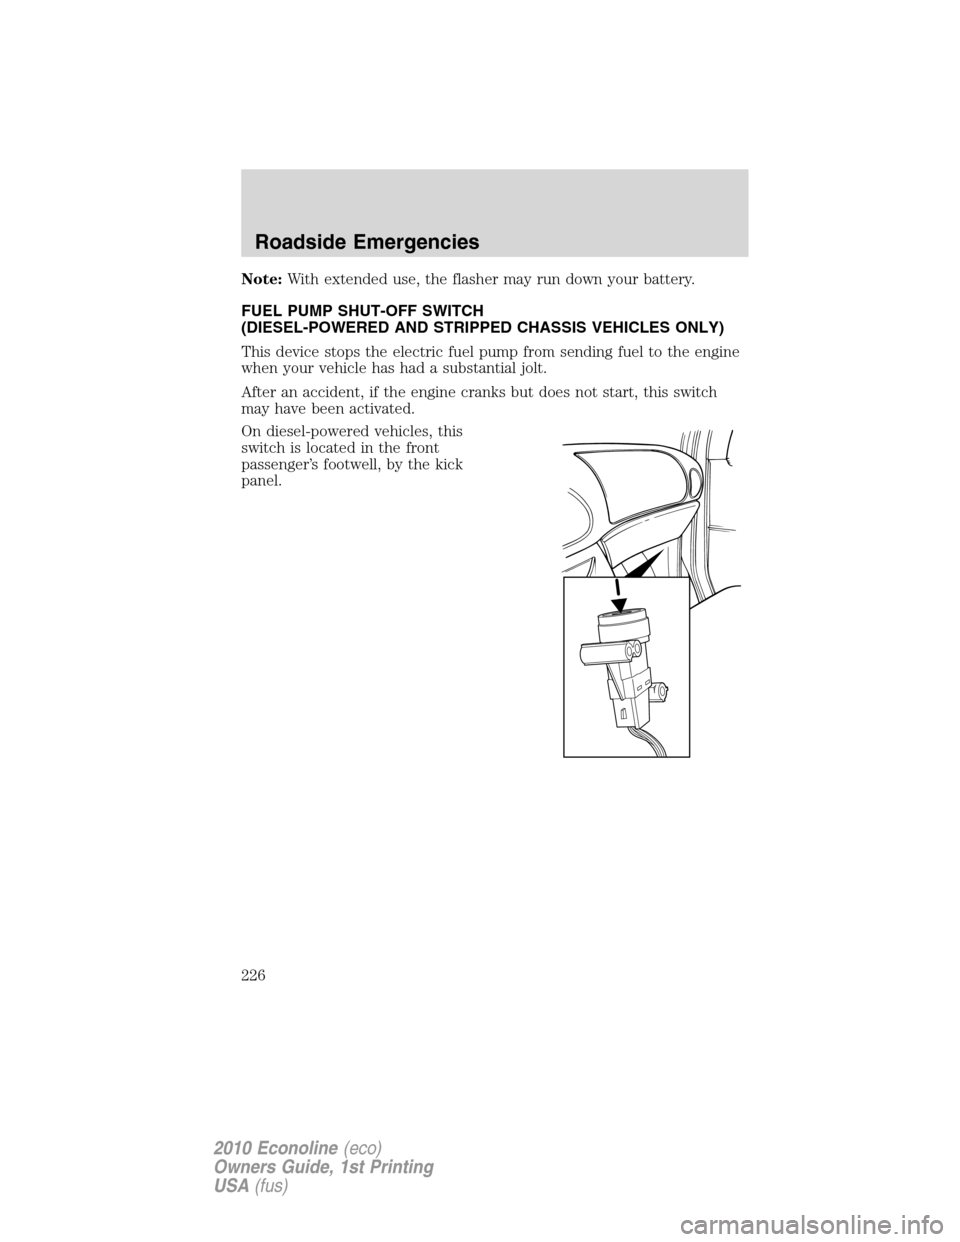
On diesel-powered vehicles, this
switch is located in the front
passenger’s footwell, by the kick
panel.
Roadside Emergencies
226
2010 Econoline(eco)
Owners Guide, 1st Printing
USA(fus)
Page 227 of 324

On commercial stripped chassis
vehicles, this switch is located on a
bracket above the brake pedal.
To reset the switch:
1. Turn the ignition off.
2. Check the fuel system for leaks.
3. If no leaks are apparent, reset the
switch by pushing in on the reset
button.
4. Turn the ignition on.
5. Wait a few seconds and return
the key to off.
6. Make another check for leaks.
Fuel pump shut-off (gas engines except stripped chassis)
In the event of a moderate to severe collision, this vehicle is equipped
with a fuel pump shut-off feature that stops the flow of fuel to the
engine. Not every impact will cause a shut-off.
Should your vehicle shut off after a collision due to this feature, you may
restart your vehicle by doing the following:
1. Turn the ignition switch to the off position.
2. Turn the ignition switch to the on position.
In some instances the vehicle may not restart the first time you try to
restart and may take one additional attempt.
WARNING:Failure to inspect and if necessary repair fuel leaks
after a collision may increase the risk of fire and serious injury.
Ford Motor Company recommends that the fuel system be inspected
by an authorized dealer after any collision.
Roadside Emergencies
227
2010 Econoline(eco)
Owners Guide, 1st Printing
USA(fus)
Page 231 of 324

Fuse/Relay
LocationFuse Amp
RatingProtected Circuits
34 5A Not used (spare)
35 10A Reverse park aid, Rear video camera,
Cutaway run/start
36 5A Passive anti-theft system (PATS) RF
module
37 10A Climate control, Stripped chassis IP #1
run/start
38 20A Not used (spare)
39 20A Radio, Navigation
40 20A Amplifier
41 15A Radio, Switch illumination, Reverse
camera mirror, Automatic dimming rear
view mirror
42 10A Upfitter switch
43 10A Stripped chassis IP connector #1
44 10A Auxiliary battery relay/Trailer tow
battery charger relay
45 5A Wipers, Stripped chassis Engine
connector 3
46 7.5A Passenger airbag deactivation indicator
(PADI)
47 30A circuit
breakerWindows accessory delay
48 Relay Delayed accessory
Power distribution box
The power distribution box is located in the engine compartment. The
power distribution box contains high-current fuses that protect your
vehicle’s main electrical systems from overloads.
WARNING:Always disconnect the battery before servicing high
current fuses.
Roadside Emergencies
231
2010 Econoline(eco)
Owners Guide, 1st Printing
USA(fus)
Page 233 of 324
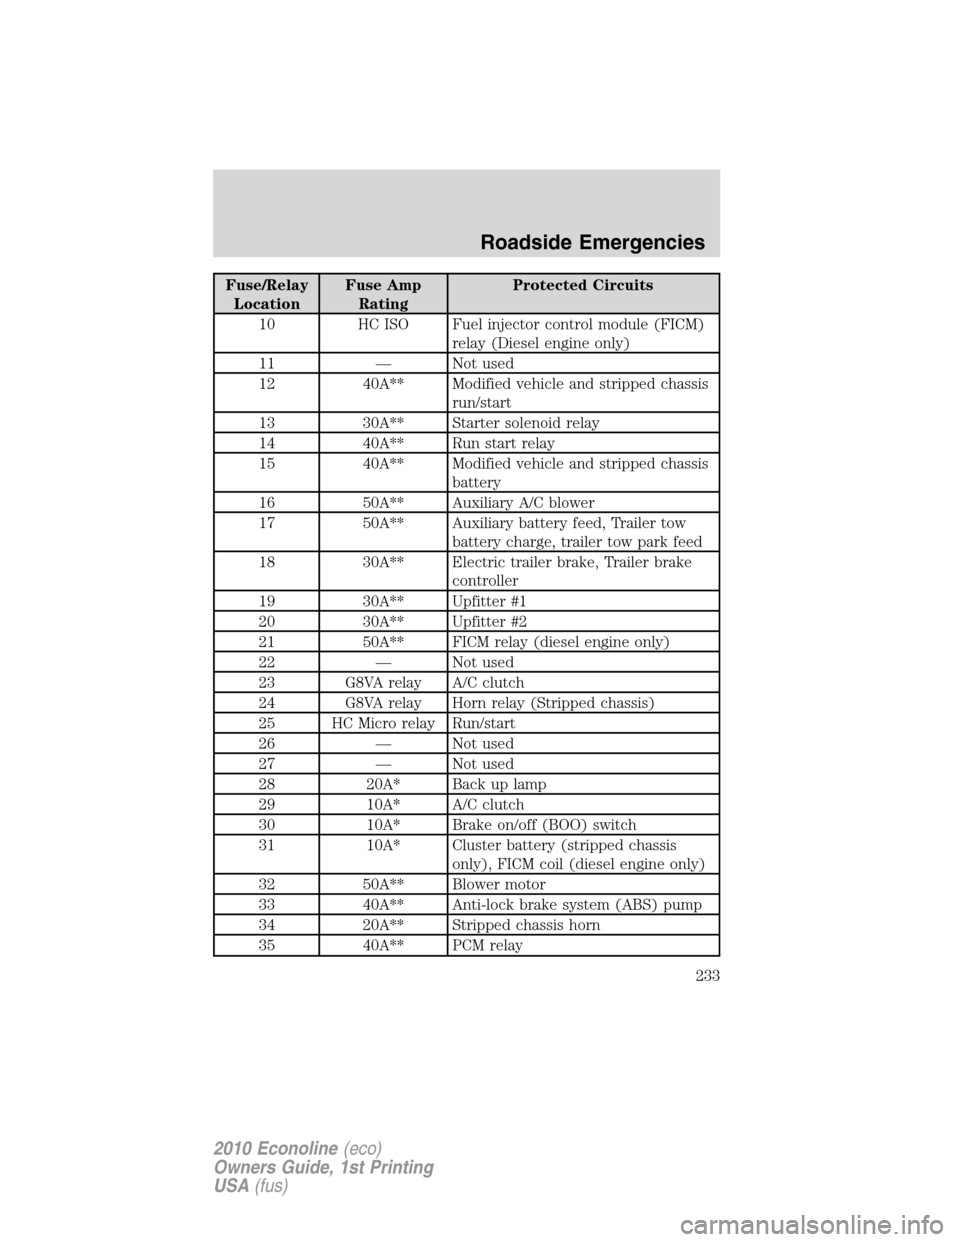
Fuse/Relay
LocationFuse Amp
RatingProtected Circuits
10 HC ISO Fuel injector control module (FICM)
relay (Diesel engine only)
11 — Not used
12 40A** Modified vehicle and stripped chassis
run/start
13 30A** Starter solenoid relay
14 40A** Run start relay
15 40A** Modified vehicle and stripped chassis
battery
16 50A** Auxiliary A/C blower
17 50A** Auxiliary battery feed, Trailer tow
battery charge, trailer tow park feed
18 30A** Electric trailer brake, Trailer brake
controller
19 30A** Upfitter #1
20 30A** Upfitter #2
21 50A** FICM relay (diesel engine only)
22 — Not used
23 G8VA relay A/C clutch
24 G8VA relay Horn relay (Stripped chassis)
25 HC Micro relay Run/start
26 — Not used
27 — Not used
28 20A* Back up lamp
29 10A* A/C clutch
30 10A* Brake on/off (BOO) switch
31 10A* Cluster battery (stripped chassis
only), FICM coil (diesel engine only)
32 50A** Blower motor
33 40A** Anti-lock brake system (ABS) pump
34 20A** Stripped chassis horn
35 40A** PCM relay
Roadside Emergencies
233
2010 Econoline(eco)
Owners Guide, 1st Printing
USA(fus)
Page 234 of 324
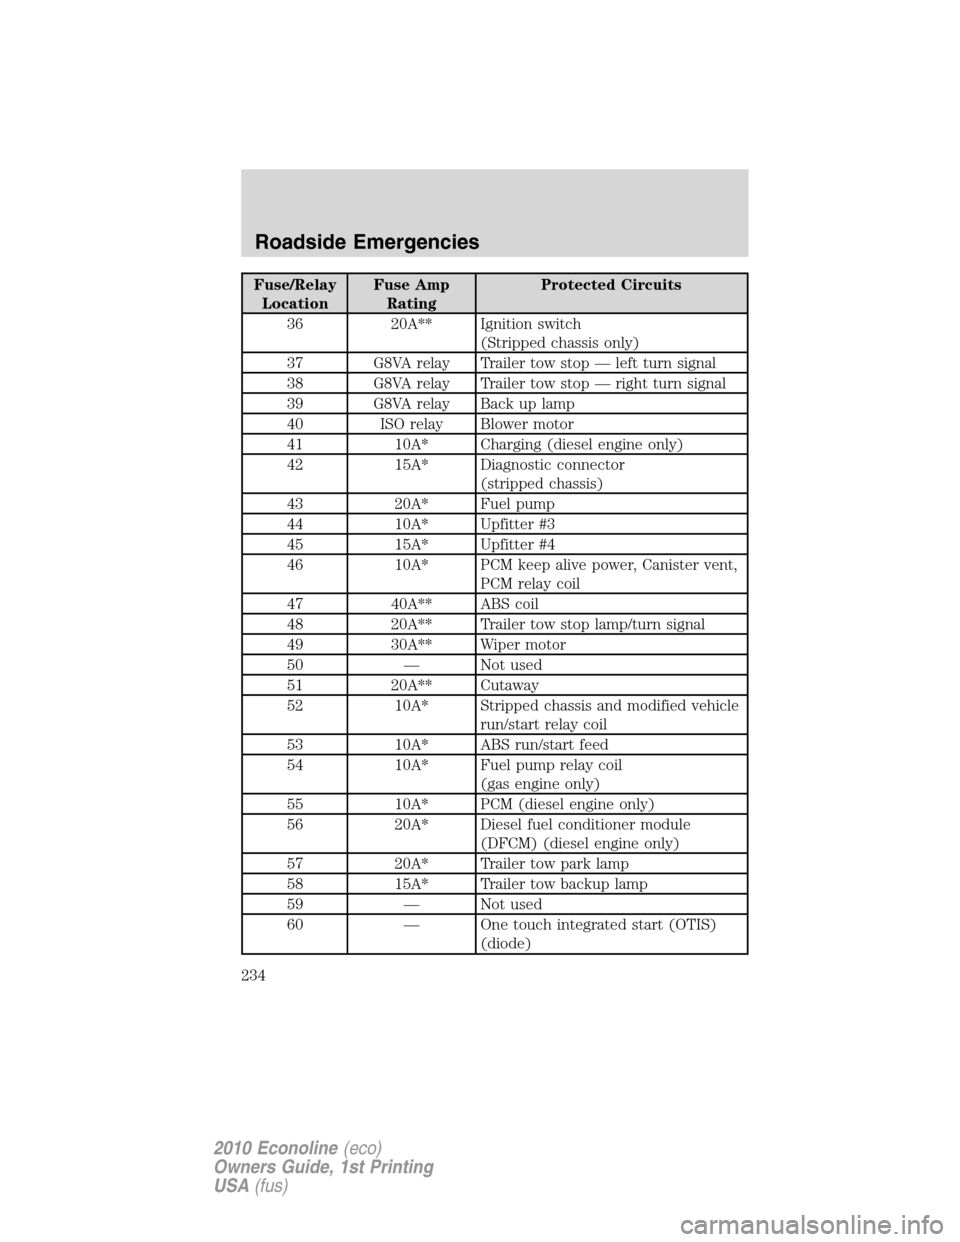
Fuse/Relay
LocationFuse Amp
RatingProtected Circuits
36 20A** Ignition switch
(Stripped chassis only)
37 G8VA relay Trailer tow stop — left turn signal
38 G8VA relay Trailer tow stop — right turn signal
39 G8VA relay Back up lamp
40 ISO relay Blower motor
41 10A* Charging (diesel engine only)
42 15A* Diagnostic connector
(stripped chassis)
43 20A* Fuel pump
44 10A* Upfitter #3
45 15A* Upfitter #4
46 10A* PCM keep alive power, Canister vent,
PCM relay coil
47 40A** ABS coil
48 20A** Trailer tow stop lamp/turn signal
49 30A** Wiper motor
50 — Not used
51 20A** Cutaway
52 10A* Stripped chassis and modified vehicle
run/start relay coil
53 10A* ABS run/start feed
54 10A* Fuel pump relay coil
(gas engine only)
55 10A* PCM (diesel engine only)
56 20A* Diesel fuel conditioner module
(DFCM) (diesel engine only)
57 20A* Trailer tow park lamp
58 15A* Trailer tow backup lamp
59 — Not used
60 — One touch integrated start (OTIS)
(diode)
Roadside Emergencies
234
2010 Econoline(eco)
Owners Guide, 1st Printing
USA(fus)
Page 235 of 324
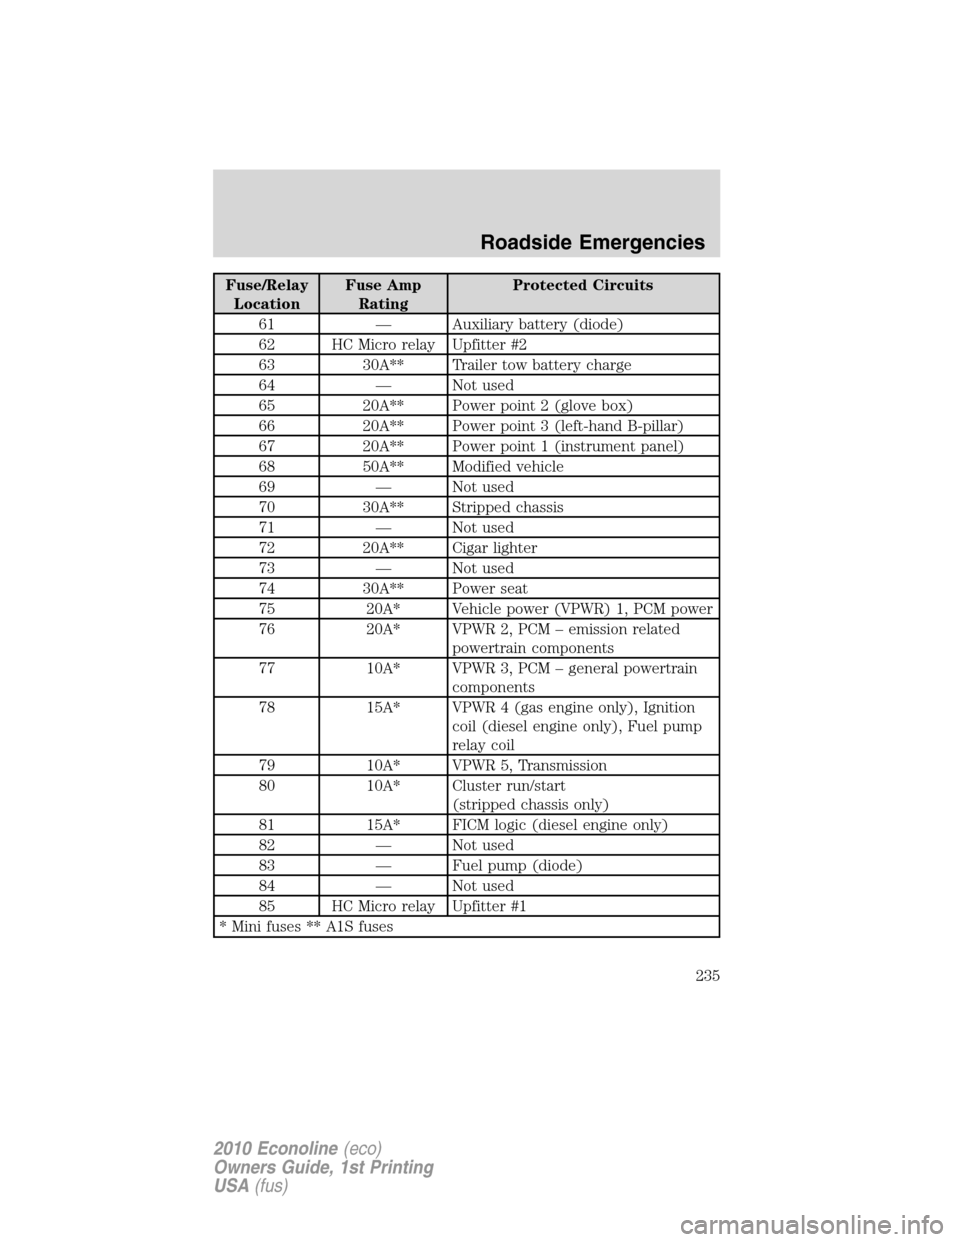
Fuse/Relay
LocationFuse Amp
RatingProtected Circuits
61 — Auxiliary battery (diode)
62 HC Micro relay Upfitter #2
63 30A** Trailer tow battery charge
64 — Not used
65 20A** Power point 2 (glove box)
66 20A** Power point 3 (left-hand B-pillar)
67 20A** Power point 1 (instrument panel)
68 50A** Modified vehicle
69 — Not used
70 30A** Stripped chassis
71 — Not used
72 20A** Cigar lighter
73 — Not used
74 30A** Power seat
75 20A* Vehicle power (VPWR) 1, PCM power
76 20A* VPWR 2, PCM – emission related
powertrain components
77 10A* VPWR 3, PCM – general powertrain
components
78 15A* VPWR 4 (gas engine only), Ignition
coil (diesel engine only), Fuel pump
relay coil
79 10A* VPWR 5, Transmission
80 10A* Cluster run/start
(stripped chassis only)
81 15A* FICM logic (diesel engine only)
82 — Not used
83 — Fuel pump (diode)
84 — Not used
85 HC Micro relay Upfitter #1
* Mini fuses ** A1S fuses
Roadside Emergencies
235
2010 Econoline(eco)
Owners Guide, 1st Printing
USA(fus)
Page 238 of 324
•Wet weather driving capability
•All-Wheel driving capability (if applicable)
•Load leveling adjustment (if applicable)
When driving with the full-size dissimilar spare tire/wheel additional
caution should be given to:
•Towing a trailer
•Driving vehicles equipped with a camper body
•Driving vehicles with a load on the cargo rack
Drive cautiously when using a full-size dissimilar spare tire/wheel and
seek service as soon as possible.
Full-size matching spare tire/wheel information
This spare tire/wheel will match the road tire/wheel. When driving with
the full size matching spare tire/wheel, do not exceed 70 mph
(113 km/h). It is intended for temporary use only. This means if you
need to use it, you should replace it as soon as possible.
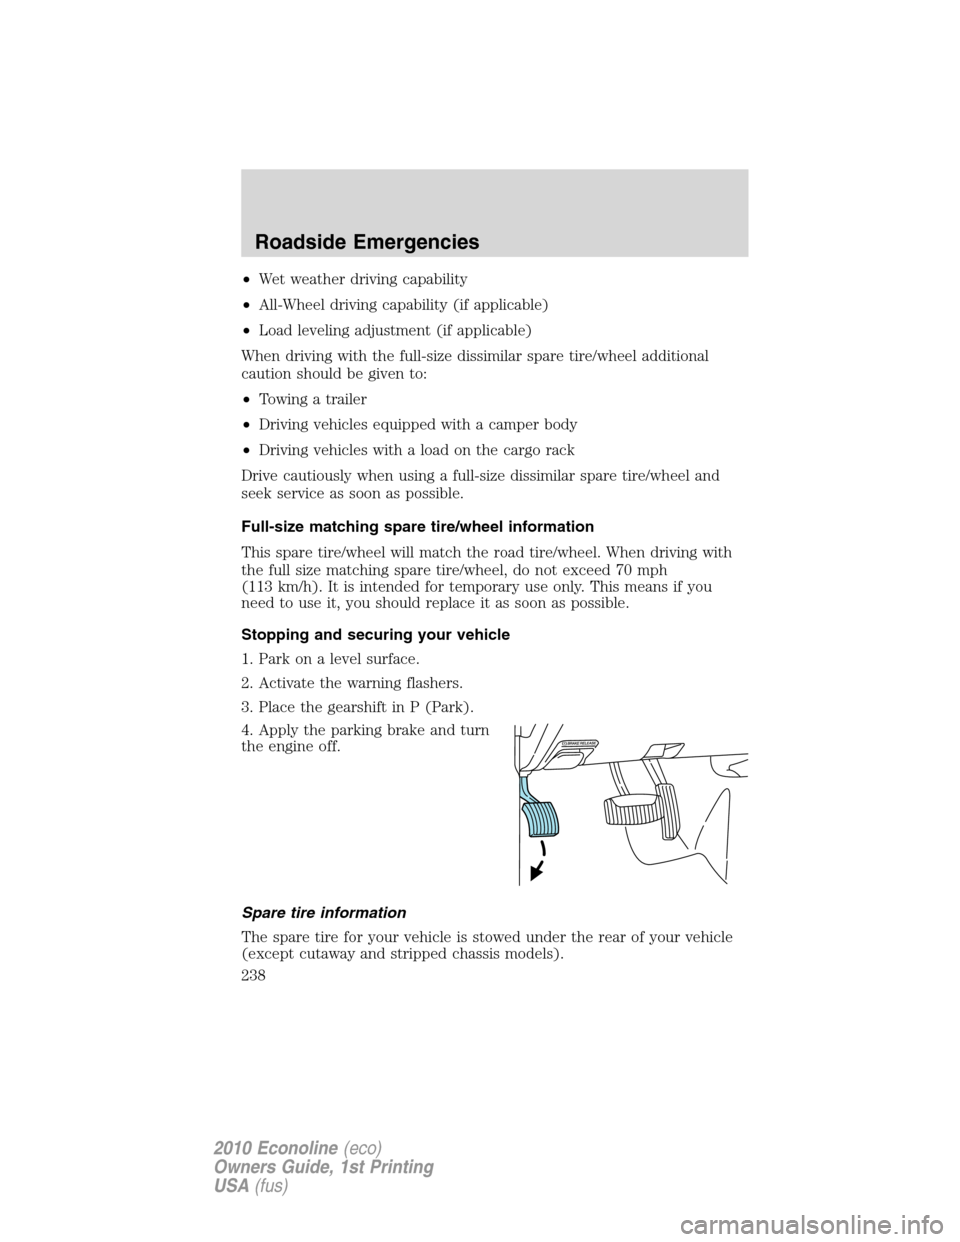
Stopping and securing your vehicle
1. Park on a level surface.
2. Activate the warning flashers.
3. Place the gearshift in P (Park).
4. Apply the parking brake and turn
the engine off.
Spare tire information
The spare tire for your vehicle is stowed under the rear of your vehicle
(except cutaway and stripped chassis models).
Roadside Emergencies
238
2010 Econoline(eco)
Owners Guide, 1st Printing
USA(fus)
Page 241 of 324
WARNING:When one of the rear wheels is off the ground, the
transmission alone will not prevent the vehicle from moving or
slipping off the jack, even if the transmission is in P (Park) (automatic
transmission) or R (Reverse) (manual transmission). To help prevent
the vehicle from moving when you change the tire, be sure that the
parking brake is set and the diagonally opposite wheel is blocked.
Replacing the tire
1. Assemble the jack handle sections together and lock into the jack. Use
the jack handle to slide the jack under the vehicle.
WARNING:To lessen the risk of personal injury, do not put any
part of your body under the vehicle while changing a tire. Do not
start the engine when your vehicle is on the jack. The jack is only
meant for changing the tire.
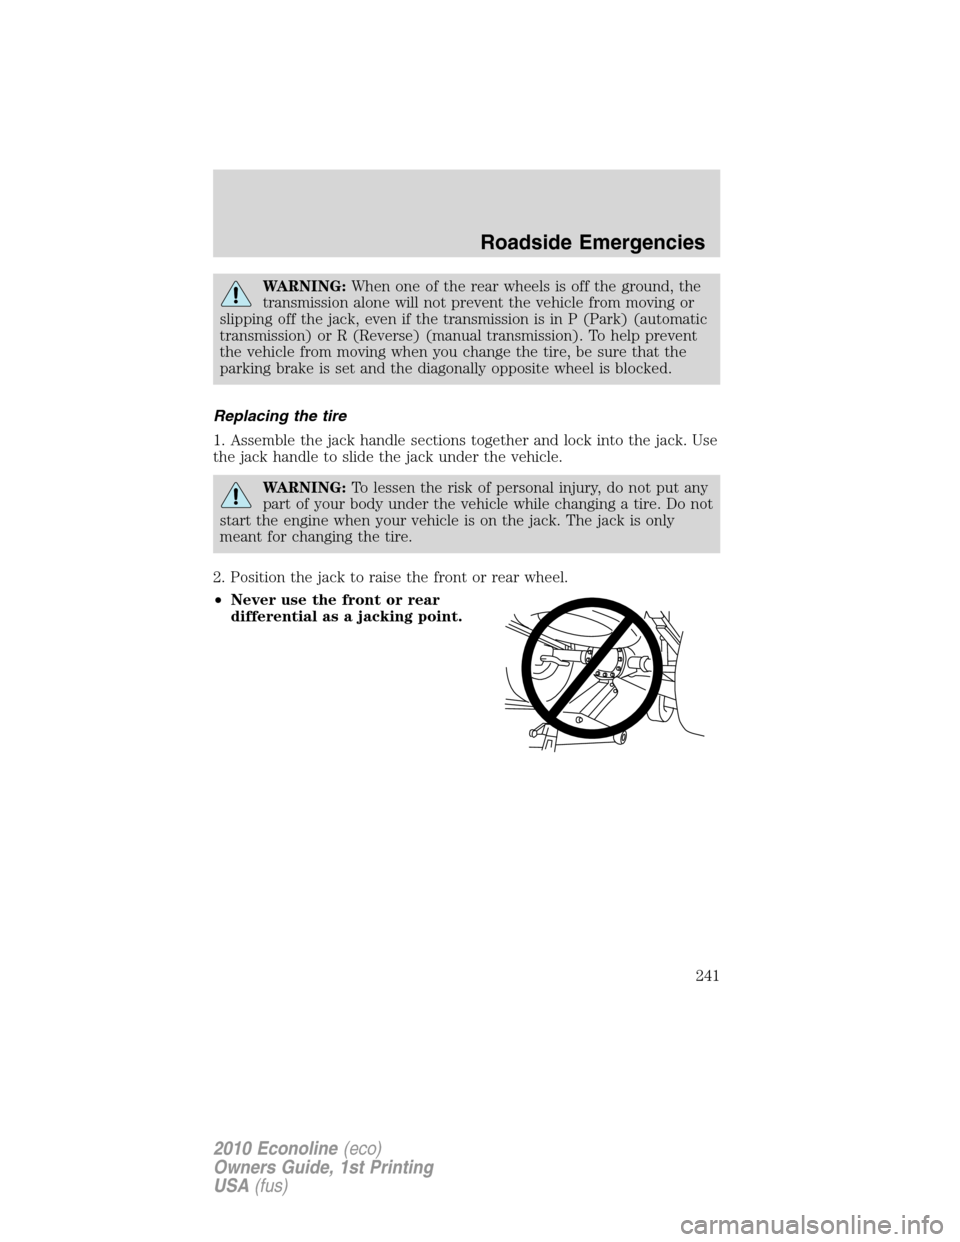
2. Position the jack to raise the front or rear wheel.
•Never use the front or rear
differential as a jacking point.
Roadside Emergencies
241
2010 Econoline(eco)
Owners Guide, 1st Printing
USA(fus)