flat tire FORD E SERIES 2011 4.G Owner's Manual
[x] Cancel search | Manufacturer: FORD, Model Year: 2011, Model line: E SERIES, Model: FORD E SERIES 2011 4.GPages: 337, PDF Size: 3.26 MB
Page 158 of 337
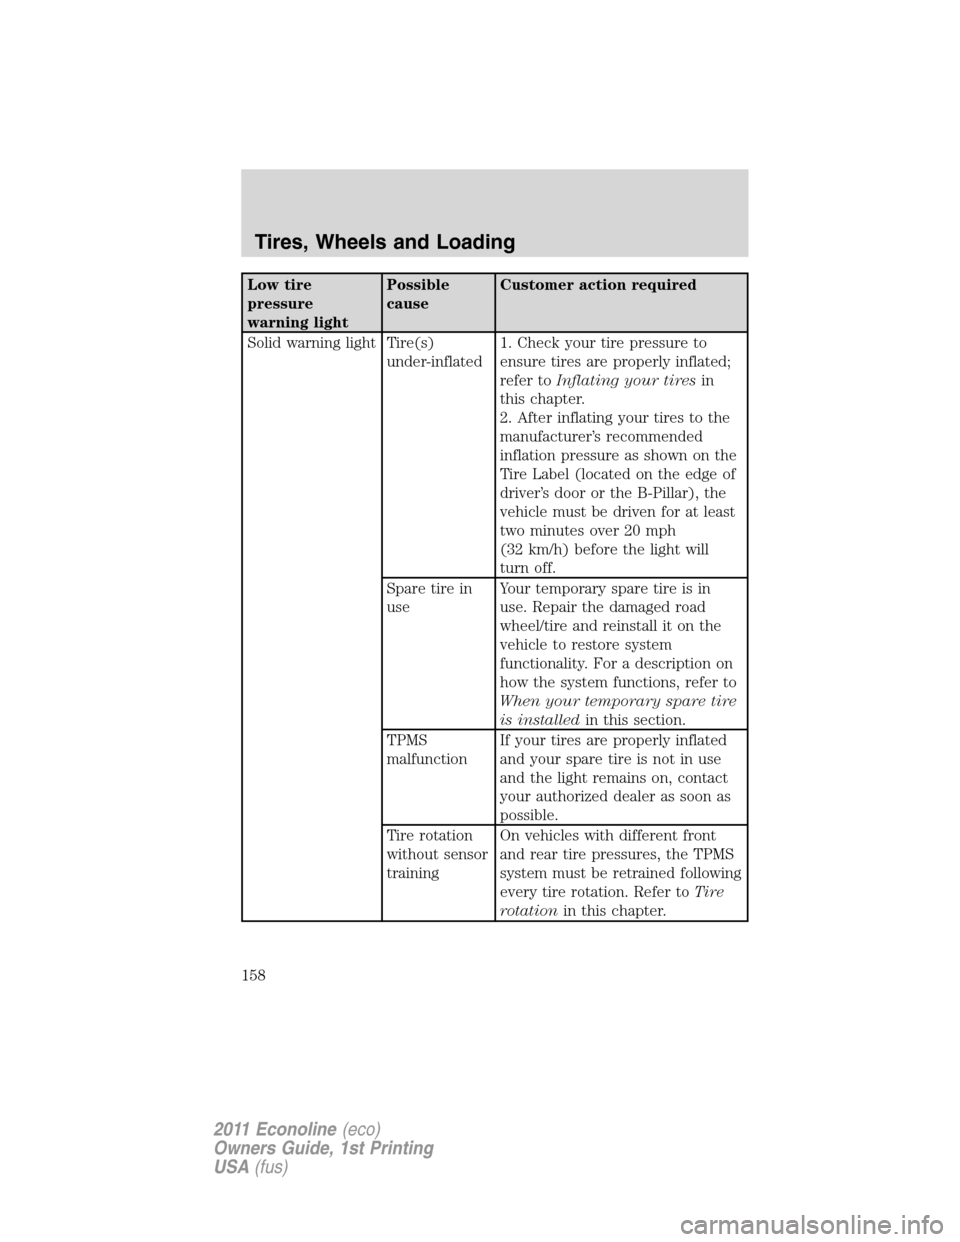
Low tire
pressure
warning lightPossible
causeCustomer action required
Solid warning light Tire(s)
under-inflated1. Check your tire pressure to
ensure tires are properly inflated;
refer toInflating your tiresin
this chapter.
2. After inflating your tires to the
manufacturer’s recommended
inflation pressure as shown on the
Tire Label (located on the edge of
driver’s door or the B-Pillar), the
vehicle must be driven for at least
two minutes over 20 mph
(32 km/h) before the light will
turn off.
Spare tire in
useYour temporary spare tire is in
use. Repair the damaged road
wheel/tire and reinstall it on the
vehicle to restore system
functionality. For a description on
how the system functions, refer to
When your temporary spare tire
is installedin this section.
TPMS
malfunctionIf your tires are properly inflated
and your spare tire is not in use
and the light remains on, contact
your authorized dealer as soon as
possible.
Tire rotation
without sensor
trainingOn vehicles with different front
and rear tire pressures, the TPMS
system must be retrained following
every tire rotation. Refer toTire
rotationin this chapter.
Tires, Wheels and Loading
158
2011 Econoline(eco)
Owners Guide, 1st Printing
USA(fus)
Page 159 of 337
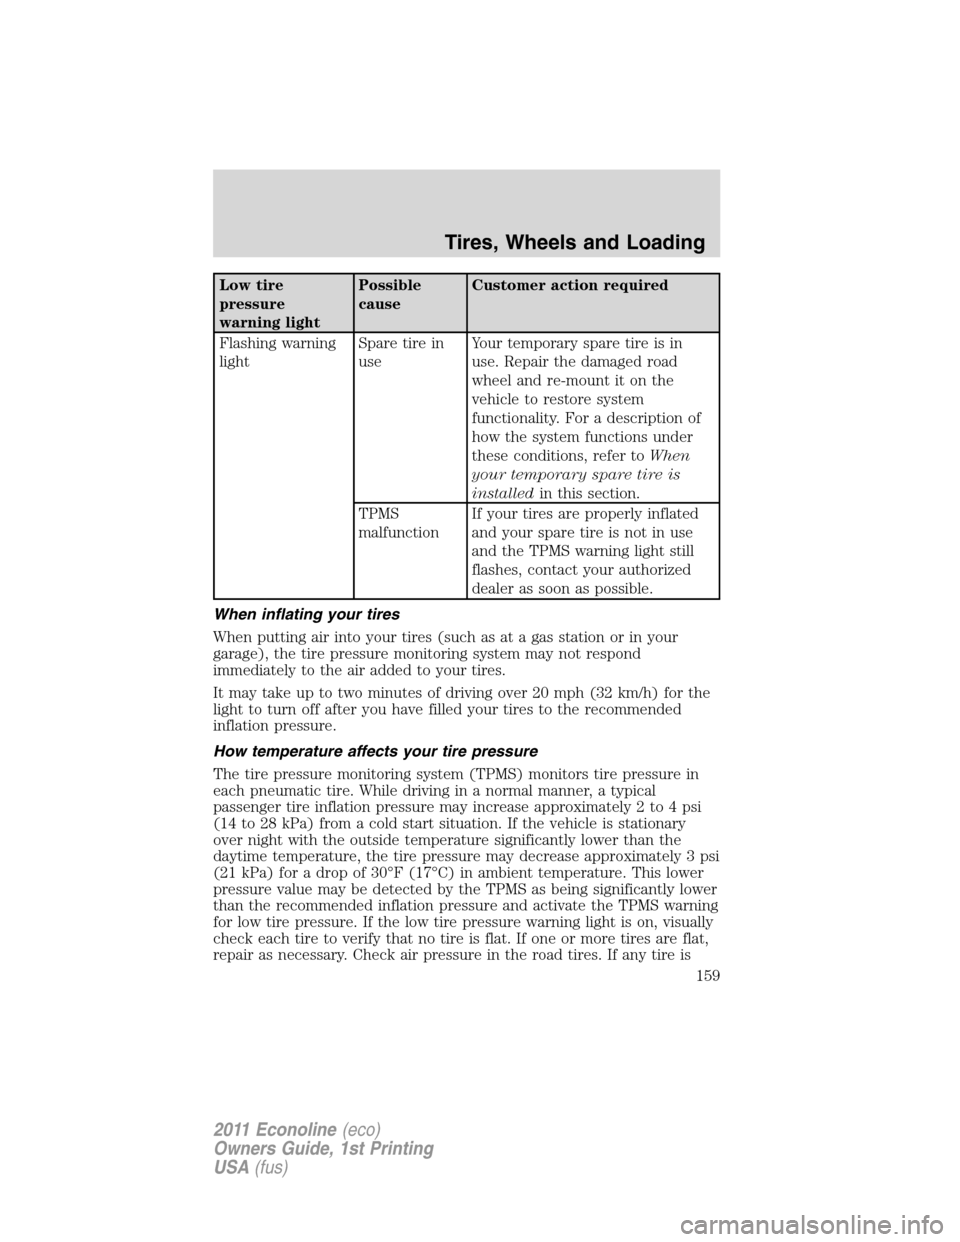
Low tire
pressure
warning lightPossible
causeCustomer action required
Flashing warning
lightSpare tire in
useYour temporary spare tire is in
use. Repair the damaged road
wheel and re-mount it on the
vehicle to restore system
functionality. For a description of
how the system functions under
these conditions, refer toWhen
your temporary spare tire is
installedin this section.
TPMS
malfunctionIf your tires are properly inflated
and your spare tire is not in use
and the TPMS warning light still
flashes, contact your authorized
dealer as soon as possible.
When inflating your tires
When putting air into your tires (such as at a gas station or in your
garage), the tire pressure monitoring system may not respond
immediately to the air added to your tires.
It may take up to two minutes of driving over 20 mph (32 km/h) for the
light to turn off after you have filled your tires to the recommended
inflation pressure.
How temperature affects your tire pressure
The tire pressure monitoring system (TPMS) monitors tire pressure in
each pneumatic tire. While driving in a normal manner, a typical
passenger tire inflation pressure may increase approximately 2 to 4 psi
(14 to 28 kPa) from a cold start situation. If the vehicle is stationary
over night with the outside temperature significantly lower than the
daytime temperature, the tire pressure may decrease approximately 3 psi
(21 kPa) for a drop of 30°F (17°C) in ambient temperature. This lower
pressure value may be detected by the TPMS as being significantly lower
than the recommended inflation pressure and activate the TPMS warning
for low tire pressure. If the low tire pressure warning light is on, visually
check each tire to verify that no tire is flat. If one or more tires are flat,
repair as necessary. Check air pressure in the road tires. If any tire is
Tires, Wheels and Loading
159
2011 Econoline(eco)
Owners Guide, 1st Printing
USA(fus)
Page 160 of 337
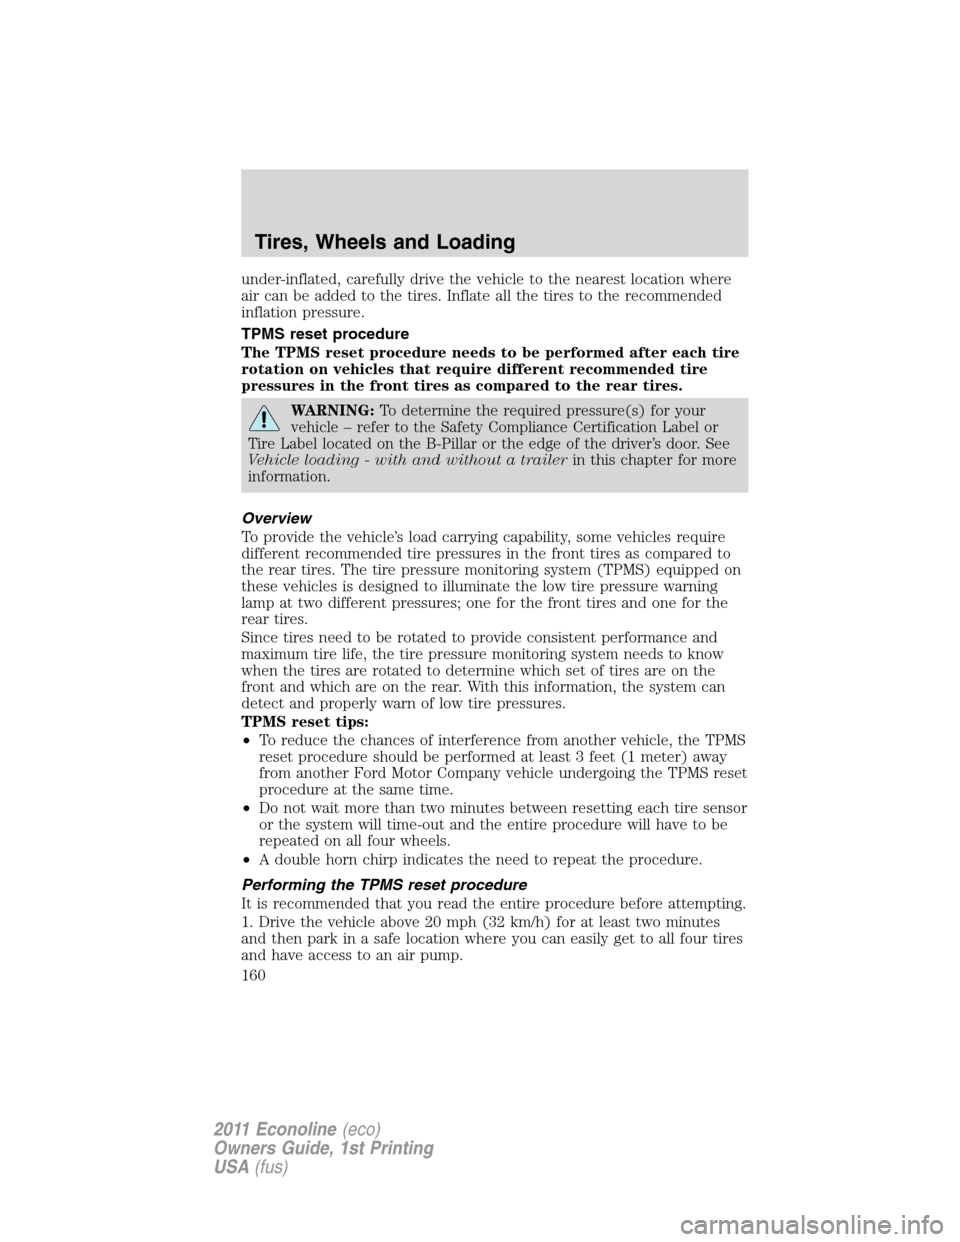
under-inflated, carefully drive the vehicle to the nearest location where
air can be added to the tires. Inflate all the tires to the recommended
inflation pressure.
TPMS reset procedure
The TPMS reset procedure needs to be performed after each tire
rotation on vehicles that require different recommended tire
pressures in the front tires as compared to the rear tires.
WARNING:To determine the required pressure(s) for your
vehicle – refer to the Safety Compliance Certification Label or
Tire Label located on the B-Pillar or the edge of the driver’s door. See
Vehicle loading - with and without a trailerin this chapter for more
information.
Overview
To provide the vehicle’s load carrying capability, some vehicles require
different recommended tire pressures in the front tires as compared to
the rear tires. The tire pressure monitoring system (TPMS) equipped on
these vehicles is designed to illuminate the low tire pressure warning
lamp at two different pressures; one for the front tires and one for the
rear tires.
Since tires need to be rotated to provide consistent performance and
maximum tire life, the tire pressure monitoring system needs to know
when the tires are rotated to determine which set of tires are on the
front and which are on the rear. With this information, the system can
detect and properly warn of low tire pressures.
TPMS reset tips:
•To reduce the chances of interference from another vehicle, the TPMS
reset procedure should be performed at least 3 feet (1 meter) away
from another Ford Motor Company vehicle undergoing the TPMS reset
procedure at the same time.
•Do not wait more than two minutes between resetting each tire sensor
or the system will time-out and the entire procedure will have to be
repeated on all four wheels.
•A double horn chirp indicates the need to repeat the procedure.
Performing the TPMS reset procedure
It is recommended that you read the entire procedure before attempting.
1. Drive the vehicle above 20 mph (32 km/h) for at least two minutes
and then park in a safe location where you can easily get to all four tires
and have access to an air pump.
Tires, Wheels and Loading
160
2011 Econoline(eco)
Owners Guide, 1st Printing
USA(fus)
Page 194 of 337
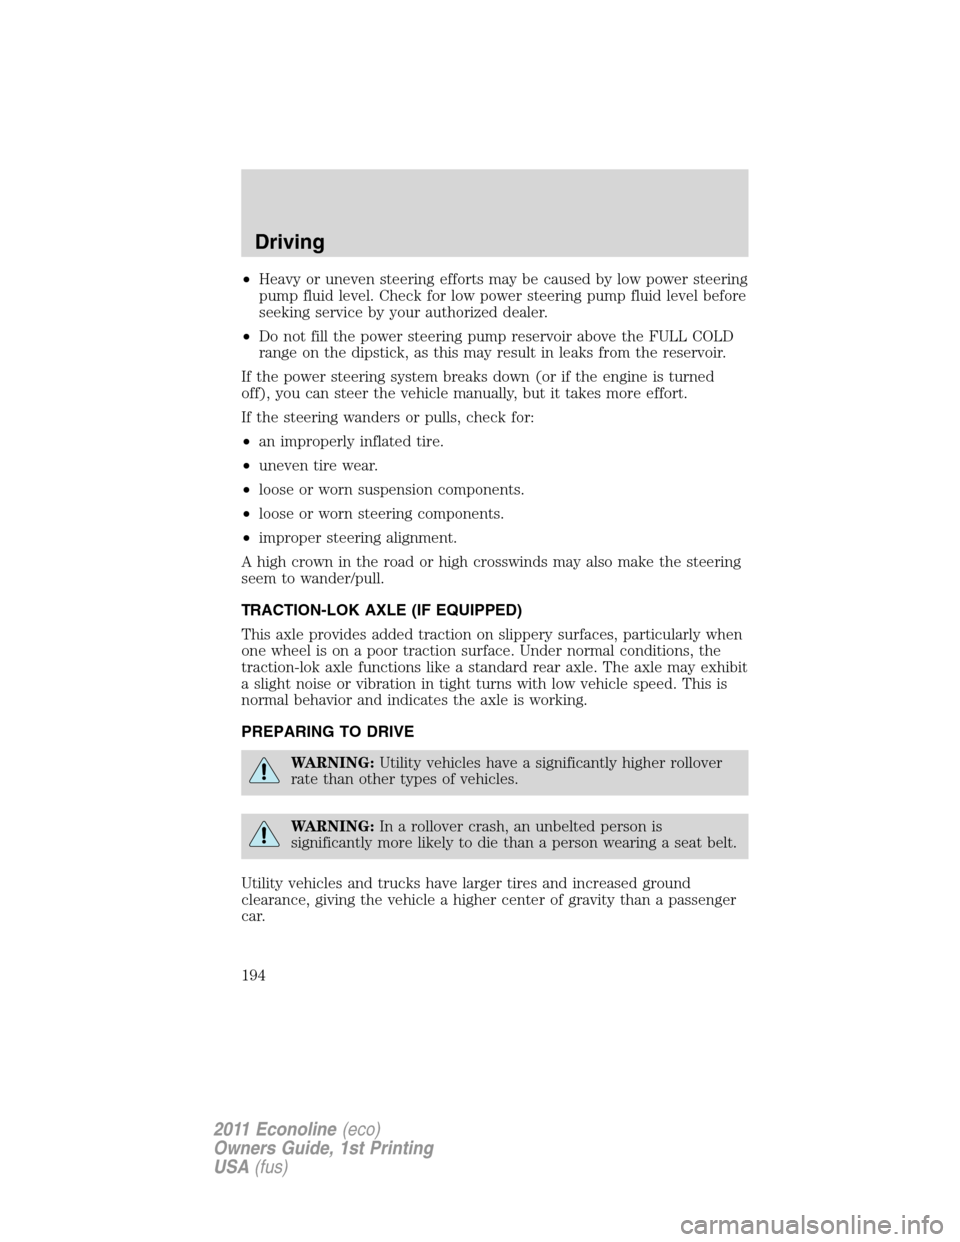
•Heavy or uneven steering efforts may be caused by low power steering
pump fluid level. Check for low power steering pump fluid level before
seeking service by your authorized dealer.
•Do not fill the power steering pump reservoir above the FULL COLD
range on the dipstick, as this may result in leaks from the reservoir.
If the power steering system breaks down (or if the engine is turned
off), you can steer the vehicle manually, but it takes more effort.
If the steering wanders or pulls, check for:
•an improperly inflated tire.
•uneven tire wear.
•loose or worn suspension components.
•loose or worn steering components.
•improper steering alignment.
A high crown in the road or high crosswinds may also make the steering
seem to wander/pull.
TRACTION-LOK AXLE (IF EQUIPPED)
This axle provides added traction on slippery surfaces, particularly when
one wheel is on a poor traction surface. Under normal conditions, the
traction-lok axle functions like a standard rear axle. The axle may exhibit
a slight noise or vibration in tight turns with low vehicle speed. This is
normal behavior and indicates the axle is working.
PREPARING TO DRIVE
WARNING:Utility vehicles have a significantly higher rollover
rate than other types of vehicles.
WARNING:In a rollover crash, an unbelted person is
significantly more likely to die than a person wearing a seat belt.
Utility vehicles and trucks have larger tires and increased ground
clearance, giving the vehicle a higher center of gravity than a passenger
car.
Driving
194
2011 Econoline(eco)
Owners Guide, 1st Printing
USA(fus)
Page 210 of 337
ROADSIDE ASSISTANCE
Getting roadside assistance
To fully assist you should you have a vehicle concern, Ford Motor
Company offers a complimentary roadside assistance program. This
program is separate from the New Vehicle Limited Warranty. The service
is available:
•24–hours, seven days a week
•for the coverage period listed on the Roadside Assistance Card
included in your Owner Guide portfolio.
Roadside assistance will cover:
•a flat tire change with a good spare, if provided with the vehicle
(except vehicles that have been supplied with a tire inflation kit)
•battery jump start
•lock-out assistance (key replacement cost is the customer’s
responsibility)
•fuel delivery – Independent Service Contractors, if not prohibited by
state, local or municipal law shall deliver up to 2.0 gallons (7.5L) of
gasoline or 5.0 gallons (18.9L) of diesel fuel to a disabled vehicle. Fuel
delivery service is limited to two no-charge occurrences within a
12-month period.
•winch out – available within 100 feet (30.5 meters) of a paved or
county maintained road, no recoveries.
•towing – Ford/Mercury/Lincoln eligible vehicle towed to an authorized
dealer within 35 miles (56 km) of the disablement location or to the
nearest authorized dealer. If a member requests to be towed to an
authorized dealer more than 35 miles (56 km) from the disablement
location, the member shall be responsible for any mileage costs in
excess of 35 miles (56 km).
Trailers shall be covered up to $200 if the disabled eligible vehicle
requires service at the nearest authorized dealer. If the trailer is disabled,
but the towing vehicle is operational, the trailer does not qualify for any
roadside services.
Roadside Emergencies
210
2011 Econoline(eco)
Owners Guide, 1st Printing
USA(fus)
Page 222 of 337
CHANGING THE TIRES
If you get a flat tire while driving, do not apply the brake heavily.
Instead, gradually decrease your speed. Hold the steering wheel firmly
and slowly move to a safe place on the side of the road.
Note:If your vehicle is equipped with the tire pressure monitoring
system (TPMS), the indicator light will illuminate when the spare tire is
in use. To restore the full functionality of the monitoring system, all road
wheels equipped with tire pressure monitoring sensors must be mounted
on the vehicle.
If your vehicle is equipped with TPMS, have a flat serviced by an
authorized dealer in order to prevent damage to the TPMS sensors, refer
toTire pressure monitoring system (TPMS)in theTires, Wheels and
Loadingchapter. Replace the spare tire with a road tire as soon as
possible. During repairing or replacing of the flat tire, have the
authorized dealer inspect the TPMS sensor for damage.
WARNING:The use of tire sealants may damage your tire
pressure monitoring system (TPMS) and should not be used.
However, if you must use a sealant, the TPMS sensor and valve stem
on the wheel must be replaced by an authorized Ford dealer.
WARNING:Refer toTire pressure monitoring system (TPMS)
in theTires, Wheels and Loadingchapter for important
information. If the tire pressure monitor sensor becomes damaged, it
will no longer function.
Dissimilar spare tire/wheel information
WARNING:Failure to follow these guidelines could result in an
increased risk of loss of vehicle control, injury or death.
If you have a dissimilar spare tire/wheel, then it is intended for
temporary use only. This means that if you need to use it, you should
replace it as soon as possible with a road tire/wheel that is the same size
and type as the road tires and wheels that were originally provided by
Ford. If the dissimilar spare tire or wheel is damaged, it should be
replaced rather than repaired.
Roadside Emergencies
222
2011 Econoline(eco)
Owners Guide, 1st Printing
USA(fus)
Page 229 of 337
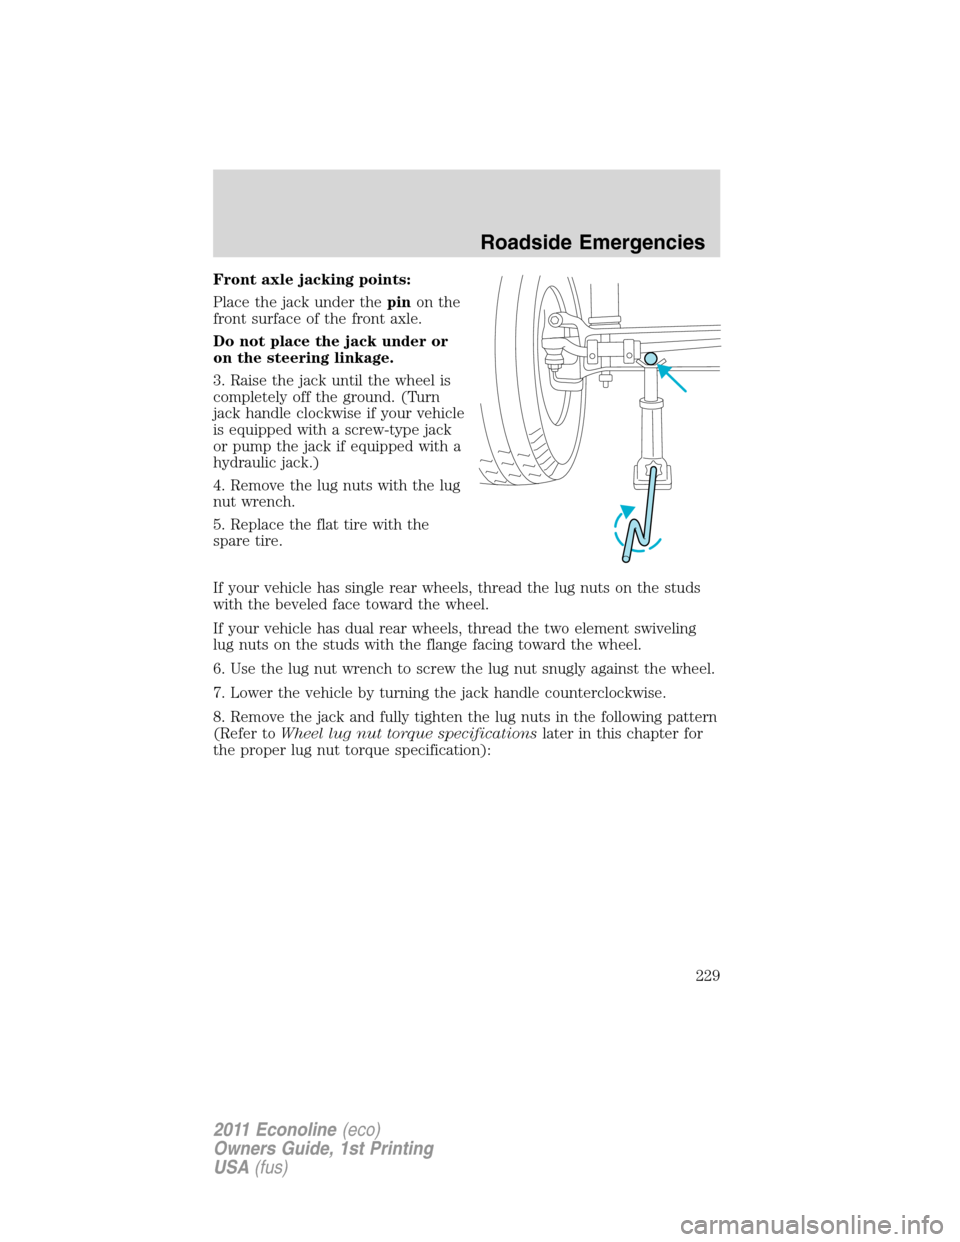
Front axle jacking points:
Place the jack under thepinon the
front surface of the front axle.
Do not place the jack under or
on the steering linkage.
3. Raise the jack until the wheel is
completely off the ground. (Turn
jack handle clockwise if your vehicle
is equipped with a screw-type jack
or pump the jack if equipped with a
hydraulic jack.)
4. Remove the lug nuts with the lug
nut wrench.
5. Replace the flat tire with the
spare tire.
If your vehicle has single rear wheels, thread the lug nuts on the studs
with the beveled face toward the wheel.
If your vehicle has dual rear wheels, thread the two element swiveling
lug nuts on the studs with the flange facing toward the wheel.
6. Use the lug nut wrench to screw the lug nut snugly against the wheel.
7. Lower the vehicle by turning the jack handle counterclockwise.
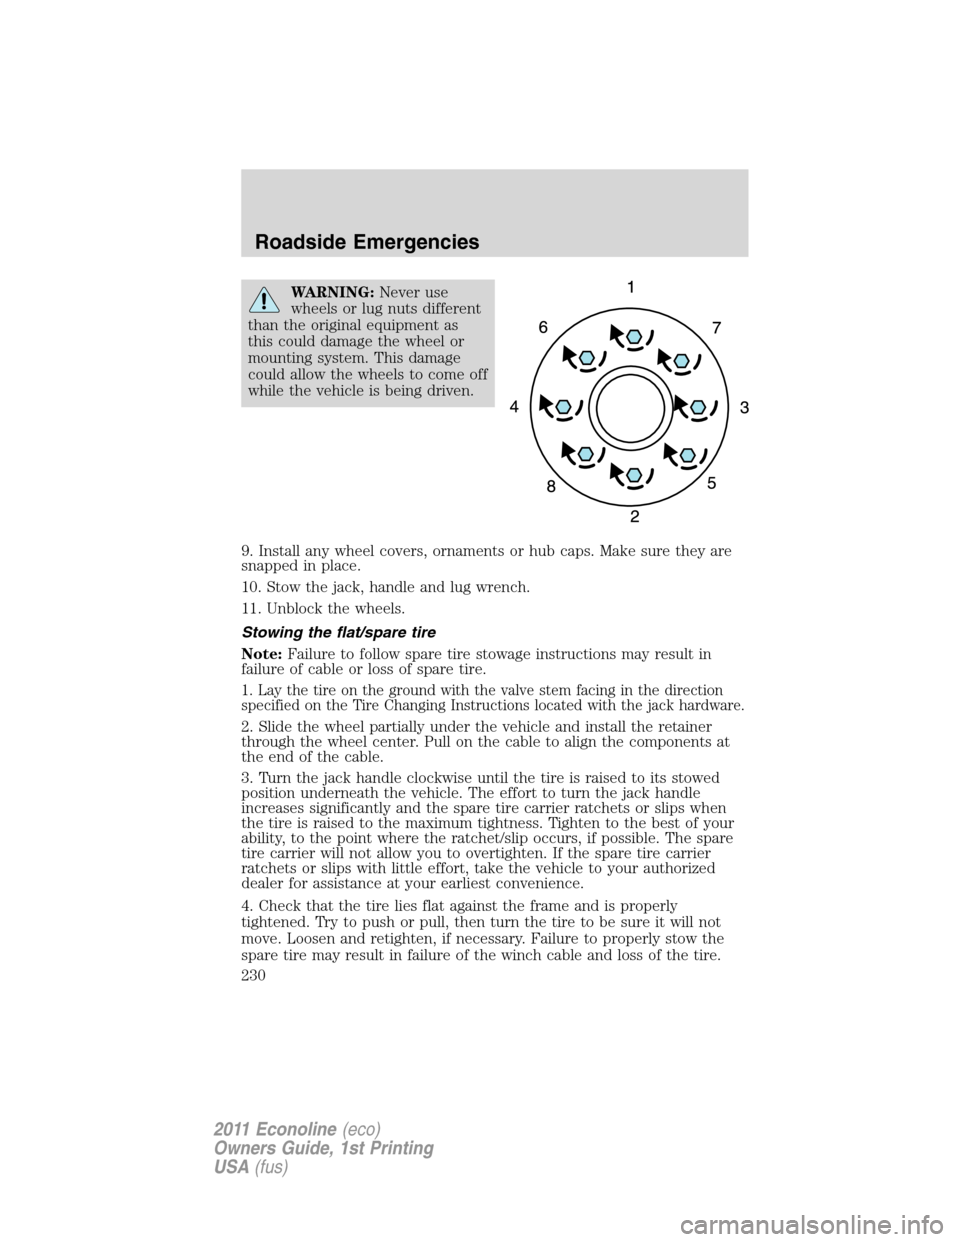
8. Remove the jack and fully tighten the lug nuts in the following pattern
(Refer toWheel lug nut torque specificationslater in this chapter for
the proper lug nut torque specification):
Roadside Emergencies
229
2011 Econoline(eco)
Owners Guide, 1st Printing
USA(fus)
Page 230 of 337
WARNING:Never use
wheels or lug nuts different
than the original equipment as
this could damage the wheel or
mounting system. This damage
could allow the wheels to come off
while the vehicle is being driven.
9. Install any wheel covers, ornaments or hub caps. Make sure they are
snapped in place.
10. Stow the jack, handle and lug wrench.
11. Unblock the wheels.
Stowing the flat/spare tire
Note:Failure to follow spare tire stowage instructions may result in
failure of cable or loss of spare tire.
1. Lay the tire on the ground with the valve stem facing in the direction
specified on the Tire Changing Instructions located with the jack hardware.
2. Slide the wheel partially under the vehicle and install the retainer
through the wheel center. Pull on the cable to align the components at
the end of the cable.
3. Turn the jack handle clockwise until the tire is raised to its stowed
position underneath the vehicle. The effort to turn the jack handle
increases significantly and the spare tire carrier ratchets or slips when
the tire is raised to the maximum tightness. Tighten to the best of your
ability, to the point where the ratchet/slip occurs, if possible. The spare
tire carrier will not allow you to overtighten. If the spare tire carrier
ratchets or slips with little effort, take the vehicle to your authorized
dealer for assistance at your earliest convenience.
4. Check that the tire lies flat against the frame and is properly
tightened. Try to push or pull, then turn the tire to be sure it will not
move. Loosen and retighten, if necessary. Failure to properly stow the
spare tire may result in failure of the winch cable and loss of the tire.
Roadside Emergencies
230
2011 Econoline(eco)
Owners Guide, 1st Printing
USA(fus)
Page 231 of 337
5. Repeat this tightness check procedure when servicing the spare tire
pressure (every six months, as per yourscheduled maintenance
information),or at any time that the spare tire is disturbed through
service of other components.
6. If removed, install the spare tire lock (if equipped) into the bumper
drive tube with the spare tire lock key (if equipped) and jack handle.
WHEEL LUG NUT TORQUE SPECIFICATIONS
On vehicles equipped with single rear wheels, retighten the lug nuts to
the specified torque at 100 miles (160 km) after any wheel disturbance
(tire rotation, changing a flat tire, wheel removal, etc.).
On vehicles equipped with dual rear wheels, retighten the wheel lug nuts
to the specified torque at 100 miles (160 km), and again at 500 miles
(800 km) of new vehicle operation and after any wheel disturbance (tire
rotation, changing a flat tire, wheel removal, etc.).
Bolt size and wheel
lug nut typeWheel lug nut torque*
ft-lb N•m
9/16 x 18 conical lug
nut150 200
9/16 x 18 two-piece
lug nut140 190
* Torque specifications are for nut and bolt threads free of dirt and
rust. Use only Ford recommended replacement fasteners.
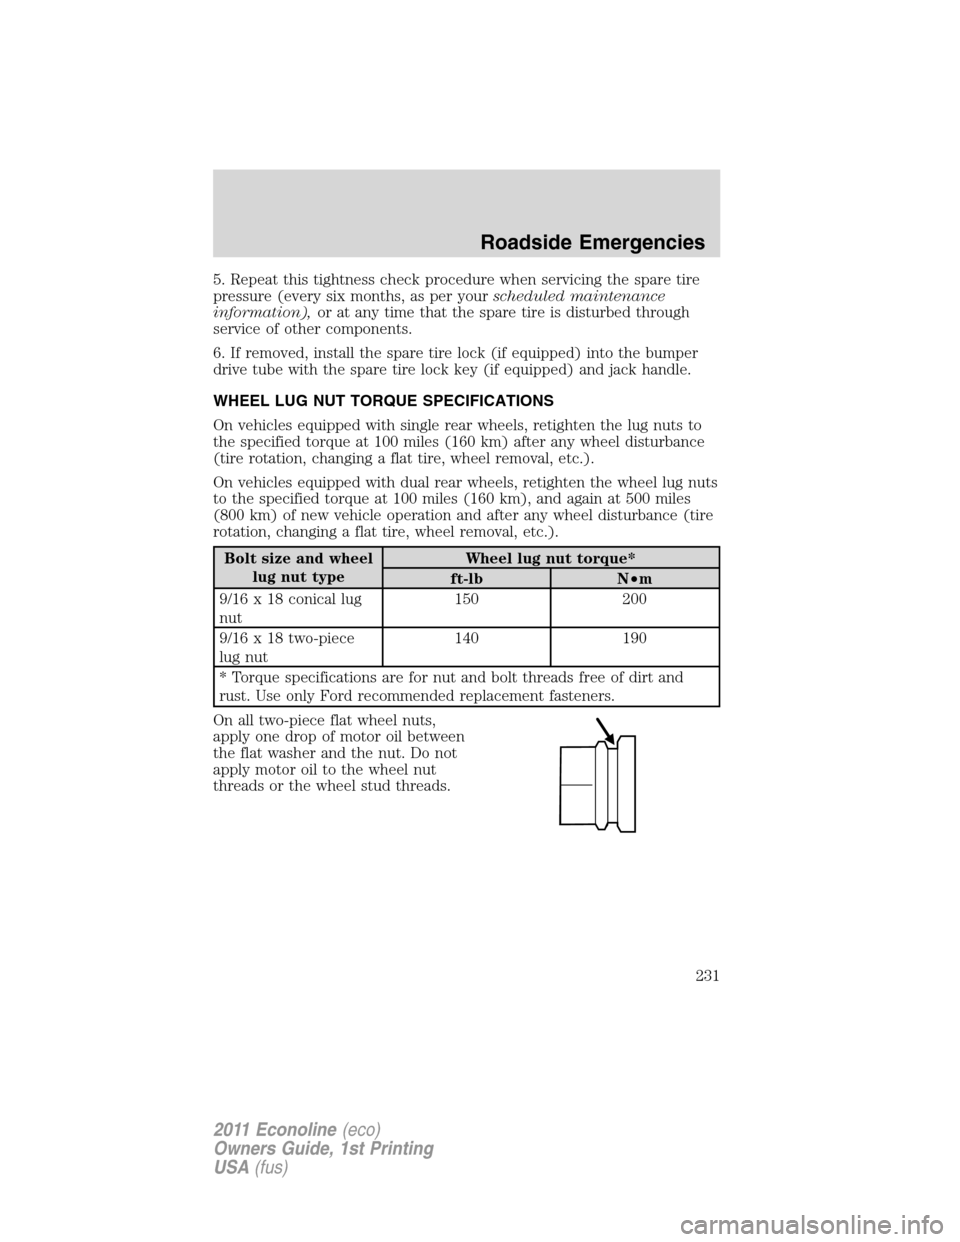
On all two-piece flat wheel nuts,
apply one drop of motor oil between
the flat washer and the nut. Do not
apply motor oil to the wheel nut
threads or the wheel stud threads.
Roadside Emergencies
231
2011 Econoline(eco)
Owners Guide, 1st Printing
USA(fus)
Page 278 of 337
•Anticipate stopping; slowing down may eliminate the need to stop.
•Sudden or hard accelerations may reduce fuel economy.
•Slow down gradually.
•Driving at reasonable speeds (traveling at 55 mph [88 km/h] uses 15%
less fuel than traveling at 65 mph [105 km/h]).
•Revving the engine before turning it off may reduce fuel economy.
•Using the air conditioner or defroster may reduce fuel economy.
•You may want to turn off the speed control in hilly terrain if
unnecessary shifting between the top gears occurs. Unnecessary
shifting of this type could result in reduced fuel economy.
•Warming up a vehicle on cold mornings is not required and may
reduce fuel economy.
•Resting your foot on the brake pedal while driving may reduce fuel
economy.
•Combine errands and minimize stop-and-go driving.
Maintenance
•Keep tires properly inflated and use only recommended size.
•Operating a vehicle with the wheels out of alignment will reduce fuel
economy.
•Use recommended engine oil. Refer toMaintenance product
specifications and capacitiesin this chapter.
•Perform all regularly scheduled maintenance items. Follow the
recommended maintenance schedule and owner maintenance checks
found inscheduled maintenance information.
Conditions
•Heavily loading a vehicle or towing a trailer may reduce fuel economy
at any speed.
•Carrying unnecessary weight may reduce fuel economy (approximately
1 mpg [0.4 km/L] is lost for every 400 lb [180 kg] of weight carried).
•Adding certain accessories to your vehicle (for example bug
deflectors, rollbars/light bars, running boards, ski racks) may reduce
fuel economy.
•Using fuel blended with alcohol may lower fuel economy.
•Fuel economy may decrease with lower temperatures during the first
8–10 miles (12–16 km) of driving.
Maintenance and Specifications
278
2011 Econoline(eco)
Owners Guide, 1st Printing
USA(fus)