remove seats FORD E SERIES 2014 4.G Owners Manual
[x] Cancel search | Manufacturer: FORD, Model Year: 2014, Model line: E SERIES, Model: FORD E SERIES 2014 4.GPages: 438, PDF Size: 5.12 MB
Page 21 of 438
WARNING:Never place, or allow a child to place, the shoulder
belt under a child’s arm or behind the back because it reduces
the protection for the upper part of the body and may increase the risk
of injury or death in a crash.
WARNING:To avoid risk of injury, do not leave children or pets
unattended in your vehicle.
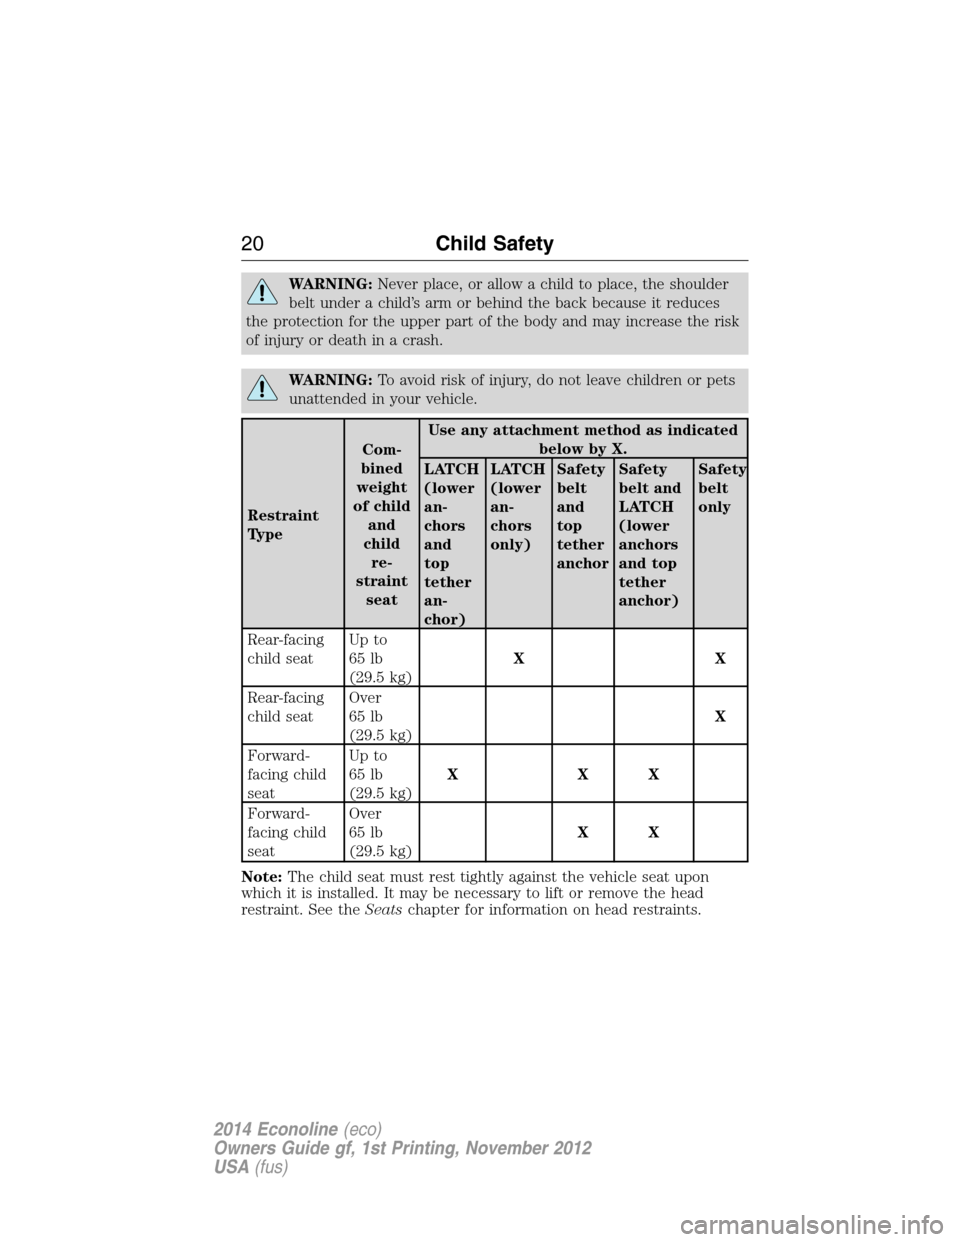
Restraint
TypeCom-
bined
weight
of child
and
child
re-
straint
seatUse any attachment method as indicated
below by X.
LATCH
(lower
an-
chors
and
top
tether
an-
chor)LATCH
(lower
an-
chors
only)Safety
belt
and
top
tether
anchorSafety
belt and
LATCH
(lower
anchors
and top
tether
anchor)Safety
belt
only
Rear-facing
child seatUp to
65 lb
(29.5 kg)XX
Rear-facing
child seatOver
65 lb
(29.5 kg)X
Forward-
facing child
seatUp to
65 lb
(29.5 kg)XXX
Forward-
facing child
seatOver
65 lb
(29.5 kg)XX
Note:The child seat must rest tightly against the vehicle seat upon
which it is installed. It may be necessary to lift or remove the head
restraint. See theSeatschapter for information on head restraints.
20Child Safety
2014 Econoline(eco)
Owners Guide gf, 1st Printing, November 2012
USA(fus)
Page 23 of 438
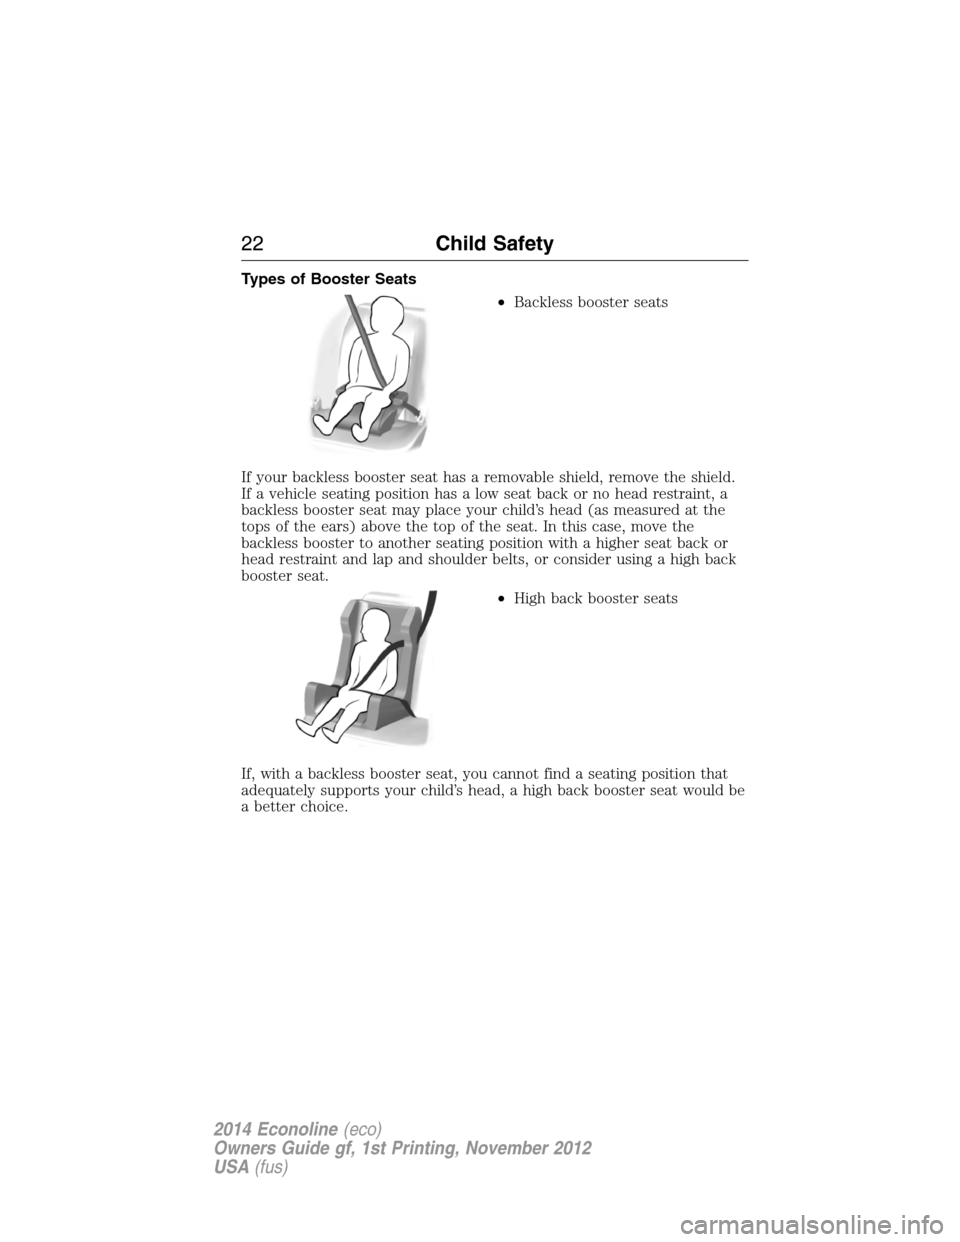
Types of Booster Seats
•Backless booster seats
If your backless booster seat has a removable shield, remove the shield.
If a vehicle seating position has a low seat back or no head restraint, a
backless booster seat may place your child’s head (as measured at the
tops of the ears) above the top of the seat. In this case, move the
backless booster to another seating position with a higher seat back or
head restraint and lap and shoulder belts, or consider using a high back
booster seat.
•High back booster seats
If, with a backless booster seat, you cannot find a seating position that
adequately supports your child’s head, a high back booster seat would be
a better choice.
22Child Safety
2014 Econoline(eco)
Owners Guide gf, 1st Printing, November 2012
USA(fus)
Page 27 of 438
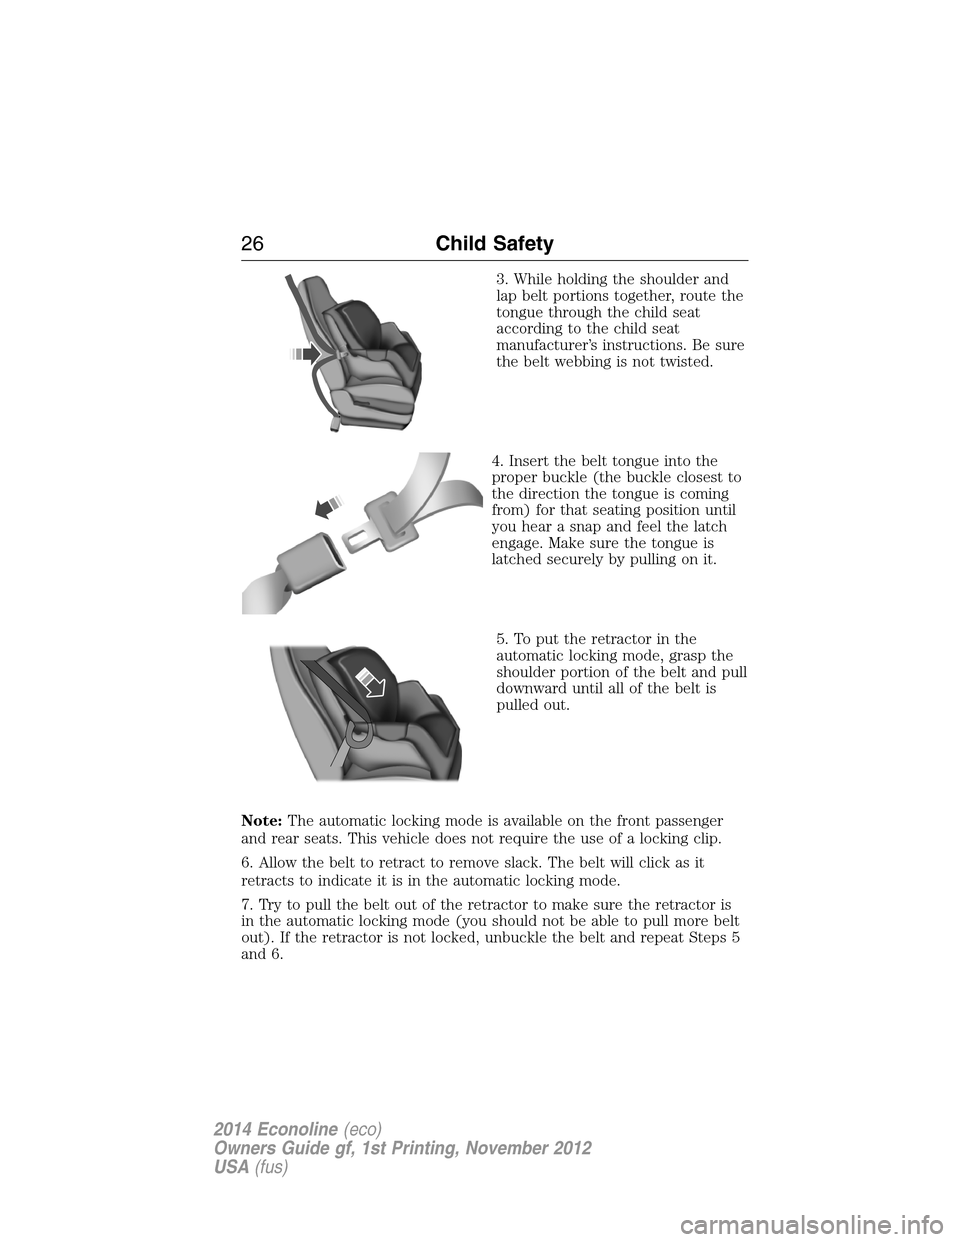
3. While holding the shoulder and
lap belt portions together, route the
tongue through the child seat
according to the child seat
manufacturer’s instructions. Be sure
the belt webbing is not twisted.
4. Insert the belt tongue into the
proper buckle (the buckle closest to
the direction the tongue is coming
from) for that seating position until
you hear a snap and feel the latch
engage. Make sure the tongue is
latched securely by pulling on it.
5. To put the retractor in the
automatic locking mode, grasp the
shoulder portion of the belt and pull
downward until all of the belt is
pulled out.
Note:The automatic locking mode is available on the front passenger
and rear seats. This vehicle does not require the use of a locking clip.
6. Allow the belt to retract to remove slack. The belt will click as it
retracts to indicate it is in the automatic locking mode.
7. Try to pull the belt out of the retractor to make sure the retractor is
in the automatic locking mode (you should not be able to pull more belt
out). If the retractor is not locked, unbuckle the belt and repeat Steps 5
and 6.
26Child Safety
2014 Econoline(eco)
Owners Guide gf, 1st Printing, November 2012
USA(fus)
Page 49 of 438
Passenger Airbag ON and OFF Switch (If Equipped)
WARNING:An airbag ON and OFF switch may have been
installed in this vehicle. Before driving, always look at the face of
the switch to be sure the switch is in the proper position in accordance
with these instructions and warnings. Failure to put the switch in a
proper position can increase the risk of serious injury or death in a
crash.
Note:The passenger airbag ON and OFF switch may be on vehicles with
no rear seats and a gross vehicle weight rating greater than 8500 pounds
(3856 kilograms). See theTowingchapter for more information.
Turning the Passenger Airbag Off
WARNING:If the light fails to illuminate when the passenger air
bag switch is in the OFF position and the ignition switch is in
ON, contact your authorized dealer as soon as possible.
WARNING:In order to avoid inadvertent activation of the
switch, always remove the ignition key from the passenger air
bag ON and OFF switch.
WARNING:An infant in a rear-facing seat faces a high risk of
serious or fatal injuries from a deploying passenger airbag. Rear
facing infant seats should never be placed in the front seats, unless the
passenger airbag is turned off.
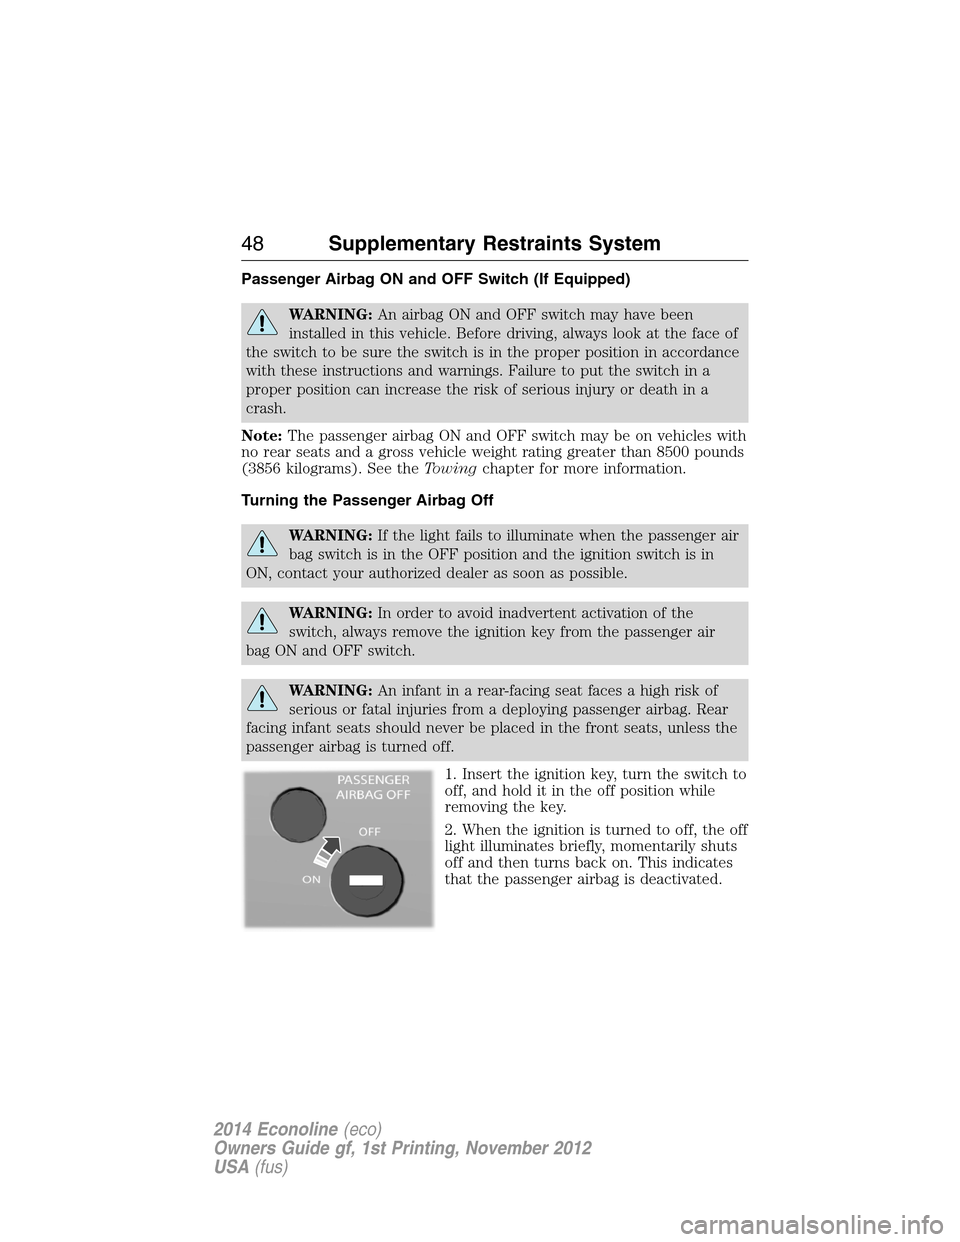
1. Insert the ignition key, turn the switch to
off, and hold it in the off position while
removing the key.
2. When the ignition is turned to off, the off
light illuminates briefly, momentarily shuts
off and then turns back on. This indicates
that the passenger airbag is deactivated.
48Supplementary Restraints System
2014 Econoline(eco)
Owners Guide gf, 1st Printing, November 2012
USA(fus)
Page 93 of 438
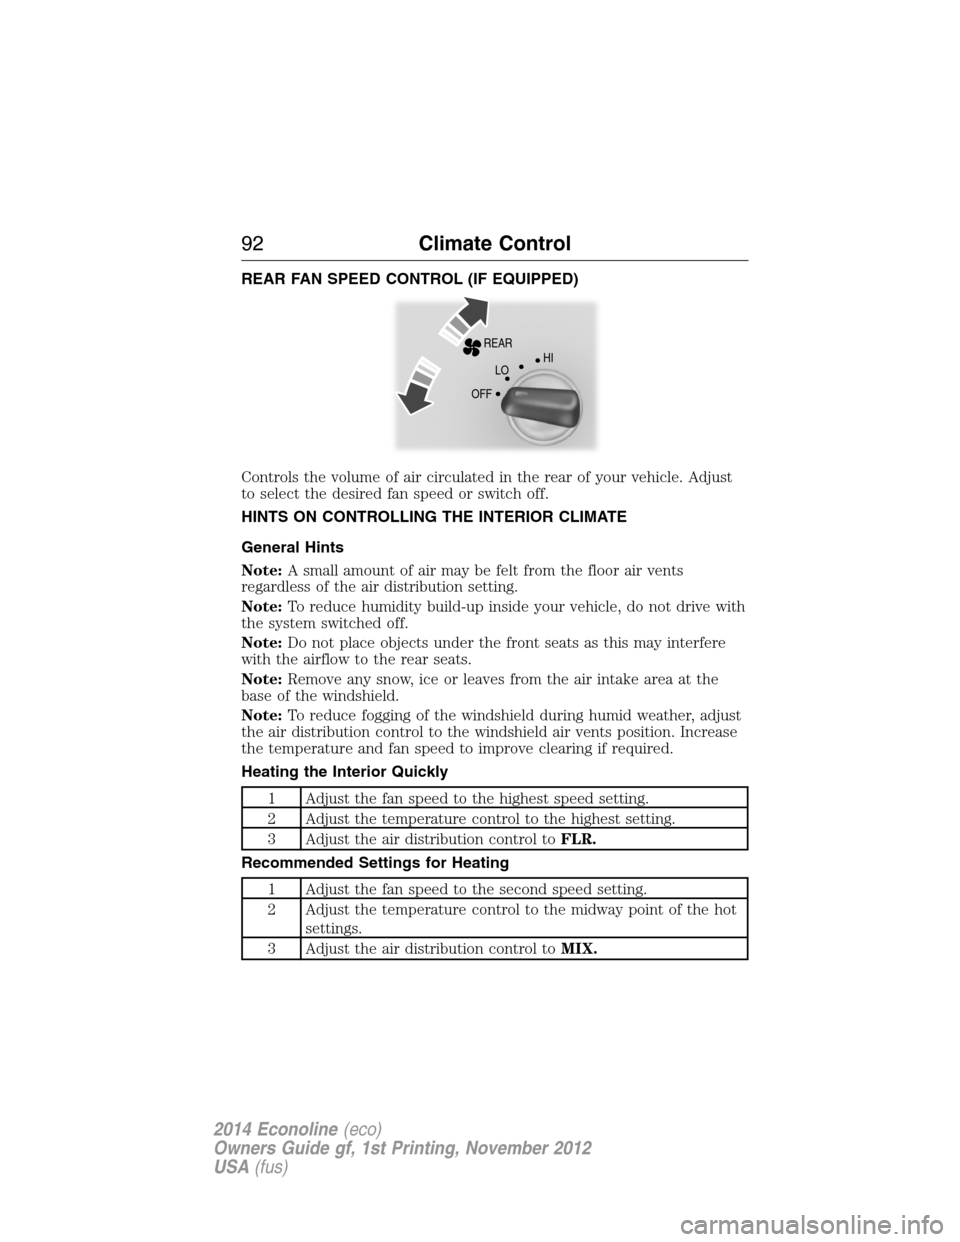
REAR FAN SPEED CONTROL (IF EQUIPPED)
Controls the volume of air circulated in the rear of your vehicle. Adjust
to select the desired fan speed or switch off.
HINTS ON CONTROLLING THE INTERIOR CLIMATE
General Hints
Note:A small amount of air may be felt from the floor air vents
regardless of the air distribution setting.
Note:To reduce humidity build-up inside your vehicle, do not drive with
the system switched off.
Note:Do not place objects under the front seats as this may interfere
with the airflow to the rear seats.
Note:Remove any snow, ice or leaves from the air intake area at the
base of the windshield.
Note:To reduce fogging of the windshield during humid weather, adjust
the air distribution control to the windshield air vents position. Increase
the temperature and fan speed to improve clearing if required.
Heating the Interior Quickly
1 Adjust the fan speed to the highest speed setting.
2 Adjust the temperature control to the highest setting.
3 Adjust the air distribution control toFLR.
Recommended Settings for Heating
1 Adjust the fan speed to the second speed setting.
2 Adjust the temperature control to the midway point of the hot
settings.
3 Adjust the air distribution control toMIX.
REAR
HI
LO
OFF
92Climate Control
2014 Econoline(eco)
Owners Guide gf, 1st Printing, November 2012
USA(fus)
Page 100 of 438
WARNING:Make sure that the seat is latched to the vehicle
floor by pushing and pulling on the seat. If not latched, the seat
may cause injury during a sudden stop.
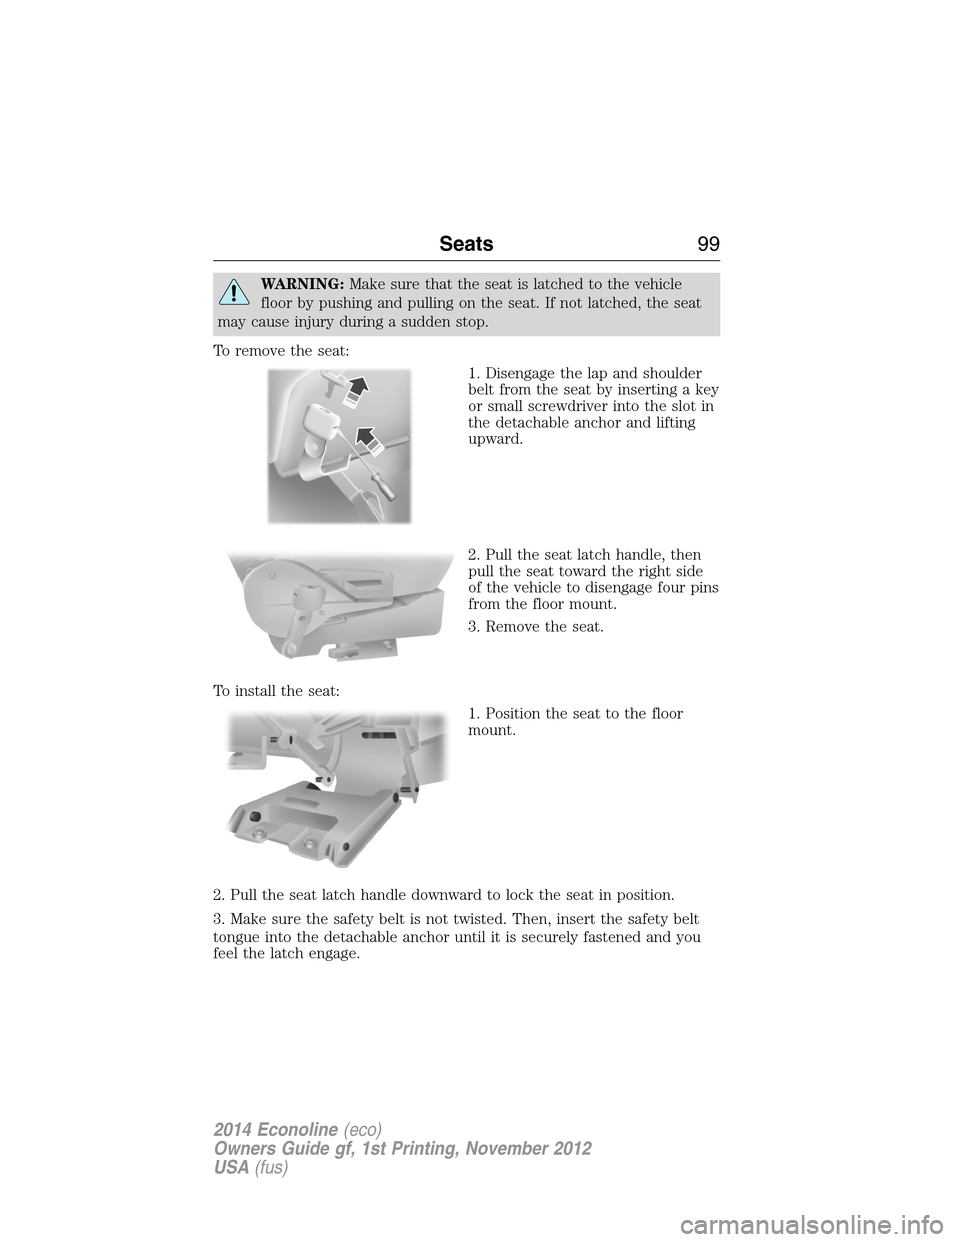
To remove the seat:
1. Disengage the lap and shoulder
belt from the seat by inserting a key
or small screwdriver into the slot in
the detachable anchor and lifting
upward.
2. Pull the seat latch handle, then
pull the seat toward the right side
of the vehicle to disengage four pins
from the floor mount.
3. Remove the seat.
To install the seat:
1. Position the seat to the floor
mount.
2. Pull the seat latch handle downward to lock the seat in position.
3. Make sure the safety belt is not twisted. Then, insert the safety belt
tongue into the detachable anchor until it is securely fastened and you
feel the latch engage.
Seats99
2014 Econoline(eco)
Owners Guide gf, 1st Printing, November 2012
USA(fus)
Page 101 of 438
Rear Bench Seat
WARNING:Always latch the vehicle seat to the floor, whether
the seat is occupied or empty. If not latched, the seat may cause
injury during a sudden stop.
WARNING:Do not hang or attach any cargo to the release
straps of the rear bench seats. Doing so could cause the release
straps to inadvertently unlatch the rear bench seat. If not latched, the
seat may cause serious injury during a sudden stop.
To remove the seats:
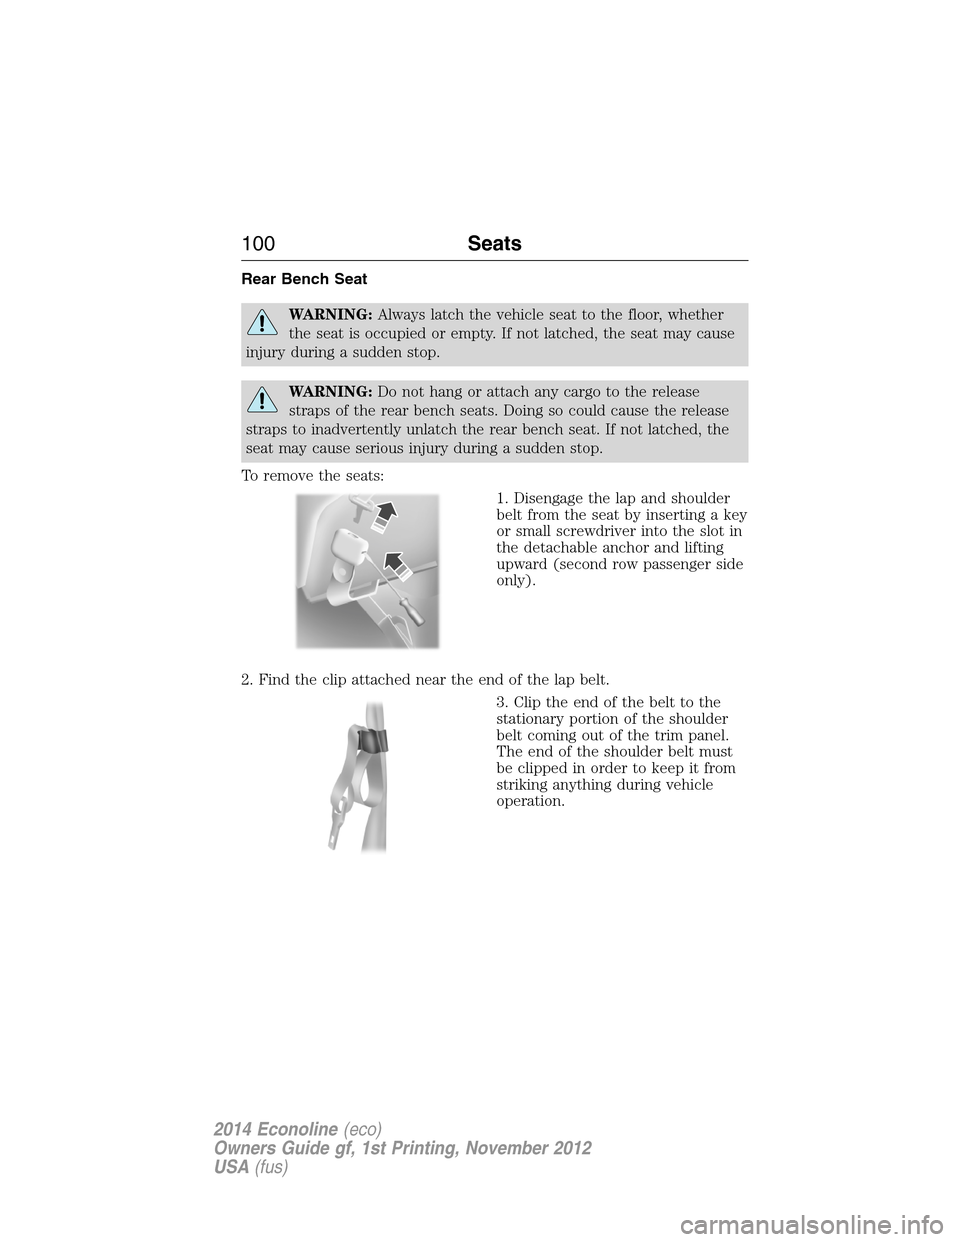
1. Disengage the lap and shoulder
belt from the seat by inserting a key
or small screwdriver into the slot in
the detachable anchor and lifting
upward (second row passenger side
only).
2. Find the clip attached near the end of the lap belt.
3. Clip the end of the belt to the
stationary portion of the shoulder
belt coming out of the trim panel.
The end of the shoulder belt must
be clipped in order to keep it from
striking anything during vehicle
operation.
100Seats
2014 Econoline(eco)
Owners Guide gf, 1st Printing, November 2012
USA(fus)
Page 102 of 438
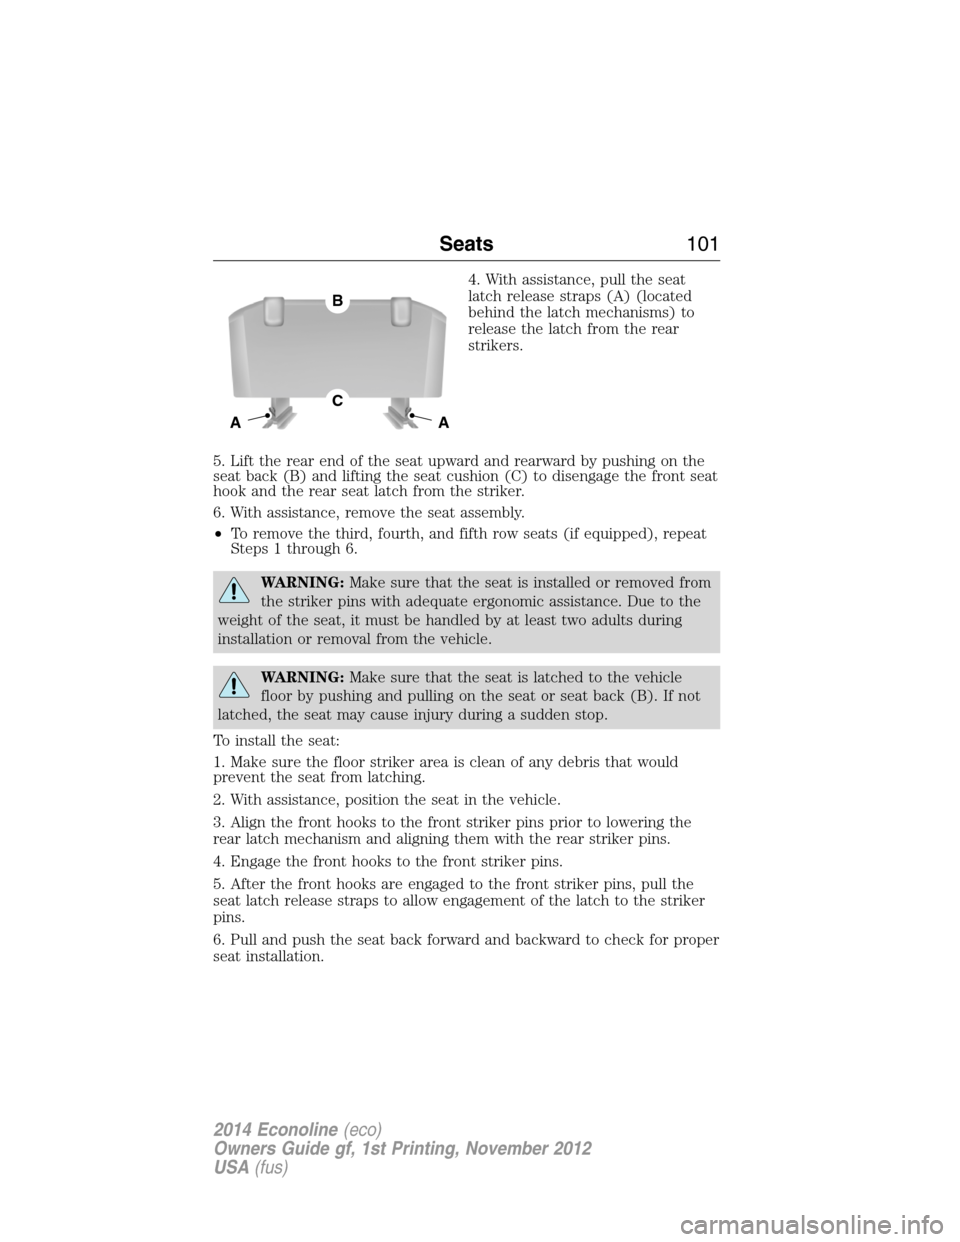
4. With assistance, pull the seat
latch release straps (A) (located
behind the latch mechanisms) to
release the latch from the rear
strikers.
5. Lift the rear end of the seat upward and rearward by pushing on the
seat back (B) and lifting the seat cushion (C) to disengage the front seat
hook and the rear seat latch from the striker.
6. With assistance, remove the seat assembly.
•To remove the third, fourth, and fifth row seats (if equipped), repeat
Steps 1 through 6.
WARNING:Make sure that the seat is installed or removed from
the striker pins with adequate ergonomic assistance. Due to the
weight of the seat, it must be handled by at least two adults during
installation or removal from the vehicle.
WARNING:Make sure that the seat is latched to the vehicle
floor by pushing and pulling on the seat or seat back (B). If not
latched, the seat may cause injury during a sudden stop.
To install the seat:
1. Make sure the floor striker area is clean of any debris that would
prevent the seat from latching.
2. With assistance, position the seat in the vehicle.
3. Align the front hooks to the front striker pins prior to lowering the
rear latch mechanism and aligning them with the rear striker pins.
4. Engage the front hooks to the front striker pins.
5. After the front hooks are engaged to the front striker pins, pull the
seat latch release straps to allow engagement of the latch to the striker
pins.
6. Pull and push the seat back forward and backward to check for proper
seat installation.
A
C
B
A
Seats101
2014 Econoline(eco)
Owners Guide gf, 1st Printing, November 2012
USA(fus)
Page 229 of 438
CLEANING THE INTERIOR
WARNING:Do not use cleaning solvents, bleach or dye on the
vehicle’s safety belts, as these actions may weaken the belt
webbing.
WARNING:On vehicles equipped with seat-mounted airbags, do
not use chemical solvents or strong detergents. Such products
could contaminate the side airbag system and affect performance of the
side airbag in a collision.
For fabric, carpets, cloth seats, safety belts and seats equipped with side
airbags:
•Remove dust and loose dirt with a vacuum cleaner.
•Apply a layer of high quality foam cleaner, designed for automotive
interiors, to the dry stained area (s) of the item you are cleaning and
allow soaking for one minute.
•If grease or tar is present on the material, spot-clean the area first
with Motorcraft Spot and Stain Remover. In Canada, use Motorcraft
Multi-Purpose Cleaner.
•If a ring forms on the fabric after spot cleaning, clean the entire area
immediately (but do not oversaturate) or the ring can set.
•Do not use household cleaning products or glass cleaners, which can
stain and discolor the fabric and affect the flame retardant abilities of
the seat materials.
CLEANING THE INSTRUMENT PANEL AND INSTRUMENT
CLUSTER LENS
WARNING:Do not use chemical solvents or strong detergents
when cleaning the steering wheel or instrument panel to avoid
contamination of the airbag system.
Clean the instrument panel and cluster lens with a clean, damp, white,
cotton cloth, then use a clean and dry, white, cotton cloth to dry these
areas.
•Avoid cleaners or polishes that increase the gloss of the upper portion
of the instrument panel. The dull finish in this area helps protect the
driver from undesirable windshield reflection.
228Vehicle Care
2014 Econoline(eco)
Owners Guide gf, 1st Printing, November 2012
USA(fus)
Page 230 of 438
•Be certain to wash or wipe your hands clean if you have been in contact
with certain products, such as insect repellent and suntan lotion, in
order to avoid possible damage to the interior painted surfaces.
•Do not use household or glass cleaners as these may damage the
finish of the instrument panel, interior trim and cluster lens.
•Do not allow air fresheners and hand sanitizers to spill on interior
surfaces. If a spill occurs, wipe off immediately. Damage may not be
covered by your warranty.
If a staining liquid like coffee or juice has been spilled on the instrument
panel or on interior trim surfaces, clean as follows:
1. Wipe up spilled liquid using a clean, white, cotton cloth.
2. Wipe the surface with a damp, clean, white, cotton cloth. For more
thorough cleaning, use a mild soap and water solution. If the spot cannot
be completely cleaned by this method, the area may be cleaned using a
commercially available cleaning product designed for automotive interiors.
3. If necessary, apply more soap and water solution or cleaning product
to a clean, white, cotton cloth and press the cloth onto the soiled area;
allow this to set at room temperature for 30 minutes.
4. Remove the soaked cloth, and if it is not soiled badly, use this cloth to
clean the area by using a rubbing motion for 60 seconds.
5. Following this, wipe area dry with a clean, white, cotton cloth.
CLEANING LEATHER SEATS (IF EQUIPPED)
•Remove dust and loose dirt with a vacuum cleaner.
•Clean spills and stains as quickly as possible.
•For routine cleaning, wipe the surface with a soft, damp cloth. For
more thorough cleaning, wipe the surface with a mild soap and water
solution. Dry the area with a soft cloth.
•If the leather cannot be completely cleaned using a mild soap and
water solution, the leather may be cleaned using a commercially
available leather cleaning product designed for automotive interiors.
•To check for compatibility, first test any cleaner or stain remover on
an inconspicuous part of the leather.
•Do not use household cleaning products, alcohol solutions,
oil/petroleum-based leather conditioners, or solvents or cleaners
intended specifically for rubber, vinyl and plastics. These products
may cause premature wearing or damage to the leather.
Vehicle Care229
2014 Econoline(eco)
Owners Guide gf, 1st Printing, November 2012
USA(fus)