reset FORD E SERIES 2016 4.G User Guide
[x] Cancel search | Manufacturer: FORD, Model Year: 2016, Model line: E SERIES, Model: FORD E SERIES 2016 4.GPages: 319, PDF Size: 6.18 MB
Page 82 of 319
If the fuel cap light remains on, at the next
opportunity, safely pull off of the road,
remove the fuel filler cap, align the cap
properly and reinstall it. The check fuel cap
light or Check fuel cap message may not
reset immediately. It may take several
driving cycles for the indicators to turn off.
A driving cycle consists of an engine
start-up (after four or more hours with the
engine off) followed by normal city and
highway driving.
FUEL CONSUMPTION
Empty reserve is the amount of fuel
remaining in the tank after the fuel gauge
indicates empty. The amount of usable
fuel in the empty reserve varies and should
not be relied upon to increase driving range.
•
The usable capacity of the fuel tank is
the amount of fuel that can be added
into the tank after the gauge indicates
empty.
• The advertised capacity is the total fuel
tank size. See Capacities and
Specifications (page 191). It is the
combined usable capacity plus the
empty reserve.
• Due to the empty reserve, you may not
be able to refuel the full amount of the
advertised capacity of the fuel tank
even when the fuel gauge reads empty.
Filling the Tank
For consistent results when refueling:
• Turn the ignition off before fueling; an
inaccurate reading results if the engine
is left running.
• Use the same fill rate
(low-medium-high) each time the tank
is filled.
• Allow no more than one automatic
shut-off when refueling. Results are most accurate when the filling
method is consistent.
Calculating Fuel Economy
Do not measure fuel economy during the
first
1,000 mi (1,600 km) of driving (this is
your engine ’s break-in period). A more
accurate measurement is obtained after
2,000 mi (3,200 km)
to 3,000 mi
(4,800 km). Also, fuel expense, frequency
of fill ups or fuel gauge readings are not
accurate ways to measure fuel economy.
1. Fill the fuel tank completely and record
the initial odometer reading.
2. Each time you fill the fuel tank, record the amount of fuel added.
3. After at least three fill ups, fill the fuel tank and record the current odometer
reading.
4. Subtract your initial odometer reading from the current odometer reading.
To calculate L/100 km (liters per 100
kilometers) fuel consumption, multiply the
liters used by 100, then divide by kilometers
traveled. To calculate MPG (miles per
gallon) fuel consumption, divide miles
traveled by gallons used.
Keep a record for at least one month and
record the type of driving (city or highway).
This provides an accurate estimate of your
vehicle ’s fuel economy under current
driving conditions. Keeping records during
summer and winter will show how
temperature impacts fuel economy.
Conditions
• Heavily loading your vehicle reduces
fuel economy.
• Carrying unnecessary weight in your
vehicle may reduce fuel economy.
• Adding certain accessories to your
vehicle such as bug deflectors, rollbars
or light bars, running boards and ski
racks may reduce fuel economy.
79
E-Series (TE4) Canada/United States of America, enUSA, Edition date: 03/2015, Second Printing Fuel and Refueling
Page 130 of 319
FUSE SPECIFICATION CHART
Power Distribution Box
WARNINGS
Always disconnect the battery before
servicing high current fuses.
To reduce risk of electrical shock,
always replace the cover to the
power distribution box before
reconnecting the battery or refilling fluid
reservoirs. Note:
If your vehicle is equipped with dual
batteries, disconnecting the primary
under-hood battery does not remove power
from all circuits.
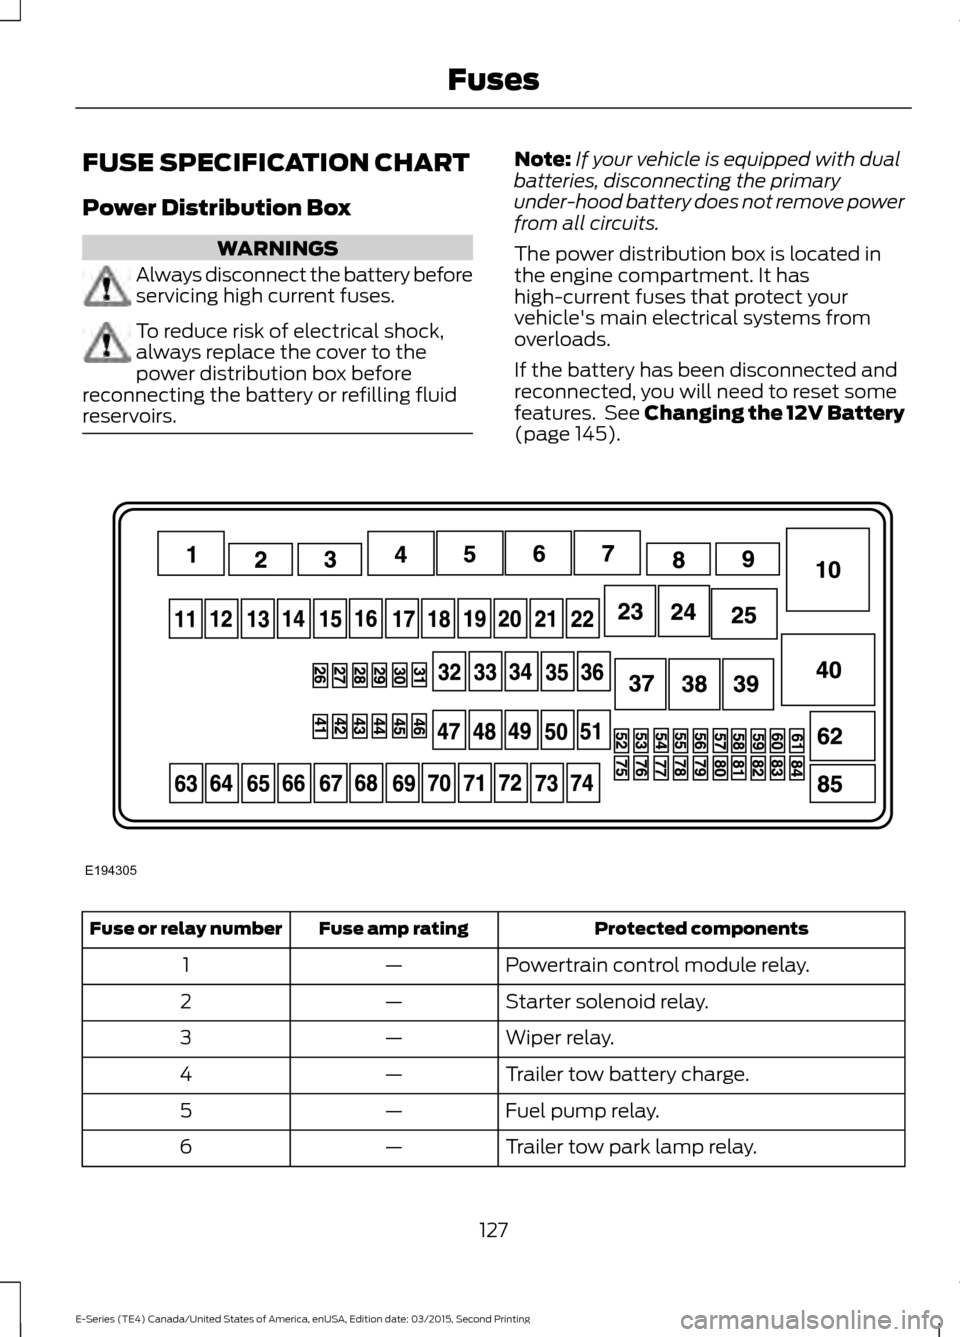
The power distribution box is located in
the engine compartment. It has
high-current fuses that protect your
vehicle's main electrical systems from
overloads.
If the battery has been disconnected and
reconnected, you will need to reset some
features. See Changing the 12V Battery
(page 145). Protected components
Fuse amp rating
Fuse or relay number
Powertrain control module relay.
—
1
Starter solenoid relay.
—
2
Wiper relay.
—
3
Trailer tow battery charge.
—
4
Fuel pump relay.
—
5
Trailer tow park lamp relay.
—
6
127
E-Series (TE4) Canada/United States of America, enUSA, Edition date: 03/2015, Second Printing FusesE194305
Page 141 of 319
ENGINE OIL DIPSTICK
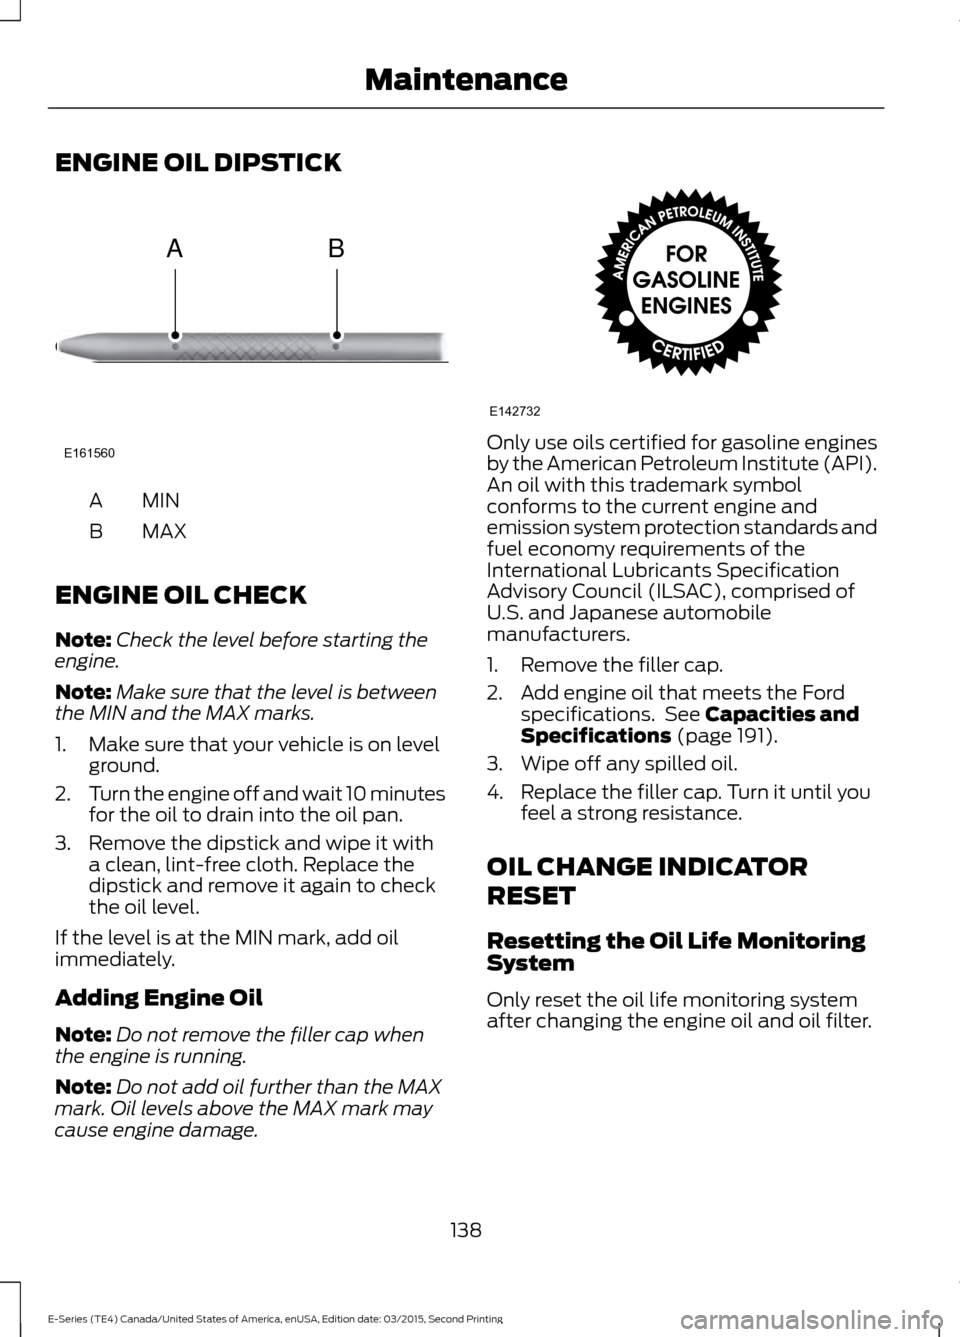
MINA
MAX
B
ENGINE OIL CHECK
Note: Check the level before starting the
engine.
Note: Make sure that the level is between
the MIN and the MAX marks.
1. Make sure that your vehicle is on level ground.
2. Turn the engine off and wait 10 minutes
for the oil to drain into the oil pan.
3. Remove the dipstick and wipe it with a clean, lint-free cloth. Replace the
dipstick and remove it again to check
the oil level.
If the level is at the MIN mark, add oil
immediately.
Adding Engine Oil
Note: Do not remove the filler cap when
the engine is running.
Note: Do not add oil further than the MAX
mark. Oil levels above the MAX mark may
cause engine damage. Only use oils certified for gasoline engines
by the American Petroleum Institute (API).
An oil with this trademark symbol
conforms to the current engine and
emission system protection standards and
fuel economy requirements of the
International Lubricants Specification
Advisory Council (ILSAC), comprised of
U.S. and Japanese automobile
manufacturers.
1. Remove the filler cap.
2. Add engine oil that meets the Ford
specifications. See Capacities and
Specifications (page 191).
3. Wipe off any spilled oil.
4. Replace the filler cap. Turn it until you feel a strong resistance.
OIL CHANGE INDICATOR
RESET
Resetting the Oil Life Monitoring
System
Only reset the oil life monitoring system
after changing the engine oil and oil filter.
138
E-Series (TE4) Canada/United States of America, enUSA, Edition date: 03/2015, Second Printing MaintenanceE161560
AB E142732
Page 142 of 319
To reset the oil life monitoring system do
the following:
1.
Switch the ignition on. Do not start the
engine.
2. Fully press the accelerator and brake pedals at the same time.
3. Keep the accelerator and brake pedals
fully pressed.
4. After three seconds, a message displays confirming the reset procedure
is in progress.
5. After 25 seconds, a message displays confirming the reset procedure is
complete.
6. Release the accelerator and brake pedals.
7. Switch the ignition off.
ENGINE COOLANT CHECK WARNINGS
Do not add engine coolant when the
engine is hot. Steam and scalding
liquids released from a hot cooling
system can burn you badly. Also, spilling
coolant on hot engine parts can burn you. Do not put engine coolant in the
windshield washer fluid container. If
sprayed on the windshield, engine
coolant could make it difficult to see
through the windshield. To reduce the risk of personal injury,
make sure the engine is cool before
unscrewing the coolant pressure
relief cap. The cooling system is under
pressure. Steam and hot liquid can come
out forcefully when you loosen the cap
slightly. Do not add coolant further than the
MAX mark. Checking the Engine Coolant
When the engine is cold, check the
concentration and level of the engine
coolant at the intervals listed in the
scheduled maintenance information. See
Scheduled Maintenance (page 268).
Note: Make sure that the coolant level is
between the MIN and MAX marks on the
coolant reservoir.
Note: Coolant expands when it is hot. The
level may extend beyond the MAX mark.
Note: If the level is at the MIN mark, below
the MIN mark, or empty, add coolant
immediately. See
Adding Engine Coolant
in this chapter.
Maintain coolant concentration within
48% to 50%, which equates to a freeze
point between -30°F (-34°C) and -34°F
(-37°C).
Note: For best results, coolant
concentration should be tested with a
refractometer such as Robinair® Coolant
and Battery Refractometer 75240. We do
not recommend the use of hydrometers or
coolant test strips for measuring coolant
concentrations.
Note: Automotive fluids are not
interchangeable. Do not use engine coolant,
antifreeze or windshield washer fluid outside
of its specified function and vehicle location.
Adding Engine Coolant
Note: Do not use stop leak pellets, cooling
system sealants or additives as they can
cause damage to the engine cooling or
heating systems. Your warranty may not
cover these damages.
139
E-Series (TE4) Canada/United States of America, enUSA, Edition date: 03/2015, Second Printing Maintenance
Page 144 of 319
Vehicles driven year-round in non-extreme
climates should use prediluted engine
coolant for optimum cooling system and
engine protection.
What You Should Know About Fail-
Safe Cooling
If the engine coolant supply is depleted,
this feature allows the vehicle to be driven
temporarily before incremental component
damage is incurred. The fail-safe distance
depends on outside temperatures, vehicle
load and terrain.
How Fail-Safe Cooling Works
If the engine begins to overheat, the engine
coolant temperature gauge moves to the
red (hot) area and:
A high engine temperature
message appears in the
information display.
The service engine soon
indicator appears in the
information display.
If the engine reaches a preset
over-temperature condition, the engine
automatically switches to alternating
cylinder operation. Each disabled cylinder
acts as an air pump and cools the engine.
If this occurs, your vehicle still operates.
However:
• The engine power becomes limited.
• The air conditioning system becomes
disabled.
Continued operation increases the engine
temperature and the engine completely
shuts down, causing steering and braking
effort to increase.
Once the engine temperature cools, the
engine can be re-started. Take your vehicle
to an authorized dealer as soon as possible
to minimize engine damage. When Fail-Safe Mode Is Activated WARNINGS
Fail-safe mode is for use during
emergencies only. Operate your
vehicle in fail-safe mode only as long
as necessary to bring your vehicle to rest
in a safe location and seek immediate
repairs. When in fail-safe mode, your
vehicle has limited power, does not
maintain high-speed operation and may
completely shut down without warning.
Potentially losing power steering assist,
and power brake assist, which may
increase the possibility of a crash resulting
in serious injury. Never remove the coolant reservoir
cap while the engine is running or hot.
Your vehicle has limited engine power,
drive your vehicle with caution. Your vehicle
does not maintain high-speed operation
and the engine operates poorly.
Remember that the engine is capable of
automatically shutting down to prevent
engine damage. In this situation:
1. Pull off the road as soon as safely
possible and switch off the engine.
2. Tow your vehicle to an authorized dealer.
3. If this is not possible, wait a short period for the engine to cool.
4. Check the coolant level and add if low.
5. Re-start the engine and drive your vehicle to an authorized dealer.
Note: Driving your vehicle without repair
increases the chance of engine damage. See
an authorized dealer as soon as possible.
141
E-Series (TE4) Canada/United States of America, enUSA, Edition date: 03/2015, Second Printing Maintenance
Page 165 of 319
•
With your foot on the brake, shift
through all the gears while the engine
is running.
• We recommend that you change the
engine oil before you use your vehicle
again.
Fuel system
• Fill the fuel tank with high-quality fuel
until the first automatic shutoff of the
fuel pump nozzle.
Cooling system
• Protect against freezing temperatures.
• When removing your vehicle from
storage, check coolant fluid level.
Confirm that there are no cooling
system leaks and that fluid is at the
recommended level.
Battery
• Check and recharge as necessary. Keep
connections clean.
• If storing your vehicle for more than 30
days without recharging the battery,
we recommend that you disconnect
the battery cables to maintain battery
charge for quick starting.
Note: It is necessary to reset memory
features if battery cables are disconnected.
Brakes
• Make sure the brakes and parking brake
release fully.
Tires
• Maintain recommended air pressure. Miscellaneous
•
Make sure all linkages, cables, levers
and pins under your vehicle are covered
with grease to prevent rust.
• Move vehicles at least 25 ft (7.5 m)
every 15 days to lubricate working parts
and prevent corrosion.
Removing Vehicle From Storage
When your vehicle is ready to come out of
storage, do the following:
• Wash your vehicle to remove any dirt
or grease film build-up on window
surfaces.
• Check windshield wipers for any
deterioration.
• Check under the hood for any foreign
material that may have collected
during storage such as mice or squirrel
nests.
• Check the exhaust for any foreign
material that may have collected
during storage.
• Check tire pressures and set tire
inflation per the Tire Label.
• Check brake pedal operation. Drive
your vehicle
15 ft (4.5 m) back and
forth to remove rust build-up.
• Check fluid levels (including coolant,
oil and gas) to make sure there are no
leaks, and fluids are at recommended
levels.
• If you remove the battery, clean the
battery cable ends and check for
damage.
Contact an authorized dealer if you have
any concerns or issues.
162
E-Series (TE4) Canada/United States of America, enUSA, Edition date: 03/2015, Second Printing Vehicle Care
Page 184 of 319
Tire Rotation
WARNING
If the tire label shows
different tire pressures for the
front and rear tires and the vehicle
is equipped with a tire pressure
monitoring system, then the
settings for the system sensors
need to be updated. Always
perform the system reset
procedure after tire rotation. If the
system is not reset, it may not
provide a low tire pressure
warning when necessary. Note:
If your tires show uneven
wear ask an authorized dealer to
check for and correct any wheel
misalignment, tire imbalance or
mechanical problem involved
before tire rotation.
Note: Your vehicle may be
equipped with a dissimilar spare
wheel and tire assembly. A
dissimilar spare wheel and tire
assembly is defined as a spare
wheel and tire assembly that is
different in brand, size or
appearance from the road tires and
wheels. If you have a dissimilar
spare wheel and tire assembly it is
intended for temporary use only
and should not be used in a tire
rotation.
Note: After having your tires
rotated, inflation pressure must be
checked and adjusted to the
vehicle requirements. Rotating your tires at the
recommended interval (as
indicated in the Scheduled
Maintenance chapter) will help
your tires wear more evenly,
providing better tire performance
and longer tire life. Sometime
irregular tire wear can be
corrected by rotating the tires.
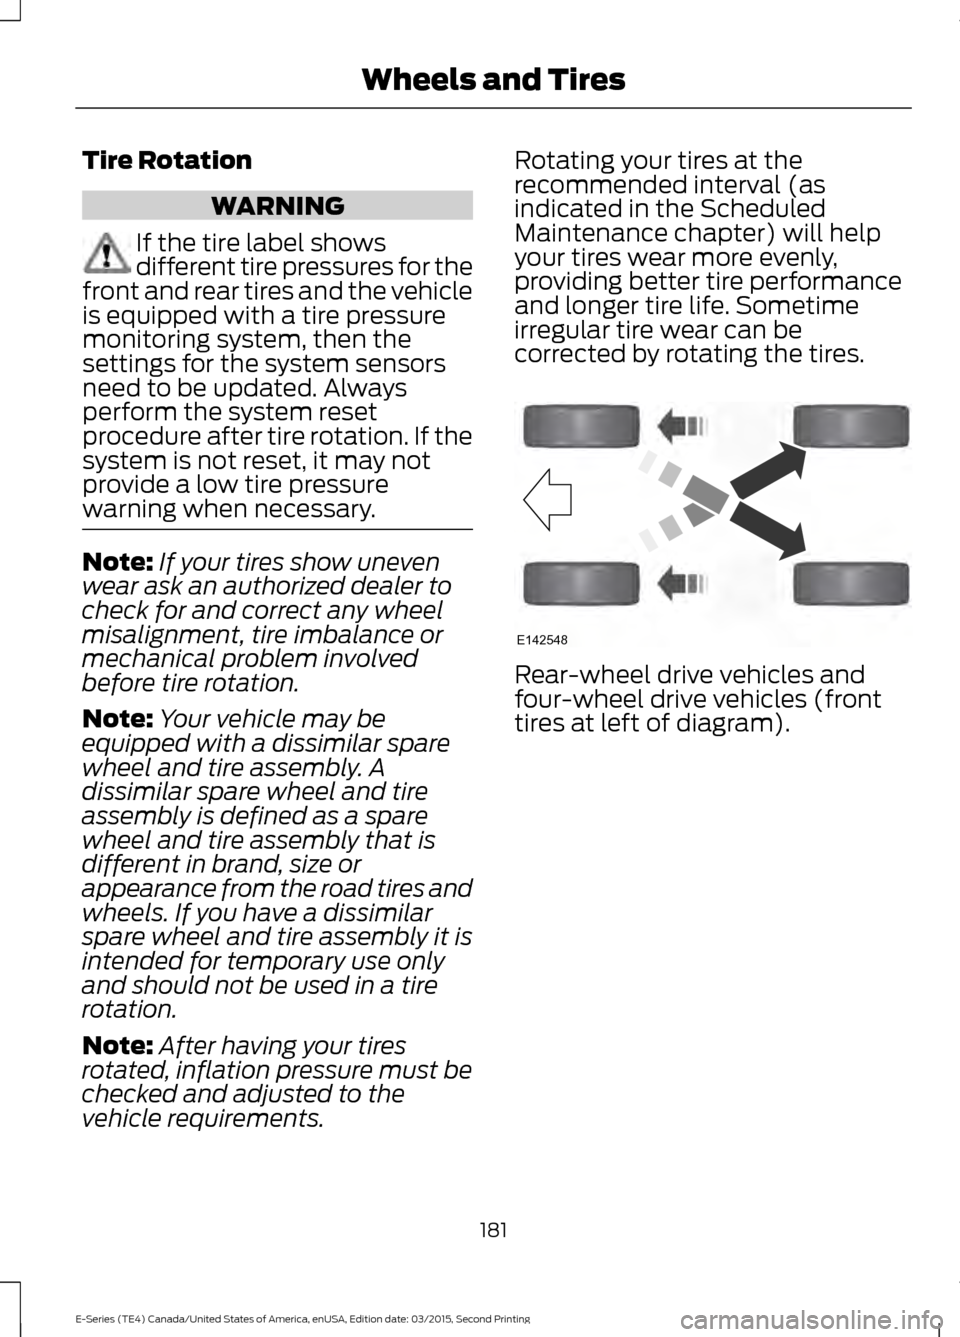
Rear-wheel drive vehicles and
four-wheel drive vehicles (front
tires at left of diagram).
181
E-Series (TE4) Canada/United States of America, enUSA, Edition date: 03/2015, Second Printing Wheels and TiresE142548
Page 211 of 319
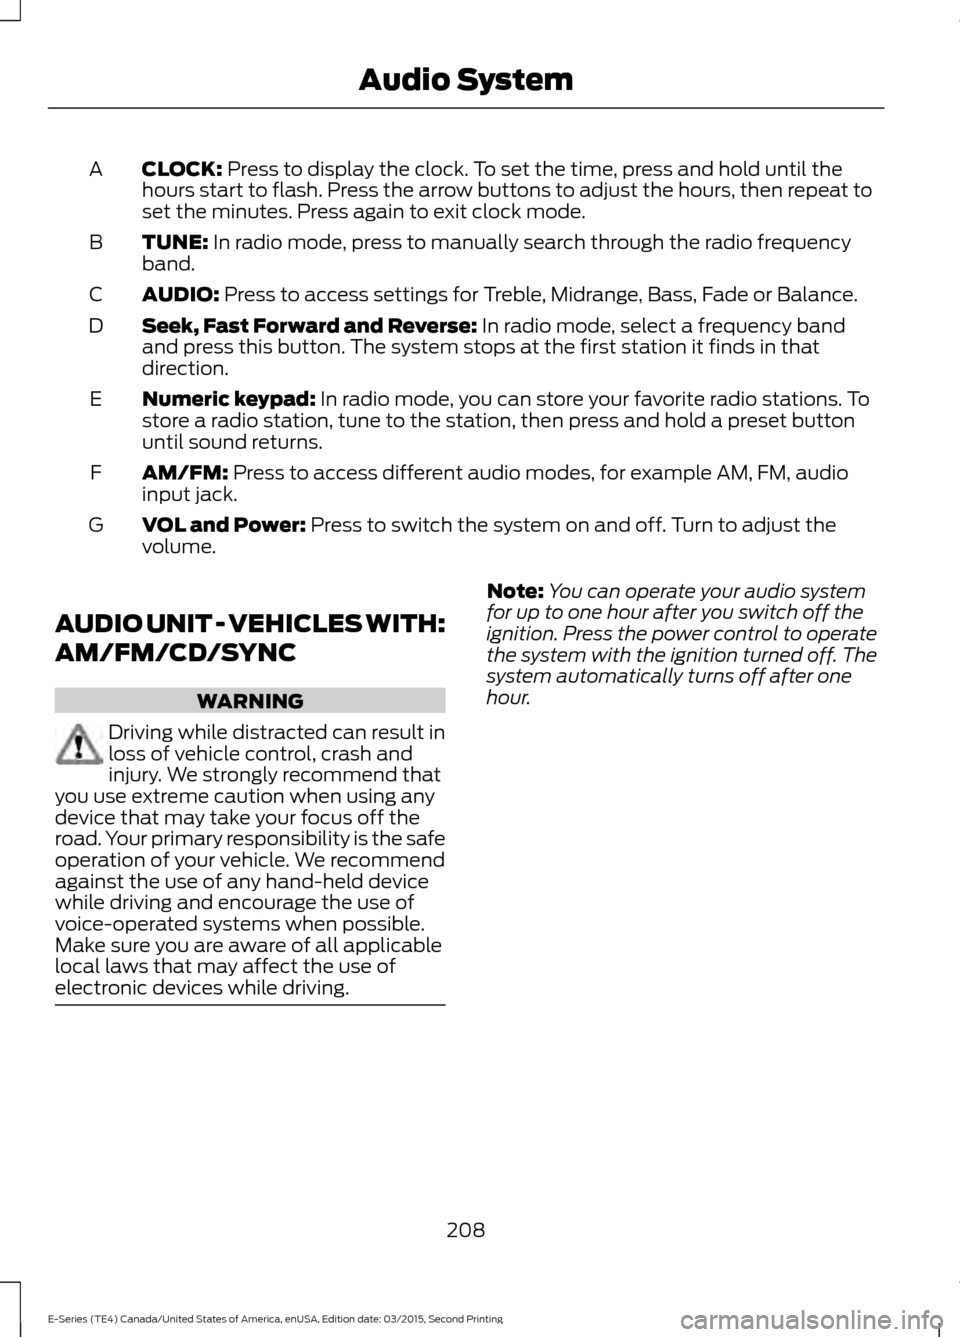
CLOCK: Press to display the clock. To set the time, press and hold until the
hours start to flash. Press the arrow buttons to adjust the hours, then repeat to
set the minutes. Press again to exit clock mode.
A
TUNE:
In radio mode, press to manually search through the radio frequency
band.
B
AUDIO:
Press to access settings for Treble, Midrange, Bass, Fade or Balance.
C
Seek, Fast Forward and Reverse:
In radio mode, select a frequency band
and press this button. The system stops at the first station it finds in that
direction.
D
Numeric keypad:
In radio mode, you can store your favorite radio stations. To
store a radio station, tune to the station, then press and hold a preset button
until sound returns.
E
AM/FM:
Press to access different audio modes, for example AM, FM, audio
input jack.
F
VOL and Power:
Press to switch the system on and off. Turn to adjust the
volume.
G
AUDIO UNIT - VEHICLES WITH:
AM/FM/CD/SYNC WARNING
Driving while distracted can result in
loss of vehicle control, crash and
injury. We strongly recommend that
you use extreme caution when using any
device that may take your focus off the
road. Your primary responsibility is the safe
operation of your vehicle. We recommend
against the use of any hand-held device
while driving and encourage the use of
voice-operated systems when possible.
Make sure you are aware of all applicable
local laws that may affect the use of
electronic devices while driving. Note:
You can operate your audio system
for up to one hour after you switch off the
ignition. Press the power control to operate
the system with the ignition turned off. The
system automatically turns off after one
hour.
208
E-Series (TE4) Canada/United States of America, enUSA, Edition date: 03/2015, Second Printing Audio System
Page 213 of 319
Folder: Press to access the previous folder on an MP3 disc.
K
FF:
Press to manually fast forward in a CD track or MP3 file.
L
REW:
Press to manually rewind in a CD track or MP3 file.
M
Numeric keypad:
In radio mode, you can store your favorite radio stations. To
store a radio station, tune to the station, then press and hold a preset button
until sound returns. The
AUTOSET function in the MENU options does not
override your original presets.
N
TEXT/SCAN:
Press to manually search the frequency band. In radio, CD and
MP3 modes, press and hold to hear a brief sampling of radio stations, CD tracks
or MP3 files. In CD and MP3 modes, press and release to display track title, artist
name and disc title. In text mode, sometimes the display requires additional
text to show. When the < / > indicator is on, press TEXT and then use the SEEK
buttons to view the additional display text.
O
AM/FM:
Press to access different audio modes, for example AM, FM.
P
VOL and Power:
Press to switch the system on and off. Turn to adjust the
volume. The SPEEDVOL in the MENU options compensates for noise levels
when vehicle speed increases.
Q
CD:
Press this button to listen to a CD.
R
DIGITAL RADIO
Note: HD Radio broadcasts are not
available in all markets.
HD Radio technology is the digital
evolution of analog AM/FM radio. Your
system has a special receiver that allows
it to receive digital broadcasts (where
available) in addition to the analog
broadcasts, it already receives. Digital
broadcasts provide a better sound quality
than analog broadcasts with free,
crystal-clear audio and no static or
distortion. For more information, and a
guide to available stations and
programming, please visit
www.hdradio.com.
When HD Radio is on and you tune to a
station broadcasting HD Radio technology,
you may notice the HD Radio logo on your
screen. When this logo is available, you
may also see Title and Artist fields
on-screen. The multicast indicator appears in FM
mode (only) if the current station is
broadcasting multiple digital broadcasts.
The highlighted numbers signify available
digital channels where new or different
content is available. HD1 signifies the main
programming status and is available in
analog and digital broadcasts. Other
multicast stations (HD2 through HD7) are
only available digitally.
210
E-Series (TE4) Canada/United States of America, enUSA, Edition date: 03/2015, Second Printing Audio System
Page 214 of 319
When HD Radio broadcasts are active, you
can access the following functions:
•
Scan allows you to hear a brief
sampling of all available stations. This
feature still works when HD Radio
reception is on, although it does not
scan for HD2-HD7 channels. You may
see the HD logo appear if the station
has a digital broadcast. •
Memory presets
allow you to save an
active channel as a memory preset.
Touch and hold a memory preset slot
until the sound returns. There is a brief
mute while the radio saves the station.
Sound returns when finished. When
switching to an HD2 or HD3 memory
preset, the sound mutes before the
digital audio plays, because the system
has to reacquire the digital signal.
Note: As with any saved radio station, you
cannot access the saved station if your
vehicle is outside the station ’s reception
area.
HD Radio Reception and Station Troubleshooting Potential reception issues
If you are listening to a multicast station and you are on
the fringe of the reception area, the station may mute due
to weak signal strength.
Reception area
If you are listening to HD1, the system switches back to
the analog broadcast until the digital broadcast is available
again. However, if you are listening to any of the possible
HD2-HD7 multicast channels, the station mutes and stays
muted unless it is able to connect to the digital signal
again.
When the system first receives a station (aside from HD2-
HD7 multicast stations), it first plays the station in the
analog version. Once the receiver verifies the station is an
HD Radio station, it shifts to the digital version. Depending
on the station quality, you may hear a slight sound change
when the station changes from analog to digital. Blending
is the shift from analog to digital sound or digital back to
analog sound.
Station blending
In order to provide the best possible
experience, use the contact form to report
any station issues found while listening to
a station broadcasting with HD Radio
technology. Independent entities own and
operate each station. These stations are
responsible for ensuring all audio streams
and data fields are accurate. 211
E-Series (TE4) Canada/United States of America, enUSA, Edition date: 03/2015, Second Printing Audio System